
Application Settings and User Defaults
All but the simplest computer programs today have a preferences window where the user can set application-specific options. On Mac OS X, the Preferences. . . menu item is usually found in the application menu. Selecting it brings up a window where the user can enter and change various options. The iPhone and other iOS devices have a dedicated application called Settings, which you no doubt have played with any number of times. In this chapter, we’ll show you how to add settings for your application to the Settings application and how to access those settings from within your application.
Getting to Know Your Settings Bundle
The Settings application lets the user enter and change preferences for any application that has a settings bundle. A settings bundle is a group of files built in to an application that tells the Settings application which preferences the application wishes to collect from the user.
Pick up your iOS device and locate your Settings icon. Touch the icon to launch the Settings app. Ours is shown in Figure 12-1.
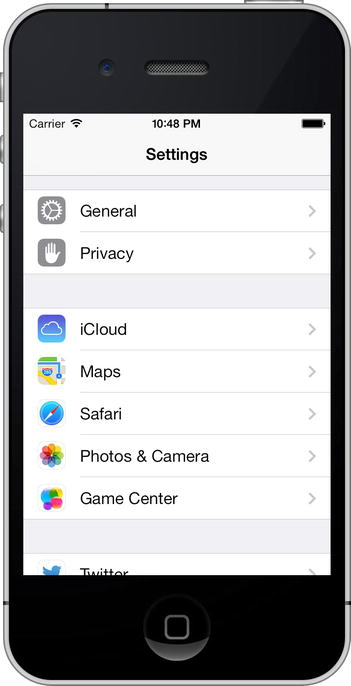
Figure 12-1. The Settings application
The Settings application acts as a common user interface for the iOS User Defaults mechanism. User Defaults is the part of the system that stores and retrieves preferences.
In an iOS application, User Defaults is implemented by the NSUserDefaults class. If you’ve done Cocoa programming on the Mac, you’re probably already familiar with NSUserDefaults because it is the same class that is used to store and read preferences on the Mac. You will have your applications use NSUserDefaults to read and store preference data using pairs of keys and values, just as you would access keyed data from an NSDictionary. The difference is that NSUserDefaults data is persisted to the file system rather than stored in an object instance in memory.
In this chapter, we’re going to create an application, add and configure a settings bundle, and then access and edit those preferences from within our application.
One nice thing about the Settings application is that it provides a solution, so you don’t need to design your own user interface for your preferences. You create a property list describing your application’s available settings, and the Settings application creates the interface for you.
Immersive applications, such as games, generally should provide their own preferences view so that the user doesn’t need to quit to make a change. Even utility and productivity applications might, at times, have preferences that a user should be able to change without leaving the application. We’ll also show you to how to collect preferences from the user directly in your application and store those in iOS’s User Defaults.
One additional complication is that the user can actually switch to the Settings application, change a preference, and then switch back to your still-running application. We’ll show you how to handle that situation at the end of this chapter.
The Bridge Control Application
In this chapter, we’re going to build a simple application that keeps track of some aspects of managing the bridge of a starship, which I’m sure you’ll agree is a useful enterprise. Our first step will be to create a settings bundle so that, when the user launches the Settings application, there will be an entry for our application, Bridge Control (see Figure 12-2).
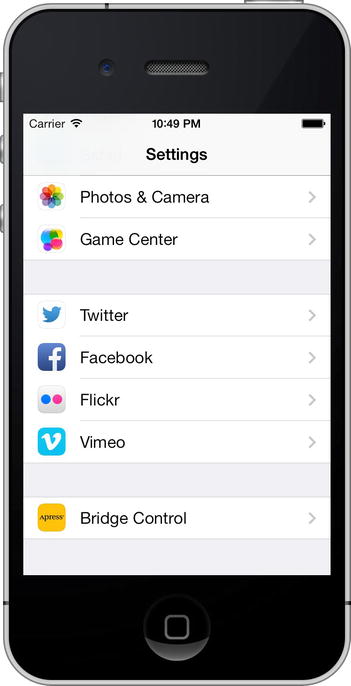
Figure 12-2. The Settings application, which shows an entry for our Bridge Control application in the simulator
If the user selects our application, Settings will drill down into a view that shows the preferences relevant to our application. As you can see in Figure 12-3, the Settings application uses text fields, secure text fields, switches, and sliders to coax values out of our intrepid user.
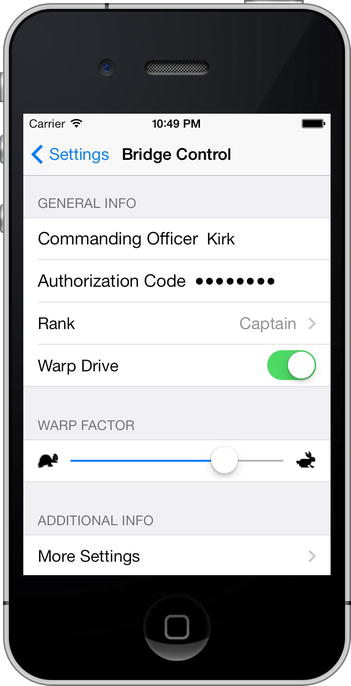
Figure 12-3. Our application’s primary settings view
Also notice the two items in the view that have disclosure indicators. The first one, Rank, takes the user to another table view that displays the options available for that item. From that table view, the user can select a single value (see Figure 12-4).

Figure 12-4. Selecting a single preference item from a list
The More Settings disclosure indicator allows the user to drill down to another set of preferences (see Figure 12-5). This child view can have the same kinds of controls as the main settings view and can even have its own child views. You may have noticed that the Settings application uses a navigation controller, which it needs because it supports the construction of hierarchical preference views.
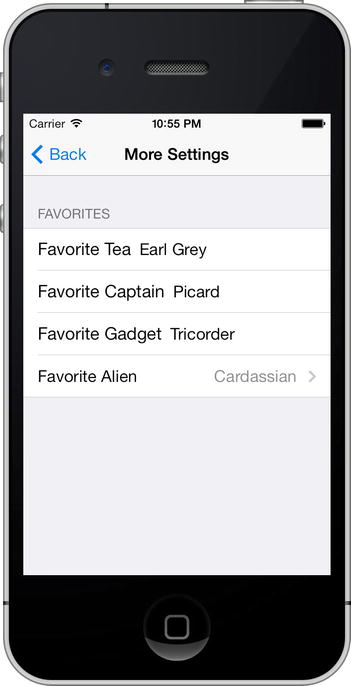
Figure 12-5. A child settings view for our application
When users launch our application, they will be presented with a list of the preferences gathered in the Settings application (see Figure 12-6).
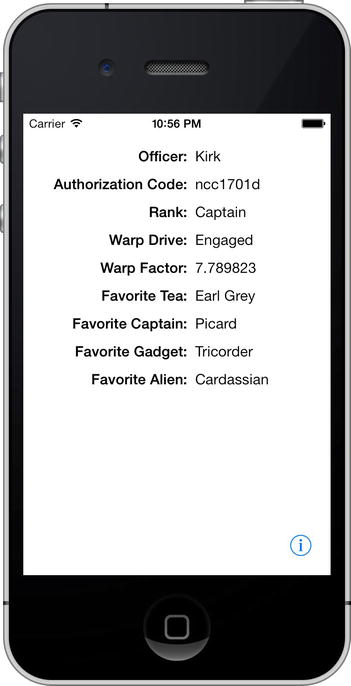
Figure 12-6. Our application’s main view
To show how to update preferences from within our application, we also provide a little information button in the lower-right corner. This button takes users to another view where they can change additional preferences directly in our application (see Figure 12-7).
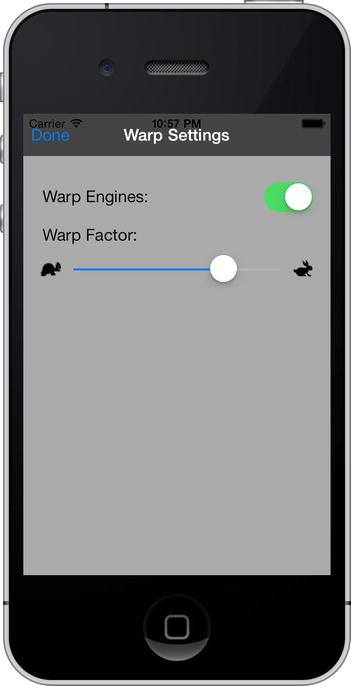
Figure 12-7. Setting some preferences directly in our application
Let’s get started building Bridge Control, shall we?
In Xcode, press ![]()
![]() N or select File
N or select File ![]() New
New ![]() Project. . . . When the new project assistant comes up, select Application from under the iOS heading in the left pane, click the Utility Application icon, and click Next. On the next screen, name your project Bridge Control. Set Devices to iPhone. Make sure that BID is set as the class prefix and that the Use Core Data button is unchecked, and then click the Next button. Finally, choose a location for your project and click Create.
Project. . . . When the new project assistant comes up, select Application from under the iOS heading in the left pane, click the Utility Application icon, and click Next. On the next screen, name your project Bridge Control. Set Devices to iPhone. Make sure that BID is set as the class prefix and that the Use Core Data button is unchecked, and then click the Next button. Finally, choose a location for your project and click Create.
We haven’t used this particular project template before, so let’s take a quick look at the project before we proceed. The Utility Application template creates an application similar to the multiview application we built in Chapter 6. The application has a main view and a secondary view called the flipside view. Tapping the information button on the main view takes you to the flipside view, and tapping the Done button on the flipside view takes you back to the main view.
It takes several controllers and views to implement this type of application. All of these are provided, as stubs, by the template. Expand the Bridge Control folder, where you’ll find the usual application delegate class, as well as two additional controller classes and a storyboard file to contain the GUI (see Figure 12-8).
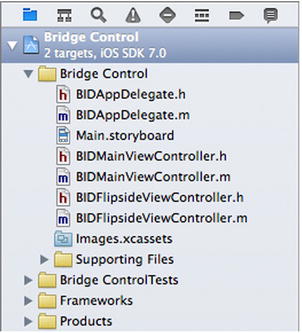
Figure 12-8. Our project created from the Utility Application template. Notice the application delegate, the storyboard, and the main and flipside view controllers
Working with the Settings Bundle
The Settings application uses the contents of each application’s settings bundle to construct a settings view for that application. If an application has no settings bundle, then the Settings app doesn’t show anything for that application. Each settings bundle must contain a property list called Root.plist that defines the root-level preferences view. This property list must follow a very precise format, which we’ll talk about when we set up the property list for our app’s settings bundle.
When the Settings application starts up, it checks each application for a settings bundle and adds a settings group for each application that includes a settings bundle. If we want our preferences to include any subviews, we need to add property lists to the bundle and add an entry to Root.plist for each child view. You’ll see exactly how to do that in this chapter.
Adding a Settings Bundle to Our Project
In the project navigator, click the Bridge Control folder, and then select File ![]() New
New ![]() File. . . or press
File. . . or press ![]() N. In the left pane, select Resource under the iOS heading, and then select the Settings Bundle icon (see Figure 12-9). Click the Next button, leave the default name of Settings.bundle, and click Create.
N. In the left pane, select Resource under the iOS heading, and then select the Settings Bundle icon (see Figure 12-9). Click the Next button, leave the default name of Settings.bundle, and click Create.

Figure 12-9. Creating a settings bundle in Xcode
You should now see a new item in the project window called Settings.bundle. Expand the Settings.bundle item, and you should see two subitems: a folder named en.lproj, containing a file named Root.strings, and an icon named Root.plist. We’ll discuss en.lproj in Chapter 22 when we talk about localizing your application into other languages. Here, we’ll concentrate on Root.plist.
Setting Up the Property List
Select Root.plist and take a look at the editor pane. You’re looking at Xcode’s property list editor (see Figure 12-10). This editor functions in the same way as the Property List Editor application in /Developer/Applications/Utilities.

Figure 12-10. Root.plist in the property list editor pane. If your editing pane looks slightly different, don’t panic. Simply control-click in the editing pane and select Show Raw Keys/Values from the contextual menu that appears
Notice the organization of the items in the property list. Property lists are essentially dictionaries, storing item types and values and using a key to retrieve them, just as an NSDictionary does.
Several different types of nodes can be put into a property list. The Boolean, Data, Date, Number, and String node types are meant to hold individual pieces of data, but you also have a couple of ways to deal with whole collections of nodes, as well. In addition to Dictionary node types, which allow you to store other dictionaries, there are Array nodes, which store an ordered list of other nodes similar to an NSArray. The Dictionary and Array types are the only property list node types that can contain other nodes.
Note Although you can use most kinds of objects as keys in an NSDictionary, keys in property list dictionary nodes must be strings. However, you are free to use any node type for the values.
When creating a settings property list, you need to follow a very specific format. Fortunately, Root.plist, the property list that came with the settings bundle you just added to your project, follows this format exactly. Let’s take a look.
In the Root.plist editor pane, names of keys can either be displayed in their true, “raw” form or in a slightly more human-readable form. We’re big fans of seeing things as they truly are whenever possible, so right-click anywhere in the editor and make sure the Show Raw Keys/Values option in the contextual menu is checked (see Figure 12-11). The rest of our discussion here uses the real names for all the keys we’re going to talk about, so this step is important.

Figure 12-11. Control-click anywhere in the property list editing pane and make sure the Show Raw Keys/Values item is checked. This will ensure that real names are used in the property list editor, which makes your editing experience more precise
Caution At the time of writing, leaving the property list, either by editing a different file or by quitting Xcode, resets the Show Raw Keys/Values item to be unchecked. If your text suddenly looks a little different, take another look at that menu item and make sure it is checked.
One of the items in the dictionary is StringsTable. A strings table is used in translating your application into another language. We’ll cover the use of strings tables in Chapter 22 when we get into localization. We won’t be using it in this chapter, but feel free to leave it in your project since it won’t do any harm.
In addition to StringsTable, the property list contains a node named PreferenceSpecifiers, which is an array. This array node is designed to hold a set of dictionary nodes, where each node represents either a single preference item that the user can modify or a single child view that the user can drill down into.
You’ll notice that Xcode’s template kindly gave us four nodes (see Figure 12-12). Those nodes aren’t likely to reflect our actual preferences, so delete Item 1, Item 2, and Item 3 (select each one and press the Delete key, one after another), leaving just Item 0 in place.
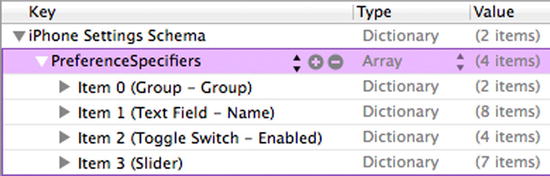
Figure 12-12. Root.plist in the editor pane, this time with PreferenceSpecifiers expanded
Note To select an item in the property list, it is best to click on one side or another of the Key column to avoid bringing up the Key column’s dropdown menu.
Single-click Item 0 but don’t expand it. Xcode’s property list editor lets you add rows simply by pressing the Return key. The current selection state—including which row is selected and whether it’s expanded—determines where the new row will be inserted. When an unexpanded array or dictionary is selected, pressing Return adds a sibling node after the selected row. In other words, it will add another node at the same level as the current selection. If you were to press Return (but don’t do that now), you would get a new row called Item 1 immediately after Item 0. Figure 12-13 shows an example of hitting Return to create a new row. Notice the dropdown menu that allows you to specify the kind of preference specifier this item represents—more on this in a bit.
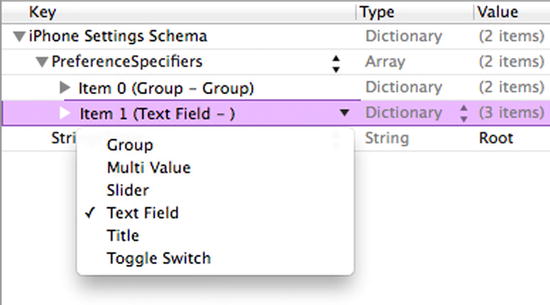
Figure 12-13. We selected Item 0 and hit return to create a new sibling row. Note the dropdown menu that appears, allowing us to specify the kind of preference specifier this item represents
Now expand Item 0 and see what it contains (see Figure 12-14). The editor is now ready to add child nodes to the selected item. If you were to press Return at this point (again, don’t actually press it now), you would get a new first child row inside Item 0.
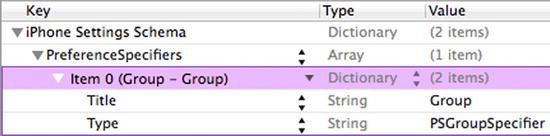
Figure 12-14. When you expand Item 0, you’ll find a row with a key of Type and a second row with a key of Title. This represents a group with a title of Group
One of the items inside Item 0 has a key of Type. Every property list node in the PreferenceSpecifiers array must have an entry with this key. The Type key is typically the second entry, but order doesn’t matter in a dictionary, so the Type key doesn’t need to be second. The Type key tells the Settings application what type of data is associated with this item.
In Item 0, the Type item has a value of PSGroupSpecifier. This indicates that the item represents the start of a new group. Each item that follows will be part of this group—until the next item with a Type of PSGroupSpecifier.
If you look back at Figure 12-3, you’ll see that the Settings application presents the application settings in a grouped table. Item 0 in the PreferenceSpecifiers array in a settings bundle property list should always be a PSGroupSpecifier, so that the settings start in a new group. This is important because you need at least one group in every Settings table.
The only other entry in Item 0 has a key of Title, and this is used to set an optional header just above the group that is being started.
Now take a closer look at the Item 0 row itself, and you’ll see that it’s actually shown as Item 0 (Group – Group). The values in parentheses represent the value of the Type item (the first Group) and the Title item (the second Group). This is a nice shortcut that Xcode gives you so that you can visually scan the contents of a settings bundle.
As shown back in Figure 12-3, we called our first group General Info. Double-click the value next to Title, and change it from Group to General Info (see Figure 12-15). When you enter the new title, you may notice a slight change to Item 0. It’s now shown as Item 0 (Group – General Info) to reflect the new title.

Figure 12-15. We changed the title of the Item 0 group from Group to General Info
Adding a Text Field Setting
We now need to add a second item in this array, which will represent the first actual preference field. We’re going to start with a simple text field.
If you single-click the PreferenceSpecifiers row in the editor pane (don’t do this, just keep reading) and press Return to add a child, the new row will be inserted at the beginning of the list, which is not what we want. We want to add a row at the end of the array.
To add the row, click the disclosure triangle to the left of Item 0 to close it, and then select Item 0 and press Return. This gives you a new sibling row after the current row (see Figure 12-16). As usual, when the item is added, a dropdown menu appears, showing the default value of Text Field.
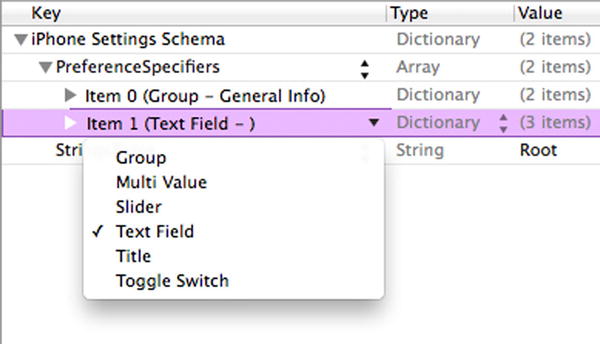
Figure 12-16. Adding a new sibling row to Item 0
Click somewhere outside the dropdown menu to make it go away, and then click the disclosure triangle next to Item 1 to expand it. You’ll see that it contains a Type row set to PSTextFieldSpecifier. This is the Type value used to tell the Settings application that we want the user to edit this setting in a text field. It also contains two empty rows for Title and Key (see Figure 12-17).
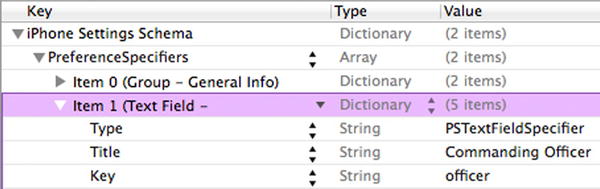
Figure 12-17. Our text field item, expanded to show the type, title, and key
Select the Title row, and then double-click in the whitespace of the Value column. Type in Commanding Officer to set the Title value. This is the text that will appear in the Settings app.
Now do the same for the Key row (no, that’s not a misprint, you’re really looking at a key called Key). For a value, type in officer (note the lowercase first letter). Remember that user defaults work like a dictionary. This entry tells the Settings application which key to use when it stores the value entered in this text field.
Recall what we said about NSUserDefaults? It lets you store values using a key, similarly to an NSDictionary. Well, the Settings application will do the same thing for each of the preferences it saves on your behalf. If you give it a key value of foo, then, later in your application, you can request the value for foo, and it will give you the value the user entered for that preference. We will use this same key value later to retrieve this setting from the user defaults in our application.
Note Our Title has a value of Commanding Officer and our Key has a value of officer. This uppercase/lowercase difference will happen frequently, and here we’re even compounding the difference by using two words for the displayed title, and a single word for the key. The Title is what appears on the screen, so the capital C and O, and putting a space between the words, all makes sense. The Key is a text string we’ll use to retrieve preferences from the user defaults, so all lowercase makes sense there. Could we use all lowercase for Title? You bet. Could we use all capitals for Key? Sure! As long as you capitalize it the same way when you save and when you retrieve, it doesn’t matter which convention you use for your preference keys.
Now select the last of the three Item 1 rows (the one with a Key of Key) and press Return to add another entry to the Item 1 dictionary, giving this one a key of AutocapitalizationType. Note that, as soon as you start typing AutocapitalizationType, Xcode presents you with a list of matching choices, so you can simply pick one from the list instead of typing the whole name. After you’ve entered AutocapitalizationType, a popup appears in the Value column, where you can select from the available options. Choose Words. This specifies that the text field should automatically capitalize each word that the user types in this field.
Create one last new row and give it a key of AutocorrectionType and a value of No. This will tell the Settings application not to autocorrect values entered into this text field. In any situation where you do want the text field to use autocorrection, you would set the value in this row to Yes. Again, Xcode presents you with a list of matching choices as you begin entering AutocorrectionType, and it shows you a list of valid options in a popup.
When you’re finished, your property list should look like the one shown in Figure 12-18.
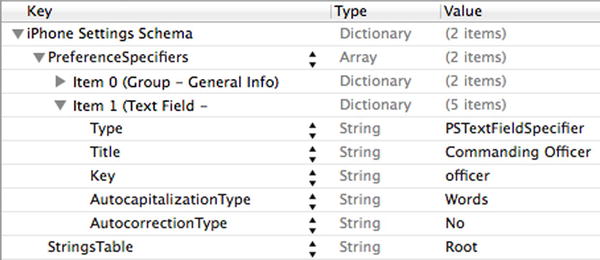
Figure 12-18. The finished text field specified in Root.plist
Adding an Application Icon
Before we try our new setting, let’s add an application icon to the project. You’ve done this before.
Save Root.plist, the property file you just edited. Next, use the project navigator to select the Images.xcassets item, and then select the AppIcon item it contains. There, you’ll find a set of drop targets where icons can be placed.
In the Finder, navigate first to the source code archive, and then into the 12 – Bridge Control folder. Drag the file Icon.png into your project’s configuration editor, dropping it onto the app icon drop target on the left.
That’s it. Now compile and run the application by selecting Product ![]() Run. You haven’t built any sort of GUI for the app yet, so you’ll see a pretty boring start screen consisting of a dark grey background with a small blue info icon in one corner. Press the home button, and then tap the icon for the Settings application. You will find an entry for your application, which uses the application icon added earlier (see Figure 12-2). Click the Bridge Control row, and you will be presented with a simple settings view with a single text field, as shown in Figure 12-19.
Run. You haven’t built any sort of GUI for the app yet, so you’ll see a pretty boring start screen consisting of a dark grey background with a small blue info icon in one corner. Press the home button, and then tap the icon for the Settings application. You will find an entry for your application, which uses the application icon added earlier (see Figure 12-2). Click the Bridge Control row, and you will be presented with a simple settings view with a single text field, as shown in Figure 12-19.
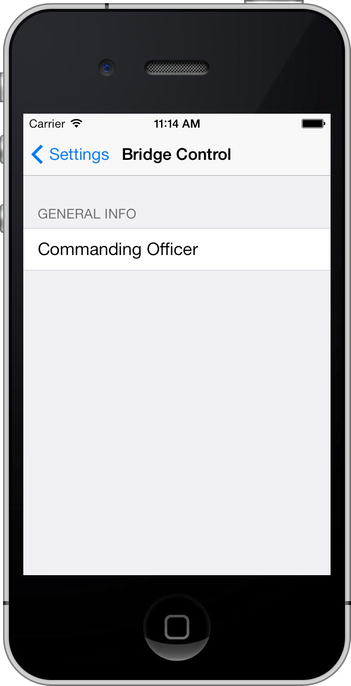
Figure 12-19. Our root view in the Settings application after adding a group and a text field
Quit the simulator and go back to Xcode. We’re not finished yet, but you should now have a sense of how easy it is to add preferences to your application. Let’s add the rest of the fields for our root settings view. The first one we’ll add is a secure text field for the user’s authorization code.
Adding a Secure Text Field Setting
Click Root.plist to return to your setting specifiers (don’t forget to turn on Show Raw Keys/Values, assuming Xcode’s editing area has reset this). Collapse Item 0 and Item 1, and then select Item 1. Press ![]() C to copy it to the clipboard, and then press
C to copy it to the clipboard, and then press ![]() V to paste it back. This will create a new Item 2 that is identical to Item 1. Expand the new item and change the Title to Authorization Code and the Key to authorizationCode. Remember that the Title is what’s shown in an on-screen label, and the Key is what’s used for saving the value.
V to paste it back. This will create a new Item 2 that is identical to Item 1. Expand the new item and change the Title to Authorization Code and the Key to authorizationCode. Remember that the Title is what’s shown in an on-screen label, and the Key is what’s used for saving the value.
Next, add one more child to the new item. Remember that the order of items does not matter, so feel free to place it directly below the Key item you just edited. To do this, select the Key/authorizationCode row, and then hit Return.
Give the new item a Key of IsSecure (note the leading uppercase I), and you’ll see that Xcode automatically changes the Type to Boolean. Now change its Value from NO to YES, which tells the Settings application that this field needs to hide the user’s input like a password field, rather than behaving like an ordinary text field. Finally, change AutocapitalizationType to None. Our finished Item 2 is shown in Figure 12-20.

Figure 12-20. Our finished Item 2, a text field designed to accept an authorizationCode
The next item we’re going to add is a multivalue field. This type of field will automatically generate a row with a disclosure indicator. Clicking it will let users drill down to another table, where they can select one of several rows.
Collapse Item 2, select the row, and then press Return to add Item 3. Use the pop-up attached to the Key field to select Multi Value, and then expand Item 3 by clicking the disclosure triangle.
The expanded Item 3 already contains a few rows. One of them, the Type row, is set to PSMultiValueSpecifier. Look for the Title row and set its value to Rank. Then find the Key row and give it a value of rank. The next part is a little tricky, so let’s talk about it before we do it.
We’re going to add two more children to Item 3, but they will be Array type nodes, not String type nodes, as follows:
- One array, called Titles, will hold a list of the values from which the user can select.
- The other array, called Values, will hold a list of the values that are stored in the user defaults.
So, if the user selects the first item in the list, which corresponds to the first item in the Titles array, the Settings application will actually store the first value from the Values array. This pairing of Titles and Values lets you present user-friendly text to the user, but actually stores something else, like a number, date, or different string.
Both of these arrays are required. If you want them to be the same, you can create one array, copy it, paste it back in, and then change the key so that you have two arrays with the same content, but stored under different keys. We’ll actually do just that.
Select Item 3 (leave it open) and press Return to add a new child. You’ll see that, once again, Xcode is aware of the type of file we’re editing and even seems to anticipate what we want to do: the new child row already has its Key set to Titles and is configured to be an Array, which is just what we wanted! Expand the Titles row and hit Return to add a child node. Repeat this five more times, so you have a total of six child nodes. All six nodes should be String type and should be given the following values: Ensign, Lieutenant, Lieutenant Commander, Commander, Captain, and Commodore.
Once you’ve created all six nodes and entered their values, collapse Titles and select it. Next, press ![]() C to copy it and press
C to copy it and press ![]() V to paste it back. This will create a new item with a key of Titles - 2. Double-click Titles - 2 and change it to Values.
V to paste it back. This will create a new item with a key of Titles - 2. Double-click Titles - 2 and change it to Values.
We’re almost finished with our multivalue field. There’s just one more required value in the dictionary, which is the default value. Multivalue fields must have one—and only one—row selected. So, we need to specify the default value to be used if none has yet been selected, and it needs to correspond to one of the items in the Values array (not the Titles array, if they are different). Xcode already added a DefaultValue row when we created this item, so all we need to do now is give it a value of Ensign. Figure 12-21 shows our version of Item 3.
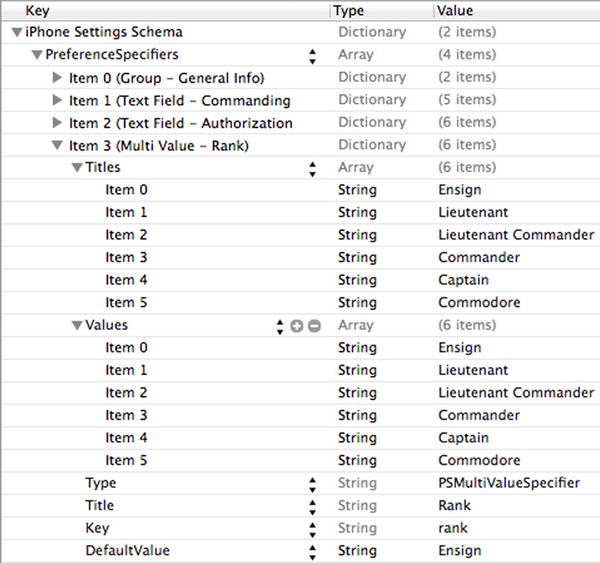
Figure 12-21. Our finished Item 3, a multivalue field designed to let the user select from one of five possible values
Let’s check our work. Save the property list, and build and run the application again. When your application starts, press the home button and launch the Settings application. When you select Bridge Control, you should see three fields on your root-level view (see Figure 12-22). Go ahead and play with your creation, and then let’s move on.
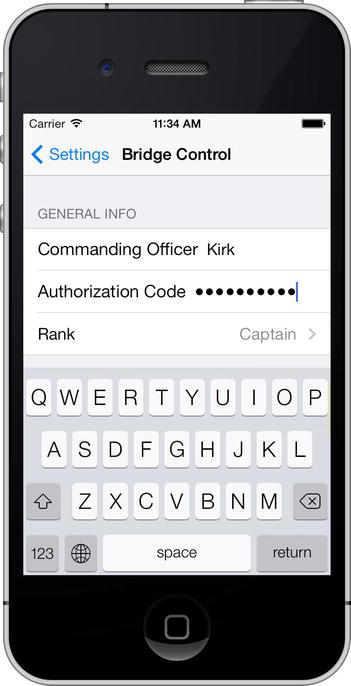
Figure 12-22. Three fields down. Not too shabby!
Adding a Toggle Switch Setting
The next item we need to get from the user is a Boolean value that indicates whether our warp engines are turned on. To capture a Boolean value in our preferences, we are going to tell the Settings application to use a UISwitch by adding another item to our PreferenceSpecifiers array with a type of PSToggleSwitchSpecifier.
Collapse Item 3 if it’s currently expanded, and then single-click it to select it. Press Return to create Item 4. Use the dropdown menu to select Toggle Switch, and then click the disclosure triangle to expand Item 4. You’ll see there’s already a child row with a Key of Type and a Value of PSToggleSwitchSpecifier. Give the empty Title row a value of Warp Drive and set the value of the Key row to warp.
We have one more required item in this dictionary, which is the default value. Just as with the Multi Value setup, here Xcode has already created a DefaultValue row for us. Let’s turn on our warp engines by default by giving the DefaultValue row a value of YES. Figure 12-23 shows our completed Item 4.
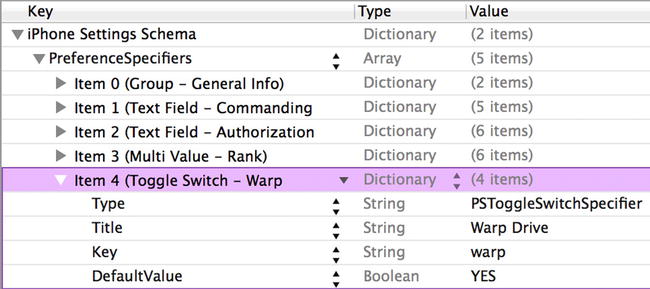
Figure 12-23. Our finished Item 4, a toggle switch to turn the warp engines on and off. Engage!
The next item we need to implement is a slider. In the Settings application, a slider can have a small image at each end, but it can’t have a label. Let’s put the slider in its own group with a header, so that the user will know what the slider does.
Start by collapsing Item 4. Now single-click Item 4 and press Return to create a new row. Use the pop-up to turn the new item into a Group, and then click the item’s disclosure triangle to expand it. You’ll see that Type is already set to PSGroupSpecifier. This will tell the Settings application to start a new group at this location. Double-click the value in the row labeled Title and change the value to Warp Factor.
Collapse Item 5 and select it, and then press Return to add a new sibling row. Use the pop-up to change the new item into a Slider, which indicates to the Settings application that it should use a UISlider to get this information from the user. Expand Item 6 and set the value of the Key row to warpFactor, so that the Settings application knows which key to use when storing this value.
We’re going to allow the user to enter a value from 1 to 10, and we’ll set the default to warp 5. Sliders need to have a minimum value, a maximum value, and a starting (or default) value; and all of these need to be stored as numbers, not strings, in your property list. Fortunately, Xcode has already created rows for all these values. Give the DefaultValue row a value of 5, the MinimumValue row a value of 1, and the MaximumValue row a value of 10.
If you want to test the slider, go ahead, but hurry back. We’re going to do just a bit more customization.
As noted, sliders can have images. You can place a small 21 × 21-pixel image at each end of the slider. Let’s provide little icons to indicate that moving the slider to the left slows us down and moving it to the right speeds us up.
Adding Icons to the Settings Bundle
In the 12 - Bridge Control folder in the project archive that accompanies this book, you’ll find two icons called rabbit.png and turtle.png. We need to add both of these to our settings bundle. Because these images need to be used by the Settings application, we can’t just put them in our Bridge Control folder; we need to put them in the settings bundle, so the Settings application can access them.
To do that, find the Settings.bundle in the project navigator. We’ll need to open this bundle in the Finder. Control-click the Settings.bundle icon in the project navigator. When the contextual menu appears, select Show in Finder (see Figure 12-24) to show the bundle in the Finder.
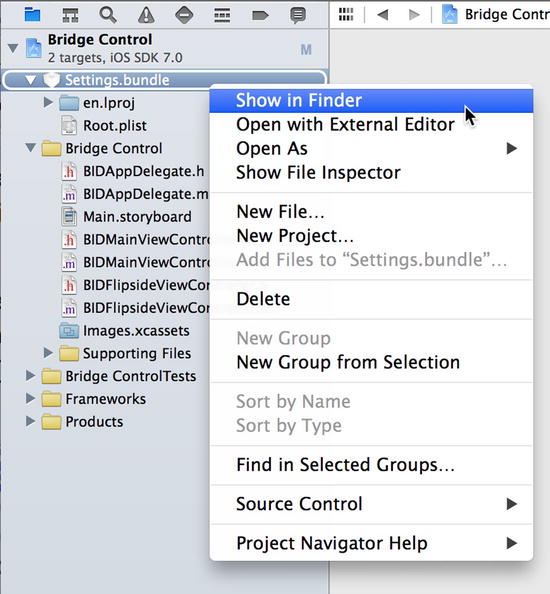
Figure 12-24. The Settings.bundle contextual menu
Remember that bundles look like files in the Finder, but they are really folders. When the Finder window opens to show the Settings.bundle file, control-click the file and select Show Package Contents from the contextual menu that appears. This will open the settings bundle in a new Finder window, and you should see the same two items that you see in Settings.bundle in Xcode. Copy the two icon files, rabbit.png and turtle.png, from the 12 - Bridge Control folder into the Settings.bundle package contents in the Finder window.
You can leave this window open in the Finder, as we’ll need to copy another file here soon. Now we’ll return to Xcode and tell the slider to use these two images.
Back in Xcode, return to Root.plist and add two more child rows under Item 6. Give one a key of MinimumValueImage and a value of turtle. Give the other a key of MaximumValueImage and a value of rabbit. Figure 12-25 shows our finished Item 6.
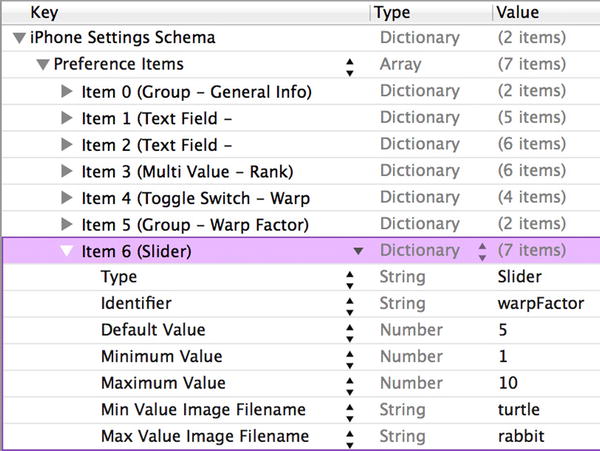
Figure 12-25. Our finished Item 6: a slider with turtle and rabbit icons to represent slow and fast
Save your property list, and then build and run the app to make sure everything is still hunky-dory. You should be able to navigate to the Settings application and find the slider waiting for you, with the sleepy turtle and the happy rabbit at their respective ends (see Figure 12-26).

Figure 12-26. We have text fields, multivalue fields, a toggle switch, and a slider. We’re almost finished
We’re going to add another preference specifier to tell the Settings application that we want it to display a child settings view. This specifier will present a row with a disclosure indicator that, when tapped, will take the user down to a whole new view full of preferences. Let’s get to it.
Since we don’t want this new preference to be grouped with the slider, first we’ll copy the group specifier in Item 0 and paste it at the end of the PreferenceSpecifiers array to create a new group for our child settings view.
In Root.plist, collapse all open items, and then single-click Item 0 to select it and press ![]() C to copy it to the clipboard. Next, select Item 6, and then press
C to copy it to the clipboard. Next, select Item 6, and then press ![]() V to paste in a new Item 7. Expand Item 7 and double-click the Value column next to the key Title, changing it from General Info to Additional Info.
V to paste in a new Item 7. Expand Item 7 and double-click the Value column next to the key Title, changing it from General Info to Additional Info.
Now collapse Item 7 again. Select it and press Return to add Item 8, which will be our actual child view. Expand it by clicking the disclosure triangle. Find the Type row, give it a value of PSChildPaneSpecifier, and then set the value of the Title row to More Settings.
We need to add one final row to Item 8, which will tell the Settings application which property list to load for the More Settings view. Add another child row, and give it a key of File and a value of More (see Figure 12-27). The file extension .plist is assumed and must not be included (if it is, the Settings application won’t find the plist file).
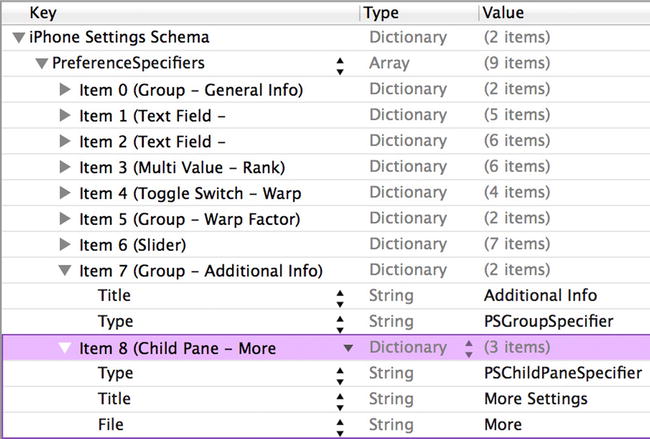
Figure 12-27. Our finished Items 7 and 8, setting up the new Additional Info settings group and providing the child pane link to the file, More.plist
We are adding a child view to our main preference view. The settings in that child view are specified in the More.plist file. We need to copy More.plist into the settings bundle. We can’t add new files to the bundle in Xcode, and the Property List Editor’s Save dialog will not let us save into a bundle. So, we need to create a new property list, save it somewhere else, and then drag it into the Settings.bundle window using the Finder.
You’ve now seen all the different types of preference fields that you can use in a settings bundle plist file. To save yourself some typing, you can grab More.plist out of the 12 - Bridge Control folder in the project archive that accompanies this book, and then drag it into that Settings.bundle window we left open earlier.
Tip When you create your own child settings views, the easiest approach is to make a copy of Root.plist and give it a new name. Next, delete all of the existing preference specifiers except the first one and add whatever preference specifiers you need for that new file.
We’re finished with our settings bundle. Feel free to compile, run, and test the Settings application. You should be able to reach the child view and set values for all the other fields. Go ahead and play with it, and make changes to the property list if you want.
Tip We’ve covered almost every configuration option available (at least at the time of this writing). You can find the full documentation of the settings property list format in the document called Settings Application Schema Reference in the iOS Dev Center. You can get that document, along with a ton of other useful reference documents, from this page: http://developer.apple.com/library/ios/navigation/.
Before continuing, select the Image.xcasset item in Xcode’s project navigator, and then copy the rabbit.png and turtle.png icons from the 12 - Bridge Control folder in the project archive into the left side of the editor area. This will add these icons to the project as new images resources, ready for use. We’ll use them in our application to show the value of the current settings.
You might have noticed that the two icons you just added are exactly the same ones you added to your settings bundle earlier, and you might be wondering why. Remember that iOS applications can’t read files out of other applications’ sandboxes. The settings bundle doesn’t become part of our application’s sandbox; it becomes part of the Settings application’s sandbox. Since we also want to use those icons in our application, we need to add them separately to our Bridge Control folder, so they are copied into our application’s sandbox, as well.
Reading Settings in Our Application
We’ve now solved half of our problem. The user can use the Setting app to declare their preferences, but how do we get to them from within our application? As it turns out, that’s the easy part.
We’ll use a class called NSUserDefaults to access the user’s settings. NSUserDefaults is implemented as a singleton, which means there is only one instance of NSUserDefaults running in our application. To get access to that one instance, we call the class method standardUserDefaults, like so:
NSUserDefaults *defaults = [NSUserDefaults standardUserDefaults];
Once we have a pointer to the standard user defaults, we use it much like an NSDictionary. To get a value from it, we can call objectForKey:, which will return an Objective-C object, such as an NSString, NSDate, or NSNumber. If we want to retrieve the value as a scalar—like an int, float, or BOOL—we can use another method, such as intForKey:, floatForKey:, or boolForKey:.
When you were creating the property list for this application, you added an array of PreferenceSpecifiers inside a plist file. Within the Settings application, some of those specifiers were used to create groups, while others were used to create interface objects for user interaction. Those are the specifiers we are really interested in because they hold the keys the real settings data. Every specifier that was tied to a user setting has a Key named Key. Take a minute to go back and check. For example, the Key for our slider has a value of warpFactor. The Key for our Authorization Code field is authorizationCode. We’ll use those keys to retrieve the user settings.
Instead of using strings for each key directly in our methods, we’ll use some precompiler #define statements for the values. That way we can use these makeshift constants in our code instead of inline strings, where we would run the risk of mistyping something. We’ll set these up in a header file, since we’re going to use some of them in more than just this class later on. So, open up BIDMainViewController.h and add these bold lines near the top of the file:
#import "BIDFlipsideViewController.h"

#define kOfficerKey                    @"officer"
#define kAuthorizationCodeKey          @"authorizationCode"
#define kRankKey                       @"rank"
#define kWarpDriveKey                  @"warp"
#define kWarpFactorKey                 @"warpFactor"
#define kFavoriteTeaKey                @"favoriteTea"
#define kFavoriteCaptainKey            @"favoriteCaptain"
#define kFavoriteGadgetKey             @"favoriteGadget"
#define kFavoriteAlienKey              @"favoriteAlien"
These constants are the keys that we used in our plist file for the different preference fields. Now that we have a place to display the settings, let’s quickly set up our main view with a bunch of labels. Before going over to Interface Builder, let’s create outlets for all the labels we’ll need. Single-click BIDMainViewController.m, and make the following changes:
#import "BIDMainViewController.h"

@interface BIDMainViewController ()

@property (weak, nonatomic) IBOutlet UILabel *officerLabel;
@property (weak, nonatomic) IBOutlet UILabel *authorizationCodeLabel;
@property (weak, nonatomic) IBOutlet UILabel *rankLabel;
@property (weak, nonatomic) IBOutlet UILabel *warpDriveLabel;
@property (weak, nonatomic) IBOutlet UILabel *warpFactorLabel;
@property (weak, nonatomic) IBOutlet UILabel *favoriteTeaLabel;
@property (weak, nonatomic) IBOutlet UILabel *favoriteCaptainLabel;
@property (weak, nonatomic) IBOutlet UILabel *favoriteGadgetLabel;
@property (weak, nonatomic) IBOutlet UILabel *favoriteAlienLabel;

@end
There’s nothing new here. Next, we declare nine properties, all of them labels, and all of them with the IBOutlet keyword to make them connectable in Interface Builder.
Save your changes. Now that we have our outlets declared, let’s head over to the storyboard file to create the GUI.
Select MainStoryboard.storyboard to edit it in Interface Builder. When it comes up, you’ll see the main view on the left and the flipside view on the right, connected by a segue. Notice that the background of the main view is dark gray. Let’s change it to white.
Single-click the View belonging to the Main View Controller, and bring up the attributes inspector. Use the color well labeled Background to change the background to white. Note that the color well also functions as a pop-up menu if you click on the right edge. If you prefer, use that menu to select White Color.
Now we’re going to add a bunch of labels to the View, so it looks like the one shown in Figure 12-28. We’ll need a grand total of 18 labels. Half of them, on the left side of the screen, will be right-aligned and bold; the other half, on the right side of the screen, will be used to display the actual values retrieved from the user defaults and will have outlets pointing to them.
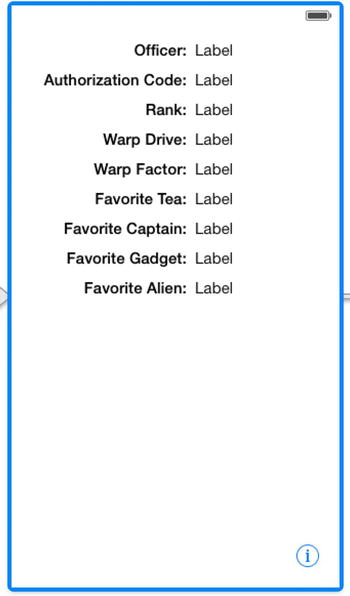
Figure 12-28. The View window in Interface Builder, showing the 18 labels we added
Use Figure 12-28 as your guide to build this view. You don’t need to match the appearance exactly, but you must have one label on the view for each of the declared outlets. Go ahead and design the view. You don’t need any help for this. When you’re finished and have it looking the way you like, come back, and we’ll continue. Just so you know, all our labels used 15-point System Font (or System Font Bold), but feel free to go wild with your own design.
The next thing we need to do is control-drag from the Main View Controller icon to each of the labels intended to display a settings value. You will control-drag a total of nine times, setting each label to a different outlet. Once you have all nine outlets connected to labels, save your changes.
Updating the Main View Controller
In Xcode, select BIDMainViewController.m, and add the following code to the class’s @implementation section:
@implementation BIDMainViewController

- (void)refreshFields {
    NSUserDefaults *defaults = [NSUserDefaults standardUserDefaults];
    self.officerLabel.text = [defaults objectForKey:kOfficerKey];
    self.authorizationCodeLabel.text = [defaults
                                        objectForKey:kAuthorizationCodeKey];
    self.rankLabel.text = [defaults objectForKey:kRankKey];
    self.warpDriveLabel.text = [defaults boolForKey:kWarpDriveKey]
                                ? @"Engaged" : @"Disabled";
    self.warpFactorLabel.text = [[defaults objectForKey:kWarpFactorKey]
                                 stringValue];
    self.favoriteTeaLabel.text = [defaults objectForKey:kFavoriteTeaKey];
    self.favoriteCaptainLabel.text = [defaults
                                      objectForKey:kFavoriteCaptainKey];
    self.favoriteGadgetLabel.text = [defaults objectForKey:kFavoriteGadgetKey];
    self.favoriteAlienLabel.text = [defaults objectForKey:kFavoriteAlienKey];
}

- (void)viewDidAppear:(BOOL)animated {
    [super viewDidAppear:animated];
    [self refreshFields];
}
.
.
.
There’s not really much here that should throw you. The refreshFields method does two things. First, it grabs the standard user defaults. Second, it sets the text property of all the labels to the appropriate object from the user defaults using the same key values that we put in our plist file. Notice that for warpFactorLabel, we’re calling stringValue on the object returned. Most of our other preferences are strings, which come back from the user defaults as NSString objects. The preference stored by the slider, however, comes back as an NSNumber, so we call stringValue on it to get a string representation of the value it holds.
After that, we overrode our superclass’s viewDidAppear: method, and there we called our refreshFields method.
What we want to do now is call refreshFields again when we are notified that the flipside controller is being dismissed. Because the flipside view is handled modally, with the main view as its modal parent, the BIDMainViewController’s viewDidAppear: method will not be called when the flipside view is dismissed. Fortunately, the Utility Application template we chose has very kindly provided us with a delegate method we can use for exactly that purpose. Add the following line of code to the existing flipsideViewControllerDidFinish: method:
- (void)flipsideViewControllerDidFinish:
        (BIDFlipsideViewController *)controller
{
    [self refreshFields];
    [self dismissViewControllerAnimated:YES completion:nil];
}
With this in place, our displayed fields will be set to the appropriate preference values both when the view loads and when the flipside view is swapped out.
Changing Defaults from Our Application
Now that we have the main view up and running, let’s build the flipside view. As you can see in Figure 12-29, the flipside view features our warp drive switch, as well as the warp factor slider. We’ll use the same controls that the Settings application uses for these two items: a switch and a slider. In addition to declaring our outlets, we’ll also declare a method called refreshFields, just as we did in BIDMainViewController, and two action methods that will be triggered by the user touching the controls.
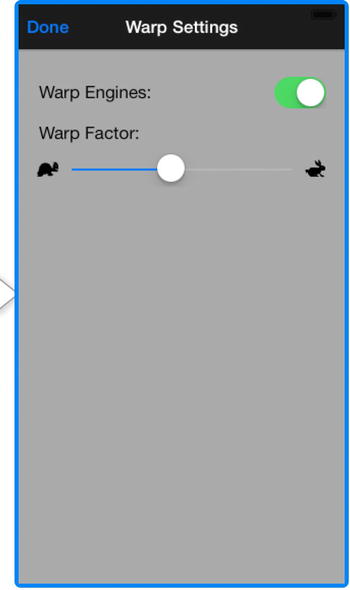
Figure 12-29. Designing the flipside view in Interface Builder
Select BIDFlipsideViewController.h and make the following changes:
#import <UIKit/UIKit.h>

@class BIDFlipsideViewController;

@protocol BIDFlipsideViewControllerDelegate
- (void)flipsideViewControllerDidFinish:
    (BIDFlipsideViewController *)controller;
@end

@interface BIDFlipsideViewController : UIViewController

@property (weak, nonatomic) id <BIDFlipsideViewControllerDelegate> delegate;
@property (weak, nonatomic) IBOutlet UISwitch *engineSwitch;
@property (weak, nonatomic) IBOutlet UISlider *warpFactorSlider;

- (void)refreshFields;
- (IBAction)engineSwitchTapped;
- (IBAction)warpSliderTouched;
- (IBAction)done:(id)sender;

@end
Note Don’t worry too much about the extra code here. As you saw before, the Utility Application template makes BIDMainViewController a delegate of the BIDFlipsideViewController. The extra code here that hasn’t been in the other file templates we’ve used implements that delegate relationship.
Now, save your changes and select MainStoryboard.storyboard to edit the GUI in Interface Builder, this time focusing on the Flipside View Controller Scene in the document outline. Hold down the Option key and click the disclosure triangle to expand Flipside View Controller and everything below it. Next, double-click the flipside view title in the title bar and change it from Title to Warp Settings.
Next, select the View in the Flipside View Controller Scene, and then bring up the attributes inspector. First, change the background color by using the Background popup to select Light Gray Color. The default flipside view background color is too dark for black text to look good, but light enough that white text is hard to read.
Next, drag two Labels from the library and place them on the View window. Double-click one of them, and change it to read Warp Engines:. Double-click the other, and call it Warp Factor:. You can use Figure 12-29 as a placement guide.
Next, drag over a Switch from the library and place it against the right side of the view, across from the label that reads Warp Engines. Control-drag from the Flipside View Controller icon to the new switch and connect it to the engineSwitch outlet. Then control-drag from the switch back to the Flipside View Controller icon and connect it to the engineSwitchTapped action.
Drag over a Slider from the library and place it below the label that reads Warp Factor: Resize the slider so that it stretches from the blue guideline on the left margin to the one on the right. Now control-drag from the Flipside View Controller icon to the slider, and then connect it to the warpFactorSlider outlet. Next, control-drag from the slider to Flipside View Controller and select the warpSliderTouched action.
Single-click the slider if it’s not still selected and bring up the attributes inspector. Set Minimum to 1.00, Maximum to 10.00, and Current to 5.00. Next, select turtle for Min Image and rabbit for Max Image. If those don’t show up in the pop-up buttons, make sure you dragged the images into the Images.xcassets assets catalog.
Now, let’s finish the flipside view controller. Select BIDFlipsideViewController.m, and add the following import at the top of the file:
#import "BIDMainViewController.h"
Next, make the following changes within the class’s implementation:
- (void)viewDidLoad
{
    [super viewDidLoad];
    // Do any additional setup after loading the view, typically from a nib.

    [self refreshFields];
}
.
.
.
- (void)refreshFields {
    NSUserDefaults *defaults = [NSUserDefaults standardUserDefaults];
    self.engineSwitch.on = [defaults boolForKey:kWarpDriveKey];
    self.warpFactorSlider.value = [defaults floatForKey:kWarpFactorKey];

}

- (IBAction)engineSwitchTapped {
    NSUserDefaults *defaults = [NSUserDefaults standardUserDefaults];
    [defaults setBool:self.engineSwitch.on forKey:kWarpDriveKey];
}

- (IBAction)warpSliderTouched {
    NSUserDefaults *defaults = [NSUserDefaults standardUserDefaults];
    [defaults setFloat:self.warpFactorSlider.value forKey:kWarpFactorKey];
}
.
.
.
We added a call to our refreshFields method. This method’s three lines of code get a reference to the standard user defaults, and then use the outlets for the switch and slider to make them display the values stored in the user defaults. We also implemented the engineSwitchTapped and warpSliderTouched action methods, so that we could stuff the values from our controls back into the user defaults when the user changes them.
Now you should be able to run the app, flip to the flipside, edit the values presented there, and see them reflected in the main view when you flip back.
We’ve created a settings bundle, including some default settings for a few values, to give the Settings app access to our app’s preferences. We’ve also set up our own app to access the same information, with a GUI to let the user see and edit it. However, one piece is missing: our app is completely unaware of the default values specified in the settings bundle. You can see this for yourself by deleting the Bridge Control app from the iOS simulator or the device you’re running on (thereby deleting the preferences stored for the app), and then running it from Xcode again. At the start of a fresh launch, the app will show you blank values for all the settings. Even the default values for the warp drive settings, which we defined in the settings bundle, are nowhere to be seen. If you then switch over to the Settings app, you’ll see the default values; however, unless you actually change the values there, you’ll never see them back in the Bridge Control app!
The reason our default settings disappeared is that our app knows nothing about the settings bundle it contains. So, when it tries to read the value from NSUserDefaults for warpFactor and finds nothing saved under that key, it has nothing to show us. Fortunately, NSUserDefaults includes a method called registerDefaults: that lets us specify the default values that we should find if we try to look up a key/value that hasn’t been set. To make this work throughout the app, it’s best if this is called early during app start-up. Select BIDAppDelegate.m and include this header file somewhere at the top of the file, so we can access the key names we defined earlier:
#import "BIDMainViewController.h"
Next, modify the application:didFinishLaunchingWithOptions: method:
- (BOOL)application:(UIApplication *)application
    didFinishLaunchingWithOptions:(NSDictionary *)launchOptions
{
    // Override point for customization after application launch.

     NSDictionary *defaults = @{kWarpDriveKey : @YES,
                               kWarpFactorKey : @5,
                               kFavoriteAlienKey : @"Vulcan"};

    [[NSUserDefaults standardUserDefaults] registerDefaults:defaults];
    return YES;
}
The first thing we do here is create a dictionary that contains three key/value pairs, one for each of the keys available in Settings that requires a default value. We’re using the same key names we defined earlier to reduce the risk of mistyping a key name. Note that in addition to the new @{} syntax for initializing a dictionary, we’re also using the new @<numeric value> syntax for creating NSNumber instances wrapping the Boolean value YES and the integer 5.
We pass that entire dictionary to the standard NSUserDefaults instance’s registerDefaults: method. From that point on, NSUserDefaults will give us the values we specify here, as long as we haven’t set different values either in our app or in the Settings app.
This class is complete. You should be able to compile and run your application. It will look something like Figure 12-6, except yours will be showing whatever values you entered in your Settings application, of course. Couldn’t be much easier, could it?
Keeping It Real
Now you should be able to run your app, view the settings, and then press the home button and open the Settings app to tweak some values. Hit the home button again, launch your app again, and you may be in for a surprise. When you go back to your app, you won’t see the settings change! They’ll remain as they are, showing the old values.
Here’s the deal: in iOS, hitting the home button while an app is running doesn’t actually quit the app. Instead, the operating system suspends the app in the background, leaving it ready to be quickly fired up again. This is great for switching back and forth between applications, since the amount of time it takes to reawaken a suspended app is much shorter than what it takes to launch it from scratch. However, in our case, we need to do a little more work, so that when our app wakes up, it effectively gets a slap in the face, reloads the user preferences, and redisplays the values they contain.
You’ll learn more about background applications in Chapter 15, but we’ll give you a sneak peek at the basics of how to make your app notice that it has been brought back to life. To do this, we’re going to sign up each of our controller classes to receive a notification that is sent by the application when it wakes up from its state of suspended execution.
A notification is a lightweight mechanism that objects can use to communicate with each other. Any object can define one or more notifications that it will publish to the application’s notification center, which is a singleton object that exists only to pass these notifications between objects. Notifications are usually indications that some event occurred, and objects that publish notifications include a list of notifications in their documentation. The UIApplication class publishes a number of notifications (you can find them in the Xcode documentation viewer, toward the bottom of the UIApplication page). The purpose of most notifications is usually pretty obvious from their names, but the documentation contains further information if you’re unclear about a given notification’s purpose.
Our application needs to refresh its display when the application is about to come to the foreground, so we are interested in the notification called UIApplicationWillEnterForegroundNotification. When we write our viewWillAppear: method, we will subscribe to that notification and tell the notification center to call this method when that notification happens. Add this method to both BIDMainViewController.m and BIDFlipsideViewController.m:
- (void)applicationWillEnterForeground:(NSNotification *)notification {
    NSUserDefaults *defaults = [NSUserDefaults standardUserDefaults];
    [defaults synchronize];
    [self refreshFields];
}
The method itself is quite simple. First, it gets a reference to the standard user defaults object and calls its synchronize method, which forces the User Defaults system to save any unsaved changes and also reload any unmodified preferences from storage. In effect, we’re forcing it to reread the stored preferences so that we can pick up the changes that were made in the Settings app. Next, the applicationWillEnterForeground: method calls the refreshFields method, which each class uses to update its display.
Now we need to make each of our controllers subscribe to the notification we’re interested in by implementing the viewWillAppear: method in both BIDMainViewController.m and BIDFlipsideViewController.m. Here’s the code to add to both classes:
- (void)viewWillAppear:(BOOL)animated {
    [super viewWillAppear:animated];

    UIApplication *app = [UIApplication sharedApplication];
    [[NSNotificationCenter defaultCenter] addObserver:self
              selector:@selector(applicationWillEnterForeground:)
              name:UIApplicationWillEnterForegroundNotification
              object:app];
}
We start by getting a reference to our application instance, and then use that to subscribe to the UIApplicationWillEnterForegroundNotification, using the default NSNotificationCenter instance and a method called addObserver:selector:name:object:. We then pass the following to this method:
- For an observer, we pass self, which means that our controller class (each of them individually, since this code is going into both of them) is the object that needs to be notified.
- For selector, we pass a selector to the applicationWillEnterForeground: method we just wrote, telling the notification center to call that method when the notification is posted.
- The third parameter, UIApplicationWillEnterForegroundNotification, is the name of the notification that we’re interested in receiving.
- The final parameter, app, is the object from which we’re interested in getting the notification. If we passed nil for the final parameter, we would get notified any time any method posted the UIApplicationWillEnterForegroundNotification.
That takes care of updating the display, but we also need to consider what happens to the values that are put into the user defaults when the user manipulates the controls in our app. We need to make sure that they are saved to storage before control passes to another app. The easiest way to do that is to call synchronize as soon as the settings are changed, by adding one line to each of our new action methods in BIDFlipsideViewController.m:
- (IBAction)engineSwitchTapped {
    NSUserDefaults *defaults = [NSUserDefaults standardUserDefaults];
    [defaults setBool:self.engineSwitch.on forKey:kWarpDriveKey];
    [defaults synchronize];
}

- (IBAction)warpSliderTouched {
    NSUserDefaults *defaults = [NSUserDefaults standardUserDefaults];
    [defaults setFloat:self.warpFactorSlider.value forKey:kWarpFactorKey];
    [defaults synchronize];
}
Note Calling the synchronize method is a potentially expensive operation because the entire contents of the user defaults in memory must be compared with what’s in storage. When you’re dealing with a whole lot of user defaults at once and want to make sure everything is in sync, it’s best to try to minimize calls to synchronize, so that this whole comparison isn’t performed over and over again. However, calling it once in response to each user action, as we’re doing here, won’t cause any noticeable performance problems.
There’s one more thing to take care of to make this work as cleanly as possible. You already know that you must clean up your memory by setting properties to nil when they’re no longer in use, as well as performing other clean-up tasks. The notification system is another place where you need to clean up after yourself by telling the default NSNotificationCenter that you don’t want to listen to any more notifications. In our case, where we’ve registered each view controller to observe this notification in its viewWillAppear: method, we should unregister in the matching viewDidDisappear: method. So, in both BIDMainViewController.m and BIDFlipsideViewController.m, put the following line at the top of the viewDidDisappear: method:
- (void)viewDidDisappear:(BOOL)animated {
    [super viewDidDisappear:(BOOL)animated];
    [[NSNotificationCenter defaultCenter] removeObserver:self];
}
Note that it’s possible to unregister for specific notifications using the removeObserver:name:object: method by passing in the same values that were used to register your observer in the first place. In any case, the preceding line is a handy way to make sure that the notification center forgets about our observer completely, no matter how many notifications it was registered for.
With that in place, it’s time to build and run the app and see what happens when you switch between your app and the Settings app. Changes you make in the Settings app should now be immediately reflected in your app when you switch back to it.
Beam Me Up, Scotty
At this point, you should have a very solid grasp on both the Settings application and the User Defaults mechanism. You know how to add a settings bundle to your application and how to build a hierarchy of views for your application’s preferences. You also learned how to read and write preferences using NSUserDefaults, as well as how to let the user change preferences from within your application. You even got a chance to use a new project template in Xcode. There really shouldn’t be much in the way of application preferences that you are not equipped to handle now.
In the next chapter, we’re going to show you how to keep your application’s data around after your application quits. Ready? Let’s go!