
At the time of this writing, the iPhone is available in more than 90 different countries, and that number will continue to increase over time. You can now buy and use an iPhone on every continent except Antarctica. The iPad and iPod touch are also sold all over the world and are nearly as ubiquitous as the iPhone.
If you plan on releasing applications through the App Store, your potential market is considerably larger than just people in your own country who speak your own language. Fortunately, iOS has a robust localization architecture that lets you easily translate your application (or have it translated by others) into, not only multiple languages, but even into multiple dialects of the same language. Do you want to provide different terminology to English speakers in the United Kingdom than you do to English speakers in the United States? No problem.
That is, localization is no problem if you’ve written your code correctly. Retrofitting an existing application to support localization is much harder than writing your application that way from the start. In this chapter, we’ll show you how to write your code so it is easy to localize, and then we’ll go about localizing a sample application.
Localization Architecture
When a nonlocalized application is run, all of the application’s text will be presented in the developer’s own language, also known as the development base language.
When developers decide to localize their applications, they create a subdirectory in their application bundle for each supported language. Each language’s subdirectory contains a subset of the application’s resources that were translated into that language. Each subdirectory is called a localization project, or localization folder. Localization folder names always end with the .lproj extension.
In the iOS Settings application, the user has the ability to set the device’s preferred language and region format. For example, if the user’s language is English, available regions might be the United States, Australia, and Hong Kong—all regions in which English is spoken.
When a localized application needs to load a resource—such as an image, property list, or nib—the application checks the user’s language and region, and then looks for a localization folder that matches that setting. If it finds one, it will load the localized version of the resource instead of the base version.
For users who select French as their iOS language and France as their region, the application will look first for a localization folder named fr_FR.lproj. The first two letters of the folder name are the ISO country code that represents the French language. The two letters following the underscore are the ISO code that represents France.
If the application cannot find a match using the two-letter code, it will look for a match using the language’s three-letter ISO code. In our example, if the application is unable to find a folder named fr_FR.lproj, it will look for a localization folder named fre_FR or fra_FR.
All languages have at least one three-letter code. Some have two three-letter codes: one for the English spelling of the language and another for the native spelling. Some languages have only two-letter codes. When a language has both a two-letter code and a three-letter code, the two-letter code is preferred.
Note You can find a list of the current ISO country codes on the ISO web site (http://www.iso.org/iso/country_codes.htm). Both the two- and three-letter codes are part of the ISO 3166 standard.
If the application cannot find a folder that is an exact match, it will then look for a localization folder in the application bundle that matches just the language code without the region code. So, staying with our French-speaking person from France, the application next looks for a localization project called fr.lproj. If it doesn’t find a language project with that name, it will look for fre.lproj and then fra.lproj. If none of those is found, it checks for French.lproj. The last construct exists to support legacy Mac OS X applications; generally speaking, you should avoid it.
If the application doesn’t find a language project that matches either the language/region combination or just the language, it will use the resources from the development base language. If it does find an appropriate localization project, it will always look there first for any resources that it needs. If you load a UIImage using imageNamed:, for example, the application will look first for an image with the specified name in the localization project. If it finds one, it will use that image. If it doesn’t, it will fall back to the base language resource.
If an application has more than one localization project that matches—for example, a project called fr_FR.lproj and one called fr.lproj—it will look first in the more specific match, which is fr_FR.lproj in this case. If it doesn’t find the resource there, it will look in fr.lproj. This gives you the ability to provide resources common to all speakers of a language in one language project, localizing only those resources that are impacted by differences in dialect or geographic region.
You should choose to localize only those resources that are affected by language or country. For example, if an image in your application has no words and its meaning is universal, there’s no need to localize that image.
What do you do about string literals and string constants in your source code? Consider this source code from the previous chapter:
UIAlertView *alert = [[UIAlertView alloc]
    initWithTitle:@"Error accessing photo library"
          message:@"Device does not support a photo library"
         delegate:nil
cancelButtonTitle:@"Drat!"
otherButtonTitles:nil];
[alert show];
If you’ve gone through the effort of localizing your application for a particular audience, you certainly don’t want to be presenting alerts written in the development base language. The answer is to store these strings in special text files called strings files.
What’s in a Strings File?
Strings files are nothing more than Unicode text files that contain a list of string pairs, each identified by a comment. Here is an example of what a strings file might look like in your application:
/* Used to ask the user his/her first name */
"LABEL_FIRST_NAME" = "First Name";

/* Used to get the user's last name */
"LABEL_LAST_NAME" = "Last Name";

/* Used to ask the user's birth date */
"LABEL_BIRTHDAY" = "Birthday";
The values between the /* and the */ characters are just comments for the translator. They are not used in the application, and you could skip adding them, though they’re a good idea. The comments give context, showing how a particular string is being used in the application.
You’ll notice that each line lists the same string twice. The string on the left side of the equal sign acts as a key, and it will always contain the same value, regardless of language. The value on the right side of the equal sign is the one that is translated to the local language. So, the preceding strings file, localized into French, might look like this:
/* Used to ask the user his/her first name */
"LABEL_FIRST_NAME " = "Prénom";

/* Used to get the user's last name */
"LABEL_LAST_NAME" = "Nom de famille";

/* Used to ask the user's birth date */
"LABEL_BIRTHDAY" = "Anniversaire";
The Localized String Macro
You won’t actually create the strings file by hand. Instead, you’ll embed each localizable text string in a special macro in your code. Once your source code is final and ready for localization, you’ll run a command-line program named genstrings. This program will search all your code files for occurrences of the macro, pulling out all the unique strings and embedding them in a localizable strings file.
Let’s see how the macro works. First, here’s a traditional string declaration:
NSString *myString = @"First Name";
To make this string localizable, do this instead:
NSString *myString = NSLocalizedString(@"LABEL_FIRST_NAME",
    @"Used to ask the user his/her first name");
The NSLocalizedString macro takes two parameters:
- The first parameter is the string value in the base language. If there is no localization, the application will use this string.
- The second parameter is used as a comment in the strings file.
NSLocalizedString looks in the application bundle inside the appropriate localization project for a strings file named localizable.strings. If it does not find the file, it returns its first parameter, and the string will appear in the development base language. Strings are typically displayed only in the base language during development, since the application will not yet be localized.
If NSLocalizedString finds the strings file, it searches the file for a line that matches the first parameter. In the preceding example, NSLocalizedString will search the strings file for the string "LABEL_FIRST_NAME". If it doesn’t find a match in the localization project that matches the user’s language settings, it will then look for a strings file in the base language and use the value there. If there is no strings file, it will just use the first parameter you passed to the NSLocalizedString macro.
You could use the base language text as the key for the NSLocalizedString macro because it returns the first key argument if no matching localized text can be found. This would make the preceding example look like this:
NSString *myString = NSLocalizedString(@"First Name",
    @"Used to ask the user his/her first name");
However, this approach is not recommended for two reasons. First, it is unlikely that you will come up with the perfect text for your app on your first try. Going back and changing all keys in the strings files is cumbersome and error-prone, which means that you will most likely end up with keys that do not match what is used in the app, anyway. The second reason is that, by clearly using uppercase keys, you can immediately notice if you have forgotten to localize any text when you run the app just by looking at it.
Now that you have an idea of how the localization architecture and the strings file work, let’s take a look at localization in action.
Real-World iOS: Localizing Your Application
We’re going to create a small application that displays the user’s current locale. A locale (an instance of NSLocale) represents both the user’s language and region. It is used by the system to determine which language to use when interacting with the user, as well as how to display dates, currency, and time information, among other things. After we create the application, we will then localize it into other languages. You’ll learn how to localize storyboard files, strings files, images, and even your application’s display name.
You can see what our application is going to look like in Figure 22-1. The name across the top comes from the user’s locale. The ordinals down the left side of the view are static labels, and their values will be set by localizing the storyboard file. The words down the right side, and the flag image at the bottom of the screen, will all chosen in our app’s code at runtime based on the user’s locale.
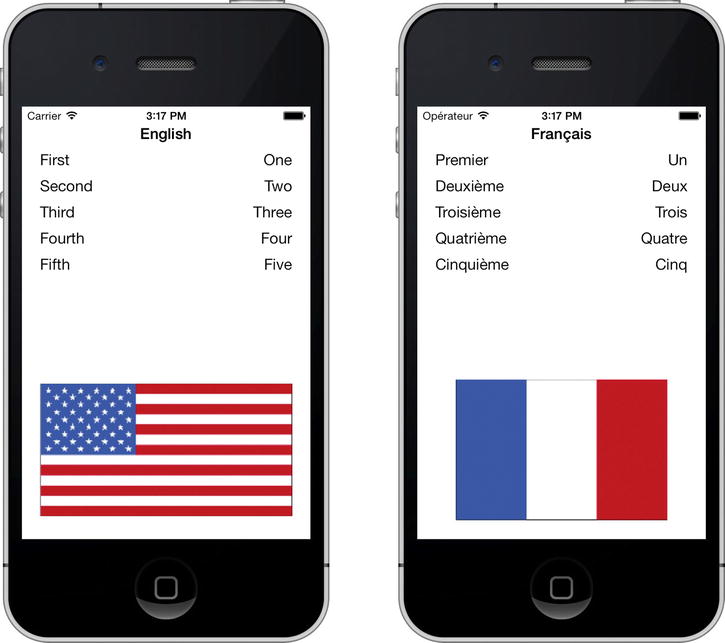
Figure 22-1. The LocalizeMe application shown with two different language/region settings
Let’s hop right into it.
Setting Up LocalizeMe
Create a new project in Xcode using the Single View Application template and call it LocalizeMe.
If you look in the source code archive (in the 22 - LocalizeMe folder), you’ll see a folder named Images. Inside that folder, you’ll find a pair of images, one named flag_usa.png and one named flag_france.png. In Xcode, select the Images.xcassets item, and then drag both flag_usa.png and flag_france.png into it.
Now let’s add some label outlets to the project’s view controller. We need to create one outlet for the blue label across the top of the view, another for the image view that will show a flag, and an outlet collection for all the words down the right-hand side (see Figure 22-1). Select BIDViewController.m and make the following changes:
#import "BIDViewController.h"

@interface BIDViewController ()

@property (weak, nonatomic) IBOutlet UILabel *localeLabel;
@property (weak, nonatomic) IBOutlet UIImageView *flagImageView;
@property (strong, nonatomic) IBOutletCollection(UILabel) NSArray *labels;

@end
Now select Main.storyboard to edit the GUI in Interface Builder. Drag a Label from the library, dropping it at the top of the view, aligned with the top blue guideline. Resize the label so that it takes the entire width of the view, from blue guideline to blue guideline. With the label selected, open the attributes inspector. Look for the Font control and click the small T icon it contains to bring up a small font-selection popup. Click System Bold to let this title label stand out a bit from the rest. Next, use the attributes inspector to set the text alignment to centered and to set the text color to a bright blue. You can also use the font selector to make the font size larger if you wish. As long as Autoshrinkis selected in the object attributes inspector, the text will be resized if it gets too long to fit.
With your label in place, control-drag from the View Controller icon to this new label, and then select the localeLabel outlet.
Next, drag five more Labelsfrom the library and put them against the left margin using the blue guideline, one above the other (again, see Figure 22-1). Resize the labels so they go about halfway across the view, or a little less. Double-click the top one and change its text from Label to First. Repeat this procedure with the other four labels, changing the text to the words Second, Third, Fourth, and Fifth.
Drag five more Labels from the library, this time placing them against the right margin. Change the text alignment using the object attributes inspector so that they are right-aligned, and then increase the width of the labels so that they stretch from the right blue guideline to about the middle of the view. Control-drag from View Controller to each of the five new labels, connecting each one to the labels outlet collection, and making sure to connect them in the right order from top to bottom. Now, double-click each one of the new labels and delete its text. We will be setting these values programmatically.
Finally, drag an Image View from the library over to the bottom part of the view, so it touches the bottom and left blue guidelines. In the attributes inspector, select flag_usa for the view’s Image attribute and resize the image to stretch from blue guideline to blue guideline. In the attributes inspector, change the Mode attribute from its current value to Aspect Fit. Not all flags have the same aspect ratio, and we want to make sure the localized versions of the image look right. Selecting this option will cause the image view to resize any other images put in this image view so they fit, but it will also maintain the correct aspect ratio (ratio of height to width). Next, make the flag bigger until it hits the right-side blue guideline. Finally, control-drag from the view controller to this image view and select the flagImageView outlet.
Save your storyboard, and then switch to BIDViewController.m and add the following code to the viewDidLoad method:
- (void)viewDidLoad
{
    [super viewDidLoad];
    // Do any additional setup after loading the view, typically from a nib.
    NSLocale *locale = [NSLocale currentLocale];
    NSString *currentLangID = [[NSLocale preferredLanguages] objectAtIndex:0];
    NSString *displayLang = [locale displayNameForKey:NSLocaleLanguageCode
                                                value:currentLangID];
    NSString *capitalized = [displayLang capitalizedStringWithLocale:locale];
    self.localeLabel.text = capitalized;
    [self.labels[0] setText:NSLocalizedString(@"LABEL_ONE", @"The number 1")];
    [self.labels[1] setText:NSLocalizedString(@"LABEL_TWO", @"The number 2")];
    [self.labels[2] setText:NSLocalizedString(@"LABEL_THREE",
                                              @"The number 3")];
    [self.labels[3] setText:NSLocalizedString(@"LABEL_FOUR", @"The number 4")];
    [self.labels[4] setText:NSLocalizedString(@"LABEL_FIVE", @"The number 5")];

    NSString *flagFile = NSLocalizedString(@"FLAG_FILE", @"Name of the flag");
    self.flagImageView.image = [UIImage imageNamed:flagFile];
}
The first thing we do in this code is get an NSLocale instance that represents the user’s current locale. This instance can tell us both the user’s language and region preferences, as set in the iPhone’s Settings application:
NSLocale *locale = [NSLocale currentLocale];
Next, we grab the user’s preferred language. This gives us a two-character code, such as “en” or “fr”:
NSString *currentLangID = [[NSLocale preferredLanguages] objectAtIndex:0];
The next line of code might need a bit of explanation. NSLocale works somewhat like a dictionary. It can give you a whole bunch of information about the current user’s preferences, including the name of the currency and the expected date format. You can find a complete list of the information that you can retrieve in the NSLocale API reference.
In this next line of code, we’re using a method called displayNameForKey:value: to retrieve the actual name of the chosen language, translated into the language of the current locale itself. The purpose of this method is to return the value of the item we’ve requested in a specific language.
The display name for the French language, for example, is français in French, but French in English. This method gives you the ability to retrieve data about any locale, so that it can be displayed appropriately for all users. In this case, we want the display name of the user’s preferred language in the language currently being used, which is why we pass currentLangID as the second argument. This string is a two-letter language code, similar to the one we used earlier to create our language projects. For an English speaker, it would be en; and for a French speaker, it would be fr:
NSString *displayLang = [locale displayNameForKey:NSLocaleLanguageCode
                                            value:currentLangID];
The name we get back from this is going to be something like “English” or “français”—and it will only capitalized if language names are always capitalized in the user’s preferred language. That’s the case in English, but not so in French. We want the name capitalized for displaying as a title, however. Fortunately, NSString has methods for capitalizing strings, including one that will capitalize a string according to the rules of a given locale! Let’s use that to turn “français” into “Français”:
NSString *capitalized = [displayLang capitalizedStringWithLocale:locale];
Once we have the display name, we use it to set the top label in the view:
self.localeLabel.text = capitalized;
Next, we set the five other labels to the numbers 1 through 5, spelled out in our development base language. We also provide a comment indicating what each word is. You can just pass an empty string if the words are obvious, as they are here; however, any string you pass in the second argument will be turned into a comment in the strings file, so you can use this comment to communicate with the person doing your translations:
[self.labels[0] setText:NSLocalizedString(@"LABEL_ONE", @"The number 1")];
[self.labels[1] setText:NSLocalizedString(@"LABEL_TWO", @"The number 2")];
[self.labels[2] setText:NSLocalizedString(@"LABEL_THREE",
                                          @"The number 3")];
[self.labels[3] setText:NSLocalizedString(@"LABEL_FOUR", @"The number 4")];
[self.labels[4] setText:NSLocalizedString(@"LABEL_FIVE", @"The number 5")];
Finally, we do another string lookup to find the name of the flag image to use and populate our image view with the named image:
NSString *flagFile = NSLocalizedString(@"FLAG_FILE", @"Name of the flag");
self.flagImageView.image = [UIImage imageNamed:flagFile];
Let’s run our application now.
Trying Out LocalizeMe
You can use either the simulator or a device to test LocalizeMe. The simulator does seem to cache some language and region settings, so you may want to run the application on the device if you have that option. Once the application launches, it should look like Figure 22-2.

Figure 22-2. The language running under the authors’ base language. Our application is set up for localization, but it is not yet localized
By using the NSLocalizedString macros instead of static strings, we are ready for localization. However, we are not localized yet, as is glaringly obvious from the uppercase labels in the right column and the lack of a flag image at the bottom. If you use the Settings application on the simulator or on your iPhone to change to another language or region, the results look essentially the same, except for the label at the top of the view (see Figure 22-3).
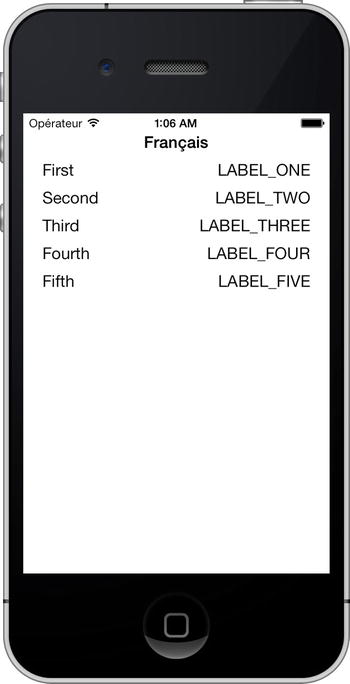
Figure 22-3. The nonlocalized application running on an iPhone and set to use the French language
Localizing the Project
Now let’s localize the project. In Xcode’s project navigator, single-click LocalizeMe, click the LocalizeMe project (not one of the targets) in the editing area, and then select the Info tab for the project.
Look for the Localizations section in the Info tab. You’ll see that it shows two localizations: Base and English. When creating a new project, Xcode creates an unspecified default localization called Base, along with a specific localization for the developer’s language. We want to add French, so click the plus (+) button at the bottom of the Localizations section and select French (fr) from the popup list that appears (see Figure 22-4).
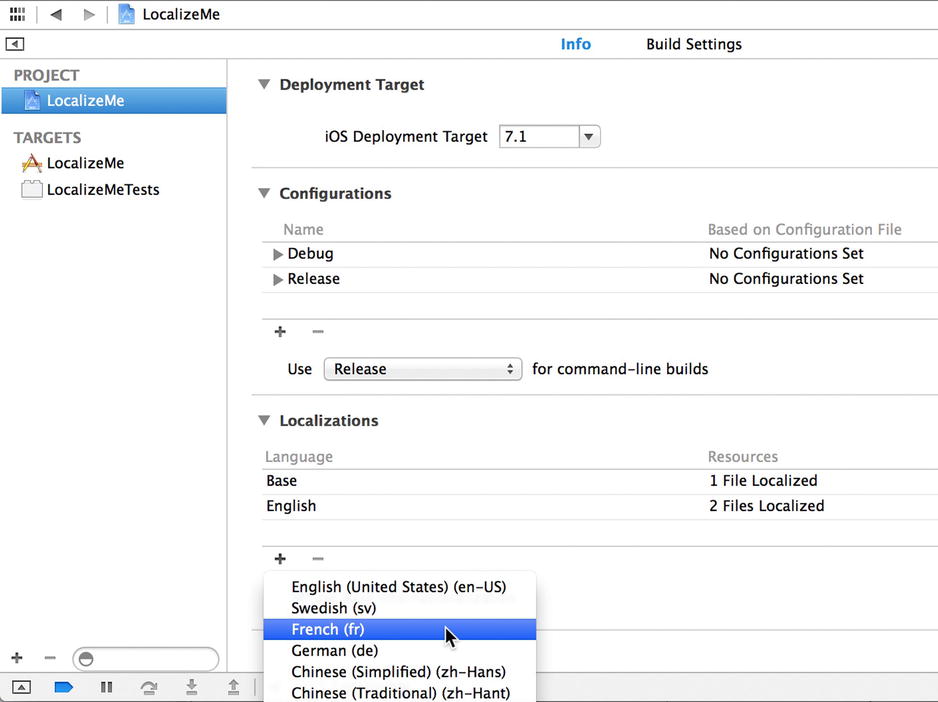
Figure 22-4. The project info settings showing localizations and other information
Next, you will be asked to choose all existing localizable files that you want to localize and what base language you want the new French localization to start from (see Figure 22-5). Right now, each of these popup buttons lets us choose only what it’s already showing (either Base or English), so just leave all files checked and select Finish.
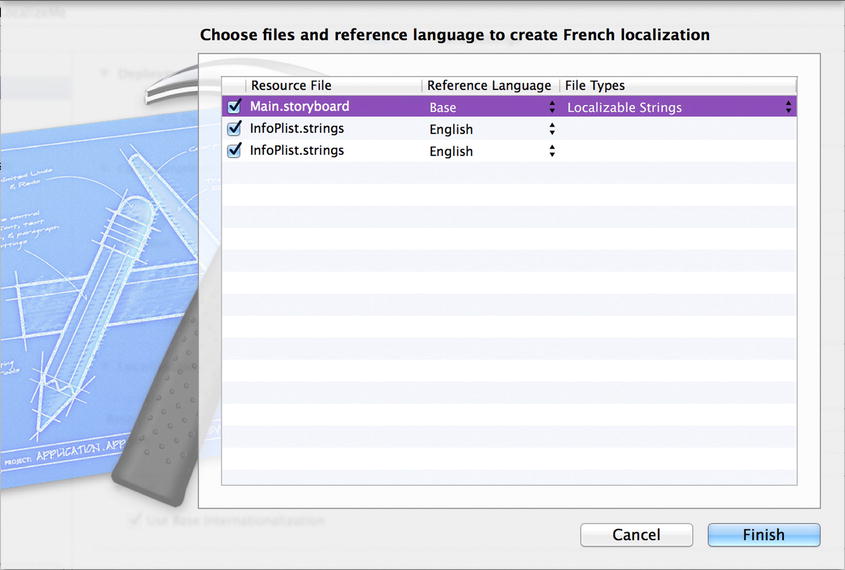
Figure 22-5. Choosing the files for localization
After adding a localization, take a look at the project navigator. Notice that the Main.storyboard file now has a disclosure triangle next to it, as if it were a group or folder. Expand it and take a look (see Figure 22-6).
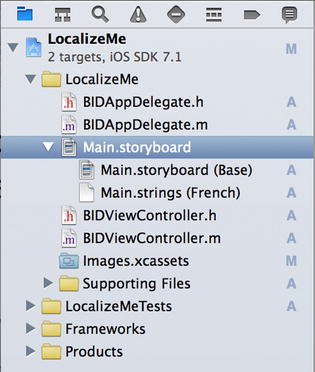
Figure 22-6. Localizable files have a disclosure triangle and a child value for each language or region you add
In our project, Main.storyboard is now shown as a group containing two children. The first is called Main.Storyboard and tagged as Base; the second is called Main.strings and tagged as French. The Base version was created automatically when you created the project, and it represents your development base language.
Each of these files lives in a separate folder, one called Base.lproj and one called fr.lproj. Go to the Finder and open the LocalizeMe folder within your LocalizeMe project folder. In addition to all your project files, you should see folders named Base.lproj and fr.lproj; for that matter, you should see one named en.lproj, as well (see Figure 22-7).
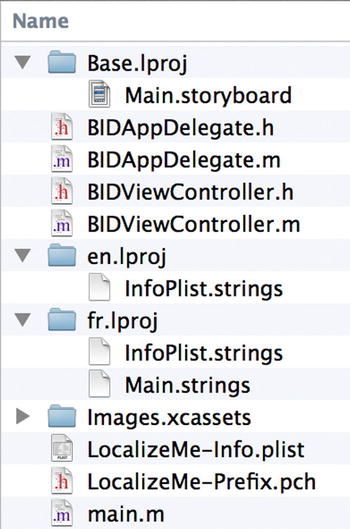
Figure 22-7. From the outset, our Xcode project included an unspecified Base language project folder (Base.lproj), as well as a specific one for our current language (in this case, en.lproj). When we chose to make a file localizable, Xcode created a language project folder (fr.lproj) for the language we selected, as well
Note that the Base.lproj folder was there all along, with its copy of Main.storyboard inside it. The en.lproj folder was also there all the while, holding onto an empty strings file. When Xcode finds a resource that has exactly one localized version, it displays it as a single item. As soon as a file has two or more localized versions, Xcode displays them as a group.
Tip When dealing with locales, language codes are lowercase, but country codes are uppercase. So, the correct name for the French language project is fr.lproj, but the project for Parisian French (French as spoken by people in France) is fr_FR.lproj, not fr_fr.lproj or FR_fr.lproj. The iOS file system is case-sensitive, so it is important to match the case correctly.
When you asked Xcode to create the French localization, Xcode created a new localization project in your project folder called fr.lproj and placed two strings files in it. One is a direct copy of InfoPlist.strings from the en.lproj folder, and the other is a new strings file that contains values extracted from Base.lproj/Main.storyboard. Instead of duplicating the entire storyboard file, Xcode just extracts every text string from the storyboard and creates a strings file ready for localization. When the app is compiled and runs later, the values in the strings file are pulled in to replace the values in the storyboard.
Localizing the Storyboard
In Xcode’s project navigator, Main.storyboard should now have two children: Main.storyboard (Base) and Main.strings (French). And if you expand the Supporting Files group, you will see a similar arrangement for the InfoPlist.strings file. Select Main.strings (French) to open the strings file, the values of which will be injected into the storyboard shown to French speakers. You’ll see something like the following text:
/* Class = "IBUILabel"; text = "Second"; ObjectID = "Agv-gm-Tho"; */
"Agv-gm-Tho.text" = "Second";

/* Class = "IBUILabel"; text = "Fourth"; ObjectID = "HiM-7A-rO8"; */
"HiM-7A-rO8.text" = "Fourth";

/* Class = "IBUILabel"; text = "Label"; ObjectID = "JHX-Zt-53a"; */
"JHX-Zt-53a.text" = "Label";

/* Class = "IBUILabel"; text = "Label"; ObjectID = "KVR-sO-2C5"; */
"KVR-sO-2C5.text" = "Label";
.
.
.
Each of these line-pairs represents a string that was found in the storyboard. The comment tells you the class of the object that contained the string, the original string itself, and a unique ObjectID for each object. The line after the comment is where you actually want to change the value on the right-hand side. You’ll see that some of these contain ordinals such as First; those are the labels on the left, all of which were given names in the storyboard. Others contain just the word Label, and these correspond to those labels on the right that kept their default title value. Locate each label text that contains any of the ordinal numbers First, Second, Third, Fourth, and Fifth; and then change the string to the right of the equal sign to Premier, Deuxième, Troisième, Quatrième, and Cinquième, respectively. Finally, save the file.
Your storyboard is now localized in French. Compile and run the program. If you’re already changed your Settings to the French language, you should see your translated labels on the left. Otherwise, go into the Settings app, switch to French, and then launch the app from Xcode again. For those folks who are a bit unsure about how to make those changes, we’ll walk you through it.
In the simulator, go to the Settings application, select the General row, and then select the row labeled International. From here, you’ll be able to change your language and region preferences (see Figure 22-8).

Figure 22-8. Changing the language and region—the two settings that affect the user’s locale
You want to change the Region Format first because, once you change the language, iOS will reset and return to the home screen. Change the Region Format from United States to France (first select French, and then select France from the new table that appears), and then change Language from English to Français. Press the Done button, and the simulator will reset its language. Now your phone is set to use French.
Run your app again. This time, the words down the left-hand side should show up in French (see Figure 22-9). Unfortunately, the flag and right column of text are still wrong. We’ll take care of those in the next section.
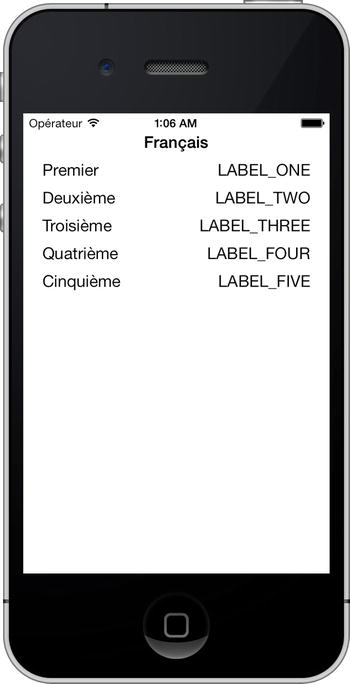
Figure 22-9. The application is partially translated into French now
Generating and Localizing a Strings File
In Figure 22-9, notice that the words on the right side of the view are still in SHOUT_ALL_CAPS style. In order to translate those, we need to generate our base language strings file and then localize that. To accomplish this, we’ll need to leave the comfy confines of Xcode for a few minutes.
Launch Terminal.app, which is in /Applications/Utilities/. When the terminal window opens, type cd and follow it with a space. Don’t press Return.
Now go to the Finder and drag the folder where you’ve saved your LocalizeMe project to the terminal window. As soon as you drop the folder onto the terminal window, the path to the project folder should appear on the command line. Now press Return. The cd command is Unix-speak for “change directory,” so what you’ve just done is steer your terminal session from its default directory over to your project directory.
Our next step is to run the program genstringsand tell it to find all the occurrences of NSLocalizedString in your .m files in the LocalizeMe folder. To do this, type the following command and press Return:
genstrings ./LocalizeMe/*.m
When the command is finished executing (it just takes a fraction of a second on a project this small), you’ll be returned to the command line. In the Finder, look in the project folder for a new file called Localizable.strings. Drag that to the LocalizeMe folder in Xcode’s project navigator; however, when it prompts you, don’t click the Add button just yet. Instead, uncheck the box that says Copy items into destination group’s folder (if needed) because the file is already in your project folder. Click Finish to import the file.
Caution You can rerun genstrings at any time to re-create your base language file; however, once you have localized your strings file into another language, it’s important that you avoid changing the text used in any of the NSLocalizedString() macros. That base-language version of the string is used as a key to retrieve the translations; if you change that text, the translated version will no longer be found, and you will need to either update the localized strings file or have it retranslated.
Once the file is imported, single-click Localizable.strings and take a look at it. It contains six entries because we use NSLocalizableString six times with five distinct values. The values that we passed in as the second argument have become the comments for each of the strings.
The strings were generated in alphabetical order. In this case, since we’re dealing with numbers, alphabetical order is not the most intuitive way to present them. In most cases, however, having them in alphabetical order will be helpful:
/* Name of the flag */
"FLAG_FILE" = "FLAG_FILE";

/* The number 5 */
"LABEL_FIVE" = "LABEL_FIVE";

/* The number 4 */
"LABEL_FOUR" = "LABEL_FOUR";

/* The number 1 */
"LABEL_ONE" = "LABEL_ONE";

/* The number 3 */
"LABEL_THREE" = "LABEL_THREE";

/* The number 2 */
"LABEL_TWO" = "LABEL_TWO";
Let’s localize this sucker.
Make sure Localizable.strings is selected, and then repeat the same steps we’ve performed for the other localizations:
- Open the file inspector if it’s not already visible.
- In the Localizations section, click the Localize… button, which brings up a small panel where you can select the original localization to move the existing file to. You should leave this set to Base, then click the Localize button on the panel.
- Back in the file inspector’s Localization section, check the French and English items to make localizations for each of those languages.
Due to a bug in Xcode, you may find that you cant execute those steps exactly as described. It seems that, after the second step, Xcode loses track of the selected file, and you’ll have to click Localizable.strings again in the project navigator. No biggie!
Back in the project navigator, click the disclosure triangle next to Localizable.strings and select the English localization of the file. In the editor, make the following changes:
/* Name of the flag */
"FLAG_FILE" = "flag_usa";

/* The number 5 */
"LABEL_FIVE" = "Five";

/* The number 4 */
"LABEL_FOUR" = "Four";

/* The number 1 */
"LABEL_ONE" = "One";

/* The number 3 */
"LABEL_THREE" = "Three";

/* The number 2 */
"LABEL_TWO" = "Two";
Next, select the French localization of the file. In the editor, make the following changes:
/* Name of the flag */
"FLAG_FILE" = "flag_france";

/* The number 5 */
"LABEL_FIVE" = "Cinq";

/* The number 4 */
"LABEL_FOUR" = "Quatre";

/* The number 1 */
"LABEL_ONE" = "Un";

/* The number 3 */
"LABEL_THREE" = "Trois";

/* The number 2 */
"LABEL_TWO" = "Deux";
In real life (unless you’re multilingual), you would ordinarily send this file out to a translation service to translate the values to the right of the equal signs. In this simple example, armed with knowledge that came from years of watching Sesame Street, we can do the translation ourselves.
Now save, compile, and run the app. You should see the labels on the right-hand side translated into French (see Figure 22-10); and at the bottom of the screen, you should now see the French flag.
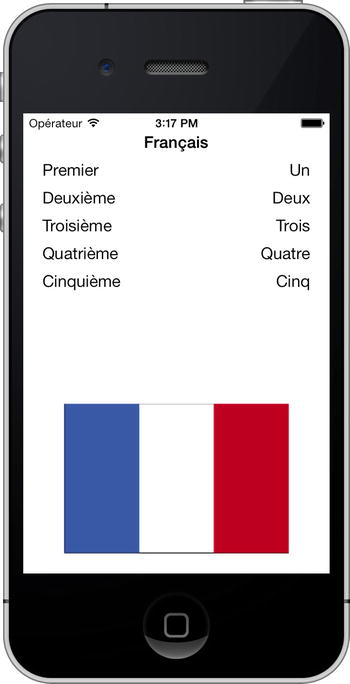
Figure 22-10. At long last, the fully localized app
Use the Settings app to switch back to English and rerun the app, and you’ll now see the English text everywhere and the U.S. flag at the bottom.
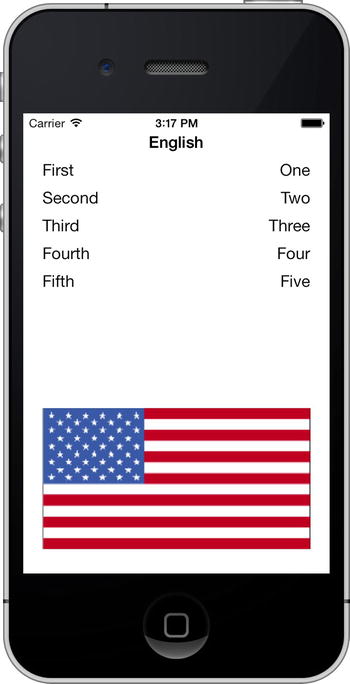
Figure 22-11. And back to the English translation, now equipped with a flag
Localizing the App Display Name
We want to show you one final piece of localization that is commonly used: localizing the app name that’s visible on the home screen and elsewhere. Apple does this for several of the built-in apps, and you might want to do so, as well.
The app name used for display is stored in your app’s Info.plist file, which, in our case, is actually named LocalizeMe-Info.plist. You’ll find it in the Supporting Files folder. Select this file for editing, and you’ll see that one of the items it contains, Bundle display name, is currently set to ${PRODUCT_NAME}.
In the syntax used by Info.plist files, anything starting with a dollar sign is subject to variable substitution. In this case, it means that when Xcode compiles the app, the value of this item will be replaced with the name of the product in this Xcode project, which is the name of the app itself. This is where we want to do some localization, replacing ${PRODUCT_NAME} with the localized name for each language. However, as it turns out, this doesn’t quite work out as simply as you might expect.
The Info.plist file is sort of a special case, and it isn’t meant to be localized. Instead, if you want to localize the content of Info.plist, you need to make localized versions of a file named InfoPlist.strings. Fortunately, that file is already included in every project Xcode creates.
Look in the Supporting Files folder and find the InfoPlist.strings file. Use the file inspector’s Localizations section to create a French localization using the same steps you did for the previous localizations (it starts off with an English version located in the en.lproj folder).
Now we want to add a line to define the display name for the app. In the LocalizeMe-Info.plist file, we were shown the display name associated with a dictionary key called Bundle display name; however, that’s not the real key name! It’s merely an Xcode nicety, trying to give us a more friendly and readable name. The real name is CFBundleDisplayName, which you can verify by selecting LocalizeMe-Info.plist, right-clicking anywhere in the view, and then selecting Show Raw Keys/Values. This shows you the true names of the keys in use.
So, select the English localization of InfoPlist.strings and add the following line:
CFBundleDisplayName = "Localize Me";
Now select the French localization of the InfoPlist.strings file. Edit the file to give the app a proper French name:
CFBundleDisplayName = "Localisez Moi";
Build and run the app, and then press the Home button to get back to the launch screen. And of course, switch the device or simulator you’re using to French if it’s currently running in English. You should see the localized name just underneath the app’s icon, but sometimes it may not appear immediately. iOS seems to cache this information when a new app is added, but it doesn’t necessarily change it when an existing app is replaced by a new version—at least not when Xcode is doing the replacing. So, if you’re running in French and you don’t see the new name—don’t worry. Just delete the app from the launch screen, go back to Xcode, and then build and run the app again.
Now our application is fully localized for the French language.
Auf Wiedersehen
If you want to maximize sales of your iOS application, you’ll probably want to localize it as much as possible. Fortunately, the iOS localization architecture makes easy work of supporting multiple languages, and even multiple dialects of the same language, within your application. As you saw in this chapter, nearly any type of file that you add to your application can be localized.
Even if you don’t plan on localizing your application, you should get in the habit of using NSLocalizedString instead of just using static strings in your code. With Xcode’s Code Sense feature, the difference in typing time is negligible. And, should you ever want to translate your application, your life will be much, much easier. Going back late in the project to find all text strings that should be localized is a boring and error-prone process, which you can avoid with a little effort in advance.
And on that note, we have now reached the end of our travels together, so it’s time for us to say sayonara, au revoir, auf wiedersehen, avtío, arrivederci, hej då, and adiós.
The programming language and frameworks we’ve worked within this book are the end result of more than 25 years of evolution. And Apple engineers are feverishly working round the clock, thinking of that next, cool, new thing. The iOS platform has just begun to blossom. There is so much more to come.
By making it through this book, you’ve built yourself a sturdy foundation. You have a solid knowledge of Objective-C, Cocoa Touch, and the tools that bring these technologies together to create incredible new iPhone, iPod touch, and iPad applications. You understand the iOS software architecture—the design patterns that make Cocoa Touch sing. In short, you’re ready to chart your own course. We are so proud!
We sure are glad you came along on this journey with us. We wish you the best of luck and hope that you enjoy programming iOS as much as we do.