
The Camera and Photo Library
By now, it should come as no surprise to you that the iPhone, iPad, and iPod touch have a built-in camera and a nifty application called Photos to help you manage all those awesome pictures and videos you’ve taken. What you may not know is that your programs can use the built-in camera to take pictures. Your applications can also allow the user to select from among the media already stored on the device. We’ll look at both of these abilities in this chapter.
Using the Image Picker and UIImagePickerController
Because of the way iOS applications are sandboxed, applications ordinarily can’t get to photographs or other data that live outside their own sandboxes. Fortunately, both the camera and the media library are made available to your application by way of an image picker.
As the name implies, an image picker is a mechanism that lets you select an image from a specified source. When this class first appeared in iOS, it was used only for images. Nowadays, you can use it to capture video as well.
Typically, an image picker will use a list of images and/or videos as its source (see the left side of Figure 21-1). You can, however, specify that the picker use the camera as its source (see the right side of Figure 21-1).
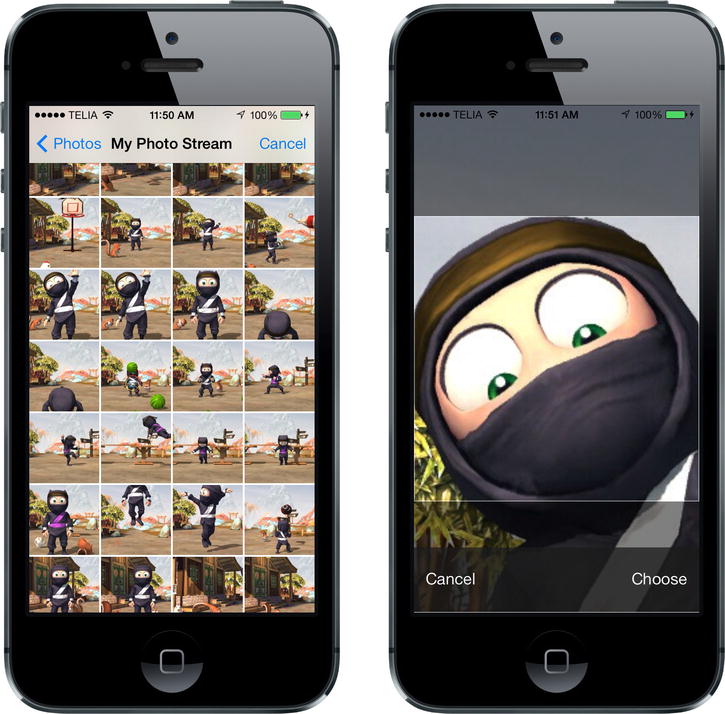
Figure 21-1. An image picker in action. Users are presented with a list of images (left). Once an image is selected, it can be moved and scaled (right). And, yeah, sometimes my camera roll is just pictures of Clumsy Ninja. I blame my children for this
The image picker interface is implemented by way of a modal controller class called UIImagePickerController. You create an instance of this class, specify a delegate (as if you didn’t see that coming), specify its image source and whether you want the user to pick an image or a video, and then launch it modally. The image picker will take control of the device to let the user select a picture or video from the existing media library. Or, the user can take a new picture or video with the camera. Once the user makes a selection, you can give the user an opportunity to do some basic editing, such as scaling or cropping an image or trimming away a bit of a video clip. All of that behavior is implemented by the UIImagePickerController, so you really don’t need to do much heavy lifting here.
Assuming the user doesn’t press cancel, the image or video that the user either captures or selects from the library will be delivered to your delegate. Regardless of whether the user selects a media file or cancels, your delegate is responsible for dismissing the UIImagePickerController so that the user can return to your application.
Creating a UIImagePickerController is extremely straightforward. You just allocate and initialize an instance the way you would with most classes. There is one catch, however: not every iOS device has a camera. Older iPod touches were the first examples of this, and the first-generation iPad is the latest. However, more such devices may roll off Apple’s assembly lines in the future. Before you create an instance of UIImagePickerController, you need to check to see whether the device your program is currently running on supports the image source you want to use. For example, before letting the user take a picture with the camera, you should make sure the program is running on a device that has a camera. You can check that by using a class method on UIImagePickerController, like this:
    if ([UIImagePickerController isSourceTypeAvailable:
         UIImagePickerControllerSourceTypeCamera]) {
In this example, we’re passing UIImagePickerControllerSourceTypeCamera to indicate that we want to let the user take a picture or shoot a video using the built-in camera. The method isSourceTypeAvailable:returns YES if the specified source is currently available. We can specify two other values in addition to UIImagePickerControllerSourceTypeCamera:
- UIImagePickerControllerSourceTypePhotoLibrary specifies that the user should pick an image or video from the existing media library. That image will be returned to your delegate.
- UIImagePickerControllerSourceTypeSavedPhotosAlbum specifies that the user will select the image from the library of existing photographs, but that the selection will be limited to the camera roll. This option will run on a device without a camera, where it is less useful but still allows you to select any screenshots you have taken.
After making sure that the device your program is running on supports the image source you want to use, launching the image picker is relatively easy:
    UIImagePickerController *picker = [[UIImagePickerController alloc] init];
    picker.delegate = self;
    picker.sourceType = UIImagePickerControllerSourceTypeCamera;
    [self presentViewController:picker animated:YES completion:nil];
After we have created and configured the UIImagePickerController, we use a method that our class inherited from UIView called presentViewController:animated:completion: to present the image picker to the user.
Tip The presentViewController:animated:completion: method is not limited to just presenting image pickers. You can present any view controller to the user, modally, by calling this method on the view controller for a currently visible view.
Implementing the Image Picker Controller Delegate
To find out when the user has finished using the image picker, you need to implement the UIImagePickerControllerDelegate protocol. This protocol defines two methods: imagePickerController:didFinishPickingMediaWithInfo: and imagePickerControllerDidCancel:.
The imagePickerController:didFinishPickingMediaWithInfo: method is called when the user has successfully captured a photo or video, or selected an item from the media library. The first argument is a pointer to the UIImagePickerController that you created earlier. The second argument is an NSDictionary instance that will contain the chosen photo or the URL of the chosen video, as well as optional editing information if you enabled editing in the image picker controller (and if and the user actually did some editing). That dictionary will also contain the original, unedited image stored under the key UIImagePickerControllerOriginalImage. Here’s an example of a delegate method that retrieves the original image:
- (void)imagePickerController:(UIImagePickerController *)picker
didFinishPickingMediaWithInfo:(NSDictionary *)info
{
    UIImage *selectedImage = info[UIImagePickerControllerEditedImage];
    UIImage *originalImage = info[UIImagePickerControllerOriginalImage];

    // do something with selectedImage and originalImage

    [picker dismissViewControllerAnimated:YES completion:nil];
}
The editingInfo dictionary will also tell you which portion of the entire image was chosen during editing by way of an NSValue object stored under the key UIImagePickerControllerCropRect. You can convert this NSValue instance into a CGRect, like so:
   NSValue *cropValue = info[UIImagePickerControllerCropRect];
   CGRect cropRect = [cropValue CGRectValue];
After this conversion, cropRect will specify the portion of the original image that was selected during the editing process. If you do not need this information, you can just ignore it.
Caution If the image returned to your delegate comes from the camera, that image will not be stored in the photo library automatically. It is your application’s responsibility to save the image, if necessary.
The other delegate method, imagePickerControllerDidCancel:, is called if the user decides to cancel the process without capturing or selecting any media. When the image picker calls this delegate method, it’s just notifying you that the user is finished with the picker and didn’t choose anything.
Both of the methods in the UIImagePickerControllerDelegate protocol are marked as optional, but they really aren’t, and here is why: modal views like the image picker must be told to dismiss themselves. As a result, even if you don’t need to take any application-specific actions when the user cancels an image picker, you still need to dismiss the picker. At a bare minimum, your imagePickerControllerDidCancel: method will need to look like this for your program to function correctly:
- (void)imagePickerControllerDidCancel:(UIImagePickerController *)picker
{
    [picker dismissViewControllerAnimated:YES completion:NULL];
}
Road Testing the Camera and Library
In this chapter, we’re going to build an application that lets the user take a picture or shoot some video with the camera. Or, the user can select something from the photo library, and then display the selection on the screen (see Figure 21-2). If the user is on a device without a camera, we will hide the New Photo or Video button and allow only selection from the photo library.
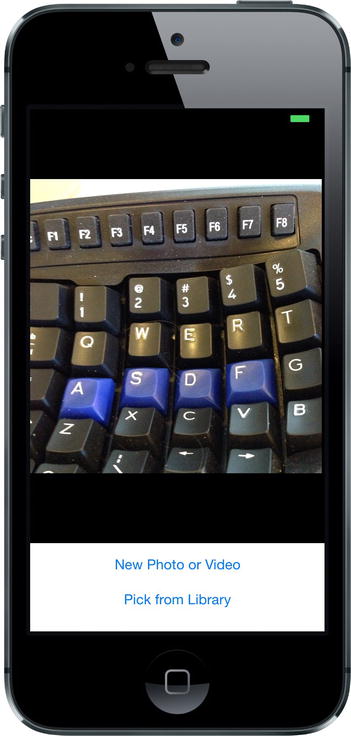
Figure 21-2. The Camera application in action
Create a new project in Xcode using the Single View Application template, naming the application Camera. The first order of business is to add a couple of outlets to this application’s view controller. We need one to point to the image view, so that we can update it with the image returned from the image picker. We’ll also need an outlet to point to the New Photo or Video button, so we can hide the button if the device doesn’t have a camera.
We also need two action methods: one for the New Photo or Video button and one that lets the user select an existing picture from the photo library.
Expand the Camera folder so that you can get to all the relevant files. Select BIDViewController.m and add the following protocol conformance declarations and properties to the class extension:
#import "BIDViewController.h"

@interface BIDViewController ()
<UIImagePickerControllerDelegate, UINavigationControllerDelegate>

@property (weak, nonatomic) IBOutlet UIImageView *imageView;
@property (weak, nonatomic) IBOutlet UIButton *takePictureButton;

@end
The first thing you might notice is that we’ve actually conformed our class to two different protocols: UIImagePickerControllerDelegate and UINavigationControllerDelegate. Because UIImagePickerController is a subclass of UINavigationController, we must conform our class to both of these protocols. The methods in UINavigationControllerDelegate are optional, and we don’t need either of them to use the image picker; however, we do need to conform to the protocol, or the compiler will give us a warning later on.
The other thing you might notice is that, while we’ll be dealing with an instance of UIImageView for displaying a chosen image, we don’t have anything similar for displaying a chosen video. UIKit doesn’t include any publicly available class like UIImageView that works for showing video content, so we’ll have to show video using another technique instead. When we get to that point, we will use an instance of MPMoviePlayerController, grabbing its view property and inserting it into our view hierarchy. This is a highly unusual way of using any view controller, but it’s actually an Apple-approved techniqueto show video inside a view hierarchy.
We’re also going to add two action methods that we want to connect our buttons to. For now, we’ll just create empty implementations so that Interface Builder can see them. We’ll fill in the actual code later:
- (IBAction)shootPictureOrVideo:(id)sender {
}

- (IBAction)selectExistingPictureOrVideo:(id)sender {
}
Save your changes and select Main.storyboard to edit the GUI in Interface Builder.
Designing the Interface
Drag two Buttons from the library to the window labeled View. Place them one above the other, aligning the bottom button with the bottom blue guideline. Double-click the top button and give it a title of New Photo or Video. Now double-click the bottom button and give it a title of Pick from Library. Next, drag an Image View from the library and place it above the buttons. Expand the image view to take up the entire space of the view above the buttons, as shown earlier in Figure 21-2.
Now Control-drag from the View Controller icon to the image view and select the imageView outlet. Drag again from View Controller to the New Photo or Video button and select the takePictureButton outlet.
Next, select the New Photo or Video button and bring up the connections inspector. Drag from the Touch Up Inside event to View Controller and select the shootPictureOrVideo: action. Now click the Pick from Library button, drag from the Touch Up Inside event in the connections inspector to View Controller, and select the selectExistingPictureOrVideo: action.
Once you’ve made these connections, save your changes.
Implementing the Camera View Controller
Select BIDViewController.m, where we have some more changes to make. Since we’re going to allow users to optionally capture a video, we need a property for an MPMoviePlayerController instance. Two more properties keep track of the last selected image and video, along with a string to determine whether a video or image was the last thing chosen.We also need to import a few additional headers to make this all work. Add the bold lines shown here:
#import "BIDViewController.h"
#import <MediaPlayer/MediaPlayer.h>
#import <MobileCoreServices/UTCoreTypes.h>

@interface BIDViewController ()
<UIImagePickerControllerDelegate, UINavigationControllerDelegate>

@property (weak, nonatomic) IBOutlet UIImageView *imageView;
@property (weak, nonatomic) IBOutlet UIButton *takePictureButton;

@property (strong, nonatomic) MPMoviePlayerController *moviePlayerController;
@property (strong, nonatomic) UIImage *image;
@property (strong, nonatomic) NSURL *movieURL;
@property (copy, nonatomic) NSString *lastChosenMediaType;

@end
Now let’s enhance the viewDidLoad method, hiding the takePictureButton if the device we’re running on does not have a camera. We also implement the viewDidAppear: method, having it call the updateDisplay method, which we’ll implement soon. First, make these changes:
@implementation BIDViewController

- (void)viewDidLoad
{
    [super viewDidLoad];
    // Do any additional setup after loading the view, typically from a nib.
    if (![UIImagePickerController isSourceTypeAvailable:
          UIImagePickerControllerSourceTypeCamera])
    {
        self.takePictureButton.hidden = YES;
    }
}

- (void)viewDidAppear:(BOOL)animated
{
    [super viewDidAppear:animated];
    [self updateDisplay];
}

- (void)didReceiveMemoryWarning
{
    [super didReceiveMemoryWarning];
    // Dispose of any resources that can be recreated.
}
It’s important to understand the distinction between the viewDidLoad and viewDidAppear: methods. The former is called only when the view has just been loaded into memory. The latter is called every time the view is displayed, which happens both at launch and whenever we return to our controller after showing another full-screen view, such as the image picker.
Next up are three utility methods, the first of which is the updateDisplay method. It is called from the viewDidAppear:method, which is called both when the view is first created and again after the user picks an image or video and dismisses the image picker. Because of this dual usage, it needs to make a few checks to see what’s what and set up the GUI accordingly. The MPMoviePlayerController doesn’t let us change the URL it reads from, so each time we want to display a movie, we’ll need to make a new controller. We handle all of that here by adding this code toward the bottom of the file:
- (void)updateDisplay
{
    if ([self.lastChosenMediaType isEqual:(NSString *)kUTTypeImage]) {
        self.imageView.image = self.image;
        self.imageView.hidden = NO;
        self.moviePlayerController.view.hidden = YES;
    } else if ([self.lastChosenMediaType isEqual:(NSString *)kUTTypeMovie]) {
        [self.moviePlayerController.view removeFromSuperview];
        self.moviePlayerController = [[MPMoviePlayerController alloc]
                                      initWithContentURL:self.movieURL];
        [self.moviePlayerController play];
        UIView *movieView = self.moviePlayerController.view;
        movieView.frame = self.imageView.frame;
        movieView.clipsToBounds = YES;
        [self.view addSubview:movieView];
        self.imageView.hidden = YES;
    }
}
The second utility method, pickMediaFromSource:, is the one that both of our action methods call. This method is pretty simple. It just creates and configures an image picker, using the passed-in sourceType to determine whether to bring up the camera or the media library. We do so by adding this code toward the bottom of the file:
- (void)pickMediaFromSource:(UIImagePickerControllerSourceType)sourceType
{
    NSArray *mediaTypes = [UIImagePickerController
                           availableMediaTypesForSourceType:sourceType];
    if ([UIImagePickerController
         isSourceTypeAvailable:sourceType]&&[mediaTypes count] > 0) {
        NSArray *mediaTypes = [UIImagePickerController
                               availableMediaTypesForSourceType:sourceType];
        UIImagePickerController *picker = [[UIImagePickerController alloc] init];
        picker.mediaTypes = mediaTypes;
        picker.delegate = self;
        picker.allowsEditing = YES;
        picker.sourceType = sourceType;
        [self presentViewController:picker animated:YES completion:NULL];
    } else {
        UIAlertView *alert =
        [[UIAlertView alloc] initWithTitle:@"Error accessing media"
                                   message:@"Unsupported media source."
                                  delegate:nil
                         cancelButtonTitle:@"Drat!"
                         otherButtonTitles:nil];
        [alert show];
    }
}
The third and final utility method is shrinkImage:toSize:,which we use to shrink our image down to the size of the view in which we’re going to show it. Doing so reduces the size of the UIImage we’re dealing with, as well as the amount of memory that imageView needs in order to display it. Since we don’t want our images to get all weirdly stretched out, we adjust the target size so that what we’re drawing matches the original image’s aspect ratio. To do this, we add this code toward the end of the file:
- (UIImage *)shrinkImage:(UIImage *)original toSize:(CGSize)size
{
    UIGraphicsBeginImageContextWithOptions(size, YES, 0);

    CGFloat originalAspect = original.size.width / original.size.height;
    CGFloat targetAspect = size.width / size.height;
    CGRect targetRect;

    if (originalAspect > targetAspect) {
        // original is wider than target
        targetRect.size.width = size.width;
        targetRect.size.height = size.height * targetAspect / originalAspect;
        targetRect.origin.x = 0;
        targetRect.origin.y = (size.height - targetRect.size.height) * 0.5;
    } else if (originalAspect < targetAspect) {
        // original is narrower than target
        targetRect.size.width = size.width * originalAspect / targetAspect;
        targetRect.size.height = size.height;
        targetRect.origin.x = (size.width - targetRect.size.width) * 0.5;
        targetRect.origin.y = 0;
    } else {
        // original and target have same aspect ratio
        targetRect = CGRectMake(0, 0, size.width, size.height);
    }

    [original drawInRect:targetRect];
    UIImage *final = UIGraphicsGetImageFromCurrentImageContext();
    UIGraphicsEndImageContext();

    return final;
}
What you’re seeing here is a series of calls that create a new image based on the specified size and render the old image into the new one.
Next, implement the following action methods that we declared in the header:
- (IBAction)shootPictureOrVideo:(id)sender {
    [self pickMediaFromSource:UIImagePickerControllerSourceTypeCamera];
}

- (IBAction)selectExistingPictureOrVideo:(id)sender {
    [self pickMediaFromSource:UIImagePickerControllerSourceTypePhotoLibrary];
}
Each of these simply calls out to one of the utility methods we defined earlier, passing in a value defined by UIImagePickerController to specify where the picture or video should come from.
Now it’s finally time implement the delegate methods for the picker view:
#pragma mark - Image Picker Controller delegate methods
- (void)imagePickerController:(UIImagePickerController *)picker
didFinishPickingMediaWithInfo:(NSDictionary *)info
{
    self.lastChosenMediaType = info[UIImagePickerControllerMediaType];
    if ([self.lastChosenMediaType isEqual:(NSString *)kUTTypeImage]) {
        UIImage *chosenImage = info[UIImagePickerControllerEditedImage];
        self.image = [self shrinkImage:chosenImage
                                toSize:self.imageView.bounds.size];
    } else if ([self.lastChosenMediaType isEqual:(NSString *)kUTTypeMovie]) {
        self.movieURL = info[UIImagePickerControllerMediaURL];
    }
    [picker dismissViewControllerAnimated:YES completion:NULL];
}

- (void)imagePickerControllerDidCancel:(UIImagePickerController *)picker
{
    [picker dismissViewControllerAnimated:YES completion:NULL];
}
The first delegate method checks to see whether a picture or video was chosen, makes note of the selection (shrinking the chosen image, if any, to precisely fit the display size along the way), and then dismisses the modal image picker. The second one just dismisses the image picker.
That’s all you need to do. Compile and run the app. If you’re running on the simulator, you won’t have the option to take a new picture, but will only be able to choose from the photo library — as if you had any photos in your simulator’s photo library! If you have the opportunity to run the application on a real device, go ahead and try it. You should be able to take a new picture, and zoom in and out of the picture using the pinch gestures. The first time the app needs to access the user’s photos on iOS, the user will be asked to allow this access; this is privacy feature that was added back in iOS 6 to make sure that apps aren’t sneakily grabbing photos without users’ consent.
After choosing a photo, if you zoom in and pan around before hitting the Use Photo button, the cropped image will be the one returned to the application in the delegate method.
It’s a Snap!
Believe it or not, that’s all there is to letting your users take pictures with the camera so that the pictures can be used by your application. You can even let the user do a small amount of editing on that image if you so choose.
In the next chapter, we’re going to look at reaching a larger audience for your iOS applications by making them oh-so-easy to translate into other languages. Êtes-vous prêt? Tournez la page et allez directement. Allez, allez!