Getting Started with Sprite Kit
In iOS 7, Apple introduced Sprite Kit, a framework for the high-performance rendering of 2D graphics. That sounds a bit like Core Graphics and Core Animation, so what’s new here? Well, unlike Core Graphics (which is focused on drawing graphics using a painter’s model) or Core Animation (which is focused on animating attributes of GUI elements), Sprite Kit is focused on a different area entirely: video games! Sprite Kit is built on top of OpenGL, a technology present in many computing platforms that allows modern graphics hardware to write graphics bitmaps into a video buffer at incredible speeds. With Sprite Kit, you get the great performance characteristics of OpenGL, but without needing to dig into the depths of OpenGL coding.
This is Apple’s first foray into the graphical side of game programming in the iOS era. It was released for iOS 7 and OS X 10.9 (Mavericks) at the same time and provides the same API on both platforms, so that apps written for one can be easily ported to the other. Although Apple has never before supplied a framework quite like Sprite Kit, it has clear similarities to various open-source libraries such as Cocos2D. If you’ve used Cocos2D or something similar in the past, you’ll feel right at home.
Sprite Kit does not implement a flexible, general-purpose drawing system like Core Graphics; There are no methods for drawing paths, gradients, or filling spaces with color. Instead, what you get is a scene graph (analogous to UIKit’s view hierarchy); the ability to transform each graph node’s position, scale, and rotation; and the ability for each node to draw itself. Most drawing occurs in an instance of the SKSprite class (or one of its subclasses), which represents a single graphical image ready for putting on the screen.
In this chapter, we’re going to use Sprite Kit build a simple shooting game call TextShooter. Instead of using premade graphics, we’re going to build our game objects with pieces of text, using a subclass of SKSprite that is specialized for just this purpose. Using this approach, you won’t need to pull graphics out of a project library or anything like that. The app we make will be simple in appearance, but easy to modify and play with.
Simple Beginnings
Let’s get the ball rolling. In Xcode, create a new application using the SpriteKit Game application template from the iOS Application section. Name your new project TextShooter, leave the other settings in their typical positions, and save it alongside your other projects.
Now take a look at the project Xcode created. You’ll see it has a pretty standard-looking BIDAppDelegate class and a small BIDViewController class that does some initial configuration of an SKView object. The SKView object, which is loaded from the application’s storyboard, is the view that will display all our Sprite Kit content. After configuring the SKView to make it show us some performance characteristics while running, the viewDidLoad method creates a new instance of BIDMyScene and tells the SKView to display the scene.
In a way, this has some parallels to the UIViewController classes we’ve been using throughout this book. The SKView class acts a bit like UINavigationController, in the sense that it is sort of a blank slate that simply manages access to the display for other controllers. At this point, things start to diverge, however. Unlike UINavigationController, the top-level objects managed by SKView aren’t UIViewController subclasses. Instead, they’re subclasses of SKScene, which in turn knows how to manage a graph of objects that can be displayed, acted upon by the physics engine, and so on. When developing with Sprite Kit, you’ll probably make a new SKScene subclass for each visually distinct portion of your app. A scene can represent a fast-paced game display with dozens of objects animating around the screen or something as simple as a start menu. We’ll see multiple uses of SKScene in this chapter.
You should also take a look at the BIDMyScene class created by the template. It has just two methods: an initializer that creates an on-screen label and a touch-event handler that creates a new bitmap-based sprite every time the user touches the screen. Go ahead and run this app to see what it does (the results are shown in Figure 17-1).

Figure 17-1. The default Sprite Kit app in action. Some text is displayed in the center of the screen, and each tap on the screen puts a rotating graphic of a fighter jet at that location
Well that’s something, but we’re going to take our app in a different direction entirely. Let’s start by gutting the two methods that are set up for us by Xcode. First, delete the initWithSize: method entirely (we’ll write a whole new one later). Next, take away most of the touchesBegan:withEvent: method, leaving just the for loop and the first line of code it contains, like this:
- (void)touchesBegan:(NSSet *)touches withEvent:(UIEvent *)event {
    /* Called when a touch begins */

    for (UITouch *touch in touches) {
        CGPoint location = [touch locationInNode:self];
    }
}
The next thing we’re going to do is fix a minor stylistic problem with this template: the name of the BIDMyScene class itself. Each scene in a Sprite Kit game represents a particular chunk of the player’s gaming experience, and it really should be named to match. Calling something “my” scene really doesn’t tell us anything, so we’re going to rename it. Xcode actually has a handy piece of functionality that will help us here. Hold your mouse pointer over the word BIDMyScene in either the .h or .m file for the class, right-click (or Ctrl-click if you’re using a trackpad) to bring up the context menu, and select Refactor ![]() Rename… to get started. In the panel that appears at the top of the window, type BIDLevelScene as the new class name, make sure the Rename related files checkbox is selected, and then click Preview. A new panel will slide out, showing you all the changes that Xcode is about to make on your behalf, as shown in Figure 17-2.
Rename… to get started. In the panel that appears at the top of the window, type BIDLevelScene as the new class name, make sure the Rename related files checkbox is selected, and then click Preview. A new panel will slide out, showing you all the changes that Xcode is about to make on your behalf, as shown in Figure 17-2.

Figure 17-2. Side-by-side comparisons of files we’re about to change
Click the Save button, which triggers yet another sliding panel from the top of the window. This one is offering to turn on an Xcode feature called snapshots that you should feel free to Disable. You’ll see that Xcode changes the name of the class in its source files, renames the source code files themselves, and also changes all references to the class in BIDViewController.m. Nice!
Hiding the Status Bar
While you’re poking around in BIDViewController.m, make one more change: disable the iOS status bar. Just add this method anywhere inside the @implementation section:
- (BOOL)prefersStatusBarHidden {
    return YES;
}
That change will make the iOS status bar disappear while our game is running, which is usually what you want for action games like this.
Now switch over to BIDLevelScene.h. This class can override the initWithSize: method from its parent class as its default initializer, but we’re going to create two new methods around creating instances, allowing us to include a level number. At the same time, we’re going to add properties for the level number, the number of lives the player has, and a flag to let us know whether the level is finished. Add the bold lines shown below:
@interface BIDLevelScene : SKScene

@property (assign, nonatomic) NSUInteger levelNumber;
@property (assign, nonatomic) NSUInteger playerLives;
@property (assign, nonatomic) BOOL finished;

+ (instancetype)sceneWithSize:(CGSize)size levelNumber:(NSUInteger)levelNumber;
- (instancetype)initWithSize:(CGSize)size levelNumber:(NSUInteger)levelNumber;

@end
Now switch over to BIDLevelScene.m, where we’ll lay down some more infrastructure. Earlier, we asked you to remove the initWithSize: method created by the application template. Now it’s time to add the following methods instead:
+ (instancetype)sceneWithSize:(CGSize)size levelNumber:(NSUInteger)levelNumber {
    return [[self alloc] initWithSize:size levelNumber:levelNumber];
}

- (instancetype)initWithSize:(CGSize)size {
    return [self initWithSize:size levelNumber:1];
}

- (instancetype)initWithSize:(CGSize)size levelNumber:(NSUInteger)levelNumber {
    if (self = [super initWithSize:size]) {
        _levelNumber = levelNumber;
        _playerLives = 5;

        self.backgroundColor = [SKColor whiteColor];

        SKLabelNode *lives = [SKLabelNode labelNodeWithFontNamed:@"Courier"];
        lives.fontSize = 16;
        lives.fontColor = [SKColor blackColor];
        lives.name = @"LivesLabel";
        lives.text = [NSString stringWithFormat:@"Lives: %lu",
                      (unsigned long)_playerLives];
        lives.verticalAlignmentMode = SKLabelVerticalAlignmentModeTop;
        lives.horizontalAlignmentMode = SKLabelHorizontalAlignmentModeRight;
        lives.position = CGPointMake(self.frame.size.width,
                                     self.frame.size.height);
        [self addChild:lives];

        SKLabelNode *level = [SKLabelNode labelNodeWithFontNamed:@"Courier"];
        level.fontSize = 16;
        level.fontColor = [SKColor blackColor];
        level.name = @"LevelLabel";
        level.text = [NSString stringWithFormat:@"Level: %lu",
                      (unsigned long)_levelNumber];
        level.verticalAlignmentMode = SKLabelVerticalAlignmentModeTop;
        level.horizontalAlignmentMode = SKLabelHorizontalAlignmentModeLeft;
        level.position = CGPointMake(0, self.frame.size.height);
        [self addChild:level];
    }
    return self;
}
That first method, sceneWithSize:levelNumber:, gives us a factory method that will work as a shorthand for creating a level and setting its level number at once. In the second method, initWithSize:, we override the class’s default initializer, passing control to the third method (and passing along a default value for the level number). That third method in turn calls the designated initializer from its superclass’s implementation. This may seem like a roundabout way of doing things, but it’s a common pattern when you want to add new initializers to a class while still using the class’s designated initializer.
The third method we added, initWithSize:levelNumber:, is where we set up the basic configuration of our level scene. First, we set the values of a couple of instance variables to point at the parameters that were passed in. Second, we set the scene’s background color. Note that we’re using a class called SKColor instead of UIColor here. In fact, SKColor isn’t really a class at all; it’s a sort of alias that can be used in place of either UIColor for an iOS app or NSColor for an OS X app. This allows us to port games between iOS and OS X a little more easily.
After that, we create two instances of a class called SKLabelNode. This is a handy class that works somewhat like a UILabel, letting us choose a font, set a text value, and specify some alignments. We create one label for displaying the number of lives at the upper right of the screen and another that will show the level number at the upper left of the screen.
If you think about the points we’re passing in as positions for each of those labels, you may be surprised to see that we’re passing in the scene’s height. In UIKit, positioning anything at the height of a UIView would put it at the bottom of that view; but in Scene Kit, the y-axis is flipped, so the maximum value of the scene’s height is a position at the top of the screen instead.
You’ll also see that we gave each label a name. This works similar to a tag or identifier in other parts of UIKit, and it will let us retrieve those labels later by asking for them by name.
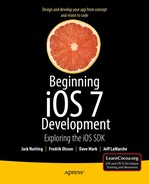
Run the game now, and you’ll see that we have a very basic structure in place, as shown in Figure 17-3.
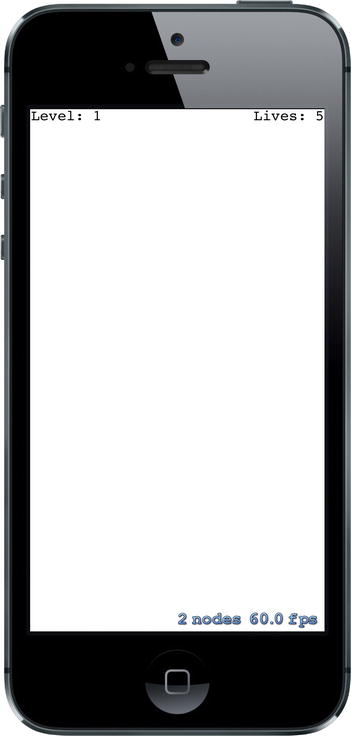
Figure 17-3. Our game doesn’t have much fun factor right now, but at least it has a high framerate!
Now it’s time to add a little interactivity. We’re going to make a new class that represents a player. It will know how to draw itself using internal components, as well as how to move to a new location in a nicely animated way. Next, we’ll insert an instance of the new class into the scene and write some code to let the player move the object around by touching the screen.
Every object that’s going to be part of our scene must be a subclass of SKNode. Thus, you’ll use Xcode’s File menu to create a new Objective-C class named BIDPlayerNode that’s a subclass of SKNode. In the nearly-empty BidPlayerNode.m file that’s created, add the following methods:
- (instancetype)init {
    if (self = [super init]) {
        self.name = [NSString stringWithFormat:@"Player %p", self];
        [self initNodeGraph];
    }
    return self;
}

- (void)initNodeGraph {
    SKLabelNode *label = [SKLabelNode labelNodeWithFontNamed:@"Courier"];
    label.fontColor = [SKColor darkGrayColor];
    label.fontSize = 40;
    label.text = @"v";
    label.zRotation = M_PI;
    label.name = @"label";

    [self addChild:label];

}
Our BIDPlayerNode doesn’t display anything itself. Instead, the init method sets up a subnode that will do the actual drawing. This subnode is another instance of SKLabelNode, just like the one we created for displaying the level number and the number of lives remaining. We’re not setting a position for the label, which means that its position is coordinate (0, 0). Just like views, each node lives in a coordinate system that is inherited from its parent object. Giving this node a zero position means that it will appear on-screen at the BIDPlayerNode instance’s position. Any non-zero values would effectively be an offset from that point.
We also set a rotation value for the label, so that the lowercase letter “v” it contains will be shown upside-down. The name of the rotation property, zRotation, may seem a bit surprising; however, it simply refers to the z-axis of the coordinate space in use with Sprite Kit. You only see the x- and y-axes on screen, but the z-axis is useful for ordering items for display purposes, as well as for rotating things around. The values assigned to zRotation need to be in radians instead of degrees, so we assign the value M_PI, which is equivalent to the mathematical value pi. Since pi radians are equal to 180 degrees, this is just what we want.
Adding the Player to the Scene
Now switch back to BIDLevelScene.m. Here, we’re going to add an instance of SKPlayerNode to the scene. Start off by importing the new class’s header and adding a property inside a new class extension:
#import "BIDLevelScene.h"
#import "BIDPlayerNode.h"

@interface BIDLevelScene ()

@property (strong, nonatomic) BIDPlayerNode *playerNode;

@end
Continue by adding the following bold code near the end of the initWithSize:levelNumber: method. Be sure to put it before the return self and before the right-curly-brace above it:
        _playerNode = [BIDPlayerNode node];
        _playerNode.position = CGPointMake(CGRectGetMidX(self.frame),
                                           CGRectGetHeight(self.frame) * 0.1);

        [self addChild:_playerNode];
    }
    return self;
}
If you build and run the app now, you should see that the player appears near the lower middle of the screen, as shown in Figure 17-4.
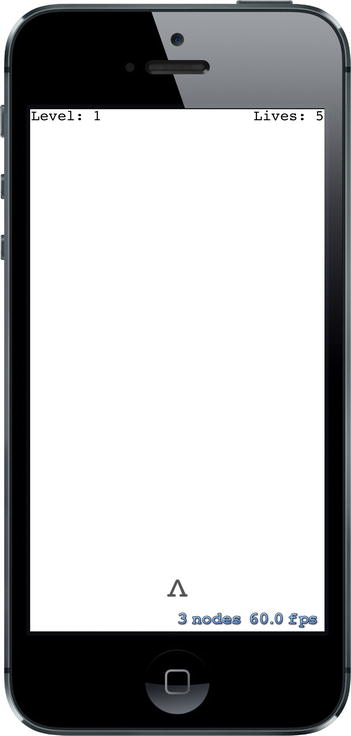
Figure 17-4. An upside-down “v” to the rescue!
Handling Touches
Next, we’re going to put some logic back into the touchesBegan:withEvent: method, which we earlier left nearly empty. Insert the bold lines shown here:
- (void)touchesBegan:(NSSet *)touches withEvent:(UIEvent *)event {
    /* Called when a touch begins */

    for (UITouch *touch in touches) {
        CGPoint location = [touch locationInNode:self];
        if (location.y < CGRectGetHeight(self.frame) * 0.2 ) {
            CGPoint target = CGPointMake(location.x,
                                         self.playerNode.position.y);
            CGFloat duration = [self.playerNode moveToward:target];
        }
    }
}
The preceding snippet uses any touch location in the lower fifth of the screen as the basis of a new location toward which you want the player node to move. It also tells the player node to move toward it. In its current state, this will give you a compiler error since we haven’t defined the player node’s moveToward: method yet. So, start by declaring the method in BIDPlayerNode.h, like this:
#import <SpriteKit/SpriteKit.h>

@interface BIDPlayerNode : SKNode

// returns duration of future movement
- (CGFloat)moveToward:(CGPoint)location;

@end
Player Movement
Next, switch over to BIDPlayerNode.m and add the following implementation:
- (CGFloat)moveToward:(CGPoint)location {
    [self removeActionForKey:@"movement"];

    CGFloat distance = BIDPointDistance(self.position, location);
    CGFloat pixels = [UIScreen mainScreen].bounds.size.width;
    CGFloat duration = 2.0 * distance / pixels;

    [self runAction:[SKAction moveTo:location duration:duration]
            withKey:@"movement"];

    return duration;
}
We’ll skip the first line for now, returning to it shortly. This method compares the new location to the current position and figures out the distance and the number of pixels to move. Next, it figures out how much time the movement should take, using a numeric constant to set the speed of the overall movement. Finally it creates an SKAction to make the move happen. SKAction is a part of Sprite Kit that knows how to make changes to nodes over time, letting you easily animate a node’s position, size, rotation, transparency, and more. In this case, we are telling the player node to run a simple movement action over a particular duration, and then assigning that action to the key @"movement". As you see, this key is the same as the key used in the first line of this method to remove an action. We started off this method by removing any existing action with the same key, so that the user can tap several locations in quick succession without spawning a lot of competing actions trying to move in different ways!
Now you’ll notice that we’ve introduced another compiler error, since Xcode can’t find any function called BIDPointDistance(). This is one of several simple geometric functions that our app will use to perform calculations using points, vectors, and floats. Let’s put this in place now. Use Xcode to make a new file, this time a Header File from the C and C++ section. Name it BIDGeometry.h and give it the following content:
#ifndef TextShooter_BIDGeometry_h
#define TextShooter_BIDGeometry_h

// Takes a CGVector and a CGFLoat.
// Returns a new CGFloat where each component of v has been multiplied by m.
static inline CGVector BIDVectorMultiply(CGVector v, CGFloat m) {
    return CGVectorMake(v.dx * m, v.dy * m);
}

// Takes two CGPoints.
// Returns a CGVector representing a direction from p1 to p2.
static inline CGVector BIDVectorBetweenPoints(CGPoint p1, CGPoint p2) {
    return CGVectorMake(p2.x - p1.x, p2.y - p1.y);
}

// Takes a CGVector.
// Returns a CGFloat containing the length of the vector, calculated using
// Pythagoras' theorem.
static inline CGFloat BIDVectorLength(CGVector v) {
    return sqrtf(powf(v.dx, 2) + powf(v.dy, 2));
}

// Takes two CGPoints. Returns a CGFloat containing the distance between them,
// calculated with Pythagoras' theorem.
static inline CGFloat BIDPointDistance(CGPoint p1, CGPoint p2) {
    return sqrtf(powf(p2.x - p1.x, 2) + powf(p2.y - p1.y, 2));
}

#endif
These are simple implementations of some common operations that are useful in many games: multiplying vectors, creating vectors pointing from one point to another, and calculating distances. To let the code use these, just add the following import near the top of BIDPlayerNode.m:
#import "BIDGeometry.h"
Now build and run the app. After the player ship appears, tap anywhere in the bottom portion of the screen to see that the ship slides left or right to reach the point you tapped. You can tap again before the ship reaches its destination, and it will immediately begin a new animation to move toward the new spot. That’s fine, but wouldn’t it be nice if the player’s ship were a bit livelier in its motion?
Wobbly Bits
Let’s give the ship a bit of a wobble as it moves by adding another animation. Add the bold lines to BIDPlayerNode’s moveToward: method.
- (CGFloat)moveToward:(CGPoint)location {
    [self removeActionForKey:@"movement"];
    [self removeActionForKey:@"wobbling"];

    CGFloat distance = BIDPointDistance(self.position, location);
    CGFloat pixels = [UIScreen mainScreen].bounds.size.width;
    CGFloat duration = 2.0 * distance / pixels;

    [self runAction:[SKAction moveTo:location duration:duration]
            withKey:@"movement"];

    CGFloat wobbleTime = 0.3;
    CGFloat halfWobbleTime = wobbleTime * 0.5;
    SKAction *wobbling = [SKAction
                          sequence:@[[SKAction scaleXTo:0.2
                                               duration:halfWobbleTime],
                                     [SKAction scaleXTo:1.0
                                               duration:halfWobbleTime]
                                     ]];
    NSUInteger wobbleCount = duration / wobbleTime;

    [self runAction:[SKAction repeatAction:wobbling count:wobbleCount]
            withKey:@"wobbling"];

    return duration;
}
What we just did is similar to the movement action we created earlier, but it differs in some important ways. For the basic movement, we simply calculated the movement duration, and then created and ran a movement action in a single step. This time, it’s a little more complicated. First, we define the time for a single “wobble” (the ship may wobble multiple times while moving, but will wobble at a consistent rate throughout). The wobble itself consists of first scaling the ship along the x-axis (i.e., its width) to 2/10ths of its normal size, and then scaling it back to it to its full size. Each of these is a single action that is packed together into another kind of action called a sequence, which performs all the actions it contains one after another. Next, we figure out how many times this wobble can happen during the duration of the ship’s travel and wrap the wobbling sequence inside a repeat action, telling it how many complete wobble cycles it should execute. And, as before, we start the method by canceling any previous wobbling action, since we wouldn’t want competing wobblers.
Now run the app, and you’ll see that the ship wobbles pleasantly when moving back and forth. It kind of looks like it’s walking!
So far so good, but this game is going to need some enemies for our players to shoot at. We’ll use Xcode to make a new Objective-C class called BIDEnemyNode, using SKNode as the parent class. We’re not going to give the enemy class any real behavior just yet, but we will give it an appearance. We’ll use the same technique that we used for the player, using text to build the enemy’s body. Surely, there’s no text character more intimidating than the letter X, so our enemy will be a letter X. . . made of lowercase Xs! Try not to be scared just thinking about that as you add these methods:
- (instancetype)init {
    if (self = [super init]) {
        self.name = [NSString stringWithFormat:@"Enemy %p", self];
        [self initNodeGraph];
    }
    return self;
}

- (void)initNodeGraph {
    SKLabelNode *topRow = [SKLabelNode
                           labelNodeWithFontNamed:@"Courier-Bold"];
    topRow.fontColor = [SKColor brownColor];
    topRow.fontSize = 20;
    topRow.text = @"x x";
    topRow.position = CGPointMake(0, 15);
    [self addChild:topRow];

    SKLabelNode *middleRow = [SKLabelNode
                              labelNodeWithFontNamed:@"Courier-Bold"];
    middleRow.fontColor = [SKColor brownColor];
    middleRow.fontSize = 20;
    middleRow.text = @"x";
    [self addChild:middleRow];

    SKLabelNode *bottomRow = [SKLabelNode
                              labelNodeWithFontNamed:@"Courier-Bold"];
    bottomRow.fontColor = [SKColor brownColor];
    bottomRow.fontSize = 20;
    bottomRow.text = @"x x";
    bottomRow.position = CGPointMake(0, -15);
    [self addChild:bottomRow];
}
There’s nothing much new there; we’re just adding multiple “rows” of text by shifting the y value for each of their positions.
Now let’s make some enemies appear in the scene by making some changes to BIDLevelScene.m. First, add the bold lines shown here, near the top:
#import "BIDLevelScene.h"
#import "BIDPlayerNode.h"
#import "BIDEnemyNode.h"

#define ARC4RANDOM_MAX      0x100000000

@interface BIDLevelScene ()

@property (strong, nonatomic) BIDPlayerNode *playerNode;
@property (strong, nonatomic) SKNode *enemies;

@end
We imported the header for our new enemy class. We also defined the maximum return value of the arc4random() function, which we’re going to use a bit later. Random number generators can be really useful for making game levels that are different every time, and arc4random() is about as random as they come. Finally, we added a new property for holding all the enemies that will be added to the level. You might think that we’d use an NSMutableArray for this, but it turns out that using a plain SKNode is perfect for the job. SKNode can hold any number of child nodes. And since we need to add all the enemies to the scene anyway, we may as well hold them all in an SKNode for easy access.
The next step is to create the spawnEnemies method, as shown here:
- (void)spawnEnemies {
    NSUInteger count = log(self.levelNumber) + self.levelNumber;
    for (NSUInteger i = 0; i < count; i++) {
        BIDEnemyNode *enemy = [BIDEnemyNode node];
        CGSize size = self.frame.size;
        CGFloat x = (size.width * 0.8 * arc4random() / ARC4RANDOM_MAX) +
                    (size.width * 0.1);
        CGFloat y = (size.height * 0.5 * arc4random() / ARC4RANDOM_MAX) +
                    (size.height * 0.5);
        enemy.position = CGPointMake(x, y);
        [self.enemies addChild:enemy];
    }
}
Finally, add these lines near the end of the initWithSize:levelNumber: method to create an empty enemies node, and then call the spawnEnemies method:
[self addChild:_playerNode];
_enemies = [SKNode node];
[self addChild:_enemies];
[self spawnEnemies];
Now run the app, and you’ll see a dreadful enemy placed randomly in the upper portion of the screen (see Figure 17-5). Don’t you wish you could shoot it?
Figure 17-5. I’m sure you’ll agree that the X made of Xs just needs to be shot
It’s time to implement the next logical step in the development of this game: letting the player attack the enemies. We want the player to be able to tap anywhere in the upper 80% of the screen to shoot a bullet at the enemies. We’re going to use the physics engine included in Sprite Kit both to move our player’s bullets and to let us know when a bullet collides with an enemy.
But first, what is this thing we call a physics engine? Basically, a physics engine is a software component that keeps track of multiple physical objects (commonly referred to as bodies) in a world, along with the forces that are acting upon them. It also makes sure that everything moves in a realistic way. It can take into account the force of gravity, handle collisions between objects (so that objects don’t occupy the same space simultaneously), and even simulate physical characteristics like friction and bounciness.
It’s important to understand that a physics engine is typically separate from a graphics engine. Apple provides convenient APIs to let us work with both, but they are essentially separate. It’s common to have objects in your display, such as our labels that show the current level number and remaining lives, that are completely separate from the physics engine. And it’s possible to create objects that have a physics body, but don’t actually display anything at all.
Defining Your Physics Categories
One of the things that the Sprite Kit physics engine lets us do is to assign objects to several distinct physics categories. A physics category has nothing to do with Objective-C categories. Instead, a physics category is a way to group related objects so that the physics engine can handle collisions between them in different ways. In this game, for example, we’ll create three categories: one for enemies, one for the player, and one for player missiles. We definitely want the physics engine to concern itself with collisions between enemies and player missiles, but we probably want it to ignore collisions between player missiles and the player itself. This is easy to set up using physics categories.
So, let’s create the categories we’re going to need. Use Xcode to make a new C header file called BIDPhysicsCategories.h and give it the following contents:
#ifndef TextShooter_BIDPhysicsCategories_h
#define TextShooter_BIDPhysicsCategories_h

typedef NS_OPTIONS(uint32_t, BIDPhysicsCategory){
    PlayerCategory        =  1 << 1,
    EnemyCategory         =  1 << 2,
    PlayerMissileCategory =  1 << 3
};

#endif
Here we declared three category constants. Note that the categories work as a bitmask, so each of them must be a power of two. We can easily do this by bit-shifting. These are set up as a bitmask in order to simplify the physics engine’s API a little bit. With bitmasks, we can logically OR several values together. This enables us to use a single API call to tell the physics engine how to deal with collisions between many different layers. We’ll see this in action soon.
Creating the BIDBulletNode class
Now that we’ve laid some groundwork, let’s create some bullets so we can start shooting.
Create a new class called BIDBulletNode, once again using SKNode as its superclass. Start in the header file, where you’ll declare the two public methods this class will have:
#import <SpriteKit/SpriteKit.h>

@interface BIDBulletNode : SKNode

+ (instancetype)bulletFrom:(CGPoint)start toward:(CGPoint)destination;
- (void)applyRecurringForce;

@end
The first method is a factory method for creating new instances of the class. The second is one that you’ll need to call from your scene each frame, to tell the bullet to move. Now switch over to BIDBulletNode.m to start implementing this class.
The first thing we’re going to do is import header for our special geometry functions and physics categories. The second step is to add a class extension with a single property, which will contain this bullet’s thrust vector:
#import "BIDBulletNode.h"
#import "BIDPhysicsCategories.h"
#import "BIDGeometry.h"

@interface BIDBulletNode ()

@property (assign, nonatomic) CGVector thrust;

@end
Next, we implement an init method. Like other init methods in this application, this is where we create the partial object graph for our bullet. This will consist of a single dot. While we’re at it, let’s also configure physics for this class by creating and configuring an SKPhysicsBody instance and attaching it to self. In the process, we tell the new body what category it belongs to and which categories should be checked for collisions with this object.
@implementation BIDBulletNode

- (instancetype)init {
    if (self = [super init]) {
        SKLabelNode *dot = [SKLabelNode labelNodeWithFontNamed:@"Courier"];
        dot.fontColor = [SKColor blackColor];
        dot.fontSize = 40;
        dot.text = @".";
        [self addChild:dot];

        SKPhysicsBody *body = [SKPhysicsBody bodyWithCircleOfRadius:1];
        body.dynamic = YES;
        body.categoryBitMask = PlayerMissileCategory;
        body.contactTestBitMask = EnemyCategory;
        body.collisionBitMask = EnemyCategory;
        body.mass = 0.01;

        self.physicsBody = body;
        self.name = [NSString stringWithFormat:@"Bullet %p", self];
    }
    return self;
}
Next, we’ll create the factory method that creates a new bullet and gives it a thrust vector that the physics engine will use to propel the bullet towards its target:
+ (instancetype)bulletFrom:(CGPoint)start toward:(CGPoint)destination {
    BIDBulletNode *bullet = [[self alloc] init];

    bullet.position = start;

    CGVector movement = BIDVectorBetweenPoints(start, destination);
    CGFloat magnitude = BIDVectorLength(movement);
    if (magnitude == 0.0f) return nil;

    CGVector scaledMovement = BIDVectorMultiply(movement, 1 / magnitude);

    CGFloat thrustMagnitude = 100.0;
    bullet.thrust = BIDVectorMultiply(scaledMovement, thrustMagnitude);

    return bullet;
}
The basic calculations are pretty simple. We first determine a movement vector that points from the start location to the destination, and then we determine its magnitude (length). Dividing the movement vector by its magnitude produces a normalized unit vector, a vector that points in the same direction as the original, but is exactly one unit long (a unit, in this case, is the same as a “point” on the screen—e.g., two pixels on a Retina device, one pixel on older devices). Creating a unit vector is very useful because we can multiply that by a fixed magnitude (in this case, 100) to determine a uniformly powerful thrust vector, no matter how far away the user tapped the screen.
The final piece of code we need to add to this class is this method, which applies thrust to the physics body. We’ll call this once per frame, from inside the scene:
- (void)applyRecurringForce {
    [self.physicsBody applyForce:self.thrust];
}Now switch over to BIDLevelScene.m to add bullets to the scene itself. For starters, import the header for the new class near the top. Next, add another property to contain all bullets in a single SKNode, just as you did earlier for enemies:
#import "BIDLevelScene.h"
#import "BIDPlayerNode.h"
#import "BIDEnemyNode.h"
#import "BIDBulletNode.h"

#define ARC4RANDOM_MAX      0x100000000

@interface BIDLevelScene ()

@property (strong, nonatomic) BIDPlayerNode *playerNode;
@property (strong, nonatomic) SKNode *enemies;
@property (strong, nonatomic) SKNode *playerBullets;

@end
Find the section of the initWithSize:levelNumber: method where you previously added the enemies. That’s the place to set up the playerBullets node, too.
_playerBullets = [SKNode node];
[self addChild:_playerBullets];
Now we’re ready to code the actual missile launches. Add this else clause to the touchesBegan:withEvent: method, so that all taps in the upper part of the screen shoot a bullet instead of moving the ship:
- (void)touchesBegan:(NSSet *)touches withEvent:(UIEvent *)event {
    for (UITouch *touch in touches) {
        CGPoint location = [touch locationInNode:self];
        if (location.y < CGRectGetHeight(self.frame) * 0.2 ) {
            CGPoint target = CGPointMake(location.x,
                                         self.playerNode.position.y);
            [self.playerNode moveToward:target];

        }else {
            BIDBulletNode *bullet = [BIDBulletNode
                                     bulletFrom:self.playerNode.position
                                     toward:location];
            if (bullet) {
                [self.playerBullets addChild:bullet];
            }
        }
    }
}
That adds the bullet, but none of the bullets we add will actually move unless we tell them to by applying thrust every frame. Our scene already contains an empty method called update:. This method is called each frame, and that’s the perfect place to do any game logic that needs to occur each frame. Rather than updating all our bullets right in that method, however, we put that code in a separate method that we call from the update: method:
- (void)update:(CFTimeInterval)currentTime {
    [self updateBullets];
}

- (void)updateBullets {
    NSMutableArray *bulletsToRemove = [NSMutableArray array];
    for (BIDBulletNode *bullet in self.playerBullets.children) {
        // Remove any bullets that have moved off-screen
        if (!CGRectContainsPoint(self.frame, bullet.position)) {
            // mark bullet for removal
            [bulletsToRemove addObject:bullet];
            continue;
        }
        // Apply thrust to remaining bullets
        [bullet applyRecurringForce];
    }
    [self.playerBullets removeChildrenInArray:bulletsToRemove];
}
Before telling each bullet to apply its recurring force, we also check whether each bullet is still on-screen. Any bullet that’s gone off-screen is put into a temporary array; and then, at the end, those are swept out of the playerBullets node. Note that this two-stage process is necessary because the for loop at work in this method is iterating over all children in the playerBullets node. Making changes to a collection while you’re iterating over it is never a good idea, and it can easily lead to a crash.
Now build and run the app, and you’ll see that, in addition to moving the player’s ship, you can make it shoot missiles upwards by tapping on the screen (see Figure 17-6). Neat!

Figure 17-6. Shooting up a storm!
Attacking Enemies with Physics
A couple of important gameplay elements are still missing from our game. The enemies never attack us, and we can’t yet get rid of the enemies by shooting them. Let’s take care of the latter right now. We’re going to set things up so that shooting an enemy has the effect of dislodging it from the spot where it’s currently fixed on the screen. This feature will use the physics engine for all the heavy lifting, and it will involve making changes to BIDPlayerNode, BIDEnemyNode, and BIDLevelScene.
For starters, let’s add physics bodies to our nodes that don’t already have them. Start with BIDEnemyNode.m, adding these #import statements near the top:
#import "BIDPhysicsCategories.h"
#import "BIDGeometry.h"
Next, add the following line to the init method:
- (instancetype)init {
    if (self = [super init]) {
        self.name = [NSString stringWithFormat:@"Enemy %p", self];
        [self initNodeGraph];
        [self initPhysicsBody];
    }
    return self;
}
Now add the code to really set up the physics body. This is pretty similar to what you did earlier for the BIDPlayerBullet class:
- (void)initPhysicsBody {
    SKPhysicsBody *body = [SKPhysicsBody bodyWithRectangleOfSize:
                           CGSizeMake(40, 40)];
    body.affectedByGravity = NO;
    body.categoryBitMask = EnemyCategory;
    body.contactTestBitMask = PlayerCategory|EnemyCategory;
    body.mass = 0.2;
    body.angularDamping = 0.0f;
    body.linearDamping = 0.0f;
    self.physicsBody = body;
}
Then select BIDPlayerNode.m, where you’re going to do a pretty similar set of things. First, add the following #import near the top:
#import "BIDPhysicsCategories.h"
Follow up by adding the bold line shown here to the init method:
- (instancetype)init {
    if (self = [super init]) {
        self.name = [NSString stringWithFormat:@"Player %p", self];
        [self initNodeGraph];
        [self initPhysicsBody];
    }
    return self;
}
Finally, add the new initPhysicsBody method:
- (void)initPhysicsBody {
    SKPhysicsBody *body = [SKPhysicsBody bodyWithRectangleOfSize:
                           CGSizeMake(20, 20)];
    body.affectedByGravity = NO;
    body.categoryBitMask = PlayerCategory;
    body.contactTestBitMask = EnemyCategory;
    body.collisionBitMask = 0;

    self.physicsBody = body;
}
At this point, you can run the app and see that your bullets now have the ability to knock enemies into space. However, you’ll also see there’s a problem here. When you start the game and then send the lone enemy hurtling into space, you’re stuck! This is probably a good time to add level management to the game.
We need to enhance BIDLevelScene so that it knows when it’s time to move to the next level. It can figure this out simply enough by looking at the number of available enemies. If it finds that there aren’t any on-screen, then the level is over, and the game should transition to the next.
Keeping Tabs on the Enemies
Begin by adding this updateEnemies method. It works a lot like the updateBullets method added earlier:
- (void)updateEnemies {
    NSMutableArray *enemiesToRemove = [NSMutableArray array];
    for (SKNode *node in self.enemies.children) {
        // Remove any enemies that have moved off-screen
        if (!CGRectContainsPoint(self.frame, node.position)) {
            // mark enemy for removal
            [enemiesToRemove addObject:node];
            continue;
        }
    }
    if ([enemiesToRemove count] > 0) {
        [self.enemies removeChildrenInArray:enemiesToRemove];
    }
}
That takes care of removing each enemy from the level’s enemies array each time one goes off-screen. Now let’s modify the update: method, telling it to call updateEnemies, as well as a new method we haven’t yet implemented:
- (void)update:(CFTimeInterval)currentTime {
    /* Called before each frame is rendered */
    if (self.finished) return;

    [self updateBullets];
    [self updateEnemies];
    [self checkForNextLevel];
}
We started out that method by checking the finished property. Since we’re about to add code that can officially end a level, we want to be sure that we don’t keep doing additional processing after the level is complete! Then, just as we’re checking each frame to see if any bullets or enemies have gone off-screen, we’re going to call checkForNextLevel each frame to see if the current level is complete. Let’s add this method:
- (void)checkForNextLevel {
    if ([self.enemies.children count] == 0) {
        [self goToNextLevel];
    }
}
Transitioning to the Next Levels
The checkForNextLevel method in turn calls another method we haven’t yet implemented. The goToNextLevel method marks this level as finished, displays some text on the screen to let the player know, then starts the next level:
- (void)goToNextLevel {
    self.finished = YES;

    SKLabelNode *label = [SKLabelNode labelNodeWithFontNamed:@"Courier"];
    label.text = @"Level Complete!";
    label.fontColor = [SKColor blueColor];
    label.fontSize = 32;
    label.position = CGPointMake(self.frame.size.width * 0.5,
                                 self.frame.size.height * 0.5);
    [self addChild:label];

    BIDLevelScene *nextLevel = [[BIDLevelScene alloc]
                                initWithSize:self.frame.size
                                levelNumber:self.levelNumber + 1];
    nextLevel.playerLives = self.playerLives;
    [self.view presentScene:nextLevel
                 transition:[SKTransition flipHorizontalWithDuration:1.0]];
}
The second half of the goToNextLevel method creates a new instance of BIDLevelScene and gives it all the start values it needs. It then tells the view to present the new scene, using a transition to smooth things over. The SKTransition class lets us pick from a variety of transition styles. Run the app and complete a level to see what this one looks like (see Figure 17-7).

Figure 17-7. Here you see a snapshot taken during the end-of-level screen-flipping transition
The transition in use here makes it looks like we’re flipping a card over its horizontal axis, but there are plenty more to choose from! See the documentation or header file for SKTransition to see more possibilities. We’ll use a couple more variations later in this chapter.
Now we’ve got a game that you can really play. You can clear level after level by knocking enemies upward off the screen. That’s OK, but there’s really not much challenge! We mentioned earlier that having enemies attack the player is one piece of missing gameplay, and now it’s time to make that happen. We’re going to make things a little harder by making the enemies fall down when they’re bumped, either from being hit by a bullet or from being touched by another enemy. We also want to make it so that being hit by a falling enemy takes a life away from the player. You also may have noticed that after a bullet hits an enemy, the bullet squiggles its way around the enemy and continues on its upward trajectory, which is pretty weird. We’re going to tackle all these things by implementing a collision-handling routine in BIDLevelScene.m.
The method for handling detected collisions is a delegate method for the SKPhysicsWorld class. Our scene has a physics world by default, but we need to set it up a little bit before it will tell us anything. For starters, it’s good to let the compiler know that we’re going to implement a delegate protocol, so let’s add this declaration to the class extension declaration near the top of the file:
@interface BIDLevelScene ()<SKPhysicsContactDelegate>
We still need to configure the world a bit (giving it a slightly less cruel amount of gravity) and tell it who its delegate is. To do so, we add these bold lines near the end of the init method, at the same place we’ve been adding all our other setup:
self.physicsWorld.gravity = CGVectorMake(0, -1);
self.physicsWorld.contactDelegate = self;
Now that we’ve set the physics world’s contactDelegate to be the BIDLevelScene, we can implement the relevant delegate method. The core of the method looks like this:
- (void)didBeginContact:(SKPhysicsContact *)contact {
    if (contact.bodyA.categoryBitMask == contact.bodyB.categoryBitMask) {
        // Both bodies are in the same category
        SKNode *nodeA = contact.bodyA.node;
        SKNode *nodeB = contact.bodyB.node;

        // What do we do with these nodes?
    } else {
        SKNode *attacker = nil;
        SKNode *attackee = nil;

        if (contact.bodyA.categoryBitMask > contact.bodyB.categoryBitMask) {
            // Body A is attacking Body B
            attacker = contact.bodyA.node;
            attackee = contact.bodyB.node;
        } else {
            // Body B is attacking Body A
            attacker = contact.bodyB.node;
            attackee = contact.bodyA.node;
        }
        if ([attackee isKindOfClass:[BIDPlayerNode class]]) {
            self.playerLives--;
        }
        // What do we do with the attacker and the attackee?
    }
}
Go ahead and add that method, but if you look at it right now, you’ll see that it doesn’t really do much yet. In fact, the only concrete result of that method is to reduce the number of player lives each time a falling enemy hits the player’s ship. But the enemies aren’t falling yet!
The idea behind this implementation is to look at the two colliding objects and to figure out whether they are of the same category (in which case, they are “friends” to one another) or if they are of different categories. If they are of different categories, we have to determine who is attacking whom. If you look at the order of the categories declared in BIDPhysicsCategories.h, you’ll see that they are specified in order of increased “attackyness”: Player nodes can be attacked by Enemy nodes, which in turn can be attacked by PlayerMissile nodes. That means that we can use a simple greater-than comparison to figure out who is the “attacker” in this scenario.
For the sake of simplicity and modularity, we don’t really want the scene to decide how each object should react to being attacked by an enemy or bumped by another object. It’s much better to build those details into the affected node classes themselves. But, as you see in the method we’ve got, the only thing we’re sure of is that each side has an SKNode instance. Rather than coding up a big chain of if-else statements to ask each node which SKNode subclass it belongs to, we can use regular polymorphism to let each of our node classes handle things in its own way. In order for that to work, we have to add methods to SKNode, with default implementations that do nothing and let our subclasses override them where appropriate. This calls for a category! Not a Sprite Kit physics category this time, but a genuine Objective-C @category definition.
To add a category to SKNode, right-click the TextShooter folder in Xcode’s project navigator and choose New File… from the popup menu. From the assistant’s iOS/Cocoa Touch section, choose Objective-C category, and then click Next. Give it a Category name of Extra and type in SKNode in the Category on field. Now click Next again and create the files. Select SKNode+Extra.h and add the bold method declarations shown here:
#import <SpriteKit/SpriteKit.h>

@interface SKNode (Extra)

- (void)receiveAttacker:(SKNode *)attacker contact:(SKPhysicsContact *)contact;
- (void)friendlyBumpFrom:(SKNode *)node;

@end
Switch over to the matching .m file and enter the following empty definitions:
#import "SKNode+Extra.h"

@implementation SKNode (Extra)

- (void)receiveAttacker:(SKNode *)attacker contact:(SKPhysicsContact *)contact {
    // default implementation does nothing
}

- (void)friendlyBumpFrom:(SKNode *)node {
    // default implementation does nothing
}

@end
Now head back over to BIDLevelScene.m to finish up its part of the collision handling. Start by adding a new header at the top:
#import "BIDLevelScene.h"
#import "BIDPlayerNode.h"
#import "BIDEnemyNode.h"
#import "BIDBulletNode.h"
#import "SKNode+Extra.h"
Next, go back to the didBeginContact: method, where you’ll add the bits that actually do some work:
- (void)didBeginContact:(SKPhysicsContact *)contact {
    if (contact.bodyA.categoryBitMask == contact.bodyB.categoryBitMask) {
        // Both bodies are in the same category
        SKNode *nodeA = contact.bodyA.node;
        SKNode *nodeB = contact.bodyB.node;

        // What do we do with these nodes?
        [nodeA friendlyBumpFrom:nodeB];
        [nodeB friendlyBumpFrom:nodeA];
    } else {
        SKNode *attacker = nil;
        SKNode *attackee = nil;

        if (contact.bodyA.categoryBitMask > contact.bodyB.categoryBitMask) {
            // Body A is attacking Body B
            attacker = contact.bodyA.node;
            attackee = contact.bodyB.node;
        } else {
            // Body B is attacking Body A
            attacker = contact.bodyB.node;
            attackee = contact.bodyA.node;
        }
        if ([attackee isKindOfClass:[BIDPlayerNode class]]) {
            self.playerLives--;
        }
        // What do we do with the attacker and the attackee?
        if (attacker) {
            [attackee receiveAttacker:attacker contact:contact];
            [self.playerBullets removeChildrenInArray:@[attacker]];
            [self.enemies removeChildrenInArray:@[attacker]];
        }
    }
}
All we added here were a few calls to our new methods. If the collision is “friendly fire,” such as two enemies bumping into each other, we’ll tell each of them that it received a friendly bump from the other. Otherwise, after figuring out who attacked whom, we tell the attackee that it’s come under attack from another object. Finally, we remove the attacker from whichever of the playerBullets or enemies nodes it may be in. We tell each of those nodes to remove the attacker, even though it can only be in one of them, but that’s OK. Telling a node to remove a child it doesn’t have isn’t an error—it just has no effect.
Adding Custom Collision Behavior to Enemies
Now that all that’s in place, we can implement some specific behaviors for our nodes by overriding the category we added to SKNode.
Select BIDEnemyNode.mand add the following two methods:
- (void)friendlyBumpFrom:(SKNode *)node {
    self.physicsBody.affectedByGravity = YES;
}

- (void)receiveAttacker:(SKNode *)attacker contact:(SKPhysicsContact *)contact {
    self.physicsBody.affectedByGravity = YES;
    CGVector force = BIDVectorMultiply(attacker.physicsBody.velocity,
                                       contact.collisionImpulse);
    CGPoint myContact = [self.scene convertPoint:contact.contactPoint
                                          toNode:self];
    [self.physicsBody applyForce:force
                         atPoint:myContact];
}
The first of those, friendlyBumpFrom:, simply turns on gravity for the affected enemy. So, if one enemy is in motion and bumps into another, the second enemy will suddenly notice gravity and start falling downward.
The receiveAttacker:contact: method, which is called if the enemy is hit by a bullet, first turns on gravity for the enemy. However, it also uses the contact data that was passed in to figure out just where the contact occurred and applies a force to that point, giving it an extra push in the direction that the bullet was fired.
Run the game, and you’ll see that you can shoot at enemies to knock them down. You’ll also see that any other enemies bumped into by a falling enemy will fall, as well.
Note At the start of each level, the world performs one step of its physics simulation to make sure that there aren’t physics bodies overlapping each other. This will produce an interesting side effect at higher levels, since there will be an increasing chance that multiple randomly placed enemies will occupy overlapping spaces. Whenever that happens, the enemies will be immediately shifted so they no longer overlap, and our collision-handling code will be triggered, which subsequently turns on gravity and lets them fall! This behavior wasn’t anything we planned on when we started building this game, but it turns out to be a happy accident that makes higher levels progressively more difficult, so we’re letting physics run its course!
If you let enemies hit you as they fall, the number of player lives decreases, but. . . hey wait, it just shows 5 all the time! The Lives display is set up when the level is created, but it’s never updated after that. Fortunately this is easily fixed by implementing the setPlayerLives: setter instead of using the automatically synthesized setter, like this:
- (void)setPlayerLives:(NSUInteger)playerLives  {
    _playerLives = playerLives;
    SKLabelNode *lives = (id)[self childNodeWithName:@"LivesLabel"];
    lives.text = [NSString stringWithFormat:@"Lives: %lu",
                  (unsigned long)_playerLives];
}
The preceding snippet uses the name we previously associated with the label (in the init method) to find the label again and set a new text value. Play the game again, and you’ll see that, as you let enemies rain down on your player, the number of lives will decrease to zero. And then the game doesn’t end. After the next hit, you end up with a very large number of lives indeed, as you can see in Figure 17-8.
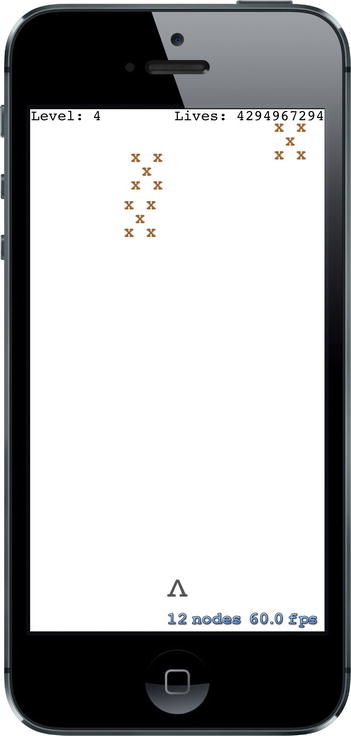
Figure 17-8. That’s a lot of lives
So what’s going on here? Well, we are using an unsigned integer to hold the number of lives. And when you’re using unsigned integers and dip below zero, you sort of wrap around that zero boundary and end up with the maximum allowed unsigned integer value instead!
The reason this problem appears is really because we haven’t written any code to detect the end of the game; that is, the point in time when the number of player lives hits zero. We’ll do that soon, but first let’s make our on-screen collisions a bit more stimulating.
Spicing Things up with Particles
One of the nice features of Sprite Kit is the inclusion of a particle system. Particle systems are used in games to create visual effects simulating smoke, fire, explosions, and more. Right now, whenever our bullets hit an enemy or an enemy hits the player, the attacking object simply blinks out of existence. Let’s make a couple of particle systems to improve this situation!
Start out by pressing Cmd-N to make a new file. Select the iOS/Resource section on the left, and then choose SpriteKit Particle File on the right. Click Next, and on the following screen choose the Spark particle template. Click Next again and name this file MissileExplosion.sks.
You’ll see that Xcode creates the particle file and also adds a new resource called spark.png to the project. At the same time, the entire Xcode editing area switches over to the new particle file, showing you a huge, animated exploding thing.
We don’t want something quite this extravagant and enormous when our bullets hit enemies, so let’s reconfigure this thing. All the properties that define this particle’s animation are available in the SKNode Inspector, which you can bring up by pressing Opt-Cmd-7. Figure 17-9 shows both the massive explosion and the inspector.
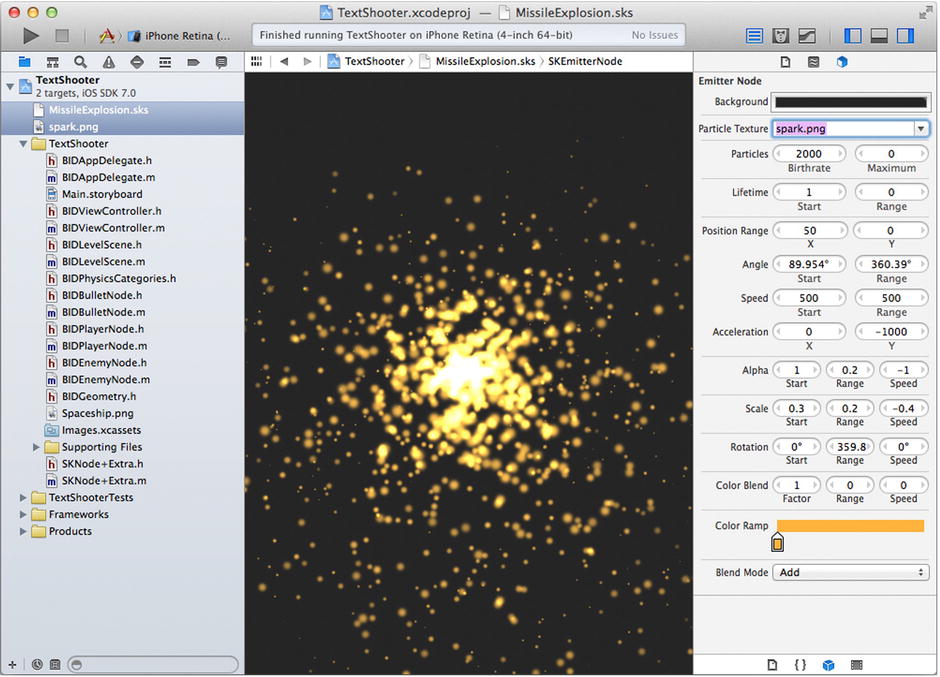
Figure 17-9. Explosion city! The parameters shown on the right define how the default particle looks
Now, for our bullet hit, let’s make it a much smaller explosion. It will have a whole different set of parameters, all of which you configure right in the inspector. First, fix the colors to match what our game looks like by clicking the Background color well and setting it to white. Next, click the small color well in the Color Ramp at the bottom and set it to black. Also, change the Blend Mode to Alpha, and now you’ll see that the flaming fountain has turned all inky.
The rest of the parameters are all numeric. Change them one at a time, setting them all as shown in Figure 17-10. At each step of the way, you’ll see the particle effect change until it eventually reaches its target appearance (see Figure 17-10).

Figure 17-10. This is the final missile explosion particle effect we want
Now make another particle system, once again using the Spark template. Name this one EnemyExplosion.sks and set its parameters as shown in Figure 17-11.
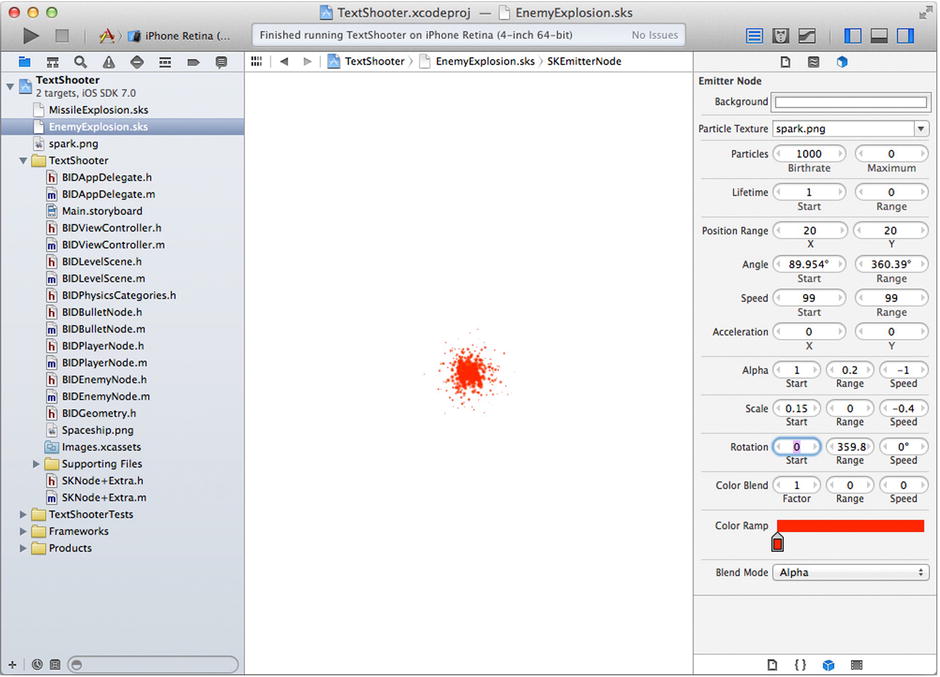
Figure 17-11. Here’s the enemy explosion we want to create. In case you’re seeing this book in black and white, the color we’ve chosen in the Color Ramp at the bottom is deep red
Putting Particles into the Scene
Now let’s start putting these particles to use. Switch over to BIDEnemyNode.m and add the bold code shown here to the bottom of the receiveAttacker:contact: method:
- (void)receiveAttacker:(SKNode *)attacker contact:(SKPhysicsContact *)contact {
    self.physicsBody.affectedByGravity = YES;
    CGVector force = BIDVectorMultiply(attacker.physicsBody.velocity,
                                       contact.collisionImpulse);
    CGPoint myContact = [self.scene convertPoint:contact.contactPoint
                                          toNode:self];
    [self.physicsBody applyForce:force
                         atPoint:myContact];

    NSString *path = [[NSBundle mainBundle] pathForResource:@"MissileExplosion"
                                                     ofType:@"sks"];
    SKEmitterNode *explosion = [NSKeyedUnarchiver unarchiveObjectWithFile:path];
    explosion.numParticlesToEmit = 20;
    explosion.position = contact.contactPoint;
    [self.scene addChild:explosion];
}
Run the game, shoot some enemies, and you’ll see a nice little explosion where each bullet hits an enemy, as shown in Figure 17-12.
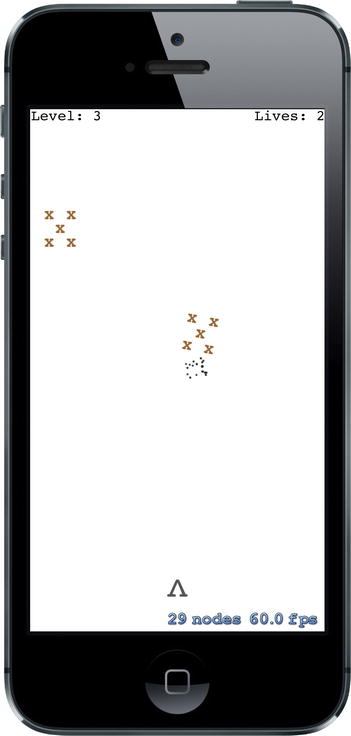
Figure 17-12. Bullets smash nicely after impact
Nice! Now let’s do something similar for those times an enemy smashes into a player’s ship. Select BIDPlayerNode.m and add this method:
- (void)receiveAttacker:(SKNode *)attacker contact:(SKPhysicsContact *)contact {
    NSString *path = [[NSBundle mainBundle] pathForResource:@"EnemyExplosion"
                                                     ofType:@"sks"];
    SKEmitterNode *explosion = [NSKeyedUnarchiver unarchiveObjectWithFile:path];
    explosion.numParticlesToEmit = 50;
    explosion.position = contact.contactPoint;
    [self.scene addChild:explosion];
}
Play again, and you’ll see a nice red splat every time an enemy hits the player, as shown in Figure 17-13.
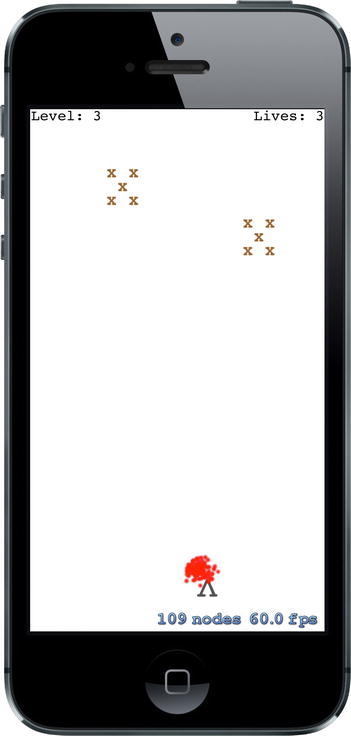
Figure 17-13. Ouch!
These changes are pretty simple, but they improve the feel of the game substantially. Now when things collide, you have visual consequences and can see that something happened.
As we mentioned before, we currently have a small problem in the game. When the number of lives hits zero, we need to end the game. What we’ll do is create a new scene class to transition to when the game is over. You’ve seen us do a scene transition before, when moving from one level to the next. This will be similar, but with a new class.
So, create a new Objective-C class. Use SKScene as the parent class and name the new class BIDGameOverScene.
We’ll start with a very simple implementation that just displays “Game Over” text and does nothing more. We’ll accomplish this by adding this code to the @implementation in BIDGameOverScene.m:
- (instancetype)initWithSize:(CGSize)size {
    if (self = [super initWithSize:size]) {
        self.backgroundColor = [SKColor purpleColor];
        SKLabelNode *text = [SKLabelNode labelNodeWithFontNamed:@"Courier"];
        text.text = @"Game Over";
        text.fontColor = [SKColor whiteColor];
        text.fontSize = 50;
        text.position = CGPointMake(self.frame.size.width * 0.5,
                                    self.frame.size.height * 0.5);
        [self addChild:text];
    }
    return self;
}
Now let’s switch back to BIDLevelScene.m. We’ll need to import the header for the new scene at the top:
#import "BIDLevelScene.h"
#import "BIDPlayerNode.h"
#import "BIDEnemyNode.h"
#import "BIDBulletNode.h"
#import "SKNode+Extra.h"
#import "BIDGameOverScene.h"
The basic action of what to do when the game ends is defined by this new method. Here, we both show an extra explosion and kick off a transition to the new scene we just created:
- (void)triggerGameOver {
    self.finished = YES;

    NSString *path = [[NSBundle mainBundle] pathForResource:@"EnemyExplosion"
                                                     ofType:@"sks"];
    SKEmitterNode *explosion = [NSKeyedUnarchiver unarchiveObjectWithFile:path];
    explosion.numParticlesToEmit = 200;
    explosion.position = _playerNode.position;
    [self addChild:explosion];
    [_playerNode removeFromParent];

    SKTransition *transition = [SKTransition doorsOpenVerticalWithDuration:1.0];
    SKScene *gameOver = [[BIDGameOverScene alloc] initWithSize:self.frame.size];
    [self.view presentScene:gameOver transition:transition];
}
Next, create this new method that will check for the end of the game, call triggerGameOverif it’s time, and return either YES to indicate the game ended or NO to indicate that it’s still on:
- (BOOL)checkForGameOver {
    if (self.playerLives == 0) {
        [self triggerGameOver];
        return YES;
    }
    return NO;
}
Finally, add a check to the existing update: method. It checks for the game over state and only checks for a potential next level transition if the game is still going. Otherwise, there’s a risk that the final enemy on a level could take the player’s final life and trigger two scene transitions at once!
- (void)update:(CFTimeInterval)currentTime {
    if (self.finished) return;

    [self updateBullets];
    [self updateEnemies];
    if (![self checkForGameOver]) {
        [self checkForNextLevel];
    }
}
Now run the game again, let falling enemies damage your ship five times, and you’ll see the Game Over screen, as shown in Figure 17-14.
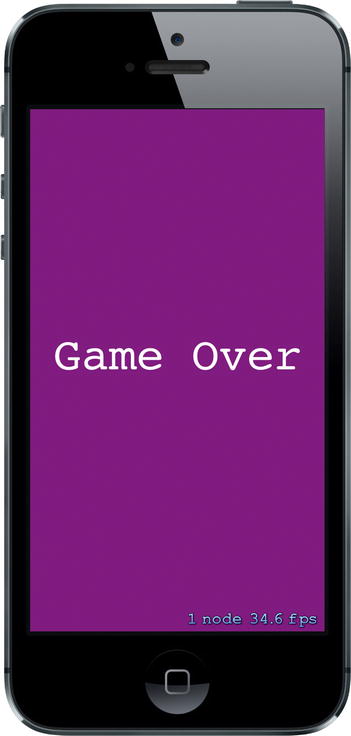
Figure 17-14. That’s it, man. Game over, man—game over
At last, a Beginning (Create a StartScene)
This leads us to another problem: What do we do after the game is over? We could allow the player to tap to restart the game; but while thinking of that, a thought crossed my mind. Shouldn’t this game have some sort of start screen, so the player isn’t immediately thrust into a game at launch time? And shouldn’t the game over screen lead you back there? Of course the answer to both questions is yes! Go ahead and create another new Objective-C class, once again using SKScene as the superclass, and this time naming it BIDStartScene.
We’re going to make a super-simple start scene here. All it will do is display some text and start the game when the user taps anywhere. Add all the bold code shown here to complete this class:
#import "BIDStartScene.h"
#import "BIDLevelScene.h"

@implementation BIDStartScene

- (instancetype)initWithSize:(CGSize)size {
    if (self = [super initWithSize:size]) {
        self.backgroundColor = [SKColor greenColor];

        SKLabelNode *topLabel = [SKLabelNode labelNodeWithFontNamed:@"Courier"];
        topLabel.text = @"TextShooter";
        topLabel.fontColor = [SKColor blackColor];
        topLabel.fontSize = 48;
        topLabel.position = CGPointMake(self.frame.size.width * 0.5,
                                    self.frame.size.height * 0.7);
        [self addChild:topLabel];

        SKLabelNode *bottomLabel = [SKLabelNode labelNodeWithFontNamed:
                                    @"Courier"];
        bottomLabel.text = @"Touch anywhere to start";
        bottomLabel.fontColor = [SKColor blackColor];
        bottomLabel.fontSize = 20;
        bottomLabel.position = CGPointMake(self.frame.size.width * 0.5,
                                        self.frame.size.height * 0.3);
        [self addChild:bottomLabel];

    }
    return self;
}

- (void)touchesBegan:(NSSet *)touches withEvent:(UIEvent *)event {
    SKTransition *transition = [SKTransition doorwayWithDuration:1.0];
    SKScene *game = [[BIDLevelScene alloc] initWithSize:self.frame.size];
    [self.view presentScene:game transition:transition];
}

@end
Now go back to BIDGameOverScene.m, so we can make the game over scene perform a transition to the start scene. Add this header import:
#import "BIDGameOverScene.h"
#import "BIDStartScene.h"
And then add these two methods:
- (void)didMoveToView:(SKView *)view {
    [self performSelector:@selector(goToStart) withObject:nil afterDelay:3.0];
}

- (void)goToStart {
    SKTransition *transition = [SKTransition flipVerticalWithDuration:1.0];
    SKScene *start = [[BIDStartScene alloc] initWithSize:self.frame.size];
    [self.view presentScene:start transition:transition];
}
The didMoveToView: method is called on any scene after it’s been put in place in a view. Here, we simply trigger a three second pause, followed by a transition back to the start scene.
There’s just one more piece of the puzzle to make all our scenes transition to each other as they should. We need to change the app startup procedure so that, instead of jumping right into the game, it shows us the start screen instead. This takes us back to BIDViewController.m, where we first import the header for our start scene:
#import "BIDViewController.h"
#import "BIDLevelScene.h"
#import "BIDStartScene.h"
Then, in the viewDidLoad method, we just replace one scene class name with another:
    // Create and configure the scene.
    SKScene * scene = [BIDLevelScene sceneWithSize:skView.bounds.size];
    SKScene * scene = [BIDStartScene sceneWithSize:skView.bounds.size];
Now give it a whirl! Launch the app, and you’ll be greeted by the start scene. Touch the screen, play the game, die a lot, and you’ll get to the game over scene. Wait a few seconds, and you’re back to the start screen, as shown in Figure 17-15.
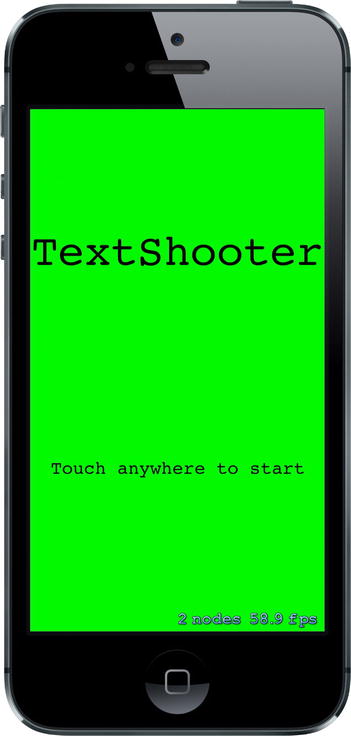
Figure 17-15. Finally, we made it to the start screen!
A Sound is Worth a Thousand Pictures
OK, just one more thing. We’ve been working on a video game, and video games are known for being noisy, but ours is completely silent! Fortunately, Sprite Kit contains audio playback code that’s extremely easy to use. Start by digging into the code archive for this chapter and finding the prepared audio files: enemyHit.wav, gameOver.wav, gameStart.wav, playerHit.wav, and shoot.wav. Drag all of them into Xcode’s project navigator.
Note These sound effects were created using the excellent, open source CFXR application (available from https://github.com/nevyn/cfxr). If you need quirky little sound effects, CFXR is hard to beat!
Now we’ll bake in easy playback for each of these sound effects. Start with BIDBulletNode.m, adding the bold code to the end of the bulletFrom:toward: method, just before the return line:
[bullet runAction:[SKAction playSoundFileNamed:@"shoot.wav"
                             waitForCompletion:NO]];
Next, switch over to BIDEnemyNode.m, adding these lines to the end of the receiveAttacker:contact: method:
[self runAction:[SKAction playSoundFileNamed:@"enemyHit.wav"
                           waitForCompletion:NO]];
Now do something extremely similar in BIDPlayerNode.m, adding these lines to the end of the receiveAttacker:contact: method:
[self runAction:[SKAction playSoundFileNamed:@"playerHit.wav"
                           waitForCompletion:NO]];
Those are enough in-game sounds to satisfy for the moment. Go ahead and run the game at this point, to try them out. I think you’ll agree that the simple addition of particles and sounds gives the game a much better feel.
Now let’s just add some effects for starting the game and ending the game. In BIDStartScene.m, add these lines at the end of the touchesBegan:withEvent: method:
[self runAction:[SKAction playSoundFileNamed:@"gameStart.wav"
                           waitForCompletion:NO]];
And finally, add these lines to the end of the triggerGameOver method in BIDLevelScene.m:
[self runAction:[SKAction playSoundFileNamed:@"gameOver.wav"
                           waitForCompletion:NO]];
Now when you play the game, you’ll be inundated by comforting bleeps and bloops, just like when you were a kid! Or maybe when your parents were kids. Or your grandparents! Just trust me, all the games used to sound pretty much like this.
Although TextShooter may be simple in appearance, the techniques you’ve learned in this chapter form the basis for all sorts of game development using Sprite Kit. You’ve learned how to organize your code across multiple node classes, group objects together using the node graph, and more. You’ve also been given a taste of what it’s like to build this sort of game one feature at a time, discovering each step along the way. Of course we’re not showing you all of our own missteps made along the way—this book is already about 700 pages long without that—but even counting those, this app really was built from scratch, in roughly the order shown in this chapter, in just a few short hours.
Once you get going, Sprite Kit allows you to build up a lot of structure in a short amount of time. As you’ve seen, you can use text-based sprites if you don’t have images handy. And if you want to swap them out for real graphics later, it’s no problem. One early reader even pointed out a middle path: Instead of plain old ASCII text in the strings in your source code, you can insert emoji characters by using Apple’s Character Viewer input source. Accomplishing this is left as an exercise to the reader!