
Navigation Controllers and Table Views
In the previous chapter, you mastered the basics of working with table views. In this chapter, you’ll get a whole lot more practice because we’re going to explore navigation controllers.
Table views and navigation controllers work hand in hand. Strictly speaking, a navigation controller doesn’t need a table view to do its thing. As a practical matter, however, when you implement a navigation controller, you almost always implement at least one table, and usually several, because the strength of the navigation controller lies in the ease with which it handles complex hierarchical data. On the iPhone’s small screen, hierarchical data is best presented using a succession of table views.
In this chapter, we’re going to build an application progressively, just as we did with the Pickers application back in Chapter 7. We’ll get the navigation controller and the root view controller working, and then we’ll start adding more controllers and layers to the hierarchy. Each view controller we create will reinforce some aspect of table use or configuration:
- How to drill down from table views into child table views
- How to drill down from table views into content views, where detailed data can be viewed and even edited
- How to use multiple sections within a table view
- How to use edit mode to allow rows to be deleted from a table view
- How to use edit mode to let the user reorder rows within a table view
That’s a lot, isn’t it? Well, let’s get started with an introduction to navigation controllers.
The main tool you’ll use to build hierarchical applications is UINavigationController. UINavigationController is similar to UITabBarController in that it manages, and swaps in and out, multiple content views. The main difference between the two is that UINavigationController is implemented as a stack, which makes it well suited to working with hierarchies.
Do you already know everything there is to know about stacks? If so, scan through the following subsection (or skip it altogether), and we’ll meet you at the beginning of the next subsection, “A Stack of Controllers.” If you’re new to stacks, continue reading. Fortunately, stacks are a pretty easy concept to grasp.
Stacky Goodness
A stack is a commonly used data structure that works on the principle of “last in, first out.” Believe it or not, a Pez dispenser is a great example of a stack. Ever try to load one? According to the little instruction sheet that comes with each and every Pez dispenser, there are a few easy steps. First, unwrap the pack of Pez candy. Second, open the dispenser by tipping its head straight back. Third, grab the stack (notice the clever way we inserted the word “stack” in there!) of candy, holding it firmly between your pointer finger and thumb, and insert the column into the open dispenser. Fourth, pick up all the little pieces of candy that flew all over the place because these instructions just never work.
OK, so far this example has not been particularly useful. But what happens next is. As you pick up the pieces and jam them, one at a time, into the dispenser, you are working with a stack. Remember that we said a stack was last in, first out? That also means first in, last out. The first piece of Pez you push into the dispenser will be the last piece that pops out. The last piece of Pez you push in will be the first piece you pop out. A computer stack follows the same rules:
- When you add an object to a stack, it’s called a push. You push an object onto the stack.
- The first object you push onto the stack is called the base of the stack.
- The last object you pushed onto the stack is called the top of the stack (at least until it is replaced by the next object you push onto the stack).
- When you remove an object from the stack, it’s called a pop. When you pop an object off the stack, it’s always the last one you pushed onto the stack. Conversely, the first object you push onto the stack will always be the last one you pop off the stack.
A Stack of Controllers
A navigation controller maintains a stack of view controllers. When you design your navigation controller, you’ll need to specify the very first view the user sees. As we’ve discussed in previous chapters, that view’s controller is called the root view controller, or just root controller, and is the base of the navigation controller’s stack of view controllers. As the user selects the next view to display, a new view controller is pushed onto the stack, and the view it controls appears. We refer to these new view controllers as subcontrollers. As you’ll see, this chapter’s application, Fonts, is made up of a navigation controller and several subcontrollers.
Take a look at Figure 9-1. Notice the title centered in the navigation bar and the back button on the left side of the navigation bar. The title of the navigation bar is populated with the title property of the top view controller in the navigation controller’s stack, and the title of the back button is populated with the title of the previous view controller. The back button acts similar to a web browser’s back button. When the user taps that button, the current view controller is popped off the stack, and the previous view becomes the current view.
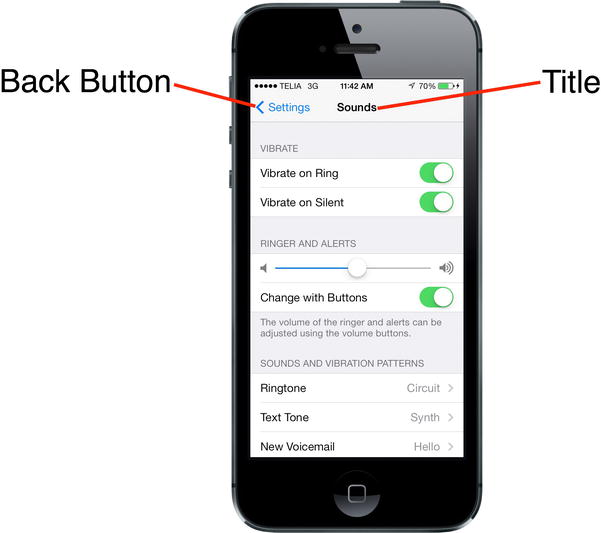
Figure 9-1. The Settings application uses a navigation controller. The back button at the upper left pops the current view controller off the stack, returning you to the previous level of the hierarchy. The title of the current content view controller is also displayed
We love this design pattern. It allows us to build complex hierarchical applications iteratively. We don’t need to know the entire hierarchy to get things up and running. Each controller only needs to know about its child controllers, so it can push the appropriate new controller object onto the stack when the user makes a selection. You can build up a large application from many small pieces this way, which is exactly what we’re going to do in this chapter.
The navigation controller is really the heart and soul of many iPhone apps; however, when it comes to iPad apps, the navigation controller plays a more marginal role. A typical example of this is the Mail app, which features a hierarchical navigation controller to let users navigate among all their mail servers, folders, and messages. In the iPad version of Mail, the navigation controller never fills the screen, but appears either as a sidebar or a temporary view covering part of the main view. We’ll dig into that usage a little later, when we cover iPad–specific GUI functionality in Chapter 11.
Fonts, a Simple Font Browser
The application we’re about to build will show you how to do most of the common tasks associated with displaying a hierarchy of data. When the application launches, you’ll be presented with a list of all the font families that are included with iOS, as shown in Figure 9-2. A font family is a group of closely related fonts, or fonts that are stylistic variations on one another. For example, Helvetica, Helvetica-Bold, Helvetic-Oblique, and other variations are all included in the Helvetica font family.
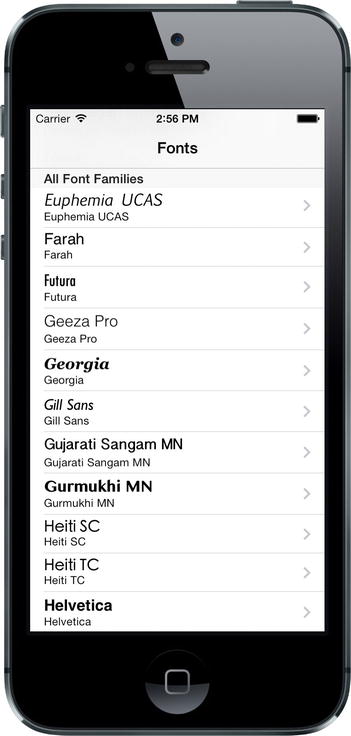
Figure 9-2. This chapter application’s root view. Note the accessory icons on the right side of the view. This particular type of accessory icon is called a disclosure indicator. It tells the user that touching that row drills down to another table view
Selecting any row in this top-level view will push a view controller onto the navigation controller’s stack. The icons on the right side of each row are called accessory icons. This particular accessory icon (the gray arrow) is called a disclosure indicator, and its presence lets the user know that touching that row drills down to another table view.
Meet the Subcontrollers
Before we start building the Fonts application, let’s take a quick look at each of the views displayed by our subcontrollers.
The Font List Controller
Touching any row of the table shown in Figure 9-2 will bring up the child view shown in Figure 9-3.

Figure 9-3. The first of the Fonts application’s subcontrollers implements a table in which each row contains a detail disclosure button
The accessory icon to the right of each row in Figure 9-3 is a bit different. This accessory is known as a detail disclosure button. Unlike the disclosure indicator, the detail disclosure button is not just an icon—it’s a control that the user can tap. This means that you can have two different options available for a given row: one action is triggered when the user selects the row, and another action is triggered when the user taps the button. Tapping the small info button within this accessory should allow the user to view, and perhaps edit, more detailed information about the current row. Meanwhile, the presence of the right-pointing arrow should indicate to the user that there is some deeper navigation to be found by tapping elsewhere in the row.
The Font Sizes View Controller
Touching any row of the table shown in Figure 9-3 will bring up the child view shown in Figure 9-4.
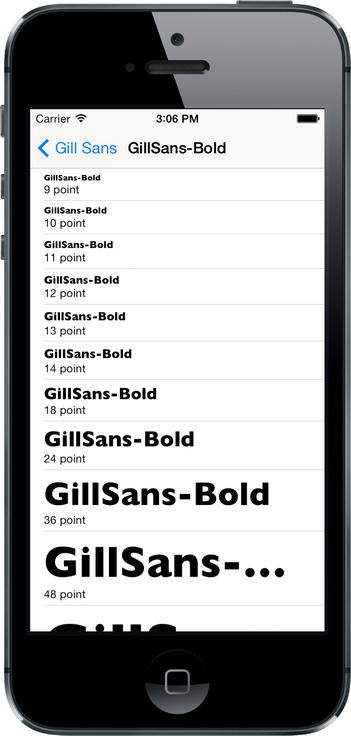
Figure 9-4. Located one layer deeper than the Font List View Controller, the Font Sizes View Controller shows multiple sizes of the chosen font, one per row
Here’s a recap of when to use disclosure indicators and detail disclosure buttons:
- If you want to offer a single choice for a row tap, don’t use an accessory icon if a row tap will only lead to a more detailed view of that row.
- Mark the row with a disclosure indicator (right-pointing arrow) if a row tap will lead to a new view listing more items (not a detail view).
- If you want to offer two choices for a row, mark the row with either a detail disclosure indicator or a detail button. This allows the user to tap the row for a new view or the disclosure button for more details.
The Font Info View Controller
The final of our application’s subcontrollers, and the only one that is not a table view, is shown in Figure 9-5. This is the view that appears when you tap on the info icon for any row in the Font List Controller shown in Figure 9-2.

Figure 9-5. The final view controller in the Fonts application allows you to view the chosen font at any size you want
This view lets the user drag a slider to adjust the size of the displayed font. It also includes a switch that lets the user specify whether this font should be listed among the user’s favorites. If any fonts are set as favorites, they’ll appear within a separate group in the root view controller.
The Fonts Application’s Skeleton
Xcode offers a perfectly good template for creating navigation-based applications, and you will likely use it much of the time when you need to create hierarchical applications. However, we’re not going to use that template today. Instead, we’ll construct our navigation-based application from the ground up, so we get a feel for how everything fits together. We’ll also walk through it one piece at a time, so it should be easy to keep up.
In Xcode, press ![]()
![]() N to create a new project, select Empty Application from the iOS Application template list, and then click Next to continue. Set Fonts as the Product Name, Apress as the Organization Name, com.apress as the Company Identifier, and BID as the Class Prefix. Also, make sure that Use Core Data is not checked, that Devices is set to iPhone, and then click Next and choose the location to save your project.
N to create a new project, select Empty Application from the iOS Application template list, and then click Next to continue. Set Fonts as the Product Name, Apress as the Organization Name, com.apress as the Company Identifier, and BID as the Class Prefix. Also, make sure that Use Core Data is not checked, that Devices is set to iPhone, and then click Next and choose the location to save your project.
As you’ll see if you select the project navigator and look inside the Fonts folder, this template gives you an application delegate and not much else. At this point, there are no view controllers or navigation controllers.
To make this app run, we’ll need to add a navigation controller, which includes a navigation bar. We’ll also need to add a series of views and view controllers for the navigation controller to show. The first of these views is the top-level view shown in Figure 9-2.
Creating the Storyboard
Our app’s GUI is going to be contained in a single storyboard. This is the best, most compact way to manage a predetermined hierarchy of view controllers. Press ![]() N to open the file creation assistant and choose Storyboard from the User Interface section. On the next screen, set the Device Family to iPhone; and on the screen after that, name the file Main.storyboard and save it in your project.
N to open the file creation assistant and choose Storyboard from the User Interface section. On the next screen, set the Device Family to iPhone; and on the screen after that, name the file Main.storyboard and save it in your project.
Now you need to make sure the app loads its GUI configuration from this storyboard, so select the top-level Fonts item in the project navigator. In the editing area, select the Fonts item from the Targets section on the left. Next, look for the Deployment Info section under the General tab, where you’ll find a combo box for Main Interface. Select Main.storyboard to finish that piece of configuration.
Apart from that, you’ll need to remove the code from the application delegate that sets up a basic GUI when there’s no storyboard or nib file to load, so select BIDAppDelegate.m. The first method is the familiar application:didFinishLaunchingWithOptions: method that we’ve dealt with before. Delete all but the last line in that method, leaving just return YES;
Setting Up the Navigation Controller
We now need to create the basic navigation structure for our application. At the core of this will be a UINavigationController, which manages the stack of view controllers that a user can navigate between, and a UITableViewController that shows the top-level list of rows we’re going to display. As it turns out, Interface Builder makes this remarkably easy to do.
Select Main.storyboard and use the object library to search for UINavigationController. Drag one of those into the editing area, and you’ll see that you actually get two scenes instead of one, similar to what you saw when creating a tab view controller in Chapter 7. On the left is a UINavigationController, which has a connection wired to the second scene, which contains a UITableViewController. You’ll see that the table has the title Root View Controller. Click that title, open the attributes inspector, and then set the title to Fonts.
It’s worth taking a moment to think about this. What exactly do we get by configuring our application to load the initial scene from this storyboard? First, we get the view created by the navigation controller, a composite view that contains a combination of two things: the navigation bar at the top of the screen (which usually contains some sort of title and often a back button of some kind on the left) and the content of whatever the navigation controller’s current view controller wants to display. In our case, the lower part of the display will be filled with the table view that was created alongside the navigation controller.
You’ll learn more about how to control what the navigation controller shows in the navigation bar as we go forward. You’ll also gain an understanding of how the navigation controller shifts focus from one subordinate view controller to another. For now, you’ve laid enough groundwork that you can start defining what your custom view controllers are going to do.
At this point, the application skeleton is essentially complete. Save all your files, and then build and run the app. If all is well, the application should launch, and a navigation bar with the title Fonts should appear. You haven’t given the table view any information about what to show yet, so no rows will display at this point (see Figure 9-6).
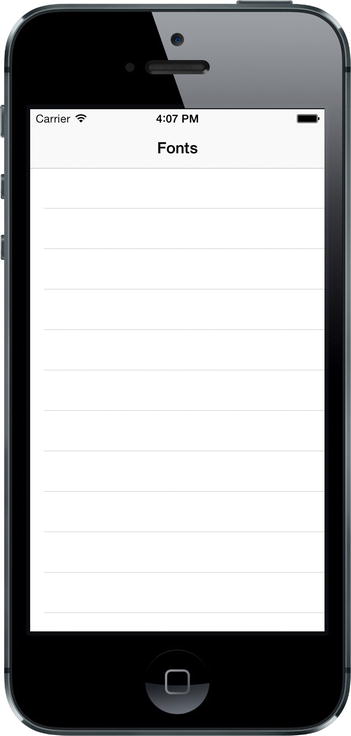
Figure 9-6. The application skeleton in action
Keeping Track of Favorites
At several points in this application, we’re going to let the user maintain a list of favorite fonts by letting them add chosen fonts, view a whole list of already-chosen favorites, and remove fonts from the list. In order to manage this list in a consistent way, we’re going to make a new class that will hang onto an array of favorites and store them in the user’s preferences settings for this application. You’ll learn a lot more about user preferences in Chapter 12, but here we’ll just touch on some basics.
Start by creating a new class. Select the Fonts folder in the project navigator and press ![]() N to bring up the new file assistant. Select Cocoa Touch in the left pane, select Objective-C class, and then click Next. On the following screen, choose NSObject to subclass from and name the new class BIDFavoritesList. After creating the files for this class, select BIDFavoritesList.h and add the bold code shown here:
N to bring up the new file assistant. Select Cocoa Touch in the left pane, select Objective-C class, and then click Next. On the following screen, choose NSObject to subclass from and name the new class BIDFavoritesList. After creating the files for this class, select BIDFavoritesList.h and add the bold code shown here:
#import <Foundation/Foundation.h>

@interface BIDFavoritesList : NSObject

+ (instancetype)sharedFavoritesList;

- (NSArray *)favorites;

- (void)addFavorite:(id)item;
- (void)removeFavorite:(id)item;

@end
In the preceding snippet, we declared the API for our new class. For starters, we declared a factory method called sharedFavoritesListthat returns an instance of this class. No matter how many times this method is called, the same instance will always be returned. The idea is that BIDFavoritesList should work as a singleton; instead of using multiple instances, we’ll just use one instance throughout the application.
Note The declaration for sharedFavoritesList has a return type that you may not recognize: instancetype. This is a fairly recent addition to Objective-C. It’s now recommended that all factory methods and init methods that would have otherwise used id as their return type should now use instancetype instead. The problem with using id is the lack of type safety. In the past, you could easily write wrong-headed code like “NSString *s = [NSArray array];” and the compiler wouldn’t complain (though your program would crash later, when you tried to send one of NSString’s methods to the NSArray you created). Using instancetype lets you keep a level of genericness, while still telling the compiler that the return value should really be limited to the type of the message recipient (or one of its subclasses).
instancetype is not being used by all of Apple’s code yet, but some classes in the iOS 7 SDK have been updated to use it. In fact, the bad array assignment shown in the previous paragraph now generates a compiler warning, since NSArray’s array class method now has instancetype as its return type. This will probably be used more and more in the future, so it’s worth getting started with.
Next, we defined methods for accessing the array, as well as adding and deleting items.
Now we want to switch over to BIDFavoritesList.m, so we can start implementing it. For starters, let’s add this property to the class extension at the top:
#import "BIDFavoritesList.h"

@interface BIDFavoritesList ()

@property (strong, nonatomic) NSMutableArray *favorites;

@end
Note that we’re declaring a property named favorites, of type NSMutableArray. In our header file, we just declared a method called favorites that returns an NSArray. Since declaring a property also typically declares the existence of a getter and a setter, won’t this lead to a conflict? Fortunately, no. Since our property’s type is a subclass of what we are using in the header, it will work just fine. This means that internally, within our class, we can use a mutable array; however, what we expose through our API seems to be an immutable NSArray. The API that this class provides should be considered a contract by any users of this code. If another piece of code digs deep, discovers that this class is actually returning an NSMutableArray, and uses it directly as such, then that code is effectively breaking the contract, and that is Not Our Problem.
Moving on, here’s the sharedFavoritesList factory method:
+ (instancetype)sharedFavoritesList {
    static BIDFavoritesList *shared = nil;
    static dispatch_once_t onceToken;
    dispatch_once(&onceToken, ^{
        shared = [[self alloc] init];
    });
    return shared;
}
This may look complicated, but it really just does one thing: it creates a new instance of the class, and returns it. The creation part is tucked inside a block of code which is passed off to the dispatch_once() function, which makes sure that the code in question runs exactly one time. Every time this method is called after the first time, the instance has already been created, so it is simply returned.
Now, it’s time for the init method:
- (instancetype)init {
    self = [super init];
    if (self) {
        NSUserDefaults *defaults = [NSUserDefaults standardUserDefaults];
        NSArray *storedFavorites = [defaults objectForKey:@"favorites"];
        if (storedFavorites) {
            self.favorites = [storedFavorites mutableCopy];
        } else {
            self.favorites = [NSMutableArray array];
        }
    }
    return self;
}
This method uses the NSUserDefaults class (more about that in Chapter 12) to see if there are any favorites stored in preferences. If so, it puts a mutable copy of the favorites into the favorites property; otherwise, it puts a new, empty mutable array in there instead.
Let’s finish up by implementing the two methods for adding and removing favorites, as well as a method they will both call to immediately save their changes:
- (void)addFavorite:(id)item {
    [_favorites insertObject:item atIndex:0];
    [self saveFavorites];
}

- (void)removeFavorite:(id)item {
    [_favorites removeObject:item];
    [self saveFavorites];
}

- (void)saveFavorites {
    NSUserDefaults *defaults = [NSUserDefaults standardUserDefaults];
    [defaults setObject:self.favorites forKey:@"favorites"];
    [defaults synchronize];
}
Both addFavorite: and removeFavorite: are very straightforward. The only thing worth noting here is the fact that, instead of accessing the array through self.favorites (the preferred style through most of this book), we’re accessing the underlying instance variable _favorites instead. The reason for this is subtle: Even though we’ve defined the property in the class extension as an NSMutableArray, the compiler will find what we declared in the @interface in the header file when trying to resolve self.favorites, and that’s an immutable NSArray! This workaround diverges from our normal style, but it will work just fine.
Each of those methods calls the saveFavorites method, which uses the NSUserDefaults class to save the array in the user’s preferences. You’ll learn more about how this works in Chapter 12; but for now, it’s enough to know that the defaults object we grab here acts like a sort of persistent dictionary, and anything that we put in there will be available the next time we ask for it, even if the application has been stopped and restarted.
Creating the Root View Controller
Now we’re ready to start working on our first view controller. In the previous chapter, we used simple arrays of strings to populate our table rows. We’re going to do something similar here, but this time we’ll use the UIFont class to get a list of font families, and then use the names of those font families to populate each row. We’ll also use the fonts themselves to display the font names, so that each row will contain a small preview of what the font family contains.
It’s time to create the first controller class for this application. Select the Fonts folder in the project navigator and press ![]() N to bring up the new file assistant. Select Cocoa Touch in the left pane, select Objective-C class, and then click Next. On the following screen, enter UITableViewController for Subclass of, and then name the new class BIDRootViewController. Click Next, and then click Create to create the new class. Finally, select BIDRootViewController.m and add the bold lines in the snippet that follows to import the header for our favorites list and add a few properties:
N to bring up the new file assistant. Select Cocoa Touch in the left pane, select Objective-C class, and then click Next. On the following screen, enter UITableViewController for Subclass of, and then name the new class BIDRootViewController. Click Next, and then click Create to create the new class. Finally, select BIDRootViewController.m and add the bold lines in the snippet that follows to import the header for our favorites list and add a few properties:
#import "BIDRootViewController.h"
#import "BIDFavoritesList.h"

@interface BIDRootViewController ()

@property (copy, nonatomic) NSArray *familyNames;
@property (assign, nonatomic) CGFloat cellPointSize;
@property (strong, nonatomic) BIDFavoritesList *favoritesList;

@end
We’ll assign values to each of those properties from the outset, and then use them at various times while this class is in use. The familyNames array will contain a list of all the font families we’re going to display; the cellPointSize will contain the font size that we want to use in all of our table view cells; and favoritesList will contain a pointer to the BIDFavoritesList singleton.
Note You may notice that the familyNames property is declared using the copy keyword instead of strong. What’s up with that? Why should we be copying arrays willy-nilly? The reason is the potential existence of mutable arrays.
Imagine if we had declared the property using strong, and an outside piece of code passed in an instance of NSMutableArray to set the value of the familyNames property. If that original caller later decides to change the contents of that array, the BIDRootViewController instance will end up in an inconsistent state, where the contents of familyNames is no longer in sync with what’s on the screen! Using copy eliminates that risk, since calling copy on any NSArray (including any mutable subclasses) always gives us an immutable copy. Also, we don’t need to worry about the performance impact too much. As it turns out, sending copy to any immutable object doesn’t actually copy the object. Instead, it returns the same object after increasing its reference count. In effect, calling copy on an immutable object is the same as calling retain, which is what ARC might do behind the scenes anytime you set a strong property. So, it works out just fine for everyone, since the object can never change.
This situation applies to all value classeswhere the base class is immutable, but mutable subclasses exist. These value classes include NSArray, NSDictionary, NSSet, NSString, NSData, and a few more. Any time you want to hang onto an instance of one of these in a property, you should probably declare the property’s storage with copy instead of strong to avoid any problems.
Set up all of this class’s properties by adding the bold code shown here to the viewDidLoad method:
- (void)viewDidLoad
{
    [super viewDidLoad];

    self.familyNames = [[UIFont familyNames]
                        sortedArrayUsingSelector:@selector(compare:)];
    UIFont *preferredTableViewFont = [UIFont preferredFontForTextStyle:
                                      UIFontTextStyleHeadline];
    self.cellPointSize = preferredTableViewFont.pointSize;
    self.favoritesList = [BIDFavoritesList sharedFavoritesList];
}
In the preceding snippet, we populated familyNames by asking the UIFont class for all known family names, and then sorting the resulting array. We then used UIFont once again to ask for the preferred font for use in a headline. We did this using a new piece of functionality in iOS 7, which builds on the new font size setting that can be specified in the Settings app. This dynamic font sizing lets the user set an overall font scaling for system-wide use. Here, we used that font’s pointSize to establish a baseline font size that we’ll use elsewhere in this view controller. Finally, we grabbed the singleton favorites list.
Before we go on, let’s delete the initWithStyle: and didReceiveMemoryWarning methods, as well as any table view delegate or data source methods that are commented out (typically tableView:canEditRowAtIndexPath:, tableView:commitEditingStyle:, tableView:moveRowAtIndexPath:toIndexPath:, and tableView:canMoveRowAtIndexPath:)—we’re not going to use any of them in this class.
The idea behind this view controller is to show two sections. The first section is a list of all available font families, each of which leads to a list of all the fonts in the family. The second selection is for favorites, and it contains just a single entry that will lead the user to a list of their favorite fonts. However, if the user has no favorites (for example when the app is launched for the first time), we’d rather not show that second section at all, since it would just lead the user to an empty list. So, we’ll have to do a few things throughout the rest of this class to compensate for this eventuality. The first of these is to implement this method:
- (void)viewWillAppear:(BOOL)animated {
    [self.tableView reloadData];
}
The reason for this is that there may be times when the set of things we’re going to display might change from one viewing to the next. For example, the user may start with no favorites, but then drill down, view a font, set it as a favorite, and then come back out to the root view. At that time, we need to reload the table view, so that the second section will appear.
Next, we’re going to implement a sort of utility method for use within this class. At a couple of points, while configuring the table view via its data source methods, we’ll need to be able to figure out which font we want to display in a cell. We put that functionality into a method of its own:
- (UIFont *)fontForDisplayAtIndexPath:(NSIndexPath *)indexPath {
    if (indexPath.section == 0) {
        NSString *familyName = self.familyNames[indexPath.row];
        NSString *fontName = [[UIFont fontNamesForFamilyName:familyName]
                              firstObject];
        return [UIFont fontWithName:fontName size:self.cellPointSize];
    } else {
        return nil;
    }
}
The preceding method uses the UIFont class, first to find all the font names for the given family name, and then later to grab the first font name within that family. We don’t necessarily know that the first named font in a family is the best one to represent the whole family, but it’s as good a guess as any.
Now, let’s move on to the meat of this view controller: the table view datasource methods. First up, let’s look at the number of sections:
- (NSInteger)numberOfSectionsInTableView:(UITableView *)tableView {
#warning Potentially incomplete method implementation.
    // Return the number of sections.
    if ([self.favoritesList.favorites count] > 0) {
        return 2;
    } else {
        return 1;
    }
    return 0;
}
We use the favorites list to determine whether we want to show the second section. Next, we tackle the number of sections in each row:
- (NSInteger)tableView:(UITableView *)tableView
 numberOfRowsInSection:(NSInteger)section
{
#warning Incomplete method implementation.
    // Return the number of rows in the section.
    if (section == 0) {
        return [self.familyNames count];
    } else {
        return 1;
    }
    return 0;
}
That one’s also pretty simple. We just use the section number to determine whether the section is showing all family names, or a single cell linking to the list of favorites. Now let’s define one other method, an optional method in the UITableViewDataSource protocol that lets us specify the title for each of our sections:
- (NSString *)tableView:(UITableView *)tableView
titleForHeaderInSection:(NSInteger)section {
    if (section == 0) {
        return @"All Font Families";
    } else {
        return @"My Favorite Fonts";
    }
}
The preceding snippet implements another simple method. It uses the section number to determine which header title to use. The final core method that every table view data source must implement is the one for configuring each cell, and ours looks like this:
- (UITableViewCell *)tableView:(UITableView *)tableView
         cellForRowAtIndexPath:(NSIndexPath *)indexPath
{
    static NSString *CellIdentifier = @"Cell";
    UITableViewCell *cell = [tableView dequeueReusableCellWithIdentifier:CellIdentifier
                                                            forIndexPath:indexPath];

    static NSString *FamilyNameCell = @"FamilyName";
    static NSString *FavoritesCell = @"Favorites";
    UITableViewCell *cell = nil;

    // Configure the cell...
    if (indexPath.section == 0) {
        cell = [tableView dequeueReusableCellWithIdentifier:FamilyNameCell
                                               forIndexPath:indexPath];
        cell.textLabel.font = [self fontForDisplayAtIndexPath:indexPath];
        cell.textLabel.text = self.familyNames[indexPath.row];
        cell.detailTextLabel.text = self.familyNames[indexPath.row];
    } else {
        cell = [tableView dequeueReusableCellWithIdentifier:FavoritesCell
                                               forIndexPath:indexPath];
    }

    return cell;
}
In the preceding snippet, we define two different cell identifiers that we will use to point out two different cells from the storyboard. We haven’t configured those yet, but we will soon! Next, we use the section number to determine which of those cells we want to show for the current indexPath. If the cell is meant to contain a font family name, then we put the family name into both its label and its detailLabel. We also use a font from the family (the one we get from the fontForDisplayAtIndexPath: method) within the text label, so that we’ll see the font family name shown in the font itself, as well as a smaller version in the standard system font.
Initial Storyboard Setup
Now that we have a view controller that we think should show something, let’s configure the storyboard to make things happen. Select Main.storyboard in the project navigator. You’ll see the navigation controller and the table view controller that we added earlier. The first thing we need to configure is the table view controller. By default, the controller’s class is set to UITableViewController. We need to change that and connect some outlets so that our table view will load successfully.
Select the Table View Controller by selecting the scene, and then selecting the small yellow icon that represents the view controller. Use the identity inspector to change the view controller’s Class to BIDRootViewController. After that, Ctrl-drag from the table view to the controller icon, select dataSource from the popup, and then do the same gesture and choose delegate. At this point, you’ve connected both of the table view’s outlets to the controller, so it knows which object to ask for information about its cells.
The other configuration we’ll need to do right now is to set up a pair of prototype cells to match the cell identifiers we used in our code. From the start, the table view has a single prototype cell. Select it and press Cmd-D to duplicate it, and you’ll see that you now have two cells. Select the first one, and then use the attributes inspector to set its Style to Subtitle and its Identifier to FamilyName. Next, select the second prototype cell, and then set its Style to Basic and its Identifier to Favorites. Also, double-click the title shown in the cell itself and change the text from Title to Favorites.
Now build and run this app on your device or the simulator, and you should see a nice list of fonts. But there is a problem! You might spot it as soon as you scroll down to the Damascus font; but to see the full extent of the problem, go all the way to the bottom and look at the Zapfino font. You’ll probably see something like what’s shown in Figure 9-7.
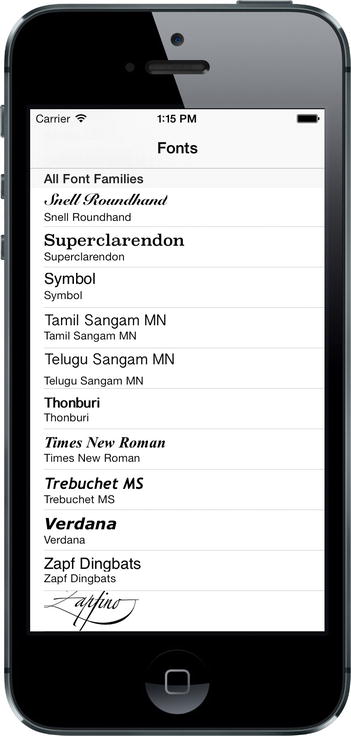
Figure 9-7. Some fonts are bigger than others
It turns out that Zapfino, and a few other fonts in the list, are way too tall to display this way. Even though we’re specifying the same point size for each font we use, the fact is that every font can have characters that extend outside the area we might expect it would take.
If you look at the lowercase letters in all the fonts you see in the list, you can see that the lowercase characters all have roughly the same height. However, you might also notice that some fonts have tall letters that go much higher than others or parts of characters that extend much further down than others. In typographical terms, these vertical distances are called ascenders and descenders. Fortunately, the UIFont class gives us a way to examine these heights for any given font. And the UITableViewDelegate protocol includes a method we can implement to specify a different height for each cell, so we can calculate a good height for each cell. Add this method to BIDRootViewController.m:
- (CGFloat)tableView:(UITableView *)tableView
heightForRowAtIndexPath:(NSIndexPath *)indexPath {
    if (indexPath.section == 0) {
        UIFont *font = [self fontForDisplayAtIndexPath:indexPath];
        return 25 + font.ascender - font.descender;
    } else {
        return tableView.rowHeight;
    }
}
This method calculates a height for each cell in the table view’s first section by calculating the difference between the font’s ascender and descender attributes. We add 25 to this number to make space for the detail text label shown below. In this case, 25 is simply a number that was arrived at by trial and error. Since the detail text label is always the same height, this will work just fine.
With that method in place, you can build and run, and you will see that each row is now perfectly adapted to the size of the font it contains. Nice!
First Subcontroller: The Font List View
Our app currently just shows a list of font families, and nothing more. We want to add the ability for a user to touch a font family and see all the fonts it contains, so let’s make a new view controller that can manage a list of fonts. Use Xcode’s new file assistant to create a new Objective-C class called BIDFontListViewController as a subclass of UITableViewController. After creating the class, select its header file and add the following properties:
#import <UIKit/UIKit.h>

@interface BIDFontListViewController : UITableViewController

@property (copy, nonatomic) NSArray *fontNames;
@property (assign, nonatomic) BOOL showsFavorites;

@end
The fontNames property is what we’ll use to tell this view controller what to display. We also created a showsFavorites property that we’ll use to let this view controller know if it’s showing the list of favorites instead of just a list of fonts in a family, since this will be useful later on.
Now switch over to BIDFontListController.m and start by deleting the initWithStyle: and didReceiveMemoryWarning methods—we’re not going to do anything with them here, either. Next, go to the top of the file, where you’ll need to import a header and declare a property:
#import "BIDFontListViewController.h"
#import "BIDFavoritesList.h"

@interface BIDFontListViewController ()

@property (assign, nonatomic) CGFloat cellPointSize;

@end
We’ll use the cellPointSize property to hold the preferred display size for displaying each font, once again using UIFont to find the preferred size. We do this by implementing viewDidLoad as follows:
- (void)viewDidLoad
{
    [super viewDidLoad];

    // Uncomment the following line to preserve selection between presentations.
    // self.clearsSelectionOnViewWillAppear = NO;

    // Uncomment the following line to display an Edit button in the navigation
    // bar for this view controller.
    // self.navigationItem.rightBarButtonItem = self.editButtonItem;

    UIFont *preferredTableViewFont = [UIFont preferredFontForTextStyle:
                                      UIFontTextStyleHeadline];
    self.cellPointSize = preferredTableViewFont.pointSize;
}
Now the first thing we want to do is create a little utility method for choosing the font to be shown in each row, similar to what we have in BIDRootViewController. Here it’s a bit different, though. Instead of holding onto a list of font families, in this view controller we’re holding onto a list of font names, and we’ll use the UIFont class to get each named font, like this:
- (UIFont *)fontForDisplayAtIndexPath:(NSIndexPath *)indexPath {
    NSString *fontName = self.fontNames[indexPath.row];
    return [UIFont fontWithName:fontName size:self.cellPointSize];
}
Now it’s time for a small addition in the form of a viewWillAppear: implementation. Remember how, in BIDRootViewController, we implemented this method in case the list of favorites might change, requiring a refresh? Well, the same applies here. This view controller might be showing the list of favorites, and the user might switch to another view controller, change a favorite (we’ll get there later), and then come back here. We need to reload the table view then, and this method takes care of that:
- (void)viewWillAppear:(BOOL)animated {
    if (self.showsFavorites) {
        self.fontNames = [BIDFavoritesList sharedFavoritesList].favorites;
        [self.tableView reloadData];
    }
}
The basic idea is that this view controller, in normal operation, is passed a list of font names before it displays, and that the list stays the same the whole time this view controller is around. In one particular case, however, this view controller is responsible for reloading its list now and then.
Moving on, we delete the numberOfSectionsInTableView: method entirely. We’ll only have one section here, and just skipping that method is the equivalent of implementing it and returning 1. Next, we implement the two other main data source methods, like this:
- (NSInteger)tableView:(UITableView *)tableView
  numberOfRowsInSection:(NSInteger)section
{
#warning Incomplete method implementation.
    // Return the number of rows in the section.
    return [self.fontNames count];
    return 0;
}

- (UITableViewCell *)tableView:(UITableView *)tableView
         cellForRowAtIndexPath:(NSIndexPath *)indexPath
{
    static NSString *CellIdentifier = @"Cell";
    static NSString *CellIdentifier = @"FontName";
    UITableViewCell *cell = [tableView
                             dequeueReusableCellWithIdentifier:CellIdentifier
                             forIndexPath:indexPath];

    // Configure the cell...
    cell.textLabel.font = [self fontForDisplayAtIndexPath:indexPath];
    cell.textLabel.text = self.fontNames[indexPath.row];
    cell.detailTextLabel.text = self.fontNames[indexPath.row];

    return cell;
}
The first of these needs no explanation, and maybe not the second one, either. It’s similar to what we used in BIDRootViewController, but even simpler.
As you’ll recall, different fonts can have different visible heights. To make each table view cell the correct height, implement this delegate method that is identical to the one in BIDRootViewController:
- (CGFloat)tableView:(UITableView *)tableView
heightForRowAtIndexPath:(NSIndexPath *)indexPath {
    UIFont *font = [self fontForDisplayAtIndexPath:indexPath];
    return 25 + font.ascender - font.descender;
}
We’ll add some more to this class later, but first we want to see it in action. To make this happen, we’ll need to configure the storyboard some more, and then make some modifications to BIDRootViewController. Switch over to Main.storyboard to get started.
Storyboarding the Font List
The storyboard currently has one table view controller, embedded inside a navigation controller. You need to add one new layer of depth to display a list of fonts, so find Table View Controller in the object library and drag one out into the editing area, probably to the right of the existing table view controller. Select the new table view controller and use the identity inspector to set its class to BIDFontListViewController. Make sure the delegate and dataSource connections from the table view to the controller are in place. Select the prototype cell in the table view and open the attributes inspector to make some adjustments. Change its Style to Subtitle, its Identifier to FontName, and its Accessory to Detail Disclosure. Using the detail disclosure accessory will let rows of this type respond to two kinds of taps, so that the user can trigger two different actions, depending on whether they tap the accessory or any other part of the row.
One way to make a user action in one view controller cause the instantiation and display of another view controller is to create a segue connecting the two of them. This is probably an unfamiliar word for many people, so let’s get this out of the way: Segue means essentially “transition,” and it is sometimes used by writers and filmmakers to describe making a smooth movement from one paragraph or scene to the next. Apple could have been a little straightforward and just called it a transition; but since that word appears elsewhere in the UIKit APIs, maybe Apple decided to use a distinct term to avoid confusion. We should also mention here that the word “segue” is pronounced exactly the same as the name of the Segway personal transportation product (and now you know why the Segway is called that).
Often, segues are created entirely within Interface Builder. The idea is that an action in one scene can trigger a segue to load and display another scene. If you’re using a navigation controller, the segue can push the next controller onto the navigation stack automatically. We’ll be using this functionality in our app, starting right now!
In order for the cells in the root view controller to make the font list view controller appear, you need to create a couple of segues connecting the two scenes. This is done simply by Ctrl-dragging from the first prototype cell over to the new scene; you’ll see the entire scene highlight when you drag over it, indicating it’s ready to connect. Release the mouse button and select push from the Selection Segue section of the floating menu that appears. Now do the same for the other prototype cell. Creating these segues means that, as soon as the user taps any of these cells, the view controller at the other end of the connection will be allocated and made ready.
Making the Root View Controller Prepare for Segues
Save your changes and switch back to BIDRootViewController.m. Note that we’re not talking about our latest class, BIDFontListViewController, but instead its “parent” controller. This is the place where you’ll need to respond to the user’s touches in the root table view by preparing the new BIDFontListViewController (specified by one of the segues you just created) for display, by passing it the values it needs to display. Start by importing the header for the new class:
#import "BIDRootViewController.h"
#import "BIDFavoritesList.h"
#import "BIDFontListViewController.h"
The actual preparation of the new view controller is done using the prepareForSegue:sender: method. You’ll find this method at the bottom of the @implementation section, which is commented out when this file is first created. Remove the comment marks and fill in the method’s implementation as shown here:
/*
#pragma mark - Navigation

// In a story board-based application, you will often want to do a little
// preparation before navigation
- (void)prepareForSegue:(UIStoryboardSegue *)segue sender:(id)sender
{
    // Get the new view controller using [segue destinationViewController].
    // Pass the selected object to the new view controller.
    NSIndexPath *indexPath = [self.tableView indexPathForCell:sender];
    BIDFontListViewController *listVC = segue.destinationViewController;

    if (indexPath.section == 0) {
        NSString *familyName = self.familyNames[indexPath.row];
        listVC.fontNames = [[UIFont fontNamesForFamilyName:familyName]
                                sortedArrayUsingSelector:@selector(compare:)];
        listVC.navigationItem.title = familyName;
        listVC.showsFavorites = NO;
    } else {
        listVC.fontNames = self.favoritesList.favorites;
        listVC.navigationItem.title = @"Favorites";
        listVC.showsFavorites = YES;
    }
}

*/
This method uses the sender (which is the UITableViewCell that was tapped) to determine which row was tapped and asks the segue for its destinationViewController, which is the BIDFontListViewController instance that is about to be displayed. We then pass some values along to the new view controller, depending on whether the user tapped a font family (section 0) or the favorites cell (section 1). Not only do we set our custom properties for our specific view controller classes, we also access each controller’s navigationItem property in order to set a title. The navigationItem property is an instance of UINavigationItem, which is a UIKit class that contains information about what should be displayed in the navigation bar for any given view controller.
Now run the app, and you’ll see that touching the name of any font family shows you a list of all the individual fonts it contains, as seen in Figure 9-3.
Creating the Font Sizes View Controller
What you’ll notice, however, is that the app currently doesn’t let you go any further. Figures 9-4 and 9-5 show additional screens that let you view a chosen font in various ways, and we’re not there yet. But soon, we will be! Let’s create the view shown in Figure 9-4, which shows multiple font sizes at once. Use Xcode’s new file assistant to create a new Objective-C class that subclasses UITableViewController, and name it BIDFontSizesViewController. The only parameter this class will need from its parent controller is a font, which you should add to BIDFontSizesViewController.h, like this:
#import <UIKit/UIKit.h>

@interface BIDFontSizesViewController : UITableViewController

@property (strong, nonatomic) UIFont *font;

@end
Now switch over the BIDFontSizesViewController.m. This is going to be a pretty simple table view controller that just implements some standard table view delegate and data source methods, plus a few private internal methods. For starters, go ahead and delete the initWithStyle:, viewDidLoad, didReceiveMemoryWarning, and numberOfSectionsInTableView: methods, along with all of the commented-out methods at the bottom. Again, you’re not going to need any of those.
What you will need, instead, are a couple of internal, private methods. One will return a list of point sizes to define all the sizes that the chosen font will be displayed in. The other will return a font corresponding to an index path, similar to those used for each of our other view controllers:
- (NSArray *)pointSizes {
    static NSArray *pointSizes = nil;
    static dispatch_once_t onceToken;
    dispatch_once(&onceToken, ^{
        pointSizes = @[@9,
                       @10,
                       @11,
                       @12,
                       @13,
                       @14,
                       @18,
                       @24,
                       @36,
                       @48,
                       @64,
                       @72,
                       @96,
                       @144];
    });
    return pointSizes;
}

- (UIFont *)fontForDisplayAtIndexPath:(NSIndexPath *)indexPath {
    NSNumber *pointSize = self.pointSizes[indexPath.row];
    return [self.font fontWithSize:pointSize.floatValue];
}
Note that the pointSizes method uses the same dispatch_once() function we used earlier, to ensure that a piece of code is run exactly once. In this case, it initializes a list of numbers that will be used to specify fonts for each row in the table.
For this view controller, we’re going to skip the method that lets us specify the number of sections to display, since we’re going to just use the default number (1). However, we must implement the methods for specifying the number of rows and the content of each cell. We’ll also implement the method to determine the height for each row, as we have in the past. Here are those three methods:
- (NSInteger)tableView:(UITableView *)tableView
 numberOfRowsInSection:(NSInteger)section
{
#warning Incomplete method implementation.
    // Return the number of rows in the section.
    return [self.pointSizes count];
    return 0;
}

- (UITableViewCell *)tableView:(UITableView *)tableView
         cellForRowAtIndexPath:(NSIndexPath *)indexPath
{
    static NSString *CellIdentifier = @"Cell";
    static NSString *CellIdentifier = @"FontNameAndSize";
    UITableViewCell *cell = [tableView
                             dequeueReusableCellWithIdentifier:CellIdentifier
                             forIndexPath:indexPath];

    // Configure the cell...
    cell.textLabel.font = [self fontForDisplayAtIndexPath:indexPath];
    cell.textLabel.text = self.font.fontName;
    cell.detailTextLabel.text = [NSString stringWithFormat:@"%@ point",
                                 self.pointSizes[indexPath.row]];

    return cell;
}

- (CGFloat)tableView:(UITableView *)tableView
heightForRowAtIndexPath:(NSIndexPath *)indexPath {
    UIFont *font = [self fontForDisplayAtIndexPath:indexPath];
    return 25 + font.ascender - font.descender;
}
There’s really nothing in any of these methods we haven’t seen before, so let’s move on to setting up the GUI for this.
Storyboarding the Font Sizes View Controller
Go back to Main.storyboard and drag another Table View Controller into the editing area. Use the identity inspector to set its class to BIDFontSizesViewController. You’ll need to make a segue connection from its parent, the Font List View Controller. So find that controller and Ctrl-drag from its prototype cell to the newest view controller, and then select push from the Selection Segue section of the context menu that appears. Next, select the prototype cell in the new scene you just added, and then use the attributes inspector to set its Style to Subtitle and its Identifier to FontNameAndSize.
Making the Font List View Controller Prepare for Segues
Now, just like the last time we extended our storyboard’s navigation hierarchy, we need to jump up to the parent controller so it can configure its child. That means we need to go to BIDFontListViewController.m and import the header for the new child controller:
#import "BIDFontListViewController.h"
#import "BIDFavoritesList.h"
#import "BIDFontSizesViewController.h"
Next, down at the bottom of the @implementation section, remove the comment marks around the prepareForSegue:sender: method and implement it like this:
/*
#pragma mark - Navigation

// In a story board-based application, you will often want to do a little
// preparation before navigation
- (void)prepareForSegue:(UIStoryboardSegue *)segue sender:(id)sender
{
    // Get the new view controller using [segue destinationViewController].
    // Pass the selected object to the new view controller.
    NSIndexPath *indexPath = [self.tableView indexPathForCell:sender];
    UIFont *font = [self fontForDisplayAtIndexPath:indexPath];
    [segue.destinationViewController navigationItem].title = font.fontName;

    BIDFontSizesViewController *sizesVC = segue.destinationViewController;
    sizesVC.font = font;
}

*/
That probably all looks pretty familiar by now, so we won’t dwell on it further.
Run the app, select a font family, select a font (by tapping a row anywhere except the accessory on the right), and you’ll now see the multi-size listing shown in Figure 9-4.
Creating the Font Info View Controller
The final view controller we’re going to create is the one shown in Figure 9-6. This one isn’t based on a table view. Instead, it features a large text label, a slider for setting text size, and a switch for toggling whether this font should be included in the list of favorites. Create a new Objective-C class in your project using UIViewControlleras the superclass, and then name it BIDFontInfoViewController. Like most of the other controllers in this app, this one needs to have a couple of parameters passed in by its parent controller. Enable this by defining these properties in BIDFontInfoViewController.h:
#import <UIKit/UIKit.h>

@interface BIDFontInfoViewController : UIViewController

@property (strong, nonatomic) UIFont *font;
@property (assign, nonatomic) BOOL favorite;

@end
Now switch over to BIDFontInfoViewController.m and add a single import and a handful of IBOutlet properties at the top:
#import "BIDFontInfoViewController.h"
#import "BIDFavoritesList.h"

@interface BIDFontInfoViewController ()

@property (weak, nonatomic) IBOutlet UILabel *fontSampleLabel;
@property (weak, nonatomic) IBOutlet UISlider *fontSizeSlider;
@property (weak, nonatomic) IBOutlet UILabel *fontSizeLabel;
@property (weak, nonatomic) IBOutlet UISwitch *favoriteSwitch;

@end
Next, delete the boilerplate initWithNibName:bundle: and didReceiveMemoryWarning methods, since you’re not going to need them. In their place, implement viewDidLoad, as well as a pair of action methods that will be triggered by the slider and switch, respectively:
- (void)viewDidLoad
{
    [super viewDidLoad];
    // Do any additional setup after loading the view.

    self.fontSampleLabel.font = self.font;
    self.fontSampleLabel.text = @"AaBbCcDdEeFfGgHhIiJjKkLlMmNnOoPpQqRrSsTtUuVv"
                                "WwXxYyZz 0123456789";
    self.fontSizeSlider.value = self.font.pointSize;
    self.fontSizeLabel.text = [NSString stringWithFormat:@"%.0f",
                               self.font.pointSize];
    self.favoriteSwitch.on = self.favorite;
}

- (IBAction)slideFontSize:(UISlider *)slider {
    float newSize = roundf(slider.value);
    self.fontSampleLabel.font = [self.font fontWithSize:newSize];
    self.fontSizeLabel.text = [NSString stringWithFormat:@"%.0f", newSize];
}

- (IBAction)toggleFavorite:(UISwitch *)sender {
    BIDFavoritesList *favoritesList = [BIDFavoritesList sharedFavoritesList];
    if (sender.on) {
        [favoritesList addFavorite:self.font.fontName];
    } else {
        [favoritesList removeFavorite:self.font.fontName];
    }
}
These methods are all pretty straightforward. The viewDidLoad method sets up the display based on the chosen font; slideFontSize: changes the size of the font in the fontSampleLabel label based on the value of the slider; and toggleFavorite: either adds the current font to the favorites list or removes it from the favorites list, depending on the value of the switch.
Storyboarding the Font Info View Controller
Now head back over to Main.storyboard to build the GUI for this app’s final view controller. Use the object library to find a plain View Controller. Drag it into the editing area, and use the identity inspector to set its class to BIDFontInfoViewController. Next, use the object library to find some more objects and drag them into your new scene. You need three labels, a switch, and a slider. Lay them out roughly as shown in Figure 9-8.
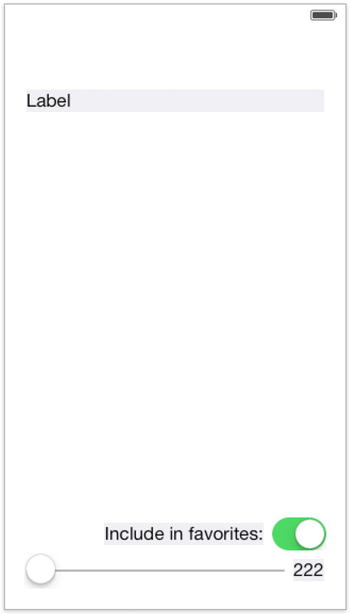
Figure 9-8. Each of the labels here has been given a light gray background color, just for purposes of this illustration. Yours should have white backgrounds
Notice that we left some space above the upper label, since we’re going to end up having a navigation bar up there. Also, we want the upper label to be able to display long pieces of text across multiple lines, but by default the label is set to show only one line. To change that, select the label, open the attributes inspector, and set the number in the Lines field to 0.
Figure 9-8 also shows changed text in the lower two labels. Go ahead and make the same changes yourself. What you can’t see here is that the attributes inspector was used to right-align both of them. You should do the same, since they both have layouts that essentially tie them to their right edges. Also, select the slider at the bottom, and then use the attributes inspector to set its Minimum to 1 and its Maximum to 200.
Now it’s time to wire up all the connections for this GUI. Start by selecting the view controller and opening the connections inspector. When we have so many connections to make, the overview shown by that inspector is pretty nice. Make connections for each of the outlets by dragging from the small circles next to favoriteSwitch, fontSampleLabel, fontSizeLabel, and fontSizeSlider to the appropriate objects in the scene. In case it’s not obvious, fontSampleLabel should be connected to the label at the top, fontSizeLabel to the label at the bottom right, and the favoriteSwitch and fontSizeSlider outlets to the only places they can go. To connect the actions to the controls, you can continue to use the connections inspector. Drag from the little circle next to slideFontSize:over to the slider, release the mouse button, and select Value Changed from the context menu that appears. Next, drag from the little circle next to toggleFavorite: over to the switch and again select Value Changed.
One more thing we need to do here is to create a segue, so that this view can be shown. Remember that this view is going to be displayed whenever a user taps the detail accessory (the little blue “i” in a circle) when the Font List View Controller is displayed. So, find that controller, Ctrl-drag from its prototype cell to the new font info view controller you’ve been working on, and select push from the Accessory Action section of the context menu that appears. Note that we just said “Accessory Action,” not “Selection Segue.” The accessory action is the segue that is triggered when the user taps the detail accessory, while the selection segue is the segue that is triggered by a tap anywhere else in the row. We already set this cell’s selection segue to open a BIDFontSizesViewController.
Now we have two different segues that can be triggered by touches in different parts of a row. Since these will present different view controllers, with different properties, we need to have a way to differentiate them. Fortunately, the UIStoryboardSegue class, which represents a segue, has a way to accomplish this: we can use an identifier, just as we do with table view cells!
All you have to do is select a segue in the editing area and use the attributes inspector to set its Identifier. You may need to shift your scenes around a bit, so that you can see both of the segues that are snaking their way out of the right-hand side of the Font List View Controller. Select the one that’s pointing at the Font Sizes View Controller and set its Identifier to ShowFontSizes. Next, select the one that’s pointing at the Font Info View Controller and set its Identifier to ShowFontInfo.
Setting up Constraints
Setting up that segue lets Interface Builder know that our new scene will be used within the context of the navigation controller like everything else, so that scene automatically receives a blank navigation bar at the top. Now that the real confines of our view are in place, it’s a good time to set up the constraints. This is a fairly complex view with several subviews, especially near the bottom, so we can’t quite rely on the system’s automatic constraints to do the right thing for us. We’ll use the Pin button at the bottom of the editing area and the pop-up window it triggers to build most of the constraints we’ll need.
Start with the uppermost label. Click Pin, and then, in the pop-up window, select the little red bars above, to the left, and to the right of the little square—but not the one below it. Now click the Add 3 Constraints button at the bottom.
Next, select the slider at the bottom and click the Pin button. This time, select the red bars below, to the left, and to the right of the little square—but not the one above it. Again, click Add 3 Constraints to put them in place.
For each of the two remaining labels and for the switch, follow this procedure: select the object, click Pin, select the red bars below and to the right of the little square, turn on the checkboxes for Width and Height, and finally, click Add 4 Constraints. Setting those constraints for all three of those objects will bind them to the lower right corner.
There’s just one more constraint to make. We want the top label to grow to contain its text, but to never grow so large that it overlaps the views at the bottom. We can accomplish this with a single constraint! Ctrl-drag from the upper label to the Include in Favorites label, release the mouse button, and select Vertical Spacing from the context menu that appears. Next, click the new constraint to select it and open the attributes inspector, where you’ll see some configurable attributes for the constraint. Change the Relation popup to Greater Than or Equal, and then set the Constant value to 10. That ensures that the expanding upper label won’t push past the other views at the bottom.
Adapting Font List View Controller for Multiple Segues
Now head back over to good old BIDFontListViewController.m. Since this class will now be able to trigger segues to two different child view controllers, it now needs to import the header for the latest view controller:
#import "BIDFontListViewController.h"
#import "BIDFavoritesList.h"
#import "BIDFontSizesViewController.h"
#import "BIDFontInfoViewController.h"
You also need to adapt the prepareForSegue:sender: method, as shown here:
- (void)prepareForSegue:(UIStoryboardSegue *)segue sender:(id)sender
{
    // Get the new view controller using [segue destinationViewController].
    // Pass the selected object to the new view controller.
    NSIndexPath *indexPath = [self.tableView indexPathForCell:sender];
    UIFont *font = [self fontForDisplayAtIndexPath:indexPath];
    [segue.destinationViewController navigationItem].title = font.fontName;

    if ([segue.identifier isEqualToString:@"ShowFontSizes"]) {
        BIDFontSizesViewController *sizesVC = segue.destinationViewController;
        sizesVC.font = font;
    } else if ([segue.identifier isEqualToString:@"ShowFontInfo"]) {
        BIDFontInfoViewController *infoVC = segue.destinationViewController;
        infoVC.font = font;
        infoVC.favorite = [[BIDFavoritesList sharedFavoritesList].favorites
                           containsObject:font.fontName];

    }
}
Now run the app and let’s see where we are! Select a font family that contains many fonts (for example, Gill Sans), and then tap the middle of the row for any font. You’ll be taken to the same list you saw earlier, which shows the font in multiple sizes. Press the navigation button at the upper left to go back, and then tap another row; however, this time tap on the right-hand side where the detail accessory is shown. This should bring up the final view controller, which shows a sample of the font with a slider at the bottom that lets you pick whatever size you want.
Also, you can now use the Include in favorites switch to mark this font as a favorite. Do that, then hit the navigation button at the top-left corner a couple of times to get back to the root controller view.
Scroll down to the bottom of the root view controller, and you’ll see something new: the second section is now there, as you can see in Figure 9-9.
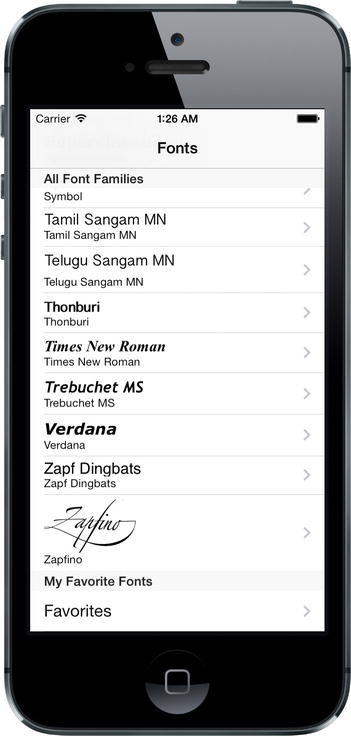
Figure 9-9. Now that we’ve picked at least one favorite font, we can see a list of them by tapping the new row that appears at the bottom of the root view controller
Tap the Favorites row, and you’ll see a listing of any fonts you’ve chosen as favorites. From there, you can do the same things you could do with the other font listing: you can tap a row to see a list of multiple font sizes, or you can tap a detail accessory to see the slider-adjustable font view and the favorites switch. You can even try turning off that switch and hitting the back button, and you’ll see that the font you were just looking at is no longer listed.
Now the basic functionality of our app is complete. But before we can really call it a day, there are a couple more features we should implement. If you’ve been using iOS for a while, you’re probably aware that you can often delete a row from a table view by swiping from right to left. For example, in Mail you can use this technique to delete a message in a list of messages. Performing this gesture brings up a small GUI, right inside the table view row. This GUI asks you to confirm the deletion, and then the row disappears and the remaining rows slide up to fill the gap. That whole interaction—including handling the swipe, showing the confirmation GUI, and animating any affected rows—is taken care of by the table view itself. All you need to do is implement two methods in your controller to make it happen.
Also, the table view provides easy functionality for letting the user reorder rows within a table view by dragging them up and down. As with swipe-to-delete, the table view takes care of the entire user interaction for us. All we have to do is one line of setup (to create a button that activates the reordering GUI), and then implement a single method that is called when the user has finished dragging. The table view gives us so much for free, it would be criminal not to use it!
Implementing Swipe-to-Delete
In this app, the BIDFontListViewController class is a typical example of where this feature should be used. Whenever the app is showing the list of favorites, we should let the user delete a favorite with a swipe, saving them the step of tapping the detail accessory and then turning off the switch. Select BIDFontListController.m in Xcode to get started. Both of the methods we need to implement are already included in each view controller source file by default, but they are commented out. We’re going to un-comment each of them and provide them with real implementations.
Start by removing the comment marks around tableView:canEditRowAtIndexPath: and providing this implementation:
/*
// Override to support conditional editing of the table view.
- (BOOL)tableView:(UITableView *)tableView
canEditRowAtIndexPath:(NSIndexPath *)indexPath
{
    // Return NO if you do not want the specified item to be editable.
    return self.showsFavorites;
    return YES;
}
*/
That method will return YES if it’s showing the list of favorites, and NO otherwise. This means that the editing functionality that lets you delete rows is only enabled while displaying favorites. If you were to try to run the app and delete rows with just this change, you wouldn’t see any difference. The table view won’t bother to deal with the swipe gesture because it sees that we haven’t implemented the other method that is required to complete a deletion. So, let’s put that in place, too. Delete the comment marks around the tableView:commitEditingStyle:forRowAtIndexPath: method and make the other changes shown inside the method that follows:
/*
// Override to support editing the table view.
- (void)tableView:(UITableView *)tableView
commitEditingStyle:(UITableViewCellEditingStyle)editingStyle
forRowAtIndexPath:(NSIndexPath *)indexPath
{
    if (!self.showsFavorites) return;

    if (editingStyle == UITableViewCellEditingStyleDelete) {
        // Delete the row from the data source
        NSString *favorite = self.fontNames[indexPath.row];
        [[BIDFavoritesList sharedFavoritesList] removeFavorite:favorite];
        self.fontNames = [BIDFavoritesList sharedFavoritesList].favorites;

        [tableView deleteRowsAtIndexPaths:@[indexPath]
                         withRowAnimation:UITableViewRowAnimationFade];
    }
    else if (editingStyle == UITableViewCellEditingStyleInsert) {
        // Create a new instance of the appropriate class, insert it into the
        // array, and add a new row to the table view
    }
}
*/
This method is pretty straightforward, but there are some subtle things going on. The first thing we do is check to make sure we’re showing the favorites list; and if not, we just bail. Normally, this should never happen, since we specified with the previous method that only the favorites list should be editable. Nevertheless, we’re doing a bit of defensive programming here. After that, we check the editing style to make sure that the particular edit operation we’re going to conclude really was a deletion. It’s possible to do insertion edits in a table view, but not without additional setup that we’re not doing here, so we don’t need to worry about other cases. Next, we determine which font should be deleted, remove it from the BIDFavoritesList singleton, and update our local copy of the favorites list.
Finally, we tell the table view to delete the row and make it disappear with a visual fade animation. It’s important to understand what happens when you tell the table view to delete a row. Intuitively, you might think that calling that method would delete some data, but that’s not what happened. In fact, we’ve already deleted the data! That final method call is really our way of telling the table view, “Hey, I’ve made a change, and I want you to animate away this row. Ask me if you need anything more.” When that happens, the table view will start animating any rows that are below the deleted row by moving them up, which means that it’s possible that one or more rows that were previously off-screen will now come on-screen, at which time it will indeed ask the controller for cell data via the usual methods. For that reason, it’s important that our implementation of the tableView:commitEditingStyle:forRowAtIndexPath: method makes necessary changes to the data model (in this case, the BIDFavoritesList singleton) before telling the table view to delete a row.
Now run the app again, make sure you have some favorite fonts set up, and then go into the Favorites list and delete a row by swiping from right to left. The row slides partly off-screen, and a Delete button appears on the right. Tap the Delete button, and the row goes away.
The final feature we’re going to add to the font list will let users rearrange their favorites just by dragging them up and down. In order to accomplish this, we’re going to add one method to the BIDFavoritesList class, which will let us reorder its items however we want. Open up BIDFavoritesList.h and add the following declaration to the @interface section:
- (void)moveItemAtIndex:(NSInteger)from toIndex:(NSInteger)to;
Next, switch over to BIDFavoritesList.m and add this method to the @implementation section:
- (void)moveItemAtIndex:(NSInteger)from toIndex:(NSInteger)to {
    id item = _favorites[from];
    [_favorites removeObjectAtIndex:from];
    [_favorites insertObject:item atIndex:to];
    [self saveFavorites];
}
That provides the underpinnings for what we’re going to do. Now select BIDFontListViewController.m and add the following lines at the end of the viewDidLoad method:
if (self.showsFavorites) {
    self.navigationItem.rightBarButtonItem = self.editButtonItem;
}
We’ve mentioned the navigation item previously. It’s an object that holds the information about what should appear in the navigation bar for a view controller. It has a property called rightBarButtonItem that can hold an instance of UIBarButtonItem, a special sort of button meant only for navigation bars and tool bars. Here, we’re pointing that at editButtonItem, a property of UIViewController that gives us a special button item that’s preconfigured to activate the table view’s editing/reordering GUI.
With that in place, try running the app again and go into the Favorites list. You’ll see that there’s now an Edit button in the upper-right corner. Pressing that button toggles the table view’s editing GUI, which right now means that each row acquires a delete button on the left, while its content slides a bit to the right to make room. This enables yet another way that users can delete rows, using the same methods we already implemented.
But our main interest here is in adding reordering functionality. For that, all we need to do is implement this method. Be sure to take away the comment marks that are there by default, and then add the bold code:
/*
// Override to support rearranging the table view.
- (void)tableView:(UITableView *)tableView
moveRowAtIndexPath:(NSIndexPath *)fromIndexPath
      toIndexPath:(NSIndexPath *)toIndexPath
{
    [[BIDFavoritesList sharedFavoritesList] moveItemAtIndex:fromIndexPath.row
                                                    toIndex:toIndexPath.row];
    self.fontNames = [BIDFavoritesList sharedFavoritesList].favorites;
}
*/
This method is called as soon as the user finishes dragging a row. All we do here is tell the BIDFavoritesList singleton to do the reordering, and then refresh our list of font names, just as we did after deleting an item. To see this in action, run the app, go into the Favorites, and tap the Edit button. You’ll see that the edit mode now includes little “dragger” icons on the right side of each row, and you can use the draggers to rearrange items.
With that, our app is complete! At least, it’s complete as far as this book is concerned. If you can think of more useful things to do with these fonts, have at it!
This chapter was a marathon. And if you’re still standing, you should feel pretty darn good about yourself. Dwelling on these mystical table view and navigation controller objects is important because they are the backbone of a great many iOS applications, and their complexity can definitely get you into trouble if you don’t truly understand them.
As you start building your own tables, refer back to this chapter and the previous one, and don’t be afraid of Apple’s documentation, either. Table views are extraordinarily complex, and it would be impossible to cover every conceivable permutation; however, you should now have a very good set of table view building blocks you can use as you design and build your own applications. As always, feel free to reuse this code in your own applications. It’s a gift from the authors to you. Enjoy!