Now that you've seen the Buildbox interface, and had a bit of an introduction to the world of game development, let's take a quick look at how things are done inside Buildbox. Let's begin by opening the Platformer Demo from the Welcome Screen.
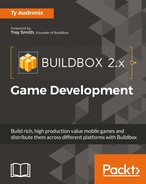
Upon opening the Platformer Demo, you'll be confronted with the game stage. Let's click the Game Mind Map button (top-left of the screen) to check it out:
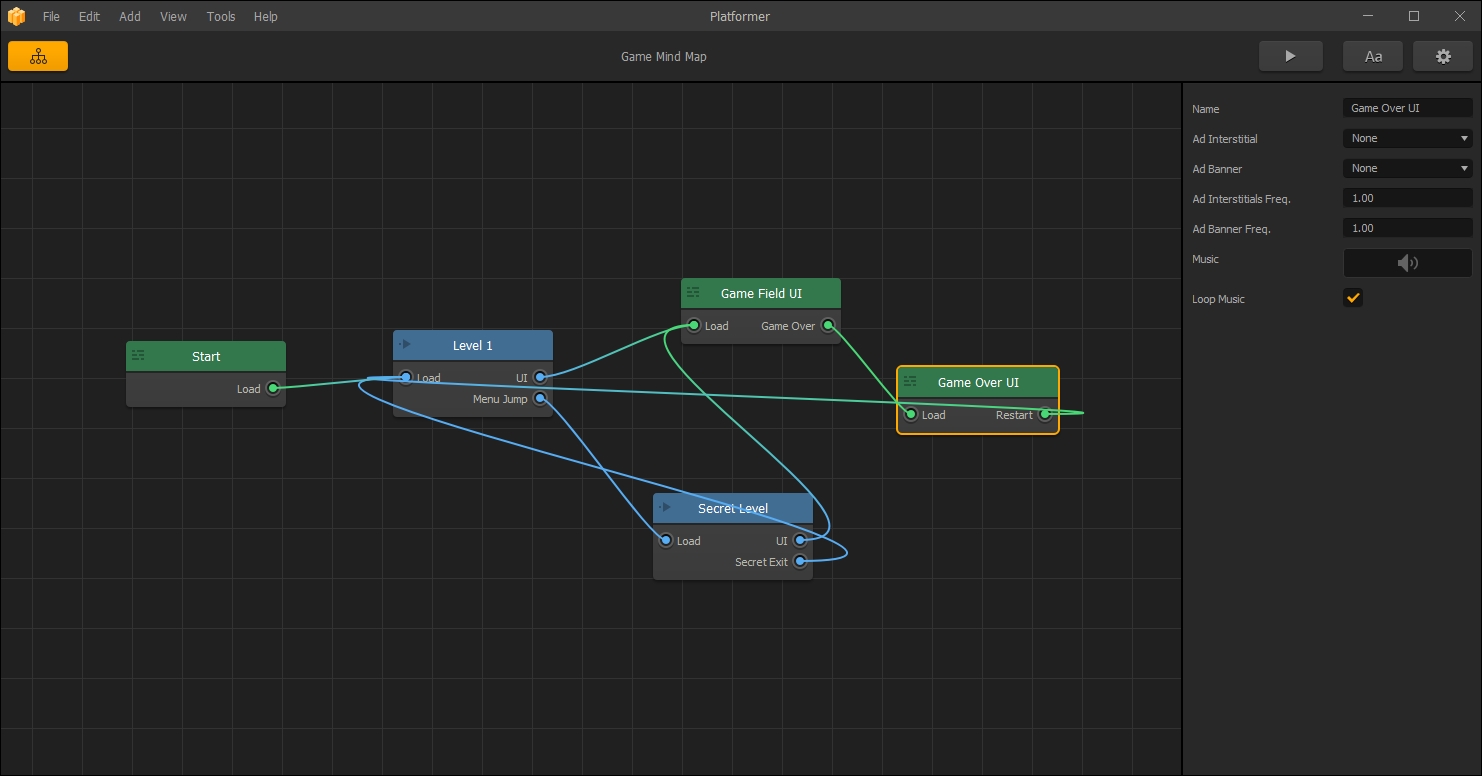
The Game Mind Map is where you can change the user experience of your game. It's also how you navigate to each area you'd like to edit.
This type of interface is known as a node-based interface. Essentially, it's an interactive flowchart. The individual blocks are called nodes. Lines come into nodes on the left and exit on the right. Let's take a minute and go over the nodes for this example game.
- All games start with a
Startnode. Think of this as a splash screen where you can show your logo, and add a loading bar (the status of the game loading into memory) while the rest of the game's loading is completed. Once loading is finished, the user will be taken directly into Level 1. - The
Level 1node, you'll notice, is blue. Blue nodes are worlds and green nodes are user interface (UI) nodes. You'll also see that theLevel 1node has two outputs on its right side. - The
UIoutput is fairly self-explanatory. This is where you select a screen to be overlaid on your world. This UI screen may contain your score, controls, and even event handlers, such as a Game Over handler to send someone to a new screen if their character dies. - The
Menu Jumpoutput on the right of theLevel 1node is tied to a node called Secret Level. This is because somewhere in theLevel 1world, aMenu Jumplogic asset has been placed. We'll get deeper into what these logic assets are when we develop Ramblin' Rover. For now, let's just say that aMenu Jumplogic asset allows a player to teleport to another world (or menu UI) once their character touches the asset in the game field. - You might also notice that both of the worlds (
Level 1andSecret Level) use the sameGame Field UInode. It makes sense if you consider it. All this means is that both worlds use the same interface overlay.
Now, what if we wanted to add a Game Over screen to this game?
This exercise will show you how to make some connections and new nodes using the Game Mind Map.
The first thing we're going to want is an event listener to sense when a character dies. It sounds complex, and if we were coding a game, this would take several lines of code to accomplish. In Buildbox, it's a simple drag-and-drop method.
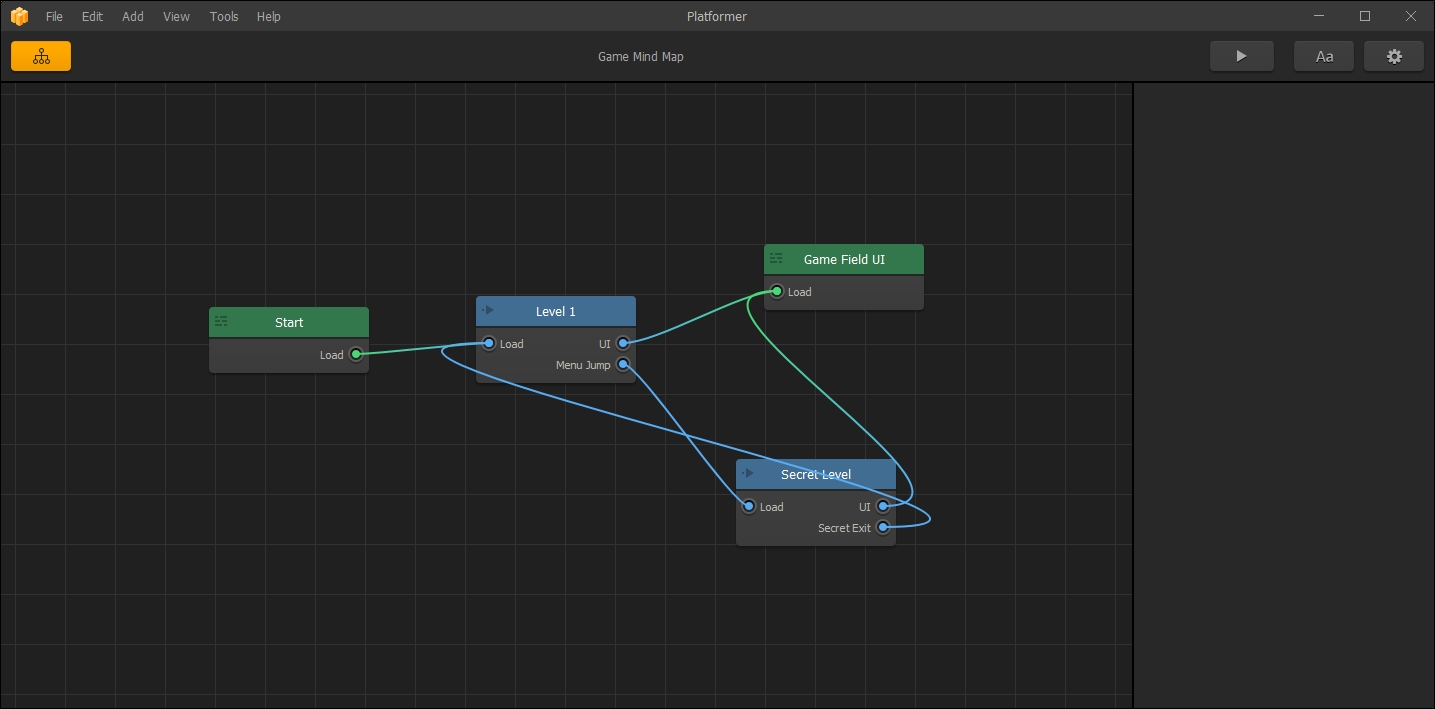
If you double-click on the Game Field UI node, you'll be presented with the overlay for the UI and controls during gameplay. Since this is a basic template, you are actually presented with a blank screen. This template is for you to play around with on a computer, so no controls are on the screen. Instead, it is assumed that you would use keyboard controls to play the demo game. This is why the screen looks blank:
There are some significant differences between the UI editor and the World editor. You can notice that the Character tab from the asset library is missing and there is a timeline editor on the bottom. We'll get into how to use this timeline later. For now, let's keep things simple and add our Game Over sensor:
If you expand the Logic tab in the asset library, you'll find the Event Observer object. You may drag this object anywhere onto the stage. It doesn't even have to be in the visible window (the dark area in the center of the stage). So long as it's somewhere on the stage, the game can use this logic asset. If you do put it on the visible area of the stage, don't worry; it's an invisible asset, and won't show in your game:
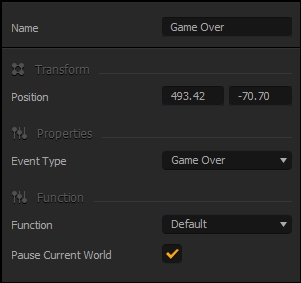
While the Event Observer is selected on the stage, you'll notice that its properties pop up in the properties window (on the right side of the screen). By default, the Game Over type of event is selected. But if you select this drop-down menu, you'll notice a ton of different event types that this logic asset can handle. Let's leave all of the properties at their default values (except the name; please change this to Game Over) and go back to the Game Mind Map (top-left button):
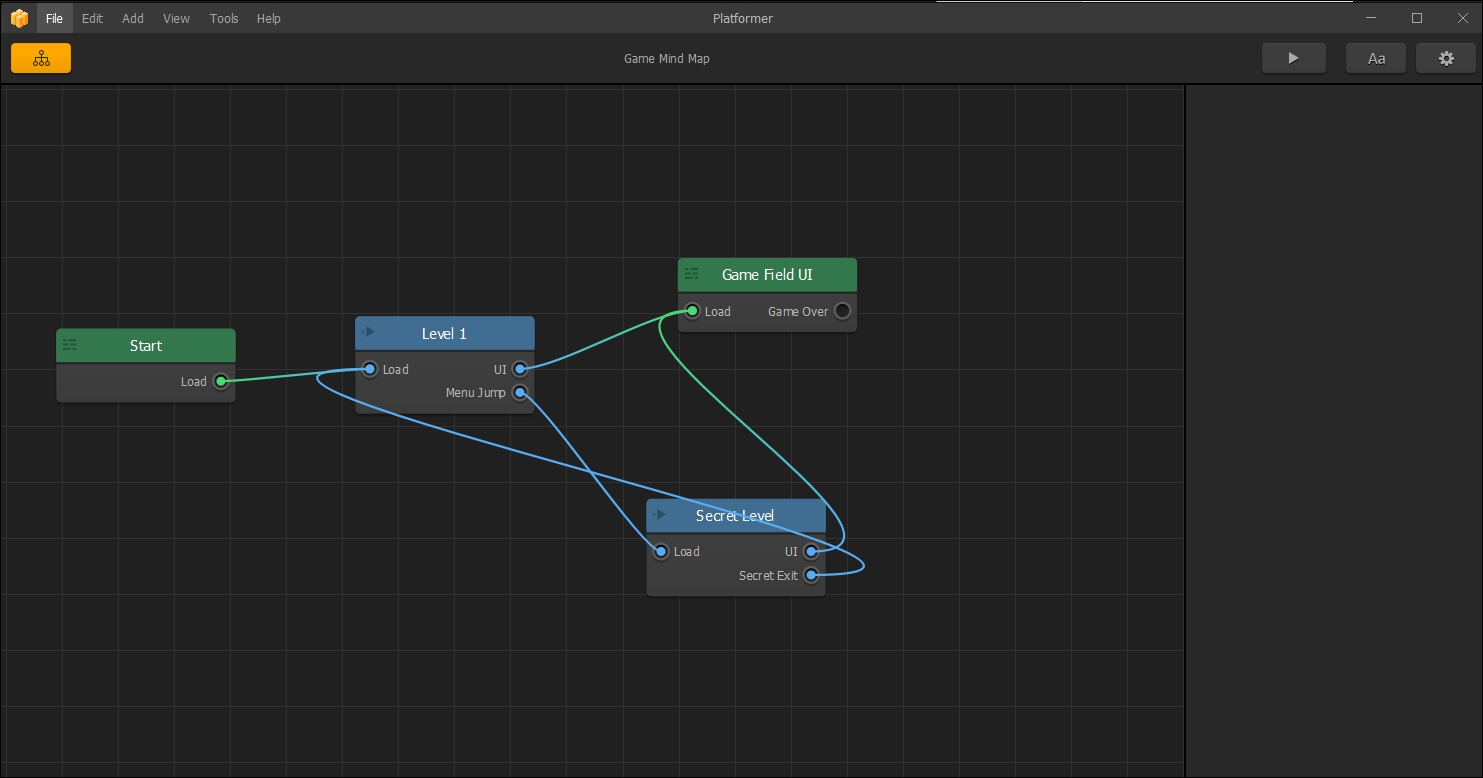
Do you notice anything different? The Game Field UI node now has a Game Over output. Now, we just need a place to send that output.
Right-click on the blank space of the grid area. Now you can either create a new world or new UI. Select Add New UI and you'll see a new green node that is titled New UI1. This new UI will be your Game Over screen when a character dies.
Before we can use this new node, it needs to be connected to the Game Over output of the Game Field UI. This process is exceedingly simple. Just hold down your left mouse button on the Game Over output's dark dot, and drag to the New UI1's Load dark dot (on the left side of the New UI1 node).
Congratulations, you've just created your first connected node. We're not done yet, though. We need to make this Game Over screen link back to restart the game. First, by selecting the New UI1 node, change its name using the parameters window (on the right of the screen) to Game Over UI. Make sure you hit your Enter key; this will commit the changed name. Now double-click on the Game Over UI node so we can add some elements to the screen.
You can't have a Game Over screen without the words Game Over, so let's add some text:
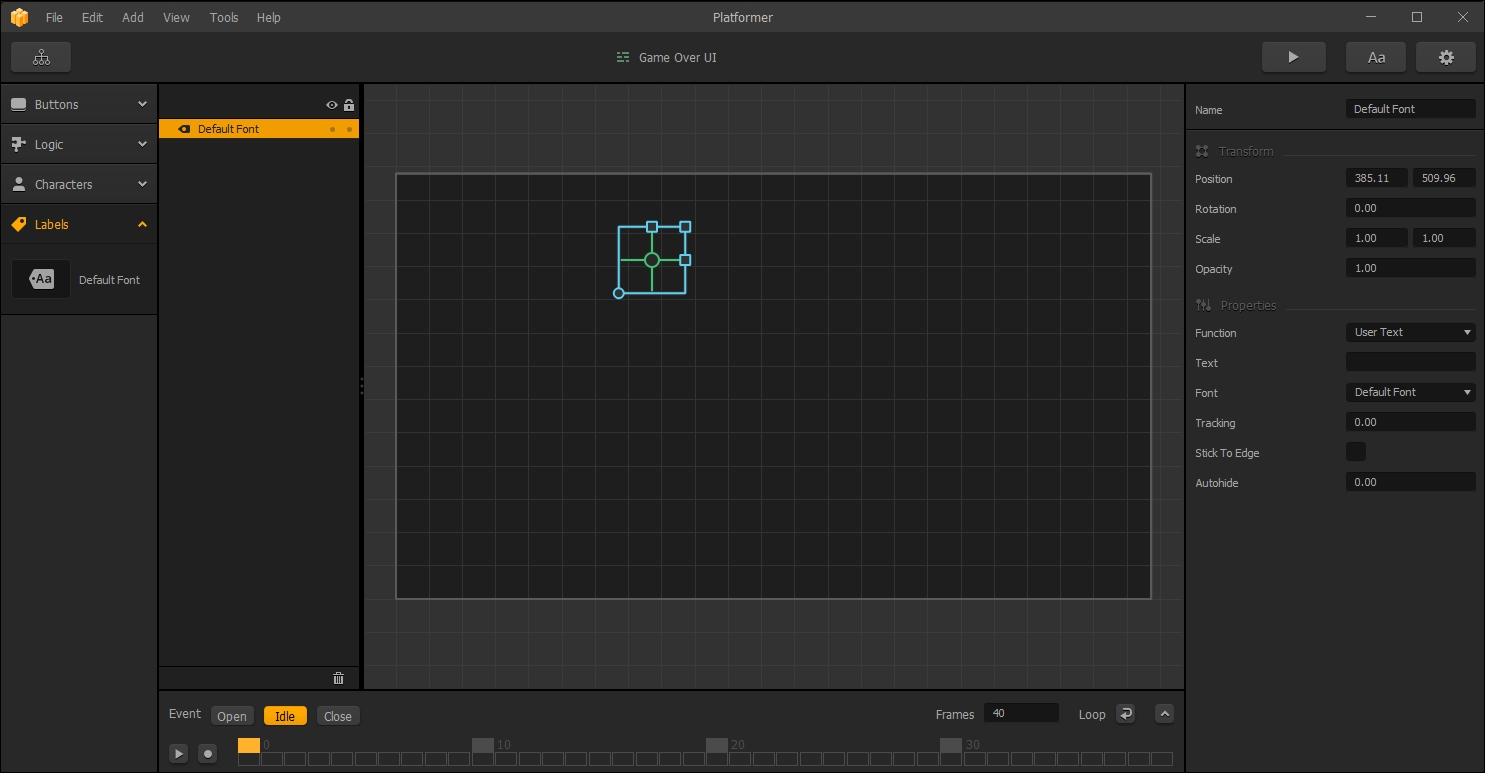
The preceding screenshot shows a label asset applied to the screen. This is where it will eventually say Game Over. Under the Labels section of the asset library, you'll see a Default Font asset. Drag this asset to the visible grid (the darker area) of the stage and you should see a green cursor with a blue adjustment box around it. Notice that no text is in the area yet.
In the Text field of the properties window on the right side of the screen, type Game Over. After you hit Enter, you'll notice that your text now appears on the screen. Resize that (using the handle on the upper-right of the blue box around the text) to a large size, and you should have something like this:
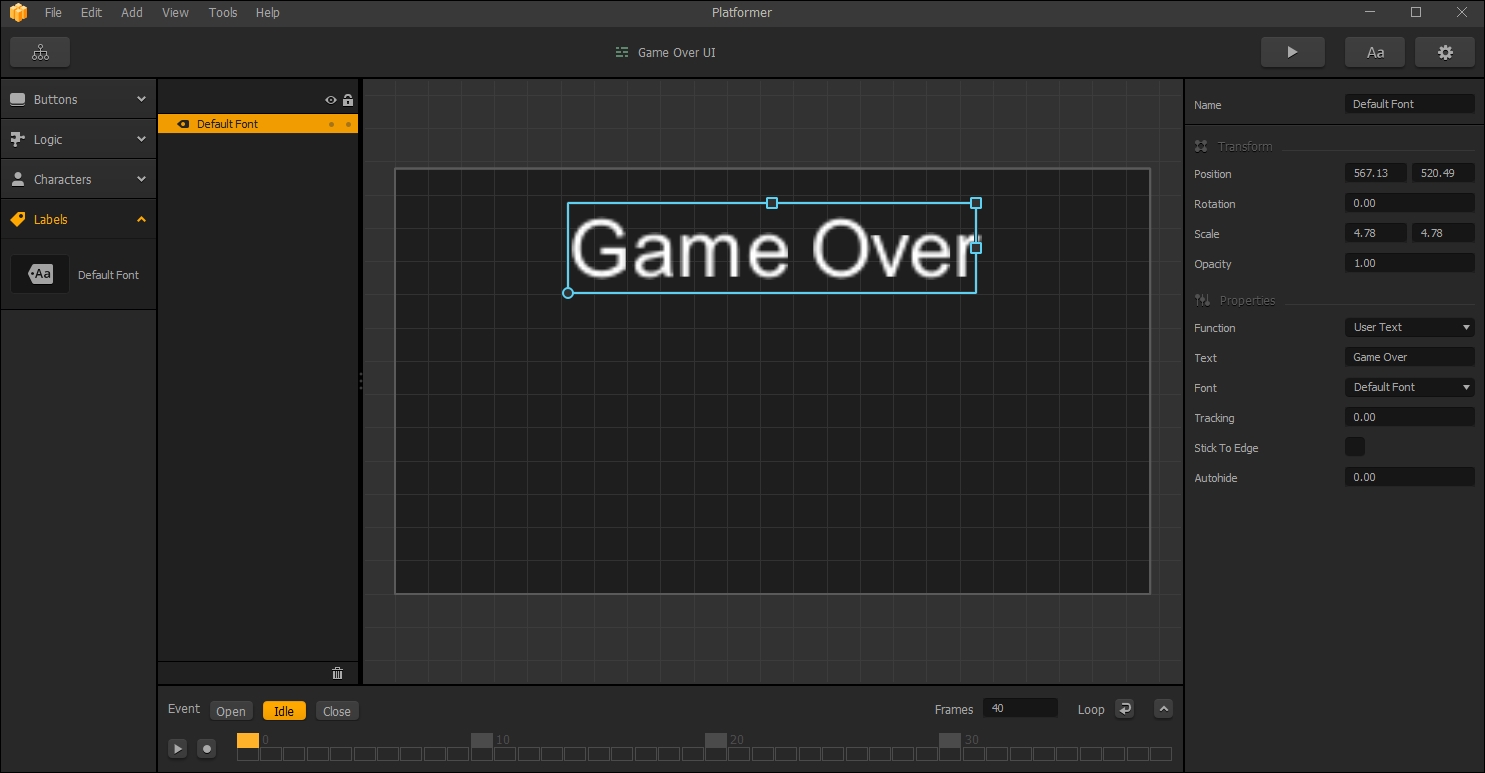
Before we move on, tick the checkbox next to Stick To Edge in the properties window. This keeps the text's relationship to the nearest edge of the visible area (which is handy when you compile for different platforms that have different resolutions).
Well, this looks...really boring. We need text that pops more. Now we'll take a quick look at how to change the fonts for your game.
As promised in the last chapter, we're about to show you the fonts interface. You could have the most beautiful graphics and audio possible in your game. Without a font that ties it all together and goes well with your graphics...well, you're just not going to make your players happy.
When choosing fonts, you should think about the mood of your game, the genre, and the era you're portraying. For example, you wouldn't choose a heavy technical-looking font for something taking place in the Wild West (unless of course, you're going for steampunk). Needless to say, font choice is extremely important, and probably the most overlooked asset in mobile and indie games today.
Let's get to it. If you click on the Font Editor button (top-right corner of the screen...the Aa button), the Font Editor window will open.
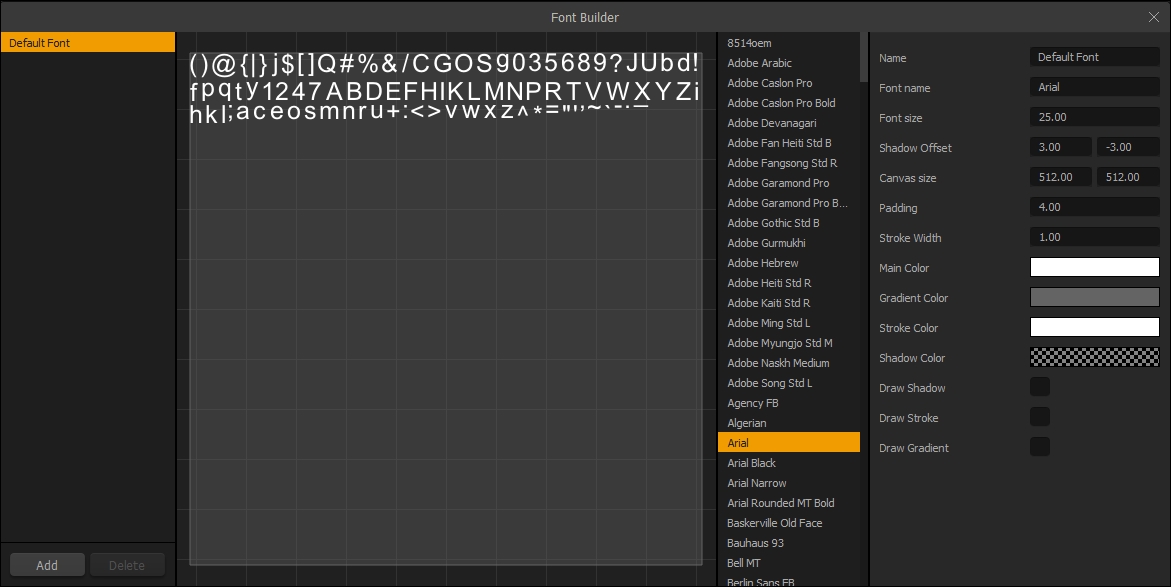
The preceding image shows the Font Editor (the Font Builder). Here, you can make just about any font look good. Let's stay basic (with Arial) so you can see just what a difference some embellishments and a better resolution can make.
On the Game Over screen, we made the font so much bigger that it blurred and pixelated. First off, let's create a new font for our Game Over text. By clicking on the Add button on the lower left, a new font is created (currently called Untitled Font). In the Name field of the properties window, change the name to Large Text. It's important to name your objects as you go to minimize confusion down the line. A full game will end up quite complex, and you definitely want to keep up good organization and naming conventions.
In the properties window, shift the Font Size up to 75.0. Now we can have big fonts that are nice and clear. We should also make this font nice and contrasty and colorful. We also want to make this font visible (no matter the brightness or color of the background).
You may notice that this font has a gradient applied to it (because the Draw Gradient checkbox is ticked). The Main Color field will change the color at the top of the font when the Draw Gradient checkbox is ticked. When it's not ticked, this will make the entire font this color. Let's change the Main Color to bright yellow. You can do this by clicking on its current color (a large grey box currently) which will bring up a color selector window.
Now, we shall change the bottom color of the font using the Gradient Color field. Go ahead and change it to a dark red. It should be noted that when the Draw Gradient checkbox is not ticked, this field is ignored by the software.
Now we need to make sure that the font is readable on both dark and light backgrounds. We'll do this using both stroke and shadow. Tick both Draw Shadow and Draw Stroke, and change the Stroke Color to pure black. You may notice that the shadow is projected up and to the right. It's also pretty close to the lettering.
To change this, all we really have to do is change the Shadow Offset. The first number (currently at 3.00) is the horizontal distance, and the second number (-3.00) is the vertical distance. The fact that the vertical distance is negative is why the shadow is up. If the horizontal number were negative, it would go left (rather than right). Let's set both numbers to 4.0 (which will make the shadow down and to the right). Now that you're done, things should look something like this:
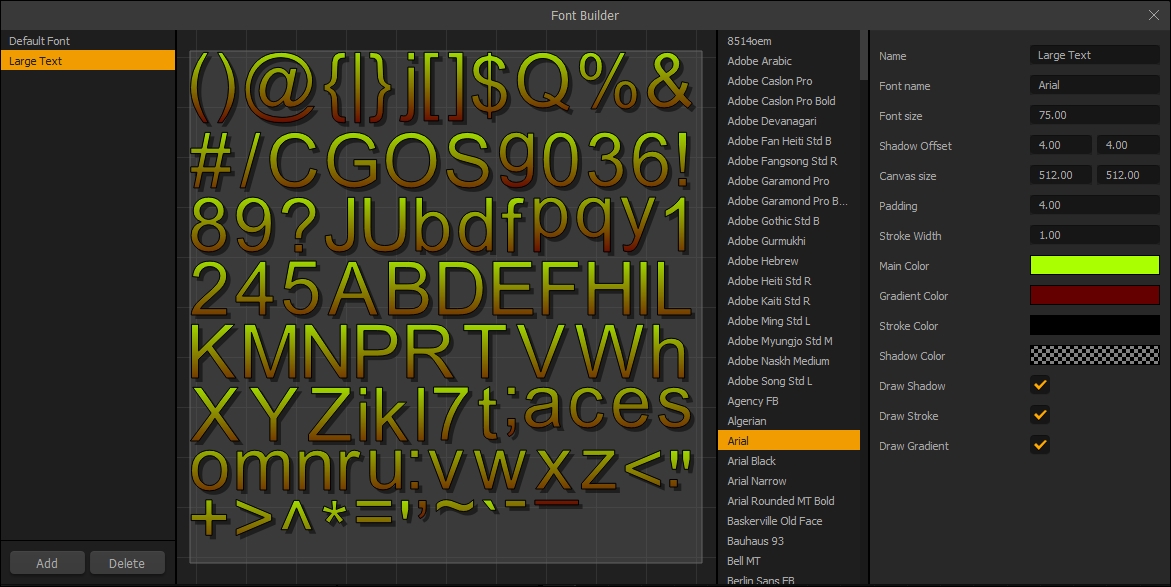
Now you can see how just a little bit of work can make even a boring font like Arial look good and rich. Go ahead and close the Font Editor window.
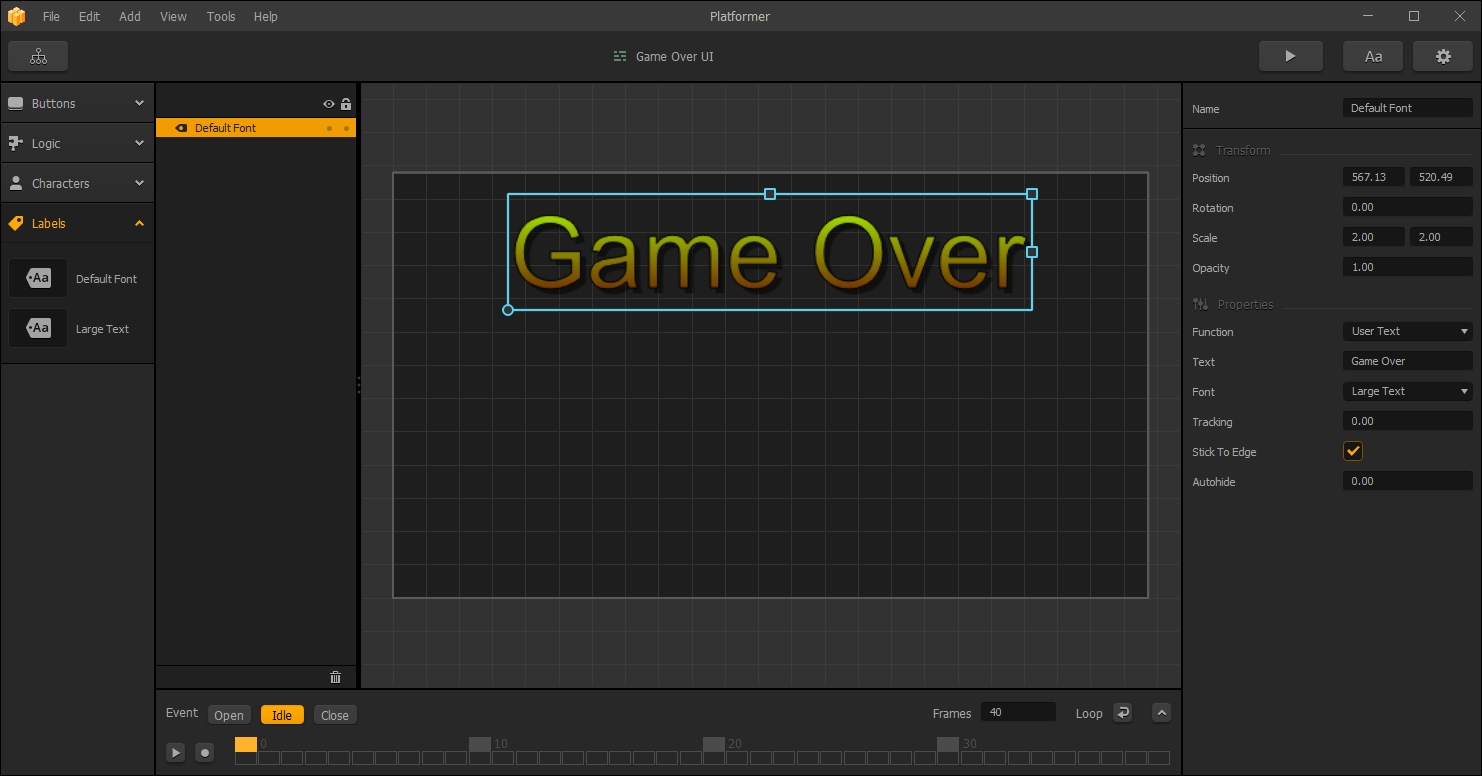
So, why does the Game Over text still look the same? Because we didn't change the default font. Instead, we created a new one for large text. We can assign our new Large Text font pretty easily. First, select the Game Over text by clicking on it. The first thing we should remember is that the default font was really small. So, before we change the font, let's change the scale to 2.0. This can be done in the properties window. There, you'll find the Scale fields. Whenever you see two text fields next to each other, this will be the same as the Shadow fields from the Font Editor (where the first field is horizontal, and the second is vertical). So, just change both fields to 2.0.
Now, in the properties window, look for the Font drop-down menu. In this, select the Large Text font we created. The result should look like this:
Now, we'll create a button to restart the game...
Using your asset library, open up the Buttons section and drag a Navigation Button to the visible area of the stage. Rename this button Restart using the Name field of the parameters window.
In the interest of time, we'll borrow some of our assets from Ramblin' Rover. If you haven't downloaded the free content yet, you can always create a quick button in your graphics program. Make it 300 x 100, and it must be saved as a PNG file. PNG files are the only graphics assets that Buildbox will accept. We'll get further into graphics while we are making Ramblin' Rover in a later chapter. If you have the content, we'll open up a file browser to where you extracted the content. We'll be using Projects/RamblinRover/Buttons/RESTART.png.
Now that we have a browser window open to where the button graphic is held and we have the Navigation Button asset on our stage, drag the image file from your browser, and drop it into the Image field of the properties window for your restart button in Buildbox. The result should look something like this:

We could simplify the process a bit by changing the Function drop-down menu from Default to Restart. However, as this game has a secret level, we wouldn't want to simply restart the hidden level if the character dies. Instead, we want to restart from the beginning of the original world. So instead, we're going to leave this as Default (which will create a new output node for the Game Over UI). So let's go back to the Game Mind Map.
Just as we did when we joined the Game Over output from the Game Field UI to the Game Over UI's Load input, we'll drag a line from the Restart output on the Game Over UI to the Load input on the Level 1 node. And there you have it, your Game Over screen is all done! It should look like this:
Congratulations! Your game is now playable. Click on the Preview button at the top right of the screen and give it a whirl.