Chapter 19. Clientless Remote-Access SSL VPNs
Secure Socket Layer (SSL) Virtual Private Network (VPN) is the rapidly evolving VPN technology that complements the existing IPsec remote-access VPN deployments. As discussed in Chapter 1, the actual data encryption and decryption occur at the application layer, usually by a browser in the clientless SSL VPN tunnels. Consequently, you do not need to install additional software or hardware clients to enable SSL VPN in your network infrastructure. Furthermore, if you want to provide full network access to your remote users, you can leverage the full tunnel mode functionality of the SSL VPN tunnels, discussed in Chapter 20. Most customers prefer using the full tunnel mode option because a VPN client can be automatically pushed to a user after a successful authentication.
The SSL VPN implementation on Cisco ASAs provides the most robust feature set in the industry. In the current software release, Cisco ASA supports all three flavors of SSL VPN. They include:
• Clientless—In the clientless mode, the remote client needs only an SSL enabled browser to access resources on the private network of the security appliances. SSL clients can access internal resources such as HTTP, HTTPS, or even Windows file shares over the SSL tunnel.
• Thin client—In the thin client mode, the remote client needs to install a small Java-based applet to establish a secure connection to the TCP-based internal resources. SSL clients can access internal resources such as HTTP, HTTPS, SSH, and Telnet servers.
• Full Tunnel—In the full tunnel client mode, the remote client needs to install a SSL VPN client first that can give full access to the internal private over a SSL tunnel. Using the full tunnel client mode, remote machines can send all IP unicast traffic such as TCP-, UDP-, or even ICMP-based traffic. SSL clients can access internal resources such as HTTP, HTTPS, DNS, SSH, and Telnet servers.
In many recent Cisco documents, clientless and thin client solutions are grouped under one umbrella and classified as clientless SSL VPN. This chapter focuses on both clientless and thin client solutions in the security appliances. Chapter 20 discusses the full tunnel solution that uses the Cisco AnyConnect VPN Client. Many enterprises use the clientless SSL VPN solution to provide limited access to the contractors who need access to a few applications.
SSL VPN Design Considerations
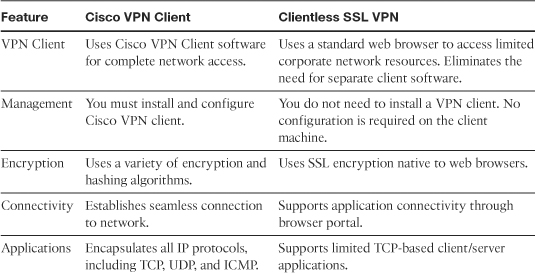
Before you implement the SSL VPN services in Cisco ASA, you must analyze your current environment and determine which features and modes might be useful in your implementation. You have the option to install a Cisco IPSec VPN client, Cisco AnyConnect VPN client, or go with the clientless SSL VPN functionality. Table 19-1 lists the major differences between the Cisco VPN client solution and the clientless SSL VPN solution. Clientless SSL VPN is an obvious choice for someone who wants to check email from a hotel or an Internet café without having to install and configure a Cisco VPN client.
Table 19-1 Contrasting Cisco VPN Client and SSL VPN
If you choose SSL VPN as your remote-access VPN solution, you must take into account these SSL VPN design considerations:
User Connectivity
Before designing and implementing the SSL VPN solution for your corporate network, you need to determine whether your users connect to your corporate network from public shared computers, such as workstations made available to guests in a hotel or computers in an Internet kiosk. In this case, using a clientless SSL VPN is the preferred solution to access the protected resources.
ASA Feature Set
A Cisco security appliance can run various features such as IPsec VPN tunnels, routing engines, firewalls, and data inspection engines. Enabling the SSL VPN feature can add further load if your existing appliance is already running a number of features. You must check the CPU, memory, and buffer utilization before enabling SSL VPN.
Infrastructure Planning
Because SSL VPN provides network access to remote users, you have to consider the placement of the VPN termination devices. Before implementing the SSL VPN feature, ask the following questions:
• Should the Cisco ASA be placed behind another firewall? If so, what ports should be opened in that firewall?
• Should the decrypted traffic be passed through another set of firewalls? If so, what ports should be allowed in those firewalls?
Implementation Scope
Network security administrators need to determine the size of the SSL VPN deployment, especially the number of concurrent users that will connect to gain network access. If one Cisco ASA is not enough to support the required number of users, the use of ASA clustering or load balancing must be considered to accommodate all the potential remote users.
Note
The security appliances support load-balancing the clientless SSL VPN sessions. Because the SSL VPN load-balancing configuration is identical to the remote-access IPSec load-balancing configuration, consult Chapter 17 for a sample load-balancing configuration
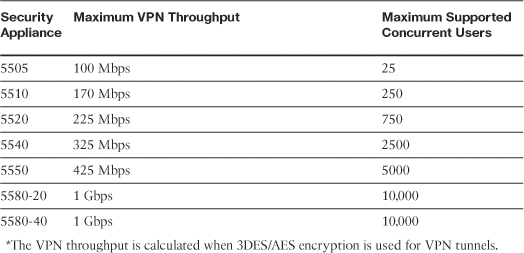
Table 19-2 lists the secure appliances and the number of supported simultaneous SSL VPN users for each platform.
Table 19-2 ASA Platforms and Supported Concurrent SSL VPN Users
Note
Cisco uses SSL VPN and WebVPN interchangeably.
SSL VPN Prerequisites
You must meet a number of prerequisites before you can start implementing an SSL VPN in your enterprise. They are discussed in the following sections.
SSL VPN Licenses
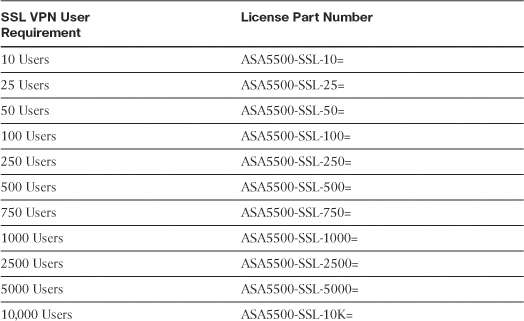
The SSL VPN functionality on the ASAs requires that you have appropriate licenses. For example, if your environment is going to have 75 SSL VPN users, you can buy the SSL VPN license that can accommodate up to 100 potential users. Table 19-3 lists the available licenses and their respective part numbers. Note that an SSL VPN license file for 10 users is supported on all platforms because all security appliances can support ten users. However, a 10,000-user license can be installed only on ASA 5580. Similarly, a 750-user license can be installed on ASA 5520, ASA 5540, ASA 5550, and ASA 5580.
Table 19-3 Available Licenses for ASAs
Cisco Systems provides a two-user complimentary license on all supported ASA devices. You do not have to purchase licenses if you want to test SSL VPN features in a lab environment where the user count is not going to exceed 2.
Note
The minimum version of code to run an SSL VPN is 7.0. In the first release of the ASA, Cisco supported the clientless and thin client modes. The full tunnel SSL VPN client support was added in version 7.1. However, it is highly recommended that you use version 8.0 or higher of the software to utilize all the SSL VPN features discussed in this chapter. This chapter focuses strictly on version 8.2(1) because of the SSL VPN enhancements that were added in this version of code.
In 8.x versions, you can purchase an additional license to implement the Advanced Endpoint Assessment feature. This feature enables the ASA to scan a remote workstation for active antivirus, antispyware, and personal firewalls and to try to update the noncompliant computers to meet the requirements of an enterprise’s security policy. This feature is discussed in the Host Scan section of this chapter in more detail. The part number for this license is ASA-ADV-END-SEC.
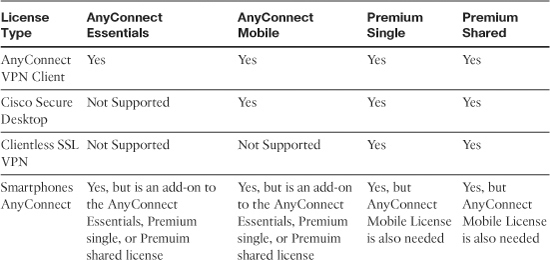
Starting with Cisco ASA version 8.2, Cisco has introduced specific licenses to be used in the SSL VPN environment. They include:
AnyConnect Premium
The AnyConnect Premium license is designed for those customers who want to deploy both clientless as well as the AnyConnect SSL VPN tunnels in a single Cisco ASA. The AnyConnect Premium license supports advanced SSL VPN features such as Cisco Secure Desktop (CSD) and Host Scanning.
AnyConnect Essentials
The AnyConnect Essentials license is designed for those customers who want to deploy solely full tunnel AnyConnect clients. The AnyConnect Essentials license does not support advanced SSL VPN features such as Cisco Secure Desktop (CSD), Host Scanning, and or clientless SSL VPN tunnels. It is a great option for those customers who are in the process of migrating from the Cisco IPSec VPN solution to a Cisco AnyConnect solution or require support for Windows 64-bit operating systems.
After you install the AnyConnect Essential license, you must use the anyconnect-essential command in the webvpn subconfiguration menu to enable AnyConnect Essential on the security appliance.
AnyConnect Mobile
For customers who want to extend the AnyConnect SSL VPN functionality to mobile endpoints such as Treo, iPAQ, and Axim, they can purchase the AnyConnect Mobile license. This is an add-on license to the AnyConnect Essential or SSL VPN premium license. The mobile endpoints need to be running Windows Mobile 5.0, 6.0, or 6.1. For a complete list of supported VPN devices, consult http://www.cisco.com/en/US/docs/security/asa/compatibility/vpn-platforms-82.html.
Shared Premium Licensing
Shared Licenses are designed for those customers who want to purchase the SSL VPN licenses in bulk and then share them among a number of Cisco ASAs on an as-needed basis. The pool of licenses is maintained by a master license server. The SSL VPN terminating security appliances are known as the participants. When participants need SSL VPN licenses, they send a request to the master server. The server, depending on license availability, grants licenses to the participants in small chunks.
By using this model, customers can benefit from operational flexibility and investment protection because they can add devices to their deployments without needing to purchase specific SSL VPN licenses for each device. In this licensing structure, the SSL user count is what is shared among the participating firewalls.
Table 19-4 provides detailed information on the different license types and the supported SSL VPN features.
Table 19-4 License Types and Supported SSL VPN Features
Note
All license keys, except for Shared Premium license, are associated per device. That means you cannot share a license among multiple Cisco ASAs, even if they are in high-availability or clustered environments. Customers who want to deploy the security appliances in high-availability areas can purchase the SSL/IPsec VPN Edition bundle with a specific license size.
If using the Shared Premium license in an Active/Standby failover scenario, the active security appliance requests the license from the license server. The standby appliance does not need any licenses.
VPN Flex Licenses
Cisco Systems also provides its customers an emergency or business continuity license called VPN Flex license. Using the SSL VPN Flex Licenses on the security appliances, customers can temporarily increase (burst) the number of SSL licenses on a box for up to 60 days. This license is extremely useful in those circumstances when a large number of employees cannot come to the office in emergency situations such as extreme weather conditions and they end up working from home through the SSL VPN tunnels. In this case, the security appliance administrator can apply a VPN flex license for a week and revert back to the permanent license when the extreme conditions end.
Client Operating System and Browser and Software Requirements
The SSL VPN functionality on Cisco security appliances is supported on a number of client operating systems and on a number of browsers. The supported platforms are discussed next.
• Compatible browser—You must use an SSL-enabled browser such as Microsoft Internet Explorer, Firefox, Opera, Safari, Mozilla, Netscape, or Pocket Internet Explorer (PIE). Table 19-5 provides a list of operating systems and the supported Internet browsers.
Table 19-5 Supported Operating Systems and Internet Browsers

Note
Cisco has certified HP iPaq H4150 Pocket PC 2003 running Windows CE 4.20.0 build 14053 with Pocket Internet Explorer. The ROM version is 1.10.03ENG with a 07/16/2004 ROM date. Cisco has also certified HP iPaq hx2495b running Windows CE 5.0.5.1.1702. You do not need to configure anything special on the security appliance to make mobile devices to work.
• Sun JRE—The browser must be enabled with Java Runtime Environment (JRE) version 1.4.1.x or higher for SSL VPN features such as port forwarding and smart tunnels.
• ActiveX—SSL VPN also uses ActiveX for Internet Explorer on Microsoft-based operating systems. ActiveX is used by smart tunnels and Cisco Secure Desktop.
• Web folder—Microsoft hotfix 892211 must be installed on Windows operating systems for web folders to be accessible in the clientless SSL VPN mode.
Note
Browser cookies must be enabled if you want to access applications through port forwarding or smart tunnels.
Infrastructure Requirements
The infrastructure requirements for SSL VPNs include, but are not limited to, the following options:
• ASA placement—If you are installing a new security appliance, determine the location that best fits your requirements. If you plan to place it behind an existing corporate firewall, make sure that you allow appropriate SSL VPN ports to pass through the firewall.
• User account—Before SSL VPN tunnels are established, users must authenticate themselves to either the local database or to an external authentication server. The supported external servers include RADIUS (including Password Expiry using MSCHAPv2 to NT LAN Manager), RADIUS one-time password (OTP), RSA SecurID, Active Directory/Kerberos, and Generic Lightweight Directory Access Protocol (LDAP). Make sure that SSL VPN users have accounts and appropriate access. LDAP password expiration is available for Microsoft and Sun LDAP.
• Administrative privileges—Administrative privileges on the local workstation are required for all connections with port forwarding if you want to use host mapping.
Pre-SSL VPN Configuration Guide
After analyzing the deployment consideration and selecting the SSL VPN as the remote-access VPN solution, you must follow the configuration steps described in this section to properly set up the SSL VPN so that it can be enabled on a Cisco security appliance. These tasks include the following:
• Enroll digital certificates (recommended)
• Set up tunnel and group policies
Enroll Digital Certificates (Recommended)
Enrollment is the process of obtaining a certificate from a certificate authority (CA). Even though the security appliance can generate self-signed certificates, using an external CA is highly recommended. The enrollment process can be broken into three steps, as described in the following sections.
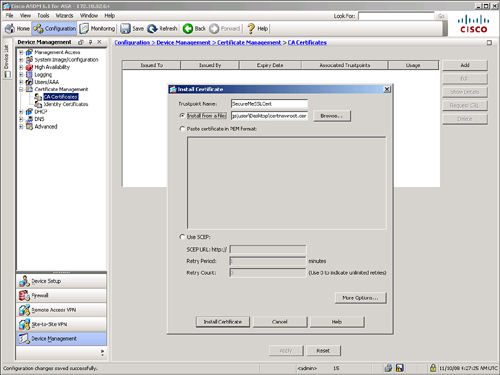
Step 1: Obtaining a CA Certificate
Obtain a CA/root certificate before requesting an identity certificate from the CA server. Make sure that you have received a CA certificate from the server in the Base64 format. After you have the CA certificate, you can use ASDM to navigate to Configuration > Device Management > Certificate Management > CA Certificates > Add. Specify a Trustpoint Name, select the Install from a File option, browse your local directory where the CA certificate resides, and click Install Certificate to install the CA certificate in the security appliance. As shown in Figure 19-1, a trustpoint called SecureMeSSLCert is defined. The name of the CA certificate file is certnewroot.cer. After you click Install Certificate, the security appliance should acknowledge that the certificate was installed successfully.
Figure 19-1 Importing CA Certificate
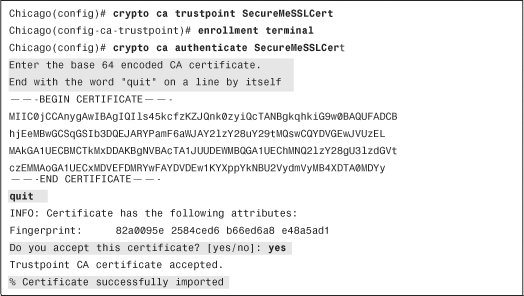
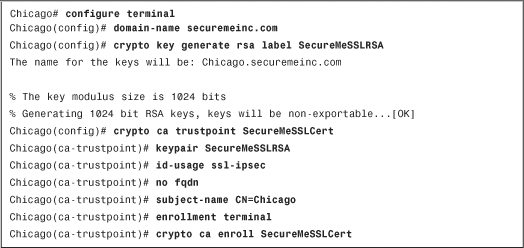
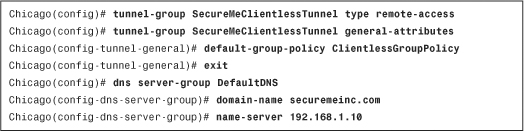
If you prefer to use the Cisco ASA CLI, define a trustpoint and then use the crypto ca authenticate command to import the CA certificate, as shown in Example 19-1.
Example 19-1 Importing the CA Certificate Manually
Step 2: Request a Certificate
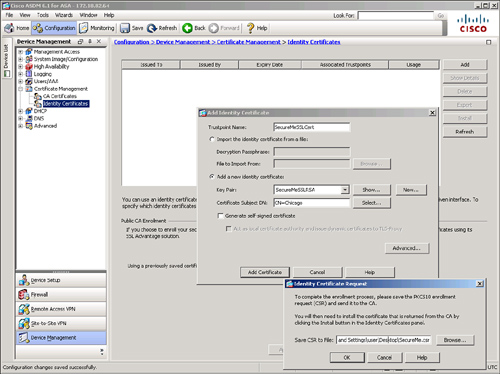
Before requesting an identity certificate, you must generate the RSA key pair through ASDM or through the CLI. If you already have the RSA keys generated that you want to use for SSL encryption, you can skip creating new ones. If you want to create new keys, navigate to Configuration > Device Management > Certificate Management > Identity Certificates and click Add. Specify the same Trustpoint Name that you defined in step 1, select the Add a New Identity Certificate option, and click New. Specify a key pair name, select its usage as General Purpose and click Generate Now to generate a new RSA key pair. As shown in Figure 19-2, a new RSA pair called SecureMeSSLRSA is being generated for SecureMeSSLCert Trustpoint. If a key pair already exists, you can use it rather than create a new one.
Figure 19-2 Generating RSA Keys and Requesting an ID Certificate

Note
After generating a request for the identity certificate via ASDM, you may receive the following error message. You can ignore the error message and continue with the rest of the configuration steps:
[ERROR] enrollment terminal
Trustpoint enrollment configuration cannot be changed for an authenticated trustpoint.
After generating the RSA keys, request an identity certificate to be used for SSL VPN. When you click Add Certificate, Cisco ASDM enables you to specify where to save the CSR file that is generated by the ASA to request a certificate from the CA server. As illustrated in Figure 19-3, the trustpoint name is SecureMeSSLCert and it is using the SecureMeSSLRSA key pair. The name in the CSR file is SecureMe.CSR and it is located in the user’s Desktop folder.
Figure 19-3 Name and Location of CSR File
In Example 19-2, the CLI configuration for manual enrollment is shown. The enrollment terminal subcommand in SecureMeSSLCert configuration is used to declare manual enrollment of the CA server. This trustpoint uses the SecureMeSSLCert RSA key.
Example 19-2 Configuring Cisco ASA for Manual Enrollment
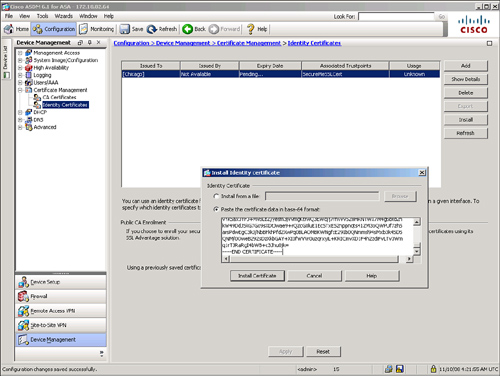
After you submit a certificate request, the certificate should be in a pending state until the CA administrator approves it. You can navigate to Configuration > Device Management > Certificate Management > Identity Certificates to check its status. After the identity certificate is approved, you can select the pending certificate request and click Install. A new window pops up where you can paste your approved certificate in Base64 encoding. Click Install Certificate to install the identity certificate in the appliance, as shown in Figure 19-4.
Figure 19-4 Installing Identity Certificate in the Security Appliance
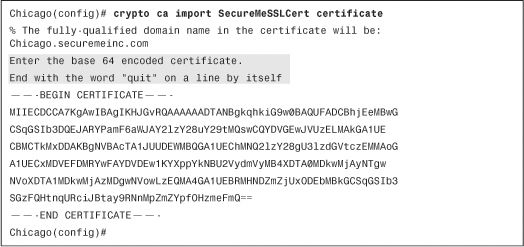
Using the CLI, after the identity certificate is approved by the CA server administrator, use the crypto ca import command to import the Base64-encoded ID certificate. Example 19-3 demonstrates how to import the ID certificate.
Example 19-3 Manually Importing the ID Certificate
Note
The same RSA key pair can be used for Secure Shell (SSH) connections to the security appliances.
Step 3: Apply Identity Certificate for SSL VPN Connections
After the certificate is imported, navigate to Configuration > Device Management > Advanced > SSL Settings, select the ‚interface or the interface where you want to terminate the SSL VPN connections, click Edit, and select the newly installed certificate from the Primary Enrolled Certificate drop-down option menu as shown in Figure 19-5.
Figure 19-5 Mapping Identity Certificate to an Interface
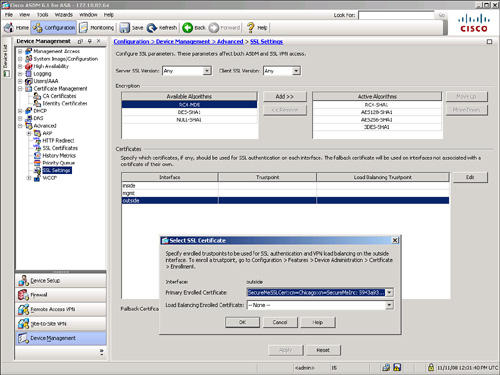
Using the CLI, issue the ssl trust-point SecureMeSSLCert outside command to activate the imported certificate on the outside interface to terminate the SSL sessions, as shown in Example 19-4.
Example 19-4 Activating the Identity Certificate on the Outside Interface
![]()
Set Up Tunnel and Group Policies
As discussed in Chapter 17, Cisco ASA uses an inheritance model when it pushes network and security policies to the end-user sessions. Using this model, you can configure policies at the following three locations:
• Under default group policy
• Under user’s assigned group policy
• Under specific user’s policy
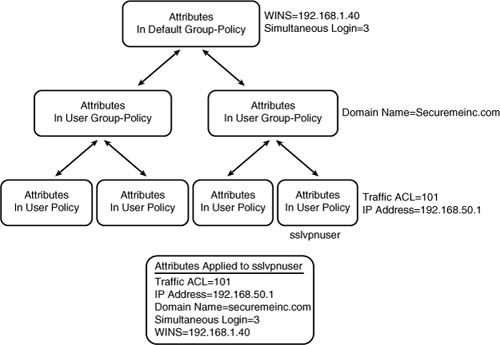
In the inheritance model, a user inherits the attributes and policies from the user policy, which inherits its attributes and policies from the user group policy, which in turn inherits its attributes and policies from the default group policy, as illustrated in Figure 19-6. In this example, a user with ID “sslvpnuser” receives a traffic access control list (ACL) and an assigned IP address from the user policy, the domain name from the user group policy, and Windows Internet Naming Server (WINS) information along with the number of simultaneous logins from the default group policy.
Figure 19-6 ASA Attributes and Policies Inheritance Model
After these policies are defined, they must be bound to a tunnel group where users terminate their sessions. This way, a user who establishes his VPN session to a tunnel group inherits all the policies mapped to that tunnel. The tunnel group defines a VPN connection profile, of which each user is a member.
Configure Group Policies
You configure the user group and default group policies by choosing Configuration > Remote Access VPN > Clientless SSL VPN Access or Network (Client) Access > Group Policies. Click Add to add a new group policy. As shown in Figure 19-7, a user group policy, called ClientlessGroupPolicy, has been added. This group policy allows only clientless SSL VPN tunnels to be established and strictly rejects all the other tunneling protocols. If you would rather assign attributes to a default group policy, you can modify DfltGrpPolicy (System Default). Any attribute that is modified under DfltGrpPolicy is propagated to any user group policy that inherits that attribute. A group policy name other than DfltGrpPolicy is treated as a user group policy.
Figure 19-7 User Group Policy Configuration
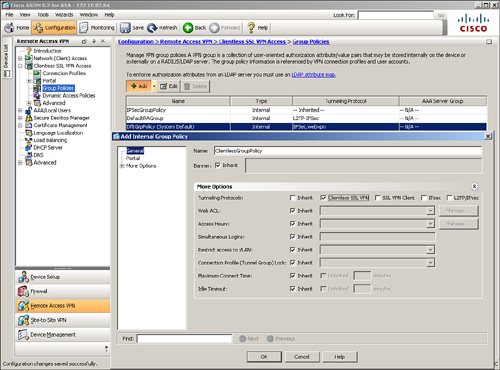
Note
The default and user group policies are set up to allow both Cisco IPsec VPN and SSL VPN tunnels. If you want to restrict a policy to solely use SSL VPN, use either clientless SSL VPN or SSL VPN client options under Tunneling Protocols, as illustrated in Figure 19-7.
Example 19-5 illustrates how to define a user group policy called ClientlessGroupPolicy. This policy allows only the clientless tunnels to be terminated on the group.
Example 19-5 Group-Policy Definition

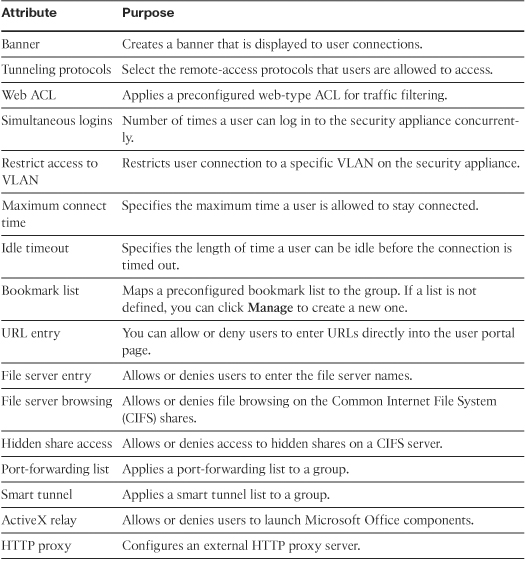
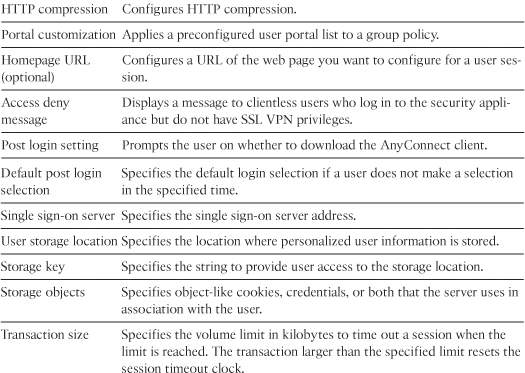
Table 19-6 lists all the SSL VPN attributes that can be mapped to a user group and default group policies. The attributes with an asterisk (*) can also be configured under a user policy.
Table 19-6 Configurable SSL VPN Attributes
The user, group, and default group polices can be applied to clientless, AnyConnect, and IPsec-based remote-access VPN tunnels. The Clientless SSL VPN–specific attributes are discussed in detail in the next few sections of this chapter.
Note
You can configure a user policy by choosing Configuration > Remote Access VPN > AAA/Local Users > Local Users.
Configure a Tunnel Group
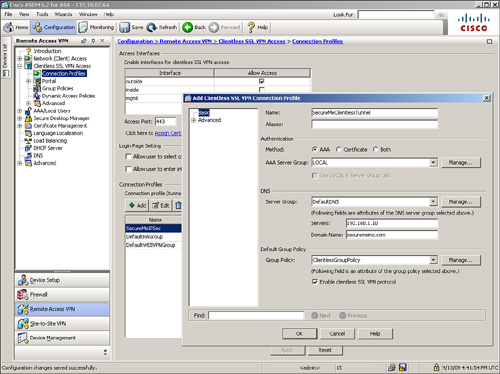
You can configure a tunnel group, also known as a connection profile, by choosing Configuration > Remote Access VPN > Clientless SSL VPN Access > Connection Profiles. Click Add to add a new tunnel group. As shown in Figure 19-8, a tunnel group called SecureMeClientlessTunnel has been added. If you configure your internal websites using the fully qualified domain name (FQDN), you must configure a Domain Name System (DNS) server on the security appliance to resolve the hostnames. Specify the DNS server address to Servers under the DNS option. In Figure 19-8, a DNS server of 192.168.1.10 is configured with a domain name of securemeinc.com. After defining a tunnel group name, you can bind a user group policy to a tunnel group. After a user is connected, the attributes and policies defined under the group policy are applied to the user. A user group policy of ClientlessGroupPolicy is linked to this tunnel group.
Figure 19-8 Configuration of a Tunnel Group
Note
If you do not define the IP address of the DNS server, you receive the following message:
“There is no DNS server defined, so you cannot access any URL with FQDN from the portal. Are you sure about this?”
You can choose to ignore this message if your security appliance is not going to resolve any FQDNs
Example 19-6 illustrates how to configure a remote-access tunnel group of SecureMeClientlessTunnel. The previously defined group policy, ClientlessGroupPolicy, is added to the tunnel group.
Example 19-6 Tunnel Group Definition
After configuring a Connection Profile, you can define a URL that users can use to connect to this tunnel group. This is useful if you want to create a specific URL for each connection profile you create and distribute the URL accordingly so that users do not have to decide to which connection profile they should connect.
Define a specific URL by modifying the connection profile and then clicking the Advanced > SSL VPN option. Under Group URL, click Add and specify a URL. For the SecureMeClientlessTunnel connection profile, https://sslvpn.securemeinc.com/SecureMeClientless is the group URL. Verify that the Enable check box is selected. Click OK to exit. When users need to connect via SSL VPN, they can use this URL to connect specifically to this tunnel group.
Example 19-7 illustrates how to specify a group-url of https://sslvpn.securemeinc.com/SecureMeClientless for SecureMeClientlessTunnel.
Example 19-7 Tunnel Group Definition

Set Up User Authentication
Cisco ASA supports a number of authentication servers, such as RADIUS, NT domain, Kerberos, SDI, LDAP, digital certificates, smart cards, and local databases. For small organizations, a local database can be set up for user authentication. For medium to large SSL VPN deployments, it is highly recommended that you use an external authentication server, such as RADIUS or Kerberos, as the user authentication database. If you are deploying the SSL VPN feature for a few users, you can use the local database. You define the users by choosing Configuration > Remote Access VPN > AAA/Local Users > Local Users. As shown in Figure 19-9, two accounts, sslvpnuser and adminuser, are configured for user authentication. The sslvpnuser account, with a password of C1$c0123 (obfuscated), will be used for SSL VPN user authentication, whereas adminuser, with a password of @d1m123 (obfuscated), will be used to manage the security appliance.
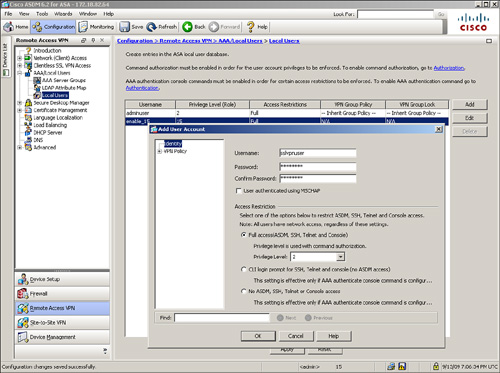
As shown in Example 19-8, two accounts, sslvpnuser and adminuser, are configured for user authentication.
Example 19-8 Local User Accounts
![]()
Many enterprises use either a RADIUS server or Kerberos to leverage their existing active directory infrastructure for user authentication. Before configuring an authentication server on Cisco ASA, you must specify authentication, authorization, and accounting (AAA) server groups by choosing Configuration > Remote Access VPN > AAA/Local Users> AAA Server Groups > Add. Specify a server group name that can be referenced by the other AAA processes. Select an authentication protocol for this server group name. For example, if you plan to use a RADIUS server for authentication, select RADIUS from the drop-down menu. This option ensures that the security appliance requests the appropriate information from the end users and forwards it to the RADIUS server for authentication and verification.
After enabling RADIUS processing, define a list of the RADIUS servers. The Cisco security appliance checks their availability on a round-robin basis. If the first server is not reachable, it tries the second server, and so on. If a server is available, the security appliance keeps using that server until it fails to receive a response. In this case, it checks the availability of the next server. It is highly recommended that you set up more than one RADIUS server, in case the first server is not reachable. You can define a RADIUS server entry by navigating to Configuration > Remote Access VPN > AAA/Local Users> AAA Server Groups and clicking Add under Servers in the Selected Group. You must specify the IP address of the RADIUS server, as well as the interface closest to the server. The security appliance authenticates itself to the RADIUS server by using a shared secret key.
Note
User passwords are sent as encrypted values from the Cisco ASA to the RADIUS server. This protects this critical information from an intruder. The security appliance hashes the password, using the shared secret that is defined on the security appliance and the RADIUS server.
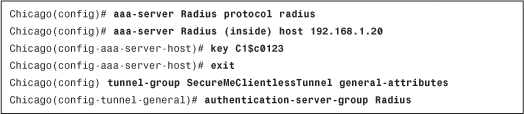
Figure 19-10 shows the Cisco ASA configured with an AAA server under the server group called Radius. The server is located toward the inside interface at 192.168.1.20. The server secret key is c1$0123 (obfuscated).
Figure 19-10 Defining a RADIUS Server for Authentication

Note
You can optionally modify the authentication and accounting port numbers if your RADIUS server does not use the default ports. The security appliance uses UDP ports 1645 and 1646 as defaults for authentication and accounting, respectively. Most of the RADIUS servers use the official IANA assigned ports 1812 and 1813 as authentication and accounting ports, respectively.
After defining the authentication server group, you have to bind it to the SSL VPN process under a tunnel group. Figure 19-11 illustrates that the newly created “Radius” AAA server group is mapped to the SecureMeClientlessTunnel tunnel group.
Figure 19-11 Mapping a RADIUS Server to a Tunnel Group
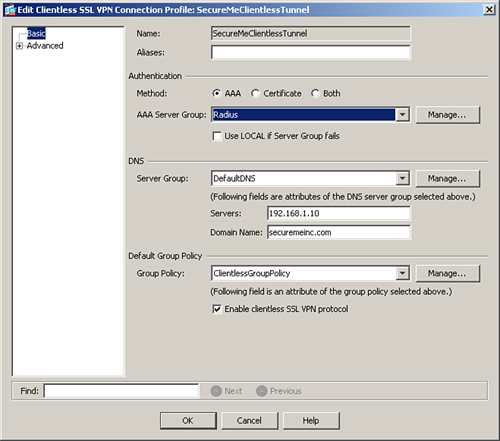
Example 19-9 shows how a radius server can be defined. The radius group-name is Radius and it is located toward the inside interface at 192.168.1.20. The shared secret is C1$c0123. The radius server is linked to SecureMeClientlessTunnel.
Example 19-9 Defining RADIUS for IPSec Authentication
Tip
For large VPN deployments (both IPsec and SSL VPNs), you can even control user access and policy mapping from an external authentication server. You should pass the user group policy name as a RADIUS or LDAP attribute to the security appliance. By doing so, you guarantee that a user will always get the same policy, regardless of the tunnel group name to which he connects. If you are using RADIUS as the authentication and authorization server, you can specify the user group policy name as attribute 25 (class attribute). Append the keyword OU= as the value of the class attribute. For example, if you define a user group policy called engineering group, you can enable attribute 25 and specify OU=engineering as its value.
Note
Starting from 8.2(1), the security appliance supports the double authentication feature where a user must provide two separate sets of login credentials at the login page. For example, you can choose to authenticate users on a primary authentication server such as Active Directory as well as on a secondary authentication server such as RADIUS. When both authentications succeed, the user is allowed to establish the SSL VPN tunnel. The secondary authentication server is specified under the Connection Profile settings.
Clientless SSL VPN Configuration Guide
The clientless configuration of SSL VPN describes the mandatory steps for enabling SSL VPNs and setting up the user interface for clientless SSL VPN users. The following sections focus on the clientless users who want to access internal corporate resources but do not have an SSL VPN client loaded on their workstations. These users typically access protected resources from shared workstations or even from the hotels or Internet cafes. The clientless configuration on Cisco ASA can be broken down into the following subsections:
• Enable Clientless SSL VPN on an interface
• Configure SSL VPN portal customization
• Configure application access
• Configure client-server plug-ins
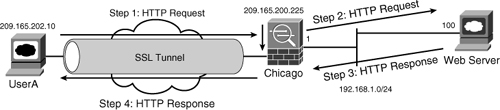
Figure 19-12 is used throughout these sections to demonstrate how to set up Cisco ASA for clientless users. As shown in this figure, the security appliance is set up to accept the SSL VPN connections from the hosts on the Internet. On the private network of the security appliance, we have a number of servers.
Figure 19-12 SSL VPN Network Topology
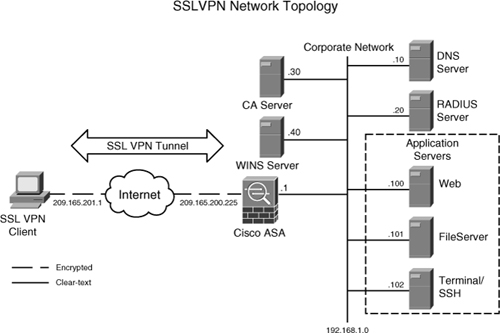
Table 19-7 provides a description of those servers used in this setup.
Table 19-7 Description and Location of Servers
Enable Clientless SSL VPN on an Interface
The first step in setting up a clientless SSL VPN on the security appliances is to enable an SSL VPN on the interface that will terminate the user session. If an SSL VPN is not enabled on the interface, Cisco ASA does not accept any connections, even if SSL VPN is globally enabled.
To enable an SSL VPN on an interface through ASDM, choose Configuration > Remote Access VPN > Clientless SSL VPN Access > Connection Profiles and select the Allow Access check box next to the interface on which you want to enable SSL VPN. As shown in Figure 19-8, an SSL VPN is enabled on the outside interface, using the default port 443. Click Apply to send the appropriate command from ASDM to the security appliance.
Example 19-10 shows that SSL VPN functionality is enabled on the outside interface
Example 19-10 Enabling SSL VPN on the Outside Interface
![]()
After SSL VPN is enabled on an interface, the security appliance is ready to accept the connections. However, you still need to go through other configuration steps to successfully accept user connections and to allow traffic to pass through.
Configure SSL VPN Portal Customization
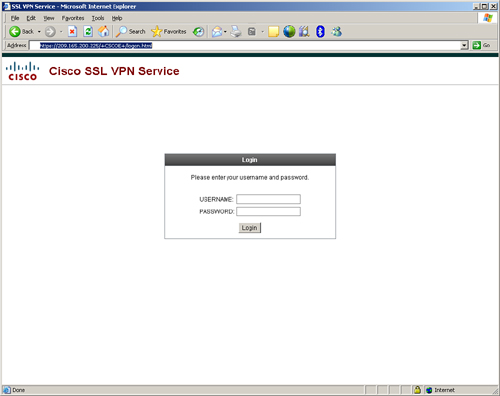
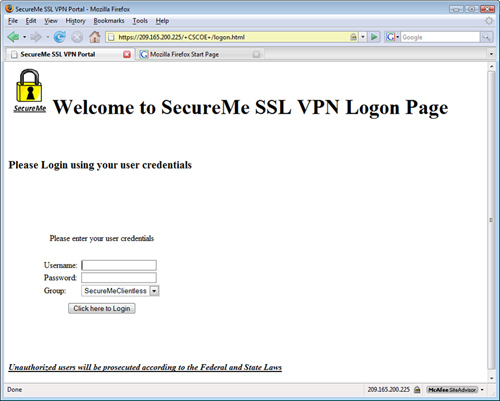
Figure 19-13 shows the default SSL VPN page when a connection is initiated from a web browser. The title of the page is SSL VPN Service and the Cisco Systems logo is displayed in the upper-left corner of the web page. The initial page prompts the user for user authentication credentials.
Figure 19-13 Default SSL VPN Login Page
You can customize the initial SSL VPN login page based on your organization’s security policies. Cisco ASA also enables you to customize the user web portal by offering a number of options to choose from. The security appliance enables you to upload images and unique XML data to fully customize the login page. In version 8.0 and higher software, you can even customize the initial login page based on the user group membership.
Note
Portal customization can only be achieved through ASDM. You cannot modify the configuration through the CLI.
Using portal customization, you can design and present the SSL VPN page in any way you like. ASA allows you to design the default login page as well as the login page for a group of users. For example, if you want contractors to access a few applications, you can customize a web portal to include those applications and then map that portal to the group policy that contractors use. This way, when a user who belongs to the contractor group policy tries to log in, he sees only applications that are listed in his portal.
Note
Portal customization can use dynamic content through the use of a JavaScript include file, <script src=“/+CSCOE+/custom.js”></script>. This file is useful if you want use the functions defined for an SSL VPN session to create your own web page.
If you want to use customization through XML, Cisco ASA contains a customization template. You should export the template to a workstation and modify its content. You can import the customized content into the security appliance as a new customized object. XML customization is outside the scope of this book.
You configure the user portal customization by choosing Configuration > Remote Access VPN > Clientless SSL VPN Access > Portal > Customization. You can either modify the DfltCustomization object or define a new customized portal. If you want to create a new portal, click Add and specify the new object name. After the new object is created, you can select it and click Edit to modify its properties. Throughout this book, we use a new object called SecureMePortal. Cisco ASA launches a new browser window where you can customize the following three portal pages when a clientless user connects to a Cisco ASA:
Logon Page
You can change the appearance of the logon page for clientless SSL VPN users. You can either customize the default logon page that affects all users or customize a tunnel-specific page that affects users who connect to that tunnel group.
At a high-level architecture, the login portal customization is broken into four elements, discussed in the following sections and illustrated in Figure 19-14.
Figure 19-14 SSL VPN Logon Page Customization
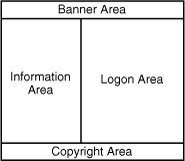
Banner Area
The banner area acts as a page title, and thus customers can define their own text for a web page. For example, if you want to present “SecureMe SSL VPN Service” as the title of the logon page, you can define it under the title panel of the customization editor. This element of a web page can be hidden or displayed to the end users by an SSL VPN administrator. You can customize the banner based on your needs. For example, you can change the font and size of the banner text, add or change your company’s logo, and position the text and logo on the page. In Figure 19-15, the administrator defines SecureMe SSL VPN Service as the page’s title. An image called securemeinc-sml.jpg has been set as the logo URL, the font color is set to #000000 (black), and the background color is set to #ffffff (white). The administrator has enabled a gradient that is used to gradually change the background color.
Figure 19-15 Logon Page Banner Customization
Note
If you want to upload customized images or files, choose Configuration > Remote Access VPN > Clientless SSL VPN Access > Portal > Web Contents and upload the files. An example is shown in the “Full Customization of a Logon Page” section later in this chapter.
You can click the Preview button to preview the portal you have designed. This is a great way to test your configuration without actually pushing it to the security appliance and then testing it using the clientless SSL VPN tunnel. Click Save to save these settings.
Note
You cannot preview a portal page if you choose Full Customization or upload an XML file.
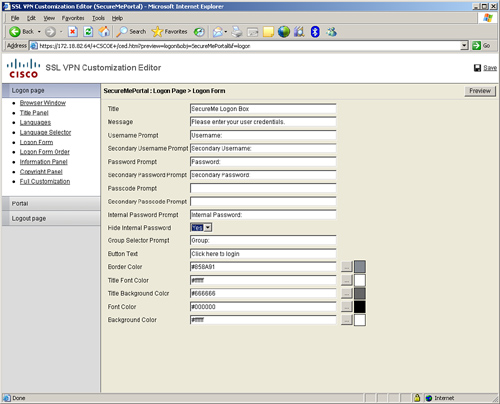
Logon Area
The logon area, also known as the logon form, prompts the user to input his or her user credentials. You can customize the title, the logon message, the username and password prompts, and the color and font of the text. You can even choose whether you want users to select a group that they want to use for their authentication. In Figure 19-16, the Cisco ASA administrator has configured the logon form to meet SecureMe’s policies. The title of the logon box is changed to SecureMe Logon Box and the message within the logon box is Please Enter Your User Credentials. The text in the username and password prompts is Username: and Password: respectively. The text in the secondary username and secondary password prompts is Secondary Username: and Secondary Password: respectively. The Hide Internal Password prompt is enabled while the text in the group selector prompt is Group:. The text within the login button is Click here to Login.” The text color of the logon box title is #ffffff (white), whereas the background color in the title is #666666 (gray). The font color of the text inside the logon box is #000000 (black), and the background color of the logon form is #ffffff (white).
Figure 19-16 Logon Form Customization
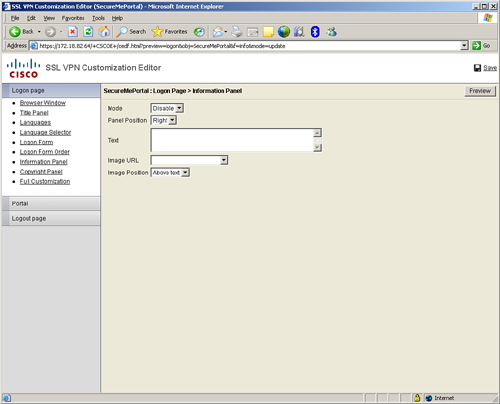
Information Area
The information area shows any text and image that you want to display on the logon page. You can specify whether you want to display the information area to the left or the right side of the logon form. The Cisco ASA administrator can choose to enable or disable this element under the Information Panel option. In Figure 19-17, the information panel is disabled by the administrator.
Figure 19-17 Logon Page Information Area Customization
Copyright Area
If you want to display the copyrighted information on the logon page, you can specify it in the Copyright area. Most customers use this area to display a logon warning or important information regarding user logons.
Portal Page
In addition to changing the appearance of the logon page, administrators can change how a portal is displayed to users after they are authenticated. This includes designing their home pages as well as their application access windows when they launch an application.
At a high-level architecture, the web portal is broken into four elements: the title panel, toolbar, navigation pane, and content area. These elements are discussed next and are illustrated in Figure 19-18.
Figure 19-18 SSL VPN User Web Portal Customization
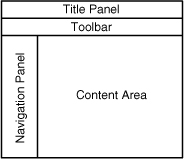
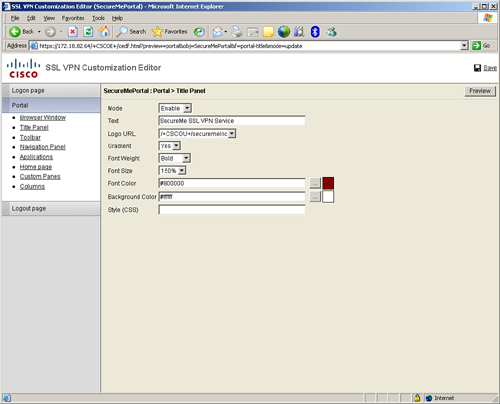
Title Panel
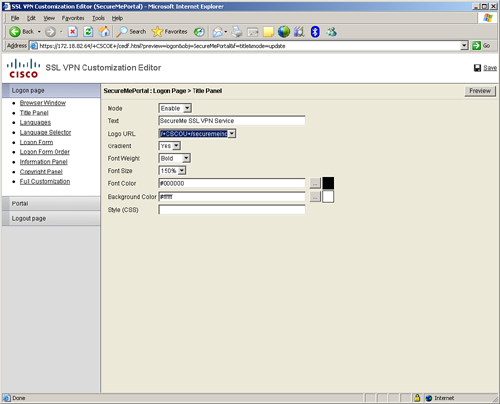
The title panel designs the title frame on the user portal after the user is logged in. An administrator can choose to hide or display the title panel by disabling or enabling the Mode option. If you choose to display the title panel when a user logs into the security appliance via SSL VPN tunnel, you can specify the title text and logo and customize the font size and colors of the frame. For example, you can present “SecureMe SSL VPN Service” as the title and load SecureMe’s company logo as the title image, as shown in Figure 19-19. The font color is #800000 (maroon), and the background color is #ffffff (white). The font size is set to 150 percent of the regular font size.
Figure 19-19 SSL VPN Web Portal Title Panel Customization
Toolbar
The toolbar is used to define user prompts such as the URL box and logout. You can also define browser button text here. An administrator can hide the toolbar from the user portal for additional security by disabling the Mode option.
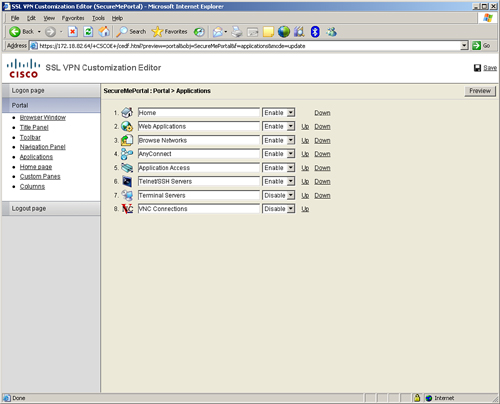
Navigation Panel
The navigation panel, if enabled, can list all applications that you want SSL VPN users to access. In the navigational panel, select Enabled for the mode and click Save to save the settings. After it is saved, click Applications and define all the applications that appear vertically in the left pane after a user logs in to the portal. An administrator can choose to enable or hide an application, or move an application up or down the list. As illustrated in Figure 19-20, the administrator has enabled the following applications:
• Home
• Web applications
• Browse networks
• AnyConnect
• Application access
• Telnet/SSH servers
Figure 19-20 SSL VPN Web Portal Application Customization
Content Area
The content area shows content for each application. An administrator can choose to split the content area, shown as Content Pane in ASDM, into multiple frames of text, HTML, RSS feeds, or image panes. You can even define an initial web-page URL in case you want SSL VPN users to see important notifications when their connections are established.
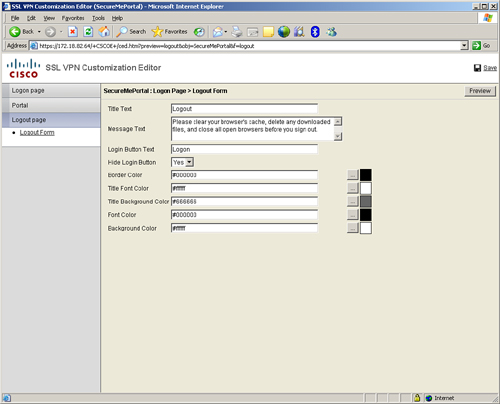
Logout Page
Cisco ASA even allows you to customize the logout page. You can define the logout message and provide an option for whether users can be allowed to log back in. You can pick the color of the title font and title background, and the font and background colors of the logout page. In Figure 19-21, the administrator has added the logout message “Please clear your browser’s cache, delete any downloaded files, and close all open browsers before you sign out.” The login button is not allowed, and thus the user needs to specify the SSL VPN server IP address in the browser to start a new session. The text color of the logout box title is #ffffff (white), and the background color of the title is #666666 (gray). The font color of the text inside the logout box is #000000 (black), and the background color of the logout form is #ffffff (white).
Figure 19-21 SSL VPN Logout Page Customization
Portal Customization and User Group
When you are finished customizing the login, portal, and logout pages, these customized objects can then be applied to the appropriate user connection profile. The following sections discuss two scenarios.
Customized Login Page and User Connection Profile
After customizing the login page, display it to the users who log in to the security appliances. You have two ways to display the login page to the user:
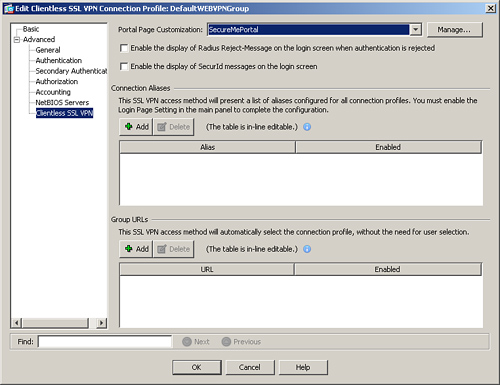
• DefaultWEBVPNGroup connection profile—If you want your customized login page to be displayed to all users who access the security appliance using its FQDN (fully qualified domain name) or the IP address, apply the customized object under the DefaultWEBVPNGroup connection profile by choosing Configuration > Remote Access VPN > Clientless SSL VPN Access > Connection Profiles. Select DefaultWEBVPNGroup and click Edit to modify its contents. Cisco ASDM launches a new window. Choose Advanced > Clientless SSL VPN and select SecureMePortal under Portal Page Customization, as shown in Figure 19-22. Click OK when finished. The clientless SSL VPN users can access the customized login portal by navigating to https://<FQDNofASA> or https://<IPAddressOfASA>.
Figure 19-22 Mapping of a Customized Portal to a Default Tunnel Group
The CLI equivalent of Figure 19-22 is as follows:
![]()
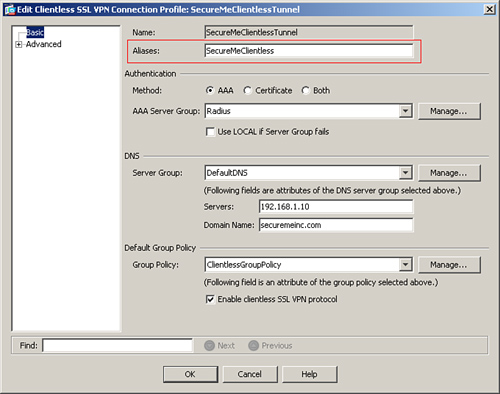
• User connection profile—You can also present the customized login page to a user by applying the object under a user connection profile. However, the customized login page is displayed only if the user accesses a specific login URL that is set up by the administrator. To apply a customized login page to a user connection profile, choose Configuration > Remote Access VPN > Clientless SSL VPN Access > Connection Profiles. Select a user connection profile or create a new one. In this scenario, we use a connection profile called SecureMeClientlessTunnel for the clientless SSL VPN session. Select the profile and click Edit to modify its settings. Cisco ASDM launches a new window. Under Aliases, specify a name that users will use to connect to the security appliance. In Figure 19-23, SecureMeClientless is configured as the alias. After setting up the alias, the next step is to map the preconfigured customized object to this connection profile. Choose Advanced > Clientless SSL VPN and select SecureMePortal under Portal Page Customization. Click OK when finished. The clientless SSL VPN users can access the customized login portal by navigating to https://<FQDNofASA>/ SecureMeClientless or https://<IPAddressOfASA>/SecureMeClientless.
Figure 19-23 Connection Profile Alias
The CLI equivalent of Figure 19-23 is as follows:
![]()
Customized Portal Page and User Connection Profile
When a user first connects to the security appliance, the logon portal is presented based on how the SSL VPN connection is established. For example, if a user selects a logon group after a successful user authentication, a user portal is shown based on what customization object is mapped to that user connection profile. You have the following three ways to display the customized portal page to a user:
• Default Login without Group Selection—When a user accesses the login page and authenticates himself without selecting a group to log in to, he is presented with the user portal page that is mapped to the DefaultWEBVPNGroup Connection Profile.
• Default Login with Group Selection—When a user accesses the login page and authenticates himself after selecting a login group, he is presented with the user portal page that is mapped to that specific user connection profile.
• User Connection Profile Login—When a user logs in to the system using the group-specific URL, he is presented with the user portal page that is mapped to that specific user connection profile. For example, if a user accesses the security appliance by entering https://sslvpn.securemeinc.com/SecureMeClientless, a web portal that is defined in SecureMePortal will be applied for the user session.
Full Customization
As mentioned earlier, you can use the full customization feature available in Cisco ASA running version 8.x. You can customize the logon, portal, and logout pages. Customers prefer the full customization functionality so that their SSL VPN portal has the same look and feel as their internal web portal. Below are the steps for customizing the logon and web portals.
Full Customization of a Logon Page
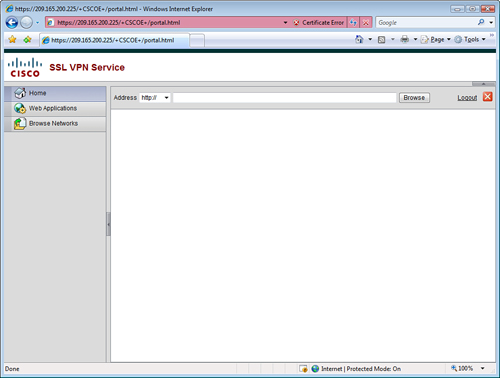
The default logon page was shown previously in Figure 19-13. If you would rather have a customized logon page as illustrated in Figure 19-24, follow these steps:
Step 1. Begin with your own logon page. If you already have HTML code, you can leverage it to define the logon customization. In the following example, a simple code is developed to design the logon page. You can see that we have left space after “Please log in using your user credentials.” This is where we will insert the code for the user logon box.
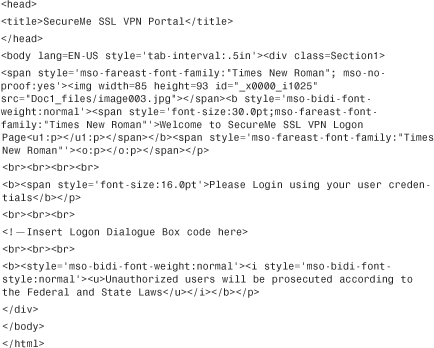
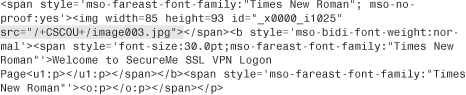
Step 2. Replace any reference to the images with the keyword /+CSCOU+/. When you upload an image to the security appliance, it is stored in the /+CSCOU+/ directory, which resides on the local flash. Thus, when you instruct the security appliance to load an image, it checks the content in that directory. The snippet of the modified code is highlighted in gray.
Step 3. Before saving the HTML code, you need to insert the logon box. In the following example, we inserted the logon dialog box by replacing <!—Insert Logon Dialog Box code here>.
Step 4. Save the HTML code as an include file so that the security appliance can add the appropriate JavaScript to support the login box. In this example, we named this file logonscript.inc.
Step 5. Import the appropriate images and logon script into the security appliance. Choose Configuration > Remote Access VPN > Clientless SSL VPN Access > Portal > Web Contents and upload the logonscript.inc and image003.jpg files from the local workstation to the flash of the security appliance. Make sure that you select “No. For example, use this option to make the content available to logon or portal page” for the “Require Authentication to Access Its Content” option.
Step 6. After uploading the web content, choose Configuration > Remote Access VPN > Clientless SSL VPN Access > Portal > Customization, select the portal page you are customizing, and click Edit. The portal customization browser window opens. Click Logon Page > Full Customization and change the mode to Enable. Select /+CSCOU+/logonscript.inc under HTML Content URL.
Step 7. Associate the customized object to a tunnel group to which the user can connect.
Figure 19-24 Customized Logon Page
Note
You can upload images and logos in the JPEG, GIF, and PNG formats.
Full Customization of a User Portal Page
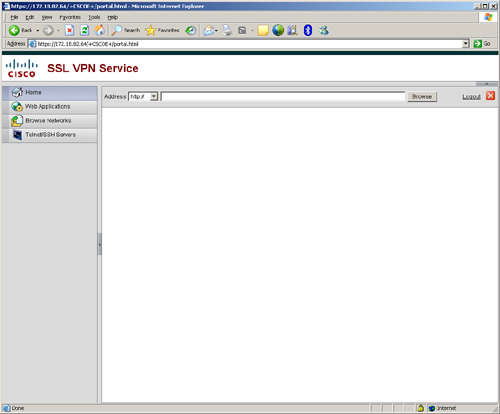
If you want to customize the user web portal, you can use the following steps to provide full customization. These steps are similar to the steps described for the logon page customization. The default user web portal is shown in Figure 19-25.
Figure 19-25 Default User Web Portal Page
Step 1. Choose Configuration > Remote Access VPN > Clientless SSL VPN Access > Portal > Customization and edit the SecureMePortal object under Portal > Custom Panes.
Step 2. Under Type HTML, make sure that the mode is set to Enable and then specify a title for the web link. In Figure 19-26, a title of “Cisco Systems Webpage” is added. Under URL, add the URL that you want users to see. In the previous example, the link to the Cisco System web page, http://www.cisco.com, is shown.
Figure 19-26 User Web Portal Full Customization
Step 3. Under Type RSS, make sure that the mode is set to Enable and then specify a title of the RSS feed link. In Figure 19-27, a title of “Internal Company News” is added. Under URL, specify the link to the RSS feed. In the previous example, an RSS feed file resides at http://192.168.1.100/SecureMe.xml. Click Save to save these changes.
Figure 19-27 HTTP Requests Through ASA
Step 4. Associate the customized object to a tunnel group to which the user can connect. If you already have the object mapped to a tunnel group, you do not need to link it again.
Configure Bookmarks
Using a clientless SSL VPN, remote users can browse their internal websites, file server shares, and Outlook Web Access (OWA) servers. Cisco ASA achieves this functionality by terminating the SSL tunnels on its outside interface and then rewriting the content before sending it to the internal server. For example, if a user tries to access an internal website, the user’s HTTPS connection is terminated to the outside interface. The ASA then forwards the HTTP or HTTPS request to the internal web server. The response from the web server is then encapsulated into HTTPS and forwarded to the client. This process is illustrated in Figure 19-27. The following sequence of events takes place when UserA tries to connect to a web server located at 192.168.1.100:
Step 1. UserA initiates an HTTP request to the web server, located on the other side of the SSL VPN tunnel. The user request is encapsulated into the SSL tunnel and is then forwarded to the security appliance.
Step 2. Cisco ASA de-encapsulates the traffic and initiates a connection to the server on behalf of the web client.
Step 3. The response from the server is sent to the security appliance.
Step 4. The security appliance, in turn, encapsulates and sends it to UserA.
Note
If you frequently use Java and ActiveX coding in a web page, Cisco ASA might not be able to rewrite web pages that embed the contents. You can enable the smart tunnel option within bookmarks to tunnel HTTP traffic directly to the web server.
The security appliance does not allow SSL VPN communication with websites that present expired certificates during session negotiations.
You can define bookmarks for the internal servers. A user, after logging in, can see those bookmarks and browse the content of the servers by clicking them. Bookmarks are links to commonly used websites to which your clientless SSL VPN users connect. Furthermore, by defining all the websites or servers to which you want to allow access, you can deny users access to any other site or server. This is one way to restrict their access to the internal network after establishing the VPN tunnel.
You can configure bookmarks by choosing Configuration > Remote Access VPN > Clientless SSL VPN Access > Portal > Bookmarks > Add. You can specify a bookmark list name that is then mapped to a user or group policy. After specifying a list name, you can click Add to specify a URL heading that appears on the main portal page after a successful user authentication. Under Bookmarks, you can add many different types of application servers, including the following:
• Websites (HTTP and HTTPS)
• File servers (CIFS)
• SSH/Telnet
• Remote Desktop Protocol (RDP)
• Virtual Network Computing (VNC)
Note
You will not see an option for VNC, RDP, or SSH/Telnet if you do not import their plug-ins first. Consult the section “Configure Client-Server Plug-ins,” later in this chapter, for details.
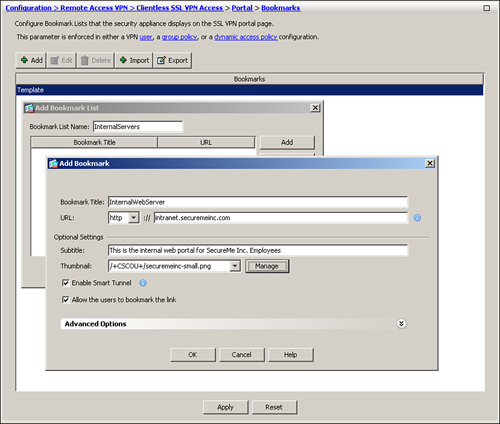
Configure Websites
After adding a bookmark list, you can add a bookmark entry for the internal web servers to which you want the clientless users to have access. In Figure 19-28, a bookmark list name of InternalServers has been added. Because it is a new list, the administrator has added a bookmark title of InternalWebServer with a URL value of http://intranet.securemeinc.com. Under advanced options, a subtitle of “This is the internal web portal for SecureMe Inc. Employees” is added with a thumbnail of the securemeinc-sml.png icon. The administrator has enabled the smart tunnel option to tunnel HTTP traffic directly to the web server.
Figure 19-28 Website Bookmark Configuration
Note
If you configure your internal websites using the fully qualified domain name (FQDN), you must configure a Domain Name System (DNS) server on the security appliance to resolve the hostnames. You configure the DNS server by choosing Configuration > Device Management > DNS > DNS Client and clicking Add to add DNS servers under DNS Server Group.
Caution
The clientless SSL VPN does not ensure that the communication from the client is secure to all the websites it is accessing. For example, if an external website is accessed by a user, and the traffic is proxied by the security appliance, the connection from the security appliance to the external web server is not encrypted.
Configure File Servers
In addition to the web servers, you can also define a bookmark list of the file servers that the clientless users can access. Cisco ASA supports network file sharing using the Common Internet File System (CIFS), a file system that uses the original IBM and Microsoft networking protocols. Through CIFS, users can access their file shares located on the file servers. Users can download, upload, delete, or rename the files under the shared directories, but only if the file system permissions allow them to perform those actions. They can even create subdirectories, assuming that they are allowed to do so.
Note
You must install Microsoft hotfix 892211 on Windows operating systems to access web folders in the clientless SSL VPN mode.
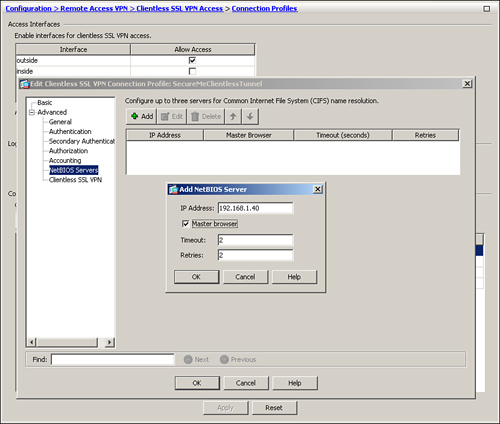
The configuration of CIFS requires the use of a NetBIOS Name Server (NBNS), also known as Windows Internet Naming Server (WINS). When a clientless user queries to browse the network, the security appliance contacts the WINS and acquires the list of available domains, workgroups, and workstations. Use the following steps to successfully configure Windows file server for clientless SSL VPN users:
Step 1. In ASDM, specify a NetBIOS server by choosing Configuration > Remote Access VPN > Clientless SSL VPN Access > Connection Profile > SecureMeClientlessTunnel > Edit > Advanced > NetBIOS Servers > Add. Specify the IP address of the NBNS server for CIFS name resolution. The “Master Browser” option specifies that the configured NBNS server acts as the master browser in addition to being a WINS server. The Timeout value instructs an appliance to wait for the configured number of seconds (default is 2 seconds) before sending another query to the next server. The Retry option is used to specify the number of times the security appliance has to go through the list of the configured NBNS servers. The default number of retries is 2, and it can range from 0 to 10. In Figure 19-29, a NetBIOS server located at 192.168.1.40 is added. The Master Browser option is also enabled.
Figure 19-29 WINS Server Definition
Example 19-11 defines a new NBNS server located at 192.168.1.40.
Example 19-11 Defining a WINS Server
![]()
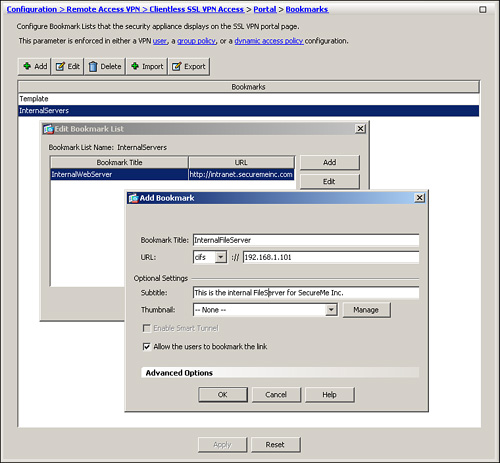
Step 2. Define a bookmark for the file server by choosing Configuration > Remote Access VPN > Clientless SSL VPN Access > Portal > Bookmarks > InternalServers > Edit > Add. Specify a bookmark title of InternalFileServer, select cifs as the URL value, and add the IP address of the file server. In Figure 19-30, a cifs file server that is located at 192.168.1.101 is added. The administrator has added “This is the internal FileServer for SecureMe Inc.” as the description for this file server.
Figure 19-30 File Server Definition
Apply a Bookmark List to a Group Policy
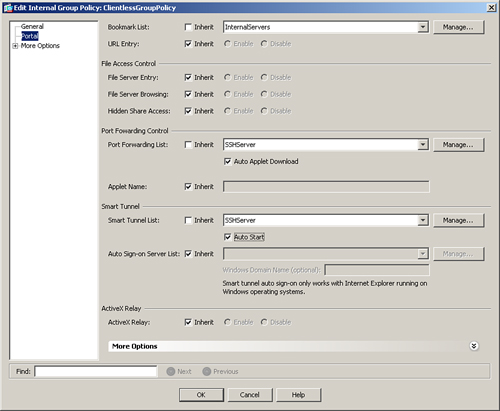
You can apply the bookmark list to a user or group policy. As shown in Figure 19-31, choose Configuration > Remote Access VPN > Clientless SSL VPN Access > Group Policies > ClientlessGroupPolicy > Edit > Portal, deselect the Inherit box, and then choose InternalServers under Bookmark List.
Figure 19-31 Bookmark to Policy Group Mapping
Single Sign-on
Optionally, you can add a single sign-on (SSO) server to ensure that clientless users do not get prompted again to enter their user credentials when they try to access Windows-based shares. In SSO, the security appliance acts as a proxy between the clientless SSL VPN user and the authentication server. The security appliance uses users’ cached credentials (an authentication cookie) when the user tries to access secure websites or shares within the private network. If you use NT LAN Manager (NTLM) authentication in your environment, you can define SSO attributes under user or group policies. As shown in Figure 19-32, SSO is enabled for all clientless SSL VPN users that send authentication requests to the servers in the 192.168.1.0 subnet, using NTLM authentication.
Figure 19-32 Single Sign-on Server Definition

Example 19-12 shows the equivalent CLI configuration of Figure 19-32.
Example 19-12 Single Sign-on Definition via the CLI

Cisco ASA, in addition to NTLM, supports many other authentication methods. They include basic HTTP, SSO authentication using SiteMinder, SAML browser post profile, and using the HTTP Form protocol.
Configure Web-Type ACLs
Cisco ASA enables network administrators to further their clientless SSL VPN security by configuring web-type access control lists (ACL) to manage access to web, Telnet, SSH, citrix, FTP, file and email servers, or all types of traffic. These ACLs affect only the clientless SSL VPN traffic and are processed in sequential order until a match is found. If an ACL is defined but no match exists, the default behavior on the security appliance is to drop the packets. On the other hand, if no web-type ACL is defined, Cisco ASA allows all traffic to pass through it.
Moreover, this robust SSL VPN feature allows these ACLs to be downloaded from a Cisco Secure Access Control Server (CS-ACS) through the use of vendor-specific attributes (VSA). This allows central control and management of user access into the corporate network because ACL definitions are offloaded to an ACS server.
Tip
Using CS-ACS, you can configure a web-type ACL by specifying the webvpn:inacl# prefix in the downloadable ACLs, where # indicates the sequence number of an access control entry (ACE).
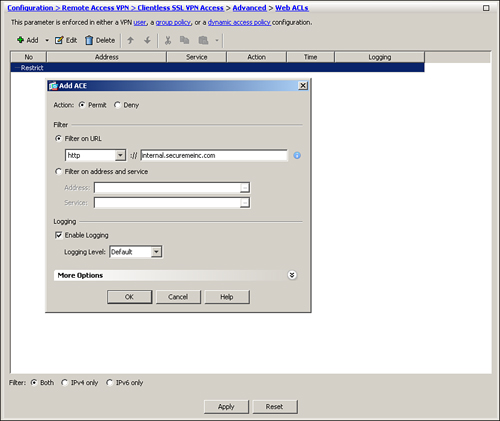
You configure a web-type ACL by choosing Configuration > Remote Access VPN > Clientless SSL VPN Access > Advanced > Web ACLs. Click Add and select Add ACL to define a new web-type ACL. Specify a web ACL name and click OK. Select the newly created ACL name, click Add again, and select Add ACE. You have two options to add a web-type ACL:
• Filter on URL—A URL-based web ACL is used to filter out SSL VPN packets if they contain a URL such as http://internal.securemeinc.com.
• Filter on address and service—An address- and service-based web ACL is used to filter out SSL VPN packets if they use TCP encapsulation based on the IP address and a Layer 4 port number.
If you prefer to add a URL-based entry to filter out SSL VPN traffic, select Filter on URL and select the protocol you want to filter. The security appliance allows you to filter based on CIFS, citrix, citrixs, FTP, HTTP, HTTPS, IMAP4, NFS, POP3, smart tunnel, SMTP, SSH, and Telnet for all types of URLs. Next, specify the URL or a wildcard to filter traffic. For example, if you want the security appliance to restrict web traffic destined to internal.securemeinc.com, select Deny as the “Action,” choose http as the filter protocol, and select internal.securemeinc.com as the URL entry. This is illustrated in Figure 19-33. Click OK when you are finished. The ACL name is Restrict.
Figure 19-33 Defining Web-Type ACLs
Note
You must import the VNC, SSH/Telnet, and RDP plug-ins to be able to filter those protocols via a web-type ACL. SSL VPN plug-ins are discussed later in this chapter.
If you want to include all URLs that are not explicitly matched in the ACL, you can include an asterisk (*) as a wildcard. For example, to block POP3 email access and allow all other protocols, take the following actions:
• Add an ACE and deny POP3 for the protocol and add * as a wildcard URL entry.
• Add another ACE and permit any for the protocol type.
If you would rather permit or block TCP traffic that is destined to particular addresses on specific ports, choose the Filter on Address and Service option. For example, to block all clientless traffic destined to 192.168.0.0/16 on port 23, select Deny as the “Action”, specify 192.168.0.0/16 under “Address”, and choose 23 under “Service”. Click OK when you are finished.
Tip
When you define a deny ACE, make sure that you configure another ACE to permit all other clientless SSL VPN traffic because there is an implicit deny at the end of each ACL.
After a web ACL is configured, link it to a default user group or user policy. Choose Configuration > Remote Access VPN > Clientless SSL VPN Access > Group Policies > ClientlessGroupPolicy > Edit > General > More Options, deselect the Web ACL Inherit check box and choose Restrict from the Web ACL drop-down menu.
Example 19-13 shows that a web-type ACL called Restrict being configured to allow http://internal.securemeinc.com. This ACL is then applied to ClientlessGroupPolicy.
Example 19-13 Defining a Web-Type ACL

Caution
Web ACLs do not block a user from accessing the resources outside the SSL VPN tunnel. For example, if a user opens another tab with a web browser and accesses a different site, that traffic is not sent to the ASA, and therefore the security policies configured on the ASA will have no effect.
Configure Application Access
Cisco ASA allows clientless SSL VPN users to access applications that reside on the protected network. Application access supports only applications that use TCP ports such as SSH, Outlook, and Remote Desktop. In version 8.0 or higher, Cisco ASA allows the following two methods to configure application access:
Configure Port Forwarding
Using port forwarding, the clientless SSL VPN users can access corporate resources over the known and fixed TCP ports such as Telnet, SSH, Terminal Services, SMTP, and so on. The port-forwarding feature requires you to install Sun Microsystems’ Java Runtime Environment (JRE) and configure applications on the end user’s PC. If users are establishing the SSL VPN tunnel from public computers, such as Internet kiosks or web cafes, they might not be able to use this feature because JRE installation requires administrative rights on the client computer.
Note
Port forwarding is supported only on the 32-bit-based operating systems such as Windows 7, Vista, XP, and Windows 2000.
To use port forwarding, the authenticated user selects Application Access from the navigation pane and clicks the Start Applications button. The port-forwarding Java applet is downloaded and then executed on the user’s computer. This applet starts listening on the locally configured ports, and when traffic is destined to those ports, the applet makes an HTTP POST request to the port-forwarding URL such as https://ASA-IP-Address/tcp/remoteserver/remoteport.
Note
To customize the Application Access name in the navigation pane, choose Configuration > Remote Access VPN > Clientless SSL VPN Access > Group Policies > ClientlessGroupPolicy > Edit > Portal, deselect the Inherit check box under “Applet Name,” and specify the customized text that you want to display in the navigation pane.
When port forwarding is in use, the HOSTS file on the client computer is modified to resolve the hostname using one of the loopback addresses. Cisco ASA uses an available address in the range from 127.0.0.2 to 127.0.0.254. This requires the logged-in user to have admin rights so that the HOSTS file can be modified. In case the HOSTS file cannot be modified, the host listens on 127.0.0.1 and the configured local port. When the session is terminated, the application port mapping is restored to the default.
Note
Certain security applications such as Cisco Security Agent (CSA) detect the modifications of the HOST and other files. You might be asked to acknowledge these modifications.
Smart tunnels, port forwarding, and plug-ins are not supported on Microsoft Windows Mobile.
Configuration of port forwarding on a security appliance is a two-step process:
Step 1. Define port-forwarding lists.
Step 2. Map port-forwarding lists to a group policy.
Step 1: Define Port-Forwarding Lists
You must define a list of servers and their respective applications that you want clientless SSL VPN users to access. You define a port-forwarding list by choosing Configuration > Remote Access VPN > Clientless SSL VPN Access > Portal > Port Forwarding > Add. Specify a name for the new port-forwarding list. This list name has local significance, and it is eventually used to map the port-forwarding attributes to a group policy, discussed in the next step. To define a specific application to be used for port forwarding, click Add and specify the following attributes:
• Local TCP Port—You should use a local port between 1024 and 65535 to avoid conflicts with the existing network services.
• Remote Server—The IP address of the server hosting the application.
• Remote TCP Port—The application port number, such as 22 for SSH service.
• Description—A description to identify this list.
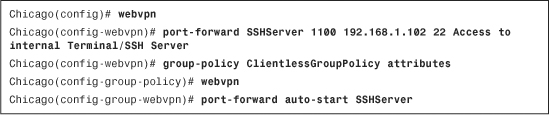
As shown in Figure 19-34, a port-forwarding list called SSHServer is defined. A server, located at 192.168.1.102 and listening on port 22, is added in this list. The administrator has configured it to use a local port of 1100 for this connection and has added a description of “Access to Internal Terminal/SSH Server.”
Figure 19-34 Defining Port-Forwarding List

Step 2: Map Port Forwarding Lists to a Group Policy
The port-forwarding list, defined in Step 1, is then mapped to a user or group policy. Choose Configuration > Remote Access VPN > Clientless SSL VPN Access > Group Policies > ClientlessGroupPolicy > Edit > Portal and select the list on the Port Forwarding List drop-down menu. Additionally, select the Auto Applet Download option to automatically install and start the applet as soon as the clientless SSL VPN user establishes a connection to the security appliance. As shown in Figure 19-31, a port-forwarding list of SSHServer is selected.
Example 19-14 shows that a port forwarding list SSHServer is being defined to tunnel traffic to an SSH server located at 192.168.1.102 if the traffic is destined to the loopback address of the host on port 1100. This port forwarding list is then applied to ClientlessGroupPolicy
Example 19-14 Defining Port-Forwarding via CLI
After the applet is loaded on the client, the user launches an SSH client such as Putty.exe to establish a connection to the server. The user must use the loopback IP address of 127.0.0.1 as the server address and port 1100 as the destination port. This redirects the connection over the SSL VPN tunnel to the server at 192.168.1.102 on port 22.
Configure Smart Tunnels
As discussed earlier, port forwarding provides access to applications that use static TCP ports. It modifies the HOSTS files on a host so that traffic can be redirected to a forwarder that encapsulates traffic over the SSL VPN tunnel. Additionally, with port forwarding, the Cisco ASA administrator needs to know to which addresses and ports the SSL VPN users will connect, and requires the SSL VPN users to have admin rights to modify the HOSTS file. To overcome some of the challenges related to port forwarding, Cisco ASA presents a new method to tunnel application–specific traffic called smart tunnels. Smart tunnels define which application can be forwarded over the SSL VPN tunnel, whereas port forwarding defines which TCP ports can be forwarded over the tunnel.
Smart tunnels do not require administrators to pre-configure the addresses of the servers running the application or the ports for those applications. In fact, smart tunnels work at the application layer by establishing a Winsock 2 connection between the client and the server. It loads a stub into each process for the application that needs to be tunneled and then intercepts socket calls through the security appliance. Thus, the principal benefit of smart tunnels over port forwarding is that users do not need to have administrative rights to use this feature.
Smart tunnels provide better performance than port forwarding and the user experience is simpler because they don’t need to configure their applications for a loopback address and for a specific local port.
Note
Smart tunnels require browsers with ActiveX, Java, or JavaScript support. Only 32-bit-based operating systems such as Windows Vista, XP, 2000, and MAC OS 10.4 and 10.5 are supported.
Like port forwarding, smart tunnel configuration is also a two-step process:
Step 1. Define a smart tunnel list.
Step 2. Map a smart tunnel list to a group policy
Step 1: Define a Smart Tunnel List
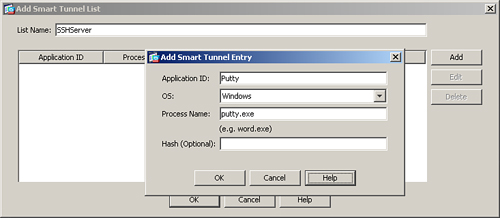
You must define a list of the applications that you want clientless SSL VPN users to access. You define a smart tunnel list by choosing Configuration > Remote Access VPN > Clientless SSL VPN Access > Portal > Smart Tunnels > Add. Specify a name for the new smart tunnel list. This list name has only local significance, and it is eventually used to map the smart tunnel attributes to a group policy, discussed in the next step. To define a specific application to be used for smart tunneling, click Add and specify the following attributes:
• Application ID—Name or ID of the application to be tunneled. The application ID has only local significance.
• OS—Select the host operating system where this application will be launched.
• Process name or full path—Name of the process to be tunneled. For example, if you want the SSH traffic to be tunneled through Putty, specify putty.exe as the process name.
• Hash (optional)—The hash is used only to provide additional security so that a user cannot change the filename and gain access to other resources over the tunnel.
As shown in Figure 19-35, a smart tunnel list called SSHServer is defined. The application ID is Putty, and the process name is putty.exe.
Figure 19-35 Defining a Smart Tunnel List
Note
The process name should be in the system path. If the application is not in the system path, the smart tunnel will not be able to forward traffic. In such a case, define the full application path under Process Name.
Step 2: Map a Smart Tunnel List to a Group Policy
The smart tunnel list, defined in Step 1, is then mapped to a user or group policy. Choose Configuration > Remote Access VPN > Clientless SSL VPN Access > Group Policies > ClientlessGroupPolicy > Edit > Portal, deselect the Inherit check box of the Smart Tunnel List, and choose the SSHServer list from the drop-down menu as illustrated in Figure 19-31. Additionally, select the Auto Start option to automatically install and start the applet as soon as the clientless SSL VPN user connects to the security appliance
Example 19-15 shows that a smart tunnel list called SSHServer is being defined to tunnel traffic for putty.exe application. This port forwarding list is then applied to ClientlessGroupPolicy.
Example 19-15 Defining Smart Tunnel via the CLI

After the applet is loaded on the client, the user launches an SSH client such as Putty.exe to establish a connection to any server that offers SSH service.
Note
Smart tunnel and port-forwarding sessions are not failover enabled. Users must start a new SSL VPN session if a failover occurs.
Configure Client-Server Plug-ins
For known applications, such as VNC, Remote Desktop, Telnet, and SSH, you can allow the clientless SSL VPN users to connect to the protected network when they use the supported applications. This way, when a clientless SSL VPN user is authenticated, the user can choose to launch an application plug-in such as VNC and connect to an internal server running the VNC application. Cisco provides the client-server plug-ins for VNCs, Remote Desktop, and SSH/Telnet. These plug-ins can be downloaded from Cisco’s website and are packaged in the .jar file format. After the plug-ins are uploaded and activated on the security appliance, they can be defined as a URL similar to HTTP:// and cifs:// under a user web portal. For example, for Remote Desktop, an SSL VPN user selects rdp:// and specifies the IP address of the server to which it connects. If you want to use a plug-in not provided by Cisco Systems, you can contact third parties to develop the .jar file for their applications.
Before you use the client-server plug-ins, you must understand the following restrictions:
• If you have a proxy server between the SSL VPN client and the security appliance, the plug-ins do not work.
• The plug-ins support single sign-on (SSO). You must install the plug-in, add a bookmark entry to display a link to the server, and specify SSO support when adding the bookmark.
• You must have guest privilege mode at a minimum to use the plug-ins
Tip
Some of the client-server plug-ins can be obtained from the following websites:
You must import the .jar files into the security appliance before you can activate a specific application for this feature. Choose Configuration > Remote Access VPN > Clientless SSL VPN Access > Portal > Client-Server Plug-ins > Import and select the plug-in name from the drop-down menu. You can select to import the plug-in from a workstation, from the local flash of the security appliance, or from a remote server using FTP. After you select the file you want to import, click Import Now. This should upload the file into the security appliance. In Figure 19-36, the ssh-plugin.jar file is being uploaded from a local workstation to be used for SSH and Telnet sessions.
Figure 19-36 Importing Client-Server Plug-ins
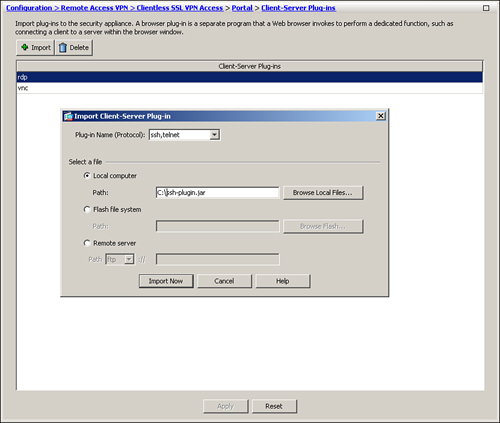
After a plug-in has been uploaded, the authenticated clientless SSL VPN users can select the appropriate protocol from the Address drop-down menu.
Note
In the current implementation, you must use ASDM to import client-server plug-ins.
Cisco Secure Desktop
Cisco Secure Desktop (CSD) provides a secure desktop environment to remote users after validating a number of security parameters on the client workstation. The purpose of CSD is to minimize the risk posed by the remote workstations. CSD collects the necessary information from those workstations. If the received information matches the preconfigured criteria, the security appliance can create a secure environment and optionally apply certain policies and restrictions on the user session. When this happens, users who want to access corporate resources from a hotel workstation or even from an Internet cafe can create a secure vault from which corporate resources can be accessed through a clientless tunnel or even for AnyConnect clients. When the user is finished using the public workstation, the vault can be destroyed to ensure that data cannot be accessed by a different user. CSD removes cookies, temporary files, browser history, and even any downloaded content when the secure vault is destroyed.
CSD is designed to help system administrators to enforce security policies for remote users. When a user tries to connect to the SSL VPN gateway, a client component is downloaded and installed on the client workstation. This client component scans the computer and gathers information such as the operating system, installed service pack, antivirus version, and installed personal firewall. This information is sent to the security appliance and then matched against predefined criteria. If the user’s computer meets the criteria, the user is given appropriate access to the internal resources. If the criteria are not met, users are granted either limited or no access. For example, an administrator might require that all remote computers must have Windows XP with Service Pack 3 installed. If remote computers meet this condition, they are matched against a profile and then allowed to launch Secure Desktop or Cache Cleaner. If dynamic access policy (DAP) is used, then appropriate actions such as network restrictions can be applied to the user sessions.
Note
Cache Cleaner is discussed in the next section, and DAP is discussed later in the chapter.
You can configure a number of parameters and group them together to define a specific location. When a remote host is scanned and the received information matches the criteria, the host is assigned that location. CSD supports five attributes to identify the location of an SSL VPN client. For example, you can define a range of IP addresses and a specific registry key, group them together, and declare them a location called “Work.” When clients connect from this address range and have that registry key, they are given access based on the defined policies. The supported attributes include the following:
• Issuer or distinguish name in a certificate
• IP address of the client
• Presence of a file
• Presence of a registry key
• Operating system version (including Windows, Mac, and Linux)
CSD uses the proven industry standards such as Triple Data Encryption Standard (3DES) and Rivest Cipher 4 (RC4) to ensure security of the vault. If the logged-in user has administrative privileges, CSD uses the 3DES encryption algorithm, and if the user has lesser privileges, it uses RC4 to encrypt the data.
CSD Components
CSD consists of three components, discussed in the next sections.
Secure Desktop Manager
Secure Desktop Manager is a GUI-based application that allows administrators to define policies and locations for remote users. It currently supports two modules: Secure Desktop and Cache Cleaner. Secure Desktop Manager can be used only within ASDM to configure CSD properties, and thus you cannot use the CLI to configure it.
Secure Desktop
Secure Desktop, also known as Secure Session, is a module that creates an encrypted vault in the client computer and enables users to securely access local resources or even allows users to establish SSL VPN sessions. Files created in this vault are encrypted and cannot be accessed by the applications outside this secure desktop. The vault can be configured so that after a user disconnects a session, the vault can be destroyed.
By using Secure Desktop, users are given appropriate access to the corporate network after their system information, such as operating system and service pack, is detected. It can also detect whether the client workstation has any keystroke-logging applications installed before granting access. This system detection is transparent to the end user because CSD collects this information without any user intervention.
Cache Cleaner
Cache Cleaner securely removes local browser data such as web pages, history information, and cached user credentials when the SSL VPN session is over. Cache Cleaner is supported on the Windows operating systems as well as the Linux and MAC OS X systems.
When Cache Cleaner is launched on a client computer, it closes any existing browser windows and initiates the Cache Cleaner process. It monitors the browser data, and when the user logs out of the SSL VPN session, it closes the browser and cleans the cache associated with the SSL VPN session.
Note
Cache Cleaner and Secure Desktop do not protect your computer from downloaded attachments after CSD is set up on the end user systems. Therefore they do not guarantee full system cleanup.
Cache Cleaner monitors only one browser application per SSL VPN session. If the initial session was established through Internet Explorer (IE), only IE-specific browser data is cleaned after the user session is terminated. If the user launches Firefox after Cache Cleaner has already started, the Firefox browser data is not wiped out after the user terminates a session.
CSD Requirements
Before you deploy CSD into a production environment, analyze your current system and network architecture to make sure that they meet the minimum versions of supported operating systems and Internet browsers.
Supported Operating Systems
When this book was written, Secure Desktop was supported only in the Windows environment. The supported Windows platforms include:
• Windows Vista 32-bit (x86) Service Pack 1
• Windows XP, including options with no service pack, Service Pack 1 through Service Pack 3
• Windows 2000, including options with no service pack, Service Pack 1, Service Pack 2, Service Pack 3, and Service Pack 4.
Windows XP and Vista 64-bit, MAC OS X 32-bit and 64-bit, and Linux-based operating system (both 32 and 64-bit) users can use Cache Cleaner on remote clients. You can also choose to use Cache Cleaner for Windows Vista, XP, and 2000 operating systems.
Mac OS X 10.4 and 10.5 and 32-bit Linux are listed as supported for host scan and prelogin assessment as well in CSD 3.2.1.
User Privileges
You do not have to be a system administrator to install CSD on a client machine. CSD can be installed on a host machine, using one of the following four methods.
• ActiveX—Requires administrative privileges
• Microsoft Java VM—Requires power user privileges
• Sun Java VM—Does not require power-user or administrative privileges
• Executable—Requires user to have executables rights.
Supported Internet Browsers
You can use the following browsers to manage, use, configure, and administer the currently released version of CSD. When this book was written, the released version of CSD was 3.4.2048.
• Internet Explorer version 6.0 Service Pack 1 and version 7.0
• Safari 2.0 and 3.1.1 on Mac OS X
• Mozilla Firefox 1.5, 2.0 and 3.0
Internet Browser Settings
You must configure the appropriate security settings in your Internet browser before CSD can be installed through ActiveX, Java, or a binary executable. For example, in Internet Explorer, use the guidelines discussed in Table 19-8. You configure these settings by choosing Tools > Internet Options > Security tab > Internet > Custom Level.
Table 19-8 Internet Browser Settings
CSD Architecture
CSD not only checks certain attributes on the client computer to ensure its compliance, but also enhances data security by providing an encrypted vault to authorized users. When a user wants to establish an SSL VPN session and CSD is enabled, the client and the gateway go through a number of steps, discussed here and illustrated in Figure 19-37.
Step 1. A user tries to request the SSL VPN login page by pointing his or her browser to the gateway IP address.
Step 2. The user session is redirected to a different web page (/start.html) because a secure desktop session has not been created. The gateway tries to install the Secure Desktop client component on the user’s workstation using ActiveX, Java, or Executable mode.
Step 3. After installing the client component, the system is scanned and necessary information is collected from the client workstation. This information is forwarded to the gateway.
Step 4. The collected information is matched against the policies that are defined in Secure Desktop Manager and are stored in data.xml.
Step 5. A secure desktop cookie is written on the client computer and the secure vault is created on the hard disk. The web session is redirected to the SSL VPN user login page.
Step 6. The user presents authentication credentials, and if authentication is successful, the clientless SSL VPN session (or even the AnyConnect client) is created.
Figure 19-37 CSD System Architecture
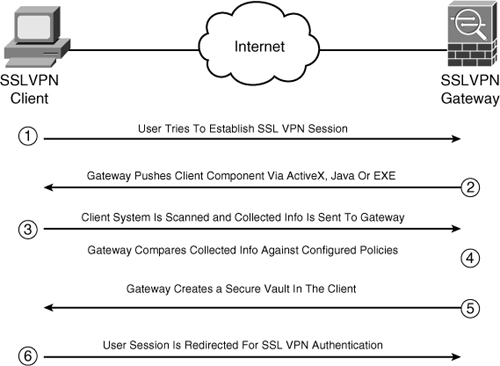
The data.xml file contains CSD-specific configuration information, including:
• Location information
• Criteria for SSL VPN features
Configuring CSD
The configuration of CSD is broken into two steps:
Step 2. Define Prelogin Sequences
Step 1: Load the CSD Package
You must load the CSD package in the local flash of the security appliance. If you are not sure whether you have CSD installed in your security appliance, choose Tools > File Management and look at the contents of the local flash. If you do not see a securedesktop-asa-3.x.xxx-k9.pkg file or a csd.x.x.xxx.pkg file, upload the file from the local flash of the management host to the flash of the security appliance. After the CSD file is uploaded, choose Configuration > Remote Access VPN > Secure Desktop Manager > Setup and click Browse Flash to select the CSD file. In Figure 19-38, a csd_3.4.2048.pkg file is selected from the flash. After the file is selected, select the Enable Secure Desktop option.
Figure 19-38 Installing the CSD Package

In Example 19-16, a CSD image called csd_3.4.2048 is loaded from the local flash. CSD is also enabled globally in the security appliance.

Note
Starting from 8.2(1), the security appliance enables you to customize the Secure Desktop windows displayed to remote users. This includes changing the Secure Desktop background, text color, Cache Cleaner, and Keystroke Logger, to name a few options.
Step 2: Defining Prelogin Sequences
To configure CSD parameters, choose Configuration > Remote Access VPN > Secure Desktop Manager > Prelogin Policy. You can define a prelogin sequence that CSD will use to identify a host and match it to an appropriate profile. If the client’s computer matches a certain profile, CSD can either create a Secure Desktop or launch Cache Cleaner. Configure Secure Desktop Manager and define the profiles and the respective policies for the SSL VPN users as follows:
• Define Secure Desktop general attributes
• Apply Secure Desktop restrictions
• Define Cache Cleaner policies
• Define Secure Desktop settings
Define Prelogin Policies
In the supported Windows, OS X, and Linux-based operating systems, you can define the potential locations from which the client computers might be connecting. For example, if your users connect from the office network, a home office network, and Internet cafes, you can define a location for each setup and give appropriate access to your users. For users connecting from the office network, you can classify those hosts fairly securely and allow a less restrictive environment. For users connecting from their home office, you can classify them as somewhat secure and apply more restrictive policies. For users connecting from Internet cafes, you can classify them as least secure and apply the most restrictive policies.
Note
In the current implementation, you must use ASDM to configure CSD.
Throughout this chapter, we use three prelogin locations to build configurations. They include:
• OfficeCorpOwned—This location is defined for those workstations that establish an SSL VPN tunnel from the corporate-owned IP addresses. Additionally, the workstation must have a unique registry setting to identify it as a corporate-owned computer. If workstations match this profile, Secure Desktop or Cache Cleaner will not be launched.
Note
Starting from 8.2(1), you can disable CSD for a particular Connection Profile. This option is useful if you want to allow AnyConnect clients to connect to a Connection Profile but you do not want to launch CSD for their corporate machines.
• HomeCorpOwned—This location is defined for those Windows computers that are corporate-owned but are employed by users who establish an SSL VPN tunnel from their home offices; these addresses do not match the corporate-owned address range. The workstations are classified as corporate owned by their unique registry settings. If workstations match this profile, Secure Desktop is launched.
• InternetCafe—This location is defined for those computers that do not match any of the previous profiles. Cache Cleaner is launched.
To define these profiles, choose Configuration > Remote Access VPN > Secure Desktop Manager > Prelogin Policy. You can define prelogin locations by having the workstations meet a number of criteria. CSD supports the following five ways to identify a host:
• Certificates—If your client workstations use unique computers, you can use the subject and the issuer names to match a specific profile. The subject and issuer names contain a number of subordinate fields such as common name (CN), organization (O), organizational unit (OU), and country (C). You can use one of the subordinate fields in the subject and issuer names to identify computers that match a specific profile. A registry check is applicable only for Windows-based operating systems.
Note
To identify computers based on certificates, specify the values of the subordinate fields. For example, to identify computers based on organizational unit (OU), simply specify the value of OU but do not list “OU” in the names.
• IP address range—If you know the IP address space of client computers, use this feature to identify computers that match a profile. You can define one or multiple address spaces to identify computers.
Note
If the client computer has multiple IP addresses, CSD uses the first identified IP address to match against a profile.
• File setting—You can use the location of a file to identify computers. This feature is useful if, for example, you want to identify a specific file to determine whether computers are corporate owned.
• Registry setting—You can use a registry key to identify computers. This feature is useful if you want to identify a specific registry location to determine whether computers are corporate owned. A registry check is applicable only for Windows-based operating systems.
• Operating system version—The host assessment provides the version of operating systems running on the remote workstation. The operating system check is for Windows 9x, 2000, XP, Vista, Mac OS X, and Linux. Secure Desktop is allowed only for Windows Vista, XP and 2000 operating systems. For other operating systems including Windows, Cache Cleaner is supported.
Note
If you specify more than one registry key or file location, CSD applies an OR logical operation. For example, if you define the location of a registry key and define the location of a file, only one of the locations must be present for a host to be identified.
To configure a prelogin location, choose Configuration > Remote Access VPN > Secure Desktop Manager > Prelogin Policy, click the (+) icon, and select the appropriate check from the drop-down menu. As illustrated in Figure 19-39, a registry check is being done. If HKEY_LOCAL_MACHINESOFTWAREMcAfeeVirusScan exists, CSD continues on and performs other checks. If a workstation does not have this registry key, it is classified as “InternetCafe”.
Figure 19-39 Defining a Registry Check
The workstations that have the registry setting are further assessed for additional checks. In Figure 19-40, workstations are checked for their IP addresses. If they are in the 192.168.1.0/24 subnet, they are identified as “OfficeCorpOwned” workstations. If they are not, they are identified as “HomeCorpOwned” workstations.
Figure 19-40 Defining an IP Range Check
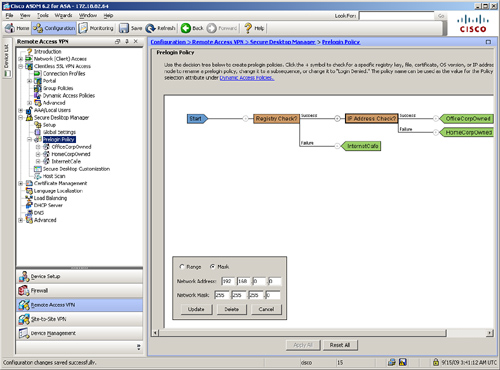
Note
If you want to identify a computer by locating a specific file in the system and ensuring the integrity of the file, you can find its checksum. To assist you with calculating the correct checksum of a file, CSD provides the crc32.exe application.
Assign CSD Policy
When a computer tries to connect to the security appliance, CSD matches it to one of the predefined locations. For each location, you can choose to load either Secure Desktop or Cache Cleaner on the workstation. Choose Configuration > Remote Access VPN > Secure Desktop Manager > [Prelogin location] and select the appropriate option. The option should be selected based on your security policies. For example, if a user is identified as a HomeCorpOwned workstation, you can enable Secure Desktop for those computers, as shown in Figure 19-41.
Figure 19-41 Assigning a CSD Policy
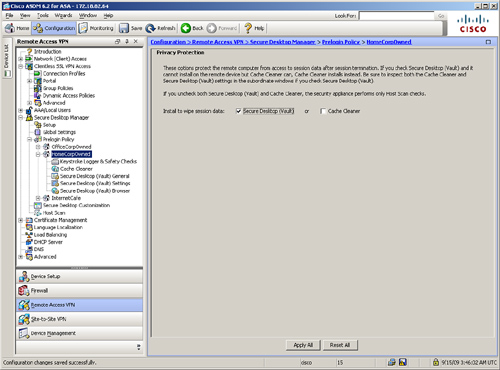
Identify Keystroke Loggers and Host Emulators
The robust implementation of CSD enables you to detect certain software-based keystroke loggers in a workstation and take appropriate actions before allowing a user’s computer to create a secure environment. Keystroke loggers usually capture keystrokes without informing the legitimate user of the computer. These applications then send the captured information to a server, generally owned by hackers. If, for example, you have a keystroke logger installed on your computer and you are doing online banking, the keystroke logger can potentially capture your user credentials and pass that information to a hacker, who can misuse your personal information for his or her advantage.
You can also detect host emulations to check whether a remote workstation is running any virtualization software. If the Always Deny Access If Running Within Emulation option is selected, remote workstations running emulation are not allowed to connect through the SSL VPN tunnel. If the Always Deny Access If Running Within Emulation option is not selected but host emulation detection is enabled, CSD prompts users to decide whether they want to continue with the SSL VPN session.
Note
Keystroke loggers are detected only when users have administrative rights to their workstations.
To prevent user computers that have a keystroke logger installed from establishing an SSL VPN tunnel, select Keystroke Logger & Safety Checks under the name of the location and enable the Check for Keystroke Loggers option. With this option enabled, the system scans and detects a keystroke-logging application on the workstation. If one is detected, the system prompts the user to identify the application as safe. However, if you do not trust user discretion, you can enable Force Admin Control on List of Safe Modules and manually identify which keystroke loggers are safe. Applications, such as Corel PaintShop Pro, usually capture keystrokes to allow users to modify data easily. In that case, an administrator can identify PaintShop Pro as a safe application.
CSD enables you to define a list of safe keystroke-logger application. Click Add and then enter the module’s path. After an application is added, it appears under List of Safe Modules. You can define as many keystroke-logging applications as you want.
Note
If Force Admin Control on List of Safe Modules is enabled, contents under List of Safe Modules are defined, and then you disable Force Admin Control on List of Safe Modules, CSD still keeps the content under List of Safe Modules. It simply deactivates the defined values.
As shown in Figure 19-42, the administrator has enabled the Check for Keystroke Loggers and Check for Host Emulation options.
Figure 19-42 Example of a Keystroke-Logging Application
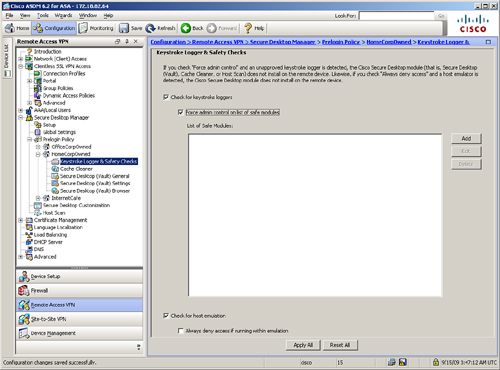
Define Secure Desktop (Vault) General Attributes
In CSD, you can set up general attributes that are applied to all SSL VPN sessions within a predefined location. For example, you may enable a feature to allow users to switch between Secure Desktop and Local Desktop. The supported Secure Desktop general attributes include:
• Enable Switching Between Secure Desktop (Vault) and Local Desktop—With this option enabled, the user has an option to switch back and forth between Secure Desktop and Local Desktop. In many cases, when an application is launched within Secure Desktop, it sends a notification or user prompt to the Local Desktop. Hence, you should enable this option if you need to switch to Local Desktop to respond to a prompt or query.
• Enable Vault Reuse (User Chooses a Password)—This option is useful if, for example, users use the same desktop computer in their office and home. Knowing that their computers are fairly secure at home, you can let them use the same vault that they had used before. This vault is protected by a password that can be up to 127 characters long. In CSD version 3.3, you can enable one of the two options under Enable Vault Reuse. The Suggest Application Uninstall upon Secure Desktop (Vault) Closing option prompts and recommends the user to uninstall Secure Session when it closes. On the other hand, the Force Application Uninstall upon Secure Desktop (Vault) Closing option uninstalls Secure Desktop on the remote workstation when users close it.
• Enable Secure Desktop (Vault) Inactivity Timeout—When this option is enabled, the system automatically closes the secure vault after a specified duration of inactivity. This option is useful for sessions that are left behind without the application having been properly closed. You should enable this option for those locations that are not secure, such as Internet cafes or untrusted host computers. If users are allowed to access critical or sensitive applications over the SSL VPN tunnel, you can configure a lower timeout value such as 5 minutes. If users access insensitive data, you can set a higher timeout such as 30 minutes.
• Open Following Web Page After Secure Desktop (Vault) Closes—As the name suggests, this option requires you to input a URL that you want to launch after Secure Desktop disconnects on a user computer. This option is useful if you want to redirect user web sessions to a website that lists a company’s policies for SSL VPN usage.
• Secure Delete—When Secure Desktop is terminated, CSD converts all data to binary 0s. It then changes all vault space to binary 1s and eventually randomizes data to 0s and 1s. This entire process is considered one pass. You can change the default setting (from 3) to run this process multiple times. After it goes through all the configured passes, it eventually deletes the allocated space that was being used by Secure Desktop.
• Launch the Following Application After Installation—You can configure CSD to launch an application after Secure Desktop has been installed. This is useful if you require users to work on a specific application when they connect through an SSL VPN session. The application must reside in the Program Files folder in Windows-based operating systems.
As shown in Figure 19-43, the administrator has defined Secure Desktop General Attributes for the “HomeCorpOwned” Windows location. Users are allowed to switch desktops. The secure delete is set for five passes and the inactivity timeout for five minutes with audio alert.
Figure 19-43 Defining Secure Desktop General Attributes
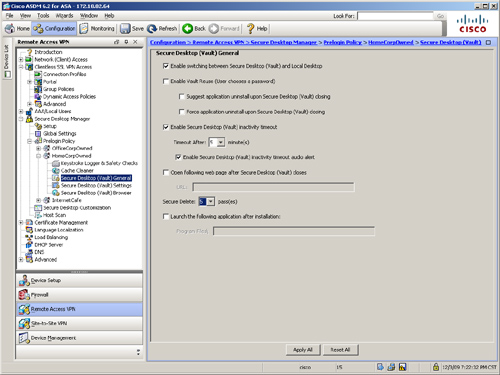
Apply Secure Desktop Restrictions
In addition to the global parameters that can be configured (discussed in the preceding section), you can apply certain restrictions to Secure Desktop to further enhance the level of security for SSL VPN sessions. These restrictions are defined in Secure Desktop (Vault) Settings under a predefined location. These restrictions include the following:
• Restrict Application Usage to the Web Browser Only, with the Following Exceptions—This option restricts the user to launch a browser other than the browser that originally initiated Secure Desktop. Choosing this option limits the user’s ability to use other applications, but increases the level of security. For example, if a user launches Secure Desktop using Internet Explorer, he is denied the ability to launch a different browser, such as Firefox, from within Secure Desktop. This option enhances security on the system because features such as Cache Cleaner do not clean the cache if a different browser is launched. In CSD version 3.2.1 or higher, the Secure Desktop Manager inserts a text box so that you can also select a preconfigured application that can run on Secure Session. If the application you want to allow is not on the preconfigured list, you can type the name of the executable files into the text box.
Caution
If your users access internal pages through Java and you apply application restrictions, make sure you allow the following entries to the browser list:
c:program
java.exe
jp2launcher.exe
• Disable Access to Network Drives and Network Folders—With this option, a user is denied access to network folders and drives. This even includes printers and any network shares that use Server Message Block (SMB) protocols. You should enable this restriction for those locations that are the least secure so that unauthorized or illegitimate users do not access protected network shares or resources. Because CSD does not clean up files that are written to mapped network drives, it is strongly recommended that you enable this option.
• Disable Access to Removable Drives and Removable Folders—When this option is enabled, users are denied access to their portable drives such as thumb or external hard drives with the Secure Desktop environment. This restriction is recommended so that users cannot copy sensitive data on a portable drive when accessing data from insecure Windows locations.
• Do Not Encrypt Files on Removable Drives—With this option enabled, users cannot save encrypted files on portable drives. This option is grayed out if Disable Access to “Removable Drives and Removable Folders” is enabled.
• Disable Registry Modification—To restrict users from modifying the system registry within Secure Desktop, enable this option.
• Disable Command Prompt Access—If unauthorized users get access to a system running Secure Desktop, they can launch command-line-based attacks to corporate resources. You should deny users command-prompt access within Secure Desktop to prevent such scenarios.
• Disable Printing—If an illegitimate user gains access to a Secure Desktop environment, the user can print sensitive data such as software code on a local printer. You should prevent users in the least secure Windows locations from being able to print.
• Allow Email Applications to Work Transparently—With this option enabled, users can access their emails while requiring Secure Desktop to erase the deleted emails when the session terminates. The supported email clients include Microsoft Outlook Express, Microsoft Outlook, and Eudora Lotus Notes. This option allows users to save email attachments to the My Documents folder, which can be accessed from Secure Desktop and from the Local Desktop.
In Figure 19-44, the CSD administrator has enabled all restrictions for the “HomeCorpOwned” predefined location. Additionally, Microsoft Word (winword.exe) is selected as an exception for a Secure Desktop session.
Figure 19-44 Enabling Secure Desktop Restrictions

Define Cache Cleaner Policies
As discussed earlier in this chapter, Cache Cleaner securely removes local browser data such as web pages, history information, and cached user credentials. When Cache Cleaner is launched on a client computer, it closes any existing browser windows, monitors browser data after a new browser window is launched. When the user logs out of the SSL VPN session, it closes the browser and cleans the cache associated with the SSL VPN session. Cache Cleaner can be enabled or disabled when you select a predefined location as shown in Figure 19-41.
Cache Cleaner can be launched for any location, if enabled. Table 19-9 lists the options available when Cache Cleaner is enabled for a Windows location.
Table 19-9 Available Cache Cleaner Options
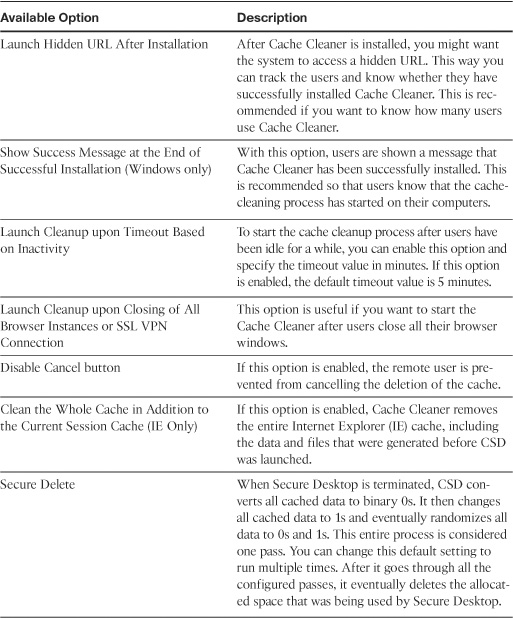
In Figure 19-45, the administrator has enabled Launch Hidden URL After Installation and added a hidden URL of http://www.securemeinc.com/cachecleaner.html for the HomeCorpOwned location. All users that match this profile will be shown a message that the Cache Cleaner process has successfully started. If user sessions are inactive for 10 minutes or if users close all browser windows, the Cache Cleaner process starts. Cache Cleaner also removes the entire IE cache.
Figure 19-45 Defining Cache Cleaner Policies
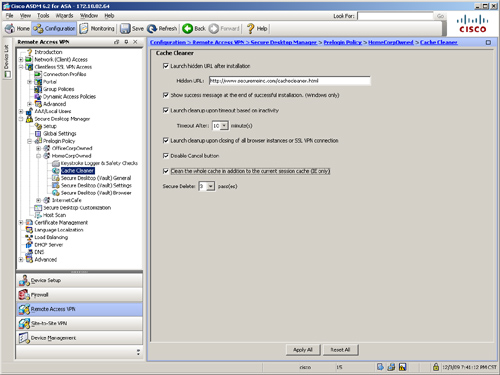
Define Secure Desktop (Vault) Browser Settings
Using Secure Desktop, you can present users with a predefined list of browser bookmarks. These bookmarks are generally the most common URLs (or favorite sites) that users connect to after their SSL VPN session is established. These bookmarks are defined under the Secure Desktop (Vault) Browser of a Windows location. You can customize these bookmarks under folders, or if just a few bookmarks exist, define them under the parent folder.
Host Scan
Host Scan is a modular component of CSD. It is installed on the end host before the user logs in to the security appliance over an SSL VPN tunnel. If CSD is in use, Host Scan can collect some important endpoint attributes and pass them to other processes such as DAP for appropriate action. Host Scan can scan an end host for information that you want to collect, such as registry entries, filenames, and process names. Host Scan functionality can be greatly enhanced if an advanced Endpoint Assessment license is used, which can collect information regarding antivirus and antispyware applications, firewalls, operating systems, and associated updates.
Host Scan, in CSD version 3.4.2048, is currently supported in
• Microsoft Windows Vista (32- and 64-bit) with Service Pack 1
• Microsoft Windows XP (32-bit) with Service Pack 2 and 3, and Microsoft Windows XP (64-bit) with Service Pack 2
• Microsoft Windows 2000 with Service Pack 4
• Mac OS X 10.4 and 10.5 (32- and 64-bit)
• Linux (32- and 64-bit biarch) systems. Successfully tested Redhat Enterprise 3 and 4, Fedora Core 4 and later, and Ubuntu
Note
Host Scan functionality occurs after CSD goes through the prelogin assessment and before DAP enforces its policies.
Host Scan Modules
Host Scan currently supports three modules:
• Advanced Endpoint Assessment
Basic Host Scan
Basic Host Scan can be used to identify the following information on a remote computer:
• Operating systems and their respective service packs
• Specific process names (in Windows operating systems only)
• Specific filenames (in Windows operating systems only)
• Registry keys (in Windows operating systems only)
You can use basic Host Scan to determine whether a remote workstation matches a specific user profile by checking information such as its operating system, registry, files, or even an actively running process. When the basic Host Scan is run on a computer, it sends the operating system, service pack information, and any checks that you configure within CSD to the security appliance.
Endpoint Assessment
Endpoint Assessment scans a remote computer for a large collection of firewall, antivirus, and antispyware software, as well as their associated signatures and definition updates. The collected information is then forwarded to the security appliance so that a specific action can be taken and enforced by dynamic access policy (DAP). You do not need to purchase any specific licenses to configure a security appliance to check for the presence of personal firewalls, antivirus software, and antispyware applications.
Advanced Endpoint Assessment
Advanced Endpoint Assessment is a licensed feature that enables you to update noncompliant computers to meet the requirements of an enterprise’s security policy. For example, if a remote user, running an older version of an antivirus definition, logs in to a security appliance, the Advanced Endpoint Assessment feature can attempt to update the definition on the remote workstation. The Advanced Endpoint Assessment is independent of the basic Host Scan and Endpoint Assessment, which were discussed earlier.
Advance Endpoint Assessment benefits you by forcing the following actions:
• Turn on an antivirus or antispyware application scan functionality if it is disabled or if it is stopped.
• Update the signature definition files for the antivirus or antispyware applications if they have not been updated for a configurable number of days.
• Apply a number of configured rules to the supported personal firewalls.
Configuring Host Scan
You can configure Host Scan by choosing Configuration > Remote Access VPN > Secure Desktop Manager > Host Scan.
Note
In the current implementation, you must use ASDM to configure Host Scan.
Set Up Basic Host Scan
To configure CSD to scan a remote computer for basic information, click Add under Basic Host Scan and select the type of basic scan you would like to configure. As mentioned in the previous section, a basic Host Scan can identify registry keys, active processes, and files located on the remote workstation. For example, if you want CSD to scan a registry key from the workstation and based on that information you want to apply appropriate action by DAP, add Registry Scan under Basic Host Scan. The system prompts you to configure the following attributes:
• Endpoint ID—Specify a meaningful name or unique string that you can later use under DAP to check the endpoint attributes. This endpoint ID is case sensitive. You can, for example, use Corp-Registry as an endpoint ID.
• Entry Path menu—Select the initial path of the registry key from the drop-down menu. For example, if the registry key you want to scan resides at HKEY_LOCAL_MACHINESYSTEMCurrentControlSetControlCorp, select HKEY_LOCAL_MACHINE from the drop-down menu.
• Entry Path field—Specify the complete name of the registry key, except for the initial directory path that you provided on the Entry Path menu. For example, if the registry key you want to scan resides at HKEY_LOCAL_MACHINESYSTEMCurrentControlSetControlCorp, specify SYSTEMCurrentControlSetControlCorp as the Entry Path field, as shown in Figure 19-46. Click OK when you are finished defining the attributes.
Figure 19-46 Defining a Registry Key Scan

Similarly, you can add a basic Host Scan for active processes and files residing on the remote workstation. To add a process scan, click Add and select Process Scan. To add a file scan, click Add and select File Scan. Refer to Table 19-10 for information on configuring file and process scans for a basic Host Scan.
Table 19-10 Basic Host Scan Configuration
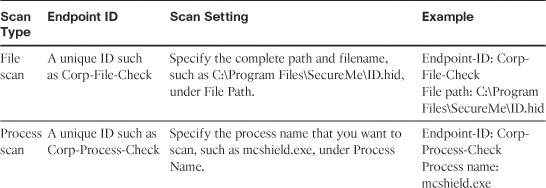
Enable Endpoint Host Scan
Enable Endpoint Assessment by choosing Configuration > Remote Access VPN > Secure Desktop Manager > Host Scan and then selecting the Endpoint Assessment ver w.x.y.z check box, where w.x.y.z is the version of Endpoint Host Scan you are using. Figure 19-46 illustrates Endpoint Assessment as being enabled and running version 2.5.19.1. After it is enabled, the Endpoint Assessment can scan for antivirus, personal firewall, and antispyware applications and updates.
After a user’s workstation passes through prelogin assessment, CSD scans the remote computer, using the endpoint assessments–defined checks, and forwards the results to the DAP engine for further action. These scan results are used as a condition for the completion of a clientless SSL VPN connection (or even a Cisco AnyConnect connection).
Set Up an Advanced Endpoint Host Scan
You must install the Advanced Endpoint Assessment license before you can use the Advanced Endpoint Host Scan feature. If a license is already installed, navigate to Configuration > Remote Access VPN > Secure Desktop Manager > Host Scan and then select the Advanced Endpoint Assessment ver w.x.y.z check box, where w.x.y.z is the version of Advanced Endpoint Host Scan you are using. After it is enabled, you can update remote hosts that are noncompliant so that they can meet the configured security requirements.
Configure the Advanced Endpoint Assessment by highlighting Advanced Endpoint Assessment ver w.x.y.z and then clicking the Configure button. A new window opens that enables you to configure enforcement policies for Windows, Mac OS X, and Linux-based workstations. The enforcement policies can be configured for firewall, antivirus, and antispyware applications.
Note
If this option is not available on your Cisco ASA, you must acquire a new activation key that has the advanced assessment feature enabled from Cisco Systems. After you have the new key, you can activate it by choosing Configuration > Device Management > System Image/Configuration > Activation Key and entering the new key.
Configure Antivirus Host Scan
To check remote workstations for antivirus compliance and to update noncompliant computers, click Add under AntiVirus. A new window opens with a list of all the supported antivirus vendors and their antivirus products. Select the antivirus vendor and product that you use in your environment from the list and click OK when finished. You can enable a number of options, if your antivirus application supports them. They include the following:
• Force File System Protection—To make sure that the remote workstations scan any received files against the antivirus process, enable this option. If the received file contains a virus, the antivirus software should detect the virus and file access is blocked.
• Force Virus Definitions Update—To force the remote workstations to check for a virus definition update, enable this option. This option is beneficial if you do not want workstations running older antivirus definitions to connect to your network. If this option is enabled, you must specify the age in days that triggered the last update.
Configure Firewall Host Scan
To check remote workstations for personal firewall compliance, click Add under Personal Firewall. A new window opens with a list of all the supported firewall vendors and their respective products. Select the firewall vendor and product that you use in your environment from the list and click OK when finished. You can also configure a firewall action if your firewall application supports it. This option is useful if you want to make sure that the remote workstation has an active firewall process running. Select Force Enable or Force Disable from the drop-down menu. Certain firewalls also support configuring specific rules. For example, you can configure a Microsoft Windows Vista firewall to allow or block certain applications from processing traffic on specific ports.
Configure AntiSpyware Host Scan
To set up the security appliance to scan the remote workstation for antispyware, click Add under AntiSpyware. You can check remote workstations for antispyware compliance and update noncompliant computers. A new window opens with a list of all supported antispyware vendors and their respective products. Select the antispyware vendor and product that you use in your environment from the list and click OK when finished. Similar to the antivirus scan option, you can also force the remote workstations to check for antispyware definition updates. This way, you can restrict workstations from connecting to your network if they are running older antispyware definitions. To enable this option, select Force Spyware Definitions Update and specify the age in days that triggered the last update.
In Figure 19-47, the administrator is setting up the Advanced Endpoint Assessment. He has enabled McAfee VirusScan Enterprise 8.x for an antivirus check and Cisco Security Agent 5.x for a personal firewall check.
Figure 19-47 Setting Up Advanced Endpoint Assessment
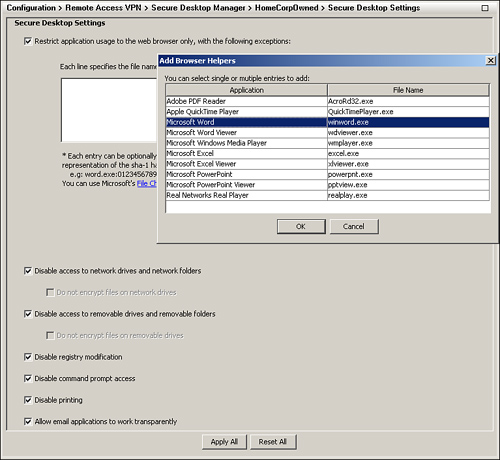
Dynamic Access Policies
In remote-access setups, such as SSL VPN, it is becoming extremely difficult to correctly identify users’ environments. A remote user may establish an SSL VPN tunnel from his corporate-owned workstation in the morning, connect to the corporate resources from an Internet café in the afternoon and then connect to the same corporate resources from home in the evening. Moreover, if you are managing a remote-access solution, it is challenging to map appropriate user authorization attributes based on their connection type. To provide a solution to these issues, Cisco introduced dynamic access policies (DAP).
DAP is defined as the collection of access control attributes that is specific to a user’s session. These policies are generated dynamically after user authorization attributes have been evaluated, such as the tunnel type to which the user is connecting and the appropriate action, such as access lists or filters is determined. After a DAP policy is generated, it is applied to the user’s session to allow or deny access to internal resources.
For example, consider a user who connects to the security appliance from two different machines for the SSL VPN tunnel. When he connects from his corporate laptop and is running Cisco Security Agent (CSA) as the firewall, he is given full access to the network via the AnyConnect client. However, if he connects from his home machine, he is only given access to a limited number of servers over the clientless SSL VPN tunnel.
Note
DAP also supports a number of other security appliance features such as IPsec and Cut-through-Proxy.
DAP Architecture
As mentioned earlier, DAP analyzes the posture assessment result of a host and applies dynamically generated access policies when a user session is established. It is designed to complement the authentication, authorization, and accounting (AAA) services by aggregating the locally defined attributes with the received attributes from the AAA server. In the case of an authorization attribute conflict, the locally defined attribute is selected. Therefore, it is possible to generate DAP authorization attributes by aggregating multiple DAP records from the AAA server and the posture assessment information for a user session.
DAP supports a number of posture assessment methods to collect endpoint security attributes. They include the following:
• Cisco Secure Desktop—CSD collects the file information, registry key values, running processes information, operating system information, and policy information from an end workstation.
• Cisco NAC—For Network Admission Control deployments, you can use the posture assessment string passed by the CS-ACS server.
• Host Scan—Host Scan is a modular component of CSD. It provides information such as antivirus, antispyware, and personal firewall software information about an end host.
The posture assessment information from end hosts can be complemented by the authorization attributes from the AAA server, such as RADIUS or LDAP.
DAP architecture consists of the following components:
• DAP selection configuration file
DAP Records
The DAP records (DAPR) contain access policy attributes, such as user connection type and user membership, and the selection criteria. These records are defined locally on the security appliances. The selection criteria determine what DAP records should be selected during a tunnel negotiation.
DAP Configuration File
DAP stores its configuration in an XML file (DAP.XML) that is located in the flash of a security appliance. This file contains all the selection criteria for each DAPR.
DAP Selection Rules
The selection rules are simply the Boolean conditions that identify what DAPRs should be selected when a session gets negotiated. These selection rules reside in the DAP configuration file.
DAP Sequence of Events
When a user tries to establish an SSL VPN tunnel (whether clientless or AnyConnect) to the security appliance and DAP is enabled, the following sequence of events occurs:
Step 1. The user negotiates an SSL VPN tunnel and is presented with a login page.
Step 2. The security appliance collects user credentials and passes them to an authentication server.
Step 3. If the user credentials are valid, the user is authenticated and the security appliance receives authorization attributes from the authentication server.
Step 4. The posture assessment process is invoked by the appropriate process, such as Cisco Secure Desktop (CSD).
Step 5. Based on the assessment results, the DAP access policy attributes are requested for the user session. The DAP records are selected based on the assessment results collected in the previous step.
Note
DAP is supported in a single routed mode security appliance.
Configuring DAP
When a user tries to establish a connection, DAP can analyze the posture assessment result of a remote host and apply access policies that are dynamically generated. A user connection might match multiple DAP records. For example, you can have a DAP record that scans only the remote workstations for a registry key. You can have another DAP record that checks the remote computer for an active process. If a remote workstation has the registry key and the process is active as well, that workstation matches against both DAP records. In this case, the security appliance combines both records dynamically and applies an aggregated access policy to a user connection.
The security appliance has a default DAP record called DfltAccessPolicy. This DAP record cannot be deleted and can contain only access policy attributes. It does not allow you to define any AAA or endpoint selection attributes. It is applied to all sessions that do not match any configured DAP records. By default, the DfltAccessPolicy does not restrict a session and allows traffic to pass through without imposing any access policies.
Note
The default behavior of DfltAccessPolicy is identical to pre-DAP-supported security appliance versions (pre 8.0), where no policy enforcement existed on user sessions.
Configure DAP by choosing either of the following navigation paths:
• Configuration > Remote Access VPN > Network (Client) Access > Dynamic Access Policies
• Configuration > Remote Access VPN > Clientless SSL VPN Access > Dynamic Access Policies
Create a new DAP record by clicking Add. ASDM opens a new window, where you can specify a name for this policy. The security appliance also enables you to specify a priority for this record. The priority is used to logically order the DAP records in case a user session matches multiple DAP records. The higher the number of a DAP record, the higher the priority.
For each DAP record, specify selection criteria and configure appropriate actions. For ease of understanding, DAP configuration is divided into the following three subconfiguration options:
Select an AAA Attributes
Because DAP complements the AAA process, the security appliance can select DAP records based on AAA authorization attributes that it receives from the following storages:
• Cisco
• LDAP
• RADIUS
Table 19-11 defines the attributes that you can select within ASDM.
Table 19-11 Supported AAA Attributes
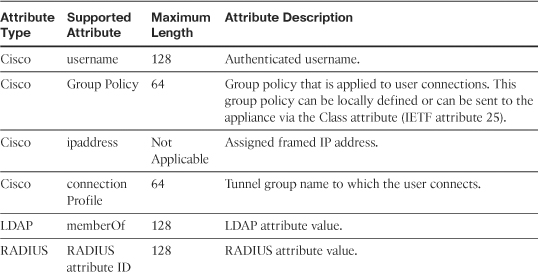
Note
You can leverage the advanced option under DAP policy construction by using Lua, which is a lightweight, fast, and powerful scripting language. For more information about Lua, refer to http://www.lua.org. To define AAA attributes under the advanced section, add the aaa and then the attribute type, followed by the attribute name. For example, if you want to define a Cisco username using Lua, you would specify it as aaa.cisco.username.
You can create one or multiple AAA attribute pairs to define a condition so that a specific DAP can be selected. In case you have more than one attribute pair defined, you can specify a logical operation (any, all, or none). For example, if you want users who connect to a tunnel group of employees or users who are members of a group fullaccess to be a part of the same DAP policy, select User Has ANY of the Following AAA Attribute Values. If you want users to match all conditions before a DAP policy can be selected, choose User Has ALL of the Following AAA Attribute Values. Additionally, you can select User Has NONE of the Following AAA Attribute Values if you want to select a DAP action and the authenticated user does not match any defined conditions.
Using the LDAP attribute type, you can leverage the native LDAP response attributes. The memberOf attribute of Active Directory specifies the distinguished name (DN) string of a group record. Specifically, the common name (CN) in the DN string is considered for group mapping. For example, if you are using LDAP authorization and you want to select users who are members of a CN called Employees, add the following under AAA attribute:
AAA Attribute Type: LDAP
Attribute ID: memberOf
Value: “=” from the drop-down menu, and “Employees” as value
Note
Using Lua, you can configure the LDAP memberOf as follows: aaa.ldap.memberOf=Employees.
Like LDAP, the RADIUS attribute type can also leverage the native RADIUS response attributes. These attributes are configured as attribute numbers and value pairs in the DAP record. For example, if you are using RADIUS authorization and you want to select users who belong to the class attribute of Employees, add the following under AAA attribute:
AAA Attribute Type: RADIUS
Attribute ID: 25
Value: “=” from the drop-down menu, and “Employees” as value
Note
The attribute ID is always the attribute number; you cannot use the attribute name. Using Lua, you can configure the RADIUS class attribute as follows: aaa.radius.25=Employees.
In Figure 19-48, the SecureMe Inc. administrator is creating a new DAP entry called Clientless-DAP. The description This Policy is applied to employees logging in through Clientless SSLVPN hosts is being added. SecureMe prefers to apply this policy for users who connect to the security appliance tunnel group of SecureMeClientlessTunnel and are members of the LDAP directory group attribute of Employees.
Figure 19-48 Defining a AAA Attribute
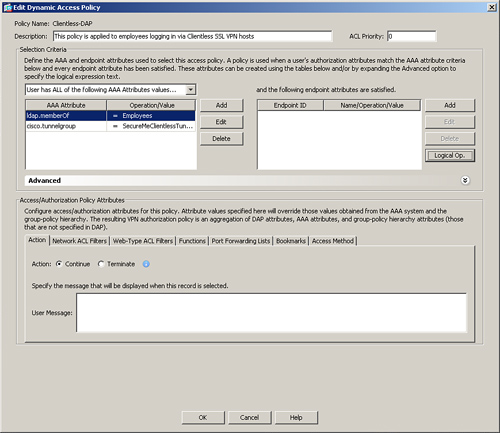
Selecting Endpoint Attributes
After defining the AAA attributes, you can optionally select the endpoint attributes. These attributes are collected by a number of sources, including Host Scans (basic, Endpoint, or Advanced Endpoint), Secure Desktop, and NAC. The AAA attributes are validated during user authentication, whereas the endpoint attributes are collected by the security appliance prior to user authentication. Table 19-12 presents all the available attributes that you can select and configure under endpoint attributes.
Table 19-12 Available Endpoint Attributes
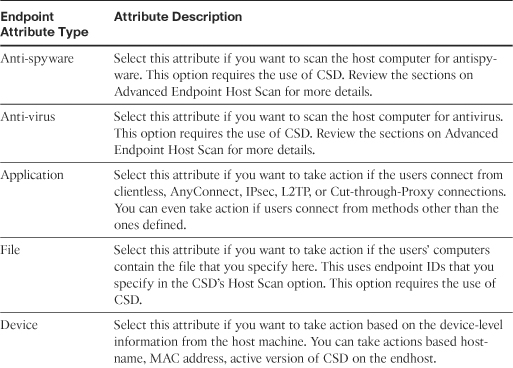
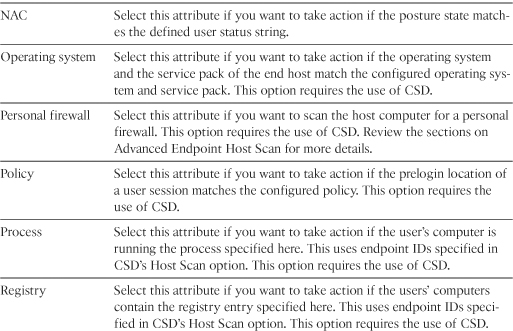
Note
When defining AAA attributes as well as endpoint attributes, DAP uses a logical AND operation between the two fields to determine a match.
DAP also uses a logical AND operation among all the configured endpoint attribute categories (such as antispyware, antivirus, and file).
DAP also uses a logical OR operation among all the endpoints of the same type. You can change this operation to a logical AND by clicking on the Logical Op button and selecting the Match All radio button for a particular type.
In Figure 19-49, SecureMe Inc. is checking the prelogin location and operating system of the remote workstations. For this DAP record, the users’ computers must meet the prelogin location of OfficeCorpOwned, and the operating system must match Windows XP Service Pack 3.
Figure 19-49 Defining an Endpoint Attribute
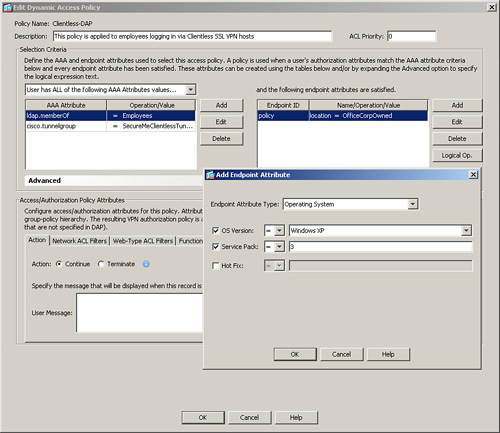
Defining Access Policies
After selecting the AAA and the endpoint attributes, the next step is to configure the policies that you want to apply to user sessions that match the attributes. You can configure VPN access attributes for a specific DAP record by using procedures outlined later in this chapter. For example, if a user’s AAA and endpoint attributes match a DAP record, you can choose to allow that connection but apply certain ACLs to restrict user traffic. The DAP enforcements take precedence over other enforcement policies, whether those be AAA filters, user or group policies, or tunnel group attributes.
As an administrator, you can configure a limited set of attribute values for a DAP record. ASDM provides seven configuration tabs to configure such attribute values:
• Action
The configuration of these tabs is discussed in the following sections.
Action Tab
The Action tab enables you to select which action will be enforced for a single DAP record. If the configured AAA and endpoint attributes match the received information from a user session, you can choose to either allow or terminate the session for that DAP record. Additionally, you can show a message of up to 128 characters to a user. The message blinks three times to get the user’s attention.
If multiple DAP records are selected for a user session, the most restrictive action is taken as the aggregated policy. For example, if a user session matches three DAP records, two of them have an action of Continue, and the third record has an action of Terminate, the collective policy terminates the user connection.
Tip
The messages are shown in HTML format. That means you can even display a URL or links to users if they do not comply with policies so that they can take appropriate actions to remediate their workstations.
Network ACL Tab
The Network ACL tab enables you to apply traffic filters for the user session that match the DAP record. You can define traffic filters in the form of network ACLs. Each ACL can have either permit or deny statements, but not both. If an ACL has both permit and deny rules, DAP rejects it as a configuration error.
If a user session matches multiple DAP records, an aggregated ACL is applied on the user. The aggregated list considers a number of parameters, such as the priority of each DAP record as well as duplications of access control entries (ACE).
To configure a network ACL, click the Network ACL tab and select a preconfigured ACL from the drop-down menu. Click the Add button to move the selected ACLs to the right under Network ACLs. The Network ACL tab even enables you to define a new ACL or modify an existing ACL. Click the Manage button to manage ACLs. In Figure 19-50, RestrictSSLVPN is selected and applied to this DAP record.
Figure 19-50 Defining Network ACLs for DAP
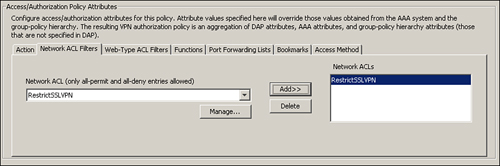
Web-Type ACL Tab
The Web-Type ACL tab, also known as the Application ACL tab, enables you to apply application-specific filters for a user session that matches a particular DAP record. You can define traffic filters in the form of network ACLs. Each ACL can have either permit or deny statements, but not both. If a web-type ACL has both permit and deny rules, DAP rejects it as a configuration error.
Note
If you happen to have an ACL entry that contains both permits and denies as access control entries, the command is rejected and the following message is displayed:
“Unable to assign an access list with mixed deny and permit rules to a dynamic access policy.”
If a user session matches multiple DAP records, an aggregated ACL is applied on the user. The aggregated list considers a number of parameters, such as the priority of each DAP record, as well as duplications of ACEs.
To configure a web-type ACL, click the Web-Type ACL tab and select a preconfigured ACL from the drop-down menu. Click the Add button to move the selected ACLs to the right under Web-Type ACLs. The Web-Type ACL tab even enables you to define a new ACL or modify an existing ACL. Click the Manage button to manage ACLs. In Figure 19-51, RestrictApplication is selected and applied to this DAP record.
Figure 19-51 Defining Web-Type ACLs for DAP
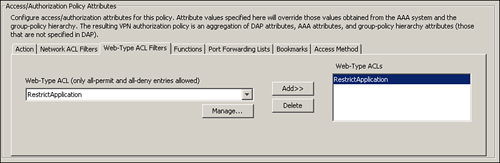
Refer to the section “Configure Web-Type ACLs,” earlier in this chapter, for information on how to manage web-type ACLs.
Functions Tab
The Functions tab enables you to configure file server browsing and entry, HTTP proxy, and URL entry. You can choose to allow or deny users from using these features for a specific DAP record. You can even choose to use the values from the group policy to which the user is connecting. For HTTP proxy, you have the option to launch an applet by DAP when a user connects. Refer to Table 19-13 for an explanation of file server browsing and entry, HTTP proxy, and URL entry features.
Table 19-13 Description of Functions Tab Features
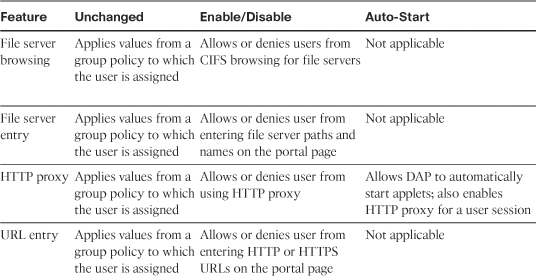
Note
You must enable WINS if you want to enable file browsing. Refer to the section “Configure File Servers,” earlier in this chapter, for more details. If WINS is not defined, the security appliance uses the configured DNS server to resolve names.
If multiple DAP records are selected for a user session, the least restrictive action is taken as the aggregated policy. For example, if a user session matches three DAP records and two of them have an action of Disable, and the third record has an action of Auto-start, the collective policy auto-starts the user connection for that specific feature.
To configure functions, click the Functions tab and select the radio button for the option you would like to enable. In Figure 19-52, file server browsing and entry as well as URL entry are enabled, and HTTP proxy is set to auto-start.
Figure 19-52 Selection of User Functions
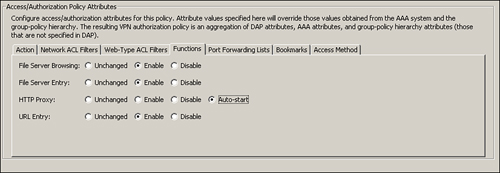
Port Forwarding Lists Tab
The Port Forwarding Lists tab enables you to apply a preconfigured port-forwarding list to a DAP record. If you do not have a preconfigured port-forwarding list, you can define one under this tab. Because DAP enforces action and policies, you can deny users the use of a port-forwarding list even if the group policy to which the user is assigned allows it. Similarly, if a group policy does not have a port-forwarding list mapped to the group policy, you can choose to auto-start the selected list.
To choose a preconfigured port-forwarding list, click the Port Forwarding Lists tab and select a preconfigured list from the drop-down menu. Click the Add button to move the selected ACLs to the right. If a new list needs to be defined, click the New button. As illustrated in Figure 19-53, a port-forwarding list called SSHServer is selected and applied to this DAP record. The port forwarding Auto-Start option is also selected so that the DAP record automatically starts the port forwarding applets.
Figure 19-53 Selecting a Port-Forwarding List
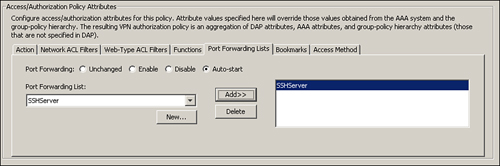
If a user session matches multiple DAP records, an aggregated policy is applied on the user. The aggregated policy concatenates the attribute values from the selected DAP records and removes any duplicates values.
Note
Refer to the section “Configure Port Forwarding,” earlier in this chapter, to learn more.
Bookmarks Tab
The Bookmarks tab enables you to apply a preconfigured Bookmark (URL) list to a DAP record. If you do not have a preconfigured bookmark list, you can define one under this tab as well. To choose a preconfigured bookmark list, click the Bookmarks tab and select a preconfigured list from the drop-down menu. Click the Add button to move the selected bookmark to the right. If a new list needs to be defined, click the Manage button. As illustrated in Figure 19-54, bookmarks are enabled and a bookmark called InternalServers is selected and applied to this DAP record.
Figure 19-54 Selecting a URL List
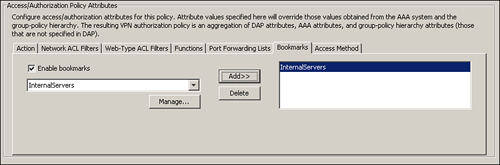
If a user session matches multiple DAP records, an aggregated policy is applied on the user. The aggregated policy concatenates the attribute values from the selected DAP records and removes any duplicates values.
Note
Refer to the section “Configure Websites” earlier in this chapter, to learn more.
Access Method Tab
On the Access Method tab you can specify an access method for a DAP record. The supported access methods include AnyConnect Client, Web-Portal, Both-Default-Web-Portal, Both-Default-AnyConnect Client, and Unchanged.
For example, if users match a DAP record but you do not want to give them AnyConnect Client functionality, select the Web-Portal option for that particular DAP record. If you select either the Both-Default-Web-Portal or Both-Default-AnyConnect Client, users who match the DAP record have access to both features and the default method is tried first. If you select Unchanged as the option, the user is allowed an access method based on the group policies that she acquires for her session. As shown in Figure 19-55, an access method of Web-Portal is selected and applied to a DAP record.
Figure 19-55 Selecting an Access Method
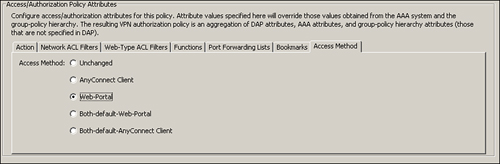
A user session can match multiple DAP records. In this case, the applied aggregated policy selects the least restrictive access method. For example, if a DAP record has Web-Portal as its access method, whereas another DAP record has Both-Default-AnyConnect Client, the user’s access method is Both-Default-AnyConnect Client. However, if Both-Default-AnyConnect Client and Both-Default-Web-Portal are selected for a user session, the aggregates policy applies Both-Default-Web-Portal as the access method.
In Example 19-17, a DAP record called Clientless-DAP is being defined. This record allows “file browsing” and “file entry” and also sets HTTP proxy to auto-start. A port forwarding list, called SSHServer, and a bookmark list, called InternalServers, are applied to this DAP record. A Web-type ACL, called RestrictApplication, is also applied.
Example 19-17 Defining a DAP Record
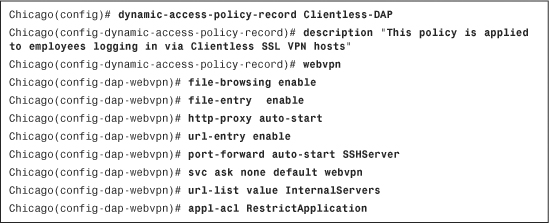
Deployment Scenarios
The Cisco SSL VPN solution is useful in deployments where remote and home users need access to corporate networks and administrators want to control their access based on a number of attributes. The SSL VPN solution can be deployed in many ways; however, this chapter covers one design scenario for ease of understanding.
Note
The design scenario discussed in the following section should be used solely to reinforce learning. It is for reference purposes only.
SecureMe has decided to provide clientless functionality to a group of mobile contractors. These contractors use a web server for browsing, a terminal server, and a Windows file server to save and retrieve their documents.
Figure 19-56 shows SecureMe’s proposed network topology for clientless connections.
Figure 19-56 SecureMe’s Clientless Connection Topology with DAP
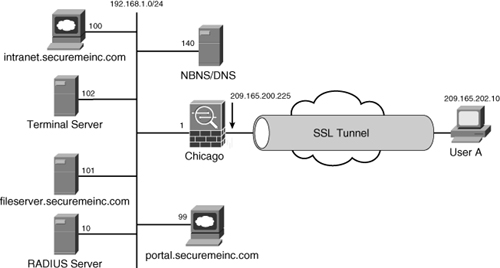
The security requirements for SecureMe are as follows:
• Allow access to internal web server located at portal.securemeinc.com.
• Deny access to all other internal web servers including intranet.securemeinc.com.
• Allow access to a file server with an IP address of 192.168.1.101.
• Allow access to a terminal server with an IP address of 192.168.1.102.
• SecureMe uses RADIUS for user authentication and uses attribute 25 for role mapping within the enterprise.
• Contractors must have an active McAfee firewall (McAfee Personal Firewall version 8.x) running before access to SecureMe’s network can be granted.
• Contractors should not be able to browse or specify any other web server in the SecureMe network.
To achieve SecureMe’s requirements, the administrator has proposed that the security appliance be configured for clientless access. Bookmarks and smart tunnels will be configured to provide access to the internal web servers, CIFS servers, and terminal servers. The preconfigured RADIUS will be leveraged for user authentication. Attribute 25 will be used by DAP to assign specific policies based on user roles. Additionally, an endpoint assessment will be done to ensure that contractors have an active firewall running. If the security appliance receives attribute 25 with a value of contractor and endpoint assessment determines that the McAfee firewall is running, contractors will be allowed to connect through the web portal.
The following sections describe the steps to implement the proposed solution.
Step 1: Define Clientess Connections
Set up clientless connections for remote contractors as follows:
Step 1. Define bookmarks for the internal servers (web and CIFS) by choosing Configuration > Remote Access VPN > Clientless SSL VPN Access > Portal > Bookmarks > Add. Specify a bookmark list name called Contractors-List and then click Add to specify a bookmark title of Internal-Web. Select http under the URL Value drop-down menu, and configure a URL value of portal.securemeinc.com. Under Advanced Options, enable the Smart Tunnel option to tunnel HTTP traffic directly to the web server. Click OK when finished. Click Add to add another entry for the CIFS server. Under Bookmark Title, specify Internal-FileServer and select cifs from the URL Value drop-down menu. Configure a URL value of fileserver.securemeinc.com.
Step 2. Configure a web-type ACL by choosing Configuration > Remote Access VPN > Clientless SSL VPN Access > Advanced > Web ACLs. Click Add, select Add ACL, and define a list called AllowWebServer. Select the newly created ACL name, click Add again, select Add ACE, and select Permit as the Action. Choose http as the filter protocol and specify portal.securemeinc.com as the URL entry. The implicit deny at the end of a Web-type ACL will deny access to internal.securemeinc.com. Click OK when finished.
Step 3. Choose Configuration > Remote Access VPN > Clientless SSL VPN Access > Portal > Smart Tunnels > Add to define an entry for the terminal server. Specify a list name of TerminalServer, an Application ID of Terminal, and a Process Name of mstsc.exe.
Step 4. Define a group policy to link the bookmark and smart tunnel lists. Choose Configuration > Remote Access VPN > Clientless SSL VPN Access > Group Policies > Add and specify ContractorGroupPolicy as the policy name for the clientless users. Under More Options, deselect the Inherit check box for Tunneling Protocols and select Clientless SSL VPN. Click the Portal option in the left pane and deselect the Inherit check box for Bookmark List. Select Contractor-List from the drop-down list. Now, deselect the Inherit check box for Smart Tunnel List and select TerminalServer from the drop-down list. Also enable Auto Start so that the smart tunnel is automatically initiated when the tunnel is established for a user. Click OK when finished.
Step 5. Choose Configuration > Remote Access VPN > Clientless SSL VPN Access > Connection Profiles, and under Access Interfaces select the Allow Access check box for the outside interface. Create a new tunnel group by clicking Add under Connection Profiles. Specify SecureMeContractorTunnel as the tunnel group name. Select RADIUS under AAA Server Group and select ContractorGroupPolicy under Default Group Policy. Specify 192.168.1.140 as the DNS server address and securemeinc.com as the domain name. Specify SecureMeContractor as the alias for this tunnel group.
Step 6. Because you are using bookmarks for the web and CIFS servers, you need to define a WINS and a DNS server. Go to Configuration > Remote Access VPN > Clientless SSL VPN Access > Connection Profiles > SecureMeContractorTunnel > Edit > Advanced > NetBIOS Servers option in the left pane. Click Add, specify 192.168.1.140 as the IP address of the NBNS server, and enable the Master Browser option. .
Step 7. Click the Advanced > Clientless SSL VPN option in the left pane. Under Group URL, click Add and specify https://sslvpn.securemeinc.com/contractors. Verify that the Enable check box is selected. Click OK to exit.
Step 2: Configure DAP
SecureMe wants to apply policy enforcements through DAP. Configure DAP by choosing Configuration > Remote Access VPN > Clientless SSL VPN Access > Dynamic Access Policies.
Step 1. Create a new DAP record by clicking Add and specifying the record name of Contractors-DAP. Under AAA attribute selection criteria, click Add and select RADIUS as the AAA Attribute Type. Under Attribute ID, specify 25 and select Value equal to Contractors. Insert another AAA attribute type of Cisco, select the Connection Profile check box, and specify SecureMeContractorTunnel as the Tunnel Group value. Select User Has ALL of the Following AAA Attribute Types as the Selection Criteria.
Step 2. Configure the endpoint attribute selection. Click Add, select Personal Firewall as the Endpoint Attribute Type, and select the Exists radio button. Under Vendor, select McAfee, Inc. and enable the Product Description and Version check boxes. Select McAfee Personal Firewall as the Product Description and 8.x as the Version. Click OK when finished.
Step 3. Configure the Access/Authorization Policy Attributes. On the Action tab, choose Continue. Click the Web-Type ACL tab and select AllowWebServer from the drop-down menu. Click the Add button to move the selected ACLs to the right under Web-Type ACLs. Now select the Functions tab and choose Enable for File Server Browsing. Also choose Disable for File Server Entry, HTTP Proxy, and URL Entry.
Step 4. On the Bookmarks tab, click Enable Bookmarks and select Contractors-List from the drop-down menu. Click the Add button to move the selected list to the right. Finally, select Web-Portal as the Access Method on the Access Method tab. Click OK when finished.
You can now connect to the ASA by using the following URL in your browser: https://sslvpn.securemeinc.com/contractors.
Monitoring and Troubleshooting SSL VPN
The following sections discuss the monitoring and troubleshooting steps that are available to help you run the SSL VPN solution smoothly on a security appliance.
Monitoring SSL VPN
To monitor the WebVPN sessions, first check how many active SSL VPN tunnels are established on the security appliance. Check this by choosing Monitoring > VPN > VPN Statistics > Sessions. The security appliance shows all the active VPN sessions, including the clientless and full tunnel client connections. As shown in Figure 19-57, an active clientless connection is created by a user called sslvpnuser. The user computer’s IP address is 209.165.200.230, and the negotiated encryption type is RC4. The security appliance has received 1,296,849 bytes of traffic, whereas it has transmitted 1,146,682 bytes of data to the client. The user is connected for just over a minute. Should you prefer to get detailed information about a user’s connection, select that specific user session and then click the Details button.
Figure 19-57 Monitoring SSL VPN Sessions Through ASDM
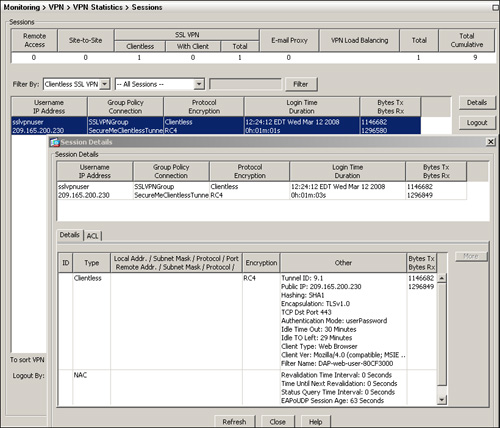
To view the DAP policies that are configured on the security appliance in Lua, issue the debug menu dap 2 command, as shown in Example 19-18. Two DAP records are configured: Clientless-DAP and Contractors-DAP.
Example 19-18 debug menu dap Command
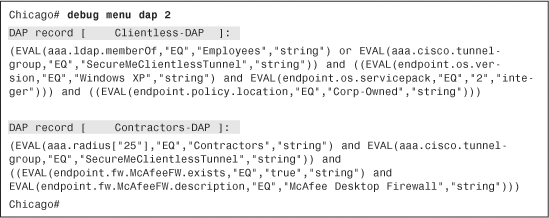
Additionally, if you want to monitor user sessions through syslogs, you can enable the webvpn, svc, csd, and dap classes. These classes are useful for understanding how users are getting authenticated, what information is being collected, and what type of attributes and policies are being applied on their sessions. As shown in Example 19-19, the administrator is collecting debug-level information for the webvpn, svc, csd, and dap classes. The syslog messages are being collected in the local buffer of the security appliance. Based on the syslog messages, an sslvpn user tries to connect to the SecureMeClientlessTunnel tunnel group. CSD determines that user’s host machine connects from the Internet cafe location, and the security appliance applies a DAP called Contractors-DAP. The user session is successfully authenticated, and the user is allowed to connect through a clientless SSL VPN (WebVPN) tunnel.
Example 19-19 class Syslog Commands
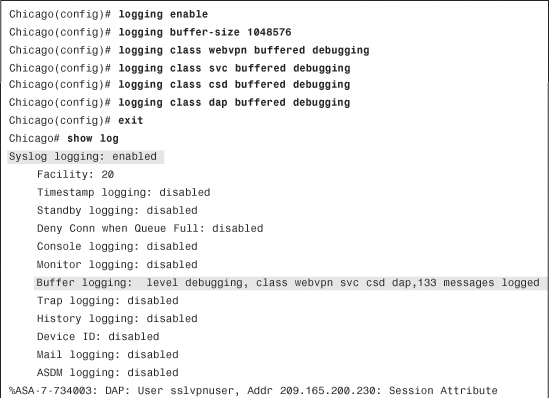
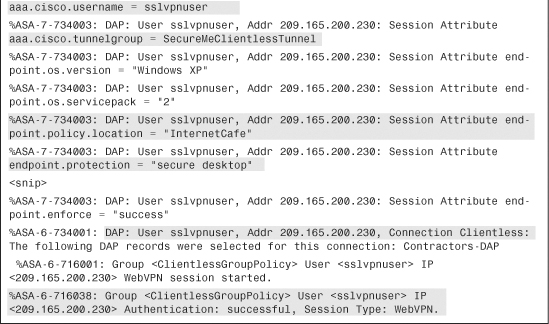
Note
The debug-level syslogs should be used if you are monitoring sessions in a lab environment. They should be used only for troubleshooting in the production environment and should be disabled when you have collected the necessary information.
Troubleshooting SSL VPN
Cisco ASA provides a number of troubleshooting and diagnostic commands for SSL VPNs. The following sections focus on three troubleshooting scenarios related to SSL VPN.
Troubleshooting SSL Negotiations
If you have a user who is not able to connect to the security appliance using SSL, follow these recommendations to isolate the SSL negotiation issues:
• Verify that the user’s computer can ping the security appliance’s outside IP address.
• If the user’s workstation can ping the address, issue the show running all | include ssl command on the security appliance and verify that SSL encryption is configured.
• If SSL encryption is properly configured, use an external sniffer to verify whether the TCP three-way handshake is successful.
Troubleshooting Clientless Issues
The following sections provide guidelines on troubleshooting the three most commonly seen clientless issues
Issues with Websites
If you use clientless SSL VPN to provide connectivity to remote users and a user is having issues connecting to the websites through bookmarks, follow these recommendations to isolate the problem:
• Check whether the user is having connectivity issues with all configured websites. If so, check whether other applications, such as CIFS, port forwarding, or smart tunnels, are working well.
• If connectivity issues are limited to one web server, check whether one user or all users are having issues connecting to that website.
• Verify whether using smart tunnels for the configured website bookmark fixes the issue.
• If the issue is still not fixed, disable additional features such as CSD and DAP to see whether that fixes the issue.
• You can also try a different browser to isolate a browser-specific issue.
• As a last option, test connectivity to the server by using AnyConnect VPN Client to rule out other issues.
Issues with CIFS
You can provide CIFS services to the clientless users so that they can access their shared resources on the Windows file servers. If the clientless SSL VPN users have issues with multiple logons when they try to access the servers, you can configure a single sign-on and see whether that resolves the issue.
If users have issues connecting to the servers or have issues accessing their shared folders or files, you can try to access them by entering the server name and share through the address bar inside the web portal page. This helps in isolating issues with CIFS bookmarks.
In some cases, clientless SSL VPN users can receive a “Failed to retrieve domains” error message when they select Browse Entire Networks with the web portal page. You can resolve this issue by adding the WINS (NBNS) server under the correct tunnel group.
In the early 8.0 version of code, an issue exists when users periodically get an “Error contacting host” error message when they try to access servers through CIFS bookmarks or click the Browse Entire Network option. The only work-around at this time is to reboot the security appliance. This issue is identified as CSCsl94183 and is fixed in versions 8.0(4), 8.1(2), and later versions.
Note
You can enable debug ntdomain 255 and debug webvpn cifs 255 to collect the appropriate information. A packet capture between the ASA and the CIFS server is also helpful. You can submit the debug output and capture to a Cisco TAC engineer for further analysis.
Troubleshooting CSD
If you have deployed CSD in your environment, users can sometimes experience slow processing when CSD is being loaded. This could be the result of the following issues:
• Number of registry keys and values reads—The more registry reads you have, the more time CSD needs to read and process entries.
• Version of Java running—Some versions of Java can process many more registry reads than some older versions.
You can help by clearing the SSL state on the Internet browser and by turning off the certificate revocation check. You can also use the latest version of CSD.
Troubleshooting DAP
The best way to troubleshoot DAP-related issues is to enable debug dap trace. For example, you can identify who is connecting to the security appliance, what tunnel group is being selected, what CSD prelogin location is chosen, what hotfixes the host is running, and what DAP record is being applied for that connection. As shown in Example 19-20, the username is sslvpnuser and the session is using the SecureMeClientlessTunnel tunnel group. The CSD prelogin location is determined as InternetCafe, and the security appliance assigns the Contractors-DAP policy for this user session.
Example 19-20 debug dap trace Command
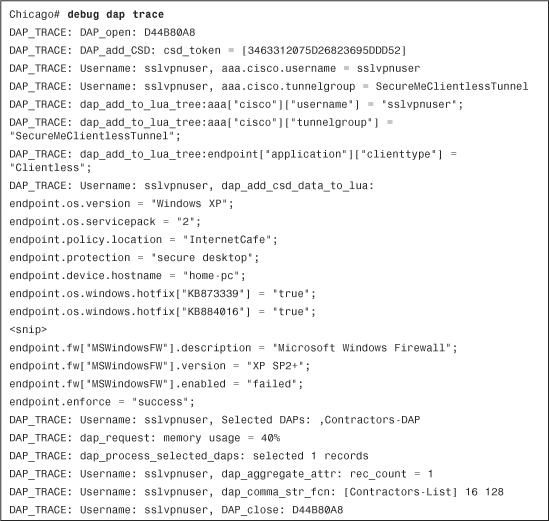
Summary
This chapter provided details about the SSL VPN functionality in Cisco ASA. Using the robust features available in Cisco ASA SSL VPN remote access, security administrators can deploy Cisco ASA in almost any network topology. This chapter discussed clientless SSL VPN client implementations. The chapter also focused on Cisco Secure Desktop (CSD) and offered guidance in setting up CSD features. The chapter discussed the Host Scan feature that is used to collect posture information about end workstations. The DAP feature and its usage were explained, and detailed configuration examples were also provided. To reinforce learning, we presented a deployment scenario along with its configuration. This chapter covered extensive show and debug commands to assist in troubleshooting complicated clientless SSL VPN deployments.