Chapter 20. Client-Based Remote-Access SSL VPNs
Chapter 19 discussed the implementation of SSL VPN on clientless workstations. However, the clientless implementation does not provide full network access to your remote users. If you want your users to have full network connectivity from their remote workstations, similar to what they would have with remote-access IPSec but by using SSL VPN, you can implement the full-tunnel-mode functionality on the Cisco ASA. Using the full tunnel client mode, remote machines can send all IP unicast traffic including TCP, UDP, or even ICMP-based packets. SSL clients can access internal resources via HTTP, HTTPS, SSH, or Telnet, to name a few.
Many enterprises are in the process of migrating from an existing IPSec-based deployment. Their main motivation is that the Cisco SSL VPN client is easy to deploy and maintain, has a smaller package size, requires no machine reboots during client install, and is easy to configure.
In the full tunnel mode, Cisco AnyConnect client can be pushed or installed on the remote workstations. Most customers prefer using the full tunnel mode option because a VPN client is automatically pushed to a user after a successful authentication. After it is installed, you can choose to keep the client installed permanently and thus reduce the connection time for the remote user.
SSL VPN Deployment Considerations
As discussed in Chapter 19, you have to analyze your current environment and determine which features and modes might be useful in your implementation before you implement the SSL VPN services in Cisco ASA. You have the option to install a Cisco IPSec VPN client, Cisco AnyConnect VPN client, or go with the clientless SSL VPN functionality. Table 20-1 lists the major differences between the Cisco VPN client solution and the Cisco AnyConnect SSL VPN client solution. Cisco AnyConnect SSL VPN is an obvious choice for someone who wants to give full network access to an enterprise’s network, using SSL-based tunnels.
Table 20-1 Contrasting Cisco VPN Client and SSL VPN
When you have determined AnyConnect SSL VPN as your choice of remote-access VPN solution, here are some of the SSL VPN design considerations that you must consider.
AnyConnect Licenses
Starting with Cisco ASA version 8.2, Cisco has introduced specific licenses to be used in the SSL VPN environment. They include
AnyConnect Premium
The AnyConnect Premium license is designed for those customers who want to deploy both clientless as well as the AnyConnect SSL VPN tunnels in a single Cisco ASA. The AnyConnect Premium license supports advanced SSL VPN features such as Cisco Secure Desktop (CSD) and Host Scanning.
AnyConnect Essentials
The AnyConnect Essentials license is designed for those customers who want to deploy solely full tunnel AnyConnect clients. The AnyConnect Essentials license does not support advanced SSL VPN features such as Cisco Secure Desktop (CSD), Host Scanning, and or clientless SSL VPN tunnels. It is a great option for those customers who are in the process of migrating from a Cisco IPSec VPN solution to a Cisco AnyConnect solution or who require support for Windows 64-bit operating systems.
Even if you have the AnyConnect Essential license installed, you must use the anyconnect-essential command in the webvpn subconfiguration menu to enable AnyConnect Essential on the security appliance.
If you want to deploy both AnyConnect and clientless SSL VPNs, you must purchase the AnyConnect Premium license that also includes CSD.
AnyConnect Mobile
For customers who want to extend the AnyConnect SSL VPN functionality to mobile endpoints such as Treo, iPAQ, and Axim, you can purchase the AnyConnect Mobile license. This is an add-on license to the AnyConnect Essential or SSL VPN Premium license. The mobile endpoints need to be running Windows Mobile 5.0, 6.0, or 6.1. For a complete list of supported VPN devices, consult http://www.cisco.com/en/US/docs/security/asa/compatibility/vpn-platforms-82.html.
Shared Premium Licensing
Shared Licenses are designed for those customers who want to purchase the SSL VPN licenses in bulk and then share them among a number of Cisco ASA on an as-needed basis. The pool of licenses is maintained by a master license server. The SSL VPN terminating security appliances are known as the participants. When a participant needs SSL VPN licenses, they send a request to the server. The server, depending on license availability, grants licenses to the participants in small chunks.
By using this model, customers can benefit from operational flexibility and investment protection because they can add devices to their deployments without having to purchase specific SSL VPN licenses for each device. In this licensing structure, the SSL user count is what is shared among the participating firewalls.
Table 20-2 provides detailed information on the different license types and the supported SSL VPN features.
Table 20-2 License Types and Supported SSL VPN Features
Note
All license keys, except for the Shared Premium license, are associated per device. That means you cannot share a license among multiple Cisco ASAs, even if they are in high-availability or clustered environments. Customers who want to deploy the security appliances in high-availability areas can purchase the SSL/IPsec VPN Edition bundle with a specific license size.
If using the Shared Premium license in an Active/Standby failover scenario, the active security appliance requests the license from the license server. The standby appliance does not need any licenses.
VPN Flex Licenses
Cisco Systems also provides its customers an emergency or business continuity license called a VPN flex license. By using the SSL VPN flex licenses on the security appliances, customers can temporarily increase (burst) the number of SSL licenses on a box for up to 60 days. This license is extremely useful in those circumstances when a large number of employees cannot come to the office in emergency situations such as extreme weather conditions, and they end up working from home through the SSL VPN tunnels. In this case, the security appliance administrator can apply a VPN flex license for a week and revert back to the permanent license when the extreme conditions end.
Cisco ASA Design Considerations
Before you deploy AnyConnect SSL VPN, make sure that you understand the impact it has in your environment. Some of the design considerations are included in the following subsections.
ASA Feature Set
A Cisco security appliance can run various features such as IPsec VPN tunnels, routing engines, firewalls, and data inspection engines. Enabling the SSL VPN feature can add further load if your existing appliance is already running a number of features. You must check the CPU, memory, and buffer utilization before enabling SSL VPN.
Infrastructure Planning
Because SSL VPN provides network access to remote users, you have to consider the placement of the VPN termination devices. Before implementing the SSL VPN feature, ask the following questions:
• Should the Cisco ASA be placed behind another firewall? If so, what ports should be opened in that firewall?
• Should the decrypted traffic be passed through another set of firewalls? If so, what ports should be allowed in those firewalls?
• Are there any proxy servers between the client and the security appliances?
Note
If you have an HTTP 1.1 proxy server between the AnyConnect client and the server, your connection should succeed as long as the proxy server uses Basic and NTLM authentication. In the current implementation, Socks proxies are not supported.
Additionally, if the proxy server runs only TCP, you cannot run DTLS. DTLS is discussed in the “Configuring DTLS” section of this chapter.
Implementation Scope
Network security administrators need to determine the size of the SSL VPN deployment, especially the number of concurrent users that will connect to gain network access. If one Cisco ASA is not enough to support the required number of users, the use of ASA clustering or load balancing must be considered to accommodate all the potential remote users.
Table 20-3 lists the secure appliances and the number of supported simultaneous AnyConnect SSL VPN users for each platform.
Table 20-3 ASA Platforms and Supported Concurrent SSL VPN Users
Note
You cannot apply Quality of Service (QoS) policies to the AnyConnect client connections.
SSL VPN Prerequisites
You must meet a number of prerequisites before you can start implementing an SSL VPN in your enterprise. They are discussed in the following sections.
Cisco Systems provides a two-user complementary license on all supported ASA devices. You do not have to purchase licenses if you want to test SSL VPN features in a lab environment where the user count is not going to exceed 2.
Note
This chapter focuses strictly on version 8.2 because of the SSL VPN enhancements that were added in this version of code.
Client Operating System and Browser and Software Requirements
The SSL VPN functionality on Cisco security appliances is supported on a number of client operating systems and on a number of browsers. The supported platforms are discussed next.
Supported Operating Systems
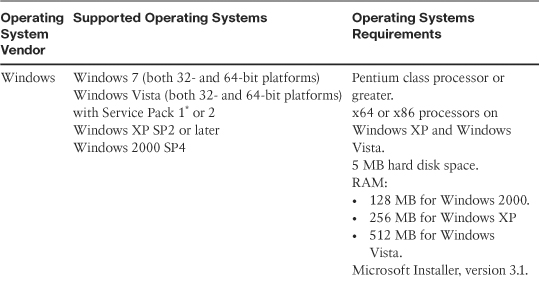
The AnyConnect SSL VPNs are supported on the Windows-, Linux-, and Mac OS X-based systems. Table 20-4 provides a list of operating systems and the requirements for each operating system.
Table 20-4 Supported Operating Systems
Note
For Fedora 9, you must first install Sun Microsystems JRE 6 Update 5 or higher.
The Linux platforms do not support web-based install.
The current release of Cisco AnyConnect client does not support any virtualization software, such as VMWare or Parallels Desktop for Mac OS.
Compatible Browsers
You must use an SSL-enabled browser such as Microsoft Internet Explorer, Firefox, Opera, Safari, Mozilla, Netscape, or Pocket Internet Explorer (PIE) to download the AnyConnect client from the security appliance. For Windows-based workstations, use Internet Explorer 6.0+ or Firefox 2.0+, and enable ActiveX or install Sun JRE 1.5 or higher, with JRE 6 recommended.
Infrastructure Requirements
The infrastructure requirements for SSL VPNs include, but are not limited to, the following options:
ASA Placement
If you are installing a new security appliance, determine the location that best fits your requirements. If you plan to place it behind a firewall, make sure that you allow appropriate SSL VPN ports to pass through the firewall. In most cases, it is placed near the Internet edge.
User Account
Before SSL VPN tunnels are established, users must authenticate themselves to either the local database or to an external authentication server. The supported external servers include RADIUS (including Password Expiry using MSCHAPv2 to NT LAN Manager), RADIUS one-time password (OTP), RSA SecurID, Active Directory/Kerberos, and Generic Lightweight Directory Access Protocol (LDAP). Make sure that SSL VPN users have accounts and appropriate access. LDAP password expiration is available for Microsoft and Sun LDAP.
Administrative Privileges
AnyConnect VPN client requires administrative rights for the initial installations.
Note
Smartcard support is not available for Linux-based AnyConnect clients. They are, however, fully supported on Windows Vista, Windows XP with SP2 and Windows 2000 Professional with SP4, and Mac OS X 10.4 and higher.
Pre-SSL VPN Configuration Guide
After analyzing the deployment consideration and selecting the SSL VPN as your choice of remote-access VPN solution, you must configure the security appliance for the tasks listed in the following subsections even before you enable SSL VPN. These tasks include the following:
• Enrolling digital certificates (recommended)
• Setting up tunnel and group policies
• Setting up user authentication
Enrolling Digital Certificates (Recommended)
Enrollment is the process of obtaining a certificate from a certificate authority (CA). The certificate enrollment process for AnyConnect SSL VPN client is identical to the enrollment process discussed in Chapter 19 for clientless SSL VPN tunnels. If you have not gone through the process of enrolling SSL VPN certificates into a Cisco security appliance, please consult the “Enroll Digital Certificates” section in Chapter 19.
Setting Up Tunnel and Group Policies
As discussed in Chapter 19, Cisco ASA uses an inheritance model when it pushes network and security policies to the end-user sessions. Using this model, you can configure policies at the following three locations:
• Under default group policy
• Under user group policy
• Under user policy
In the inheritance model, a user inherits the attributes and policies from the user policy, which inherits its attributes and policies from the user group policy, which in turn inherits its attributes and policies from the default group policy.
Note
“DfltGrpPolicy” is a special group name, used solely for the default group policy.
After defining these policies, you must bind them to a tunnel group where users terminate their sessions. This way, a user who establishes his VPN session to a tunnel group inherits all the policies mapped to that tunnel. The tunnel group defines a VPN connection profile, of which each user is a member.
Configuring Group Policies
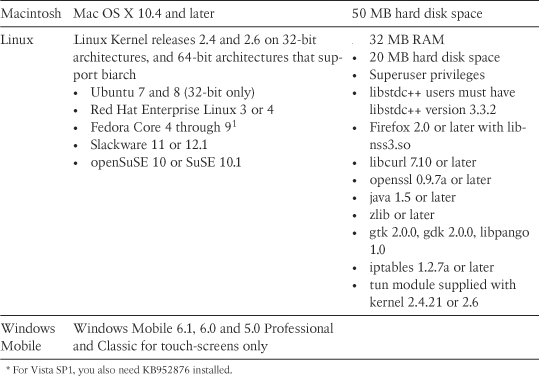
You configure the user group and default group policies by choosing Configuration > Remote Access VPN > Network (Client) Access > Group Policies. Click Add to add a new group policy. As shown in Figure 20-1, a user group policy, called AnyConnectGroupPolicy, has been added. This group policy allows only clientless SSL VPN tunnels to be established and rejects all the other tunneling protocols. If you would rather assign attributes to default group policy, you can modify DfltGrpPolicy (System Default). Any attribute that is modified here is propagated to any user group policy that inherits that attribute. A group policy name other than DfltGrpPolicy is treated as a user group policy.
Figure 20-1 User Group Policy Configuration
Note
The default and user group policies are set up to allow both Cisco IPsec VPN and SSL VPN tunnels. If you want to restrict a policy to use only SSL VPN, use either the Clientless SSL VPN or the SSL VPN Client options under Tunneling Protocols, as illustrated in Figure 20-1.
The user, group, and default group polices can be applied to clientless, AnyConnect, and IPsec-based remote-access VPN tunnels. The AnyConnect SSL VPN specific attributes are discussed in detail in the next few sections of this chapter.
Note
You can configure a user policy by choosing Configuration > Remote Access VPN > AAA/Local Users > Local Users.
Example 20-1 illustrates how to define a user group policy called AnyConnectGroupPolicy. This policy allows only the IPSec tunnels to be terminated on the group.
Example 20-1 Group Policy Definition

Configuring a Tunnel Group
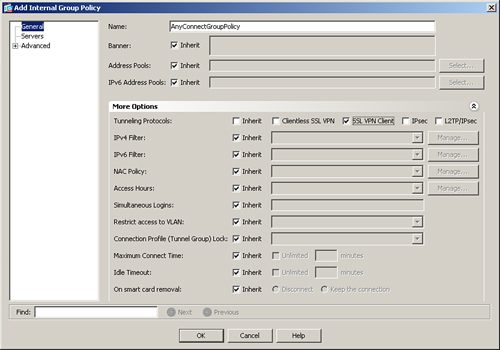
You can configure a tunnel group, also known as connection profile, by choosing Configuration > Remote Access VPN > Network (Client) Access > AnyConnect Connection Profiles and clicking Add. As shown in Figure 20-2, a tunnel group called SecureMeAnyConnect has been added. After defining a tunnel group name, you can bind a user group policy to a tunnel group. After a user is connected, the attributes and policies defined under the group policy are applied to the user. A user group policy of AnyConnectGroupPolicy is linked to this tunnel group.
Figure 20-2 Configuration of a Tunnel Group
Example 20-2 illustrates how to configure a remote-access tunnel group of SecureMeAnyConnect. The previously defined group policy, AnyConnectGroupPolicy, is added to the tunnel group.
Example 20-2 Tunnel Group Definition

After configuring a Connection Profile, you can define a specific URL that users can use to connect to this tunnel group. This is useful if you want to create a specific URL for each Connection Profile you create and distribute the URL accordingly so that users do not have to decide to which Connection Profile to connect.
You can define a specific URL by modifying the Connection Profile and then clicking the Advanced > SSL VPN option. Under Group URL, click Add and specify a URL. For the SecureMeAnyConnect connection profile, specify https://sslvpn.securemeinc.com/sslvpnclient as the group URL. Verify that the Enable check box is selected. Click OK to exit. When users need to connect via SSL VPN, they can use this URL to connect specifically to this tunnel group.
Setting Up User Authentication
Cisco ASA supports a number of authentication servers, such as RADIUS, NT domain, Kerberos, SDI, LDAP, digital certificates, smart cards, and local databases. For small organizations, a local database can be set up for user authentication. For medium to large SSL VPN deployments, it is highly recommended that you use an external authentication server, such as RADIUS or Kerberos, as the user authentication database. If you are deploying the SSL VPN feature for a few users, you can use the local database. You define the users by choosing Configuration > Remote Access VPN > AAA/Local User > Local Users.
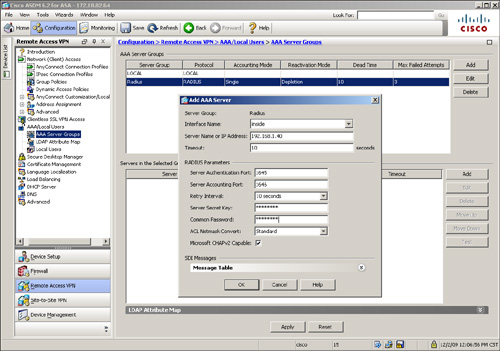
Many enterprises either use a RADIUS server or Kerberos to leverage their existing active directory infrastructure for user authentication. Before configuring an authentication server on Cisco ASA, you must specify authentication, authorization, and accounting (AAA) server groups by choosing Configuration > Remote Access VPN > AAA/Local User > AAA Server Groups > Add. Specify a server group name that can be referenced by the other AAA processes. Select an authentication protocol for this server group name. For example, if you plan to use a RADIUS server for authentication, select RADIUS from the drop-down menu. This option ensures that the security appliance requests the appropriate information from the end users and forwards it to the RADIUS server for authentication and verification.
After enabling RADIUS processing, define a list of the RADIUS servers. The Cisco security appliance checks their availability on a round-robin basis. If a server is available, the security appliance keeps using that server until it fails to receive a response. In this case, it checks the availability of the next server. It is highly recommended that you set up more than one RADIUS server, in case the first server is not reachable. You can define a RADIUS server entry by navigating to Configuration > Remote Access VPN > AAA/Local User > AAA Server Groups and clicking Add under Servers in the Selected Group. You can specify the IP address of the RADIUS server as well as the interface closest to the server. The security appliance authenticates itself to the RADIUS server by using a shared secret key. Figure 20-3 shows the Cisco ASA configured with an AAA server under the server group called Radius. The server is located toward the inside interface at 192.168.1.40. The shared key is C1$c0123 (obfuscated).
Figure 20-3 Defining a RADIUS Server for Authentication
After defining the authentication servers, bind them to the SSL VPN process under a tunnel group. Refer to Figure 20-2 to see that the newly created Radius AAA server group is mapped to the SecureMeAnyConnect tunnel group. Example 20-3 shows how a radius server can be defined. The radius group-name is Radius and it is located toward the inside interface at 192.168.1.40. The shared secret is C1$c0123. The radius server is added to SecureMeAnyConnect
Example 20-3 Defining RADIUS for IPSec Authentication
Tip
For large VPN deployments (both IPsec and SSL VPNs), you can even control user access and policy mapping from an external authentication server. You should pass the user group policy name as a RADIUS or LDAP attribute to the security appliance. By doing so, you guarantee that a user will always get the same policy, regardless of the tunnel group name to which he connects. If you are using RADIUS as the authentication and authorization server, you can specify the user group policy name as attribute 25 (class attribute). Append the keyword OU= as the value of the class attribute. For example, if you define a user group policy called engineering group, you can enable attribute 25 and specify OU=engineering as its value.
AnyConnect VPN Client Configuration Guide
During the early development period of SSL VPNs, network administrators needed a VPN client that had similar benefits of an IPsec remote-access VPN client, but required less administrative overhead than installing and maintaining the IPsec VPN client. To accommodate those requirements, the idea of a full tunnel SSL VPN client emerged. In the pre-version 8.0 releases, Cisco provided the SSL VPN Client (SVC). This is a self-downloading, self-installing, self-configuring, and self-uninstalling VPN that offers all benefits that are currently available in the Cisco IPsec client. However, in 8.0 or later versions of Cisco ASA, Cisco introduced a newer SSL VPN client called “Cisco AnyConnect VPN Client”. The AnyConnect VPN clients leverage the SSL encryption engine that is already present on the client computer. If you currently use the pre-version 8.0 of code on the security appliances and have SVC clients deployed, test the AnyConnect version in a lab environment first before upgrading the code to version 8.0 or higher of the software. Table 20-5 discusses the differences between the SVC and AnyConnect VPN clients. If you decide that the AnyConnect VPN client will be beneficial in your environment, you can plan to upgrade your security appliance to version 8.x of the code.
Table 20-5 Contrasting SVC and AnyConnect

Because versions 8.x of code support only AnyConnect VPN client, we discuss only AnyConnect in this chapter.
Note
If you use 64-bit (x64) platforms, Cisco provides support only through the Cisco AnyConnect VPN Client. Cisco AnyConnect VPN Client supports Windows 7, XP as well as Windows Vista x64 platforms. Cisco currently does not have plans to provide support for 64-bit platforms for the Cisco IPsec VPN Client or even the Cisco SSL VPN Client (SVC).
AnyConnect VPN client can be installed on a user’s computer using one of these two methods:
• Web-enabled mode—In this method, the client is downloaded to a user computer through a browser. The user opens a browser and references the IP address or the FQDN of Cisco ASA to establish an SSL VPN tunnel. The user is presented with the standard SSL VPN logon page and is prompted for credentials. If credentials are valid, users are allowed to log in, and if they are using Internet Explorer, they are prompted to download the client using ActiveX. Otherwise, they are prompted to start it manually through the AnyConnect link. If ActiveX fails, the browser tries to download the client through Java. If either ActiveX or Java is successful, the client is downloaded and installed. After it is installed, it tries to connect to the security appliance and establishes an SSL VPN tunnel.
Note
If you are installing the AnyConnect client on Windows Vista and are running low-rights Internet Explorer, the installation will fail. To fix this issue, users must include the Secure Gateway to the Trusted Zone.
• Standalone mode—In this method, the client is downloaded as a standalone application from a file server or directly from the Cisco Systems website. The Microsoft Software Installer (MSI) is executed to install the client to the workstation. If the client is not preconfigured, the user needs to specify the IP address or FQDN of the security appliance, the tunnel group to connect to, the username, and the associated password.
Note
If you receive the following message, you need to copy MSVCP60.dll and MSVCRT.dll into the system32 directory. Please consult the Microsoft’s article KB259403 for more information.
“The required system DLL filename is not present on the system.”
The configuration of AnyConnect VPN client is a two-step process:
Step 1. Loading the AnyConnect package
Step 2. Defining AnyConnect VPN client attributes
Note
If you have Cisco Security Agent (CSA) installed on the AnyConnect VPN clients, you must import the new CSA policies on the workstations. CSA version 4.5 or higher ships with the AnyConnect policies that are attached to the Remote Desktops and Laptops group. You must select them to prevent the AnyConnect client from failing with CSA version 4.5 because these policies are not enabled by default.
Loading the AnyConnect Package
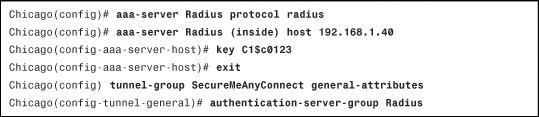
Before you define configuration policies for the AnyConnect VPN client, you have to load the AnyConnect VPN client package in the local flash of the security appliance. You can verify whether it is installed by choosing Configuration > Remote Access VPN > Network (Client) Access > Advanced > SSL VPN > Client Setting. If an AnyConnect VPN client image is not installed, you can click Add to:
• Browse through the local flash of the security appliance and select the AnyConnect file you want to use. As shown in Figure 20-4, anyconnect-win-2.3.0254-k9.pkg is being added from the local flash of the security appliance.
Figure 20-4 Installing the AnyConnect VPN Client Package
• Upload a file from the local computer to the local flash of Cisco ASA. You should check for the latest version of the AnyConnect package file at the Cisco website.
Note
You can upload multiple SSL VPN client packages. The order in which the files are listed reflects the order in which they are presented to a user to be downloaded.
Caution
Do not rename the package files that you download from the Cisco website. If you change the filename, the hash verification that includes the filename fails.
Example 20-4 shows an AnyConnect image, anyconnect-win-2.3.0254-k9.pkg, being installed in the security appliance.
Example 20-4 Enabling AnyConnect SSL VPN
![]()
Defining AnyConnect SSL VPN Client Attributes
After loading the AnyConnect package in the security appliance’s configuration, you can define client parameters such as the IP address that client should receive via ASDM. Before an AnyConnect SSL VPN tunnel is functional, you have to configure the following two required attributes:
• Enabling AnyConnect VPN client functionality
• Defining a pool of addresses
Optionally, you can define other attributes to enhance the functionality of the AnyConnect VPN configuration. They include the following:
• Keeping SSL VPN client installed
• DTLS
All these options are defined in the next sections.
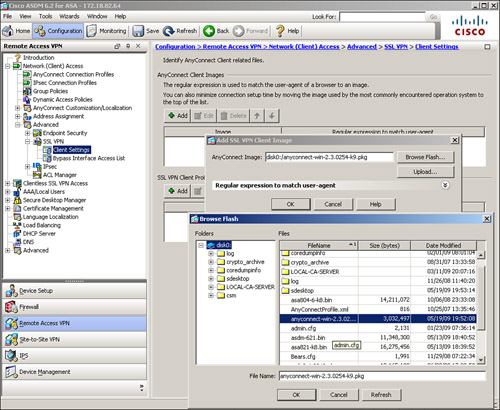
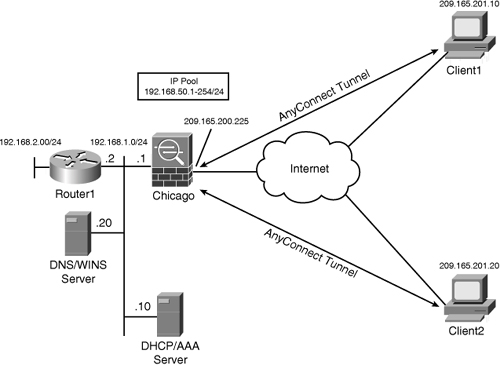
Figure 20-5 is used throughout these sections to demonstrate how to set up Cisco ASA for AnyConnect users. As shown in this figure, the security appliance is set up to accept the SSL VPN connections from hosts on the Internet. On the private network of the security appliance are a number of servers.
Figure 20-5 SSL VPN Network Topology
Table 20-6 provides a description of the servers used in this setup.
Table 20-6 Description and Location of Servers
Enabling AnyConnect VPN Client Functionality
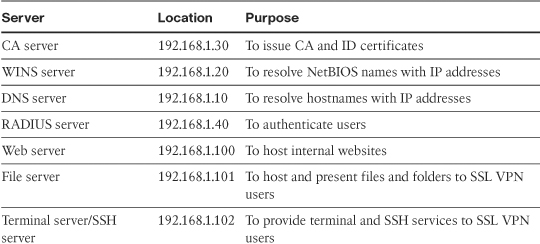
After the AnyConnect VPN client is loaded into flash, the next step is to enable the AnyConnect Client functionality on the interface that terminates the connection. You do so by selecting “Enable Cisco AnyConnect VPN Client or Legacy SSL VPN Client access on the interfaces selected in the table below” in Configuration > Remote Access VPN > Network (Client) Access > AnyConnect Connection Profiles. Select the outside interface if it is the interface that will terminate the SSL VPN connection. This is shown in Figure 20-6. Specify the SSL VPN port that the clients should be using to establish the VPN tunnel. By default, it is TCP port 443 and DTLS UDP port 443. DTLS is discussed later in this chapter.
Figure 20-6 Enabling AnyConnect VPN Client Functionality on an Interface
Example 20-5 shows that AnyConnect functionality is enabled on the outside interface.
Example 20-5 Enabling SSL VPN on the Outside Interface
![]()
The AnyConnect VPN client requires administrative privileges on the client computer when it is installed. When AnyConnect client is launched, no administrative privileges are required subsequently.
Defining a Pool of Addresses
During the SSL VPN tunnel negotiations, an IP address is assigned to the VPN adapter of the AnyConnect VPN client. The client uses this IP address to access resources on the protected side of the tunnel. Cisco ASA supports three different methods to assign an IP address back to the client:
• Local address pool
• DHCP server
• RADIUS server
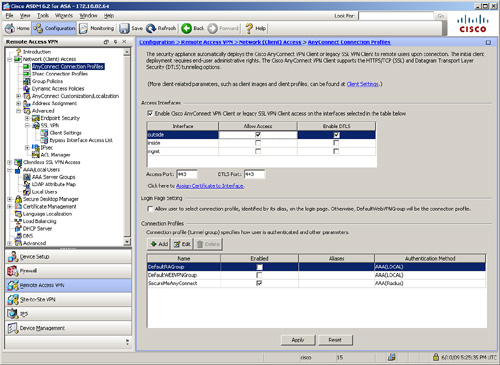
Many organizations prefer assigning an IP address from the local pool of addresses for flexibility. You assign the IP address by configuring an address pool and then linking the pool to a policy group. You can either create a new pool of addresses or select a preconfigured address pool. You can define a new pool of addresses by choosing Configuration > Remote Access VPN > Network (Client) Access > Address Assignment > Address Pools. Click Add and configure the following attributes, as illustrated in Figure 20-7:
Figure 20-7 Defining an Address Pool Using ASDM
• Name—An alphanumeric name to be assigned to this pool. A pool name of SSLVPNPool is assigned.
• Starting IP address—The first IP address to be assigned to a client. A starting IP address of 192.168.50.1 is assigned.
• Ending IP address—The last IP address to be assigned to a client. A starting IP address of 192.168.50.254 is assigned.
• Subnet mask—The associated subnet mask for this pool of addresses. A subnet mask of 255.255.255.0 is configured.
By default, all address assignment methods are allowed. If you want to disable a specific address assignment method, you can do so by navigating to Configuration > Remote Access VPN > Network (Client) Access > Address Assignment > Assignment Policy.
Note
If all three methods are configured for address assignment, Cisco ASA prefers RADIUS over DHCP and internal address pools. If Cisco ASA is not able to get an address from the RADIUS server, it contacts the DHCP server for address allocation. If that method fails as well, Cisco ASA checks the local address pool as the last resort.
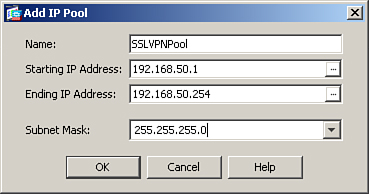
After defining a pool of addresses, map the pool to a user group policy. Choose Configuration > Remote Access VPN > Network (Client) Access > Group Policies > AnyConnectGroupPolicy > Edit. Deselect the Inherit check box under Address Pools and then click Select to choose a predefined pool of addresses. A new window pops up with all the preconfigured address pools. Select the address pool you want to use and click Assign to map the pool to this policy. In Figure 20-8, the SSLVPNPool is assigned to AnyConnectGroupPolicy. Click OK when finished.
Figure 20-8 Mapping an Address Pool to a Group Policy
Example 20-6 shows how to assign an address from a pool called SSLVPNPool, which is mapped to a group policy called AnyConnectGroupPolicy.
Example 20-6 Defining Pool of Addresses

Tip
You can also link a pool of addresses to the tunnel group. However, if a pool is mapped to a group policy and a different pool is mapped to a tunnel group, then the security appliance prefers the pool that is linked to the group policy.
Advanced Full Tunnel Features
After setting up basic full tunnel client parameters, you can configure some of the advanced parameters to enhance the SSL VPN implementation in your network. Some of the important full tunnel features are discussed in the next sections:
• Keeping the SSL VPN client installed
Split Tunneling
After the tunnel is established, the default behavior of the Cisco AnyConnect VPN client is to encrypt traffic to all the destination IP addresses. This means that if an SSL VPN user wants to browse to http://www.cisco.com over the Internet, as illustrated in Figure 20-9, the packets are encrypted and sent to Cisco ASA. After decrypting them, the security appliance looks at its routing table and forwards the packet to the appropriate next-hop IP address in clear text. These steps are reversed when traffic returns from the web server and is destined to the SSL VPN client.
Figure 20-9 Traffic with No Split Tunneling

This behavior might not always be desirable for the following two reasons:
• Traffic destined to the non-secure networks traverses over the Internet twice: once encrypted and once in clear text.
• Cisco ASA handles extra VPN traffic destined to the nonsecure subnet. The security appliance analyzes all traffic leaving and coming from the Internet
With split tunneling, the security appliance can notify the AnyConnect VPN client about the secured subnets. The VPN client, using the secured routes, encrypts only those packets that are destined for the networks behind the security appliance.
Caution
With split tunneling, the remote computer is susceptible to hackers, who can potentially take control over the computer and direct traffic over the tunnel. To mitigate this behavior, a personal firewall is highly recommended on the AnyConnect VPN clients workstations.
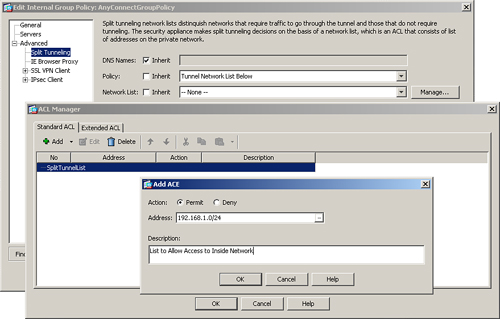
Split tunneling can be configured under a user, user group policy, or default group policy. Choose Configuration > Remote Access VPN > Network (Client) Access > Group Policies > AnyConnectGroupPolicy > Edit > Advanced > Split Tunneling. Under Policy and Network List, deselect the Inherit check box. Select Tunnel Network List Below from the Policy drop-down menu. Additionally select a network list from the drop-down menu. If you would rather define a new network list, click the Manage option. Cisco ASDM launches the ACL Manager and prompts you to define a new list. Under the Standard ACL tab, click Add to add an ACL. In Figure 20-10, a new ACL, called SplitTunnelList, has been added. Select the newly defined list, click Add again under the Standard ACL, and add an ACE. In Figure 20-10, an ACE entry for 192.168.1.0/24 has been added with a description of List to Allow Access to Inside Network.
Figure 20-10 Split Tunneling Configuration
Example 20-7 shows the CLI equivalent of Figure 20-10.
Example 20-7 Split Tunnel Configuration

DNS and WINS Assignment
For the AnyConnect VPN clients, you can assign DNS and WINS server IP addresses so that they can browse and access internal sites after their SSL tunnel is established. You can configure these attributes by choosing Configuration > Remote Access VPN > Network (Client) Access > Group Policies > AnyConnectGroupPolicy > Edit > Servers. To add multiple DNS or WINS servers, use a comma (,) to separate the entries. In Figure 20-11, the primary DNS server is defined as 192.168.1.10 and the secondary DNS server is 192.168.1.20. The primary WINS server is 192.168.1.20, and the secondary WINS server is 192.168.1.10. The default domain name to be pushed to the AnyConnect VPN client is securemeinc.com.
Figure 20-11 Defining DNS and WINS Servers for AnyConnect VPN clients

Example 20-8 shows the CLI equivalent of Figure 20-11.
Example 20-8 Defining DNS and WINS Servers for IPSec VPN Clients

Keeping the SSL VPN Client Installed
After the AnyConnect client is successfully installed, the security appliance, by default, keeps the client installed on the computer, even if the tunnel is disconnected. You should keep this option enabled so that users do not need to go through the process of installing the client. Additionally, the initial AnyConnect Client installation requires administrative rights. If you do not allow your end users to have administrative privileges, keep the client installed on the workstation. If you want to uninstall the client after the user disconnects the SSL VPN tunnel, navigate to Configuration > Remote Access VPN > Network (Client) Access > Group Policies > AnyConnectGroupPolicy > Edit > Advanced > SSL VPN Client, deselect the Keep Installer on Client System option, and select No.
Example 20-9 shows how you can uninstall the client after the user disconnects the SSL VPN tunnel through the CLI.
Example 20-9 Uninstalling AnyConnect Client After Session Disconnects

Configuring DTLS
Datagram Transport Layer Security (DTLS), defined in RFC 4347, provides security and privacy for UDP packets. This allows UDP-based applications to send and receive traffic in a secure fashion without worrying about packet tampering and message forgery. Thus, applications that do not want to be associated with the delays associated with TCP but still want to communicate securely can use DTLS.
Cisco AnyConnect Client supports both SSL as well as DTLS transport protocols. DTLS is enabled, by default, on the security appliance. If it is enabled and UDP is blocked or filtered, communication between the client and the security appliance reverts to the SSL protocol.
You can disable or re-enable DTLS by choosing Configuration > Remote Access VPN > Network (Client) Access > Group Policies > AnyConnectGroupPolicy > Edit > Advanced > SSL VPN Client, deselecting the Inherit box for the Datagram TLS option, and selecting Enable or Disable.
Note
If the security appliance is set up to use RC4-MD5 encryption, the AnyConnect client fails to establish a DTLS tunnel. You can use any other encryption type.
Example 20-10 shows how you to disable DTLS for the AnyConnectGroupPolicy group policy, using the CLI.
Example 20-10 Uninstalling AnyConnect Client After Session Disconnects

Configuring Traffic Filters
In its default firewall role, the Cisco ASA allows decrypted traffic to pass through. This is extremely useful if you trust all your remote AnyConnect VPN clients. Cisco ASA permits all decrypted SSL VPN packets to pass through it without inspecting them against the configured ACL.
You can change this default behavior if you want the outside interface ACL to inspect the IPSec-protected traffic by navigating to Configuration > Remote Access VPN > Network (Client) Access > Advanced > SSL VPN > Bypass Interface Access List and deselecting the Enable Inbound IPSec Sessions to Bypass Interface Access-Lists option. If you prefer to use the CLI, issue the no sysopt connection permit-vpn command and define appropriate ACLs to allow VPN traffic to pass through. Example 20-11 shows that only the Telnet traffic from the VPN pool of addresses (192.168.50.0/24) to an inside host located at 192.168.1.10 is allowed to pass through the security appliance.
Example 20-11 Disabling Sysopt and Configuring ACLs

If you do not want to disable the sysopt connection permit-vpn and still want to filter VPN traffic for a specific user or group policy, you can define an access list to allow or deny specific traffic and map that access list to a user or group policy.
If you prefer to use ASDM, choose Configuration > Remote Access VPN > Network (Client) Access > Group Policies > AnyConnectGroupPolicy > Edit > General > More Options, deselect the Inherit box for the IPv4 Filter option, and select an ACL from the drop-down menu.
Example 20-12 shows that only the Telnet traffic from the VPN pool of addresses (192.168.50.0/24) to an inside host located at 192.168.1.10 is allowed to pass through the AnyConnectGroupPolicy.
Example 20-12 Filtering SSL VPN Traffic

AnyConnect Client Configuration
The AnyConnect client must be configured so that it can be connected to the correct security appliance. You do so by defining a client profile and then loading the profile on the client machine.
Creating AnyConnect Client Profile
These configuration settings are stored in the form of user profiles that are automatically delivered to a client machine during connection setup. Some of the things you want to define in the user profile include the following:
• The hostname or the IP address of the security appliance
• Any backup security appliances
• The tunnel group name to which you want to connect
• The username that you want to use for authentication
A user profile is stored locally on the AnyConnect client in an XML file. The name of the file is AnyConnectProfile.xml, and it can be found at the following locations, depending on the operating system.
For Windows-based clients, excluding Vista:
C:Documents and SettingsAll UsersApplication DataCiscoCisco AnyConnect VPN ClientProfile
For Windows Vista–based clients:
C:ProgramDataCiscoCisco AnyConnect VPN ClientProfile
For MAC OS X and Linux, the path is as follows
/opt/cisco/vpn/profile
There are two ways to create/modify the AnyConnectProfile.xml file:
Manual Method
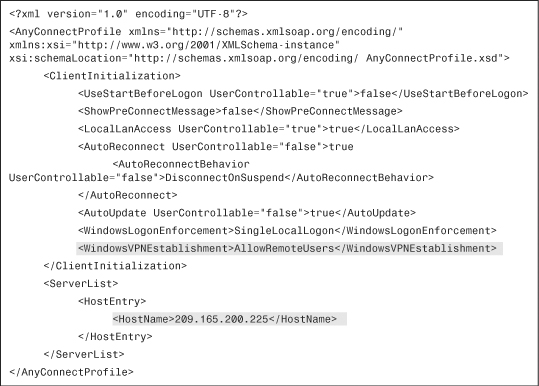
Using the manual method, you can create or modify the AnyConnectProfile.xml file by using any XML Editor such as XML Notepad or Arbortext. Example 20-13 shows the output of an AnyConnectProfile.xml file. The IP address of the headend security appliance is defined as 209.165.200.225 and the remote users are allowed to log in to the workstations to launch the AnyConnect client.
Example 20-13 Output of AnyConnectProfile.xml File
Note
When the AnyConnect client is installed, it also copies a profile template named as AnyConnectProfile.tmpl. You can use this template to create the AnyConnectProfile.xml file.
Note
In AnyConnect version 2.3, Cisco introduced the support to allow remote users to log in to a workstation via Windows Remote Desktop. You can now create a VPN connection to a secure gateway from within the Remote Desktop (RDP) session. However, this feature requires that you enable split tunneling on the security appliance.
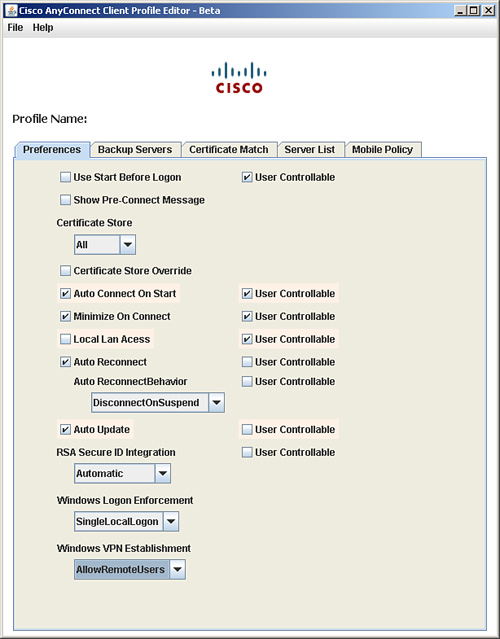
Profile Editor
A better approach is to use the Profile Editor. It is a Java-based application, developed by Cisco Systems, that enables you to create and modify the Cisco AnyConnect Profile. You can download this file from Cisco.com by searching for AnyConnectProfileEditor. In Figure 20-12, a profile editor is being used to define a new profile. This file must be saved with the .xml extension.
Figure 20-12 AnyConnect Profile Editor
Tip
A number of tools can be used to validate the output of an XML file. If you create or modify an AnyConnect profile and want to verify the syntax of your XML file, you can validate the file by going to http://tools.decisionsoft.com/schemaValidate/.
This site prompts you to upload you XML profile (AnyConnectProfile.xml) and the schema (AnyConnectProfile.xsd) and produce a report with any found errors. The AnyConnect profile schema file is located in the same directory as the AnyConnectProfile.xml file.
Note
For a complete list of all the parameters that can be enabled through Profile Editor, consult the AnyConnect Client Administrator Guide and refer to section “Sample AnyConnect Profile and XML Schema”:
http://www.cisco.com/en/US/partner/products/ps8411/prod_maintenance_guides_list.html
Loading AnyConnect Profile into Cisco ASA
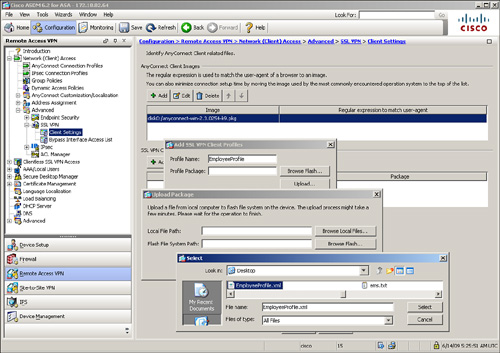
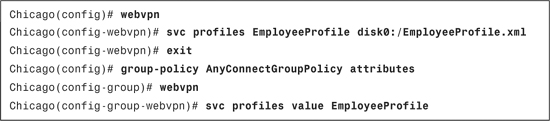
After a profile has been created, the next step is to import it into the security appliance and apply it to the users. Navigate to Configuration > Remote Access VPN > Network (Client) Access > Advanced > SSL VPN > Client Settings and select Add under SSL VPN Client Profiles. Click Upload and select the XML file from your computer. Specify a profile name and start the process of uploading the XML file to the security appliance. In Figure 20-13, a profile named EmployeeProfile.xml is being imported into the security appliance as EmployeeProfile.
Figure 20-13 AnyConnect Profile Editor
After loading the client profile to the security appliance, the next step is to apply the profile to the appropriate group policy. This way, any user connecting to the tunnel group that has the group policy with the profile mapped can receive the updated client policy. Navigate to Configuration > Remote Access VPN > Network (Client) Access > Group Policies > AnyConnectGroupPolicy > Edit > Advanced > SSL VPN Client, deselect the Inherit check box next to Client Profile to Download, and select EmployeeProfile that was defined earlier.
Example 20-14 shows a client profile called EmployeeProfile is loaded from the local flash. It is being applied to a group policy called AnyConnectGroupPolicy.
Example 20-14 Loading and Applying Client Profile
Connecting from AnyConnect Client
As mentioned earlier in this chapter, there are two ways (web-enabled and standalone) to install the AnyConnect Client to a computer. In the web-enabled mode, the VPN client is downloaded from the security appliance. After it is downloaded, the client connects to the security appliance. For our configuration example, use the web-enabled mode to connect to the appliance, launch a web browser, and navigate to https://sslvpn.securemeinc.com/sslvpnclient.
In standalone mode, the client is downloaded as a standalone application. If the client is not preconfigured, the user needs to specify the IP address or FQDN of the security appliance, the tunnel group to connect to, the username, and the associated password.
Deployment Scenario of AnyConnect Client
The Cisco SSL VPN solution is useful in deployments where remote and home users need access to corporate networks and administrators want to control their access based on a number of attributes. The SSL VPN solution can be deployed in many ways; however, we discuss one design scenario for ease of understanding
Note
The design scenario discussed in this chapter should be used solely to reinforce learning.
SecureMe has recently learned about the SSL VPN functionality in Cisco ASA and wants to deploy it for a number of remote employees in Chicago. These employees need full access to the internal network without restriction to complete their tasks if they meet criteria defined by the administrator.
Figure 20-14 shows SecureMe’s network topology for AnyConnect Client.
Figure 20-14 SecureMe’s SSL VPN for AnyConnect Clients
SecureMe’s security requirements are as follows:
• Allow full access to the internal network when a user machine is deemed a corporate asset.
• Use a RADIUS server as the external database for user lookup.
• Apply appropriate policies on users based on their user authentication.
• Encrypt all traffic from the client to the security appliance.
• Provide Internet access to remote users via the security appliance.
To achieve SecureMe’s requirements, the administrator has proposed that the security appliance use CSD and collect information from the remote workstation. If workstations have a registry key of HKLMSYSTEMCurrentControlSetControlCorp and their IP addresses do not fall within the corporate network range, they are declared “CorpOwnedHomeMachine”. Users will be prompted for credentials, and those credentials will be checked against the RADIUS database. If users are successfully authenticated, they will be allowed to establish an SSL VPN tunnel through the AnyConnect Client. After an AnyConnect Client is loaded on the workstation, it should remain installed. On the security appliance, address translation rules need to be configured to provide Internet access to the AnyConnect VPN users.
The steps to implement the proposed solution are as follows:
Step 1. Set up CSD for registry check
Step 2. Set up RADIUS for authentication
Step 3. Configure AnyConnect SSL VPN
Step 4. Enable address translation for internet access
The following sections cover these steps in detail.
Step 1: Set Up CSD For Registry Check
The first step in achieving the listed goals is to create a secure environment for remote users. You do so by following these steps:
Step 1. Choose Configuration > Remote Access VPN > Secure Desktop Manager > Setup, click Browse Flash to select the CSD file you want to use, and select Enable Secure Desktop.
Step 2. Choose Configuration > Remote Access VPN > Secure Desktop Manager > Prelogin Policy and define a prelogin sequence based on registry key and IP address range. Create a new Windows location called CorpOwnedHomeMachines that has a registry key check of HKLMSYSTEMCurrentControlSetControlCorp and an address check where the address should not fall in the 209.165.200.224/27 subnet.
Step 3. Choose Configuration > Remote Access VPN > Secure Desktop Manager > CorpOwnedHomeMachines and deselect the Secure Desktop and the Cache Cleaner option.
Step 2: Set Up RADIUS for Authentication
The second step is to set up a RADIUS server for user authentication. Do so by following these guidelines:
Step 1. Choose Configuration > Remote Access VPN > AAA/Local Users > AAA Server Groups > Add. Specify the server group called RADIUS and select RADIUS from the drop-down menu. Click OK when finished.
Step 2. Click the newly created server group, and under Servers in the Selected Groups, click Add. Under Interface Name, select inside from the drop-down menu and specify 192.168.1.10 as the IP address of the RADIUS server. Configure a Server Secret Key of SecureMe123 and click OK when finished.
Step 3: Configure AnyConnect SSL VPN
The third step needed to meet the listed requirements is to configure AnyConnect VPN client on the security appliance for remote users. Follow these guidelines to achieve the goals:
Step 1. Choose Configuration > Remote Access VPN > Network (Client) Access > Advanced > SSL VPN > Client Settings > Add. Click Browse Files, select a AnyConnect VPN client, and click OK.
Step 2. After loading the AnyConnect Client, enable full tunnel client functionality on the outside interface. This is achieved by selecting the Enable Cisco AnyConnect VPN Client or Legacy SSL VPN Client Access on the Interfaces Selected in the Table Below option under Configuration > Remote Access VPN > Network (Client) Access > AnyConnect Connection Profiles on the outside interface. Make sure that the Allow Access check box is selected for the outside interface. Also select the Enable DTLS option.
Step 3. Choose Configuration > Remote Access VPN > Network (Client) Access > Address Assignment > Address Pools > Add. Under Name, specify SSLVPNPool and configure 192.168.50.1 through 192.168.50.254 as the pool of addresses and a mask of 255.255.255.0.
Step 4. Choose Configuration > Remote Access VPN > Network (Client) Access > Group Policies > Add. Specify AnyConnectGroupPolicy as the group policy name. Under Address Pools, deselect the Inherit check box and select SSLVPNPool.
Step 5. Click the option for Advanced > Split Tunneling in the left pane. Under Policy, deselect the Inherit check box and select Tunnel All Networks.
Step 6. Click the Servers option in the left pane and configure 192.168.1.20 as the WINS and DNS server addresses.
Step 7. Click the Advanced > SSL VPN Client option in the left pane and make sure that Keep Installer on Client System option is enabled and set to Yes. Click OK when you are finished.
Step 8. Create a new tunnel group by choosing Configuration > Remote Access VPN > Network (Client) Access > AnyConnect Connection Profiles. Under Connection Profiles, click Add and specify SecureMeAnyConnect as the tunnel group name. Select RADIUS under AAA Server Group and select AnyConnectGroupPolicy under Default Group Policy. Make sure that the SSL VPN Client Protocol check box is selected.
Step 9. Click the Advanced > SSL VPN option in the left pane. Under Group URL, click Add and specify https://sslvpn.securemeinc.com/sslvpnclient. Verify that the Enable check box is selected. Click OK to exit.
Step 4: Enable Address Translation for Internet Access
The final step is to define address translation. The AnyConnect clients send all encrypted data to the security appliance. For the AnyConnect clients to access the Internet, you must define address translation rules for the pool of addresses handed out to the clients. You do so by following these guidelines:
Step 1. Choose Configuration > Device Setup > Interfaces and select Enable Traffic Between Two or More Hosts Connected to the Same Interface.
Step 2. Choose Configuration > Firewall > NAT Rules > Add > Add Dynamic NAT Rules. Under the Translated section, click Manage > Add and configure the following policy for the Global Address Pool:
• Interface: outside
• Pool ID: 1
• IP Address to Add: Port Address Translation (PAT), using IP address of the interface. Click Add>> and then OK when done.
Step 3. Configure the following NAT Access Rule under the Original section:
• Interface: outside
• Source: 192.168.50.0/24
• Translated Global Pool ID: 1. Click OK when done.
You can now connect to the ASA, using the following URL in your browser: https://sslvpn.securemeinc.com/sslvpnclient.
Monitoring and Troubleshooting AnyConnect SSL VPNs
The following sections discuss the monitoring and troubleshooting steps that are available to help you in running the SSL VPN solution smoothly on a security appliance.
Monitoring SSL VPN
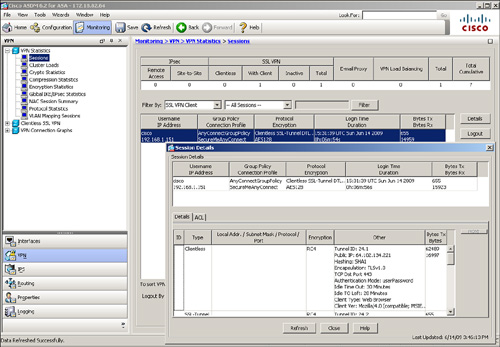
To monitor the WebVPN sessions, first check how many active SSL VPN tunnels are established on the security appliance. You can do this by choosing Monitoring > VPN > VPN Statistics > Sessions. The security appliance shows you all the active VPN sessions, including the clientless and full tunnel client connections. As shown in Figure 20-15, an active AnyConnect connection is created by a user called cisco. The user computer’s assigned IP address is 192.168.1.151, and the negotiated encryption type is RC4. The security appliance has received 15,923 bytes of traffic, whereas it has transmitted 655 bytes of data to the client. The user is connected for almost seven minutes. Should you prefer to get detailed information about a user’s connection, select that specific user session and then click the Details button.
Figure 20-15 Monitoring SSL VPN Sessions Through ASDM
Troubleshooting SSL VPN
Cisco ASA provides a number of troubleshooting and diagnostic commands for SSL VPNs. The following sections focus on two troubleshooting scenarios related to SSL VPN.
Troubleshooting SSL Negotiations
If you have a user who is not able to connect to the security appliance using SSL, you can follow these steps to isolate the SSL negotiation issues:
Step 1. Verify that the user’s computer can ping the security appliance’s outside IP address.
Step 2. If the user’s workstation can ping the address, issue the show running all | include ssl command on the security appliance and verify that SSL encryption is configured.
Step 3. If SSL encryption is properly configured, use an external sniffer to verify whether the TCP three-way handshake is successful.
Note
AnyConnect clients will fail to establish connection if the security appliances are configured to accept connection with SSL Server version v3. You must use TLSv1 for AnyConnect clients. Navigate to Configuration > Remote Access VPN > Advanced > SSL Settings to specify the SSL encryption type and version that you want to use.
Troubleshooting AnyConnect Client Issues
The following sections provide guidelines on troubleshooting the commonly seen AnyConnect VPN client issues and cover troubleshooting two issues.
Initial Connectivity Issues
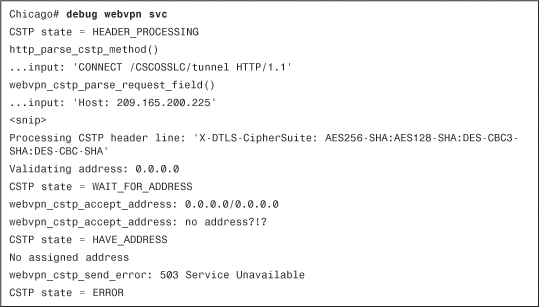
If you are using AnyConnect VPN client in your environment and a user is having initial connectivity issues, enable debug webvpn svc on the security appliance and analyze the debug messages. You can fix most of the configuration-specific issues easily by looking at the error messages. For example, if your security appliance is not configured to assign an IP address, you receive a “No assigned address” error message in the debugs. This is highlighted in Example 20-15.
Example 20-15 debug webvpn svc Command
Optionally, you can enable an SVC-specific syslog on the security appliance and look at the messages. For example, if the security appliance does not assign an IP address to an AnyConnect client, you should see the “No address available for SVC connection” message, as shown in Example 20-16.

Additionally, you can look at the AnyConnect VPN client logs in Windows Event Viewer. Choose Start > Settings > Control Panel > Administrative Tools > Event Viewer > Cisco AnyConnect VPN client and review the logs. If an address is not being assigned, you should see an error message.
Traffic-Specific Issues
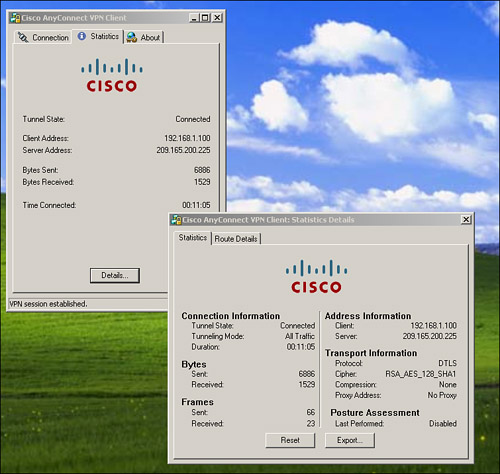
If you are able to connect but fail to successfully send traffic over the SSL VPN tunnel, look at the traffic statistics on the client to verify that traffic is being received and transmitted by the client. As illustrated in Figure 20-16, the client has encrypted 6886 bytes and decrypted 1529 bytes. Therefore, as far as the client is concerned, it is transmitting and receiving traffic.
Figure 20-16 Monitoring SSL VPN Traffic Statistics on AnyConnect VPN Client
Next, check the security appliance for received and transmitted traffic, as shown previously in Figure 20-15. If the security appliance applies a filter, the filter name is shown and you can look at the ACL entries to check whether your traffic is being dropped.
Note
If you are using a MAC AnyConnect VPN client, the logs are stored at /var/log/system.log.
If you are troubleshooting AnyConnect VPN client issues, the logs are stored at ~/Library/Logs/CrashReporter/Cisco AnyConnect VPN Client.crash.log.
Summary
This chapter provided details about the AnyConnect SSL VPN functionality in Cisco ASA. Using the robust features available in Cisco ASA SSL VPN remote access, security administrators can deploy Cisco ASA in almost any network topology. The chapter also focused on using the AnyConnect profile editor to show how a client profile can be defined. To reinforce learning, a deployment scenario was presented, along with configurations. This chapter covered extensive show and debug commands to assist in troubleshooting complicated AnyConnect VPN deployments.