Chapter 15. Monitoring and Troubleshooting the Cisco Content Security and Control Security Services Module
In Chapter 14, you learned how to configure the Content Security and Control Security Services Module (CSC SSM). This chapter covers the monitoring and troubleshooting of the CSC SSM, as well as other administrative tasks.
Monitoring the CSC SSM
The Adaptive Security Device Manager (ASDM) enables you to view CSC SSM high-level device information by selecting the Content Security tab within the ASDM Home screen. The Content Security tab is illustrated in Figure 15-1.
Figure 15-1 ASDM CSC SSM Device Information

The Content Security tab provides the following details:
• Model—In this example the CSC SSM model is ASA-SSM-CSC-10.
• Mgmt IP—This is the IP address of the management interface (192.168.3.2 is used in this example).
• Version—Displays the CSC SSM software version. The CSC SSM is running version 6.3.1172.0 in this example.
• Daily Node #—Number of devices for which the CSC SSM provided services within the last 24 hours (this number is updated every day at midnight).
• Last Update—The date of the last software update downloaded from Trend Micro.
• Base License—Displays the base license expiration date.
• Plus License—Displays the plus license expiration date (if the plus license has been purchased).
• Licensed Nodes—Displays the maximum number of devices that are supported by the license installed in the system.
• System Resources Status—Displays CSC SSM CPU and memory utilization statistics.
• Threat Summary—Displays virus, spyware, URL blocked, URL filtered, and spam statistics for the present day, last 7 days, and last 30 days.
• Email Scan—Displays a graph illustrating statistics of scanned emails and the email viruses and spyware detected.
• Latest CSC Security Events—Displays (in real time) security event messages generated by the CSC SSM.
The information included in the Content Security provides a high-level overview of the traffic and events in the CSC SSM. The following sections describe more advanced CSC SSM monitoring features and techniques.
Detailed Live Event Monitoring
You can access a more detailed report of real-time CSC SSM security events in ASDM by navigating to Monitoring > Trend Micro Content Security > Live Security Events. The Buffer Limit field shows the maximum number of log messages that will be stored in the buffer. The default is 1000; however, the buffer limit can be any number from 100 to 2000.
To view live security events messages that are received from the CSC SSM, click View and complete the following steps:
Step 1. After you click on View, the Live Log dialog box is displayed.
The Live Log dialog box has the following display-only columns:
• Time—The time an event occurred.
• Source—The IP address or host of the source that triggered such event.
• Threat/Filter—The type of threat or URL filtering event that triggered the event.
• Subject/File/URL—The subject of emails that include a threat, the names of FTP files that contain a threat, or blocked/filtered URLs.
• Receiver/Host—The email address or host recipient of malicious emails.
• Sender—The sender of emails that include a threat.
• Content Action—The action taken upon the content of a message.
• Msg Action—The action taken on a message.
Step 2. You can filter messages by using the Filter By drop-down list. The following options are available:
• Show All—Displays all messages.
• Filter by Text—Allows you to filter messages based on text that you enter.
Step 3. Click Filter to filter event messages based on the selected criteria.
Step 4. You can also search event messages by using the Find field and clicking Find Messages.
Step 5. Click Pause to pause the scrolling of live events.
Step 6. Click Save to save the log to a text file.
Step 7. Click Clear Display to clear the list of events.
Configuring Syslog
Similar to any other networking device, the memory space on the CSC SSM is limited; therefore, it is recommended that you configure the CSC SSM to send security event messages to a syslog server. Complete the following steps to configure the CSC SSM to send security event messages to a syslog server:
Step 1. Log in to the Trend Micro InterScan for CSC SSM web management console and navigate to Logs > Settings. The screen shown in Figure 15-2 is displayed.
Figure 15-2 Configuring Syslog

Step 2. Check the Enable check box for each syslog server to be configured. In this example, the syslog server IP address is 172.18.104.111.
Step 3. Configure the port number that is used to communicate to the syslog server under the Port Number column. The default port (514) is configured in this example.
Step 4. Select the protocol to be used under the Protocol pull-down menu. The UDP protocol is used in this example.
Step 5. Select the syslog facility under the Syslog facility pull-down menu (local3 is used in this example). The syslog facility is an identifier in the range local0 to local7 for the purpose of identifying the CSC SSM when sending messages to the syslog server.
Step 6. Select the features for which you want events to be sent to the syslog server under the Save Following Logs section.
Note
Debug logs generate very detailed information about traffic and other events in the CSC SSM. It is recommended that you enable debug logs only when troubleshooting a specific problem and not during normal operation. Debug logs are covered later in this chapter.
Step 7. Click Save to save the configuration.
Note
For detailed information about the CSC SSM-related system log messages, refer to the Cisco Content Security and Control SSM Administrator Guide at the following link:
http://www.cisco.com/en/US/products/ps6120/products_installation_and_configuration_guides_list.html.
Troubleshooting the CSC SSM
This section covers several tips and methodologies that can be used to troubleshoot CSC SSM problems.
Re-Imaging the CSC SSM
In very rare occasions, you may encounter a problem where you need to install the CSC SSM software via the Cisco ASA command-line interface (CLI). This may be because of a software corruption or hardware replacement after a failure. Complete the following steps to install the CSC SSM software via the Cisco ASA CLI:
Step 1. Enter the hw-module module 1 recover configure command, as shown in the following example:

Step 2. Enter the TFTP server URL at the Image URL [tftp://0.0.0.0/]: prompt. The URL used in this example is tftp://172.18.108.26/csc-software.bin.
Step 3. Enter the IP address to be assigned to the CSC SSM management interface at the Port IP Address [0.0.0.0]: prompt (172.18.104.123 is used in this example).
Step 4. Enter the VLAN ID at the VLAN ID [0]: prompt. VLAN 10 is used in this example.
Step 5. Enter the IP address of the gateway at the Gateway IP Address [0.0.0.0]: prompt. 172.18.104.1 is the gateway IP address in this example.
Step 6. Use the hw-module module 1 recover boot command to start the software recovery, as shown in the following example:
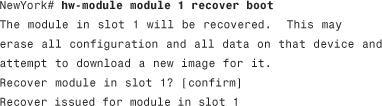
Step 7. After about a minute, the CSC SSM goes into the ROMMON mode, and prints messages similar to the following
![]()
Step 8. The software is downloaded from the TFTP server and installed into the CSC SSM.
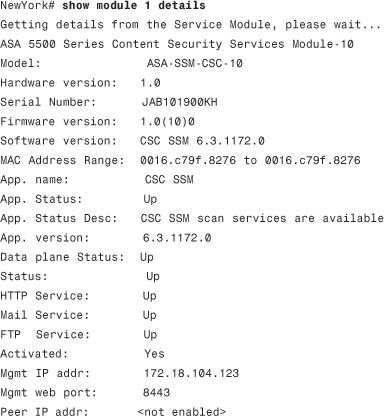
Step 9. To verify that the installation is successful, use the Cisco ASA show module command, as shown in the following example:

In this example, the Cisco ASA has a CSC SSM model ASA-SSM-CSC-10 installed. The output of this command also shows the software version of the CSC SSM. The software version installed in the CSC SSM in this example is 6.3.1172.0. The CSC SSM status is displayed at the end of the output of the show module command. The show module 1 details command displays more detailed information, as shown in the following example:
Password Recovery
There are two passwords used to manage the CSC SSM: the ASDM/Web interface password and the root account password. The default entry for both passwords is the word cisco.
Caution
Use the root account only under the supervision of Cisco TAC. Unauthorized modifications made through the root account are not supported and require that the device be reimaged to guarantee correct operation.
If you have lost the root account password, but still have the ASDM/Web interface/CLI password, you can continue to manage the CSC SSM via the web interface. On the other hand, if all passwords are lost, the CSC SSM must be reimaged, unless you have configured the password-reset policy to Allowed.
Complete the following steps to change the password-reset policy:
Step 1. Use the session <module number> command from the Cisco ASA CLI to access the CSC SSM CLI menu, as shown in the following example:

Log in with administrator credentials to access the Trend Micro InterScan for Cisco CSC SSM Setup Main Menu.
Step 2. Select Password Management (number 5). The following menu is displayed:

Step 3. To modify the password reset policy, select Modify Password-reset Policy (number 2). The Modify Password-reset Policy options are displayed, as shown in the following example:

In this example, the current CSC SSM password-reset policy is already set to Allowed; to change to Denied type y at the Do You Want to Modify the CSC SSM Password-Reset Policy Now? [y|n] prompt. Leaving the password-reset policy to Allowed compromises the security of the CSC SSM because you can reset the CSC SSM password through the ASDM without verifying the old password. Under this setting, you can reset the password, even if the current password has been lost.
Configuration Backup
Backing up your configuration is a best practice that you should always follow. The CSC SSM allows you to back up your configuration to a file. The following information is saved when you back up your configuration:
• Selected scanning method for SMTP, POP3, HTTP, and FTP protocols and the actions to take when a threat is detected
• Compressed and large file handling
• Whether you want to scan for spyware and other malicious software
• Anti-spam filter threshold settings
• Approved and blocked senders
• Message size limitations
• Content filtering criteria
• Email reputation and Web reputation (filter level, and action)
• File blocking rules
• URL blocking and filtering criteria
• Scheduled update settings
• Proxy settings
• Syslog settings
• Connection settings
• Device failover settings
• Notification settings
• System time settings
• System patch status
• Licensing information and status
• Domain Controller Agent and Domain Controller Server information
• User and group information
Complete the following steps to back up your configuration:
Step 1. Log in to the Trend Micro InterScan for CSC SSM web management console and navigate to Administration > Configuration Backup.
Step 2. To back up the configuration, click the Export button under the Export InterScan SSM Settings into the Configuration File section. After you click the Export button, the configuration parameters are built into a compressed file. The default name of the configuration file is config.tgz; however, you can rename this file to any other filename while keeping the .tgz extension.
Note
To import the backup configuration file, log in to the Trend Micro InterScan for CSC SSM web management console and navigate to Administration > Configuration Backup. Then click the Browse button under the Import InterScan SSM Configuration File section. A standard file browsing dialog box opens, which enables you to search for and select the configuration file to be imported. When you locate the file in the dialog box, click Open. Then click Import.
Upgrading the CSC SSM Software
Follow these steps to upgrade the Trend Micro InterScan for Cisco CSC SSM as new software becomes available:
Step 1. Download the new image to your local workstation.
Step 2. Log in to the Trend Micro InterScan for CSC SSM web management console and navigate to Administration > Product Upgrade.
Step 3. Click Browse to locate the upgrade files on your local drive. A standard file browsing dialog box opens, which enables you to search for and select the configuration file to be imported. When you locate the file in the dialog box, click Open and then click Upload.
Note
The Installed Patches table shows the last version updates that have taken place in the system.
CLI Troubleshooting Tools
Earlier in this chapter, in the “Password Recovery” section, you learned how to log in to the CSC SSM CLI, using the Cisco ASA session command. The CSC SSM CLI has several troubleshooting tools that can be useful when trying to determine the root cause of certain problems you may encounter. When you log in to the CSC SSM CLI and select Troubleshooting Tools from the Trend Micro InterScan for Cisco CSC SSM Setup Main Menu, the options shown in Example 15-1 are displayed.
Example 15-1 CSC SSM CLI Troubleshooting Tools

To enable the root account, select Enable Root Account (number 1).
Caution
Use the root account only under the supervision of Cisco TAC. Unauthorized modifications made through the root account are not supported and require that the device be reimaged to guarantee correct operation.
Select Show System Information (number 2) to display detailed system information, as shown in Example 15-2.
Example 15-2 Troubleshooting Tools—Show System Information


The output of the Show System Information in Example 15-2 displays detailed system information, such as the following:
• General product information
• Scan engine and pattern information
• Kernel details
• System disk details
• Detailed file listing
• Detailed memory usage and information
• Detailed system process information
• Hardware details
• Ethernet interface information
• Connection information
• Routing table
• Routing cache
• Failover status
The output of Show System Information can also be compiled into a text file. This output or file can be very useful while troubleshooting problems with the assistance of the Cisco TAC.
To gather and create a temporary file with all log entries in the CSC SSM, select Gather Logs under the Troubleshooting Tools menu, as shown in Example 15-3.
Example 15-3 Troubleshooting Tools—Gather Logs
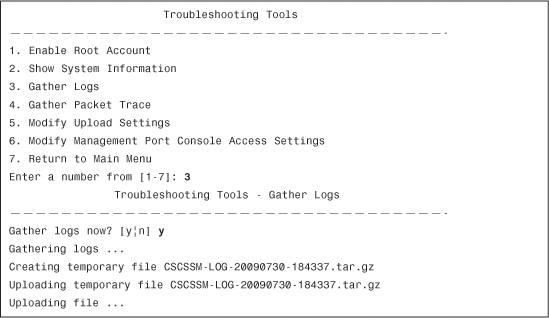
In Example 15-3, a temporary file named CSCSSM-LOG-20090730-184337.tar.gz is created and uploaded to a preconfigured FTP or TFTP server. To configure the FTP or TFTP server information, select Modify Upload Settings. Your FTP or TFTP server must be set up to enable uploading. When you enter 5 (Modify Upload Settings), the following prompts appear:
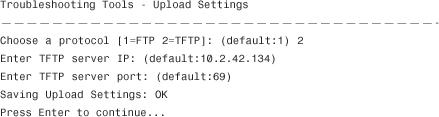
Respond to the prompts to configure the upload settings. The settings are saved for future use. When you are finished, enter 7, Return to Main Menu.
Note
The Gather Packet Trace function is now obsolete. Please use the capture command in the Cisco ASA CLI for the asa_dataplane interface. The configuration of the capture command is covered is Chapter 3, “System Maintenance.”
To modify management port console access settings, select the Modify Management Port Console Access Settings option. The output of the Troubleshooting Tools—Management Port Console Access Settings menu is shown in Example 15-4.
Example 15-4 Troubleshooting Tools—Management Port Console Access Settings

Select 1 to enable the respective management protocol, at each prompt, or 2 to disable it.
Summary
This chapter covered information about monitoring your CSC SSM to enable you to detect and take action on viruses, worms, Trojans, and other security threats. Additionally, different troubleshooting tips and administrative tasks were covered.