Chapter 6. Authentication, Authorization, and Accounting (AAA)
This chapter provides a detailed explanation of the configuration and troubleshooting of authentication, authorization, and accounting (AAA) network security services that Cisco ASA supports. AAA offers different solutions that provide access control to network devices. The following services are included within its modular architectural framework:
• Authentication—The process of validating users based on their identity and predetermined credentials, such as passwords and other mechanisms like digital certificates.
• Authorization—The method by which a network device assembles a set of attributes that regulates what tasks the user is authorized to perform. These attributes are measured against a user database. The results are returned to the network device to determine the user’s qualifications and restrictions. This database can be located locally on Cisco ASA or it can be hosted on a RADIUS or Terminal Access Controller Access-Control System Plus (TACACS+) server.
• Accounting—The process of gathering and sending user information to an AAA server used to track login times (when the user logged in and logged off) and the services that users access. This information can be used for billing, auditing, and reporting purposes.
AAA Protocols and Services Supported by Cisco ASA
Cisco ASA can be configured to maintain a local user database or to use an external server for authentication. The following are the AAA authentication underlying protocols and servers that are supported as external database repositories:
• RADIUS
• TACACS+
• Kerberos
• Lightweight Directory Access Protocol (LDAP)
Table 6-1 shows the different methods and the functionality that each protocol supports.

Using an external authentication server in medium and large deployments is recommended, for better scalability and easier management.
Cisco ASA supports the authentication methods listed in Table 6-1 with the following services:
• Virtual private network (VPN) user authentication
• Administrative session authentication
• Firewall session authentication (cut-through proxy)
Table 6-2 outlines the support for the authentication methods in correlation to the specific services.
Table 6-2 Authentication Support Services

Cisco ASA VPN user authentication support is similar to the support provided on the Cisco VPN 3000 Series Concentrator.
As previously mentioned, the authorization mechanism assembles a set of attributes that describes what the user is allowed to do within the network or service. Cisco ASA supports local and external authorization, depending on the service used. Table 6-3 shows the authorization support matrix.
Table 6-3 Authorization Support

Note
Local authorization for administrative sessions can be used only for command authorization.
Cisco ASA does not support RADIUS command authorization for administrative sessions because of limitations in the RADIUS protocol.
Accounting is supported by RADIUS and TACACS+ servers only. Table 6-4 shows the Cisco ASA accounting support matrix.

The following subsections introduce each of the authentication protocols and servers that Cisco ASA supports.
RADIUS
RADIUS is a widely implemented authentication standard protocol that is defined in RFC 2865, “Remote Authentication Dial-In User Service (RADIUS).” RADIUS operates in a client/server model. A RADIUS client is usually referred to as a network access server (NAS). A NAS is responsible for passing user information to the RADIUS server. Cisco ASA acts as a NAS and authenticates users based on the RADIUS server’s response.
Note
Cisco ASA supports several RADIUS servers, including the following:
• CiscoSecure ACS for NT
• CiscoSecure ACS for UNIX
• Cisco Access Registrar
• Livingston
• Merit
• Funk Steel Belted
• Microsoft Internet Authentication Server
These are some of the most commonly deployed RADIUS server vendors. Support and testing with other servers is a continuous effort between vendors.
The RADIUS server receives user authentication requests and subsequently returns configuration information required for the client (in this case, the Cisco ASA) to support the specific service to the user. The RADIUS server does this by sending Internet Engineering Task Force (IETF) or vendor-specific attributes. (RADIUS authentication attributes are defined in RFC 2865.) Figure 6-1 illustrates how this process works.
Figure 6-1 Basic RADIUS Authentication Process

In this example, a Cisco ASA acts as a NAS and the RADIUS server is a Cisco Secure Access Control Server (ACS). The following sequence of events is shown in Figure 6-1:
Step 1. A user attempts to connect to the Cisco ASA (i.e., administration, VPN, or cut-through proxy).
Step 2. The Cisco ASA prompts the user, requesting a username and password. The user sends his or her credentials to the Cisco ASA.
Step 3. The Cisco ASA sends the authentication request (Access-Request) to the RADIUS server.
Step 4. The RADIUS server sends an Access-Accept message (if the user is successfully authenticated) or an Access-Reject (if the user is not successfully authenticated).
Step 5. The Cisco ASA responds to the user and allows access to the specific service.
The RADIUS server can also send IETF or vendor-specific attributes to the Cisco ASA, depending on the implementation and services used. These attributes can contain information such as an IP address to assign the client and authorization information. RADIUS servers combine authentication and authorization phases into a single request-and-response communication cycle. The Cisco ASA authenticates itself to the RADIUS server by using a preconfigured shared secret. For security reasons, this shared secret is never sent over the network.
Note
Passwords are sent as encrypted messages from the Cisco ASA to the RADIUS server. This is useful to protect this critical information from an intruder. The Cisco ASA hashes the password, using the shared secret that is defined on the Cisco ASA and the RADIUS server.
The RADIUS servers can also proxy authentication requests to other RADIUS servers or other types of authentication servers. Figure 6-2 illustrates this methodology.
Figure 6-2 RADIUS Server Acting as Proxy to Other Authentication Servers

In Figure 6-2, RADIUS Server 1 acts as a proxy to RADIUS Server 2. It sends the authentication request from the Cisco ASA to RADIUS Server 2 and proxies the response back to the ASA.
TACACS+
TACACS+ is an AAA security protocol that provides centralized validation of users who are attempting to gain access to NASs. The TACACS+ protocol offers support for separate and modular AAA facilities. The TACACS+ protocol’s primary goal is to supply complete AAA support for managing multiple network devices.
TACACS+ uses port 49 for communication and allows vendors to use either User Datagram Protocol (UDP) or TCP encoding. Cisco ASA uses the TCP version for its TACACS+ implementation.
The TACACS+ authentication concept is similar to RADIUS. The NAS sends an authentication request to the TACACS+ server (daemon). The server ultimately sends any of the following messages back to the NAS:
• ACCEPT—User has been successfully authenticated and the requested service is allowed. If authorization is required, the authorization process begins at this point.
• REJECT—User authentication is denied. The user may be prompted to retry authentication, depending on the TACACS+ server and NAS.
• ERROR—A certain error takes place during authentication. This can be experienced because of network connectivity problems or a configuration error.
• CONTINUE—User is prompted to provide further authentication information.
After the authentication process is complete, if authorization is required the TACACS+ server proceeds with the authorization phase. The user must first successfully be authenticated before proceeding to TACACS+ authorization.
RSA SecurID
RSA SecurID (SDI) is a solution provided by RSA Security. The RSA ACE/Server is the administrative component of the SDI solution. It enables the use of one-time passwords (OTPs). Cisco ASA supports SDI authentication natively only for VPN user authentication. However, if it is using an authentication server, such as CiscoSecure ACS for Windows NT, the server can use external authentication to an SDI server and proxy the authentication request for all other services supported by Cisco ASA. Cisco ASA and SDI use UDP port 5500 for communication.
The SDI solution uses small physical devices called tokens that provide users with an OTP that changes every 60 seconds. These OTPs are generated when a user enters a personal identification number and are synchronized with the server to provide the authentication service. The SDI server can be configured to require the user to enter a new PIN when trying to authenticate. This process is called New PIN mode, which Cisco ASA supports. Figure 6-3 demonstrates how this solution works when a user attempts to connect to the Cisco ASA using the Cisco VPN Client software.
Figure 6-3 SDI Authentication Using New PIN Mode
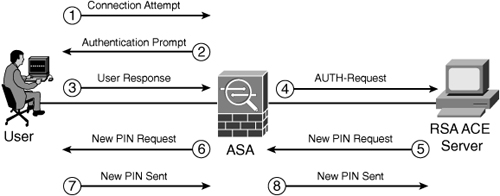
The purpose of New PIN mode is to allow the user to change its PIN for authentication. The following sequence of events occurs when using SDI authentication with the New PIN mode feature, as shown in Figure 6-3:
Step 1. The user attempts to establish a VPN connection with the Cisco VPN client and negotiates IKE Phase 1. (Complete information about IKE and IPSec negotiations is provided in Chapter 1, “Introduction to Security Technologies.”)
Step 2. The Cisco ASA prompts the user for authentication via X-Auth (extended authentication). The user provides a username and passcode. (X-Auth is also covered in Chapter 17, “IPSec Remote Access VPNs.”)
Step 3. The Cisco ASA forwards the authentication request to the SDI server.
Step 4. If New PIN mode is enabled, the SDI server authenticates the user and requests a new PIN to be used during the next authentication session for that user.
Step 5. The Cisco ASA prompts the user for a new PIN.
Step 6. User enters new PIN.
Step 7. The Cisco ASA sends the new PIN information to the SDI server.
Note
You can find more information about the RSA SDI server at http://www.rsasecurity.com.
Microsoft Windows NT
Cisco ASA supports Windows NT native authentication only for VPN remote-access connections. It communicates with the Windows NT server via TCP port 139. Similarly to SDI, you can use a RADIUS/TACACS+ server, such as CiscoSecure ACS, to proxy authentication to Windows NT for other services supported by Cisco ASA.
Active Directory and Kerberos
Cisco ASA can authenticate VPN users via an external Windows Active Directory, which uses Kerberos for authentication. Kerberos is an authentication protocol created by the Massachusetts Institute of Technology (MIT) that provides mutual authentication used by many vendors and applications. It can also communicate with a UNIX/Linux-based Kerberos server. Support for this authentication method is available for VPN clients only. Cisco ASA communicates with the Active Directory and/or a Kerberos server via UDP port 88. Configuration and troubleshooting of remote access VPN tunnels are covered in Chapter 16, “Site-to-Site IPSec VPNs.”
Lightweight Directory Access Protocol
Cisco ASA supports LDAP authorization for remote-access VPN connections only. The LDAP protocol is defined in RFC 3377, “Lightweight Directory Access Protocol (v3),” and RFC 3771, “The Lightweight Directory Access Protocol (LDAP) Intermediate Response Message.” LDAP provides authorization services when given access to a user database within a Directory Information Tree (DIT). This tree contains entities called entries, which consist of one or more attribute values called distinguished names (DNs). The DN values must be unique within the DIT.
Note
Cisco ASA communicates with an LDAP server over TCP port 389. LDAP provides only authorization services. Consequently, a separate protocol is required for authentication services.
HTTP Form Protocol
The Cisco ASA supports single sign-on (SSO) authentication of WebVPN users, using the HTTP Form protocol. The SSO feature is designed to allow WebVPN users to enter a username and password only once while accessing WebVPN services and any web servers behind the Cisco ASA.
Note
The Cisco ASA acts as a proxy for the user to the authenticating server. The Cisco ASA keeps a cookie and uses it to authenticate the user to any other protected web servers. The SSO feature is covered in more detail in Chapter 19, “Clientless Remote Access SSL VPN.”
Defining an Authentication Server
Before configuring an authentication server on Cisco ASA, you must specify AAA server groups. A server group defines the attributes of one or more AAA servers. This information includes the AAA protocol used, IP address of the AAA servers, and other related information. Complete the following steps to accomplish this using ASDM:
Step 1. Log in to ASDM and navigate to Configuration > Device Management > Users/AAA > AAA Server Groups > AAA Server Groups.
Step 2. By default the LOCAL Server group is present in the configuration. To add a AAA server group click on Add.
Step 3. The screen illustrated in Figure 6-4 is shown. Enter a server group name under the Server Group field, as illustrated in Figure 6-4. The AAA server group name used in this example is my-radius-group.
Figure 6-4 Add AAA Server Group Dialog Box
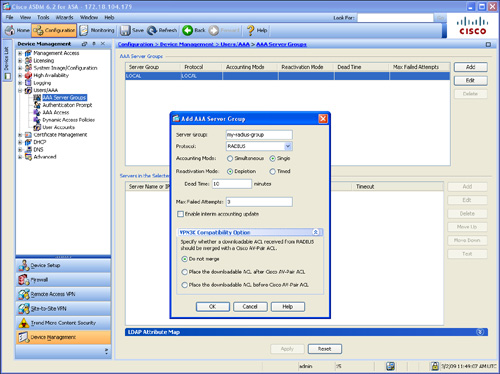
Step 4. Select the AAA protocol to be used from the Protocol drop-down list. RADIUS is used in this example; however, you can choose from any of the following server types:
• RADIUS
• TACACS+
• SDI
• NT Domain
• Kerberos
• LDAP
• HTTP Form
Step 5. Several of the parameters in this dialog box depend on the authentication protocol that is used. In this example all the other fields are left with default values. The Accounting Mode field has two options: Simultaneous and Single. When single mode is selected, the Cisco ASA sends accounting data to only one accounting server. To send accounting data to all servers in the group select Simultaneous.
Step 6. Depletion is selected in the Reactivation Mode field. The reactivation mode is used to control the behavior when AAA servers fail. When depletion mode is selected in the Cisco ASA, failed servers are reactivated only after all the servers in the group are inactive. If this option is selected you must add a time interval in the Dead Time field. In this example, the default value is configured (10 minutes).
Alternatively, you can select Timed mode where failed servers are reactivated after 30 seconds of down time.
Step 7. The Max Failed Attempts is used to limit the maximum number of failed authentication attempts. The default is 3 attempts.
Note
The Cisco ASA supports downloadable access control lists (ACLs). This is discussed later in this chapter in the “Configuring Downloadable ACLs” section. To be compatible with the Cisco VPN 3000, you can specify whether a downloadable ACL received from the RADIUS server should be merged with a Cisco AV-Pair ACL, as shown in Figure 6-4 under the VPN3k Compatibility Option section.
Step 8. Click OK.
Step 9. Click Apply to apply the configuration changes.
Step 10. Click Save to save the configuration in the Cisco ASA.
Complete the following steps to add the AAA server to the AAA server group that was previously configured:
Step 1. Log in to ASDM and navigate to Configuration > Device Management > Users/AAA > AAA Server Groups > AAA Server Groups.
Step 2. Click on Add under the Servers in the Selected Group (while selecting the group called my-radius-group. The dialog box shown in Figure 6-5 is displayed.
Figure 6-5 Add AAA Server Dialog Box

Step 3. As you see in Figure 6-5, the Server Group my-radius-group is already pre-populated in the screen. Select the interface where the RADIUS server resides, using the Interface Name pull-down menu. In this example, the RADIUS server is reachable through the management interface.
Step 4. Enter the AAA server name or IP address under the Server Name or IP Address field. In this example, the RADIUS server’s IP address is 172.18.124.145.
Step 5. Specify the amount of time (in seconds) that the Cisco ASA waits before timing out the authentication session under the Timeout field. The default value of 10 seconds is used in this example.
Step 6. You can specify the port used by the Cisco ASA to communicate to the RADIUS server for authentication purposes. In this example, the default RADIUS authentication port 1645 is entered under the Server Authentication Port field.
Step 7. Similarly, you can specify the port used by the Cisco ASA to communicate to the RADIUS server for accounting. In this example, the default RADIUS accounting port 1646 is entered under the Server Accounting Port field.
Step 8. The Retry Interval is the amount of time the Cisco ASA waits to retry an authentication attempt, in case the RADIUS server does not respond. The default value of 10 seconds is used in this example.
Step 9. Enter the secret key used by the Cisco ASA and the RADIUS server to authenticate each other under the Server Secret Key field. This can be a string of up to 64 characters.
Step 10. Enter a case-sensitive password that is common among users who access this RADIUS authorization server via the Cisco ASA under the Common Password field. If you do not use a common password, the user’s username is used as the password when accessing the RADIUS authorization server.
Step 11. You can optionally specify how the Cisco ASA will handle netmasks received in downloadable ACLs (covered later in this chapter) by selecting any of the following in the ACL Netmask Convert pull down menu:
• Detect automatically—The Cisco ASA automatically detects a wildcard netmask expression and converts it to a standard netmask.
• Standard—The Cisco ASA honors the netmask received from the RADIUS server and does not perform any translation from wildcard netmask expressions.
• Wildcard—The Cisco ASA converts all netmasks to standard netmask expressions.
The default value (Standard) is used in this example.
Step 12. Click OK.
Step 13. Click Apply to apply the configuration changes.
Step 14. Click Save to save the configuration in the Cisco ASA.
If you are using the command line interface (CLI) to configure the Cisco ASA, specify AAA server groups with the aaa-server command. The syntax of the aaa-server command to specify a new AAA server group and the respective protocol is as follows:
aaa-server server-tag protocol server-protocol
The server-tag keyword is the server group name that is referenced by the other AAA command, and server-protocol is the name of the supported AAA protocol. Example 6-1 shows the different authentication protocols that can be defined within a AAA server group.
Example 6-1 AAA Server Group Authentication Protocols

In Example 6-1, the AAA server group tag is named my-radius-group. After defining the AAA server group with the respective authentication protocol, you are shown the (config-aaa-server) prompt. Example 6-2 shows the commands that are used to accomplish the same tasks that were previously demonstrated for ASDM.
Example 6-2 Configuring the AAA Server Using the CLI

In Example 6-2, the AAA server group my-radius-group is defined to process authentication requests using the RADIUS protocol. In the second line the RADIUS server (172.18.124.145) is defined, as well as the interface (management) where the RADIUS server resides. The key used for authentication is myprivatekey. The RADIUS common password is set to mycommonpassword.
Note
Accounting mode options are available only if you are configuring an AAA server group for RADIUS or TACACS+.
You can also use the max-failed-attempts subcommand, which specifies the maximum allowed number of communication failures for any server in the AAA server group before that server is disabled or deactivated. The maximum number of failures can be configured in a range from 1 to 5.
Cisco ASA supports two different AAA server reactivation policies or modes:
• Timed mode—The failed or deactivated servers are reactivated after 30 seconds of downtime.
• Depletion mode—The failed or deactivated servers remain inactive until all other servers within the configured group are inactive.
To view statistics about all AAA servers defined for a specific protocol, use the following command:
show aaa-server protocol server-protocol
Example 6-3 includes the output of this command for the RADIUS protocol.
Example 6-3 Output of the show aaa-server protocol Command

Several counters can be helpful when troubleshooting AAA-related problems. For instance, you can compare the number of authentication requests versus the number of authentication rejects and accepts. Additionally, you should pay attention to any malformed authentication requests, unrecognized responses, or timeouts to determine whether there is a communication problem with the AAA server.
To show the configuration of a specific AAA server, use the following command:
show running-config aaa-server [server-group [(if_name) host ip_address]]
To show statistics about a specific AAA server, use the following command:
show aaa-server [server-tag [host hostname]]
Example 6-4 includes the output of this command for server 172.18.124.145.
Example 6-4 Output of the show aaa-server Command for a Specific Host

To clear the AAA server statistics for a specific server, use this command:
clear aaa-server statistics [tag [host hostname]]
To clear the AAA server statistics for all servers providing services for a specific protocol, use this command:
clear aaa-server statistics protocol server-protocol
To erase a specific AAA server group from the configuration, use this command:
clear configure aaa-server [server-tag]
Configuring Authentication of Administrative Sessions
Cisco ASA supports authentication of administrative sessions by using a local user database, a RADIUS server, or a TACACS+ server. An administrator can connect to the Cisco ASA via
• Telnet
• Secure Shell (SSH)
• Serial console connection
• Cisco ASA Device Manager (ASDM)
If connecting via Telnet or SSH, the user can retry authentication three times in case of user error. After the third time, the authentication session and connection to the Cisco ASA are closed. Authentication sessions via the console prompt the user continuously until the correct username and password are entered.
Before you start the configuration, you must decide which user database you will use (local or external AAA server). If you are using an external AAA server, configure the AAA server group and host as covered in the previous section. You can use the aaa authentication command to require authentication verification when accessing Cisco ASA for administration. The following sections teach you how to configure external authentication for each type of connection.
Authenticating Telnet Connections
You can enable Telnet access to the Cisco ASA to any internal interface or to the outside if an IPSec connection is established. (Telnet sessions are allowed to the outside interface only over an IPSec connection.) To configure authentication for Telnet connections to the Cisco ASA using ASDM, complete the following steps:
Step 1. Log in to ASDM and navigate to Configuration > Device Management > Users/AAA > AAA Access > Authentication. The screen illustrated in Figure 6-6 is displayed.
Figure 6-6 Using ASDM to Configure Authentication for Telnet Connections

Step 2. Select Telnet under the Require Authentication for the Following Types of Connections section.
Step 3. In this example, the RADIUS server previously configured in the AAA server group is used for authentication. Select the server group (my-radius-group) from the Server Group pull-down menu.
Step 4. If you would like to fall back to the local user database in case the RADIUS server fails, select Use LOCAL when Server Group Fails, as shown in Figure 6-6.
Step 5. Click OK.
Step 6. Click Apply to apply the configuration changes.
Step 7. Click Save to save the configuration in the Cisco ASA.
You can also authenticate any users before they use the enable command via the CLI. To accomplish this task, complete the following steps:
Step 1. Log in to ASDM and navigate to Configuration > Device Management > Users/AAA > AAA Access > Authentication.
Step 2. Select the Enable check box under the Require Authentication to Allow Use of Privilege Mode Commands section, as shown in Figure 6-6.
Step 3. In this example, the RADIUS server is used for authentication. Select the server group my-radius-group from the Server Group drop-down list.
Step 4. To allow the Cisco ASA to use the local database as a fallback method, select the Use LOCAL when Server Group Fails check box.
Step 5. Click OK.
Step 6. Click Apply to apply the configuration changes.
Step 7. Click Save to save the configuration in the Cisco ASA.
Example 6-5 shows the CLI commands sent by ASDM to the Cisco ASA.
Example 6-5 Using the CLI to Configure Authentication for Telnet Connections

In Example 6-5, the aaa authentication enable console command is set to require authentication before any user can enter into enable mode. The my-radius-group AAA server group name is applied to this command. The keyword LOCAL is used to enable fallback to the local database if the configured authentication server is unavailable.
The second line in Example 6-5 enables authentication for Telnet connections by using the my-radius-group AAA server group, as well as the LOCAL keyword to enable fallback to the local database.
Note
Do not confuse the keyword console with the serial console on the Cisco ASA. This keyword is used to force the Cisco ASA to require AAA authentication for any client trying to connect to it via Telnet, serial console, HTTP, or SSH. Telnet is used in Example 6-9.
Authenticating SSH Connections
The steps for using ASDM to configure authentication for SSH administrative sessions to the Cisco ASA are very similar to the ones discussed in the previous section. Complete the following steps to configure authentication for SSH connections to the Cisco ASA:
Step 1. Log in to ASDM and navigate to Configuration > Device Management > Users/AAA > AAA Access > Authentication. The same screen illustrated in Figure 6-6 is displayed.
Step 2. Select SSH under the Require Authentication for the Following Types of Connections section.
Step 3. In this example, the RADIUS server previously configured in the AAA server group (my-radius-group) is used for authentication.
Step 4. If you would like to fall back to the local user database in case the RADIUS server fails, select Use LOCAL when Server Group Fails, as shown in Figure 6-6.
Step 5. Click OK.
Step 6. Click Apply to apply the configuration changes.
Step 7. Click Save to save the configuration in the Cisco ASA.
To enable SSH on Cisco ASA via the CLI, you first configure a hostname and domain name before generating the RSA key pair used by SSH. Example 6-6 shows how to generate the RSA key pair and enable SSH version 2 connections from any systems on the inside interface.
Example 6-6 Generating RSA Key Pair and Enabling SSH Version 2

After the RSA key pair has been generated and SSH has been enabled, complete your AAA server group and host configuration. In this example, the my-radius-group AAA server group is used in the aaa authentication ssh console command to enable SSH authentication, as shown in Example 6-7.
Example 6-7 Configuring SSH Authentication to a TACACS+ Server
![]()
The LOCAL keyword is used in Example 6-7 to enable fallback to the local database. Make sure to issue the write memory command to save the configuration after the RSA keypair is generated.
Authenticating Serial Console Connections
Complete the following steps to configure authentication for serial console connections to the Cisco ASA, using ASDM:
Step 1. Log in to ASDM and navigate to Configuration > Device Management > Users/AAA > AAA Access > Authentication.
Step 2. Select Serial under the Require Authentication for the Following Types of Connections section.
Step 3. In this example, the RADIUS server previously configured in the AAA server group (my-radius-group) is used for authentication.
Step 4. If you would like to fall back to the local user database in case the RADIUS server fails, select Use LOCAL when Server Group Fails.
Step 5. Click OK.
Step 6. Click Apply to apply the configuration changes.
Step 7. Click Save to save the configuration in the Cisco ASA.
To configure authentication of serial console connections, use the aaa authentication serial console command. Be aware that you can get locked out of the Cisco ASA easily with any misconfiguration. Example 6-8 demonstrates how to configure serial console authentication, using the AAA server group previously configured.
Example 6-8 Configuring Serial Console Authentication
![]()
Note
Establishing two separate sessions to the Cisco ASA is always recommended when configuring AAA authentication. The purpose of this procedure is to avoid getting locked out of the CLI. Open one session using a Telnet or SSH connection and connect to the serial console of the Cisco ASA. One of the sessions can be disconnected after the configuration is verified and tested. If the administrator is locked out of the security appliance, follow the password recovery procedure discussed in Chapter 3, “System Maintenance.”
Authenticating Cisco ASDM Connections
Complete the following steps to configure authentication for ASDM administrative connections to the Cisco ASA using ASDM:
Step 1. Log in to ASDM and navigate to Configuration > Device Management > Users/AAA > AAA Access > Authentication.
Step 2. Select HTTP/ASDM under the Require Authentication for the Following Types of Connections section.
Step 3. In this example, the RADIUS server previously configured in the AAA server group (my-radius-group) is used for authentication.
Step 4. If you would like to fall back to the local user database in case the RADIUS server fails, select Use LOCAL when Server Group Fails.
Step 5. Click OK.
Step 6. Click Apply to apply the configuration changes.
Step 7. Click Save to save the configuration in the Cisco ASA.
Alternatively, the aaa authentication http console CLI command can be configured to require authentication for Cisco ASDM users. Example 6-9 demonstrates how to configure ASDM authentication, using the AAA server group previously configured.
Example 6-9 Configuring HTTP Authentication for ASDM Users
![]()
If this command is not configured, Cisco ASDM users can gain access to the ASA by entering only the enable password, and no username, at the authentication prompt.
Authenticating Firewall Sessions (Cut-Through Proxy Feature)
Cisco ASA firewall session authentication is similar to the cut-through proxy feature on the Cisco Secure PIX Firewall. The firewall cut-through proxy requires the user to authenticate before passing any traffic through the Cisco ASA. A common deployment is to authenticate users before accessing a web server behind the Cisco ASA. Figure 6-7 illustrates how firewall session authentication works.
Figure 6-7 Cut-Through Proxy Feature Example

The following are the steps represented in Figure 6-7:
Step 1. The user on the outside of the Cisco ASA attempts to create an HTTP connection to the web server behind the ASA.
Step 2. The Cisco ASA prompts the user for authentication.
Step 3. The Cisco ASA receives the authentication information from the user and sends an AUTH Request to the CiscoSecure ACS server.
Step 4. The server authenticates the user and sends an AUTH Accept message to the Cisco ASA.
Step 5. The Cisco ASA allows the user to access the web server.
Complete the following steps to enable network access authentication via the cut-through proxy feature, using ASDM.
Step 1. Log in to ASDM and navigate to Configuration > Firewall > AAA Rules.
Step 2. Click on Add and select Add Authentication Rule. The dialog box illustrated in Figure 6-8 is displayed.
Figure 6-8 Adding an Authentication Rule via ASDM

Step 3. Select the interface where the authentication rule will be applied from the Interface pull-down menu. The inside interface is selected in this example.
Step 4. Select Authenticate in the Action field to require user authentication.
Step 5. Select the AAA server group (my-radius-group) from the AAA Server Group pull-down menu.
Note
You can add a AAA server to the server group by clicking the Add Server button. In this example, the preconfigured AAA server is used.
Step 6. You must specify a source and a destination for traffic that will require authentication. Enter the source IP address, network address, or the any keyword in the Source field. Alternatively, you can click the ellipsis (...) to select an address that has already been configured in ASDM. In this example, the any keyword is entered to require authentication for any source from the inside interface.
Step 7. Enter the destination IP address, network address, or the any keyword in the Destination field. Alternatively, you can click the ellipsis (...) to select an address that has already being configured in ASDM. In this example, the any keyword is entered to require authentication when a host tries to reach any destination.
Step 8. Enter an IP service name for the destination service in the Service field. Alternatively, click the ellipsis (...) button to open a separate dialog box where you can select from a list of available services. In this example, authentication is required for any host trying to access any TCP-based applications.
Step 9. You can optionally enter a description for the authentication rule in the Description field.
Note
You can click on More Options to specify a source service for TCP or UDP applications or set a time range within which this rule is to be applied.
Step 10. Click OK.
Step 11. Click Apply to apply the configuration changes.
Step 12. Click Save to save the configuration in the Cisco ASA.
Cut-through proxy can also be enabled with the aaa authentication match CLI command. It enables you to configure an access control list (ACL) to classify what traffic is authenticated. Using the aaa authentication match command replaces the use of the include and exclude options and it is now the preferred method to configure authentication through the Cisco ASA appliance. The following is the command syntax:
aaa authentication match acl interface server-tag
The acl keyword refers to the name or number of the ACL configured to define what traffic is authenticated. The interface keyword defines the interface that receives the connection request. The server-tag is the AAA server group defined by the aaa-server command.
Example 6-10 shows the commands sent by ASDM to the Cisco ASA to enable cut-through proxy.
Example 6-10 Configuring Cut-Through Proxy Using the CLI
![]()
In Example 6-10, an ACL named inside_authentication is configured to permit (or match) TCP traffic from any source to any destination. This ACL is then applied to the aaa authentication match command. The inside keyword specifies that this rule is applied to the inside interface. The AAA server group named my-radius-group is associated to the end of the command.
You can also add exceptions to not authenticate certain users based on IP address. Figure 6-9 illustrates an example of how the aaa authentication match command works. SecureMe, Inc., has two users in the 10.10.1.0/24 network who need to access the web server in the 10.10.2.0/24 network. The Cisco ASA is configured to authenticate all users in the 10.10.1.0 network; however, User2 is allowed to connect to the web server without being authenticated.
Figure 6-9 Firewall Session Authentication Exceptions

The following are the steps represented in Figure 6-9:
Step 1. User1 attempts to access the web server (10.10.2.88).
Step 2. The Cisco ASA prompts the user to authenticate.
Step 3. User1 replies with his credentials.
Step 4. The Cisco ASA sends the authentication request (Access-Request) to the CiscoSecure ACS RADIUS server (172.18.124.141).
Step 5. The CiscoSecure ACS server sends back its reply (Access-Accept) to the Cisco ASA.
Step 6. User1 is able to access the web server.
User2 can access the web server without being required to authenticate.
The commands to achieve this configuration are included in Example 6-11.
Example 6-11 Configuring Firewall Session Authentication Exceptions

Cisco ASA is capable of excluding authentication for devices by using their MAC addresses. This feature is practical when bypassing authentication for devices such as printers and IP phones. Create a MAC address list by using the mac-list command. Subsequently, use the aaa mac-exempt command to bypass authentication for the specified MAC addresses on the list. Example 6-12 demonstrates how to configure the Cisco ASA to achieve this functionality.
Example 6-12 Configuring Authentication Exceptions by Using MAC Address Lists

In Example 6-12, a MAC list named MACLIST is defined with two host MAC addresses and is associated with the aaa mac-except command.
Note
Only one MAC list can be associated with aaa mac-exempt.
Both authentication and authorization are bypassed if this feature is turned on.
Authentication Timeouts
Authentication timeouts specify how long the Cisco ASA should wait before requiring the user to reauthenticate after a period of inactivity or absolute duration. Customize authentication timeouts in ASDM by navigating to Configuration > Firewall > Advanced > Global Timeouts and editing the Authentication inactivity timeout field. Alternatively, you can configure authentication timeouts via the CLI by using the timeout uauth command. The following is the command syntax:
timeout uauth hh:mm:ss [absolute | inactivity]
The inactivity timer begins after a user connection becomes idle. The absolute timer runs continuously. If you use the inactivity and absolute timeouts at the same time, the absolute timeout duration should be longer than the inactivity timeout. If you set the timeouts the opposite way, the inactivity timeout does not work because the absolute timeout always expires sooner.
Note
It is recommended to configure the absolute timeout command value for at least 2 minutes. Never configure the timeout uauth duration to 0, particularly when using passive FTP, because the authentication session then never times out.
Additionally, you can use the clear uauth command to delete all cached credentials and make all users reauthenticate when attempting to create a new connection through the Cisco ASA. You can append a username at the end of the command to make a specific user reauthenticate. For example, use clear uauth joe to force a user called “joe” to reauthenticate.
Customizing Authentication Prompts
Cisco ASA enables you to customize the authentication prompts by navigating to the Configuration > Device Management > Users/AAA > Authentication Prompt in ASDM and entering an authentication prompt under the Prompt section. Similarly, the auth-prompt command can be used in the CLI to customize the authentication prompt. This customization is available only for Telnet, HTTP, or FTP authentication. The following is the usage and syntax of this command:
auth-prompt [prompt | accept | reject] prompt text
Table 6-5 lists all the options of the auth-prompt command.
Table 6-5 auth-prompt Command Options

Note
The accept and reject options apply only for Telnet connections.
Configuring Authorization
Cisco ASA supports authorization services over TACACS+ for firewall cut-through proxy sessions. It also supports authorization services over TACACS+ and its internal user database for administrative sessions. RADIUS-downloadable ACLs are also supported by Cisco ASA. Command access is authorized by privilege level only when authorization is done against the local database.
Additionally, authorization over RADIUS, LDAP, and internal user databases is available for VPN user connections. This is used for mode-config attributes for remote-access VPN clients. Information about mode-config and its attributes is provided in Chapter 17.
Complete the following steps to configure authorization with ASDM:
Step 1. Log in to ASDM and navigate to Configuration > Firewall > AAA Rules.
Step 2. Click on Add and select Add Authorization Rule. The dialog box shown in Figure 6-10 is displayed.
Figure 6-10 Add Authorization Rule Dialog Box

Step 3. Select the interface where the authentication rule will be applied from the Interface pull-down menu. The inside interface is selected in this example.
Step 4. Select Authorize in the Action field to require user authentication.
Step 5. Select the AAA server group (my-tacacs-group) from the AAA Server Group pull-down menu.
Note
You can add a AAA server to the server group by clicking the Add Server button. In this example, the preconfigured AAA server is used. The TACACS+ server was previously added to the configuration via navigation to Configuration > Device Management > Users/AAA > AAA Server Groups.
Step 6. You must specify a source and a destination for traffic that will require authorization. Enter the source IP address, network address, or the any keyword in the Source field. Alternatively, you can click the ellipsis (...) to select an address that has already being configured in ASDM. In this example the any keyword is entered to require authentication for any source from the inside interface.
Step 7. Enter the destination IP address, network address, or the any keyword in the Destination field. Alternatively, you can click the ellipsis (...) to select an address that has already been configured in ASDM. In this example, the any keyword is entered to require authorization when a host tries to reach any destination
Step 8. Enter an IP service name for the destination service in the Service field. Alternatively, click the ellipsis (...) button to open a separate dialog box where you can select from a list of available services. In this example, authentication is required for any host trying to access any TCP-based applications.
Step 9. You can optionally enter a description for the authentication rule in the Description field.
Note
You can click on More Options to specify a source service for TCP or UDP applications or set a time range within which this rule is to be applied.
Step 10. Click OK.
Step 11. Click Apply to apply the configuration changes.
Step 12. Click Save to save the configuration in the Cisco ASA.
Alternatively, in the CLI, the aaa authorization match command enables authorization for firewall cut-through proxy and administrative sessions. The following is the syntax for this command to enable authorization for firewall cut-through proxy sessions:
aaa authorization match access_list_name if_name server_tag
The access_list_name option specifies the ACL name used to categorize which traffic requires authorization.
Command Authorization
You enable command authorization in ASDM by following these steps:
Step 1. Log in to ASDM and navigate to Configuration > Device Management > Users/AAA > AAA Access > Authorization.
Step 2. Click on Enable to enable authorization.
Step 3. Select the AAA server group under the Server Group pull-down menu.
Note
TACACS+ server commands can be configured as a shared profile component, for a group, or for individual users. If you enable TACACS+ command authorization, and a user enters a command at the CLI, the Cisco ASA sends the command and username to the TACACS+ server to determine whether the command is authorized.
Step 4. Optionally, you can select the Use LOCAL when Server Group Fails check box as a fallback method in case the TACACS+ server is unreachable.
Step 5. To perform authorization for exec shell access, click on Enable under the Perform Authorization for Exec Shell Access section. You can specify whether authorization is performed by using the remote server parameters or the local authentication server.
Step 6. Click Apply to apply the configuration changes.
Step 7. Click Save to save the configuration in the Cisco ASA.
To configure command authorization via the CLI, use the following command:
aaa authorization command {LOCAL | tacacs_server_tag [LOCAL]}
The server tag LOCAL defines local command authorization. It can also be used as a fallback method in case the TACACS+ server is unreachable.
When using authorization, the following attributes are passed to the TACACS+ server in the attribute payload of the authorization request message:
• cmd—The command string to be authorized (used for authorization for administrative sessions only)
• cmd-arg—The command arguments to be sent (used for authorization for administrative sessions only)
• service—The type of service for which authorization is requested
The following attributes may be received from a TACACS+ server in an authorization response message:
• idletime—Idle timeout value for firewall cut-through proxy sessions
• timeout—Absolute timeout value for firewall cut-through proxy sessions
• acl—The identifier of an ACL to be applied to a specific user
Configuring Downloadable ACLs
Cisco ASA provides support for a per-user ACL authorization by enabling you to download an ACL from a RADIUS or TACACS+ server. This feature allows you to push an ACL to the Cisco ASA from a CiscoSecure ACS server. The downloadable ACL works in combination with the ACLs configured in the ASA. The user traffic needs to be permitted by both ACLs for it to flow through the ASA. However, the per-user-override option can be configured at the end of the access-group command to bypass this requirement. The following is an example of applying the per-user-override option on an access-group command applied to the inside interface:
access-group 100 in interface inside per-user-override
In ASDM, configure this by navigating to Configuration > Firewall > Access Rules and clicking on the Advanced button. The Access Rules Advanced Options dialog box is displayed, enabling you to select the Per User Override option on each access list entry.
All downloadable ACLs are applied to the interface from which the user is authenticated.
Figure 6-11 and the steps following illustrate an example of how downloadable ACLs work.
Figure 6-11 Downloadable ACL Example

Step 1. A user initiates a web connection to Cisco.com. The Cisco ASA is configured to perform authentication (cut-through proxy) and prompts the user for authentication credentials.
Step 2. The user replies with his credentials.
Step 3. The Cisco ASA sends the RADIUS authentication request (Access-Accept) to the CiscoSecure ACS server.
Step 4. The CiscoSecure ACS server authenticates the user and sends a RADIUS response (Access-Accept), including an ACL name associated with the user.
Step 5. The Cisco ASA verifies whether it has an ACL named the same as the one downloaded from the CiscoSecure ACS server. There is no need to download a new ACL if an ACL is identified with the same name.
You can configure downloadable ACLs in CiscoSecure ACS in a few different ways:
• Configure a Shared Profile Component (SPC), including both the ACL name and the actual ACL. This enables you to apply the ACL to any number of users within CiscoSecure ACS.
• Configure each ACL entry within a specific user profile.
• Configure the ACLs to be applied to a specific group.
These options are supported with Cisco ASA to better fit your security policies.
Configuring Accounting
To configure accounting on the Cisco ASA via ASDM, complete the following steps. The goal in the following example is to enable accounting for all IP traffic sourced from the 10.10.1.0/24 network and destined to the 10.10.2.0/24 network.
Step 1. Log in to ASDM and navigate to Configuration > Firewall > AAA Rules.
Step 2. Click on Add and select Add Accounting Rule.
Step 3. Select the interface where the accounting rule is to be applied. In this example, the inside interface is used.
Step 4. Under Action, select Account to enable accounting.
Step 5. Select the AAA server group from the AAA Server Group pull-down menu. In this example, the previously configured AAA server group called my-radius-group is used.
Step 6. You can configure the source and destination to define specific traffic traversing the Cisco ASA that is to be used for accounting. Configure the specific source IP address or network under the Source field. By default the any keyword is displayed to enable accounting for all sources. In this example, the source network 10.10.1.0/24 is used.
Step 7. Configure the specific destination IP address or network under the Destination field. By default, the any keyword is displayed to enable accounting for all sources. In this example, the destination network 10.10.2.0/24 is used.
Step 8. Select the specific service or protocol in the Service field. In this example, the ip keyword is used to enable accounting for all IP traffic sourced from the 10.10.1.0/24 network and destined to the 10.10.2.0/24 network.
Step 9. Optionally, you can enter a description for this accounting rule in the Description field.
Step 10. Click Apply to apply the configuration changes.
Step 11. Click Save to save the configuration in the Cisco ASA.
To enable accounting via the CLI use the aaa accounting command:
aaa accounting match access_list_name if_name server_tag
Example 6-13 demonstrates how to configure accounting on the Cisco ASA via the CLI.
Example 6-13 Enabling Accounting by Using an ACL to Define Interesting Traffic

In Example 6-13, an ACL is configured to enable accounting for all connections initiated from 10.10.1.0/24 to 10.10.2.0/24. The ACL is then applied to the aaa accounting match command. A previously defined AAA server group named my-radius-group is used with this command.
You can also use the aaa accounting include | exclude command options, as demonstrated for the aaa authentication command. The aaa accounting match command makes the include and exclude options obsolete.
RADIUS Accounting
Table 6-6 lists all the RADIUS accounting messages supported by Cisco ASA.
Table 6-6 RADIUS Accounting Messages Supported in the Cisco ASA


The accounting-on message marks the start of accounting services. Subsequently, to mark the end of accounting services, use the accounting-off message. The start and stop accounting records messages are used to label when a user started a connection to a specific service. These sessions are labeled with their own accounting session IDs.
TACACS+ Accounting
Table 6-7 lists all the TACACS+ accounting messages that Cisco ASA supports.
Table 6-7 TACACS+ Accounting Messages Supported by Cisco ASA

Cisco ASA also enables you to configure command accounting, depending on the user’s privilege level. Use the following command to enable this feature:
aaa accounting command {privilege level} tacacs_server_tag
Example 6-14 demonstrates how to configure command accounting on the Cisco ASA, depending on the user’s privilege level.
Example 6-14 Enabling Command Accounting
![]()
In Example 6-14, the accounting command is enabled for users that execute a privilege level 15 command.
Alternatively, you can configure command accounting via ASDM by navigating to Configuration > Device Management > Users/AAA > AAA Access > Accounting and selecting Enable under the Require Command Accounting for ASA section.
Troubleshooting Administrative Connections to Cisco ASA
You can authenticate administrative connections by using RADIUS, TACACS+, or the Cisco ASA local user database. The following debug commands are available to troubleshoot AAA problems when you are trying to connect to the Cisco ASA for administration:
• debug aaa—Provides information about the authentication, authorization, or accounting messages generated and received by the Cisco ASA.
• debug radius—To troubleshoot RADIUS transactions, use this command, which has several options:
• all—Enables all debug options
• decode—Shows decoded RADIUS transaction messages
• session—Provides information about all RADIUS sessions
• user—Enables you to capture RADIUS transaction information for a specific user connection
• debug tacacs—To troubleshoot TACACS+ transactions, use this command with either of the following options:
• session—Provides detailed information about all TACACS+ transactions
• user—Allows you to capture TACACS+ transaction information for a specific user connection
If you enter debug tacacs without any options, the debug command is enabled with the session option by default. Example 6-15 includes the output of debug tacacs during a successful Telnet authentication.
Example 6-15 Output of debug tacacs During a Successful Telnet Authentication

In Example 6-15, User1 connected to the Cisco ASA via Telnet. The Cisco ASA was configured to perform authentication via an external TACACS+ server. The first highlighted line shows that User1 attempted a connection to the Cisco ASA. The second highlighted line shows the ASA requesting the user’s password. The user information is sent to the TACACS+ server and is finally authenticated. The third highlighted line shows that the authentication was successful. Example 6-16 includes the output of debug tacacs during an authentication failure. In this example, the incorrect password was entered by the user and the TACACS+ server failed its authentication.
Example 6-16 Output of debug tacacs During a Failed Authentication Because of Wrong Password

In Example 6-17, the TACACS+ server was offline or unreachable.
Example 6-17 Output of debug tacacs While TACACS+ Server Is Unreachable

The highlighted lines show how the Cisco ASA attempts to communicate with the TACACS+ server three times and finally finishes all authentication transactions. The show aaa-server command is useful while troubleshooting and monitoring authentication transactions. Example 6-18 includes the output of the show aaa-server command for all TACACS+ transactions.
Example 6-18 Monitoring and Troubleshooting TACACS+ Transactions with the show aaa-server Command

In Example 6-18, the Cisco ASA processed a total of four authentication requests. Three of those requests were successfully authenticated and one was rejected by the TACACS+ server.
Troubleshooting Firewall Sessions (Cut-Through Proxy)
The techniques to troubleshoot cut-through proxy sessions on Cisco ASA are similar to those mentioned in the previous section. Additionally, the show uauth command can be used to display information about authenticated users and current transactions. Example 6-19 shows the output of this command.
Example 6-19 Output of the show uauth Command

In Example 6-19, a total of three concurrent authentication requests were processed by the Cisco ASA. One is currently being processed.
Summary
Cisco ASA supports several AAA solutions for different services. It ensures the enforcement of assigned policies by allowing you to control who can log in to the Cisco ASA or in to the network. Additionally, it controls what each user is allowed to do. It can also record security audit information by using accounting services. This chapter covered how Cisco ASA can use authentication services to control pass-through access by requiring valid user credentials. It also demonstrated how Cisco ASA is configured to authenticate administrative sessions from Telnet, SSH, serial console, and ASDM.
This chapter demonstrated how authorization can enforce per-user access control after authentication is done. It guided you through configuring the Cisco ASA appliance to authorize management and administrative commands and network access.
The Cisco ASA accounting services track traffic that passes through the security appliance, enabling you to have a record of user activity. This chapter also demonstrated how you can enable accounting to track and audit user activity.