Chapter 14. Configuring Cisco Content Security and Control Security Services Module
The Content Security and Control Security Services Module (CSC SSM) provides mechanisms to detect and take action on viruses, worms, Trojans, and other security threats. It supports the inspection of SMTP, POP3, HTTP, and FTP network traffic. However, it does not support HTTPS. The CSC SSM provides the capability of blocking compressed or very large files that exceed specified parameters. Additionally, it can detect and remove spyware, adware, and other malware.
The following additional features are available if the Plus level of the CSC SSM license is purchased:
• Protecting against spam and phishing fraud (SMTP and POP3 traffic).
• Content filtering to allow or prohibit email traffic containing configurable keywords.
• URL blocking based on configurable parameters.
• Filtering of web traffic according to predefined categories that you allow or disallow, such as adult or mature content, games, chat or instant messaging, or gambling sites.
• Filtering of FTP files according to predefined rules.
This chapter covers the setup, integration, features, and configuration of the CSC SSM.
Initial CSC SSM Setup
Complete the following steps to perform the initial setup and configuration of the CSC SSM.
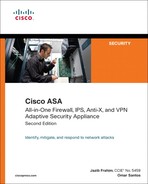
Step 1. Log in to the Adaptive Security Device Manager (ASDM) and navigate to Configuration > Trend Micro Content Security > CSC Setup > Wizard Setup and click on the Launch Setup Wizard button. The dialog box shown in Figure 14-1 is displayed.
Figure 14-1 CSC SSM Setup Wizard—License Activation
Step 2. The first step during the initial configuration is to install the CSC SSM license on the device. Enter the activation code for the Base License to enable antivirus, anti-spyware, and file-blocking capabilities on the device, as shown in Figure 14-1. If you have purchased the Plus license, enter the Plus License Activation code. If not, this field is blank. The Plus license includes anti-spam, anti-phishing, content filtering, URL blocking and filtering, and web reputation.
Step 3. Click Next. The IP Configuration screen shown in Figure 14-2 is displayed.
Figure 14-2 CSC SSM Setup Wizard—IP Address Configuration

Step 4. The CSC SSM has a management interface that is used for configuration and monitoring. As a best practice, it is recommended that you configure this interface in your management network. Enter the IP address, mask, and gateway information for the management interface of the CSC SSM under the Management Interface section. In this example, the IP address of the management interface is 172.18.104.189, with a subnet mask of 255.255.255.0. The gateway is 172.18.104.129.
Step 5. Enter the primary and secondary DNS server IP addresses under the DNS Servers section.
Step 6. If a proxy server is used within your network, enter the IP address and port under the Proxy Server section.
Step 7. Click Next. The Host Configuration screen shown in Figure 14-3 is displayed.
Figure 14-3 CSC SSM Setup Wizard—Host Configuration

Step 8. The screen shown in Figure 14-3 enables you to enter the hostname for the CSC SSM and the name of the domain in which the CSC SSM resides under the Host and Domain Names section. The hostname used in this example is NY-CSC-SSM and the domain name is securemeinc.com.
Step 9. Enter the domain name for incoming email under the Incoming E-mail Domain Name section. The domain name securemeinc.com is used in this example.
Step 10. Enter the email address of the domain administrator, the IP address of the email server, and the port number used by the email server under the Notification Settings section. The administrator email used in this example is [email protected], the email server IP address is 172.18.104.123, and the port used is 25.
Step 11. Click Next. The Management Access Configuration screen shown in Figure 14-4 is displayed.
Figure 14-4 CSC SSM Setup Wizard—Management Access Configuration

Step 12. Enter the IP addresses for the hosts or networks that are allowed to connect to the CSC SSM for management purposes under the Host/Network section. After you have defined the specific hosts/networks, click Add to add it to the Selected Hosts/Networks table.
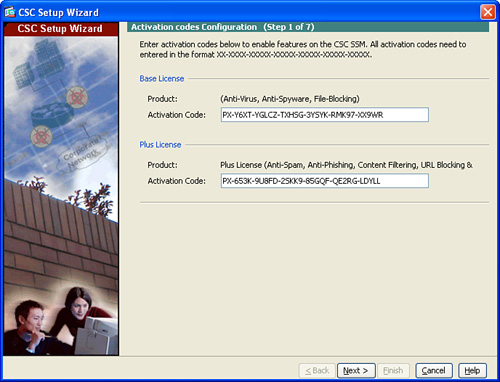
Step 13. Click Next. The Password Configuration screen shown in Figure 14-5 is displayed.
Figure 14-5 CSC SSM Setup Wizard—Password Configuration
Step 14. The dialog box illustrated in Figure 14-5 enables you to change the password required for management access to the CSC SSM. After you have changed the administrative password, click Next. The Traffic Selection for CSC Scan screen shown in Figure 14-6 is displayed.
Figure 14-6 CSC SSM Setup Wizard—Traffic Selection for CSC Scan

Step 15. The dialog box illustrated in Figure 14-6 enables you to define what traffic will be inspected by CSC SSM. Click Add to specify the interface, source, and destination of network traffic for the CSC SSM to scan, and the specific service/protocol. In this example, all traffic is inspected by all interfaces (globally).
Step 16. Click Next.
Step 17. A summary of all the settings that you have made with the CSC Setup Wizard is displayed. Click Finish to complete the CSC Setup Wizard and save the configuration.
Note
You must verify that the Cisco ASA’s clock has been set correctly because the CSC SSM synchronizes its clock with the Cisco ASA. The CSC SSM may experience problems if the time is not correct.
Configuring CSC SSM Web-Based Features
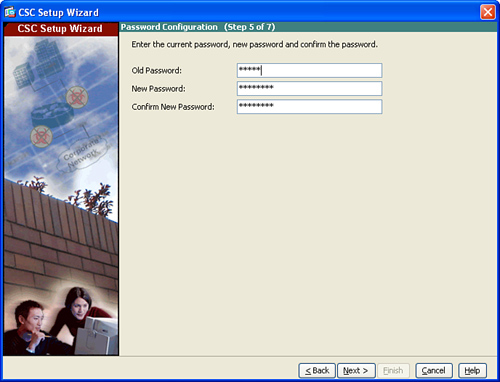
After you have completed the initial CSC SSM configuration, you can start configuring each of the supported features. This section covers the configuration of web-related features. You can configure web-related CSC SSM features by navigating to Configuration > Trend Micro Content Security > Web in ASDM or by connecting directly to the CSC SSM web management console with a web browser. The screen shown in Figure 14-7 is displayed.
Figure 14-7 CSC SSM URL Blocking and Filtering
The screen in Figure 14-7 enables you to launch the CSC SSM web management console to configure the following features:
URL Blocking and Filtering
When you navigate to Configuration > Trend Micro Content Security > Web in ASDM, the URL Blocking section shows whether or not URL blocking is enabled on the CSC SSM. To configure URL blocking, click Configure URL Blocking to open the CSC SSM web management console.
Complete the following steps to configure URL blocking:
Step 1. After you click on Configure URL Blocking in ASDM, log in to the Trend Micro InterScan web management console. Navigate to Web (HTTP) > URL Blocking. The screen shown in Figure 14-8 is displayed.
Figure 14-8 Configuring URL Blocking

Step 2. Under the Via Local List tab, you can enable or disable URL blocking. In this example, URL blocking is already enabled.
Step 3. The CSC SSM has a policy framework based on user and group identity to apply URL filtering and blocking policies to specific groups or individual users. Check the Include User Group Policies check box to enable URL blocking by users or groups.
Step 4. The URLs to Block section enables you to define a particular website name or IP address to be blocked. You can also define a URL keyword to include sites within a specific keyword. In this example, the keywords facebook and myspace are used to block these social networking sites. When you define these keywords the CSC SSM blocks all associated sites and folders such as the following:
Note
After entering the website, URL keyword, or string under the Match field, click the Block button to add it to the Block List or the Do Not Block button to add it to the Block List Exceptions. Entries remain as blocked or exceptions until you remove them.
Alternatively, you can also use a string to block a site matching an exact match of that string. Note that you must configure the correct domain name within the URL. For instance, in this example, www.example.com/facebook will not be blocked.
Similarly, you can enter specific URLs, keywords, or strings and click the Do Not Block button to define blocking exceptions.
Step 5. You can also create a block and exception list in a text file and import it to the CSC SSM. The text file must have the title URL Blocking Import File followed by [block] and [allow] entries, as shown in the following example:

Step 6. Click Save to save the configuration.
Note
The Notification tab allows you to create a notification message to be displayed to the user when an attempt to access a blocked URL via HTTP is detected.
File Blocking
When you navigate to Configuration > Trend Micro Content Security > Web in ASDM, the File Blocking section shows whether or not file blocking is enabled on the CSC SSM. To configure file blocking, click Configure File Blocking to open the CSC SSM web management console and configure file blocking.
Complete the following steps to configure file blocking.
Step 1. After you click on Configure File Blocking in ASDM, log in to the Trend Micro InterScan web management console. Navigate to Web (HTTP) > File Blocking. The screen shown in Figure 14-9 is displayed.
Figure 14-9 Configuring Web File Blocking

Step 2. Check the types of files to be blocked by file type group. Unchecked groups of file types that will not be blocked. The following file types are predefined:
• Audio/Video (.avi, .cda, .m2a, .mov, .mp3, .mpeg, .mpg, .ra, .rm, .ram, .wav, .wma)
• Compressed (.zip, .tar, .arj)
• Executable (.exe, .dll, .vbs)
• Images (.bmp, .gif, .jpg, .png, .svg)
• Java (.jar, .java)
• Microsoft Office (.csv, .doc, .pdf, .ppt, .rtf, .txt, .wpd, .xls)
Step 3. Optionally, check Block Specified File Extensions to add file types that are not listed in the group file types.
Step 4. Click Save to save the configuration.
Note
The Notification tab enables you to create a notification message to be displayed to the user when an attempt to access a blocked file type is detected.
HTTP Scanning
When you navigate to Configuration > Trend Micro Content Security > Web in ASDM, the Scanning section shows whether or not HTTP scanning is enabled on the CSC SSM. To configure HTTP scanning, click Configure Web Scanning to open the CSC SSM web management console and configure HTTP scanning.
Complete the following steps to configure HTTP Scanning:
Step 1. After you click on Configure HTTP Scanning in ASDM, log in to the Trend Micro InterScan web management console. Navigate to Web (HTTP) > Scanning. The screen shown in Figure 14-10 is displayed.
Figure 14-10 Configuring HTTP Scanning

Step 2. Make sure that HTTP Scanning is enabled. However, the Disable button allows the administrator to disable HTTP scanning if it is not needed.
Step 3. Select All HTTP Traffic to scan all HTTP traffic (the default setting), or select Only Webmail to scan only traffic matching the scanning parameters.
Step 4. Select the method used to scan the file types under the Default Scanning section. The following are the available scanning methods:
• All scannable files—Scans all files regardless of the file type. This is the default setting.
• IntelliScan—Used to scan only files identified by Trend Micro, using true file type identification.
• Specified file extensions—Enables you to specify file types to be scanned.
Step 5. In the Compressed File Handling section, you can define how to handle password-protected files that cannot be scanned.
Step 6. Additionally, you can configure the CSC SSM not to scan a compressed file if it meets any of the following configurable parameters:
• Decompressed File Count Exceeds—Specify a file count threshold. The value can be from 1 to 1000 (the default value is 500).
• Size of a Decompressed File Exceeds—The value can be from 1 to 50 MB (the default value is 30 MB).
• Number of Layers of Compression Exceeds—The value can be from 2 to 20 (the default value is 3).
• Size of Decompressed Files Is “x” Times the Size of Compressed File—The value can be from 2 to 200 (the default value is 100).
Step 7. The Action on Unscanned Compressed Files buttons enable you to configure the CSC SSM to deliver an unscanned compressed file or to delete the file.
Step 8. The Large File Handling section enables you to configure the CSC SSM not to scan files that are larger than a specific value. Additionally, you can set the action on large files to Deliver or Delete.
Step 9. The Enable Deferred Scanning for Files Larger Than field enables you to specify a file size (in megabytes) to be processed using deferred scanning. Deferred scanning is a way to scan a large file for threats that divide the file into multiple chunks. The first part of the file is downloaded to the client; this is while the CSC SSM still scanning subsequent chunks of the file. The values can be from 1 to 10 megabytes (MB). The default value is 2 MB.
Step 10. Select the type of spyware or grayware you would like the CSC SSM to detect under the Scan for Spyware/Grayware section. The available options are as follows
• Spyware
• Dialers
• Password Cracking Applications
• Adware
• Joke Programs
• Remote Access Tools
• Others
When the Others option is used, the CSC SSM may detect several commercial products. However, some of these programs can also be used with malicious intent or are unwanted applications in the network environment.
Step 11. Click Save to save the configuration.
Configuring CSC SSM Mail-Based Features
The CSC SSM supports both SMTP and POP3 threat detection and filtering. This section covers the configuration of the mail-based features supported by the CSC SSM.
SMTP Scanning
The CSC SSM supports the scanning of incoming and outgoing SMTP messages. This section covers the configuration of both.
Configuring SMTP Incoming Scanning
When you navigate to Configuration > Trend Micro Content Security > Mail in ASDM, the Scanning section under the SMTP tab shows whether or not scanning of incoming SMTP messages is enabled on the CSC SSM. To configure incoming SMTP scanning, click the Configure Incoming Scan hyperlink to open the CSC SSM web management console and configure incoming SMTP scanning.
Complete the following steps to configure incoming SMTP scanning.
Step 1. After you click on Configure Incoming Scan in ASDM, log in to the Trend Micro InterScan web management console. Navigate to Mail (SMTP) > Scanning > Incoming. The screen shown in Figure 14-11 is displayed.
Figure 14-11 Configuring Incoming SMTP Scanning

Notice that the screen displayed in Figure 14-11 is very similar to the screen used to configure HTTP Scanning.
Step 2. Make sure that SMTP Incoming Message Scan is enabled. However, the Disable button allows the administrator to disable SMTP message scanning if it is not needed.
Step 3. Select the method used to scan the file types under the Default Scanning section. The following are the available scanning methods:
• All scannable files—Scans all files regardless of the file type. This is the default setting.
• IntelliScan: Uses “True File Type” Identification—Used to scan only files identified by Trend Micro using true file type identification.
• Specified File Extensions—Allows you to specify file types to be scanned.
Step 4. Select Enable IntelliTrap to enable the IntelliTrap CSC SSM feature used to detect potentially malicious code in real-time compressed executable email attachments.
Step 5. The Compressed File Handling section enables you to define how to handle password-protected files that cannot be scanned.
Step 6. Additionally, you can configure the CSC SSM not to scan a compressed file if it meets any of the following configurable parameters:
• Decompressed File Count Exceeds—Specify a file count threshold. The value can be from 1 to 1000 (the default value is 500).
• Size of a Decompressed File Exceeds—The value can be from 1 to 50 MB (the default value is 30 MB).
• Number of Layers of Compression Exceeds—The value can be from 2 to 20 (the default value is 3).
• Size of Decompressed Files Is “x” Times the Size of Compressed File—The value can be from 2 to 200 (the default value is 100).
Step 7. The Action on Unscanned Compressed Files buttons allow you to configure the CSC SSM to deliver an unscanned compressed file or to delete the file.
Step 8. In the Large File Handling section (not shown in Figure 14-11) you can configure the CSC SSM to not scan files that are larger than a specific value. Additionally, you can set the action on large files to Deliver or Delete.
Step 9. The Enable Deferred Scanning for Files Larger Than field (not shown in Figure 14-11) enables you to specify a file size (in megabytes) to be processed by deferred scanning. Deferred scanning is a way to scan a large file for threats that divide the file into multiple chunks. The first part of the file is downloaded to the client; this happens while the CSC SSM is still scanning subsequent chunks of the file. The values can be from 1 to 10 megabytes (MB). The default value is 2 MB.
Step 10. Select the type of spyware or grayware you would like the CSC SSM to detect under the Scan for Spyware/Grayware section. The available options are the following:
• Spyware
• Dialers
• Hacking Tools
• Password Cracking Applications
• Adware
• Joke Programs
• Remote Access Tools
• Others
When the Others option is used, the CSC SSM may detect several commercial products and other “hacking tools”. However, some of these programs can also be used with malicious intent or are unwanted applications on the network environment.
Step 11. The Action tab displays a set of options that enable you to specify what action is taken when a malware or spyware has been detected in an incoming SMTP message. The least risky option is to clean the message and the most risky choice is to deliver the message anyway.
Step 12. The Notification tab displays a set of options that enable you to define who will be notified when a security risk has been detected. An inline notification message that would appear in all incoming email can also be composed. The settings on the Notifications tab are optional. A default message appears in each message text box; however, you can change this to any message that best fits your environment and security policies.
Step 13. Click Save to save the configuration.
Configuring SMTP Outgoing Scanning
When you navigate to Configuration > Trend Micro Content Security > Mail in ASDM, the Scanning section under the SMTP tab shows whether or not scanning of outgoing SMTP messages is enabled on the CSC SSM. To configure outgoing SMTP scanning, click the Configure Outgoing Scan hyperlink to open the CSC SSM web management console and configure outgoing SMTP scanning. The configuration steps for configuring outgoing messages are exactly the same as the ones described for scanning incoming SMTP messages. In this instance, navigate to Mail (SMTP) > Scanning > Outgoing.
SMTP Anti-Spam
The CSC SSM supports the detection and blocking of spam email messages. When configuring the SMTP anti-spam feature, you can configure Content Scanning or Email Reputation. The following sections cover the configuration of both features.
Configuring SMTP Anti-Spam Content Scanning
When you navigate to Configuration > Trend Micro Content Security > Mail in ASDM, the Anti-spam section under the SMTP tab shows whether or not Anti-spam Content Scanning is enabled on the CSC SSM. To configure Anti-spam Content Scanning, click the Configure Anti-spam (Content Scanning) hyperlink to open the CSC SSM web management console.
Complete the following steps to configure Anti-spam Content Scanning:
Step 1. After you click on Configure Anti-spam (Content Scanning) in ASDM, log in to the Trend Micro InterScan web management console. Navigate to Mail (SMTP) > Anti-spam > Content Scanning. The screen shown in Figure 14-12 is displayed.
Figure 14-12 Configuring Anti-Spam Content Scanning

Step 2. Make sure that SMTP Anti-spam is enabled. To disable it, click on the Disable button.
Step 3. The Filter Threshold section enables you to configure one of three levels of spam settings (High, Medium, and Low). The most restrictive is the High option. Use this setting carefully because it also has a greater chance of false positives. The least restrictive option is Low, which is the default. When the Low option is selected, the CSC SSM blocks the most commonly known spam mail; however, it may allow some spam to enter your network. It is always recommended to start with the Low setting and increase it later as needed. This minimizes the implementation impact within your organization.
Step 4. In the Approved Senders section, you can define specific email addresses or domain names that are always allowed to send email. The CSC SSM does not scan messages from these addresses and domain names for spam purposes. This applies to both SMTP and POP3 traffic. In this example, the domain name securemeinc.com is entered.
Step 5. The Blocked Senders section enables you to define specific email addresses or domain names that are automatically classified as spam. In this example, the email address [email protected] is automatically classified as a spam originator.
Step 6. The Importing Approved or Blocked List section enables you to import a preformatted file that can include a list with approved or blocked senders.
Step 7. In the Action tab, you can configure the action taken when an SMTP message is classified as spam. The available actions are as follows
• Stamp Message—An identifier is placed in the subject field of all messages identified as spam. This can be the word “spam” or any other identifier that better suits your security policy and requirements. This is the default action.
• Delete Message—This is used to delete the offending message before it reaches the recipient.
Click Save to save the configuration.
Configuring SMTP Anti-Spam Email Reputation
Email Reputation is a Trend Micro feature set that enables you to leverage a combination of Real-time Blacklist (RBL+) and Quick IP Lookup (QIL) technologies to determine whether an email message is spam or a legitimate message.
When you navigate to Configuration > Trend Micro Content Security > Mail in ASDM, the Anti-spam section under the SMTP tab shows whether or not Anti-spam Email Reputation is enabled on the CSC SSM. To configure Anti-spam Email Reputation, click the Configure Anti-spam (Email Reputation) hyperlink to open the CSC SSM web management console.
Complete the following steps to configure Anti-spam Email Reputation:
Step 1. After you click on Configure Anti-spam (Email Reputation) in ASDM, log in to the Trend Micro InterScan web management console. Navigate to Mail (SMTP) > Anti-spam > Email Reputation. The screen shown in Figure 14-13 is displayed.
Figure 14-13 Configuring Anti-Spam Email Reputation

Step 2. Make sure that SMTP Anti-spam (Email Reputation) is enabled. However, the Disable button allows the administrator to disable SMTP antispam scanning if it is unnecessary.
Step 3. The Email Reputation feature is available only if you have purchased the Plus license. Select the service level that applies to you under the Set Service Level section. Two options are available (Standard and Advanced). The Standard level uses a reputation database that includes numerous well-known spam sources.. To obtain more information about the standard service level offering, go to http://us.trendmicro.com/go/ers/standard.
The advanced service level combines entries from the standard reputation database with a dynamic real-time reputation database that includes anti-spam technology provided by Trend Micro.
Step 4. In the Approved IP Address(es) section, you can configure exceptions to the Email Reputation checking. In this example, the 192.168.0.0/16 and 10.0.0.0/8 networks are added to the approved list.
Step 5. The Action tab enables you to define the action to be taken when a host matches the Standard and Advanced service level databases entries within an incoming SMTP message. You can select the following actions:
• Intelligent Action—Permanently denies connection to email from any IP address in the standard or advanced reputation database. The CSC SSM sends a “Mail-blocked” message to the sender, although this message is configurable. This is the default action.
• Close Connection with No Error Message—Permanently denies connection to email from any IP address in the standard or advanced reputation database with no explanation sent to the sender.
• Bypass (Not Recommended)—Enables you to detect and log the offending IP address; however, the offending message is delivered to the recipient.
Step 6. Click Save to save the configuration.
SMTP Content Filtering
Content filtering is a feature where the CSC SSM intercepts and prohibits the delivery of email messages that contain offensive or restricted content.
When you navigate to Configuration > Trend Micro Content Security > Mail in ASDM, the Content Filtering section under the SMTP tab shows whether or not SMTP Content Filtering is enabled on the CSC SSM. To configure SMTP Content Filtering, click the Configure Incoming Filtering (for incoming email messages) or the Configure Outgoing Filtering (for outgoing email messages) hyperlink to open the CSC SSM web management console.
Note
The incoming and outgoing filtering sections contain the same configuration parameters. The only difference is the direction of the email messages.
Complete the following steps to configure SMTP Content Filtering.
Step 1. After you click the Configure Incoming Filtering or the Configure Outgoing Filtering hyperlink in ASDM, log in to the Trend Micro InterScan web management console. Navigate to Mail (SMTP) > Content-Filtering and select either Incoming or Outgoing.
Step 2. Make sure that SMTP Incoming Content Filter is enabled. To disable it, click on the Disable button.
Step 3. In the Message Size section, you can filter incoming messages of a certain size (in kilobytes (KB) or megabytes (MB)). If nothing is configured, the CSC SSM does not filter incoming messages based on a specific size.
Step 4. The Message Subject and Body section enables you to define words within the subject or body of an email message to be filtered.
Step 5. The Message Attachment section enables you to define words within a filename of an email message attachment. You can also configure wildcards with an asterisk [*]. For example, to match any attachment that has the word confidential within its filename, use *confidential*.
Additionally, you can also filter attachments based on the file type. The following file types are predefined:
• Audio/Video (.avi, .cda, .m2a, .mov, .mp3, .mpeg, .mpg, .ra, .rm, .ram, .wav, .wma)
• Compressed (.zip, .tar, .arj)
• Executable (.exe, .dll, .vbs)
• Images (.bmp, .gif, .jpg, .png, .svg)
• Java (.jar, .java)
• Microsoft Office (.csv, .doc, .pdf, .ppt, .rtf, .txt, .wpd, .xls)
Step 6. The Actions tab enables you to define the action taken when a violation has been detected in an incoming email message or attachment.
Step 7. The Notifications tab enables you to define different notification messages sent to an administrator, the sender, or the recipient when a violation has been detected in an incoming email message or attachment.
Step 8. Click Save to save the configuration.
POP3 Support
The CSC SSM also supports the POP3 email protocol. The following POP3 features are supported:
• POP3 Scanning
• Anti-spam
• Content Filtering
These features are configured exactly the same way that the previous SMTP features were configured. The only difference is that there is no concept of incoming vs. outgoing in POP3 (that is, all messages are incoming).
Configuring CSC SSM File Transfer Protocol (FTP)
The CSC SSM supports the scanning and blocking of files being transferred via FTP. The following sections describe how to configure FTP scanning and file blocking.
Configuring FTP Scanning
When you navigate to Configuration > Trend Micro Content Security > File Transfer in ASDM, the File Scanning section shows whether or not scanning of files transferred via the FTP protocol is enabled on the CSC SSM. To configure FTP scanning, click the Configure File Scanning hyperlink to open the CSC SSM web management console.
Complete the following steps to configure FTP scanning:
Step 1. After you click on Configure File Scanning in ASDM, log in to the Trend Micro InterScan web management console. Navigate to File Transfer (FTP) > Scanning. The screen shown in Figure 14-14 is displayed.
Figure 14-14 Configuring FTP Scanning

Notice that the screen displayed in Figure 14-14 is very similar to the screen used to configure HTTP and SMTP Scanning.
Step 2. Make sure that FTP Scanning is enabled. To disable it, click on the Disable button.
Step 3. Select the method used to scan the file types under the Default Scanning section. The following are the available scanning methods:
• All Scannable Files—Scans all files regardless of the file type. This is the default setting.
• IntelliScan: Use “True File Type” Identification—Used to scan only files identified by Trend Micro via true file type identification.
• Specified File Extensions—Enables you to specify file types to be scanned.
Step 4. The Compressed File Handling section enables you to define how to handle password-protected files that cannot be scanned.
Step 5. Additionally, you can configure the CSC SSM not to scan a compressed file if it meets any of the following configurable parameters:
• Decompressed File Count Exceeds—Specify a file count threshold. The value can be from 1 to 1000 (the default value is 500).
• Size of a Decompressed File Exceeds—The value can be from 1 to 50 MB (the default value is 30 MB).
• Number of Layers of Compression Exceeds—The value can be from 2 to 20 (the default value is 3).
• Size of Decompressed Files Is “x” Times the Size of Compressed File—The value can be from 2 to 200 (the default value is 100).
Step 6. The Action on Unscanned Compressed Files buttons enable you to configure the CSC SSM to deliver an unscanned compressed file or to delete the file.
Step 7. The Large File Handling section enables you to configure the CSC SSM to not scan files that are larger than a specific value. Additionally, you can set the action on large files to Deliver or Delete.
Step 8. The Enable Deferred Scanning for Files Larger Than field enables you to specify a file size (in megabytes) to be processed using deferred scanning. Deferred scanning is a way to scan a large file for threats that divide the file into multiple chunks. The first part of the file is downloaded to the client; this happens while the CSC SSM is still scanning subsequent chunks of the file. The values can be from 1 to 10 megabytes (MB). The default value is 2 MB.
Step 9. Select the type of spyware or grayware you would like the CSC SSM to detect under the Scan for Spyware/Grayware section. The available options are as follows:
• Spyware
• Dialers
• Hacking Tools
• Password Cracking Applications
• Adware
• Joke Programs
• Remote Access Tools
• Others
When the Others option is used, the CSC SSM may detect several commercial products. However, some of these programs can also be used with malicious intent or are unwanted applications on the network environment.
Step 10. The Action tab displays a set of options that enable you to specify what action is taken when a malware or spyware has been detected in an incoming FTP file. The least risky choice is to clean the file and the most risky choice is to allow the file anyway.
Step 11. The Notification tab displays a set of options that enable you to define who will be notified when a security risk has been detected. The settings on the Notifications tab are optional. A default message appears in each message text box; however, you can change this to any message that best fits your environment and security policies.
Step 12. Click Save to save the configuration.
FTP File Blocking
When you navigate to Configuration > Trend Micro Content Security > File Transfer in ASDM, the File Blocking section shows whether or not FTP file blocking is enabled on the CSC SSM. To configure FTP file blocking, click Configure File Blocking to open the CSC SSM web management console.
Complete the following steps to configure FTP File blocking:
Step 1. After you click on Configure File Blocking in ASDM, log in to the Trend Micro InterScan web management console. Navigate to File Transfer (FTP) > File Blocking. The screen shown in Figure 14-15 is displayed.
Figure 14-15 Configuring FTP File Blocking

Notice that the screen displayed in Figure 14-15 is very similar to the screen used to configure HTTP File Blocking.
Step 2. Make sure that File Blocking is enabled. To disable it, click on the Disable button.
Step 3. Check the types of files to be blocked by file type group. Unchecked groups of file types will not be blocked. The following file types are predefined:
• Audio/Video (.avi, .cda, .m2a, .mov, .mp3, .mpeg, .mpg, .ra, .rm, .ram, .wav, .wma)
• Compressed (.zip, .tar, .arj)
• Executable (.exe, .dll, .vbs)
• Images (.bmp, .gif, .jpg, .png, .svg)
• Java (.jar, .java)
• Microsoft Office (.csv, .doc, .pdf, .ppt, .rtf, .txt, .wpd, .xls)
Step 4. Optionally, check Block Specified File Extensions to add file types that are not listed in the group file types.
Step 5. The Notification tab enables you to create a notification message to be displayed to the user when an attempt to access a blocked file type is detected.
Step 6. Click Save to save the configuration.
Summary
The CSC SSM provides a framework to help you detect and take action on viruses, worms, Trojans, and other security threats. It supports the inspection of SMTP, POP3, HTTP, and FTP network traffic. This chapter provided step-by-step instructions on how to configure HTTP scanning, file blocking, URL blocking, URL filtering, and web reputation features. The configuration of SMTP and POP3 email features was also covered in detail, as well as the configuration of FTP scanning and file blocking.