3. Setting Up Your Camera
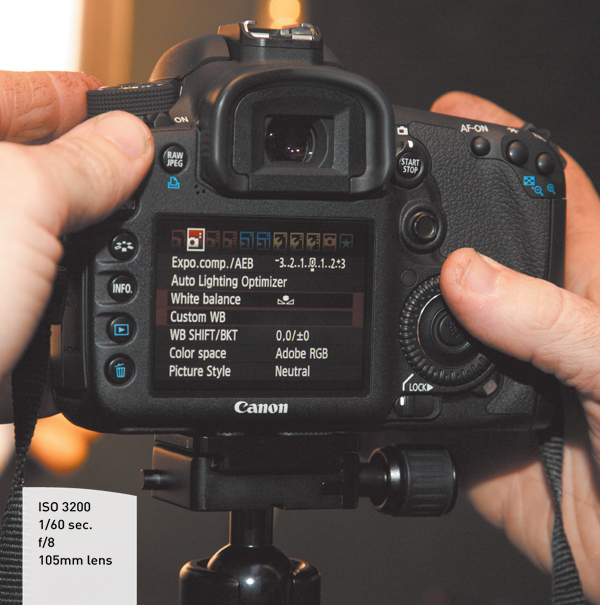
Photo by Lisa Robinson.
A DSLR camera is more like a personal computer than you might think. It’s capable of calculating adjustments based on the available light and action in the scene; it can adjust and control how the camera’s lens performs. In fact, most DSLRs have several features that allow you to take complete control of your camera.
Of course, those features require you to work through a menu system that makes setting up your TV set look easy. You’ll find a complex menu system coupled with a series of dials and buttons. Oh, and every camera model is different (even two from the same manufacturer).
Oh good, you’re still reading. Although configuring your camera’s features sounds complex, there are only a few key settings you need to worry about. In this chapter you’ll learn about every critical option. You may need to hunt or peck (or actually break out your camera’s user manual). But I’ll do my best to streamline what you need to look for.
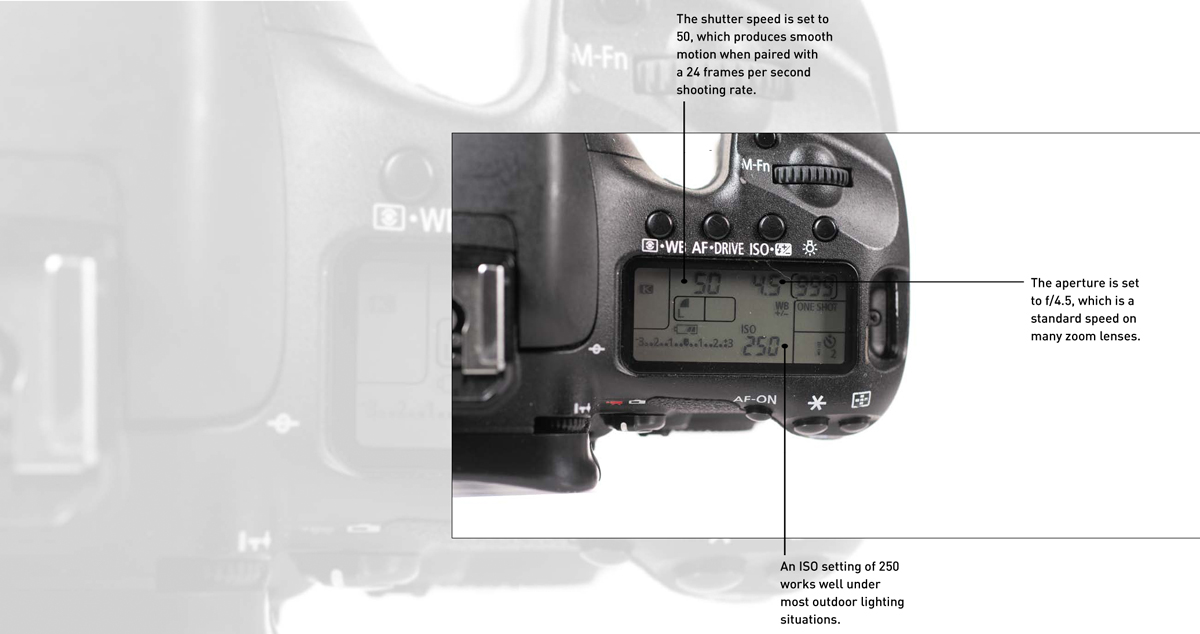
Poring Over the Camera
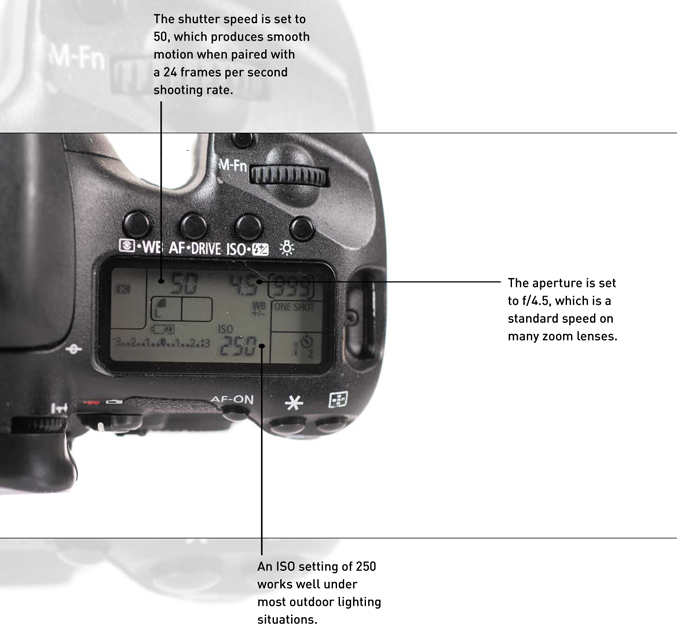
Properly configuring a camera for shooting video requires adjusting several options within the camera. These include adjusting the shutter speed for natural-looking motion as well as the aperture and the ISO to achieve a proper exposure. This level of control can typically only be attained when shooting in Manual mode.
Choosing a Frame Size
The first choice you need to make when setting up your camera is which frame size to shoot. Frame size is simply a description of how big the recorded image is. Unlike still photography where sizes and settings can vary quite a bit, usually there are only two high-definition (HD) video standards you can choose (Figure 3.1).
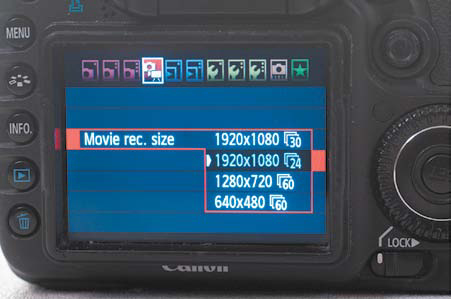
Figure 3.1. This chart illustrates the size differences between the two HD video sizes as well as standard definition video.
The two HD standards you’ll encounter are:
• 1920x1080. You should strongly consider shooting using this larger HD standard (often called 1080p or Full HD). It will give you the best possible resolution that HD video supports. This frame size is the most popular for HD and matches the resolution of most HD televisions.
• 1280x720. Cameras that record with a resolution of 1280x720 (often called 720p) are also perfectly capable of recording beautiful images. Although this is not the highest resolution, it is still considered high definition. Many first-generation DSLR video cameras only support this resolution.
Although DSLR cameras often offer standard definition video (sizes like 640x480), I recommend avoiding the lower quality formats.
When you look at your camera’s menu (Figure 3.2), you may find that your camera only offers one of these two frame sizes. Fortunately, both are acceptable for modern HD video production. The reason the video industry adheres to standards is to ensure that images recorded on cameras will be able to be edited and played back in a consistent manner.
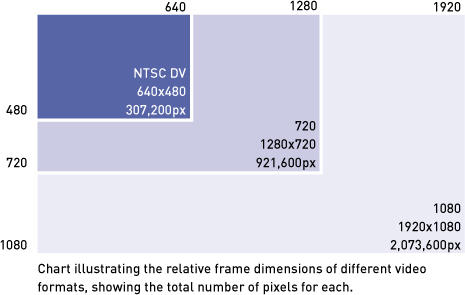
Figure 3.2. The Canon 7D can shoot two sizes of high-definition video and one standard-definition size.
Be sure that you look at the options supported by your editing system. Additionally, note that shooting and editing 1080p will place heavier demands on your computer, storage, and camera. If you’re only producing video for the Web or for sharing at home, it’s best to choose 720p due to the smaller frame sizes and better performance on older computers.
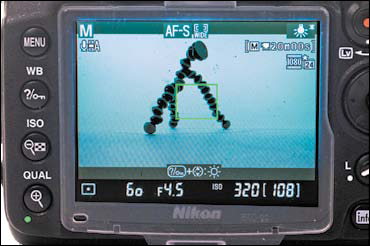
Figure 3.3. The gray bars indicate parts of the shot that are not written to the video file. This is due to differences in aspect ratio between the camera’s sensor and a television screen.
Choosing a Frame Rate
When you record a video file, you are essentially creating a container to hold multiple still images, or frames, that are captured in rapid succession (at a constant interval). The rate at which you capture these still images is called the frame rate.
Video works because of a concept called persistence of vision, which identifies how the human brain can connect a rapidly shown series of still images to perceive motion (Figure 3.4). The human eye starts to see smooth motion at about 8 frames per second. However, motion really starts to smooth out at rates of 24 frames per second and higher. For video on a DSLR, your camera will typically support multiple frame rates (Figure 3.5). When describing video, this frame rate is measured in seconds (and may contain a decimal value):
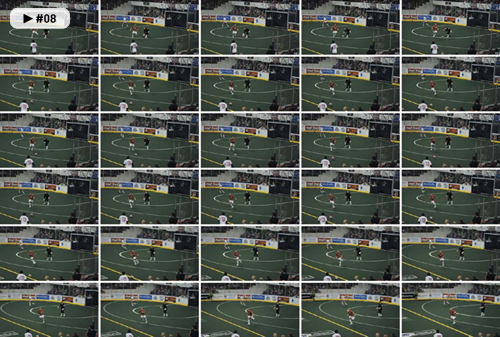
Figure 3.4. One second of video is actually 30 still images recorded in rapid succession (when recording at 30 fps).
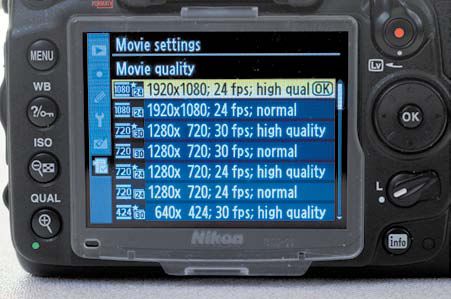
Figure 3.5. The Nikon D7000 supports several frame rates to choose from.
• 60 fps (59.94 fps). Standard frame rate for 720p HD used in the United States and other NTSC (National Television System Committee) based countries. NTSC is a set of video standards used in the United States and a few other countries.
• 50 fps. Standard frame rate for 720p HD used in Europe and other PAL (Phase Alternating Line) based countries. PAL is a set of standards for video used in Europe and other parts of the world.
• 30 fps (really 29.97 fps). The most common frame rate for broadcast in the United States and other NTSC based countries
• 25 fps. The common video frame rate used in Europe and additional markets around the world that are based on the PAL standard.
• 24 fps (can also be 23.98 fps). A rate that closely matches that of motion-picture film.
If you can’t find a desired frame rate, you might have to tweak the camera settings. Some cameras allow you to switch between NTSC and PAL modes. This can affect the available frame rates and sometimes even frame sizes.
It is important that you minimize mixing frame rates in a video editing project because it can lead to extra rendering time and jerky footage. Choosing a frame rate is often dictated by what you intend to do with the footage:
• If you want a motion-picture film look, 24 fps is very popular. This rate works well for Web, DVD, and Blu-ray distribution.
• If you are shooting footage that’s destined for traditional broadcasting, 25 fps for PAL or 30 (29.97) fps for NTSC is a common choice.
• If you want to achieve slow-motion effects, overcranking is the way to go. With overcranking, the camera records at a higher frame rate, and you can stretch the clip in postproduction to make smoother slow-motion effects.
Why Does Video Look Different than a Photo?
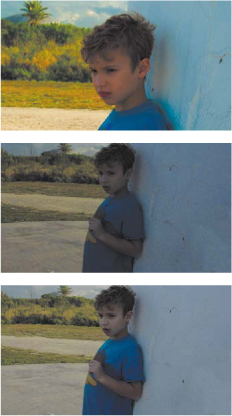
Figure 3.6. The top image was shot as a photo. The center image is an uncorrected video file, and the bottom image is a color corrected video clip. The still photo looks better because it was shot in a format that captured much more image data and color information. It was also shot using a slower shutter speed to let in more light.
White Balancing Your Camera
One of the most important settings on your camera that you need to choose is a white balance. This control allows you to set the overall color (or tone) for the scene. White is used as a reference point because it is the perfect blend of all the color channels. When a camera is properly set up, a white object will appear neutral with no color cast. Ideally, you should set your white balance correctly before shooting in a location, but you have some flexibility to fix your footage afterward in your editing application.
Using Auto White Balance
By default, your camera is probably set to use an automatic white balance (sometimes called AWB). The way that auto works is that the camera will analyze the frame and create an automatic setting that attempts to neutralize any color shift. This setting works pretty well for indoor shooting where lighting is consistent.
With that said, I am not a big fan of auto white balance. When shooting using this setting, your camera can be sensitive to other factors, such as a passing cloud or someone walking through the frame. Instead, it is a better idea to switch to a preset or even create your own.
Using a White Balance Preset
The presets on your camera will vary depending on the model and manufacturer. However, they are usually easy to understand when you think about them (Figure 3.7). Typically, the presets are named for the type of lighting they work best with (Figure 3.8):
• Daylight or Direct Sunlight. This option works best for general shooting under daylight conditions where the sun is readily visible.
• Shade. This option is used when shooting in sunlight and your subjects are in the shade. It tends to make the image more orange to compensate for the bluish tones of the shaded areas.
• Cloudy. This setting is similar to daylight but compensates for the sky having some cloud cover (which cools down the color temperature). Many prefer this setting because it is a little warmer.
• Tungsten or Incandescent. This white balance setting is designed for shooting indoors with standard lightbulb illumination.
• Fluorescent. This setting works best when shooting under standard fluorescent tube lights. However, some lights are daylight balanced, which would require you to switch to the daylight setting.
• Flash. You won’t use this option when shooting video because you can’t use a flash.

Figure 3.7. The list of white balance presets are named for the lighting conditions they’re designed for.
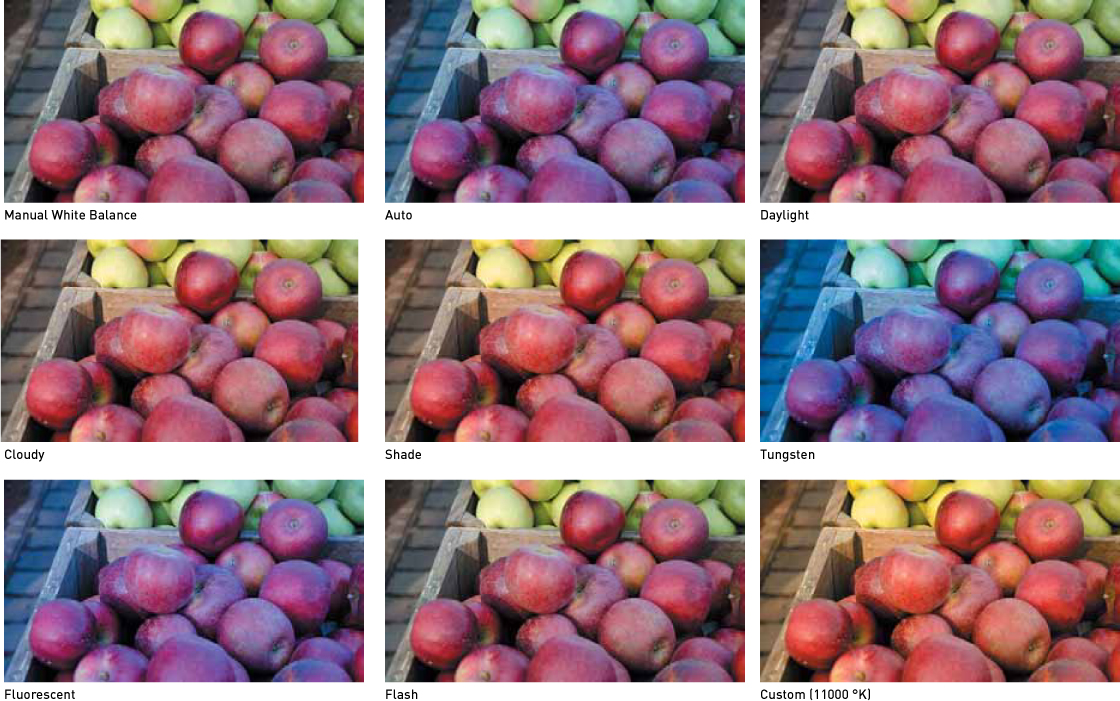
Figure 3.8. The same scene shot with different white balance settings produces very different results.
Manually Setting White Balance
Sometimes, you’ll want to manually set the white balance on your camera. For example, you might want to compensate for when multiple lighting sources are mixed together. You may also want to make a change to make a shot warmer or cooler for artistic purposes.
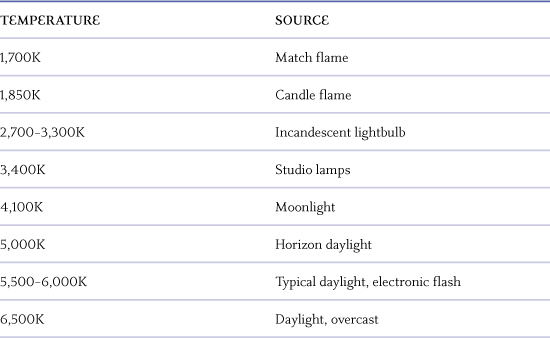
Table 3.1 lists the typical color temperature for different kinds of light. These temperatures can be used to adjust white balance in the camera.
Table 3.1. Color Temperatures for Light Sources
Using a Reference Image to Set White Balance
If memorizing a bunch of temperatures is too difficult and you aren’t happy with a built-in preset, it’s time to make your own preset. This is typically useful when shooting in a location that has mixed lighting (such as sunlight through a window combined with bulbs from inside).
The exact process will vary from camera to camera, but typically the process involves doing the following.
1. Shoot a reference photo with something white in it. The white should fill most of the frame. The subject can be a sheet of paper or a more accurate calibration target.
2. Choose the custom white balance option in your camera’s menu.
3. Select the reference image so the camera can calibrate itself (Figure 3.9).
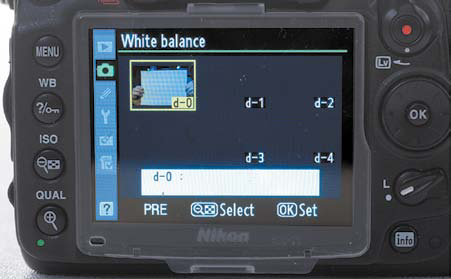
Figure 3.9. Using a reference image lets you accurately set the white balance. In this case, a piece of white paper is used to help the camera properly measure color.
4. Visually inspect the preset’s result and ensure that skin tones and key details in the shot look natural.
Choosing a Shooting Mode
Your DSLR offers several different shooting modes (Figure 3.10) to assist you in getting the right image. When shooting stills, I’m a big fan of Aperture Priority mode, which offers a great balance of control and lets me set the depth of field manually. Other shooting conditions may call for Program or Shutter Priority mode to properly expose the scene.
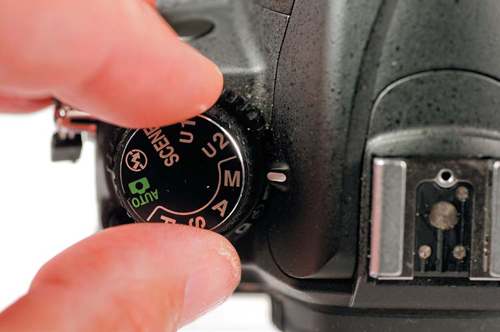
Figure 3.10. Choosing the right shooting mode is essential for getting proper exposure and the correct shutter speed.
Unfortunately, these modes don’t work when shooting video. You’ll need to switch your camera to Manual mode if you want the best results. This means you’ll have to tackle all of the decisions about how to set up your camera. Don’t worry; you’ll learn these settings throughout the next several chapters.
Why do you have to do all the work? Well, let’s examine the decisions you’ll need to make. Your shutter speed options are very limited when shooting video (typically between 1/50 and 1/100 of a second). Otherwise, the video will have stuttering or blurring motion.
Setting the aperture, on the other hand, is one setting you’ll want to take precise control over. Aperture has a huge impact on exposure and focus; as such, you’ll need to choose a setting that is visually pleasing and one that gives you adequate control (more details about aperture are in next chapter).
So, welcome to Manual mode. It takes a little getting used to, but it will make you a better photographer. After a few bumps along the way, you’ll get the hang of it and be less dependent on your camera and more on your eyes and brain.
Adjusting the Volume
It’s important that your camera be set to the correct audio levels when recording. If the levels are too low, you’ll hear lots of background noise when you boost the audio during editing. If the levels are too high (loud), you’ll hear popping or clicking. It turns out that when recording digital audio, you have less flexibility than older analog methods (like when recording to tape). Because the audio is basically a binary one or zero, it only has two possible values. Once you cross the 0 dBFS threshold on your volume meter, you will experience distortion or clipping.
The volume controls offered in cameras vary greatly from manufacturer to manufacturer. The most limited only allow for the audio to be on or off, which is undesirable because the camera will try to just run in Auto mode (called Automatic, Automatic Gain Control, or ACG) (Figure 3.11).
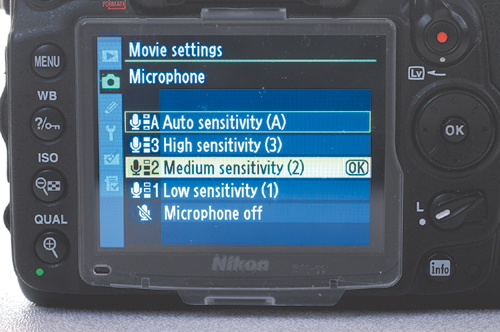
Figure 3.11. If your camera offers another choice besides Auto, always use it. I typically find that the Medium or Standard option works best.
Auto mode tends to lead to a lot of variance in the audio recording and whooshing of background noise due to sudden rises in between dialogue or in between primary audio. It is also problematic because the camera tries to make all sounds the same volume. As a result, you lose perspective as to how close an object is to the camera (which often serves as a point of view for those watching).
The solution is to adjust the recoding levels based on your scene. If your camera offers volume controls, use them. For many DSLR cameras, this may only be a Low, Medium, or High setting. However, many camera manufacturers are beginning to address user feedback and have been improving the audio controls in newly released cameras. Be sure to read Chapter 9, “Recording Sound,” for more on working with microphones and controlling your audio recording (Figure 3.12).
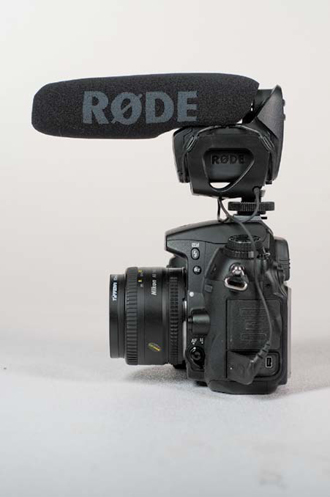
Figure 3.12. The use of external microphones and other audio devices is covered in Chapter 9.
Using Picture Styles or Controls
Many DSLR cameras offer controls that influence how the camera processes the image. These controls let you perform tasks like boosting contrast or adding more saturation to the image. At first glance, the use of Picture Styles, or Controls, can be very appealing.
Why Use Picture Styles or Controls?
The use of Picture Styles, or Controls, is a great way to make your footage look good right in the camera, especially if you’re concerned about being able to post the video online with less color correction or editing. Essentially, you can obtain a better sense of “what you see is what you get.”
Pictures Styles offer a number of presets that help improve your video. Some allow you to enhance the contrast in your scene (Figure 3.13). Others can be used to create a black-and-white image; you can also use them to boost colors. These presets are best learned through experimentation because there is a tremendous amount of variation between manufacturers.
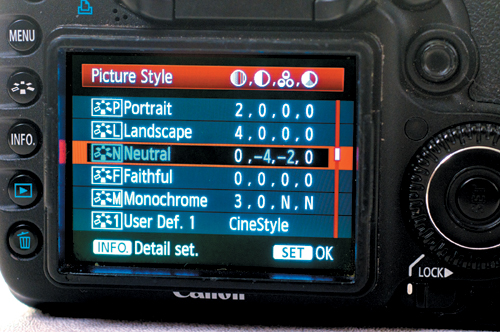
Figure 3.13. The Canon 7D offers several Picture Styles to choose from. More can be downloaded, and you can even create your own.
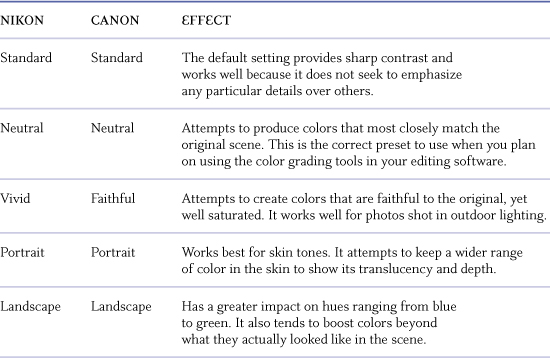
Typically, your camera will ship with a small collection of Picture Styles built in. Table 3.2 lists the standard options from Canon and Nikon.
Table 3.2. Picture Styles for Canon and Nikon Cameras
Typically, many more options are available from your camera manufacturer’s website. They can be loaded onto a camera memory card and then accessed via your camera’s menu system. Even a few third-party styles exist, such as the Technicolor CineStyle (http://bit.ly/technicolorcinestyle), which can be used on Canon EOS cameras.
Some manufacturers even provide end users with a utility to create their own styles. For example, Canon offers a free download of its Picture Styles Editor (www.canon.co.jp/imaging/picturestyle/editor/index.html). Nikon also offers a similar workflow with its View NX software.
Why Not Use Picture Styles or Controls?
Although these presets seem pretty appealing at first glance, the problem is that their use limits future flexibility. For example, if you shot with a monochromatic style that stripped out all color, that color is gone. Making a black-and-white image in your nonlinear editing software takes only seconds, so why not do it there instead, especially because you can change your mind?
Even if you just use certain options like Standard or Vivid, you can record an image with too much color or contrast. And the last thing you want to do is compress the histogram of image data too much. Although a punchy image with rich blacks and bright whites looks attractive, it can lose details in the shadows or highlights (Figure 3.14).
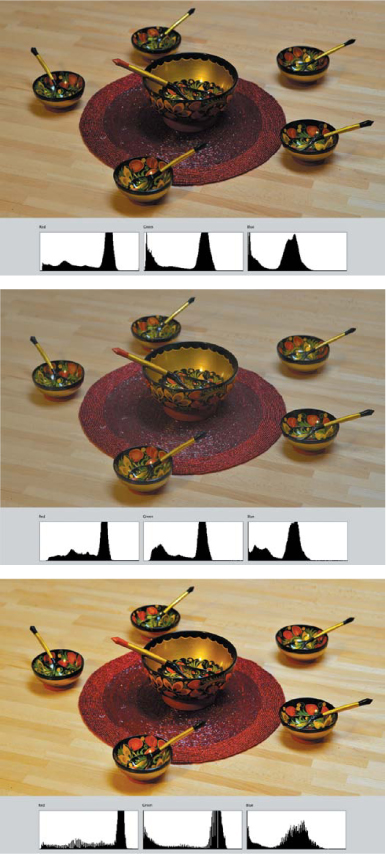
Figure 3.14. The image with styles looks more dramatic (top), but less information is captured by the sensor. It is generally better to shoot flat or neutral (center). You can then easily adjust the shot with color and exposure correction in your nonlinear editing application (bottom). In this case, a Curves and Saturation adjustment were added.
It is better to shoot a flatter image that is more evenly exposed. Styles like Flat or Neutral tend to work well because they capture the most information about the image.
Chapter 3 Assignments
Now that you know the essential settings that matter, it’s time for you to set up your camera correctly. Take the time to check your settings, and you’ll have a better shooting experience.
Choose Your Frame Size and Rate
Decide on the frame size and rate that works best for you. Try shooting a few clips with each setting for test purposes. Bring that footage into your editing application and see if your computer can properly handle all frame rates and sizes.
White Balance Manually
Explore how to manually set the white balance on your camera. Have your subject hold up a white piece of paper, and then use that as a reference to set the white balance. You may need to look up the specific steps on how to do this for your camera model (see “White Balancing Your Camera” for an overview of the process). Shoot footage with this custom setting. Then switch to a few of your camera’s presets and compare the shots.
Test Your Styles
Become familiar with the built-in shooting styles or profiles offered by your camera. Try shooting a few scenes using different styles. Also, be sure to use a flat or neutral style or profile. Save this footage to use when you read Chapter 11 “Editing Essentials,” so you can analyze it using your editing software tools.
Share your results with the book’s Vimeo group!
Join the group here: vimeo.com/groups/DSLRVideoFSTGS