4. Exposure and Focus
When you start to get serious about shooting great-looking video on your DSLR, you’ll likely begin to disable several of the automatic features on your camera. Additionally, you’ll likely be attracted to the more artistic capabilities, like a wider range of contrast and shallow depth of field. Of course, these artistic options can quickly become frustrating limitations without a solid foundation of knowledge combined with a good deal of practice.
Poring Over the Footage
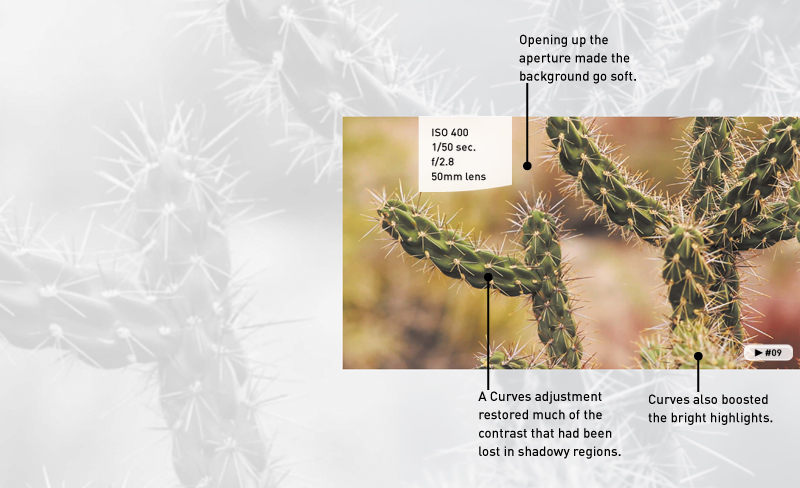
While shooting in the desert outside Albuquerque, New Mexico, I decided to capture the sunrise. Although the mountain range provided some interesting shots, I was drawn to the local vegetation. The light levels were a little low because I was shooting at dawn. So, instead of worrying about contrast levels in the camera, I shot “flat.” Making sure the image was in focus and exposed for the middle of the histogram, I was able to capture highlights and shadows. In postproduction, by using a Curves adjustment (see Chapter 11, “Editing Essentials”), boosting the contrast was easy and added a more dramatic punch to the image.
Poring Over the Footage
Shooting against a bright sky is always tough, especially with video. Unlike with a raw photo, it’s difficult to recover the highlights and lift the shadows. For this shot, I composed the shot so the sun was not in the frame. I then carefully metered the shot (by looking at my histogram on camera). I exposed so the tree and the sky were not over-or underexposed. This allowed me to darken the sky and lighten the tree in my editing application for a better end shot.
The Exposure Triangle
An essential concept in photography is the exposure triangle (Figure 4.1). Three settings in your camera affect how your camera exposes an image: ISO, aperture, and shutter speed.

Figure 4.1. By combining the three primary elements of photography—ISO, aperture, and shutter speed—you can achieve proper exposure.
If you’re used to shooting in Automatic mode, you may have never adjusted these properties. However, if you’ve used Aperture or Shutter Priority mode, you’ve started to dabble with manual control.
When shooting video, you’ll likely need to shoot entirely in Manual mode and take precise control over all three properties to get the exposure you need. Even if you think you’ve mastered exposure for your DSLR when shooting stills, keep reading. Getting the correct exposure for video is more complicated because of video’s limitations.
Shutter Speed
The first property you’ll set is the side of the triangle with the least flexibility. The shutter speed controls how long your camera stays open when you take a photo. It has a similar function in video because it greatly impacts how much light comes through. The shutter speed also controls the amount of motion blur in an image (Figure 4.2).
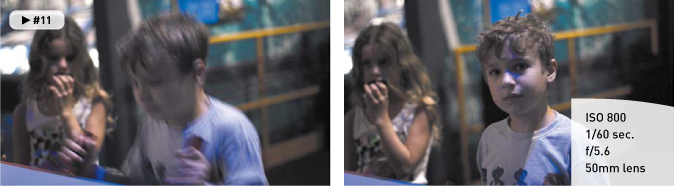
Figure 4.2. The camera was locked down on a tripod and properly exposed for this shot. When my son is moving quickly, the shutter speed emphasizes the motion blur; when he’s moving slowly or holding still, he’s much more in focus.
To simulate a filmic image, you need to use the optimum shutter angle to accompany the 24p frame rate in a DSLR. You can use this simple formula:
one second ÷ (frame rate x 2)
For example, when shooting 24 fps, you would set your light meter to a 1/48 second exposure time (you may only have 1/50 as a choice). At 30 fps, you would use 1/60 of a second. Following this guideline will help ensure that the motion blur created by the camera looks natural.
Can this rule be broken? Of course. There are two instances in which you will break this rule:
• If you want to take on a more stylized approach to your video, you can change the shutter speed. A long shutter speed creates more motion blur and streaking. A shorter speed creates more of a hyperaction look with staccato movements.
• If all else fails and you can’t get the exposure you need, you can change the shutter speed to let more (or even less) light into the camera. However, this change should only be made after you’ve exhausted the available aperture and ISO options.
Aperture
An easy way to think of aperture is as a window. The bigger the window, the more light you let into your camera (Figure 4.3). Easy enough, right? Of course, a lower number for the f-stop means a bigger opening (which can seem backwards at first).
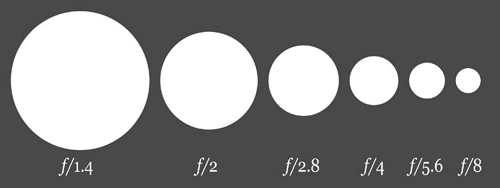
Figure 4.3. The lower the f-stop, the wider the aperture. A wider opening lets more light into your camera. Image from Wikimedia Commons. Image by Cbuckley and Dicklyon.
The advantage of having a lower f-stop means that you have more control over how much light gets into the camera. This sounds easy; just use the lowest number, right? Well, it’s not that simple. Here are a few details to consider:
• The more you open the aperture, the shallower the depth of field. When shooting with an f/1.4 lens, you can literally have a person’s nose in focus while the ears are out of focus.
• A lens with a lower f-stop is often more expensive. Most kit lenses have f-stops that range from f/4 to f/6. On the other hand, professional zooms can get as fast as f/2.8 and professional prime lenses (fixed focal length) can get even faster.
• Cheaper zoom lenses change their f-stop as you move through the zoom. This can lead to an exposure change in the middle of a video shot if you attempt to use the zoom options.
Typically, I’ll use aperture as my first control for exposure. After I’ve locked in my ISO, I then adjust my aperture to achieve a proper exposure. Often, aperture can be used to control the depth of field in an image (how soon the image starts to go out of focus). For many, this shallow depth of field is a desirable aspect to shooting on a DSLR.
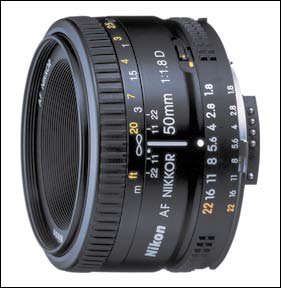
Figure 4.4. The AF Nikkor 50mm f/1.8D lens from Nikon is an affordable prime lens for Nikon cameras. It also offers manual aperture and focus rings, which provide flexible controls while recording video.
• When you need to shoot in very low-light conditions
• When you want to shoot with a shallow depth of field to blur your background or give the video a more filmic look
ISO
Your camera has an ISO setting that controls how sensitive its sensor is to light. The lower the number, the less sensitive the sensor is. For most cameras, an ISO setting of 100 is considered the base setting. This ISO works well when shooting under bright lights or sunny days.
As lighting conditions change, you can bump up the ISO setting to 200 or 400 to deal with mixed lighting or overcast days. Higher ISO settings, like 800, 1250, and even 1600, can be used for nighttime and low-light shooting. Many newer DSLR cameras offer even higher ISO settings.
However, it’s important to remember that cranking up the ISO is literally like turning up the volume. As the signal is amplified, the amount of visible noise increases (Figure 4.5). For still workflows, this noise can often be cleaned up with filters. For video, you’re out of luck. Too much noise will result in a grainy image with dancing pixels. Be sure to test your camera and determine how high of an ISO setting you’re comfortable using.
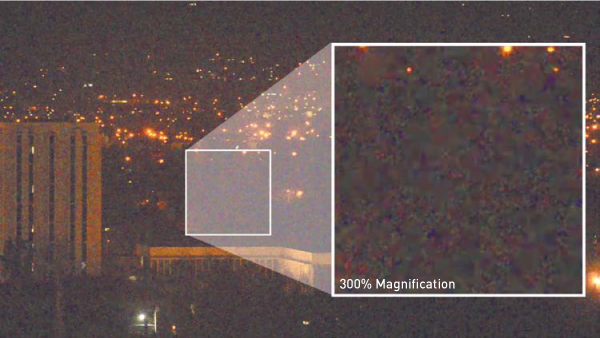
Figure 4.5. The noise becomes very visible in this low-light image. In this case, an ISO of 6400 was used; however, it produces an unusable image. Be careful not to boost your ISO too high when shooting in low light, or visible noise will ruin the shot.
I’ve found that many cameras have ISO settings that often stair step each other. This means that the noisiness of the image can vary greatly between settings. If a particular ISO looks too noisy, try dialing down one (or even up one). Certain ISO settings on your camera will perform better than others; the only way to know is to test your camera. You can really only see the noise on a larger screen like your computer or a television.
Controlling Depth of Field
If you’ve watched feature films, commercials, or music videos closely, you’ll notice that focus is often used creatively to control the viewers’ attention. Sometimes the camera will start out of focus and then slowly roll into clarity to reveal a subject. Other times the camera might rack in-between a person in the foreground to then find a person farther in the background.
A driving force in the popularity of DSLR cameras for video is the image sensor superiority these cameras offer. The large sensors allow for greater control in depth of field. When used properly, your footage can take on more cinematic qualities.
What Is Bokeh?
You’ve likely noticed that the way your camera blurs objects is different than how your eyes behave. In fact, there’s actually a Japanese word for this stylized blurring. It’s called bokeh (pronounced boh-kay or boh-kuh).
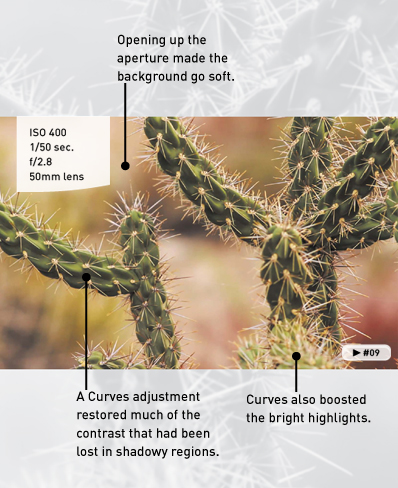
What’s the big deal? Well, many find the use of blur appealing. It can also be quite useful when you want to keep the focus on your subject and let the background go soft. The blurring often appears most in the brightest areas of an image (such as headlights or small lights in a skyline). However, bokeh can be used to simplify just about any background.
There are two ways to easily create bokeh in an image:
• Using a prime lens or a very fast zoom lens, you can open up the lens wide. Using a low f-stop (typically f/2.8 or lower) can really bring out a bokeh blur (Figure 4.6).
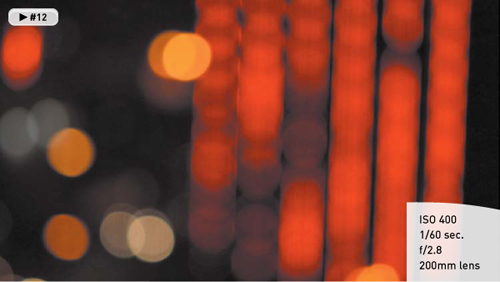
Figure 4.6. A theater marquee in San Jose, California, combined with passing traffic turns into an abstract shot when the camera is thrown far out of focus.
• Using a longer (telephoto) lens, you can compress the action of your shot. Instead of being close to your subject, move farther back and zoom in. This can create isolation due to a shallow depth of field (Figure 4.7).
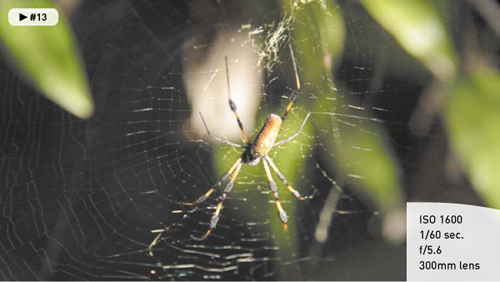
Figure 4.7. While hiking through a forest on Grand Bahamas I came across an intricate spider web. The scene was very low light, and my zoom lens was not very fast. By zooming all the way in from a greater distance, I threw the background out of focus and simplify it, which really helped the strands of the web to stand out.
The Impact of Light and Motion on Focus
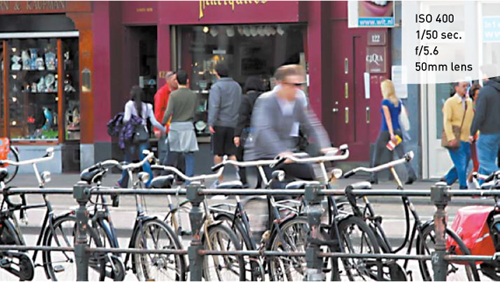
Figure 4.8. While shooting on an overcast day, the effect of motion on focus is easy to see. Faster moving subjects like the biker are the most out of focus, whereas stationary objects are clearer. For this image, the camera was also handheld, so the inherent image shake further softened the shot.
Foreground and Background
If you want to properly use bokeh or a shallow depth of field, you need to think about your foreground and background, and how you compose your shots. I’ll explore composition in Chapter 5, “Composing Shots.” For now, here are a few simple techniques you can try:
• When setting up an interview, portrait, or talking head, don’t position the subject against a wall. Instead, look for a more open space. Try shooting in a long hallway, a conference room, or even just through a doorway. Stacking the scene works well to create depth (Figure 4.9).
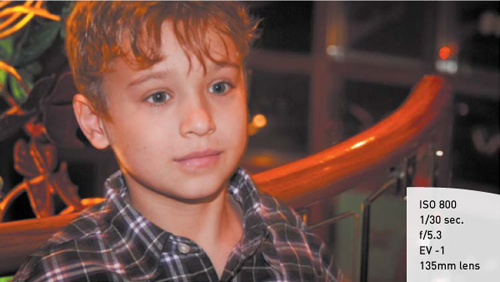
Figure 4.9. Positioning my subject at the top of a staircase allowed me to compose the shot so there were areas in the background that stretched off into the distance (and became defocused).
• If you’re shooting a large crowd or busy event, tweak the aperture settings on your camera. Open the aperture a bit and set your focus so the front of the group is in focus and the back starts out soft. As people move through the scene, they’ll reveal themselves (Figure 4.10).
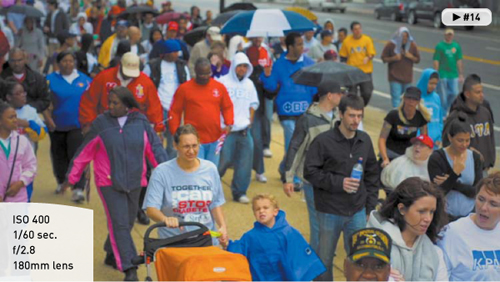
Figure 4.10. By zooming in from a greater distance, as well as shooting at an angle, I created a well-defined focus plane for this shot. People farther away are out of focus but reveal themselves as they move towards the camera.
• If you’re recording two people talking to each other, increase the distance between them. Then try using a zoom lens and adjust your zoom level to taste. This lens will make the two people appear close to each other but set one of the two more out of focus than the other.
Rack Focusing
As you become more experienced, you’ll want to try rack focusing (changing your focus from one object to another while recording). For example, you might want to go from a focused image to a blurry one as an animated transition. Or you might want to keep a moving subject in focus as the subject walks through a shot. Just keep in mind that rack focusing is not easy to do.
Modern lenses are actually more difficult to rack focus because lenses manufactured today are designed to autofocus more quickly. To do this, manufacturers set the lens so the focus ring only needs a small turn to move through all the focus positions. This feature is great for shooting stills because it’s much faster to shoot when the camera is in control. But it makes it more difficult for video.
For this reason, I seek out older lenses for my video kit. Stopping into just about any local camera store, you’ll find a used department with older prime lenses. Many of these lenses have focus rings that turn almost a full 360 degrees, which makes focusing by hand much easier because the ring is not as sensitive. If you can’t find an older lens that matches your camera (often a problem for Canon shooters due to changes in the lens mount system), you can purchase an adapter ring. If your lens has physical rings to control both aperture and focus, you can use an adapter from companies like Fotodiox or Novoflex (Figure 4.11).
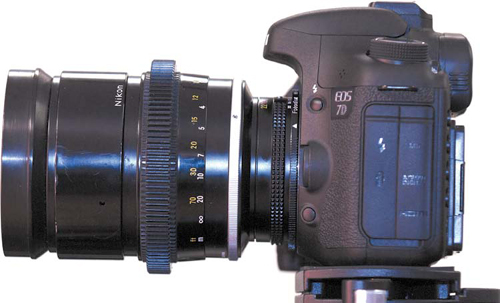
Figure 4.11. An older Nikon prime lens is attached to a newer Canon 7D using an adapter ring from Fotodiox. Lenses need manual aperture and focus rings to work properly with the adapters.
Setting Focus
Knowing that you appreciate the role of focus (as well as the challenges associated with it), it’s time to get practical. Making sure your shot is in focus is a critical step. Ideally, you’ll check focus before you record. Trying to adjust focus in the middle of a shot can leave portions of your footage unusable.
Take a Picture
One of the easiest ways to make sure your footage is in focus is to let the camera do it for you. Most lenses support the ability to autofocus while still being manually adjusted. Hold down the camera’s shutter release halfway to engage the autofocus ability. Doing this before you turn on your LCD’s LiveView feature is usually fastest, but you can typically still do this once the LCD is active.
When you have focus, you can start recording. Better yet, shoot a still photo first. The image will be a much higher resolution, which can come in handy if you need to make physical prints. Additionally, the photo will capture useful metadata about the camera and lens settings that the video will not. A photo provides information about exposure, f-stop, aperture, ISO, shutter speed, and more. This is a great way to learn from your mistakes as well as successes.
Zoom, Zoom, and Check
If want to check focus, you need to take a few extra steps. Just turning on the LCD and glancing at it won’t cut it. The small screen makes everything look more in focus because it can’t show you all the pixels at once. The reduced image size creates the illusion of a sharper image.
If you want to really see what is in focus, you’ll need to zoom, and then zoom some more. If you’re using a zoom lens, zoom in as tight as possible on your subject. Zooming in on an area like the eyes works well; a button on a shirt works well too. You’ll then need to digitally zoom.
Typically, you’ll find a Zoom button (look for a magnifying glass with a plus symbol in it) on your camera. Pressing it will enlarge the image on your screen and only show you part of the image (Figure 4.12). You may need to use the command dial to navigate around the zoomed in pixels. Find the detail area that you want to focus on.
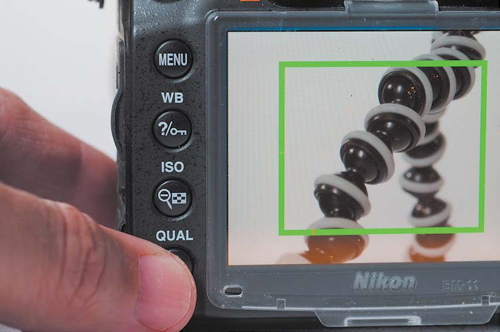
Figure 4.12. Zooming in on your LCD can help you check focus before you roll a video shot.
You can then use the focus ring on your camera to tweak the focus. Make minor turns to find the ideal focus. If needed, adjust the aperture and ISO settings of your camera to refine the depth of field. When you’re satisfied, you can either press the Zoom Out button or just press the Record button to roll the camera.
Maintaining Focus
If you’re shooting a stationary subject from a stationary camera, focus is pretty dang easy. But when one object starts to move, it gets a bit more difficult. If both the subject and camera are set in motion, you begin playing a game of chase that often leaves the shot slightly soft with rack focuses as you try to find the subject clearly.
The Myth of Autofocus
If you read the marketing materials that accompany most DSLR cameras, they promise useful autofocus features. Just turn on the intelligent tracking in your camera and the camera will lock on a face, follow your subject, and keep the subject in focus. Sounds great, right? In theory, yes.
Unfortunately, these controls are pretty useless in practice. Relying on autofocus will result in the camera making continuous adjustments. Chances are it will latch onto the wrong subject. Pan or tilt the camera just a little and suddenly the camera may start searching for focus.
Film and video professionals do not use autofocus when shooting video. Sure, it’s fine to engage autofocus to lock in a clear shot before rolling, but don’t expect the camera to maintain focus for you. It just doesn’t work; even the best systems make your video look amateurish and jarring.
Practicing Focus
So how do you get shots that are in focus? The same way that you get great composition—practice, practice, practice. With time, you’ll get the hang of things. Turning your focus ring will get easier with time. You’ll master the small adjustments needed to smoothly transition between focus points.
Of course, there’s nothing wrong with practicing a tough shot either. A film or video pro will often rehearse a complex shot, having the subject stand on certain marks or move through a location slowly. Additionally, don’t be afraid to repeat a shot a few times. Getting multiple “takes” improves your chances of getting the right footage and gives you choices when you sit down to edit.
Change Your f-stop
The more you open your aperture, the more light you allow into the camera. That’s good news when shooting in low light except that the depth of field gets shallower. If you’re having a hard time focusing, close down the aperture. Switching to f/8 is immensely easier to focus than f/1.4.
Of course, making a change in aperture will dramatically change your exposure. To compensate, you can make these changes (which are in order of preference):
• Add more light to the scene. Use video or available lights, change locations, open the blinds, and so on. All of these actions will give you more light to work with.
• Change your ISO to increase the sensitivity of your camera. Many modern DSLR cameras can shoot at ISO 1200 or even 1600 without introducing too much noise.
• Lower your shutter speed to allow more light to reach your camera sensor. If you don’t have a lot of action in the scene, switching from 1/50 or 1/60 to 1/30 will dramatically increase the light without much impact on image quality.
Using a Loupe
As a still photographer, you’re probably used to squinting into the small viewfinder for hours on end. The proper use of a viewfinder lets you accurately compose a shot. Most viewfinders also offer useful overlays to judge exposure and provide other technical information about the shot you’re about to take.
Unfortunately, when shooting video on your DSLR, the viewfinder stops working because the camera’s mirror must stay up when capturing video. I discussed the importance of the camera’s LCD in Chapter 2, “Essential Equipment.” A good LCD can go a long way, but the addition of one critical piece of gear—a loupe—can dramatically improve your ability to judge focus and exposure.
Several manufacturers sell loupes that magnify the image on the back of the LCD panel. The loupes typically enlarge the image two to three times, making it much easier to see critical focus (Figure 4.13). A loupe helps you see just how much of your shot is (or is not) in focus. Some viewfinders attach using a series of bands, whereas some attach to a snap on the frame. Others attach to the bottom of your camera or to the hot shoe plate on top (where an external flash would go). Each manufacturer takes its own approach and offers several compelling reasons to explain why its loupe is the best.
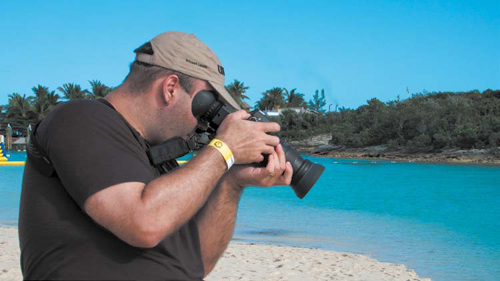
Figure 4.13. Here I’m using a Zacuto Z-Finder to better judge exposure and focus when shooting. The bright sun at the beach caused a lot of light pollution, which made seeing the camera’s LCD unassisted more difficult.
Here are a few additional benefits to using a loupe:
• A loupe can block out light pollution, making it easier to judge exposure and contrast.
• A loupe can make the camera more stable by creating an additional point of contact with your eye. This can lead to less camera shake, especially for handheld shooting.
• Some viewfinders even contain a diopter, which can help adjust for minor vision issues or when an eyeglass wearing shooter takes off his glasses.
A good loupe costs between $100 and $400. The addition of a loupe can be thought of as investing in a lens for the back of your camera. Here are a few recommended manufacturers:
• Zacuto Z-Finder. www.zacuto.com
• Hoodman Cinema Kit Pro. www.hoodmanusa.com
• LCDVF. www.kinotehnik.com
• Cavision MHE3Q-P. www.cavision.com
Your DSLR may offer a swivel LCD, which can be very useful when you’re not holding the camera at eye level. For example, you can angle it downward when holding the camera over your head to shoot a concert or an event. When shopping for a camera, make sure the LCD has proper contrast and color fidelity when you hold the camera at an irregular angle.
Using a Viewfinder or Monitor
To truly see how your video looks, you’ll want to look at it in a 1:1 viewing environment. In other words, one pixel in the footage file equals one pixel on a screen. This is pretty easy to do when you edit after shooting but takes some extra steps to do while shooting.
Why Monitor Externally?
Even film and video professionals use external monitors when on set or on location. Other crewmembers, like the director, art director, or makeup artist, also need to check fine details in how the subject and sets look. In fact, the director of photography will often walk over and double-check that the shot is meeting the technical requirements for focus and exposure. After all, the LCD and built-in viewfinders of even professional cameras can too easily hide flaws in the video signal.
Your camera likely includes an HDMI port that’s capable of sending out a high-quality digital signal. You can connect this port to a computer display, television, professional monitor, or electronic viewfinder to see what you’re shooting on a larger or higher-resolution screen. This makes it much easier to judge focus and exposure.
Using a Monitor
Many computer monitors and television sets include an HDMI port. This makes it convenient to use an off-the-shelf computer display or television for a relatively low cost, and by using the HDMI connection, you can see your image on a screen that is much larger than the camera’s LCD. Although the color and exposure of these screens are not 100 percent accurate, they do provide better guidance on how the shot will look.
Many pros and serious enthusiasts also invest in a dedicated field monitor designed for DSLR video workflows. These are often lightweight (made from materials like aluminum) and measure 6–10 inches. Companies like Marshall Electronics and SmallHD offer battery-operated monitors that are designed to attach to a camera’s hot shoe for easy mounting and use in the field. These monitors vary greatly in price and often offer professional features to help with focus and exposure via onscreen overlays.
Make sure you get a very long HDMI cable or an extension cable. You’ll want to avoid putting the camera’s HDMI port under tension. Also, long cables are easier to snake out of the way to prevent any accidentally tripping, which can send both a person and a camera flying.
Using a Viewfinder
Most professional video cameras include a high-quality electronic viewfinder (EVF) for checking image quality while recording. These devices offer screens similar in size to a camera’s LCD but use much higher-quality screens with denser pixels. As with a high-resolution screen (like a “retina display”) on a smart phone, these screens make it much easier to see fine details.
High-quality EVF screens can often be combined with a loupe to create a truly professional monitoring solution (Figure 4.14). With a true viewfinder, you can clearly see exposure and focus. EVF screens often include easy-to-access buttons that turn on overlays to assist with exposure, focus, and composition.
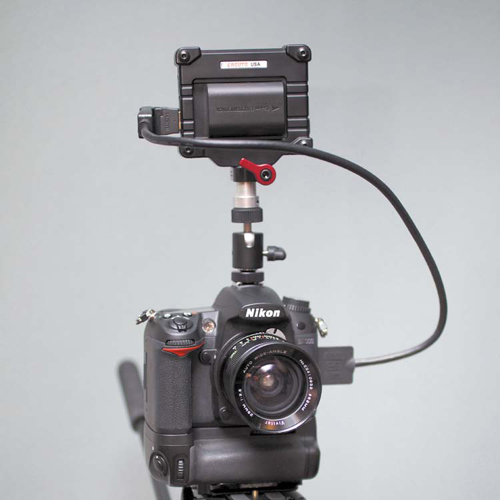
Figure 4.14. The Zacuto Electronic Viewfinder, combined with Zacuto’s loupe, creates a complete monitoring solution.
Although EVF screens are not cheap (typically ranging from $400–$800), they make a big difference in the type of video you shoot. I find that investing in a loupe and an EVF is comparable in price to buying a new lens. Spending money on the back of the camera often has a bigger impact on the quality of images you acquire than buying another lens for the front of your camera.
Chapter 4 Assignments
Learning how to master exposure and focus is the subject of several chapters in this book. When recording video with your DSLR, you’ll find that these two technical hurdles can be quite challenging. Take the time to practice these skills repeatedly because you’ll always find challenges ahead.
Experiment with the Exposure Triangle
Try different combinations of ISO, aperture, and f-stop with your camera in Manual mode. Attempt to achieve a proper exposure while experimenting with the depth of field options your camera offers.
Record a Shot with Bokeh
Set your camera’s aperture as wide open as possible. Then try racking focus until you can create bokeh. When you have the basics down, move on to blurring a background while leaving a foreground subject in focus.
Manually Set Focus
Using the camera’s LCD panel, set your zoom lens to magnify your subject. Then, using the Magnify buttons, increase the magnification on the LCD panel. Using the focus ring, try to manually focus your camera.
Share your results with the book’s Vimeo group!
Join the group here: vimeo.com/groups/DSLRVideoFSTGS