
2. Essential Equipment

It’s important to understand the role equipment plays in capturing great footage. You’ll quickly discover that you’ll depend on having some key pieces of equipment and the knowledge to use them to create great shots. If you put the right tools in the wrong hands, you’ll get subpar results. And if you put the wrong tools in the right hands, you’ll still get poor results. The magic really starts to happen when the right tools for the job are placed in the hands of someone who knows how to use them.
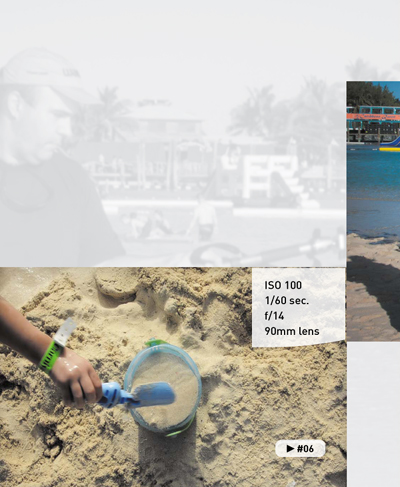
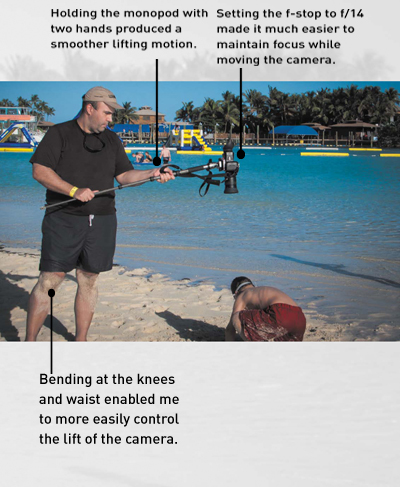
Poring Over the Camera
While shooting at the beach, I decided to put my monopod to good use. I wanted a platform that would help me get a more stable shot (without having to lug a tripod with me). Once there, I decided to use the monopod to extend my reach. By setting the f-stop to a higher aperture, I had a wide depth of field. I then lifted the camera up from a tight shot of the sand bucket to a wider shot to show more of the sandcastle construction.
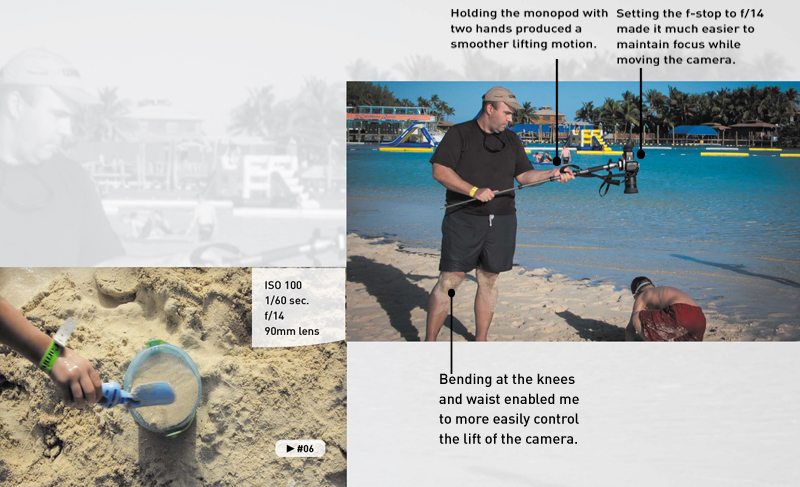
Photo by Meghan Ryan-Harrington.
Getting Started
Out of the box a DSLR camera can shoot pretty good video (audio, on the other hand, not so much). But which camera you use (or buy if you don’t have one) should depend on several factors. In this chapter I’ll first explore the features that really matter when using a DSLR camera to shoot video. Next, I’ll talk about the most useful items to add to your camera kit (like camera support) (Figure 2.1).
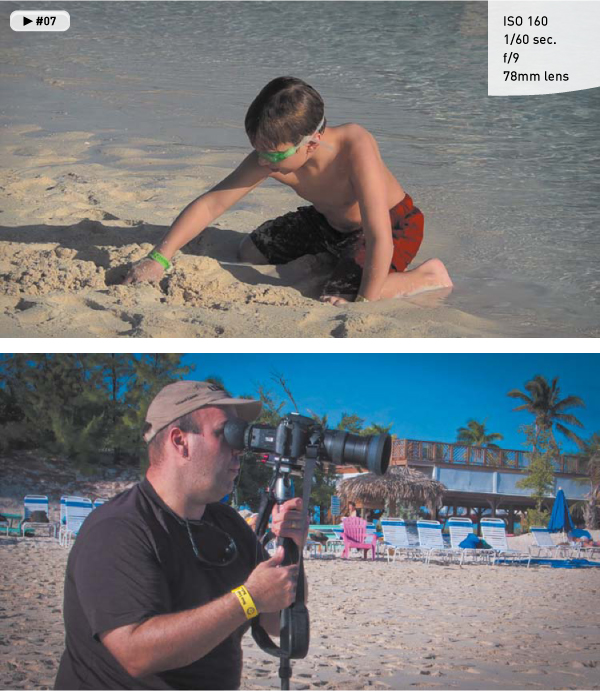
Figure 2.1. Using a monopod helped me stabilize my shot, which was useful because I was shooting from a distance. The use of a loupe also helped me better judge my exposure and focus. A monopod is very similar to a tripod but has only a single leg. It is useful for reducing camera bobbles and shakes. Photo by Meghan Ryan-Harrington.
I’ll also talk about two items you’ll burn through quickly: memory cards, which you’ll rapidly fill up as you shoot video, and batteries, which you’ll run down more quickly shooting video than you would stills. Then I’ll discuss tripods and lenses. You can always enhance your shooting by getting a stable shot or changing focal length using a different lens.
Don’t think you need to run out and spend more money to start. Just think about investing wisely in your hobby over time. I’ll try to help you evaluate which equipment helps the most. Let’s explore some essential equipment.
Choosing a Camera
If you haven’t bought a video-enabled DSLR yet, I’d like to offer some advice on which features matter most (if you’ve already bought your camera, be sure to look for these options or consider them when you upgrade to a new camera). Which camera you choose is largely a matter of personal preference. The most important detail to remember is to test the camera before purchasing it. This might mean borrowing a friend’s camera or heading down to the local camera/electronics store to give it a spin.
Existing Investment
When buying a new camera, you should first think about any investment you’ve already made. If you’ve already invested in digital photography gear, you may already have lenses from a certain camera manufacturer. It’s not uncommon for good lenses to cost as much as a camera (some cost even more). If you’ve already bought into one type of system or manufacturer, you may want to build upon your existing investment.
Ergonomics
If you read online websites or talk to salespeople in stores, it’s easy to believe that you need to buy the latest and greatest camera. But all those features don’t matter if the camera doesn’t feel right in your hands (Figure 2.2). The grip needs to feel comfortable and the body sized right. If it’s too big and heavy, you’ll fumble with the camera; too small and you’ll constantly feel like you’re about to drop it. Consider these factors:
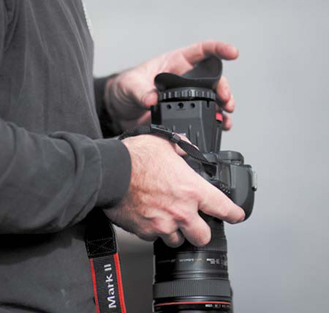
Figure 2.2. Make sure the camera feels comfortable and balanced in your hands. Photo by Lisa Robinson.
• Size. The body you choose should fit your hands well. If the body is too small, your hands will get in the way of the controls. Conversely, if the body is too big, you’ll find the body difficult to hold.
• Weight. Entry-level DSLR cameras tend to be rather light, which is great for portability. However, if you use a large lens, the cameras can become front heavy and difficult to hold. Higher-end and pro cameras tend to be heavier and work well with bigger lenses. Be sure to choose a camera that you can afford and that feels comfortable.
On-camera LCD Screen
When you shoot video on a DSLR camera, you won’t be using the eyepiece or view-finder. Instead, you’ll be using the camera’s LCD screen to compose the shot and check focus (Figure 2.3). Here are few simple criteria to use when choosing a camera body and LCD screen:
• Size. The larger the LCD screen, the better. A large screen makes it easier to see your footage. Most DSLR cameras have screen sizes of up to 3.5 inches diagonally.
• Resolution. A large LCD is useless if it doesn’t have a clear picture. Camera LCDs are measured in dots or pixels. A higher number indicates a higher resolution and therefore more clarity.
• Brightness. When you’re recording and reviewing video, you’ll be using the LCD screen. So, make sure you choose one that is bright enough to see (even in outdoor lighting).
• Flexibility. Some DSLRs offer viewfinders that you can angle for easier viewing because sometimes you’ll want to shoot from an angle other than eye level. Whether you want to get a low-angle, point-of-view shot or hold the camera above the crowd at a concert, a swivel LCD can help you achieve shots that would otherwise be impossible.
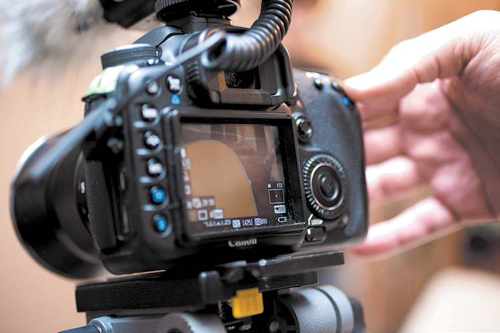
Figure 2.3. The LCD screen provides a preview of your footage when shooting. This is typically called Live View. Photo by Lisa Robinson
Recording Format
Different cameras record video to different formats. Typically, you won’t have a choice within the camera; rather, the format will vary between camera models and manufacturers. The trend has been that the newer the camera, the higher quality the video files are that are written to the memory card (Figure 2.4).
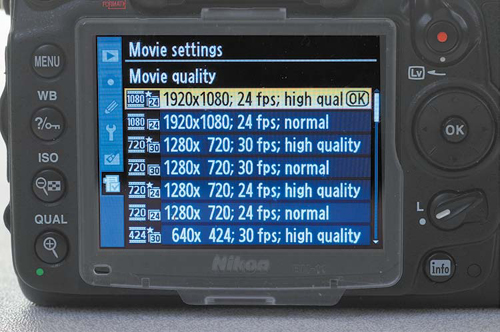
Figure 2.4. Most DSLR cameras offer multiple recording modes and even quality settings for recording video. Pictured here is the Nikon D7000.
When capturing video, the original signal created by the camera sensor is heavily compressed. This process is typically handled by a codec (compressor/decompressor). The camera applies compression to make the files smaller; when the video is played back on the camera (or your computer), it is decompressed into a full signal. This process is not exclusive to DSLR cameras. All video cameras apply some form of compression.
Why is compression important? Well, chances are that you’ll want to edit your video clips together into finished productions. To edit your footage, you can use entry-level software like iMovie or Adobe Premiere Elements, or more professional tools like Final Cut Pro X or Adobe Premiere Pro. So, it’s important to make sure that your camera’s compressed file format is compatible with the editing software you want to use. Otherwise, you’ll likely need to perform time-consuming steps to convert all of your footage before you can use it. You’ll explore the conversion and editing processes in more detail in Chapters 10 and 11.
The three most common formats used by video DSLR cameras include:
• H.264. The H.264 format is one of the most commonly used video formats on the market. It is used for capturing video and delivering it to the Web. The Canon 7D and the Nikon D7000 cameras (as well as many others) use this format.
• AVCHD. The AVCHD (Advanced Video Coding High Definition) format is owned jointly by Sony and Panasonic. It is used on a variety of cameras, such as the Panasonic Lumix GH2.
• Motion JPEG. The Motion JPEG or Photo JPEG format is an older format that was first adopted in early Nikon cameras that shot video. This format is not as broadly supported by video editing tools and has subsequently been dropped in favor of H.264. You should avoid this format if possible.
Recording Length
One way in which DSLR video cameras differ from traditional video cameras is their limits on recording time. Your camera can only record video for a finite amount of time before it needs to be stopped and restarted (Figure 2.5). This limitation can vary between camera models (often ranging from 5–20 minutes).
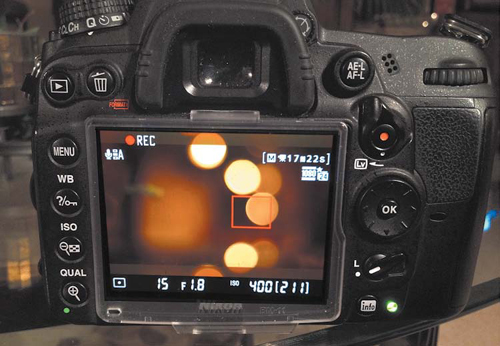
Figure 2.5. Record times will vary based on the camera manufacturer as well as the frame rate and recording quality chosen.
The primary reason for the recording length limit is the way that memory cards are formatted. Most DSLR cameras shoot to memory cards using the Windows FAT32 file system. This system can’t write files bigger than 4 GB, so recording time is capped to fit into smaller files.
If you plan to shoot events like sports or concerts, a longer file length can be useful. It is generally recommended that you don’t overshoot anyway (because it makes editing more difficult). But if you need long record times, make sure you consider this limit when choosing a camera.
Sensor Resolution
When you shop for a DSLR camera, much of the discussion will focus on the sensor size and resolution (Figure 2.6). Talk to any salesperson, and it seems like the megapixel wars will never end. A few years ago, an 8-megapixel camera was considered high end; now you can find that resolution in cell phones.
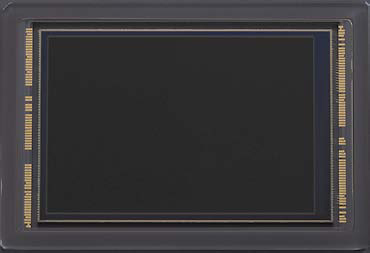
Figure 2.6. The sensor in your DSLR is a complex device that has benefits for shooting photos and video. Be sure to carefully read camera reviews when you’re shopping because not all sensors are created equal.
Extra megapixels are great when it comes to printing large photos. But anytime you’re shooting video on a DSLR, you’ll only be using a fraction of the available pixels on the sensor. For example, the 18 megapixel Canon T3i has a max resolution of 5184 x 3456 pixels when taking still photos. But when shooting video at 1920 x 1080, your effective megapixel count is only 2.1 megapixels!
Because you’ll likely use the body you choose for both stills and video, choose a camera body that meets the megapixel requirements for your still images and don’t worry about sensor resolution for video.
Sensor Size
Another area that is a dividing line when it comes to choosing a camera is the size of its sensor. Higher-end professional cameras often use a full-frame sensor, which matches the size of a 35mm film frame (Figure 2.7). But why does it matter what size the sensor is?
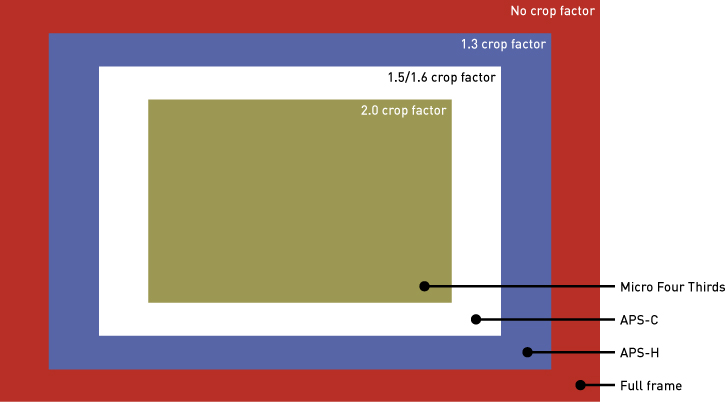
Figure 2.7. Sensor sizes vary greatly between camera models and manufacturers. Although a full-frame sensor is often held up as a gold standard, many affordable cropped sensor cameras are on the market that also perform well.
As a general rule of thumb, the larger the sensor the more control you’ll have over depth of field (DOF). The depth of field defines the distance between the closest and farthest object in a shot that appear to be sharp. Often when shooting photos and video, people choose to create a very shallow depth of field. The shallow depth of field look is often equated with film-style shooting, and it can be used artistically when designing shots. Additionally, a DSLR camera when combined with a good lens can shoot significantly higher-quality video under poor lighting conditions because the larger sensor can capture more light.
So you’re thinking, just buy a big sensor, right? Well, that’s easier said than done. Full-frame sensors tend to be found only on the most professional DSLR cameras.
The lenses used on these cameras also tend to be more expensive. When choosing a camera body, purchase the best you can afford.
When the sensor is not full size, it is typically referred to as cropped. Cropped sensors are more common than full-frame sensors, and cropped factors can be useful for video. For example, you can get a much longer reach with your lenses without having to purchase extremely expensive telephoto and super telephoto lenses.
Memory Cards—Lots of ’em
When you start shooting DSLR video, two facts will become clear. Memory cards are the fuel for your engine, and your engine runs hot. Essentially, when shooting video, you are capturing between 24 and 60 still images each second. Although these aren’t high-resolution, raw files, the file sizes do add up quickly. So, be sure to keep in mind that your storage will run out quicker in the video world.
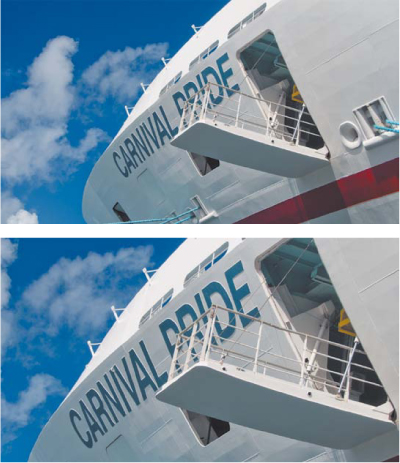
Figure 2.8. A cropped sensor will make a lens perform differently. The cropped sensor magnifies the image, giving it a different effective focal length.
• 1.5. This crop factor is employed by Nikon for its entire DX lineup, like the D7000 and D3100.
• 1.6. This crop factor is used by Canon for its APS-C bodies, like the 7D and the Digital Rebel series.
• 2.0. This is a large crop factor ratio that’s used by Micro Four Thirds image sensors, like the one featured on the Panasonic Lumix GH1 DSLR.
How Many Cards
The number or cards you need is really a matter of personal choice. Typically, a DSLR video camera consumes about 5.5 MB a second, which means 330 MB each minute or about 1 GB every three minutes. If you are covering a long event (such as a 90-minute performance), you’d want a 32 GB card. It’s a little different than shooting stills, isn’t it?
Using the preceding ratio, you should have a good idea of how much storage to buy. The key here is to learn restraint. Don’t just roll all the time. Choose to shoot video when your subjects or scenes look good (even going so far as to practice a shot). Remember to stop the camera from time to time. If you’re traveling on vacation, you may want to bring a laptop and a portable hard drive so you can off-load cards and back up your data.
Choosing a Format
The format your camera records will often be chosen for you. Some cameras support multiple card slots (even types), but most will give you only one option. The most common formats in use are CompactFlash (CF) and Secure Digital (SD) cards (Figure 2.9):
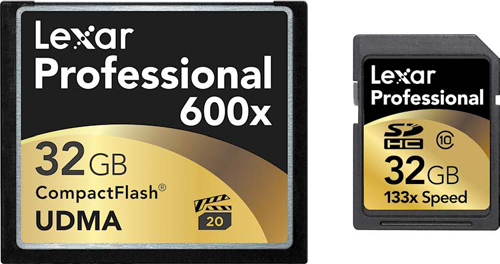
Figure 2.9. Although the CompactFlash format took the early lead in both speed and capacity, Secure Digital cards have caught up in most cases with the newer high-capacity formatted cards (SDHC). Image courtesy Lexar.
• CompactFlash cards. The CF format is a mainstay for professional digital photographers. These cards tend to be the most robust and sturdy, and less prone to accidental damage. Originally, CF cards were also significantly faster than early SD memory cards. When comparing costs per gigabyte, CF cards are typically more expensive than SD cards. CF cards tend to be offered in higher capacities with faster transfer speeds than SD cards.
• Secure Digital cards. SD cards are most common in consumer electronic devices—in everything from music players and photo frames to GPS units. Also, they are becoming increasingly common in DSLR cameras. It’s important to choose the new Secure Digital High Capacity (SDHC) format because of its higher capacity and transfer speeds that are fast enough for recording video. Make sure your card reader is rated for using SDHC cards because many older card readers are not.
Some camera manufacturers offer a CF and an SD slot. In this case you can often choose to route your video to one slot and stills to the other. This makes organizing your footage a bit easier.
Demystifying Card Speeds
Recording video on your DSLR requires that data constantly be written to storage. This means you’ll need fast storage that can keep up with the data rate of your DSLR camera. If your memory cards are inferior, the video may stutter (called dropping frames). In many cases a second-rate card can lead to video that doesn’t record at all.
Unfortunately, manufacturers (and marketers) make the whole process entirely confusing. You’ll find all sorts of creative language used to make memory cards sound faster than a rocket and more reliable than your dog. Such jargon can really get confusing when you’re shopping for storage that’s fast enough for video files.
In the simplest terms, you’ll want to choose a fast card. But what do the different card speeds really mean? For video, you’ll want a card that’s at least 133x. Usually, though, you’ll want cards rated at 300x or faster. Faster cards mean faster transfers to your computer and are less likely to cause a camera to overheat.
Another easy way to tell which cards to use is how they’re labeled. For CF cards, look for a UDMA (Ultra Direct Memory Access) rating (Figure 2.10). When choosing an SDHC card, look for Class 10 or higher.
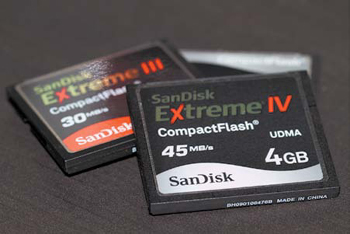
Figure 2.10. If your DSLR uses CF cards, make sure they carry a UDMA rating so they’re fast enough to handle video.
More Power for the Camera
How many DSLR camera batteries do you own? If the answer is less than three, you should probably plan on picking up more. You see, when you’re shooting video, your camera will need much more power than you usually use when just shooting stills. The reason is that the LCD panel’s Live View function is a big drain on batteries. Additionally, when shooting stills, your camera only records for a few bursts, but with video it works much harder.
Batteries and Chargers
Your camera likely came with one battery and one charger. Well, prepare to take your credit card back out. You might be used to capturing hundreds or even thousands of shots using a single battery when shooting stills, but when shooting video, you can drain a single battery in just a couple of hours (Figure 2.11).

Figure 2.11. Consider purchasing additional batteries and an extra charger to help you meet the more demanding power requirements for shooting video on your DSLR.
So the question is how long do you want to be able to shoot? If you’re just taking a few shots at a time, one battery might do it. But do you really want to miss that perfect shot because of a dead battery? Just as you likely have a spare tire for your car, you should keep at last one spare battery.
If you plan to spend long days shooting (such as vacations or making an independent film), more batteries are in order. I carry four batteries and two chargers so I can have two batteries charging and two with me at all times. Less is fine too, but a spare battery is critical.
Wall Power
If you’ll be shooting from a stationary position (such as at a concert or a child’s play), it might be a good idea to carry and use an AC adapter. Many DSLR cameras offer an optional unit that you can purchase (typically priced between $60 and $150). You can look for units from the same manufacturer as your camera or third-party sellers (just be sure to read the reviews first). If you plan to use wall power, consider using an extension cord to extend your reach.
Choosing Lenses
When you bought your DSLR camera, it may have included one lens, which is often referred to as a kit lens. This is a great starting point, but it’s only a starting point. To shoot in different conditions, you may find that you need to build up a collection of lenses (Figure 2.12). When it comes time to choose lenses, there are an amazing number of choices: wide, telephoto, fast, slow, specialty, cheap, and expensive. So, how do you decide which lenses are the best choice for your kit? Let’s look at some of the determining factors.
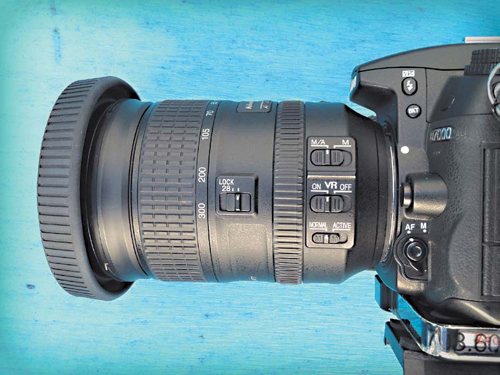
Figure 2.12. One of the most versatile lenses in my kit is my 28–300mm lens. It’s a great “tourist lens” that I can often use to shoot with outdoors all day long. Having multiple focal lengths makes it possible for me to carry a single lens on day trips.
Lens Manufacturer
When purchasing a lens, one of the first decisions you’ll have to make is whether to buy a lens made by the same manufacturer as your camera. This is often called an original equipment manufacturer (OEM) lens (Figure 2.13). OEM lenses tend to be more expensive than those made by third-party manufacturers. However, an OEM lens often works better because it’s designed to take advantage of all the features your camera offers.
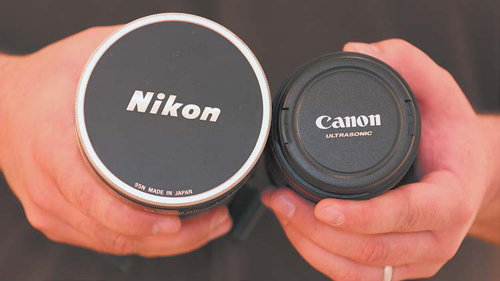
Figure 2.13. I recommend starting your lens search by looking at OEM lenses from the manufacturer of your camera body.
Third-party lenses are a valid choice too. Sigma, Tokina, and Zeiss are just a few of the dozens of non-OEM lens manufacturers. Third-party lenses are typically either cheaper than their OEM equivalents or they offer unique features (sometimes at a premium cost).
It really doesn’t matter which brand you choose (although OEM lenses usually have higher resale values when you trade in). Essentially, a good performing lens is a good performing lens. You can read detailed reviews of lenses at Digital Photography Review (www.dpreview.com). Make sure that when comparing OEM and third-party lenses of the same focal length and aperture, you also compare them for build quality and sharpness.
Aperture
When you look at a camera lens, you’ll often see its aperture labeled as an f-stop. This number describes how wide the aperture is on the lens (where light passes through). The lower the number, the wider the aperture (Figure 2.14).
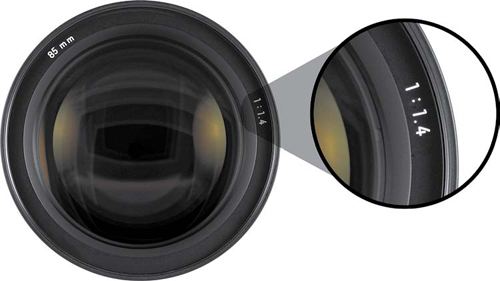
Figure 2.14. You’ll often find the maximum aperture for a lens written on the front. Remember that many zoom lenses change their aperture as you change their zoom level. Photo by istockphoto/rKIRKimagery.
A lens with a low f-stop is said to be “fast.” The faster a lens, the better it performs in low light. Another advantage of a fast lens is that at wider apertures (f/1.8, f/1.2, and so on) you can use a shallow depth of field look. This is often called bokeh, and you can use it artistically to control where viewers look in your shots. You’ll learn a lot more about bokeh in Chapter 4, “Exposure and Focus.”
The only major drawback for fast lenses is price. But even though fast lenses are expensive, having at least one in your bag is essential for photo and video work. I recommend using lenses that have an aperture of f/2.8 or larger. If your scenes will have quite a bit of light available (for example, when working outdoors), an aperture of f/4 should work just fine, and those lenses have the benefit of being cheaper.
Focal Length
The longer the focal length on a lens, the closer the subject appears. Having a range of focal lengths can become important so you can properly compose shots in your scene (Figure 2.15). Unlike with photos, you can’t really crop and scale video without a significant loss in quality.

Figure 2.15. This is what it looks like when you and a few of your friends bring all of your lenses together so they can socialize with each other.
Here are the focal ranges I like to have in my bag:
• 10–35mm. Lenses in this range are best for wide-angle shots. In video work these lenses are great for taking in lots of action in a scene or for establishing the location of a shoot. A wide-angle lens helps you see the big picture (but does require you to be close to the action).
• 50–100mm. Lenses in this focal range are often used for portrait shots and interviews. One of the first investments to make for your kit is a 50mm lens (often called a nifty-fifty), which is an affordable addition. You can get a great lens for about $100 that will work well in low light and has a shallow depth of field (which looks great for interviews).
• 200mm or greater. Long telephoto lenses are ideal for shooting from a distance. They are also useful to capture close-up action shots.
Zoom Lenses vs. Prime Lenses
When choosing a lens, you have a major functional choice to make. A prime lens offers only a single focal length, whereas a zoom lens provides a variety of focal lengths. There are many reasons to choose one over the other. In fact, many photographers carry both types in their bags.
When to use zoom lenses
If you want the greatest flexibility when shooting, a zoom lens works well. By turning the zoom ring, you can quickly change between focal lengths (Figure 2.16). These quick changes can really come in handy when you’re shooting at live events. A zoom lens is also useful when you want to avoid changing lenses or have a limit on how much you can carry.
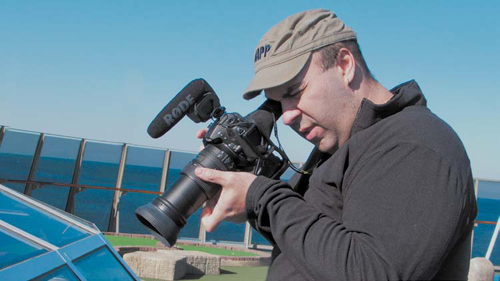
Figure 2.16. A zoom lens adds versatility when you need to quickly compose shots.
Photo by Meghan Ryan-Harrington.
A DSLR zoom lens behaves differently than a traditional video lens in two ways:
• Shakiness can occur. Because the zoom controls aren’t motorized, it’s very difficult to get a smooth zoom, so don’t zoom while recording. Use the zoom option to recompose your shot between takes.
• Exposure may change. As you adjust a zoom lens, the aperture may change. Most zoom lenses have a range of aperture settings. For example, I love using my Nikon 28–300mm lens when I am out for a day with the family. However, the f-stop will change between 3.5 when shooting at a wide angle and 5.6 when zoomed in. These changes in exposure are caused by the lens physically changing in length as I rotate the zoom controls.
When to use prime lenses
If you are shooting video on a DSLR camera for the aesthetic benefits, you should strongly consider shooting with prime lenses (Figure 2.17). From a quality point of view, there are two major benefits: A good prime lens with a wide aperture of f/1.2 to f/2.8 allows you to shoot in existing light or low-light environments more easily. Primes are universally faster than zooms due to the way they are manufactured.
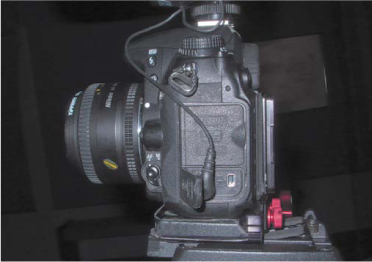
Figure 2.17. Prime lenses tend to be cheaper than their zoom counterparts, although they require you to physically move the camera to change composition. For this shot, I chose a 50mm lens for shooting in low light.
Additionally, prime lenses generally have fewer moving parts and fewer glass elements than zoom lenses. This means that the image tends to be sharper and the lens significantly lighter.
Using a prime lens for shooting interviews or portrait shots is a great choice. You can set the lens to a wide aperture (a lower f-stop) and really use the shallow depth of field. You’ll explore prime lenses more in Chapter 4.
A Stable Platform
When you shoot photos with a DSLR, hand holding the camera is pretty easy. With each click of the shutter you’re essentially freezing motion. Unfortunately, this doesn’t translate well to video because the form factor of a DSLR camera is not designed well for handheld video shooting. When recording video, you capture every movement of the camera. Unless you want your viewers to feel motion sickness, you’ll need to take corrective actions.
Use a Tripod
One rule that is drilled into those studying videography and cinematography is to use a tripod. Creating a steady shot while shooting video is more difficult than you might think, and viewers will notice every wiggle, bump, and cup of coffee you drink. It cannot be said enough times—use a tripod (Figure 2.18). Sure, there’ll be times when you’ll need to break this rule and put the camera in motion, but you can’t go wrong with a steady shot.
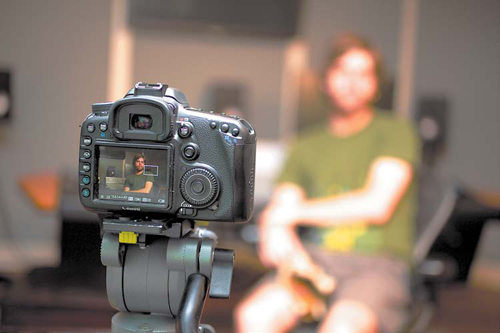
Figure 2.18. A tripod prevents unwanted camera movements that can distract the viewer. Photo by Lisa Robinson.
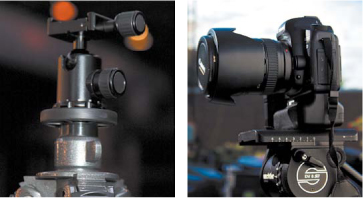
Figure 2.19. The tripod on the left is a classic photo tripod that is designed to be locked down. The video tripod on the right can be panned and tilted while recording. Photos by Lisa Robinson.
Selecting a Fluid Head
The most important part of a tripod is the head, which is where the camera attaches and where controls exist to help reposition the camera. Small, still photography heads are limiting when it comes to smooth movement. They can typically be unlocked, repositioned, and then locked to hold their place.
However, a video tripod head usually has springs (Figure 2.20) that help balance the tripod head to prevent unwanted movement. When properly calibrated, you should be able to let go of the camera head without the head tilting one way or another.
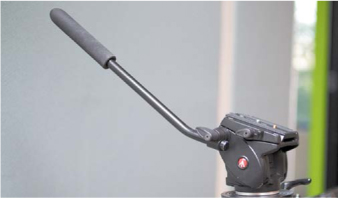
Figure 2.20. The handle on the fluid head tripod makes it easier to smoothly pan and tilt the camera. Photos by Lisa Robinson.
The cost of tripod heads varies wildly, which is often due to how much weight the tripod is designed to carry. For DSLR cameras, you can often get by with affordable tripod heads. Models like the Manfrotto 501HDV and 701HDV Video Head start at around $140.
Consider some of these options when shopping for a tripod head:
• A sliding base plate. Being able to slide the camera forward and backward on the tripod head is useful (especially if you change lenses). This is essential to balance the camera and prevent unwanted tilting.
• Adjustable tension controls. Many tripod heads allow you to tighten or loosen resistance to create smoother movements when panning or tilting. Having enough tension can also prevent unwanted drifting when you stop moving the head.
• Ball leveling. You’ll often find a bubble level built into the tripod head. Many tripods let you loosen the head a bit and adjust it so the camera can be leveled without having to adjust the tripod legs.
Selecting a Tripod
The fluid head you select will need a set of legs to rest on. Tripods legs come in all sizes, heights, and weights. Often, the manufacturer of your fluid head makes a matching line of tripod legs. You may also be able to reuse the legs on a photography tripod.
Here are a few options to consider:
• Tripod material. Tripod legs are made of a variety of materials (based on weight and durability). Heavier steel and aluminum tripods are meant for durability but can be a drag to carry around. Lighter materials, such as carbon fiber, are very popular.
• Tripod height. Although it impacts cost, you can choose how many stages you want in your tripod. The stages determine the height range of your camera. Two-stage tripods are the most common. They allow for a lens height in the range of approximately three feet to six feet. If you need to shoot at live events or from a distance, a three-stage tripod can help you shoot over a crowd.
• Tripod stability. Many tripods offer a spreader bar to increase stability. The spreader bar might be located at the base or part way up the legs; it connects all three legs to each other. When you set the spreader, it allows you to securely raise or lower the camera beyond its normal height range. The spreader creates additional stability and keeps the tripod sturdy.
As a beginner, you won’t have to spend much money on a tripod. As you improve, you may find the need to upgrade your tripod.
Here are a few tripod head manufacturers to consider:
• Sachtler (www.sachtler.de)
• Cartoni (www.cartoni.com)
• Miller (www.millertripods.com)
• Manfrotto (www.manfrotto.com)
• Gitzo (www.gitzo.us)
Chapter 2 Assignments
The key to success is to get comfortable with the equipment you already have before you run out and spend more money. These three exercises will help you familiarize yourself with your gear’s capabilities.
Change the Recording Format of Your Camera
Access your camera’s menus and try to change its recording format. I highly recommend sticking with a 24p frame rate for maximum versatility and a cinematic look. Choose 1920x1080 if it’s an option; otherwise, choose 1280x720.
Run Your Battery All the Way Down
Get familiar with how long a fully charged battery will last. Drop a fresh battery in your camera, and then turn on the Live View monitor. Keep recording until the battery dies and the camera shuts off. Note approximately how long you can shoot on a single battery. Use this information to decide how many batteries you’ll want to keep in your camera bag.
Practice with a Tripod
Take some time to get familiar with your tripod. Adjust the tension knobs on your camera and practice smoothly repositioning the camera to frame new shots.
Share your results with the book’s Vimeo group!
Join the group here: vimeo.com/groups/DSLRVideoFSTGS