
11. Editing Essentials
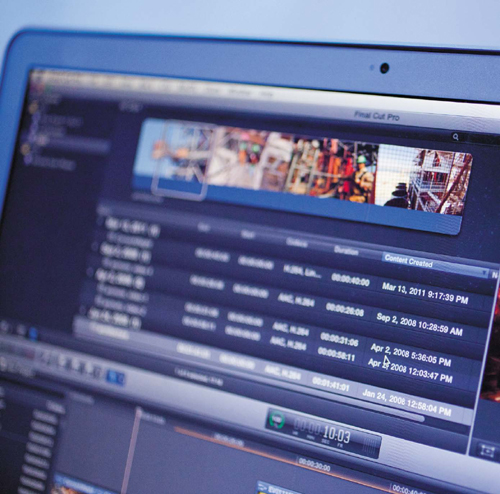
Photo by Lisa Robinson.
The process of editing video takes your footage from simply living on your hard drive and turns it into something that you can share. Just as computers revolutionized photography, the process of editing video has changed drastically in recent years. Editing video on a computer is typically referred to as nonlinear editing because you can work on sections in any order (as opposed to the original tape or film style of editing that required a program to be built one shot after another in a linear fashion).
In this chapter you’ll learn how to choose an editing tool and discover essential techniques for editing picture and sound. You’ll also learn how video can be color corrected or even manipulated to improve its appearance. Learning how to edit takes time, and you’ll likely need to choose a dedicated book or video for the specific editing tool you select. However, I’ll attempt to give you a solid understanding of the core steps and technology that relate to editing video.
Poring Over the Equipment
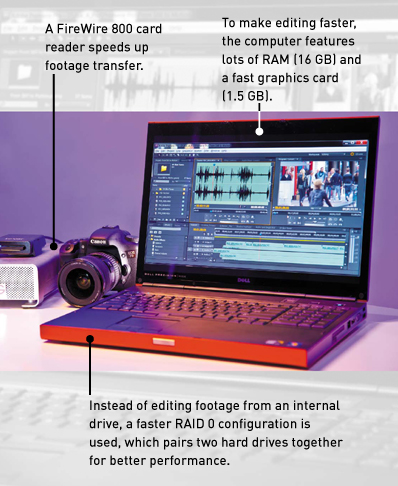
Planning your edit system is a matter of balancing your budget and equipment. If you need to enhance the equipment you already own, you’ll want to evenly spread your dollars to find affordable yet efficient devices. For example, a top computer that has very little RAM will just cause a bottleneck when it comes to editing. The same holds true if you skimp by using slow hard drives. Be sure to balance your budget and get the equipment you can afford while focusing on performance.
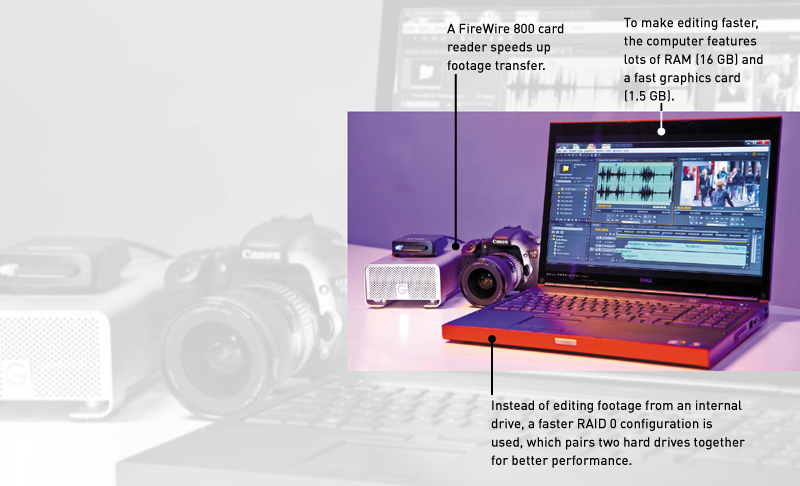
Photo by Lisa Robinson.
Choosing Editing Software
Choosing which software to use for editing is a very personal (and sometimes difficult) choice. The process of editing requires a lot of thought and the ability to make decisions. Because people think (and work) quite differently, several tools have emerged (Figure 11.1). When choosing software, remember that there is no onesize-fits-all solution. You’ll need to balance your needs to select the right tool. The following sections provide some selection criteria that you should be aware of.
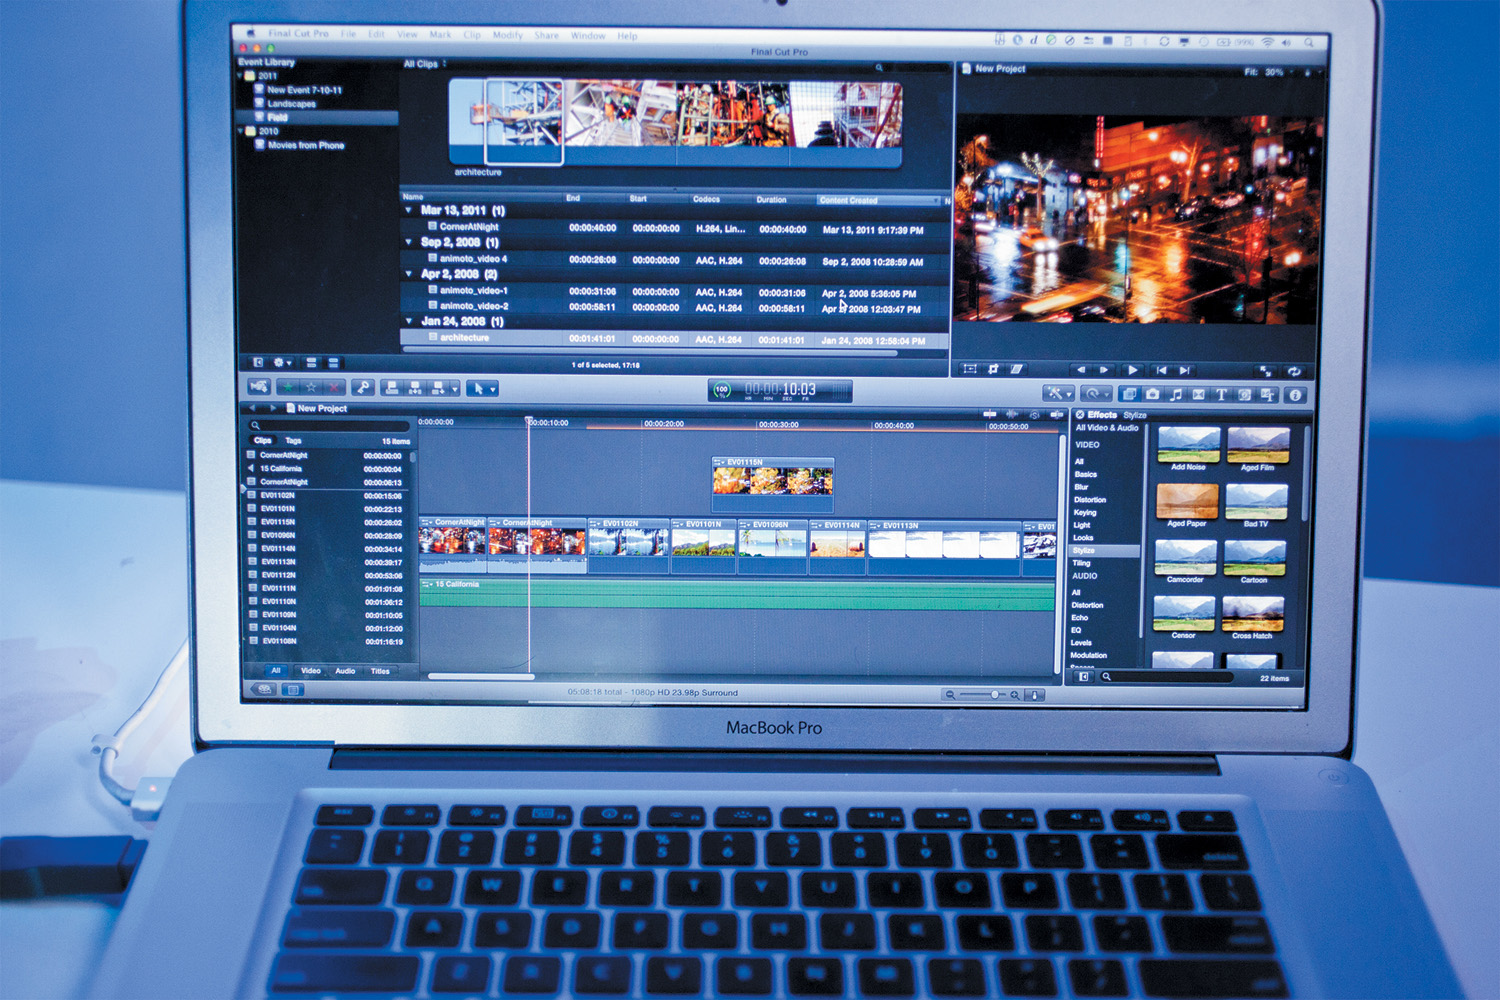
Figure 11.1. Final Cut Pro X is a major revision to traditional video editing tools. It offers a unique approach to editing video that many new users find very approachable.
Cost of Software
When you’re looking at editing tools, you’ll quickly discover that they vary dramatically in cost. For example, iMovie and Windows Movie Maker are included with Apple and Microsoft’s operating systems. Other tools that you can purchase for only a few hundred dollars are quite powerful as well. And for the most advanced tasks of editing feature films or network television, systems can spiral into tens of thousands of dollars (and much higher). Always look at what you get for your money and weigh the benefits of speed and file support when choosing an editing tool.
Ease of Use
Editing software programs often vary in their approach to the task. Some use the typical drag-and-drop method, whereas others require you to be more precise and carefully choose your shots. Tasks that seem easy to some will seem difficult to others. Ease of use is very subjective and depends on the individual user.
The key is to try out different applications before you buy. Most manufacturers offer time-limited demos (Figure 11.2). You can also use training materials like books, online video, and hands-on classes to try out the tools. Don’t read too much into reviews or online forums; you need to find the tool that’s right for you.
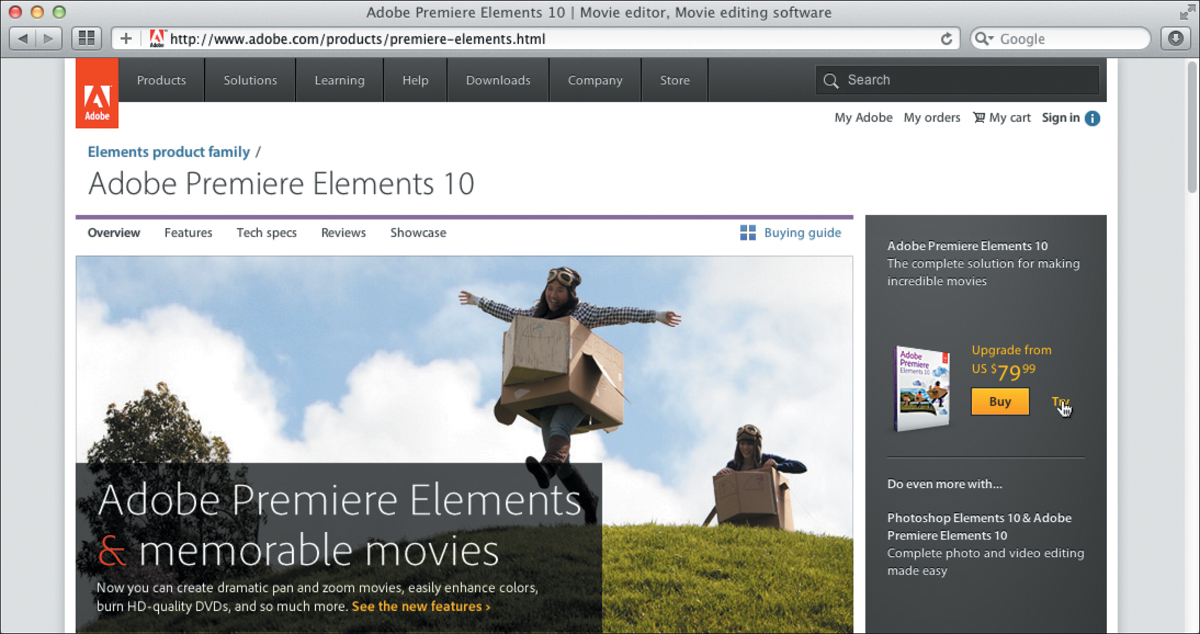
Figure 11.2. Adobe Premiere Elements is available as a free, 30-day trial download so you can see how it performs. Most manufacturers provide similar offers.
The biggest mistake I see is when people choose to go it alone and try to teach themselves how to edit video. Although you probably could have learned to drive a car on your own, it might have gotten really expensive if you had numerous crashes and fender benders. The same holds true with video editing. If you are going to invest in equipment and software, invest your time and money in learning how to get the most out of both.
Supported File Formats
When you’re looking at editing software, be sure to weigh your options. Most of the free tools will need to convert your DSLR footage into an optimized format (Figure 11.3). This means lost time and the expense of using up much more hard drive space. Some editing applications (such as Final Cut Pro X and Adobe Premiere Pro) offer support for native editing (meaning that footage can be used direct from the camera with no conversion).
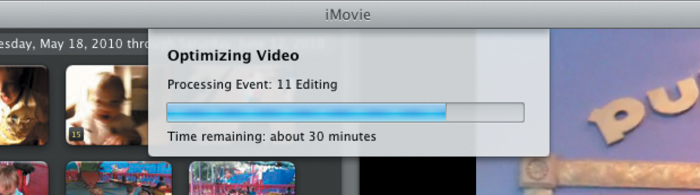
Figure 11.3. Apple iMovie is a very easy-to-learn and use editing application. You will experience significant delays, however, when you first import your DSLR footage because the application converts its file format.
Customer Support
Video editing can often be challenging because it requires you to master several skills. Therefore, you’ll want to choose a product that offers extensive customer support options. Look at the software company’s website for an active user forum. Does the company offer certified training classes? How many books or DVDs are published on the tool? Can you find a video podcast to learn new skills? Are there any local user groups sharing ideas and support? Are there any online communities to help you dig deeper (Figure 11.4)?

Figure 11.4. The Creative COW (Communities of the World) website is a popular place for people to congregate and discuss many different software applications. The site offers tutorials, articles, and robust user forums (free of charge). Just visit www.CreativeCOW.net to see it in action.
Essential Editing Controls
Although every editing application behaves a bit differently, most have a lot in common. But be prepared to read and use the online help or documentation from the manufacturer (or pick up a dedicated book from Peachpit Press). In this section, I’ll explore how most video editing applications work in a general sense. By understanding some of the tasks involved in editing, as well as the key terminology, you will find it easier to jump in and start editing.
Importing Media
Before you can edit your DSLR footage, you’ll need to import it into the editing software. In the previous chapter you learned strategies for organizing footage at the hard drive level with a system of folders. These folders can often be imported by dragging them into your editing tool or choosing File > Import (Figure 11.5). The exact steps tend to vary greatly from tool to tool. This is one task for which you’ll need to break out the software owner’s manual or look for a specific tutorial from the manufacturer.
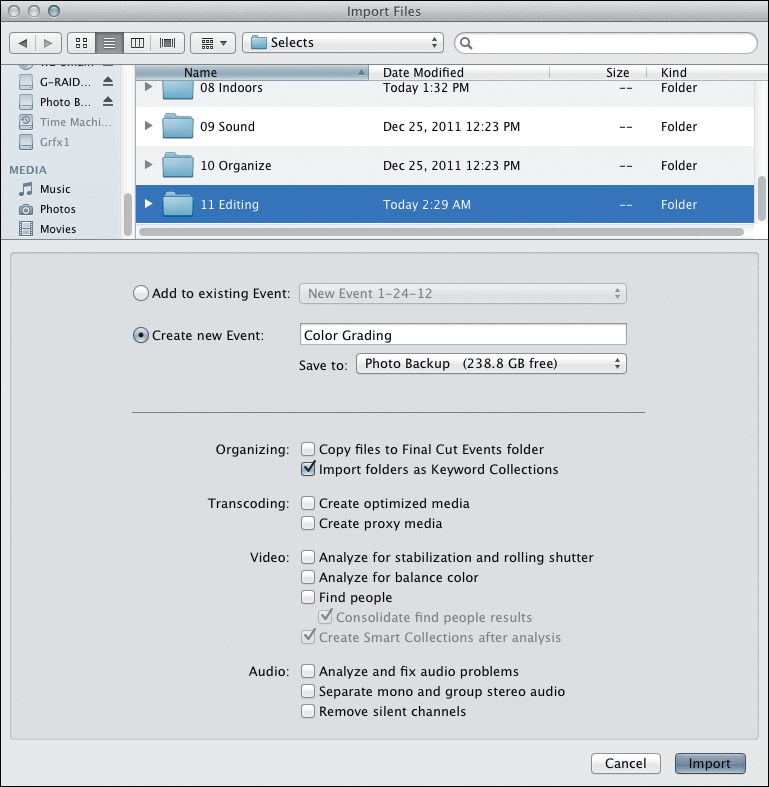
Figure 11.5. Final Cut Pro X gives you several controls when importing footage. You can choose how to organize the media, whether or not to transcode on import, as well as to analyze and automatically fix several audio and video problems on import.
Selecting and Loading a Clip
Once the footage is in your newly created project, you can start to select and load clips. This is really the first step to editing. Typically, you’ll browse through folders in a project (often called bins). You can often view thumbnails or preview images in the folder as well. You can then select the clips you want to use.
Usually, there are two ways to load clips for editing:
• Double-click a clip in your Project panel (Figure 11.6).
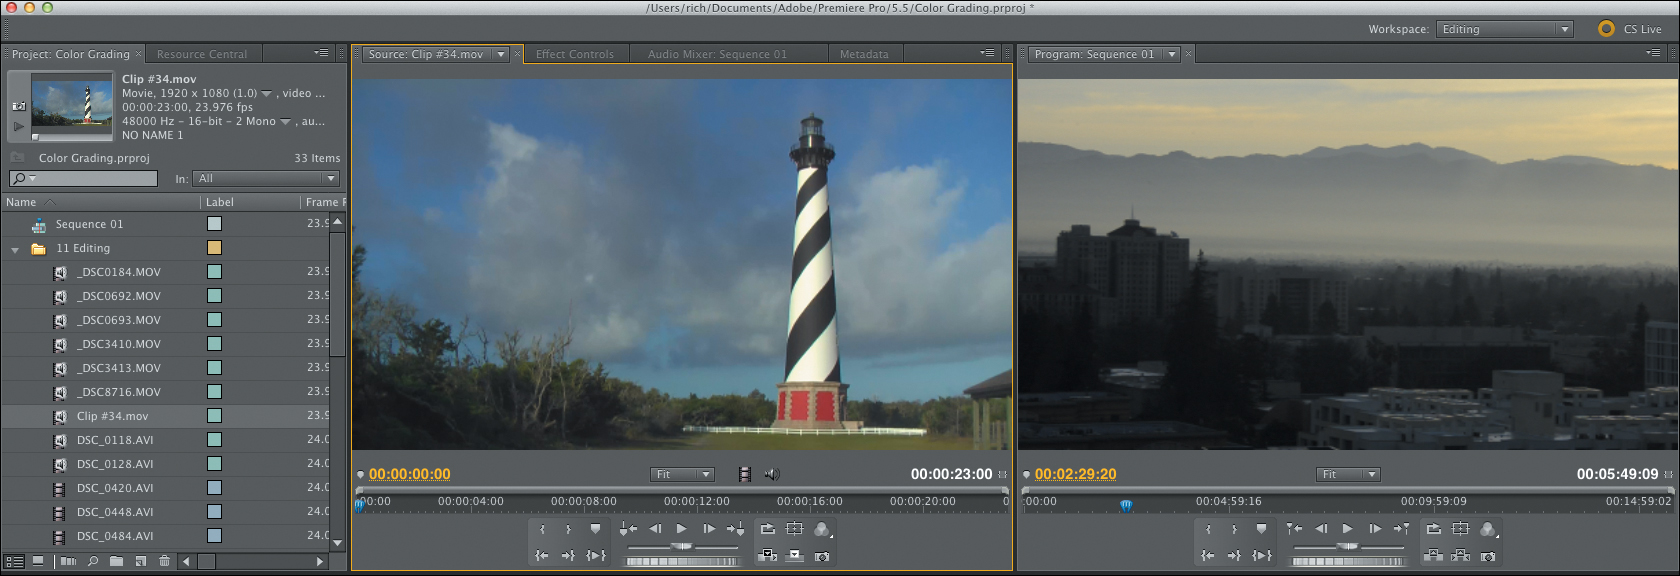
Figure 11.6. The Source Monitor is typically located on the left when looking at two-monitor-style editing applications. It lets you control or prepare a clip before you add it to your sequence, as well as modify the clip later during editing.
• Drag a clip from the Project panel to the Source Monitor or editing window where you can preview or view your footage.
Loading a clip lets you specify what part of the clip you want to use. In some editing applications you drag handles to specify a clip’s range or duration. A more precise way is to use buttons or keyboard shortcuts to set In and Out (usually using the I and O keys on the keyboard) points.
Targeting Tracks
Once you’ve selected the part of a clip you want to use, you then need to set a destination (Figure 11.7). Video editing applications use tracks to hold clips. You can stack clips on top of each other to create composited images (such as text over a video shot) or complex audio tracks (such as music, sound effects, and narration). Precisely targeting tracks is essential.
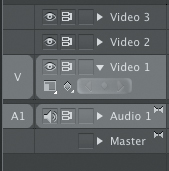
Figure 11.7. A patch panel interface is common in many editing tools. It lets you route source tracks into specific destinations.
The technique you choose for adding clips to a track will vary based on your editing approach:
• Dragging. If you prefer to edit by dragging clips to tracks, you can target tracks by simply dropping a clip where you want it. This method is the least accurate and can lead to clips ending up in unintended places in your footage.
• Pasting. You can copy clips from one part of a sequence to another by using the Copy and Paste commands. You can often target specific tracks using the track headers at the edge of the Timeline panel or window.
• Source Monitor. The most precise way to edit is with the Source Monitor. You can use both audio and video source track indicators at the edge of your Timeline as well as target where you want the edit.
• Three-point editing. Knowledgeable editors know that the most precise edit they can make is a three-point edit. Ultimately, the three-point edit is defined by using a total of three marks. For example, you can mark an In and Out point in the Source Monitor to define the range of a source clip to use, and then in the Timeline (or Program Monitor) you can choose where that clip will start or end with a third point. Or, you can mark an In and Out point in the Timeline to define the range where the clip goes, and then mark an In or Out point in the source clip to define where it starts (Figure 11.8). There is no need to set a fourth point, because the application determines it for you. This method lets you set a range for the edit. You can define either what portion of the source you use or how long the clip should be in the Timeline. You can then choose a starting or ending point.
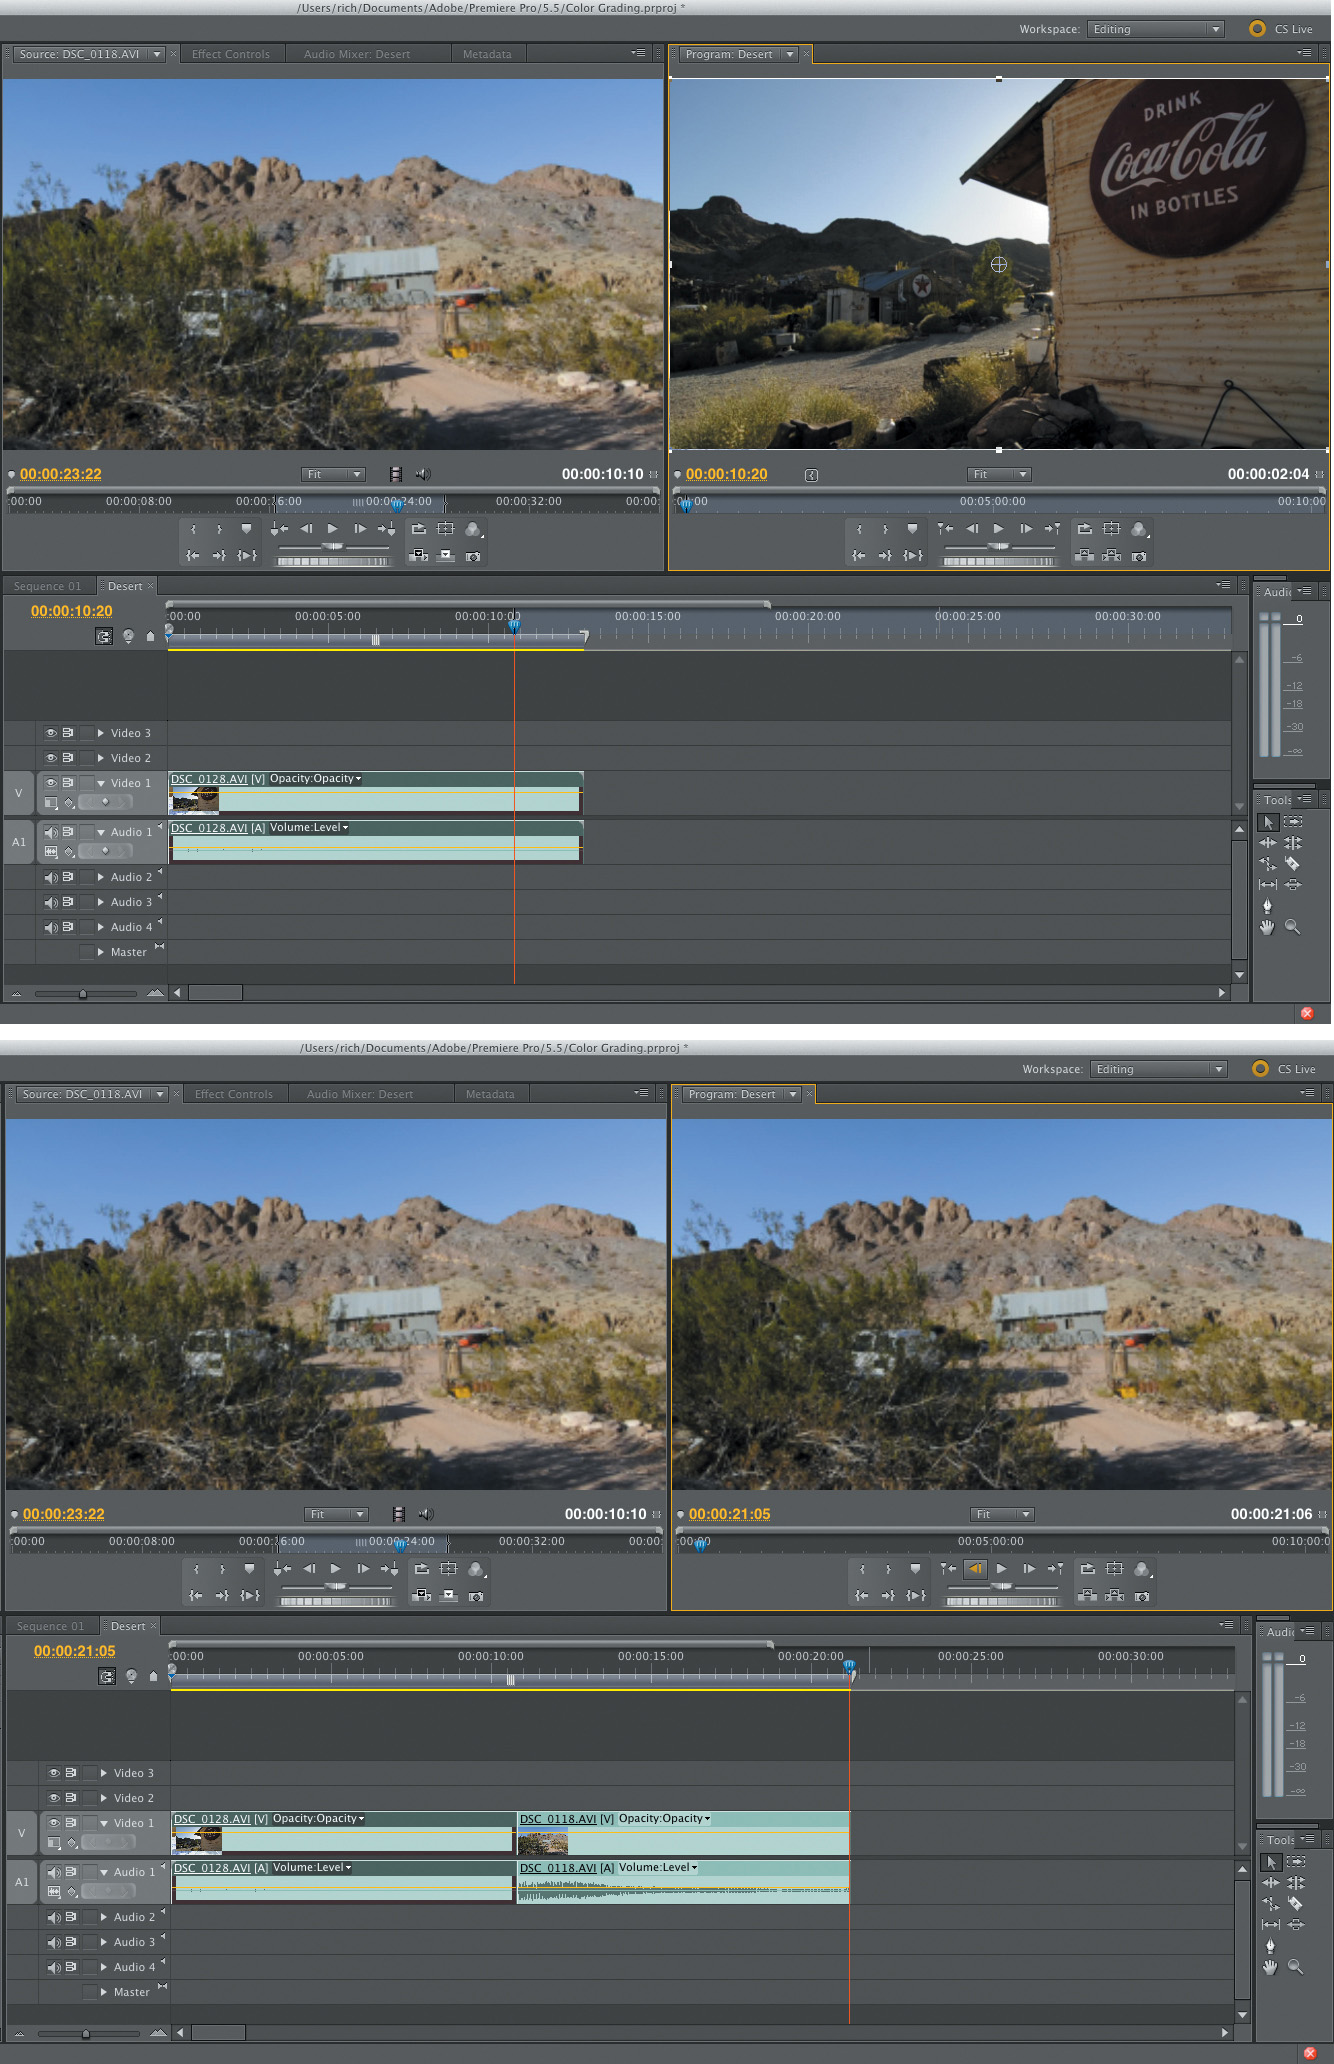
Figure 11.8. By setting an In and Out point in the Source Monitor, I determined what part of the clip would be used in the Timeline (also called sequence). An In point set in the Timeline defines where the clip will be edited. The bottom figure shows the result of adding the clip; the sequence is now longer and has the chosen shot added to it.
Overwrite Editing
The Overwrite edit is the most common command you’ll use in most editing applications. Essentially, the selected video or audio frames are added to the Timeline, and if any existing material is already in place, the new material replaces it by overwriting it. The Overwrite edit is a fast way to quickly assemble your edited footage. The key with an Overwrite edit is to remember to accurately patch your tracks so the targeted tracks line up. This way the audio or video ends up in the correct location in the Timeline, and you don’t accidentally erase a clip. For example, you would want to overwrite a speaker title graphic on top of a video clip, but not likely overwrite and remove the video clip of the speaker.
Here’s how to create an Overwrite edit:
1. Open a sequence or project that you want to edit.
2. Select a clip and load the clip into the Source Monitor.
3. Mark a duration that you’d like to use as discussed previously (Figure 11.9).

Figure 11.9. In Adobe Premiere Pro (top), you’ll set your In and Out points in the Source Monitor. Final Cut Pro X (bottom) has you set points on the clip thumbnail while browsing. Both use the standard I and O shortcuts for In and Out.
4. Place the playhead (or current-time indicator) in the sequence where you’d like to add the media. The playhead is a vertical line that acts a lot like a cursor but defines the location in time.
5. If necessary, make sure the tracks are properly patched to their correct destination.
Drag the source clip track indicators so they map to the headers of the tracks where you want to overwrite the media.
6. In the Source Monitor, click the Overwrite button. If you’re using Final Cut Pro, this button is labeled Append.
The audio and video media are overwritten to the targeted tracks in your sequence (Figure 11.10).
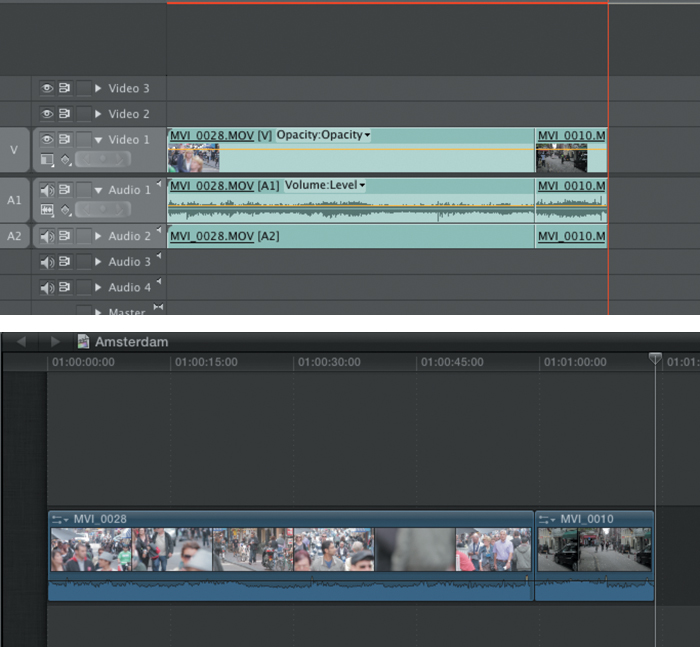
Figure 11.10. In Adobe Premiere Pro (top) and Final Cut Pro X (bottom) the selected clip is added to the Timeline. Any Timeline marks as well as patching will affect the duration of the edited material.
Insert Editing
The Insert edit command is similar to an Overwrite edit command in that you must select part of a clip and choose a clear destination. The major difference is that an Insert edit will push any existing footage further down the Timeline (instead of overwriting it).
The Insert edit is best used when you want to preserve previously edited content but need to make an addition. For example, you might need to add an extra sound bite or add a shot to a series of clips that illustrate your story (often called b-roll).
Here’s how to create an Insert edit:
1. Open a sequence that you want to edit.
2. Load a clip into the Source Monitor. Mark a duration that you’d like to use.
3. Place the current-time indicator in the sequence where you want to insert the media (Figure 11.11).
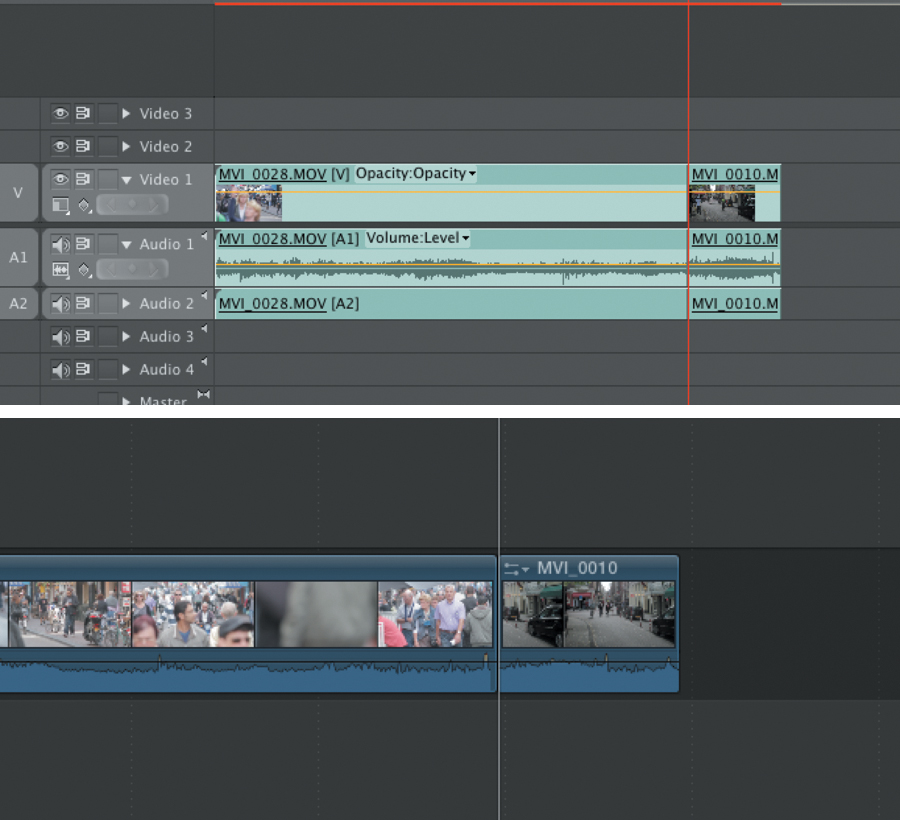
Figure 11.11. In Adobe Premiere Pro (top) and Final Cut Pro X (bottom) the editing result is the same. Simply place your playhead where you want the Insert edit to occur.
Typically, this will be between two clips, but you can also split an existing clip.
4. If needed, click to select the headers of the tracks where you want the Insert edit to occur. This specifies where the footage will be placed in the Timeline, vertically.
5. If needed, drag the source clip track indicators so they map to the headers of the tracks where you want to insert the media. This patching is simply connecting where the incoming video clip will be routed.
6. In the Source Monitor, click the Insert button (Figure 11.12).
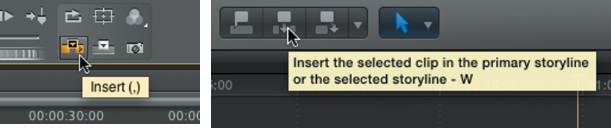
Figure 11.12. Adobe Premiere Pro (left) and Final Cut Pro X (right) call the edit an Insert edit. This terminology is in fact common across most editing applications.
The edit occurs. The audio and video of the source clip are added to the sequence (Figure 11.13). Existing media is typically pushed to the right to make room for the new footage.
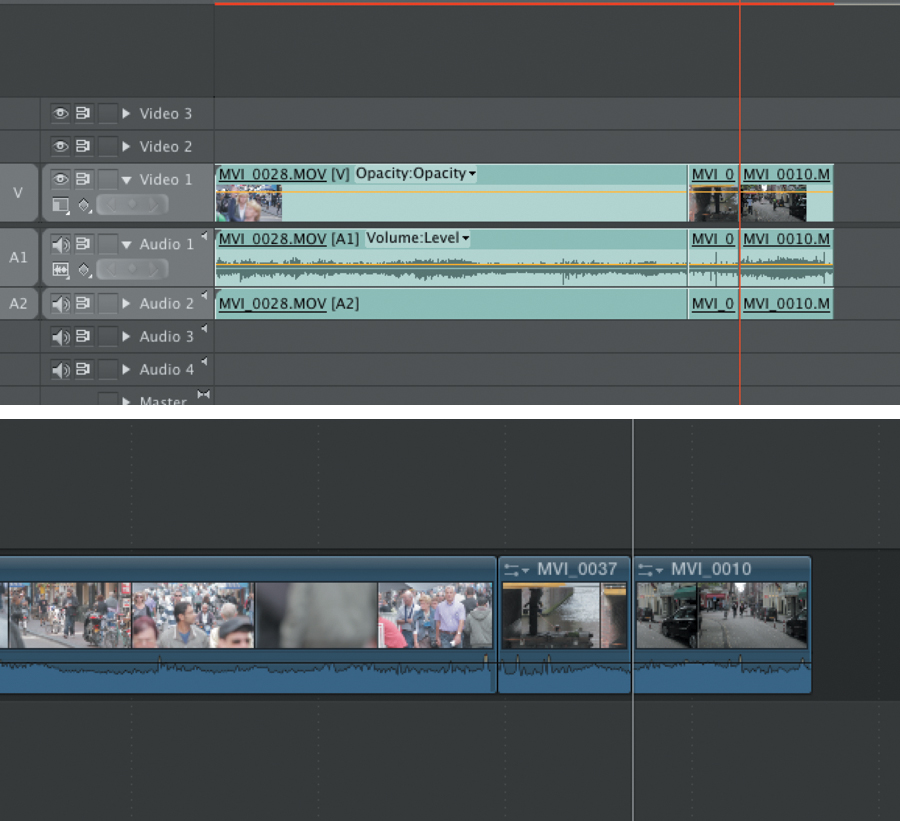
Figure 11.13. The media is inserted and pushes other clip(s) further down the Timeline. This behavior is similar in Adobe Premiere Pro (top) and Final Cut Pro X (bottom).
Syncing Sound
As you learned earlier (in Chapter 9), video-enabled DSLRs are capable of recording beautiful HD video but only barely usable audio. If you’ve chosen to employ a sync-sound approach to record sound, you’ll need to merge the audio from your recording device to the footage recorded by your camera. For this process, you can take three different approaches.
Manually Syncing Clips
You may choose to manually synchronize audio in your nonlinear editing application. In this case you’ll ingest your DSLR video footage (usually with reference or camera audio) and your high-quality audio from a digital audio recorder. You then must line up the audio.
Here’s how the process typically works.
1. Load the desired video clip into the Source Monitor for your project.
2. Determine an In point where you want to sync the clip.
Look for an easy-to-spot reference point, such as the use of a slate (Figure 11.14), clapboard, or hands clapping. You can look for a visual point in the video clip or for a spike in the clip’s audio waveform.
Figure 11.14. The slate application counts down, and then has a one frame white flash (and a loud audio beep) to help with syncing footage.
3. Switch the video clip to clearly see the audio waveform. This may be in a tab in the window or an option on a popup menu.
4. Using the advance one frame buttons (or the common arrow shortcut keys), move the playhead to refine the In point (Figure 11.15). If needed, re-mark the clip’s In and Out points.
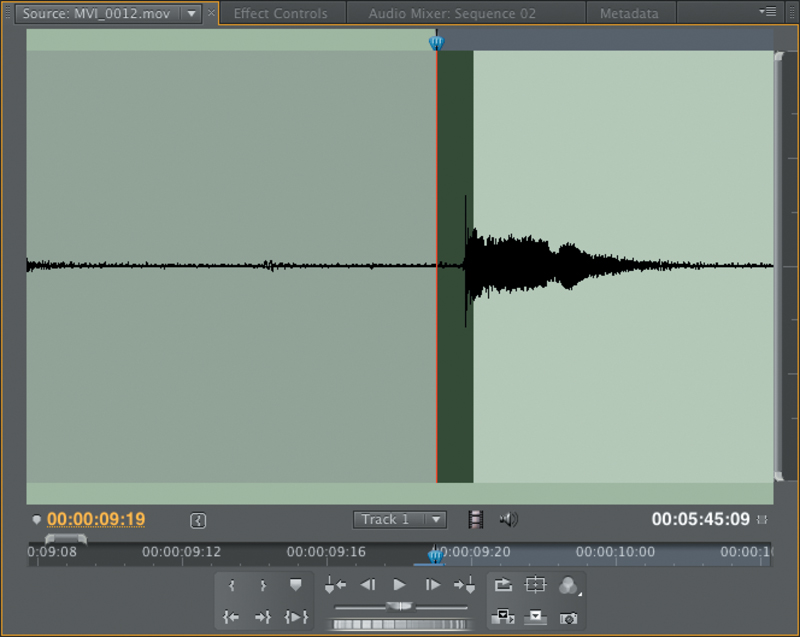
Figure 11.15. The original In point was one frame off. Using the audio waveform view can help you edit more precisely.
5. Edit the video into your Timeline.
6. Load the sync-sound audio clip into your Source Monitor.
7. Using the techniques you used earlier, determine the correct position for an In point for the sync-sound audio track (Figure 11.16).
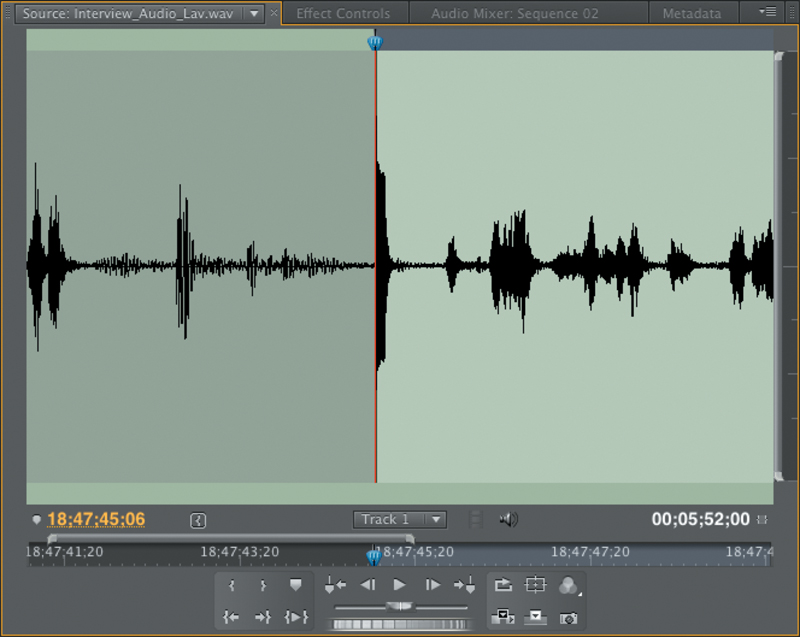
Figure 11.16. The audio sync point should be easier to see on the sync-sound track because it should be a better audio track (due to the microphone being closer to the subject).
8. In your Timeline, target an empty audio track and set a new In point that matches the start of the corresponding video clip (Figure 11.17).
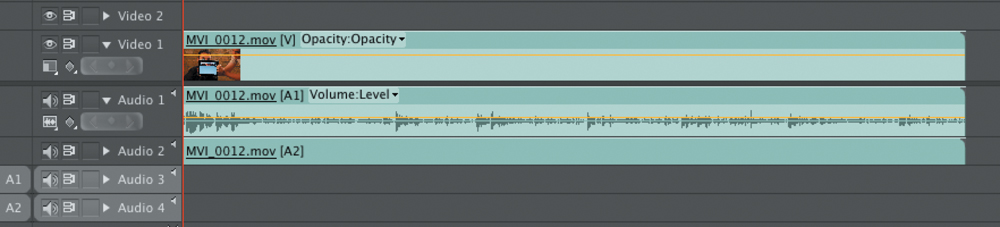
Figure 11.17. Make sure you’ve accurately targeted your source and destination tracks before making the edit.
9. Edit the audio from the digital audio recorder into the open sequence, placing the high-quality audio on the lower audio track (Figure 11.18).
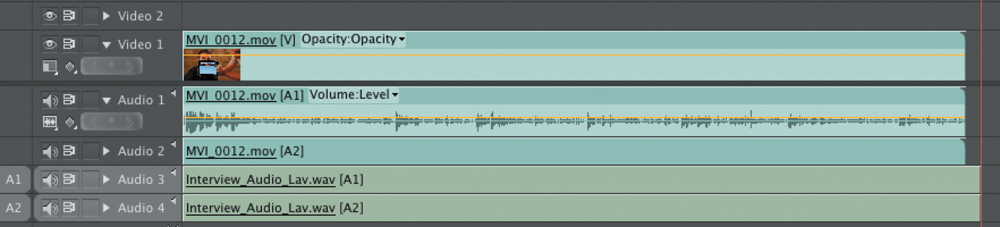
Figure 11.18. The better audio is added to your sequence below the reference audio source.
10. The clips are now in sync.
You can test this by disabling the reference audio tracks and checking sync (Figure 11.19).

Figure 11.19. Play back the sequence with only the video and sync-sound audio tracks enabled. Make sure that the picture and new sound do not drift apart and lose synchronicity.
11. You can then trim or cut away any extra audio.
Feel free to delete the original camera audio and just leave the higher-quality audio in use. If your editing application supports linking (Figure 11.20) or merging these synced clips, this can make editing easier when you need to move or reposition the clip in your editing Timeline.
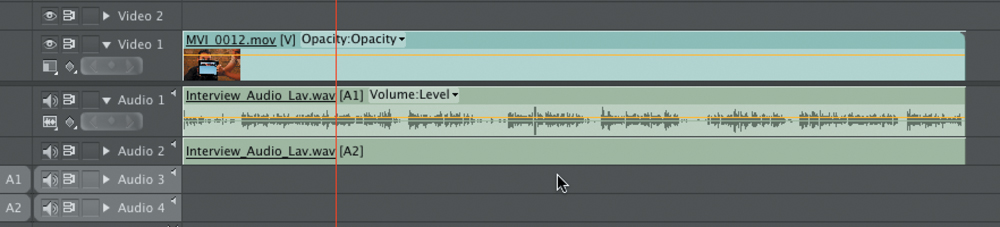
Figure 11.20. I first unlinked the original audio and deleted it. The new audio was then trimmed to match the duration of the video clip and moved immediately below it in the Timeline. The new audio and original video sources were then linked so they’d behave as a single clip that can be moved around the Timeline.
Automatically Syncing Clips
As you read through (or completed) the prior exercise, you might have been struck by how time-consuming the syncing process is. Although it only takes about a minute to sync each clip, that time can still really add up. For this reason, many software tools have emerged to make the process easier.
• Built-in tools. Editing tools are starting to include some built-in syncing tools. For example, Apple’s Final Cut Pro X can analyze audio and line up clips in a project. Adobe Premiere Pro uses markers to quickly sync clips and merge them to create new clips that are easier to edit with (Figure 11.21).
Figure 11.21. Final Cut Pro X can analyze clips in an Event (top). The newly synced clips can then be aligned and added to your project (bottom).
• Singular Software PluralEyes. The most popular syncing application is PluralEyes from Singular Software (www.singularsoftware.com). The tool works with software from Adobe, Apple, Avid, Grass Valley, and Sony. The tool sells for $149, and you’ll need a version specific to your editing tool of choice. The software automatically analyzes the audio track and syncs multiple tracks of sources with little to no work (Figure 11.22). Detailed tutorials are on the Singular Software site. PluralEyes also works well for multi-camera editing.
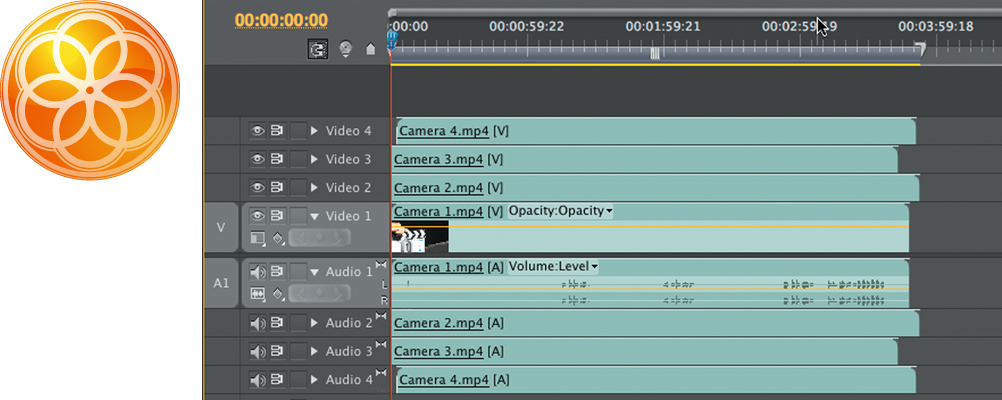
Figure 11.22. PluralEyes can sync multiple video and audio tracks at the same time, which works great if you’re shooting an event like a concert, wedding, or play with multiple cameras simultaneously.
Creating New Clips with Dualeyes
Although syncing software that works in an editing Timeline is useful, I prefer to sync sound clips before I even edit. Fortunately, the folks at Singular Software introduced DualEyes (Figure 11.23) to specifically address the needs of a DSLR sync-sound work-flow. DualEyes is a dedicated application that processes your sound files before you edit the footage. Here are the basics on how DualEyes works.

Figure 11.23. DualEyes is a stand-alone application available for Mac and Windows for syncing sound.
1. Launch DualEyes. You can download a demo from www.singularsoftware.com.
2. Choose to create a new project, and then save the project to a location of your choice.
3. In the main DualEyes window click the plus (+) button to add your DSLR video (with reference audio) and high-quality audio from your digital audio recorder. Browse and select the files on your hard drive that you want to use. You can also drag files directly into the window (Figure 11.24).

Figure 11.24. The DualEyes project window lets you add as many audio and video clips as needed to process. The clips can be different lengths or even repeated (such as a single audio file for an entire musical performance or interview).
4. Click the Options menu to choose how the program performs, and select the Replace Audio for MOV Files option. If you’re using a Windows machine, this option will be Replace Audio in MOV and AVI Files.
This option replaces the reference audio in the clip on disk with the high-quality audio while syncing the clips at the same time.
5. When you’re ready, click the Scissors button to process the footage.
The files are analyzed and new media is created. When you import the footage into an editing application, the clips will use the high-quality audio and will act like any other clip. Keep in mind that the synced clips will be placed in the same location as your source files (but with a modified name).
Adding Transitions
As you build your sequence, you may choose to add transitions between some of the shots. The proper use of wipes and dissolves can smooth the change of time and space between two video clips. You can also use audio dissolves to help clean up edits or smooth over sound beds. The key to using transitions, however, is (and will always be) restraint. Do not add transitions to simply make your video “more interesting” or to “add excitement.”
Transitions Need Handles
If you plan on using transitions, you need to understand the concept of handles. The transition between two shots needs additional media beyond what’s used in your Timeline (Figure 11.25). The reason is that two pieces of media need to overlap to create the new transition effect. This overlap is called handles. If your shots don’t have enough overlap, they may be shortened when you add a transition (and you can get unwanted changes in a clip’s duration or your desired editing). Some editing tools won’t let you add a transition at all if there’s not enough media overlap. Make sure when you’re shooting that you let a shot roll a few seconds before and after the critical action; this will become your handle once you set In and Out points.

A Media start
B Handle
C In point
D Out point
E Handle
F Media end
Figure 11.25. A video clip with handles. The ghosted area in the Timeline simulates the handle area and would not be visible normally when you looked at your editing software.
Adding Video Transitions
Video transitions can be applied between two shots. Effects like a Dissolve or a Dip to Color can be used to create a gentle transition (Figure 11.26). Other effects like Wipes and Pushes can be used to reveal graphic elements or signify a bigger change as you transition from one section of a video to another.
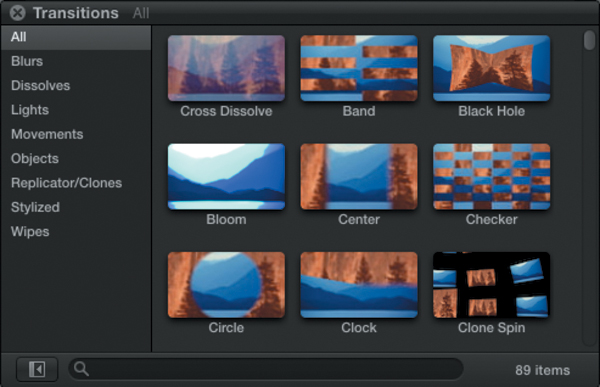
Figure 11.26. You’ll find several effects to choose from built into Final Cut Pro X.
Applying a transition may vary between applications, but the process usually looks like this:
1. Locate two clips that are immediately back to back on the same track.
You can also usually apply a transition to a clip’s starting or ending point to create a transition to black or a lower track in the Timeline.
2. Effects are usually applied in one of two ways:
• Place the playhead at the location where you want to apply the transition. Then choose the desired effect from the Effects menu.
• Drag the desired effect from the Effects panel or window onto the targeted clip in your Timeline.
3. Refine the clip settings as needed using your Effects controls. These are usually visible by clicking on the effect to select it first. You may then need to look for an Effects tab or control list.
4. Preview the applied effect and adjust its settings as need.
Adding Audio Transitions
Transitions can also be quite helpful when working with audio tracks. You can use audio crossfades to smooth out volume changes in audio tracks. Or, you might have an abrupt upcut in the editing of a sound bite (that leads to a word sounding clipped or interrupted) that can be solved with a quick dissolve. You may also want to add a slow transition to gently fade out the music at the end of your video. In addition to using audio effects, some editing tools give you control handles or points that you can use to adjust the volume in your video sequence.
Adjusting Exposure and Color
Throughout this book you’ve learned how important color correction is. When shooting video, it’s difficult to get perfect color. This is especially true when lighting conditions are mixed (such as daylight mixed with interior lighting) (Figure 11.27) or when shooting in changing conditions (like sunrise or mixed cloud cover). In this section I’ll explore some of the most useful effects you should look for in your nonlinear editing application. I’ll also discuss some common color correction scenarios and how to approach and fix them.
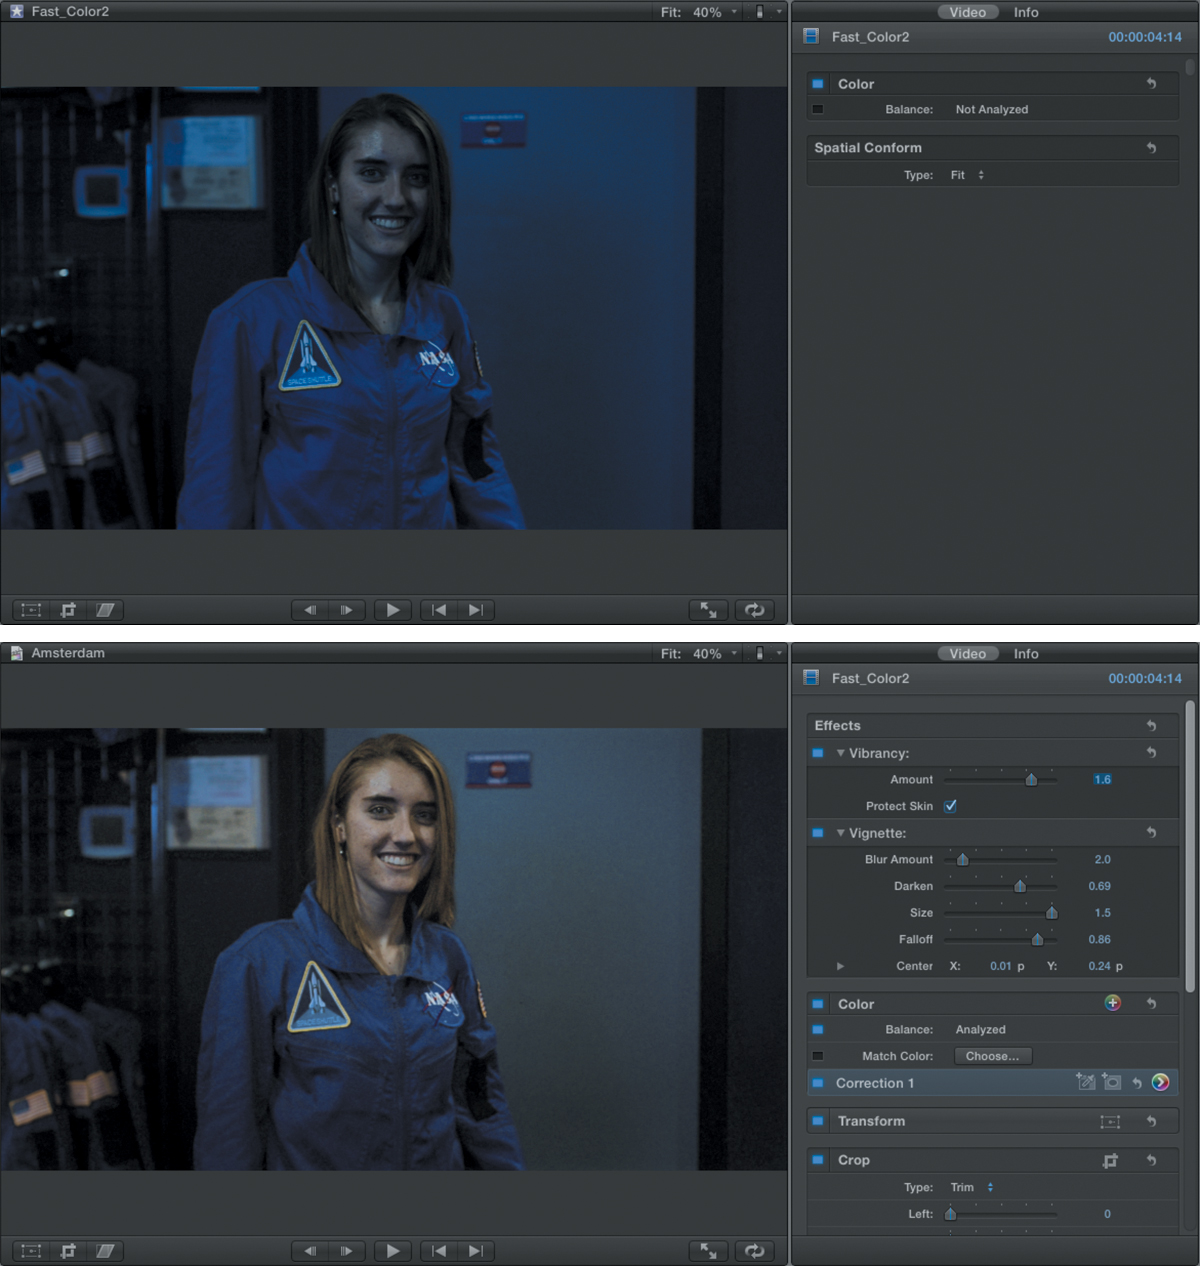
Figure 11.27. Using the Analyze clip feature in Final Cut Pro X, I was able to get the shot close to being properly exposed. I lifted the midtones a little to brighten the exposure. A vignette and a Vibrancy adjustment (selective Saturation) completed the color correction repair.
Essential Effects for Color and Exposure
Although different software tools will vary in the features they offer, many features will overlap between them. In this section I’ll provide you with an overview of some common tools that exist across software applications. I’ll show you some before and after shots, as well as some interface shots from different software applications. Although the interfaces may vary, you’ll see that similar results can be achieved.
Auto Effects
If you are in a rush for time, many tools offer auto filters for color and exposure correction (Figure 11.28). You may find options for Auto Color, Auto Contrast, or Auto Levels. Typically, auto effects can be applied and then reduced in intensity (often called fading). To gain confidence correcting color and exposure, be sure to use these options when you start editing your footage. You may also find auto buttons or check boxes within certain effects that will give you a similar outcome.
Figure 11.28. The image at the top is the original shot. After applying an Auto Contrast effect (bottom), the contrast in the scene improves.
Levels
A Levels adjustment is one of the most useful effects you can apply. It lets you adjust the black-and-white points in an image (Figure 11.29).
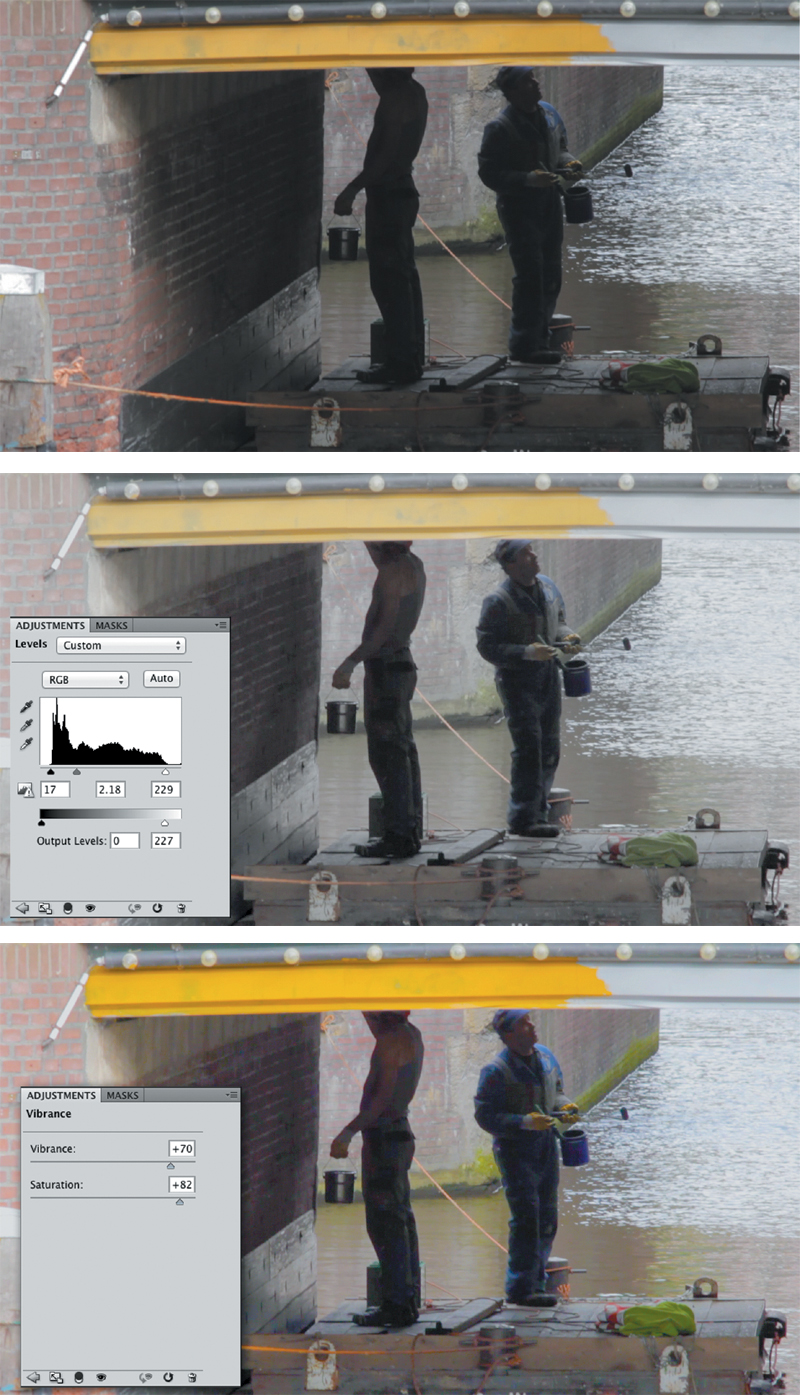
Figure 11.29. The original image (top) is rather dark in the shadows and midtones. I lifted the midtones by dragging the gray slider to the left. Contrast was restored by pulling the Black and White input sliders inward. The Output levels for white were lowered to reduce the overall brightness. The shot was then finished (bottom) with a Saturation and Vibrance boost to enrich the color.
You can also adjust a middle slider to affect the midtone (gamma) levels. Many applications let you adjust Levels on a per channel level, letting you affect the Red, Green, and Blue channels separately, which allows you to fix exposure and color at the same time.
Curves
A Curves adjustment is similar to a Levels adjustment; it is primarily used for exposure. It also can be used for a color adjustment when applied to individual channels. Where Curves differs is that it offers more control (16 control points versus only 3 for Levels).
The idea behind Curves is simple. The entire tonal range of the image is mapped to a diagonal line that runs from left to right, black to white, or dark to light. You can click on the line and pull up or down to make an adjustment to a particular part of the tonal range (Figure 11.30). The Curve adjustment is an effective tool for fine-tuning contrast corrections made with other filters or for a shot on its own.
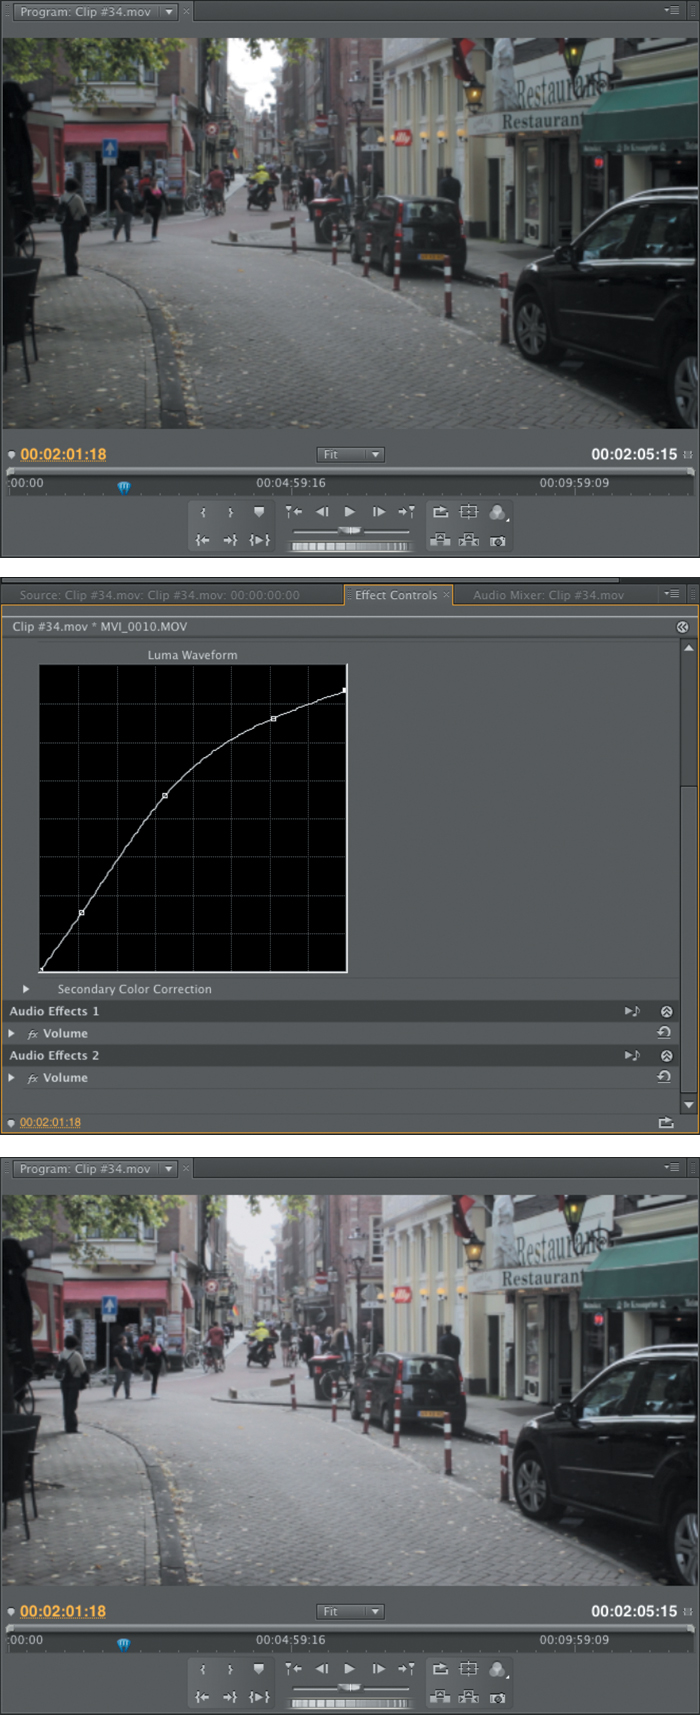
Figure 11.30. The Curves adjustment is often the most precise exposure adjustment you can make.
Color Corrector or Fast Color Corrector Effect
Most video editing tools contain a color correction effect that is a combo effect. The Color Corrector (often called Fast Color Corrector) can fix exposure and contrast issues (Figure 11.31). Simultaneously, it can also adjust the overall color balance and saturation in a clip. This effect is often a one-stop, fix-all effect.
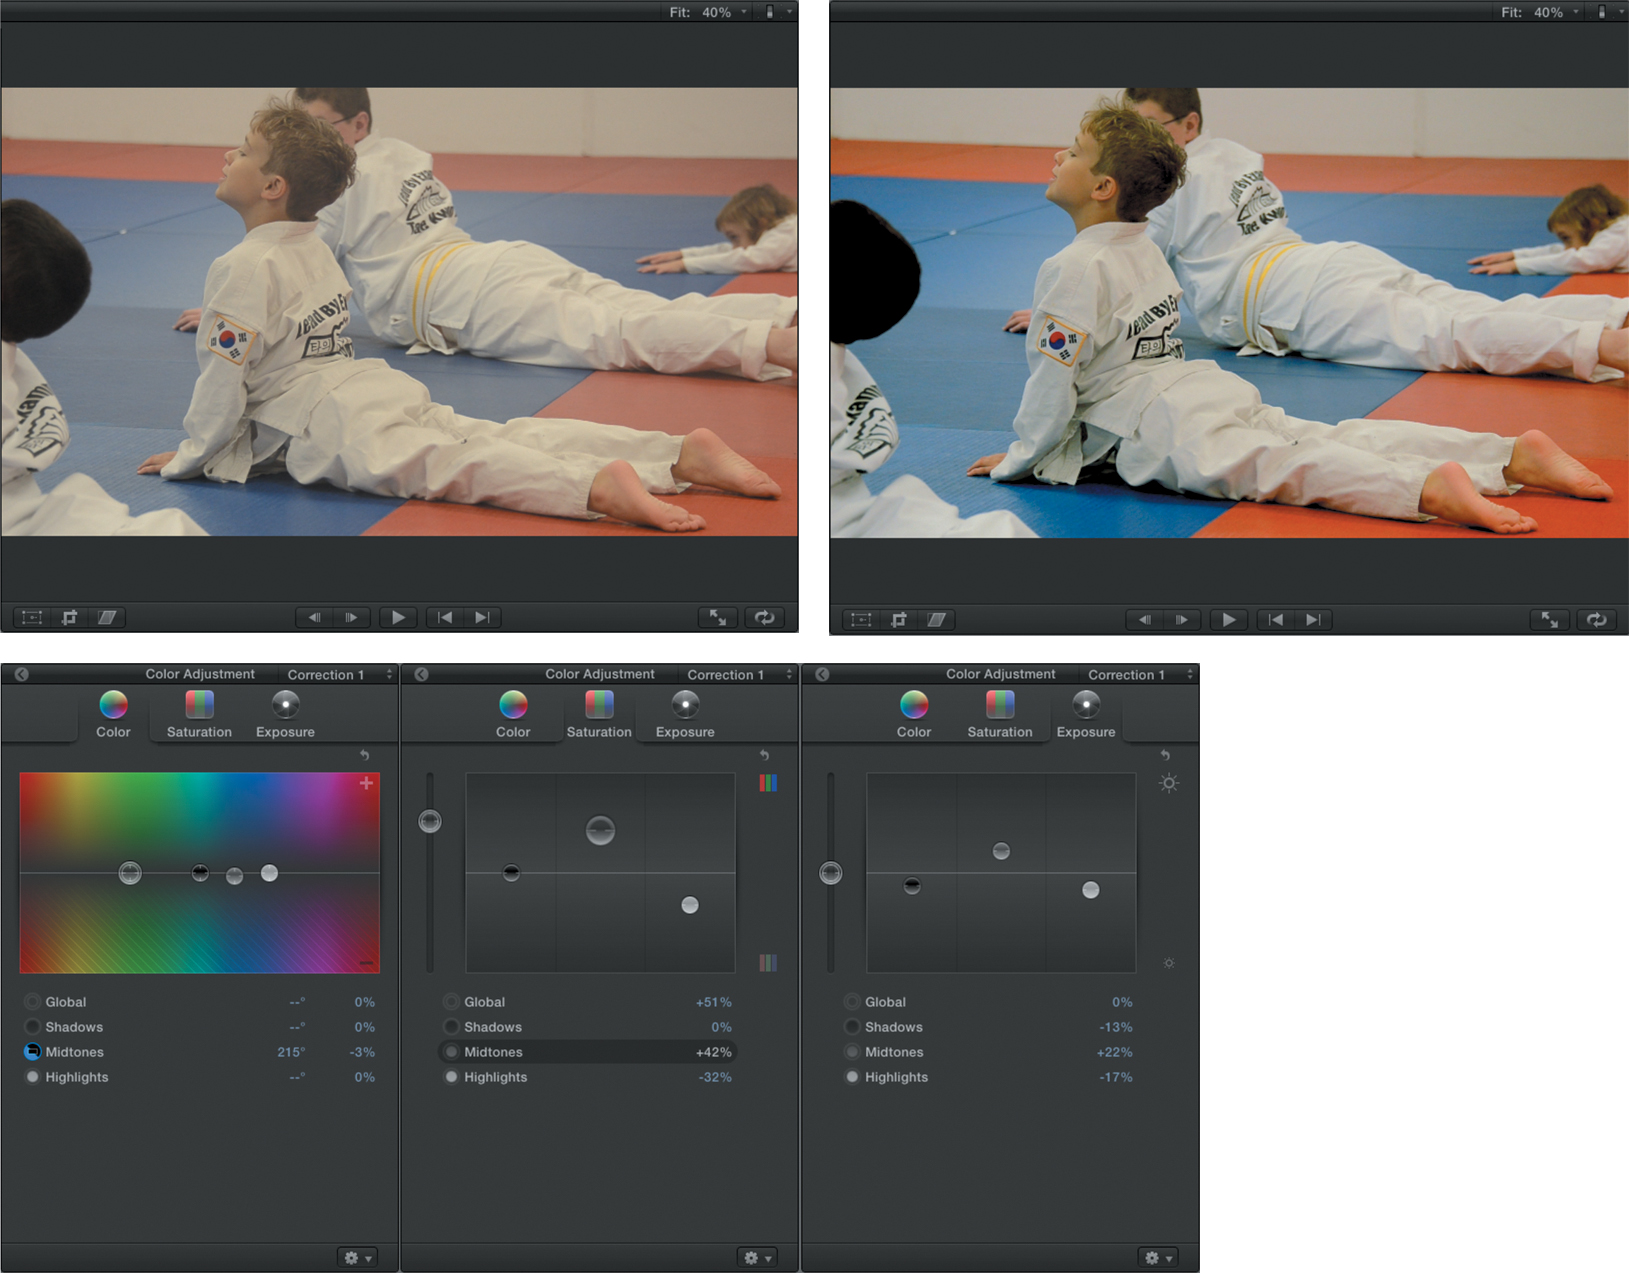
Figure 11.31. The original image (top left) lacks contrast and is washed out. After adjusting the color temperature for the midtones, I lifted the Exposure and boosted the Saturation (bottom). The final image (top right) is more pleasing to most viewers.
Three-Way color Corrector
The Three-Way Color Corrector is an effect that most people “graduate” to at some point in their workflow. It is similar to a normal color corrector except it offers individual controls for adjusting color in the shadows, midtones, or highlights independently (Figure 11.32). This effect is very useful for fixing color casts in an image. The effect also offers additional controls for limiting adjustments based on a color or exposure range (typically called secondary color correction).
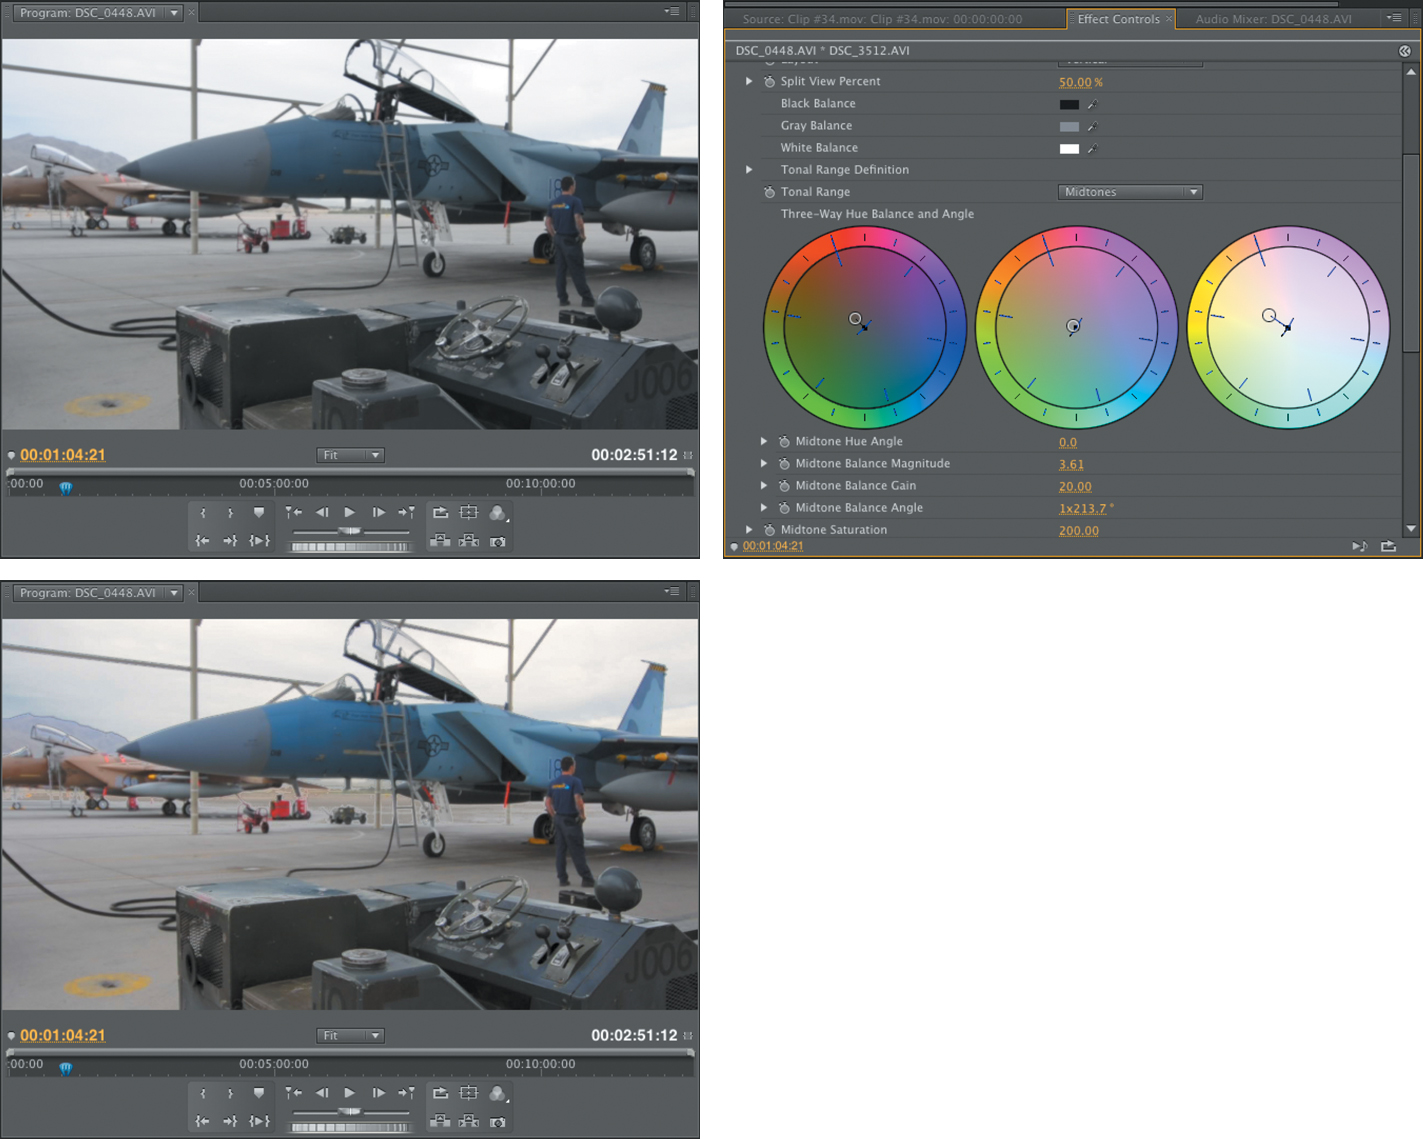
Figure 11.32. The Three-Way Color Corrector allows you to adjust exposure and saturation for each of the three tonal ranges. The top-left image shows the original footage, and the bottom-left is corrected for color and tone.
Color Correction Vs. Color Grading

Figure 11.33. For this shot, exposure was adjusted and colors were boosted.
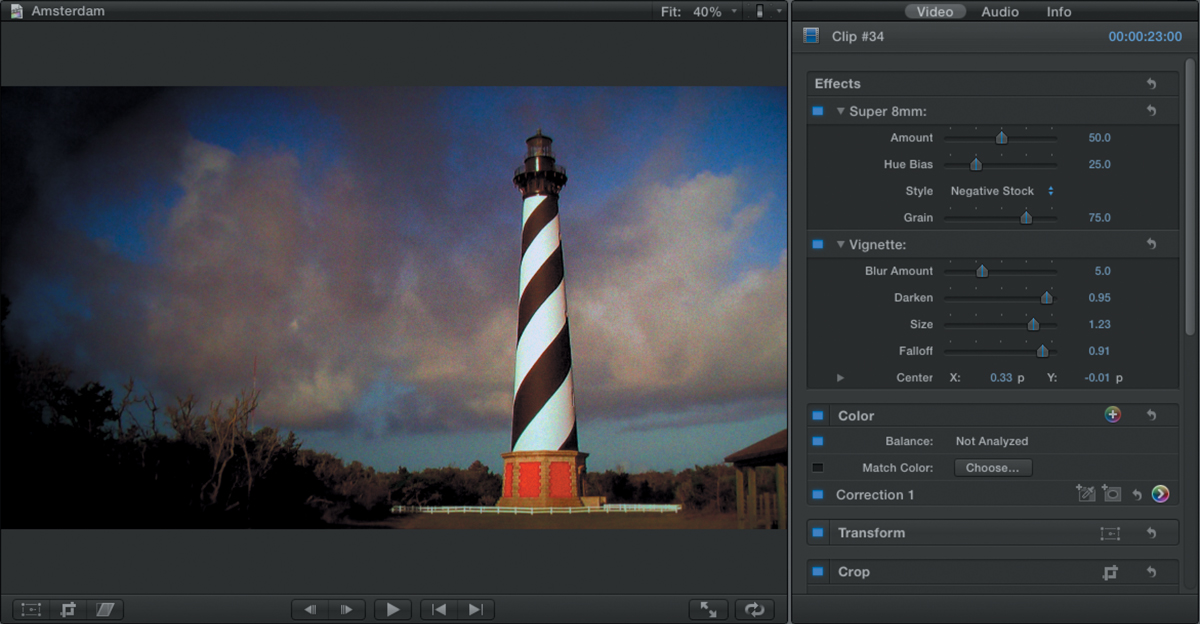
Figure 11.34. To create a moody look, I used the Super 8mm and Vignette effects in Final Cut Pro X to age the footage and make it feel grittier.
Exposure Problems
Exposure problems frequently plague video. As you’ve learned throughout this book, it is better to expose properly or slightly underexpose your footage. Capture a shot that is too dark and it’s difficult to lift the shadows. The more you brighten a dark shot, the more likely you’ll introduce excessive video noise or grain. If you dramatically overexpose a shot, the blown-out areas are lost forever. However, a slight overexposure issue can often be compensated for and fixed.
Fixing Underexposed Footage
If a clip is underexposed, one of the easiest ways to fix it is with a Curves adjustment. This works well for low-light or evening shooting. Here’s an approach that will work in most cases.
1. Select a clip in your sequence that needs adjustment.
2. Apply a Curves adjustment to that clip (Figure 11.35).
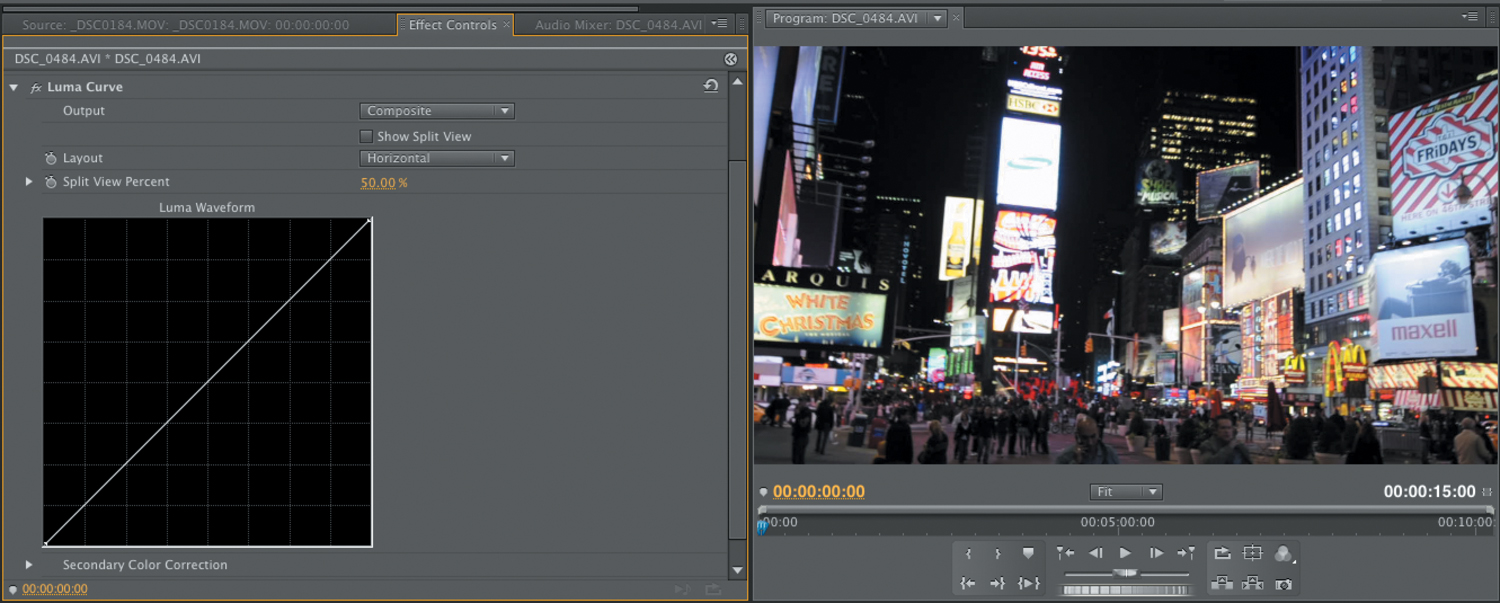
Figure 11.35. The original shot is underexposed.
3. Click on the line of the Curve to add a control point.
For an underexposed shot, click in the lower 25 percent (toward the top) of the curve. A control point is added to the line that will affect the luma values.
4. Drag upward slightly to remap the darker areas to a lighter luma value (Figure 11.36).
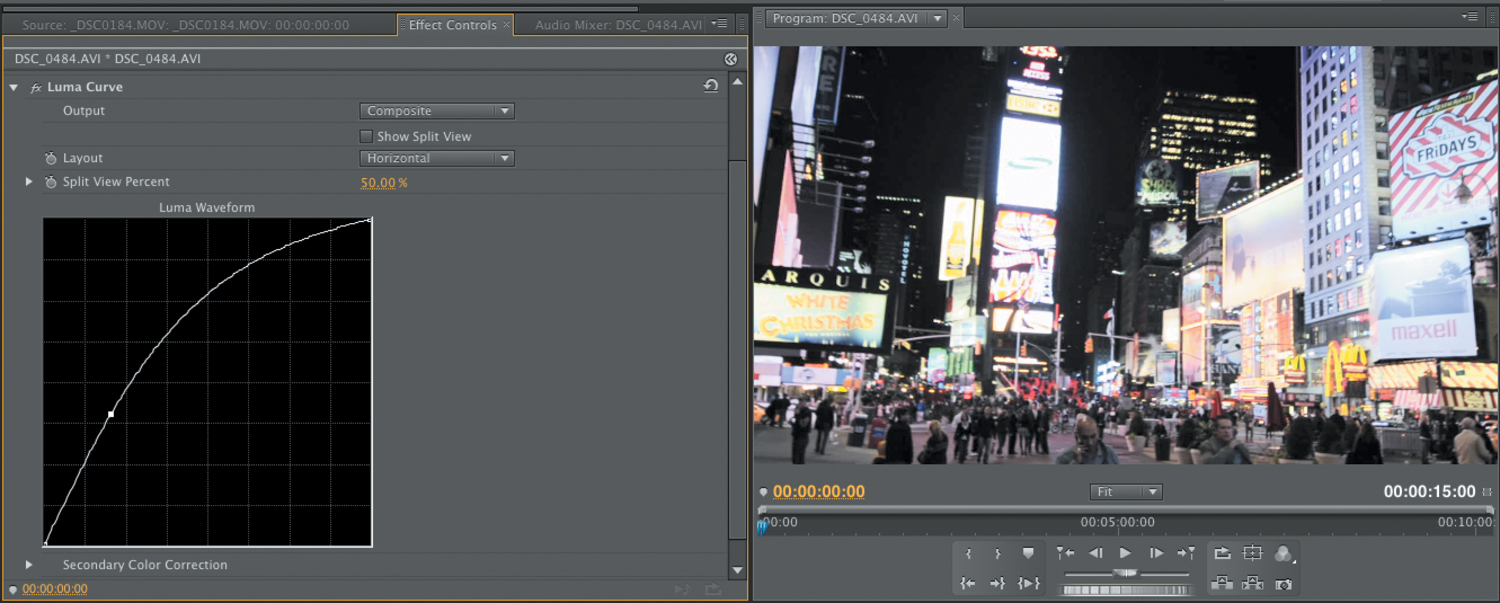
Figure 11.36. Lifting the shadowy areas helps the overall exposure.
The picture may now start to look washed out a bit from the brightening of the image.
5. To fix the washed-out picture, add another control point in the upper 25 percent of the curve and drag down slightly to restore some highlight detail (Figure 11.37).
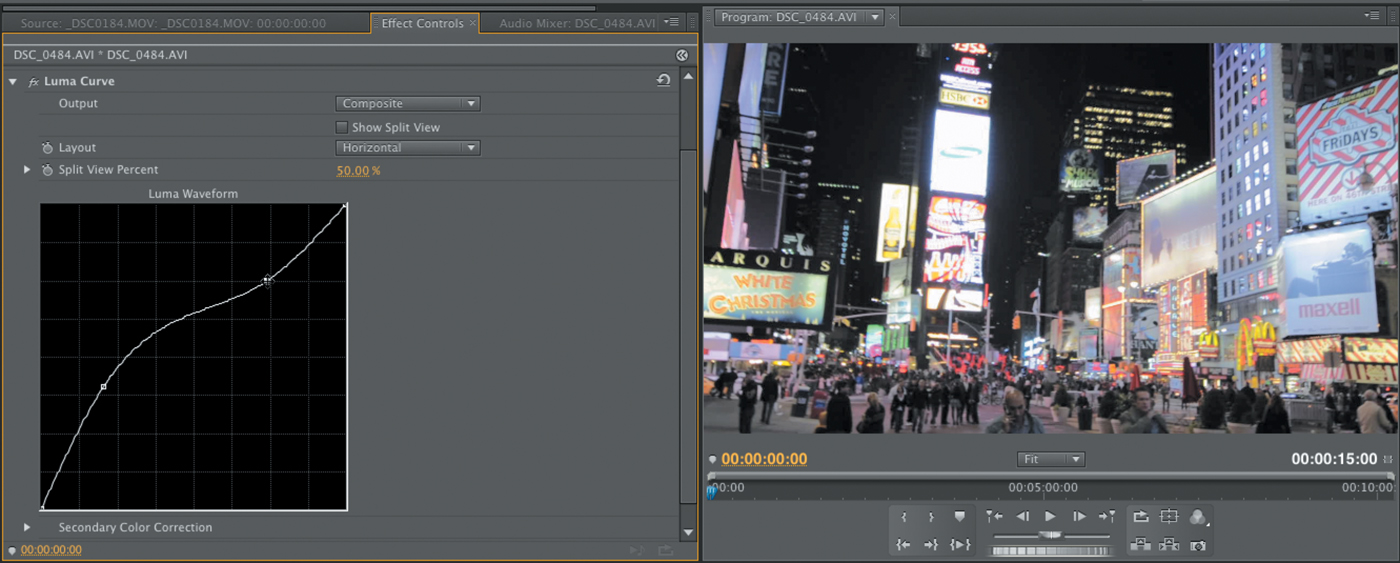
Figure 11.37. Restoring highlight detail to a washed-out image.
6. You may need to refine the image slightly with a Saturation or HLS adjustment as well to restore the washed-out color (Figure 11.38).
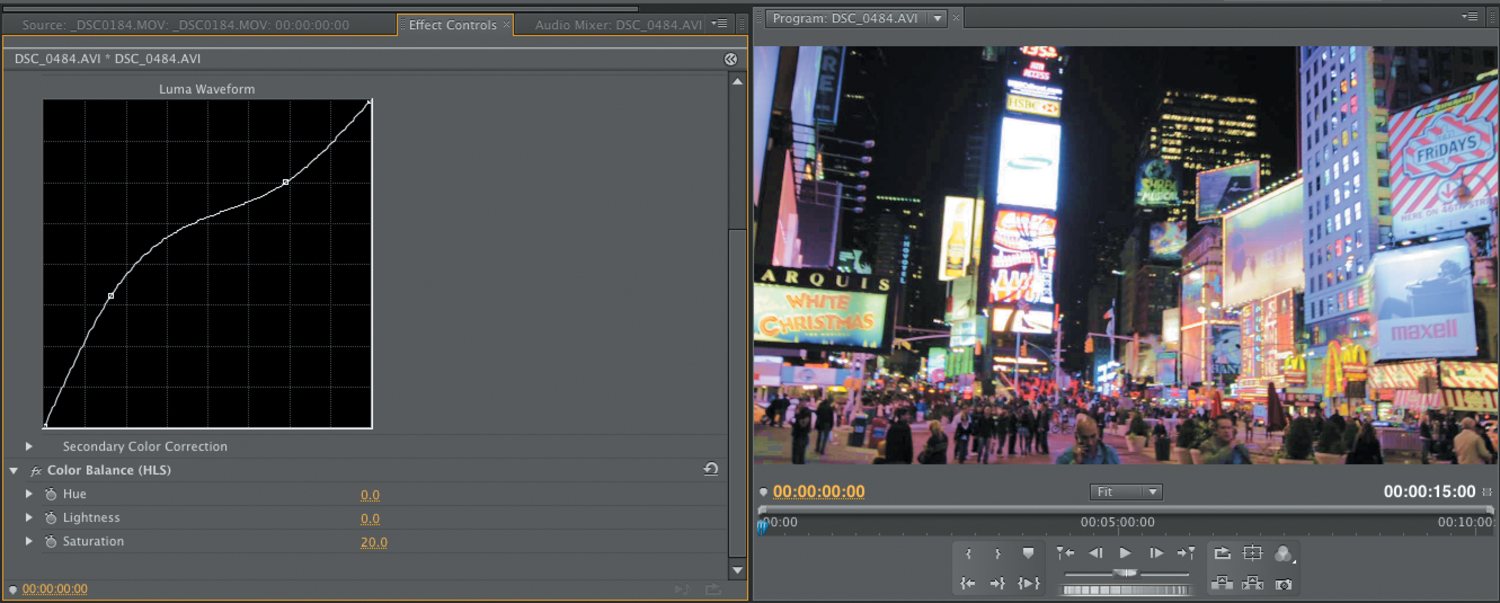
Figure 11.38. A slight Saturation adjustment to the image restored the washed-out color.
Fixing Overexposed Footage
Repairing overexposed footage is similar to underexposed footage. You can use a Curves effect to tackle the problem (just pull the Curves adjustment in the opposite direction). Alternatively, you can use a Levels adjustment to repair the footage.
1. Select a clip in your sequence that needs adjustment (Figure 11.39).
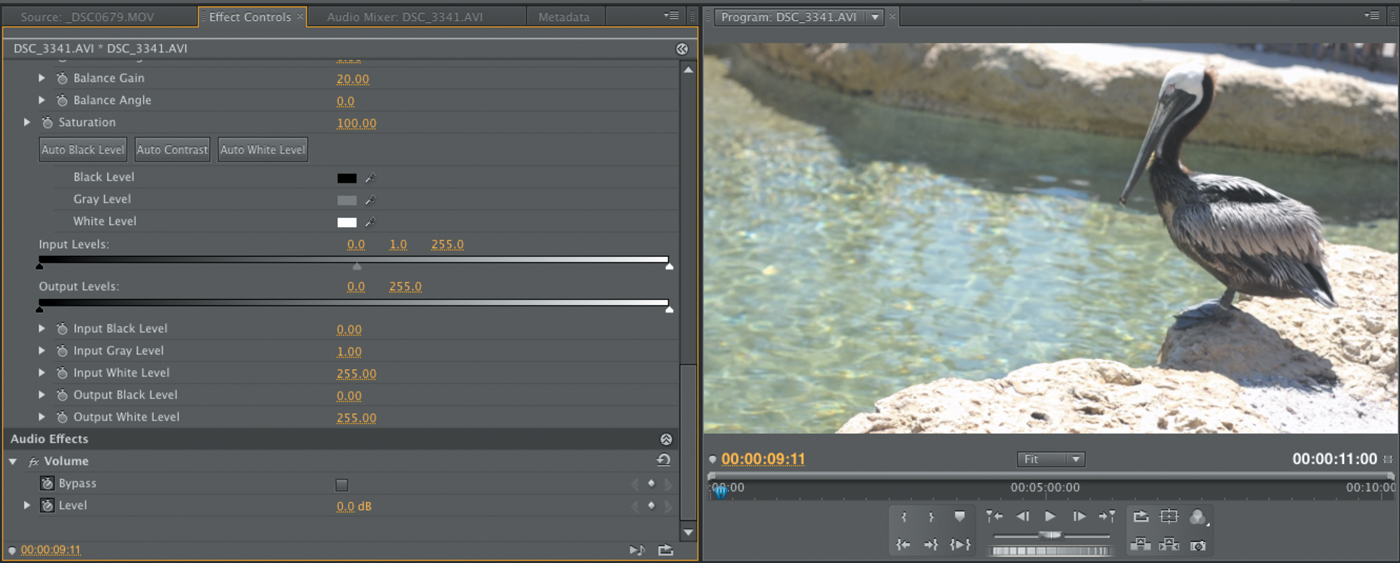
Figure 11.39. The original shot is overexposed.
2. Apply a Levels adjustment to that clip. Depending on your application, the Fast Color Corrector or Three-Way Color Corrector may also work.
3. Drag the white Output slider to lower the white levels (Figure 11.40).
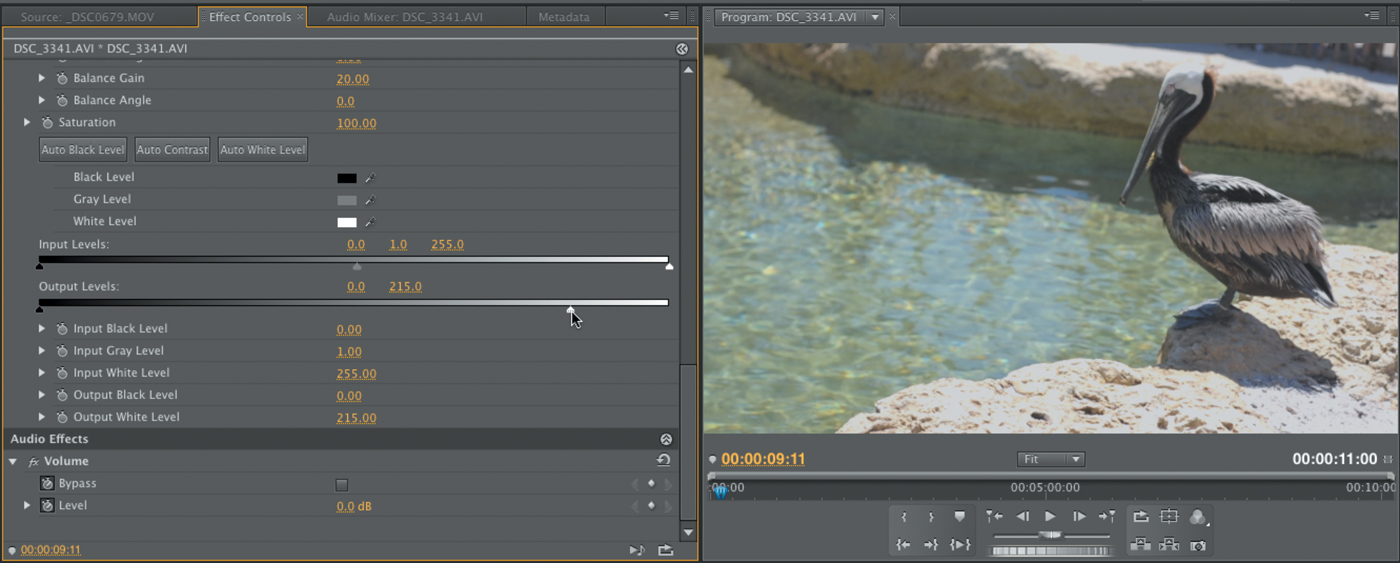
Figure 11.40. Lowering the white Output slider reduced the intensity of the white areas of the image.
4. Drag the middle (gray) Input slider to the left or right to adjust the exposure of the midtones (Figure 11.41).
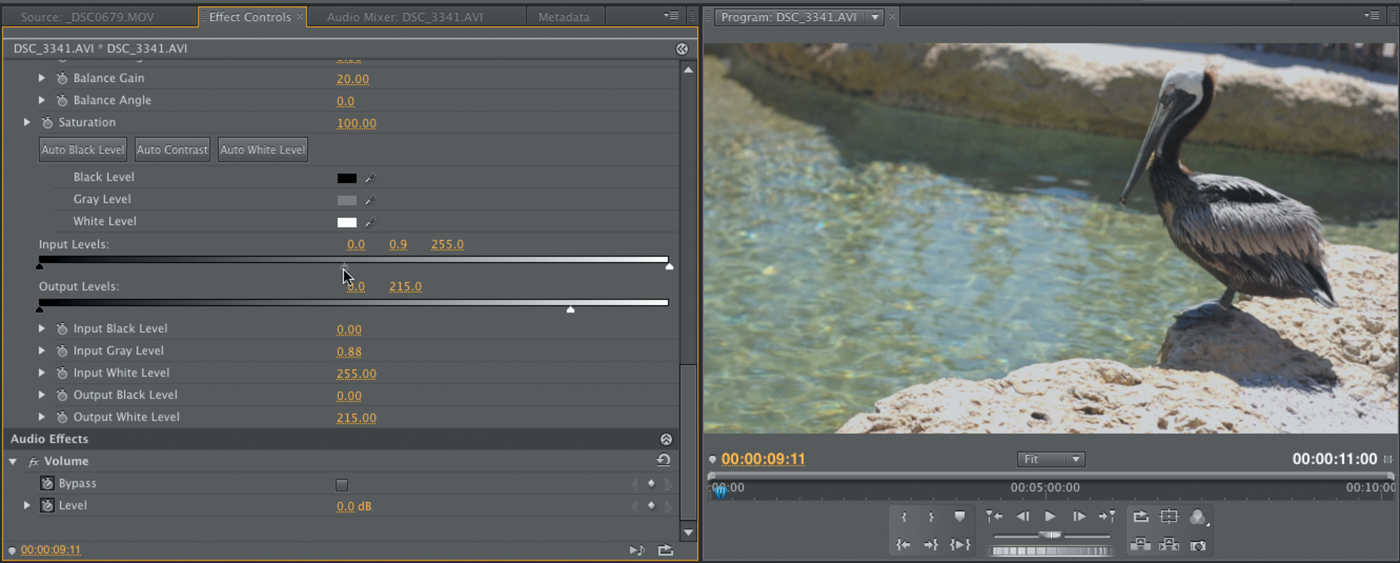
Figure 11.41. Changing the gray slider changes the overall exposure of the image.
Dragging to the left will darken the midtones; dragging to the right will brighten them.
5. Drag the black Input slider to the right to improve contrast (Figure 11.42).

Figure 11.42. The black Input slider adds contrast to the image.
6. You may need to refine the image slightly with a Saturation adjustment as well to restore the washed-out color (Figure 11.43).

Figure 11.43. Increasing Saturation helps with the overall image quality.
Fixing Color Casts
Color casts occur in images for several reasons. It may be because you improperly white balanced your footage. Or, perhaps you were shooting in light with a strong color and you want to change the scene. No matter what the reason, color can be dramatically adjusted when working with video, whether it’s simply boosting color with a Saturation adjustment or by taking a more in-depth approach of tackling adjustments to the hue of the scene to achieve more natural-looking color.
Use Your Vectorscope
If your editing tool offers a Vectorscope, it is the most useful tool when working with color. A Vectorscope measures hue and saturation for each video clip. As you look at the scene, it will map the color on different vectors. The angle around the Vectorscope represents the hue of the color. You can actually see the colors on the scope; there are marks for primary video colors—red, green, blue—and secondary video colors—yellow, magenta, and cyan.
Take a look at the shot of the pink flamingo in Figure 11.44. In this scene there is a very saturated pink tone to the bird. The pink can be seen as trace falling between red and yellow on the Vectorscope. To a lesser degree, there is some green vegetation in the scene. You can see a small spike in trace pushing toward green on the Vectorscope.
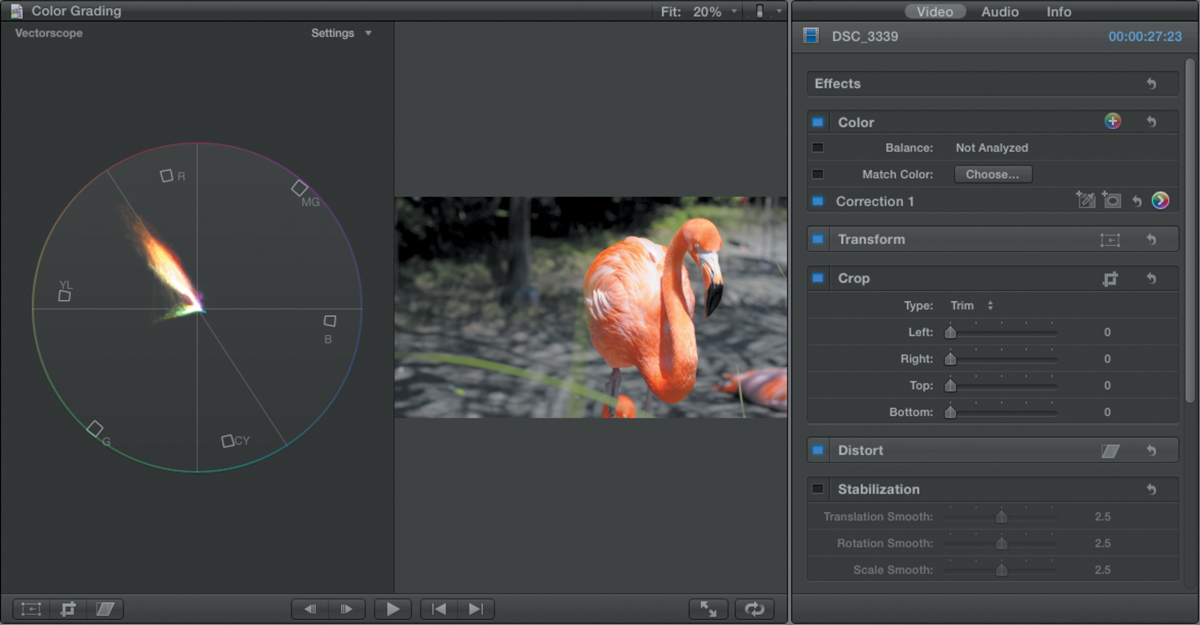
Figure 11.44. The Vectorscope helps you see critical color details in your image.
The middle of the Vectorscope represents pure white (or no color). The farther the trace distance from the center, the more saturation there is for a particular color. If you think there is too much of a particular color in a shot, you can look at the Vectorscope to analyze the trace (Figure 11.45). Also on the Vectorscope is a line that falls between the yellow and red targets that is referred to as the flesh tone line. This can be helpful when adjusting skin tones because it gives you a target to aim for (Figure 11.46) (no matter what the ethnicity of the subject is, this is the color of blood and flesh tone).

Figure 11.45. This image has a bluish tint. You can see unwanted trace pushing toward cyan and blue on the Vectorscope.

Figure 11.46. After the image is corrected, the bulk of the trace falls onto the flesh tone line on the Vectorscope.
Fixing Contrast First
Before you adjust the color in an image, repair any contrast issues. As you lighten a shot, colors will tend to lose saturation and appear washed out. Similarly, if you darken a shot, you might boost the intensity of color. The goal is to fix the exposure issues first, and then restore a saturation level that is pleasing. Because DSLR video cameras tend to compress the colors a lot, a saturation boost is very common.
Fixing Unwanted Color
If your scene has unwanted color, it can often be removed by employing several strategies. None of these strategies are exclusive of each other; rather, they may become a matter of personal preference. You also might find that you have some limited options in less expensive editing tools. Here are some options to try to fix unwanted color:
• Use an eyedropper. Many effects feature an eyedropper so you can click an area with unwanted color casts (Figure 11.47) to fix it. Usually, the black and white eyedroppers are the easiest to use to set a proper black-and-white point in the image. You’ll find these controls in many Levels adjustments as well as color corrector filters.
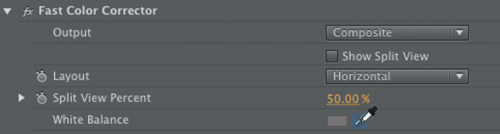
Figure 11.47. You can use eye-droppers to white balance your footage with effects.
• Adjust the channels. You can often make adjustments on a per channel basis. If you see a shift in the color, you can adjust one or more channels of the image with a Curves or Levels effect (Figure 11.48).
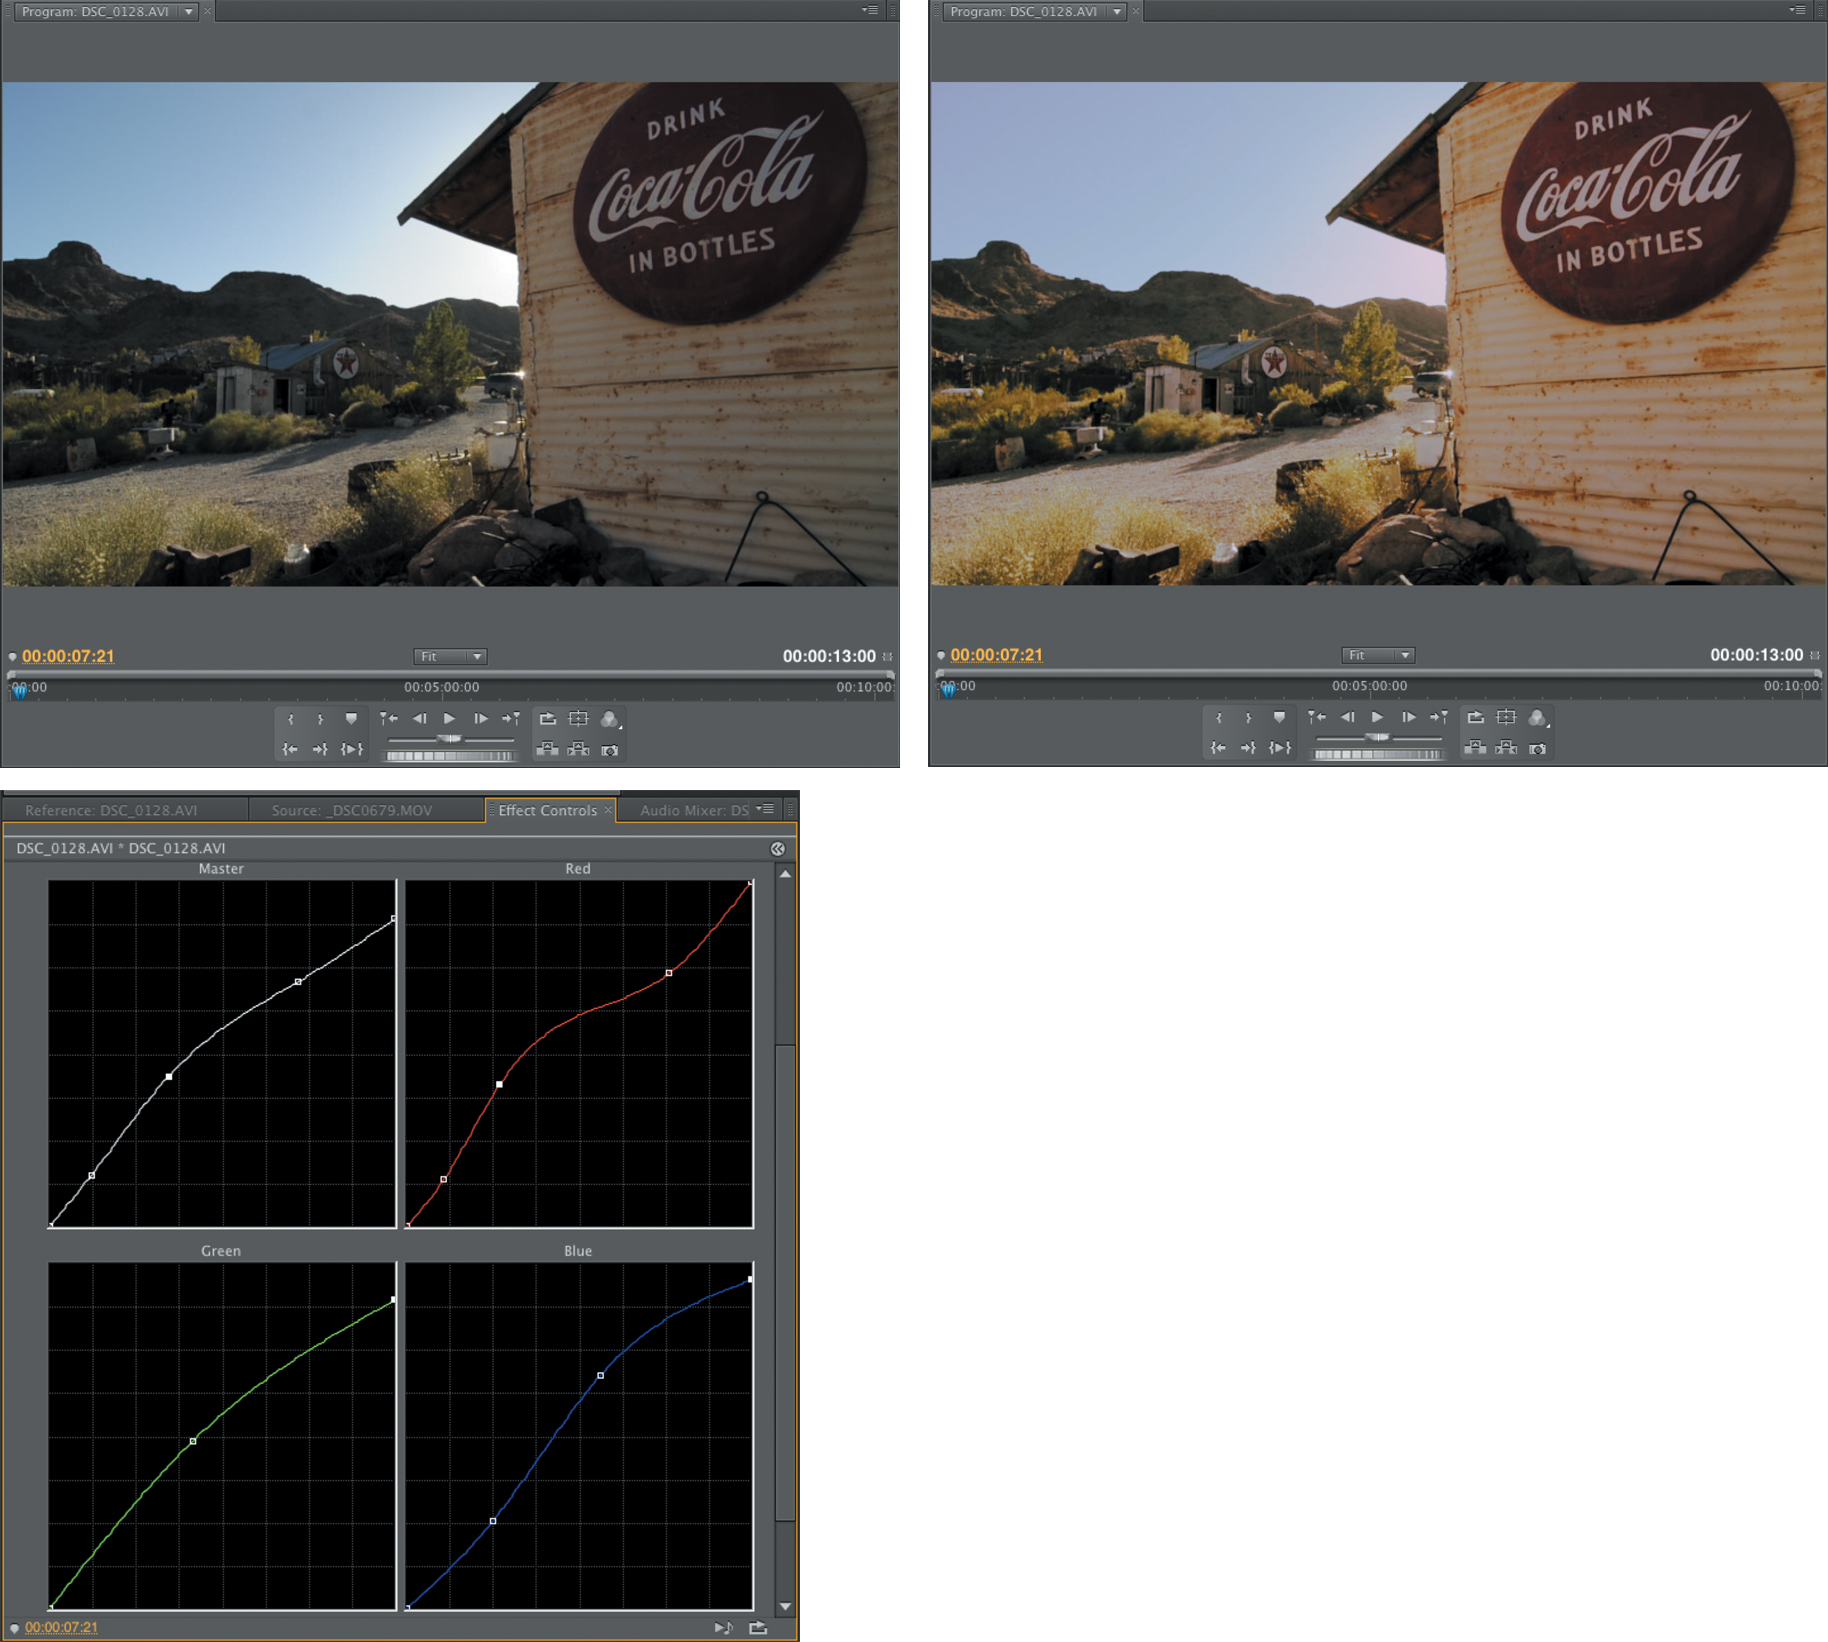
Figure 11.48. The original image’s (top-left) color casts have been manipulated using the RGB Curves effect. This allowed for a unique adjustment in each channel.
• Use the wheels. In most color corrector effects you’ll find Hue wheels. There may be single wheel (for all ranges) (Figure 11.49) or three wheels (for shadows, midtones, and highlights). Simply pull the color wheel away from the color you want to remove. For example, if a shot is too blue, just pull it toward orange.
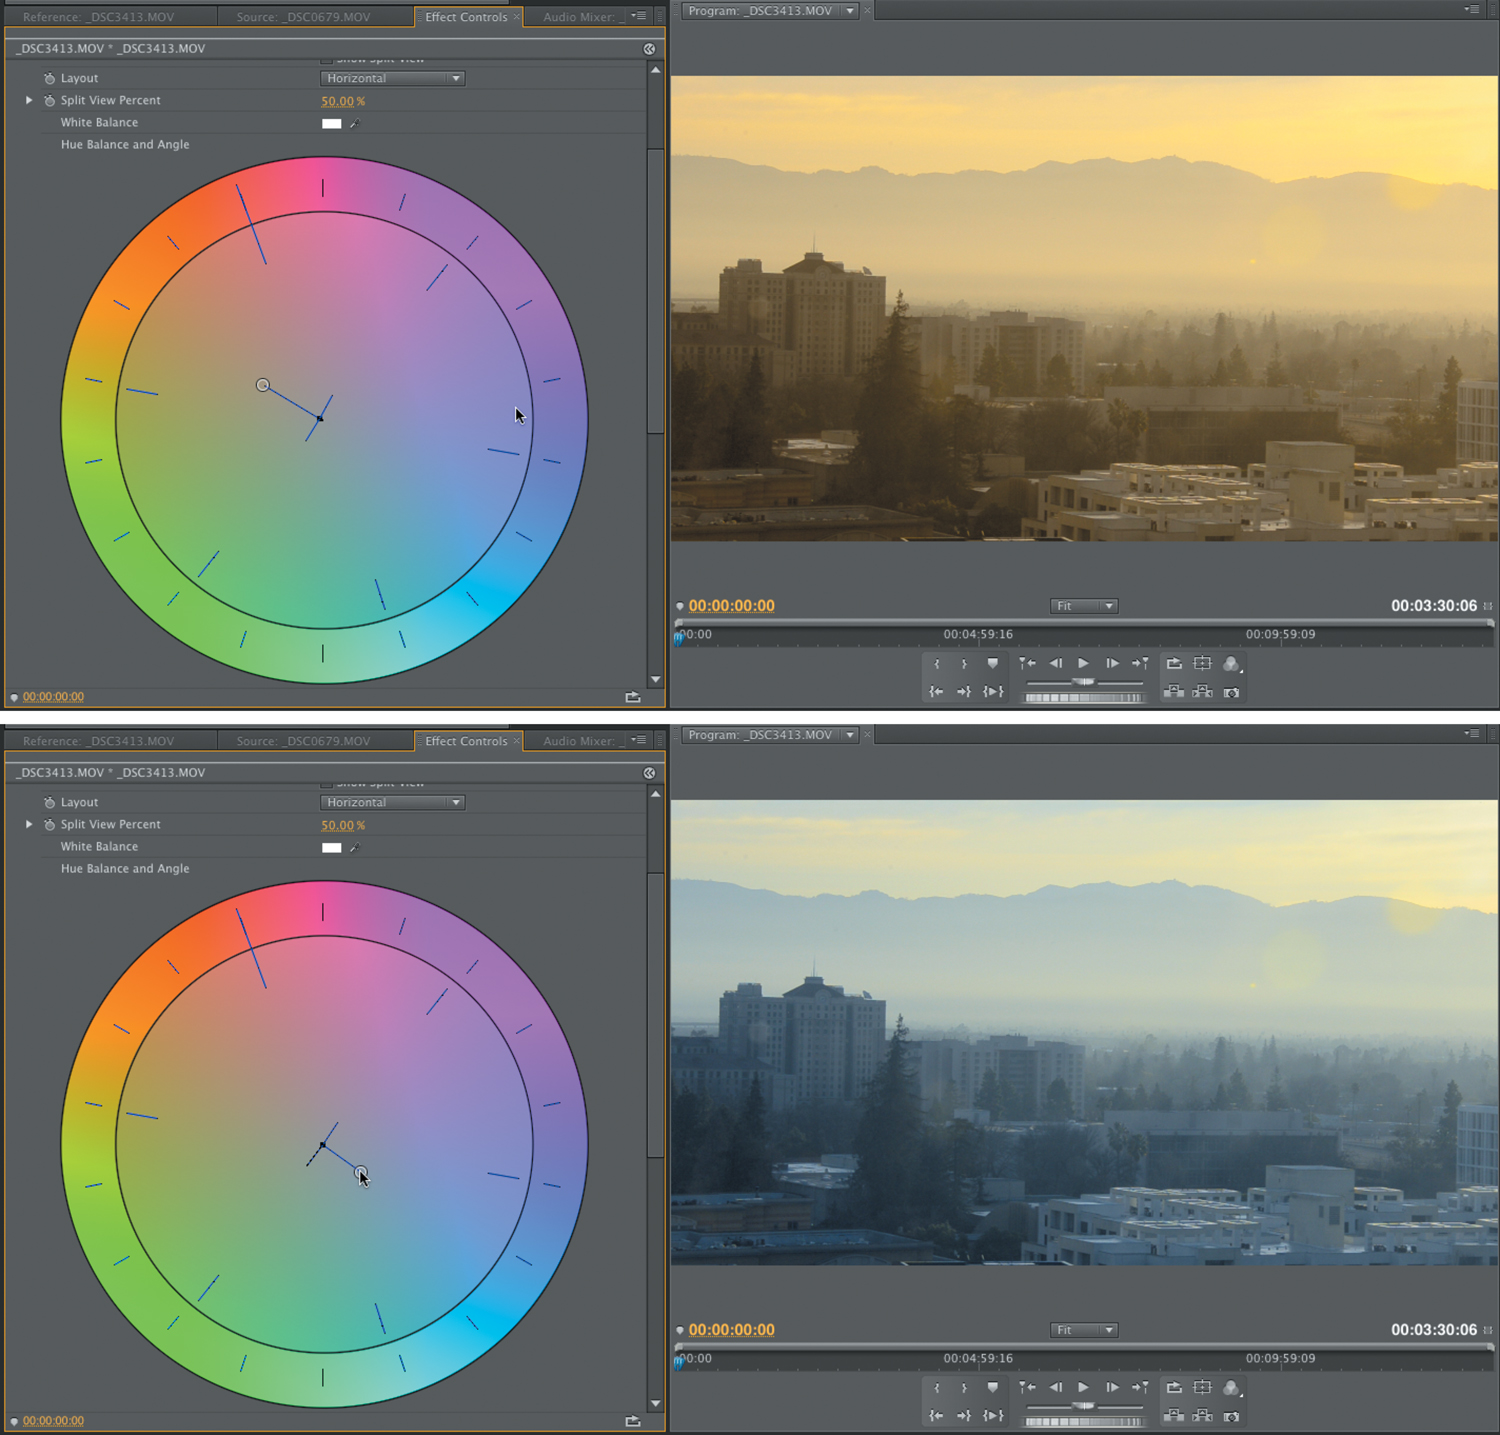
Figure 11.49. Adjusting the Hue wheel can control the color temperature of your footage.
Chapter 11 Assignments
Editing is an enjoyable process once you get the hang of it. I invite you to explore editing by completing the following exercises.
Perform Three-point Editing
Practice making precise edits. Using In and Out points, precisely select the range of a clip. Then use a sequence and edit clips precisely into the Timeline using the Insert and Overwrite commands. Repeat this exercise until you have assembled a short sequence of shots.
Adjust Exposure
Using some footage from your low-light shooting and from shooting outdoors, adjust the exposure of your footage until you have even midtones. After adjusting midtones, restore proper saturation levels to your clips.
Color Grade a Shot
Try color grading some of your footage. Select a handful of shots and adjust their color. Attempt to unify the shots first so they feel like they were shot at the same time. Then adjust the appearance of the shot to create an emotional feel.
Share your results with the book’s Vimeo group!
Join the group here: vimeo.com/groups/DSLRVideoFSTGS