1. What Is DSLR Video?
Whether you stumbled across the video options in your DSLR camera or specifically selected your camera with video shooting in mind, I welcome you to the world of DSLR video. Telling stories with video is enjoyable and challenging. Your camera is a great tool, but by its very nature, video is a complex medium. Throughout this book I’ll focus on teaching you the most important techniques. It doesn’t matter which camera you’re shooting with, my goal is to help you master the skills you need to become a motion storyteller.
Poring Over the Footage
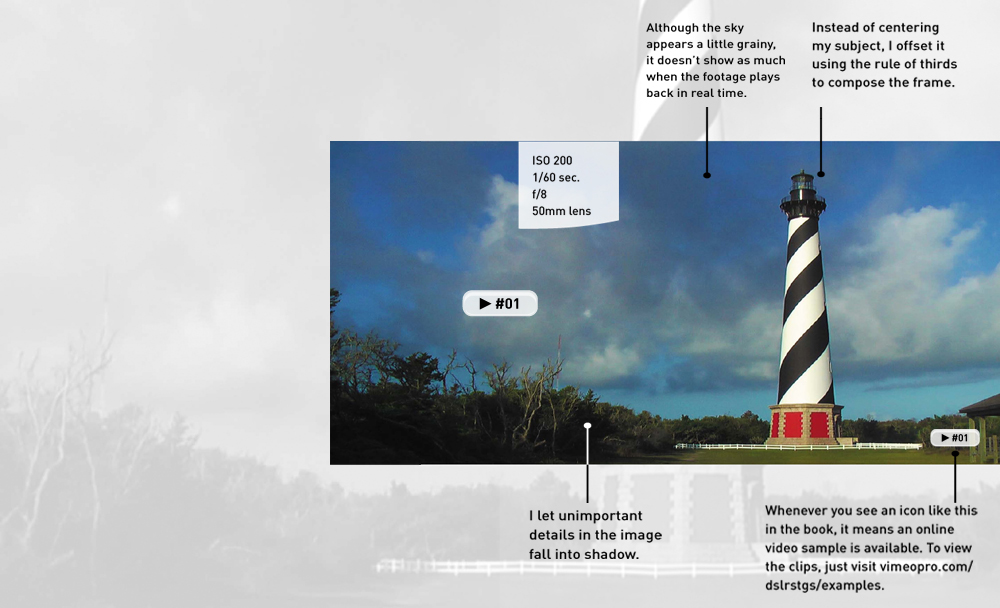
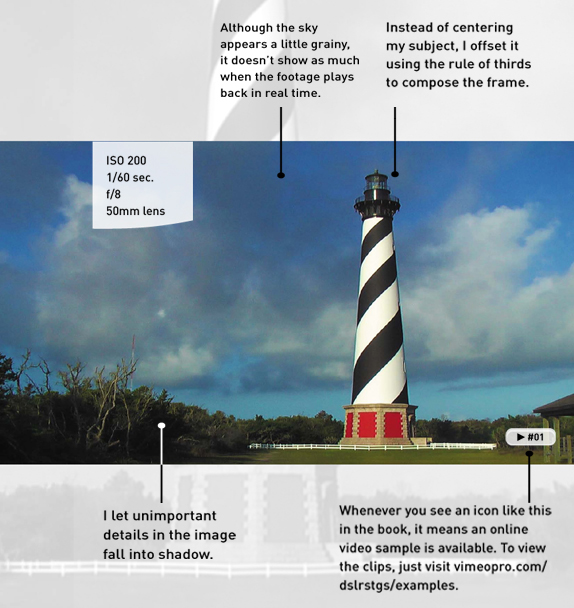
While visiting the Outer Banks region of North Carolina, you notice a dominant item all along the coast—lighthouses. This shot was easy to compose because there were such strong angles to work with. However, it was a tough shot to expose properly. The high-contrast, black-and-white stripes had to be balanced with the details in the sky, and the shadowy area of the trees started to lose detail. Video is sometimes very challenging to expose properly because it has less of a dynamic range than photography.

Poring Over the Footage
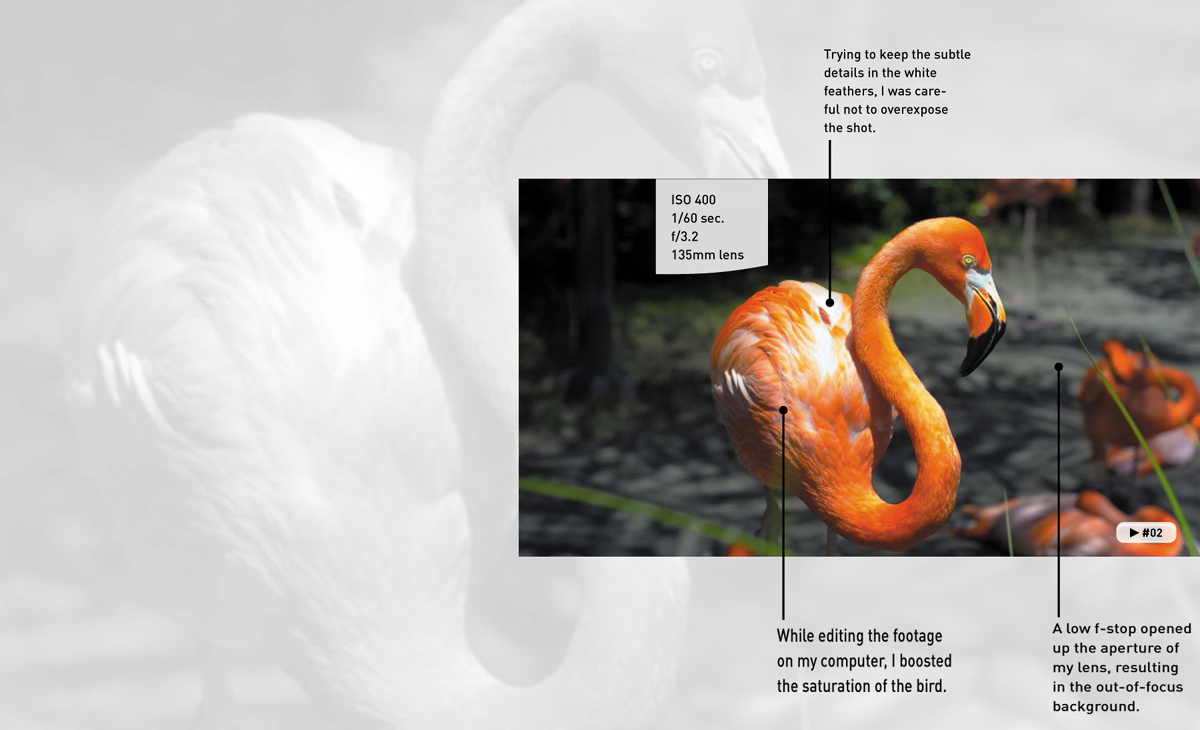
Our family enjoys visiting zoos, wildlife preserves, and parks. For this image, I relied on the shallow depth of field options to keep one bird in focus while blurring the busy background. By controlling my camera and lens settings, I was able to exert greater control over the final shot.

Why Is DSLR Video So Popular?
If you pick up just about any new “stills” camera, you’ll find that it probably also shoots video (Figure 1.1). DSLR video, or hybrid, cameras are booming in popularity. The camera you have is probably quite capable of recording great-looking video. Whether shooting is a hobby or your job, your DSLR camera is up to the task.
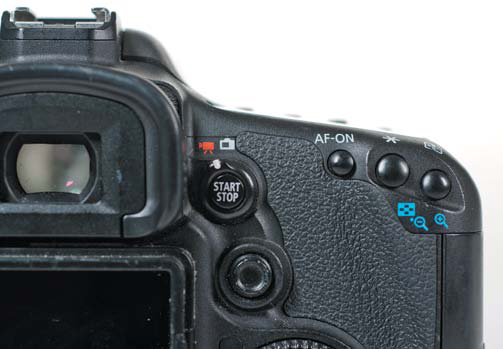
Figure 1.1. The addition of dedicated video buttons on most “still” cameras is a sign of video’s popularity.
Here are a few reasons that have led to the rapid adoption of DSLR video:
• Wonderful value. Your DSLR camera can achieve incredible image quality at a fraction of the price of a traditional video camera. DSLR video cameras have found their way into the hands of everyone from doting parents to Hollywood cinematographers. Everyone agrees that these cameras can give you a great picture at a great price.
• Convenience. Whether you’re shooting photos or stills, one camera can now do both. You no longer have to carry two cameras with you on vacation, and you can create photos and video using the same lens (Figure 1.2).
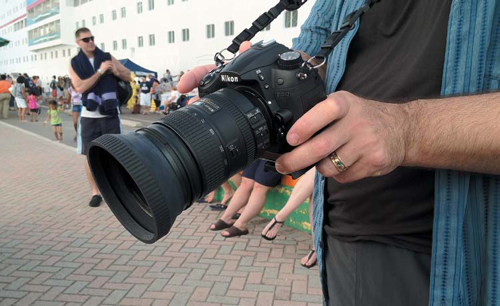
Figure 1.2. Carrying a single camera body is very convenient. Photo by Meghan Ryan-Harrington.
• New challenges. Many experienced photographers I know are attracted to video because it’s new and challenging. If you are the type of person who finds learning fun, becoming a better videographer will also improve your photography. If photography isn’t as much fun as it used to be, give it a creative jolt by mixing in some video.
• New opportunities. Creating video with your DSLR camera opens many doors. You have new ways to tell stories using motion. You can also reach out to more people through the use of video-sharing sites like YouTube or Vimeo, as well as social media outlets like Facebook and Twitter. If you make a living from your photography, your clients may be looking for (and willing to buy) video services from you.
What’s Great About DSLR Video?
For almost 30 years now, I’ve been shooting, directing, and editing video. I create video professionally, so the last thing I want to do is shoot video as my hobby. For me, photography was always my escape. It gave me the ability to step away from big group projects and focus on capturing life’s intimate moments.
Well, thanks to what I can do with my DSLR camera, I now shoot video more than ever. Whether it’s shots of my kids in action, capturing memories from a vacation, or producing short stories for the Web, I have a new passion for creating video.
For me, there are two major reasons I love shooting video on a DSLR. The first is aesthetics—the resulting look and feel of the footage I can acquire. The second involves the technical aspects that make a video-enabled DSLR camera so much better than other affordable (and even many not so affordable) HD video cameras.
Aesthetic Benefits
For me, one of the most appealing elements of both photography and video has been the ability to tell stories using images. I really like to capture memories and share those with an audience. Sometimes they are personal stories just meant for family; other times they are television commercials viewed by a huge audience. In either case, I want the footage to look great. With a DSLR camera, getting great-looking footage is a lot easier than using other camera technology. Here are two reasons why:
• Great control over depth of field. If you’ve ever shot on a traditional video camera, you know that once you’ve set focus, the whole image tends to stay in focus. With a DSLR camera, you have a much bigger image sensor, which allows you more options when capturing your image. The ability to set a shallow focus lets you keep your subject as the star and blur any unwanted background details (Figure 1.3).
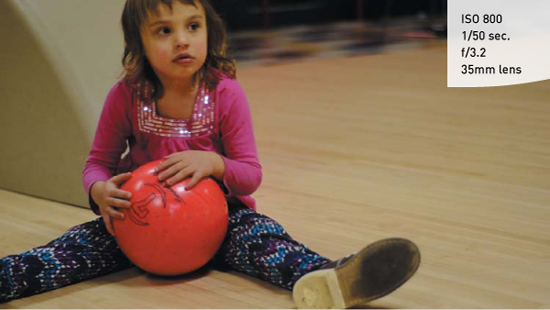
Figure 1.3. Opening up the aperture made the background go soft. Instead of a busy bowling alley behind my daughter competing for attention, the focus is set on her.
• Filmic image. For years, people have applied filters or effects to their video to make it look less like video. Whether it was TV news or home movies, the footage tended to look flat and boring (Figure 1.4). With a DSLR, you have great lens quality and a more photographic-like image (Figure 1.5). Also, several more controls are in the camera that you can adjust to modify the look of your footage. You’ll learn more about these options in Chapter 3, “Setting Up Your Camera.”
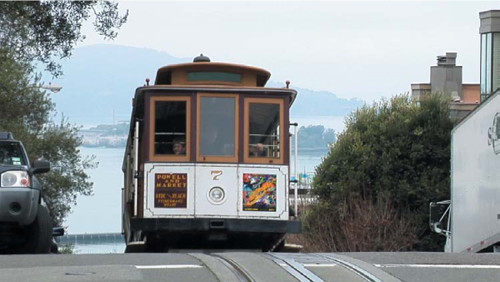
Figure 1.4. This shot is from a traditional video camera. The colors of the image are very flat, and the contrast ratio between the darkest and brightest areas lacks punch.

Figure 1.5. A DSLR camera does a better job with contrast and holds on to key image details as well.
Technical Benefits
Although I love the look of video my DSLR camera can create, I have to admit that I also love the power it gives me to shoot in challenging situations. On a traditional video production shoot, a lot of effort is placed on lighting the scene. Many tricks are used and lots of equipment is put in place to make a better-looking image. And a professional video crew tends to range in size from 2 to 15 people. All of these expensive components have traditionally kept the cost of professional video high, and at the bare minimum has meant dragging a lot of equipment out on every shoot.
DSLR cameras are changing this situation in a few ways:
• Lens selection. One of the best features of a DSLR camera is that you can change its lens. You can match the lens to the shooting scenario. If you need to shoot from far away, you can attach a powerful zoom lens. If you need to shoot in low light, you can attach an affordable prime lens to the camera. Over time, you’ll build up your lens collection; in fact, investing in good lenses is a smart idea (Figure 1.6). Currently, I have lenses that are 25 or more years old, and the good ones still produce great images. I’ll explore different options for lenses throughout this book.
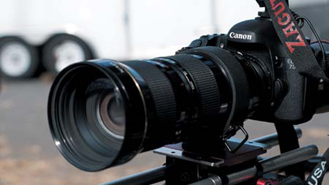
Figure 1.6. This lens is more than a decade old but still performs great for shooting video.
• Low-light performance. Compared to a video camera, a DSLR camera is much better at shooting in low-light conditions. You can now get better-looking images with less light (Figure 1.7). Although it’s still best to maximize the light you have, a DSLR camera can shoot in many places that a regular video camera would fail.
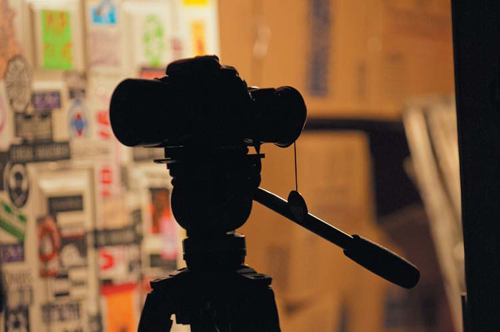
Figure 1.7. One of my favorite types of shooting is concert photography. The DSLR is superior in tough lighting conditions compared to other types of cameras.
• Smaller and lighter camera. If a camera is too heavy or bulky, you’ll likely end up leaving it behind. A DSLR camera is pretty light, and if you toss a lens or two in your bag, it’s still easy to carry on your shoulder. Plus, you can place the camera in lots of interesting places. I’ve seen DSLR cameras mounted to handlebars on bikes, used in underwater housings for scuba diving, and more.
What’s Not So Great About DSLR Video?
Every coin has two sides. So, although there is much to love about shooting video on a DSLR video camera, there are some drawbacks that will drive you nuts. If you’re used to shooting video on a traditional video camera, these shortcomings will be particularly noticeable. Be sure to pay attention to these issues as you grow and develop your shooting techniques.
Audio Workflow
The audio recorded by your DSLR camera is usually dreadful. Your camera likely has a cheap microphone that happens to be placed right where your hand will brush against it (or even cover it). For this reason, most people add an external microphone (Figure 1.8) onto their cameras to improve its sound-recording abilities.
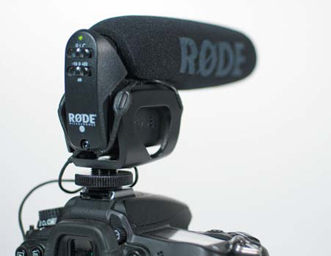
Figure 1.8. Using an external microphone improves the quality of the audio your camera can record.
If dialogue or interviews are important, you may need to go a step further. You can record far better sounding audio using a dedicated digital recorder and a professional-quality microphone. You can merge all of these audio sources together during the editing stage. Be sure to read Chapters 9 and 11 for more on audio acquisition and editing.
Tapeless Workflow
In the past, video cameras shot to tape. Tape was cheap, and when the project was done, you had your original tape as a backup for your project. You could also record your finished project back to tape. Tape was easy; you could hold it in your hand and easily know what you had.
As cameras moved into the world of high definition (HD), the use of tapeless recording formats really took off. Tape takes up space and makes cameras bigger. Additionally, tape requires a lot more moving parts on a camera, which are more likely to break.
With DSLR video, you record to memory cards—chances are lots of memory cards (every three minutes you record is about 1 GB of data). You also need to use higher-speed memory cards because the video files you capture have a lot of data to quickly record. The upshot is that cards are more expensive (than tape was), and you’ll need more of them (Figure 1.9).

Figure 1.9. Be sure to stock up on enough memory cards. Photo by iStockphoto.
Unless you have a lifetime supply of memory cards (or a lot of money), you’ll need to transfer the files on those cards in order to keep shooting. Hopefully, you’ll have enough space on the cards you have to get you through the day. But speaking from firsthand experience, there will be times when you’ll be backing up your footage while on a shoot. You might need to transfer your footage at your hotel each night while on vacation or while out and about to your laptop. In any case, you’ll need to keep in mind that you’ll have a lot more data to work with and will need strategies (and disk space) to deal with all that data. I cover backing up your footage in depth in Chapter 10, “Backing Up and Organizing Your Footage.”
Focus Is Difficult
A hallmark of DSLR video is shooting with a shallow depth of field (Figure 1.10). This look is often associated with a “film look” and is attractive but difficult to attain. DSLR cameras also lack most of the auto-focus features that are available in many consumer video cameras. Add to these issues challenges with the ergonomics and form factor, which make the camera difficult to hold when shooting video, and you’ll discover that focus is tricky. Although you can adjust exposure and audio, there is nothing you can do to fix a picture that has soft focus. However, this problem can be resolved with practice and the addition of some equipment.
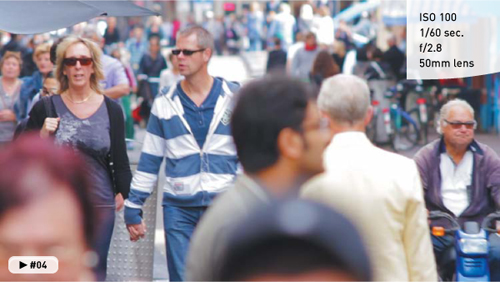
Figure 1.10. In this busy scene, parts of the shot are in focus and parts are out of focus. Adjusting the aperture of your camera will have the greatest impact on what is in focus and what is not.
Add-on Gear Is Important
If you’ve never been near a professional video or film set, you’d be amazed at just how much gear is in use and the number of people needed for a successful shoot. You see, most Hollywood feature films have a huge lighting department, multiple photographers, and audio specialists (Figure 1.11). The DSLR camera can also have lots of add-on gear to improve its ergonomics and performance (Figure 1.12). You, on the other hand, probably don’t have the resources to run out and buy every piece of gear or hire a full crew.
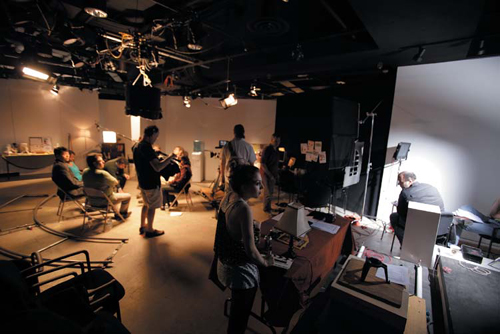
Figure 1.11. This is a full crew shoot for a television commercial I directed. Although we shot with a Canon 7D, we used a full lighting crew to achieve our look.

Figure 1.12. This DSLR camera has been converted to a film-style camera. Equipment like a matter box (for adding filters to the lens) and a follow focus (to make it easier to focus on a moving subject) complete this pro-style camera package.
If you read some of the popular websites or read magazine articles about DSLR video, you may think you need to own several thousands of dollars of equipment, which can really be overkill. But out of the box, a DSLR camera can be a little challenging to use.
Here are three essentials that I consider must-haves:
• Fluid-head tripod. A tripod provides your camera with a steady platform. The use of a fluid head can help you create animated movements of the camera as the camera pans (side to side) or tilts (up and down). A shaky camera leads to soft focus and can give your audience a feeling of motion sickness. You really need a video-style tripod or to adapt your existing tripod so it uses a fluid head (Figure 1.13). A stable platform for your camera is one of the best pieces of equipment you can use to improve the quality of your video.
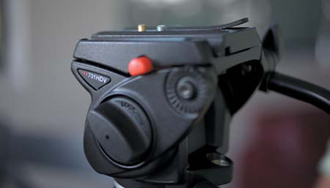
Figure 1.13. The use of a fluid head makes it easier to control your camera. You can attain much smoother camera movement using the right gear.
• Viewfinder or loupe. The screen on your DSLR camera will make your video look in focus and properly exposed (even when it’s not). A small screen makes it difficult to judge image quality. A viewfinder or loupe is like a lens for the back of the camera (Figure 1.14) that can help you with exposure and focus. The benefits to using a loupe or viewfinder are many, and I’ll discuss them in depth throughout the book.
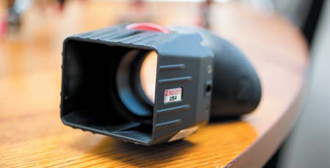
Figure 1.14. This loupe attaches to the back of the camera to magnify the LCD image when shooting. Photo by Lisa Robinson.
• Audio recording device with microphone. “Audio is half the picture” is an adage used by video professionals. The thought is that good sound greatly enhances a story. In fact, poor audio will quickly force anyone watching your production to stop. Investing in a microphone—and possibly a dedicated recorder (Figure 1.15)—allows you to record much better sound.
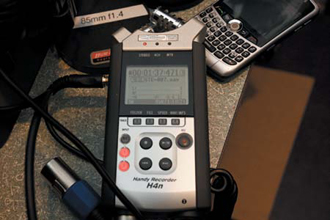
Figure 1.15. The Zoom H4N makes it easy to connect external microphones, as well as monitor the sound recording through headphones. See Chapter 9 for more details.
Shooting with Motion in Mind
If you’ve been shooting photos, you’ve probably developed many of the skills that are used to tell visual stories. Composition skills help you frame the shot, and exposure skills ensure that the details of the image are clear. You may be a great photographer or just getting started, but if you want to shoot great video, you’ll need a bit of retraining and rethinking.
With photography, you can walk away with one great shot and it’s a successful shoot. With video, you’ll need many great shots that match in exposure and style. What becomes important is how several shots will come together to tell a story.
The Sequencing of Motion
Many people who start to shoot video focus intensely on just the shot. This produces beautiful images but not necessarily a story. As a beginner, you may be perfectly content to string a bunch of shots together with a music track. Sure, a montage is fun to shoot and share, but it’s much harder to hold the viewers’ attention, let alone communicate a message.
The biggest change for photographers and new shooters moving into video is thinking of video as a series of interconnected shots. Your goal is to not just gather a bunch of pretty pictures. Instead, you need to think about how one shot leads to the next (Figure 1.16). In some instances, your subject may move through a space, linking one shot to the next.
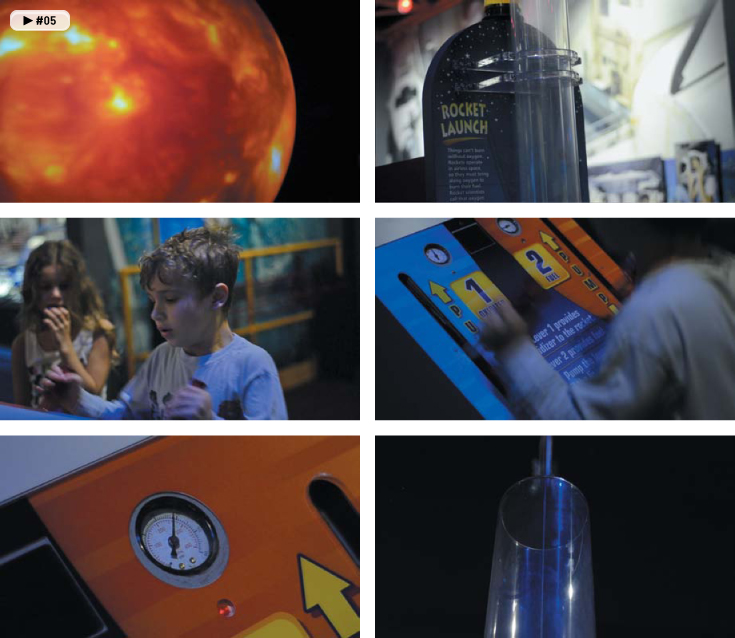
Figure 1.16. For this scene, I used six shots to tell the story. The first shot establishes the location at a space museum and then moves on to a close-up of the exhibit my son was playing with. The next shot establishes my son and his interest in the exhibit. A two-shot sequence builds up the drama as he pumps the handles to prime the rocket launch. The scene resolves with the rocket launch.
You also may need to figure out how to condense a long event into a shorter video (unless you like putting an audience to sleep). This can be done in two ways by strategically using multiple shots to convey a sequence. Some do this by carefully repeating action and changing their shot composition and position each time. Others solve the problem by shooting with multiple cameras at the same time. Composition and sequencing are explored in more depth in Chapter 5, “Composing Shots.”
Timing the Scene
Another challenge you’ll face is time, specifically determining how long each shot in your scene should be. There are lots of details to think about when you are trying to establish shot length. You should have some idea of how long a shot should be before you start recording because it will affect camera movement and framing (Figure 1.17).

Figure 1.17. Make sure you think about your shot length before you record. It will make your shots more usable when it comes time to edit.
Here are a few guidelines to consider when timing your shots:
• Do you need to cover a specific amount of time? If you’re using narration or an interview talking about a topic, you’ll want to cover it with footage. If you’ve already written your story or interviewed your subject, review it and determine the durations you need.
• How many angles do you want? One of the most common approaches to add visual interest to a video is to cut from one angle of a shot to another. Try to think about how you can break a scene into multiple shots.
• Be safe and repeat. If you’re not sure about your footage (and even if you think you are), try recording the scene a few times. Just as you might take a few photos “for safety,” try recording each video shot a few times. This will protect you from issues like soft focus and give you more choices when you start to edit your video together.
• Leave handles. When shooting, be sure to leave five seconds of usable padding on each side of a shot (the start and end). This means roll a little before you start your pan or tell your subject to start moving (and don’t press Stop as soon as the shot ends). This extra footage is often needed for transitions or minor timing adjustments. It’s also a good idea to let the camera roll for a second so you have a stable shot that is free from the vibration of the start and stop of the Record button.
Chapter 1 Assignments
I hope that you’re excited by the opportunities and challenges ahead. Shooting video is fun, and I’m sure you’ll enjoy the process. It’s time to get familiar with your camera so you can move on to the fun stuff in upcoming chapters.
Download Your Camera Manual
Because it would be impossible to cover all cameras in this book, I can’t address every unique setting on your camera. It’s a good idea to find your camera manual as a digital file and store it as a PDF on your laptop, tablet, or phone so you can quickly look up information in the field.
Shoot Under Different Conditions
Take your camera with you into different environments and try shooting with it. Get familiar with shooting outdoors and indoors, as well as in daylight and evening light. You’ll explore all of these shooting situations in depth throughout the book, but it’s good for you to have some firsthand experience at the outset (especially with the hard parts, like exposure and focus).
Start “Watching” Movies and Television
Going forward, start to pay more attention to the films and television shows you watch. Look at how multiple shots are connected to make scenes. Look at how long each shot is onscreen. By carefully watching, you’ll begin to see how video and film is made.
Share your results with the book’s Vimeo group!
Join the group here: vimeo.com/groups/DSLRVideoFSTGS