In This Chapter
Choosing what part(s) of a report or of several reports to display
Enabling users to move from one report object to another
Employing highly selective drill down
Hyperlinking between reports
Report Parts allows developers to extract and display only selected parts of a report (report objects) while the rest of the objects on the source pages are not displayed. With Report Parts, advanced developers can integrate key elements of an existing report — such as summary data, tables, and charts — into workflow applications that users can access through a Web portal, PDA, cell phone, or other wireless device.
In this chapter, I discuss the two ways you can use Report Parts:
Report Part Drill-down: This method uses a drill-down capability that is a more restricted method than the standard drill-down available when you perform regular page navigation.
Another Report Object: This method involves defining a hyperlink path to other objects in the same report (or in a different report).
Note
Using the Report Parts facility requires the use of a scripting language, such as VBScript, to create the Report Parts Viewer. After you create the Report Parts Viewer, you integrate it into the HTML code that produces the Web application that actually presents the Report Parts to your audience.
The Report Parts facility allows you to focus attention on the specific parts of a report that are relevant to a given user community. By crafting different Report Parts for different user communities, you can address multiple audiences with a single report. The members of each audience see only the information that concerns them; other parts of the report aren't displayed.
You can view reports in several ways:
Through the Crystal Reports development environment: Keep in mind, however, that not everyone who needs to view the reports will be a report designer. Those who are not designers won't have Crystal Reports.
Through BusinessObjects Enterprise via the BusinessObjects Enterprise Web desktop (InfoView): Users employing this method need only a browser and the assigned privileges of a licensed BusinessObjects Enterprise seat. Seat? What's a seat? In Business Objects marketing lingo, the price of a BusinessObjects Enterprise license is based on the number of seats it supports. This is the number of people who are parked in front of computers running BusinessObjects Enterprise at any one time.
Through a viewer: Viewers are available via the standalone Report Application Server (RAS). (See the nearby sidebar, "What's a Report Application Server?" for more information.) The Crystal Reports Viewer works offline and need not be connected to anything. All it needs is the report file. Chapter 22 describe the Crystal Reports Viewer in detail.
Most of the viewers available are page viewers, which are programs that display entire report pages. However, the Report Parts Viewer shows only specific report objects, without showing the rest of the page the objects are on. With the Report Parts Viewer, a user can see one part of a report and then click a link to go to another part of the same report (or of a different report) to get specific related information. Thus, you can give users exactly the information they need, whichever report it's in.
Note
The Report Parts Viewer is not a preexisting tool in the way that the Crystal Reports Viewer is. To embed the Report Parts Viewer in a Web page, you must first invoke it with an ASP or a JSP page (written in VBScript or JavaScript, respectively). I don't go into those details here. Writing ASP or JSP pages is more related to building Web sites than to creating Crystal Reports documents. You might want to concentrate on mastering Crystal Reports for the time being, and let a Web guru do the ASP or JSP coding.
You can move from one report object to another via a hyperlink. For such navigation to work, however, the second report must be managed by BusinessObjects Enterprise or by the standalone RAS. This type of navigation is available only in the DHTML viewers, which are zero-client, server-side viewers. You can link directly from an object in one report to an object in another report.
Note
A zero-client, server-side viewer requires nothing on the client machine other than a browser. The viewer itself resides on the server.
The Report Parts Viewer and any of the page viewers both support navigation, but what the user sees is different in the two cases:
Using Report Parts Viewer: When users are navigating between Report Parts (using the Report Part Viewer), they link from one report object to another report object. Both report objects are designated as Report Parts: The only things that the users see when they follow a chain of hyperlinks. The rest of the page remains out of view.
Using a page viewer: When users view a report with a page viewer and the report uses page navigation, they are linked from one object to another, but can see the entire page that these objects are on. Chapter 22 covers the Crystal Reports viewer, which is an example of a page viewer.
You set up the navigation from the Hyperlink tab of the Format Editor dialog box. I illustrate this action with a couple of examples in the following sections.
Drill-down is a standard capability of regular page navigation (see Chapter 6 for more about drill down), but Report Parts drill down is more restricted. The Report Part Viewer emulates the drill-down functionality of Crystal Reports but doesn't provide full drill-down capability. You can drill down from summary fields, group charts and maps, and fields in a report's group headers and group footers. Report Parts drill down from or to objects in a report's page header or page footer is not supported. Furthermore, all destination objects (the objects you are linking to) must be in the same report section.
Performing a Report Part drill down involves three steps:
Define the Initial Report Part settings.
Create a Report Part Drill-down hyperlink.
Publish the report into the BusinessObjects Enterprise environment.
After these steps are completed, the Report Part is ready for viewing. Following is a step-by-step example of Report Part Drill-down.
The first thing you must do is define the Initial Report Part settings:
Open the report that holds the first Report Part.
You define its default home object as the starting point of the Report Parts Drill-down.
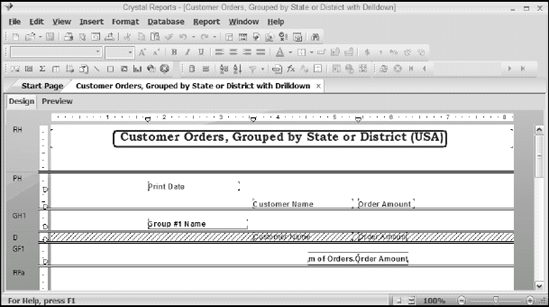
For this example, open the Customer Orders Grouped by State or District with Drill-down report created in Chapter 6. In Design view, it looks similar to Figure 20-1.
Right-click the object you want to set as the default home object and then choose Copy from its shortcut menu.
For this example: In Design view, right-click the text object in the Report Header (RH) and choose Copy from its shortcut menu.
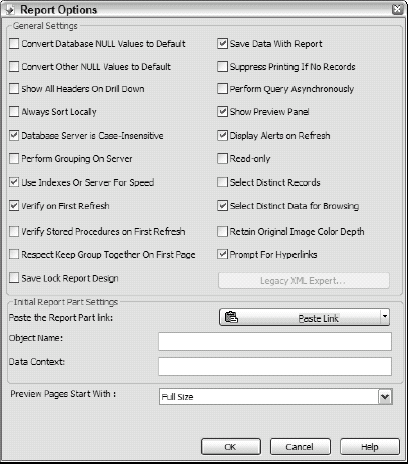
Choose File

The Report Options dialog box appears. See Figure 20-2.
In the Initial Report Part Settings area, click the Paste Link button.
The Object Name and Data Context fields are filled in automatically with the name and data context of the home object you selected.
Click OK.
After your initial Report Part setting is in place, you can create a Report Part drill-down hyperlink. You can link to another location on the source report, or you can link to a location on a different report. To keep this example simple, link to another location on the same report:
Right-click the object that you selected to be the destination of the hyperlink.
For example, if you're using the Customer Orders Grouped by State or District with Drill-down report, right-click the Group #1 Name field in the GH1 report section.
From the pop-up menu that opens, choose Format Field to display Format Editor.
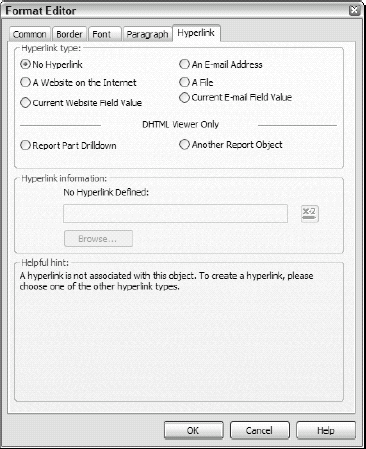
Click the Hyperlink tab, as shown in Figure 20-3.
In the DHTML Viewer Only area, select Report Part Drilldown.
The Hyperlink information area appears, showing a Details entry in the Available Fields pane.
Expand the Details entry to see what fields are available as destinations for the link, as shown in Figure 20-4.
Select the field you want to use as the destination of the hyperlink and move it over to the Fields to Display pane.
To follow along with the example, select CustomerName1 and then click the > button pointing to the Fields to Display pane. In this case, you want to display only the names of the customers, not the amount they have ordered.
Click OK to establish the hyperlink and dismiss the Format Editor.
Choose File
For this example, save the file as Customer Orders, Grouped by State or District with Drilldown and Hyperlink.
In Preview mode, double-click the destination object, only the underlying details for that report part are displayed. You do not get any of the other objects that would normally be on the page.
For this example, double-click the Group #1 region name for a particular state.
A drill down of the report part you specified displays.

You now have a report in which drill down displays only the data you want to display rather than whole pages. Your users can access the data through a Report Parts Viewer that's embedded in an application that they're using.
Before a user out on the network can view the report, you must publish it into the BusinessObjects Enterprise environment for access over the network. I do not cover BusinessObjects Enterprise in this book. BusinessObjects XI Release 2 For Dummies shows you how to publish your report on a network.
Report Part Drill-down is one of the two ways you can use Report Parts. The other way is to select Another Report Object. With this option, you can define a hyperlink path to objects in the same report or in a different report. If you're defining a path to a different report, that report must either be open in the same instance of Crystal Reports as the first report (managed by BusinessObjects Enterprise), or it must be part of a standalone Report Application Server environment. As with Report Part Drill-down, all destination objects must reside in the same report section. Linking to another report is very similar to creating a Report Part Drill-down report.
To link from one report object to another report object in either the same or a different report — and this need not be a drill-down operation — follow these steps:
Open the source and target reports.
Note
The source report is the one you copy an object from. The target report is the one you add the hyperlink information to.
For this example, the source report is Customer Orders by State or District (Mexico), and the destination report is Customer Orders, Grouped by State or District (USA).
In the source report, right-click the destination object and choose Copy from its shortcut menu.
For this example, the destination object is the Mexican flag graphic.
Select the intended home object in your target report, and then right-click it and then select Format Field from the shortcut menu.
I use the Print Date object as the home object in the Customer Orders, Grouped by State or District (USA) report.
In Format Editor, click the Hyperlink tab and then select the Another Report Object radio button (in the DHTML Viewer Only area), as shown in Figure 20-5.
In the Hyperlink Information area, click the Paste button.
The Report Title, Object Name, and Data Context fields are automatically filled in.
Click OK.
A hyperlink is established between your home object and a destination object. Now you can create a series of hyperlinks in the same manner, allowing users to move from one object to the next, to the next, using a Report Part Viewer.
