In This Chapter
Understanding formula syntax
Writing formulas with Formula Workshop
Deleting formulas you no longer want
Using data types in formulas
Manipulating data with variables in formulas
Altering reports at runtime with control structures
You can create a report by dragging database fields onto a blank report, adding text and images, and performing a variety of summaries. Such reports are fine for many applications, but sometimes you want to do more than merely summarize data. You might want to process it in some way before displaying it. Crystal Reports has a formula capability that gives you much more latitude in creating the report you want. If you're already a programmer, using formulas won't be tough. If you're not a programmer, you might be surprised to see how soon you can do useful things with formulas. Formulas enable you to perform arithmetic, logical, and string manipulation operations on your data. Using formulas, you can present in your report the information you want your readers to see, even if it's not present in the proper form in your database.
In this chapter, I show you how to use formulas to massage raw data into a presentable form. Crystal Reports includes a number of built-in functions that you can include in your formulas to speed your development efforts. In addition to the built-in functions, you can create your own custom functions to perform operations that are a little out of the ordinary.
You can use formulas in a number of ways.
One common use of a formula is to perform a calculation that modifies the contents of a database field. Suppose you have a database table named Product that holds data (including price) on all the products you sell. To calculate a 10-percent discount from your normal price, you could use a formula such as this:
{Product.Price} * .9Formulas follow one of two Crystal Reports syntaxes, either one of which you can use to write them. The two syntaxes are equivalent, so you can use whichever you find easier. The preceding formula (for example), written with BASIC syntax, looks like this:
formula = {Product.Price} * .9Crystal Reports Basic syntax is similar to Visual Basic syntax. If you're a Visual Basic programmer, you might be most comfortable using BASIC syntax — and it'll work. If you're not particularly biased toward Visual Basic, you might prefer to use Crystal Reports syntax (unchanged since the early versions of the product). Although Crystal Reports syntax can do a few things that BASIC syntax can't, neither has a universal advantage over the other. In the example formulas in this book, I use Crystal Reports syntax.
In this chapter, I throw at you a number of new words. Here are some simple definitions to help you understand how these terms are used in a programming context.
Formula: Any legal combination of symbols that represents a value.
Function: A section of a formula that performs a specific task.
Operator: A symbol that represents a specific action. For example, the (+) sign is the operator for the addition operation.
Parameter: A variable that is passed to a function.
Argument: A parameter.
Clause: A subsection of a formula.
Variable: A symbol or name that stands for a value.
Data type: Classification of a particular type of data. Different data types include Date, Integer, and Character.
Crystal Reports has a number of predefined functions, which you can include in formulas to reduce the size and complexity of the formula code that you have to write yourself. For example, suppose that you have a database application with a data entry form in which users enter a customer's name and address information. In the Region field, users are supposed to enter an uppercase, two-letter state or province code. If the user accidentally fails to use uppercase, the following Crystal Reports UpperCase function corrects that problem:
UpperCase ({Customer.Region})This formula converts whatever is in the Region field of the Customer table to uppercase. As you can see, the argument of the function is enclosed in parentheses. The combination of the UpperCase function and its argument {Customer.Region} constitutes a formula. If the contents are already in uppercase, no change occurs. If any of the letters are lowercase, though, they're changed to uppercase. When you use this function, you don't have to bother checking the case of an entry, and then correcting it if necessary. I discuss functions in greater detail when I talk about the Formula Editor component of Formula Workshop, later in this chapter.
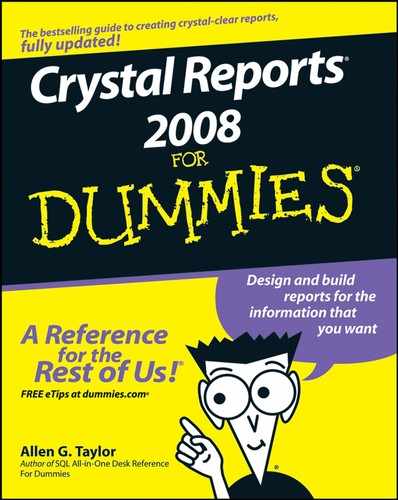
After you have a report open in Crystal Reports, you can access Formula Workshop from the Expert Tools toolbar. When you click the Formula Workshop icon, the screen shown in Figure 10-1 is displayed.
The Workshop tree in the left pane of Formula Workshop displays several folders: Report Custom Functions, Repository Custom Functions, Formula Fields, SQL Expression Fields, Selection Formulas, and Formatting Formulas. I discuss most of these options later in this chapter.
After you create a formula, you can give it a name and save it as a custom function. You can then use the custom function again in the same report or in other reports.
To create a custom function, follow these steps:
Open the report where you want to use the function.
To follow along with this example, open the
Top5USAfinal.rptreport file from Chapter 9.
Right-click the Report Custom Functions branch on the Workshop tree and choose New from the contextual menu that appears.
The Custom Function Name dialog box appears, asking you to enter a name for the custom function you are about to create.
Enter a meaningful function name.
I named this function
ConcatWith1Space. You'll use this function to concatenate (combine) a customer contact's first and last name, with one blank space in between.Click the Use Editor button.
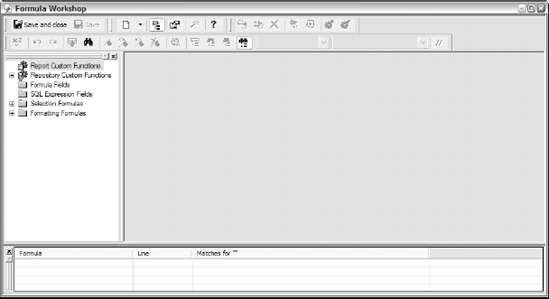
The Custom Function Editor appears, as shown in Figure 10-2. In the center are the Functions pane (with various predefined functions that you can include in your custom function) and the Operators pane. You use operators to combine function elements or operate on function elements. You can also find a collection of predefined functions in the Functions pane on the left and an array of operators in the Operators pane on the right.
If they're not already displayed, expand the Functions and Operators nodes to see the functions and operators.
Figure 10-3 shows the Functions and Operators panes with the main nodes expanded.
As you can see, there are quite a few different types of functions and of operators.
Function types are
Formatting Functions
Math
Financial
Strings
Date and Time
Arrays
Ranges
Type Conversion
Programming Shortcuts
Variable Constants
Xcelsius
Additional Functions
Available types of operators are
Arithmetic
Conversion
Comparisons
Strings
Ranges
Boolean
Arrays
Pattern
Control Structures
Other
Scope
Variable Declarations
Within each function type, a number of specific functions are available. Figure 10-4 shows some of the String functions that you can use, and all of the String operators. The
UpperCase ()function used earlier in this chapter is on the list of string functions because it operates on strings of characters. Other function and operator types are equally well represented.You can drag functions and operators down to the formula entry area to build a custom function, or you can directly type the function into the formula entry area.
Either drag the elements you need from the Functions and Operators panes or type your function directly.
To follow along with this example, expand the Strings branch in the Operators pane (because concatenation is a string function). You could specify concatenation in two ways: (x + y) and (x & y). If you drag the first formula (x + y) down into the formula-entry area, it deposits a plus (+) sign. If you drag down the second one, it deposits an ampersand (&).
Tip
In many cases (as in this example), it's easier to just type the formula rather than drag pieces of it from the trees in the panes above the formula-entry area.
In the pane below the Functions and Operators panes, type the parameter declarations and the body of the function. Note that the word
Function ()is already there.Note
The parentheses enclose any parameters that the function might use. Even if the function has no parameters, the parentheses remain, enclosing nothing.
For the example, you want to concatenate the contact first name and the contact last name from the Customers table, with one blank space between them. The two parameters,
xandy, represent the two names you want to concatenate. Both are declared as string variables (StringVar). Type the following:Function (StringVar x, StringVar y) (x + " " + y);
This function concatenates a string with a blank space, and then concatenates the result with a second string.
Click the Save and Close button to save the custom function
ConcatWith1Space.


This is just what you need to create a full name for customer contacts. It may also be useful in a number of other contexts. After you create a custom function, you can use it in many places and with any two string arguments.
You can't use a custom function directly in a report; you must wrap the function in a formula. Therefore, the next order of business is to create a formula that applies your general concatenation function: specifically, concatenating the first and last names of customer contacts:
- Click the Formula Workshop icon.

In the Workshop tree on the left edge of Formula Workshop, right-click Formula Fields and choose New from the contextual menu that appears.
In the Formula Name dialog box appears, enter a name, such as ContactFullName.
Click OK.
Formula Editor appears, as shown in Figure 10-5. It looks a lot like Custom Function Editor (refer to Figure 10-2), with some differences.
In the Workshop tree on the left, expand the Report Custom Functions node. If you followed the running example in this chapter, notice that ConcatWith1Space is listed under it. Note also that ContactFullName is listed under Formula Fields even though you haven't added functionality to it yet. The formula exists; it just doesn't do anything yet.

Like with the Custom Function Editor, you get useful things to include in your formula: The Functions tree contains standard functions, and the Operators tree contains operators. You can drag these functions and operators down to the appropriate spot in the formula you're building, or you can type them by hand. Often, it's easier to type them than to drag them. Formula Workshop also has a Report Fields tree, which Custom Function Editor doesn't have. You can drag fields from the Field tree into the appropriate spot in the formula you're building.
If you've been following along, you don't need these handy tools just now — although they're good to know about — because you already did most of the work of building this formula when you created the ConcatWith1Space custom function. In that case, all you need to do next is the following:
Click your custom function under the Report Custom Functions node in the Workshop tree to send it down to the Formula pane.
To follow along with the example, click
ConcatWith1Space. It appears in the Formula pane.Click the Save and Close button.
The next step is to add the contact's full name to the report. You do that with the help of the Formula Expert.
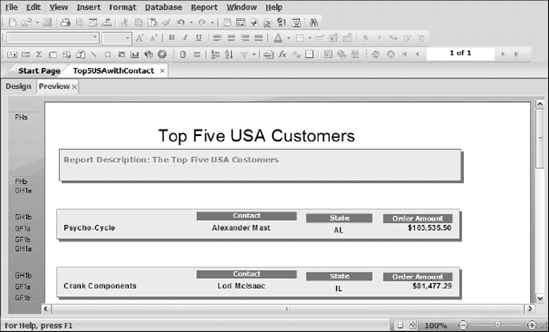
Currently, the Top Five USA Customers report lists the customer name, state, and order total for the five U.S. customers who have purchased the most merchandise from Xtreme Mountain Bikes. Suppose that at each of these customer sites, you want to insert the full name of the contact person between the Customer Name and the State columns:
Switch to Design view.
Move the State and Order Amount columns in all the appropriate sections to the right to make room for the new column that will contain the contact's full name.

Expand the Formula Fields node in the Workshop tree, and then click the
ContactFullNameformula.Click the Use Expert/Editor icon on the menu bar (magic wand icon).
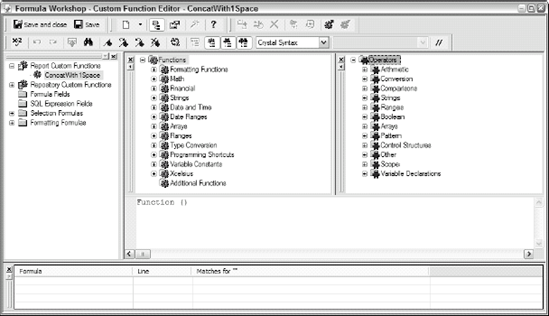
Formula Expert appears in the Formula Workshop. The Custom Function Supplying Logic pane offers two entries: Report Custom Functions and Repository Custom Functions.
Expand the Report Custom Functions node, and then click
ConcatWith1Space, as shown in Figure 10-6.In the Function Arguments pane, the
xandyarguments from theConcatWith1Spacecustom function await values. For this report, you wantxto be Customer.ContactFirstName andyto be Customer.ContactLastName.Click the Value field of the x row and then choose Choose Other Field from the drop-down menu that appears.
The Choose Field dialog box appears.
In the Customer table, select Contact First Name and then click OK.
The selected field appears in the Value column for the
xrow.Click the Value field of the
yrow and then choose Choose Other Field from the drop-down menu.In the Customer table, select Contact Last Name and then click OK.
The selected field appears in the Value column for the
yrow.Click Save and Close.
Back in Design mode, display Field Explorer (if it's not already displayed). From Field Explorer, drag ContactFullName from under Formula Fields and place it in the data band just to the left of the Region column.
Add Contact as a heading to section GH1b, above the full-name field.
An easy way to do this is to copy the State header, paste it above the ContactFullName column, and then edit it to read Contact instead of State.
Next, add the full name of the contact to your report:
- On the Insert Tools toolbar, click the Insert Text Object icon.

Place the resulting placement frame to a spot in GF1a, between the Customer column and the State column.
Drag ContactFullName from the Formula Fields node of Field Explorer to the placement frame.
On the Formatting toolbar, with ContactFullName selected, click the Bold icon.
The font in this column matches the font in the other columns. You might want to center the contact name, as was done with the state abbreviation.
Switch to Preview mode to confirm that the names of the customer contacts appear where you want them.
Note
You can always switch back to Design mode and adjust the position of the new column.
Figure 10-7 shows the result.
Save the report as
Top5USAwithContact.
SQL Expression Editor is another incarnation of Formula Workshop. It's very similar to Formula Editor, but you use it to build SQL expressions from tables, functions, and operators. With an SQL expression, you can issue commands to the database that underlies your report — but you can retrieve no more than one database record at a time. With an SQL statement, you can retrieve multiple records in a single operation. Chapter 23 covers using SQL statements. To really handle SQL properly, though, you have to know more about it than this book has space to cover. For a thorough treatment, read SQL For Dummies (by yours truly, also from Wiley).
The SQL Expression Editor view of Formula Workshop looks exactly like the Formula Editor view of Formula Workshop except for the name in the title bar. You operate on it the same way, too. The only difference is that the expression that you build must adhere to legal SQL syntax. The SQL Expression Editor is an advanced feature; you probably won't use it until you have gained considerable experience with both Crystal Reports and with SQL.
Crystal Reports offers three kinds of selection formulas:
Group selection: By apply a group selection formula to a report you can restrict retrieval to a single group or to specific desired groups.
Record selection: With a record selection formula, you can restrict retrieval to specific records. For example, in a report that groups sales figures by state, you can use a group selection formula to pull out the sales for a specific state. Similarly, you can use a record-selection formula to retrieve selected records (of specific customers and so on).
Saved data selection: Saved data selection filters report data after the records have been stored in the report. The formula deals with only this saved data. Changing a saved data selection formula does not trigger a refresh from the database.
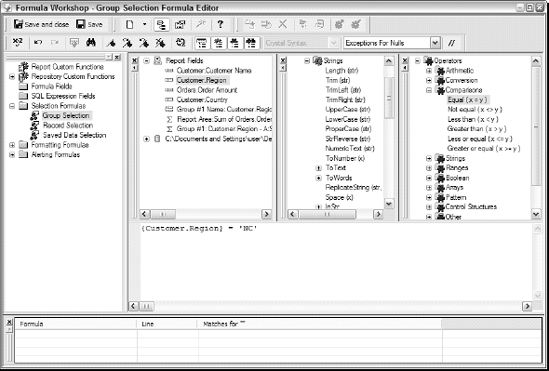
To see an example of a group selection formula in action, start by opening the Customer Report, Grouped by State or District (USA) report (as described in Chapter 6). Note that the first page shows sales for Benny the Spokes Person, Psycho-Cycle, and The Great Bike Shop in Alabama because Alabama is the first state or district in an alphabetical sort on Region. Note also that the right side of the tab bar indicates that the report has multiple pages (1 of 1+).
This is the full report, with results for all Xtreme customers in the United States. But suppose you want to print a report for only a single state, North Carolina. Follow these steps:
- On the Expert Tools toolbar, click the Formula Workshop icon.
Expand the Selection Formulas node in the Workshop tree to display the Group Selection, Record Selection, and Saved Data Selection options.
Select Group Selection.
Group Selection Formula Editor appears in the Workshop. You want to retrieve the records where the value of the Region field is
NC.Drag Customer.Region from the Report Fields pane down to the blank pane below the Fields pane.
You want to set that field equal to
NC.After the Customer.Region field, type an equal sign (=).
Alternatively, you could instead expand the Comparisons node in the Operators pane and drag down an equal sign.
Finish the formula by typing (after the equal sign) the two-letter state abbreviation, surrounded by single quotes.
Type 'NC' to follow along with this example. The resulting formula is shown in Figure 10-8.

Click the Save and Close button to save the formula and close Formula Workshop.
Now when you look at the report, it consists of only a single page, showing information for only North Carolina. However the Grand Total in the report footer still shows the total order amount for the entire country.
Close the report without saving.
The North Carolina report is a one-shot report that you probably won't have to run again.
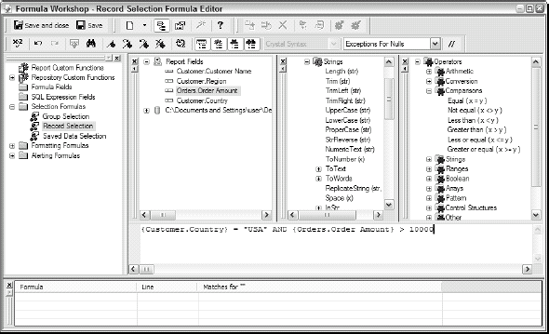
For record selection, you follow substantially the same steps as for group selection. Suppose you want to see all transactions in Customer Orders, Grouped by State or District (USA) in which the order amount was greater than $10,000. After opening the report, follow these steps:
- On the Expert Tools toolbar, click the Formula Workshop icon.
Expand the Selection Formulas node in the Workshop tree to display the selection options.
Select Record Selection.
Record Selection Formula Editor appears in Workshop. The Formula pane already contains a formula
({Customer.Country} = "USA")To add an additional constraint to retrieve records where the value of the Orders.Order Amount field is greater than 10,000, you must add a new clause to the formula.
To the existing formula, append the keyword AND.
Drag Orders.Order Amount from the Report Fields pane down into the Formula pane below the existing formula.
Type > (a greater-than sign) after the Orders.Order Amount field.
Finish the formula by typing an amount after the greater-than sign.
Type 10000 to follow along with the example. The resulting formula is shown in Figure 10-9.
Click the Save and Close button to save the formula and close Formula Workshop.
Presumably this is the type of information that management will want to see more than once while making decisions.
Now, when you refresh the data and look at the report, only orders greater than $10,000 are shown. Only ten states have customers with orders in excess of $10,000.
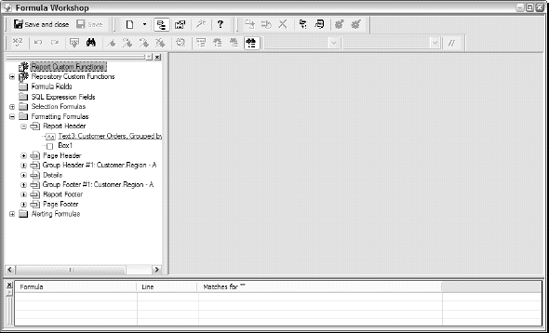
You can use formatting formulas to change various aspects of the format of a report. In this section, I show you how to change the heading color of the Customer Report, Grouped by State or District (USA) report (used in the previous section):
Open Formula Workshop.
Expand the Formatting Formulas node in the Workshop tree.
Several subnodes appear, including the Report Header node.
Expand the Report Header node.
The screen looks like Figure 10-10.
Right-click the report title entry (Customer Orders, and so on) under Report Header and choose New Formatting Formula from the contextual menu that appears.
In the New Formatting Formula dialog box that appears, select Background Color, and then click the Use Editor button.
Format Formula Editor appears. Comments in the Formula pane, all preceded by a double slash (//), show the available colors.
Select a color.
I chose Aqua, by typing
crAquain the Formula pane.
Click the Save and Close button to save the new formula and close Formula Workshop.
When Formula Workshop disappears, you see that the report now has a colored report heading.
You can add or change the formatting of any aspect of a report in the same way. Do a little looking around in the Report Fields, Functions, and Operators panes of Format Formula Editor to get an idea of what's available.
In earlier sections of this chapter, I show you how to use Formula Workshop to create a formula. Modifying an existing formula is just as easy. Just display it in the Formula Workshop Formula pane, make whatever modifications you want, check it, and save it. Deleting a formula is even easier: Select it in the Workshop tree, and then click the Delete icon on the Workshop toolbar.
Formulas deal with data, and databases can hold several different types of data. You use formulas to manipulate this data, but you must be careful to do it properly. For example, you can use the common addition, subtraction, multiplication, and division mathematical operators on number type data, but you can't multiply a number by a string. Specific operations apply to specific data types.
Some data types are more complex than others. The simplest data types are number, currency, string, date, time, datetime, and Boolean. Range types and array types are more complex. Look at the simple types first.
The number type includes positive and negative integers and real numbers. When you enter number data, however, don't separate each group of three digits with commas. The only non-numeric characters allowed in a number are the decimal point and the negation sign. Following are examples of number-type data:
42
-273
3.1415927
93000000.
You can perform addition, subtraction, multiplication, and division operations on number data. Just make sure that you don't divide by 0. Doing so causes an error (not to mention gray hair on your poor old math teacher).
Currency data is similar to number data except that it starts with a dollar sign ($), and numbers to the right of the decimal point are rounded differently. Following are a few examples of currency type data:
$19.95
-$4000000000.
$64000
Character strings use different operators than those you use with numbers and currency. You can't add two strings, but you can concatenate them. You can convert a string to all uppercase or all lowercase, which is something you can't do with a number.
Strings must be enclosed in either single or double quotes. Here are a few strings:
"I Left My Heart in San Francisco"
"$19.95"
'You can put "quoted text" within a string.'
'You can even include an apostrophe in a string''s text'
As you can see, sometimes you must use quotes in an unusual way to keep from confusing the string parser. (The string parser is the part of Crystal Reports that analyzes and interprets strings, one character at a time.)
Tip
Anything within quotes is a string, even if it looks like a number or a currency value.
As you might surmise, the date data type holds dates, the time data type holds times, and the datetime data type holds a combination of the date and time. Date and time data types are somewhat redundant because the datetime data type can hold dates without times and times without dates. You might want to use the date or the time data type anyway, though, because data in those two types takes up less storage space in memory and on the hard disk than the same quantity stored as a datetime data type.
Datetime values are not strings or numbers. They are literals, which are handled differently from the way either strings or numbers are handled. Datetime literals are enclosed in pound (#) signs. This differentiates them from strings (which are quoted) and numbers (which are not enclosed in anything). Following are some examples of values that can be stored in the datetime data type:
#July 20, 1969#
#20 Jul 1969 4:18 pm#
#7/20/1969 16:18:00#
#7/20/1969#
#4:18 pm#
Boolean data is named after the British mathematician George Boole, who invented Boolean algebra, which gave logic a mathematical foundation. Boolean data has only two values, True and False. Crystal Reports accepts Yes and No as synonyms for True and False. Boolean logic has been critical to the development of the digital computer, which uses ones and zeros to represent True and False.
Crystal Reports enables you to restrict the values of data elements to a specified range for all data types except Boolean. For example:
70 To 100 includes values between, and including, 70 and 100. |
70_To_100 includes values between, but NOT including, 70 and 100. |
70_To 100 includes values between 70 and 100, including 100 but not 70. |
UpTo 100 includes all numbers up to and including 100. |
"A" To_ "Z" includes all character strings starting with an uppercase letter, except for strings starting with "Z". |
UpFrom #1/1/2000# includes all dates after the once-dreaded Y2K day. |
Arrays are ordered lists of values that are all the same type. In Crystal Reports, an array can contain data of a simple type or of a range type. Array elements are enclosed in square brackets, as in this example:
[2, 3, 5, 7, 11, 13]
This array contains the first six prime numbers. Or try planets:
["Mercury", "Venus", "Earth", "Mars"]
is an array containing the string values of the names of the terrestrial planets in our solar system.
You can subscript an array by specifying the index in square brackets after the array. (A subscript specifies a particular element of an array.) For example, the following use of brackets
[2, 3, 5, 7, 11, 13] [3]
specifies 5, the third element in the array.
You can also specify a range of elements, as follows:
["Mercury", "Venus", "Earth", "Mars"] [3 To 4]
This creates a new array, ["Earth", "Mars"].
In the discussion of Formula Workshop, I use the x and y variables to act as placeholders for specific values in the ConcatWith1Space custom function. Whenever the formula parser encounters a variable in a formula, it looks for the value represented by that variable, and then plugs the value into the formula. Because the value of a variable can be changed by the user or assigned in the formula, variables give Crystal Reports considerable flexibility.
Before you can use a variable, you must declare it to make Crystal Reports aware of it. When you declare a variable, you must specify three things: its name, its scope, and its data type. The name could be something simple, such as x or y. It could also be something more descriptive, such as topic.
When you declare a variable's data type, stick Var on the end of the type, as in StringVar or NumberVar. Scope may be local, global, or shared. If a variable is declared locally, it is valid only in the formula in which it is declared. If a variable is declared globally, it's available to all the formulas in a report that declare it (except for subreports).
A shared variable is available to all formulas in a report that declare it, including subreports. Subreports are covered in Chapter 11.
After you declare a variable, you can assign it a value. Here's an example:
//Declare topic1 to be a global variable of String type that
//specifies a book topic.
Global StringVar topic1;
topic1 := "Crystal Reports";
You can also declare a variable and assign it a value in a single statement, as follows:
Global StringVar topic2 := "SQL";
You can now use the variable in a formula.
Control structures enable you to alter the flow of execution from a strict sequential order to something else. For example, you can branch one way or another with an If-Then-Else control structure. You can branch multiple ways with a Select Case structure. You can loop through an expression or a set of expressions multiple times with a For or While Do structure. You can implement business logic (or illogic) to a fare-thee-well with these structures.
The If-Then-Else control structure is useful when you want to do one thing if a condition is true and another thing if the condition is false. Suppose you want to give a 5-percent discount to customers who order more than $10,000 worth of products in a single order. Before printing their invoice, you could have Crystal Reports make the calculation for you as follows:
//Give 5% discount for orders > $10,000
If {Orders.Order Amount} > 10000.
Then
     {Orders.Order Amount} * 0.95
Else
     {Orders.Order Amount};
If the condition is satisfied, Order Amount is multiplied by 0.95, giving a 5-percent discount. Otherwise, Order Amount is unchanged. The change to Order Amount applies only to this report. The data in the database is not affected.
Tip
The Else clause is required even though it doesn't change anything. The data type of the result returned from the Else clause must match the data type of the result returned by the Then clause. If you leave out the Else clause and the condition is not satisfied, the formula returns the default value for the data type.
Use the Select Case control structure when you have more than two alternatives to choose from and you want to do a different thing in each case. Suppose the 5-percent discount you offered your customers last month resulted in a huge increase in sales, so you decide to expand the offer this month. Using a Select Case statement does the job:
//Give volume-based discounts
Select {Orders.Order Amount}
     Case 15000. To 1000000.:
         {Orders.Order Amount} * 0.93
     Case 12000. To 14999.99:
         {Orders.Order Amount} * 0.94
     Case 10000. To 11999.99:
         {Orders.Order Amount} * 0.95
     Default:
         {Orders.Order Amount};
If an order is between $15,000 and $1,000,000, a 7-percent discount is applied. Lesser discounts are applied for smaller orders. Below $10,000, no discount is applied. If an order comes through for more than $1,000,000, there must be a mistake, so no discount is applied. The Default clause is optional. If you omit it, the value of the selection condition is not changed. (It isn't changed in the preceding example either, but you avoid confusion by making it explicit.)
Like the If-Then-Else structure and the Select Case structure, using a For loop alters the flow of execution, but it alters it in a different way. Whereas using If-Then-Else and the Select Case constructs cause execution to take one path of execution rather than another, using a For loop causes execution to pass through a single piece of code multiple times.
A For loop is the best tool to use when you want to execute a section of code a predetermined number of times. Suppose you have a character field named Size in a table named Product, and you want to know how many instances of the letter x it contains. You can find out with a formula containing a For loop:
Local NumberVar Index;
Local NumberVar Xcount := 0;
Local NumberVar StringLength := Length ({Product.Size});

//loop through the characters in Size and count x's
For Index := 1 to StringLength Step 1 Do
(If ({Product.Size} [Index] = "x") Then
     (Xcount := Xcount + 1;)
 Else (Xcount := Xcount;)
);
Xcount
In the preceding example, Product.Size is treated as a string array, and Index is the subscript that points to each character in the array in turn. Execution steps through the Size field, one character at a time, counting the occurrences of x as it goes. If x occurs three times in the Size field, Xcount holds a 3. The last line in the formula returns the value of Xcount.
While Do loop
Whereas a For loop is designed for situations in which you know (or can compute) how many iterations of the loop you want to execute, using a While Do loop is ideal when you don't know the number of iterations. A While Do loop depends on the Boolean truth value of a condition. As long as the condition remains true, execution continues to loop. When the condition turns false, the current iteration of the loop is completed, and looping terminates. If the condition is initially false, the loop is not executed at all.
Suppose that in the preceding example, you wanted to know the character position of the first x rather than the total number of instances of x in the string. Because you don't know how far into the string the first x occurs (if at all), using a While Do loop is appropriate:
Local NumberVar Index := 1;
Local NumberVar Xpos := 0;
Local NumberVar StringLength := Length ({Product.Size});

//Find location of first x in Product.Size
While Index <= StringLength And Xpos = 0 Do
(If ({Product.Size} [Index] = "x") Then
     (Xpos := Index;)
 Else (Xpos := Xpos;)
Index := Index + 1;
);
Xpos
Note that if Index were initially greater than StringLength, the loop would be skipped.
A Do While loop is similar to the While Do loop, but whereas a While Do loop doesn't execute if the condition is not initially satisfied, a Do While loop is always guaranteed to execute at least once, regardless of whether the condition is satisfied. Sometimes you want the behavior of While Do, and other times you want the behavior of Do While. Crystal Reports gives you both.
With a Do While loop, you can accomplish the same character location task that was illustrated in the While Do loop example. The code is just a little bit different:
Local NumberVar Index := 1;
Local NumberVar Xpos := 0;
Local NumberVar StringLength := Length ({Product.Size});

//Find location of first x in Product.Size
Do
(If ({Product.Size} [Index] = "x") Then
     (Xpos := Index;)
 Else (Xpos := Xpos;)
Index := Index + 1;
While Index <= StringLength And Xpos = 0
);
Xpos
In this case, the loop is executed once, and the first character of Product.Size is checked to see whether it's an "x". This occurs even if the condition is not satisfied because execution doesn't reach the condition until after the loop has been executed once. Thus, if (by some mischance) the value of Index was greater than StringLength, an "x" located beyond the end of the Product.Size string would cause Xpos to take on a nonzero value. This could be misleading and cascade into a significant error.
Note
It's important to choose your loop type according to whether you want the loop to execute at least once, regardless of whether the condition is satisfied.