
The example in the previous section relied upon the elements that already exist in the DOM. Normally, in D3.js we would start with a set of data, and then build visualizations based on this data. We would also want to change the visualization as the data changes as a result of either adding more data items, removing some or all of them, or changing the properties of the existing objects.
This process of managing mapping of data to visual elements is often referred to as binding of data, and in terms of the D3.js nomenclature, it is referred to as a data join (do not confuse this with an SQL join). Binding in D3.js is performed by using the .data() function of a selector.
Let's dive in, and examine a few examples of binding data in some detail.
Binding of data can be one of the hardest things for someone new to D3.js to get used to. Even for somebody who uses other languages and frameworks that provide data binding, the way in which D3.js binds data is a little different, and getting to know how it does so will save a lot of time down the road. Therefore, we will take the time to examine it in detail as it is essential for creating effective D3.js visualizations.
In D3.js, we drive the visualization of data through binding using the following functions of a selector.
|
Function |
Purpose |
|---|---|
|
|
Specifies the data to be used to drive the visualization |
|
|
Returns a selector representing the new items to be displayed |
|
|
Returns a selector representing the items that are no longer to be displayed |
This pattern in which test functions are used is so ingrained in the D3.js code that it is often referred to as the enter/update/exit pattern or general update pattern. It provides a powerful means of declaratively telling D3.js how you want the dynamic data to be displayed, and to let D3.js handle the rendering.
We will come back to these details of the specifics of enter/update/exit in a little bit. For now, let's start by examining our selection example from earlier in the chapter, where we selected all the div objects in the document. This will help us understand the basis of how a selector facilitates the rendering process.
We will use a slight variant on the d3.selectAll() function from the previous example. Here, we will assign the result to a variable named selector:
<div id='div1'>A</div>
<div id='div2'>B</div>
<div id='div3'>C</div>
<div id='div4'>D</div>
<script>
    var selector = d3.select('body')
                     .selectAll('div');
</script>
Note
bl.ock (2.8): http://goo.gl/etDgJV. The output is not shown as the code does give results visually different from the previous examples.
There are two other subtle differences in this preceding statement from the previous examples. The first is that we select the body DOM element, and the second is that we chain a call to .selectAll() for the div tags.
Using this pattern of a function chain, we are instructing D3.js to select all the div tags that are a child of the body tag. This chaining of select function calls allows us to navigate through the HTML document to look for tags in specific places, and as we will see shortly, specify where to put the new visual elements.
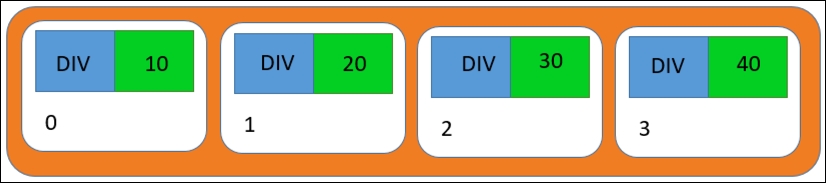
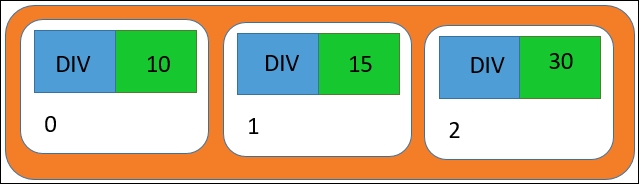
To help conceptualize a selector, I believe that a selector can be thought of as a collection of mappings between the DOM elements and the data that D3.js has associated with those element(s). I find it useful to mentally picture a selector with diagrams such as the following:
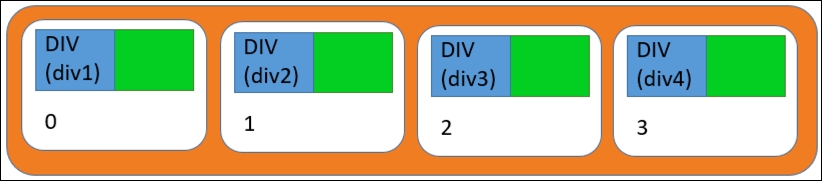
The orange part in the preceding diagram represents the overall selector that results from our selection. This selector contains four items represented by white, rounded rectangles, one for each div, and which we can think of as being numbered from 0 through 3.
The ordering is important as we will see when we update the data. By default, the ordering depends on how the identified DOM elements are ordered in the DOM at the point of selection (in this case, children of the body tag).
Each item in a selector can then be thought of as consisting of two other objects. The first is the actual DOM element that was identified by the selection, represented by a blue square in the preceding diagram. Inside that square in the image is the DOM element type (div), and the value of its id property.
The second is the datum that D3.js has associated with that DOM element, represented by the green square. In this case, there is no data that is bound at this point by D3.js, so the data for each is null (or empty in the diagram). This is because these DOM elements were created in HTML and not with D3.js, and hence there is no associated datum.
Let's change that and bind some data to these div tags. We do this by chaining a call to .data() immediately following the selection functions. This function is passed a collection of values or objects, and it informs D3.js that you want to associate each datum with a specific visual representation created by the function calls that follow.
To demonstrate this, let's modify the code to the following, binding the array of integers to the div tags:
var selector = d3.select('body')
                 .selectAll('div')
                 .data([10, 20, 30, 40]);
Note
bl.ock (2.9): http://goo.gl/h1O1wX. The output is omitted from the book as it is not visually different from the previous example.
The result of chaining the call to .data() tells D3.js that for each item identified in the selector, the datum at the same index in the data should be assigned. In this example, this does not change the visual. It simply assigns a datum to each div element.
To check this, let's examine the result using the developer tools. If you right-click on A in the browser, and select inspect item, the tools will open. Next, open the properties panel, as shown in the following screenshot:

The highlighted red rectangle in the preceding screenshot shows that the div tag now has a __data__ property, and its value is 10. This is how D3.js binds data to the visuals, by creating this property on the DOM element and assigning the datum. If you examine the three other div tags, you will see that they all have this property and the associated value.
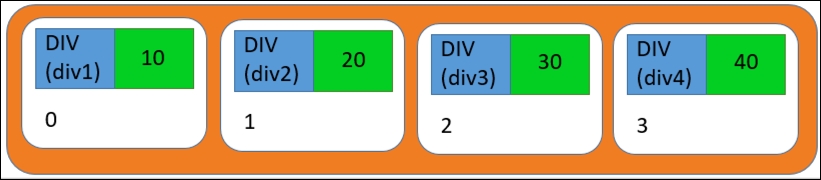
Using the visual for our selector, we get the following values:
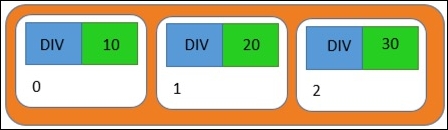
Now you might ask what happens if the count of items in the call to .data() does not equal the amount of items in the selector? Let's take a look at those scenarios, starting with the case of fewer data items than the selected DOM elements:
 var selector = d3.select('body')
                  .selectAll('div')
                  .data([10, 20, 30]);
Note
bl.ock (2.10): http://goo.gl/89NReN. The output has been omitted again, since the visual did not change.
If you open the Developer tools after running this example, and examine the properties for each of our div tags, you will notice that the first three have a __data__ property with the values assigned. The fourth tag does not have the property added. This is because D3.js iterates through the items in the data, assigning them one by one, and any extra DOM elements in the selector are ignored.
Conceptually, the selector then looks like following:

Now let's change the code to have more data items than the DOM elements:
var selector = d3.select('body')
                 .selectAll('div')
                 .data([10, 20, 30, 40, 50]);
Note
bl.ock (2.11): http://goo.gl/CvuxNJ. The output has been omitted again since the visual did not change.
Examining the resulting DOM in the Developer tools, you can see that there are still only four div elements, with 10 through 40 assigned respectively. There is no new visual created for the extra data item.

Why is a visual not created in this case? It is because the call to .data() assigns data only to the existing visual elements in the selector. Since .data() iterates the items passed to it, it stops at the last item, and the extra DOM elements are ignored.
There is one more case that I think is worth examining. The examples so far for .data() have had pre-existing div tags in the document. Let's now try binding some data items when there are no existing div tags. The body of code for this is as follows:
    var selector = d3.select('body')
                     .selectAll('div')
                     .data([10, 20, 30]);
Note
bl.ock (2.12): http://goo.gl/5gsEGe. The output has been omitted as there are no visuals.
This does not create any DOM elements, since we do not chain any functions to create them after .data(). However, the variable selector is a valid selector with three items. In our visual, it would look like the following diagram, where the blue squares are empty:

If you take a look at the output created on the console, you will see that this selector indeed has an array of three items:
[[undefined, undefined, undefined]]
The output does not necessarily show the data, but it does demonstrate that the selector consists of three items. Our conceptual model shows more, but it is only a conceptual model after all, and intended for understanding and not for representing the underlying data structures.
Now let's see how we instruct D3.js to create some visuals for the data items to fill in those blue squares, and put something on the screen.
To create visuals with D3.js, we need to call the .enter() method of the selector after the call to .data(). Then we chain the other method calls to append one or more DOM elements, and normally, also call various functions for setting the properties of those DOM elements.
To exemplify the use of .enter(), let's take a look at the last example from the previous section, where we started without any div tags in the body and used D3.js to bind three integers:
var selector = d3.select('body')
    .selectAll('div')
    .data([10, 20, 30]);
Now using the selector variable, we call the .enter() function and assign it to a variable named entering:
var entering = selector.enter();
The value of entering will represent the new items in the selector that need to be created. selector did not have any div tags selected, and since we bound to three items, this variable represents the three new items in the selector that need to be created.
We can then use the entering value and call functions to specify how to render the visuals for each item:
entering.append('div')
    .text(function(d) { return d; });
Note
bl.ock (2.13): http://goo.gl/HFdspR.
After execution, the value of selector contains three items, with both values assigned and the DOM elements created:

The resulting output on the page will be as follows:
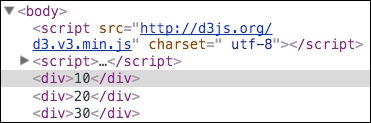
Examining the resulting DOM, we see that three div tags have been created:
Now that we have created DOM elements from data without any existing visuals, let's change the code to update the data by adding a new datum upon the press of a button.
In D3.js, data which need new visuals created are said to be in a state referred to as entering. After calling .data(), we can call the .enter() method on that same resulting selector. This method identifies the items in the selector that are entering, and hence require visuals to be created. We then simply chain methods on the result of .enter() to tell D3.js how each data item should be visualized.
Let's change our code a little bit to demonstrate this in action.
Note
bl.ock (2.14): http://goo.gl/TuVYQu
This code makes a few modifications to the previous example. First we add a button that can be pressed. This button will call a function named render() and pass an array of four values to it, the first three of which are identical in value. There also exists a new datum at the end:
<button onclick='render([10, 20, 30, 40])'>Take action!</button>
The render function itself does the selection and creation of the new visual elements, but it uses the values passed to the function instead of a hard-coded array of values.
  function render(dataToRender) {
    var selector = d3.select('body')
                     .selectAll('div')
                     .data(dataToRender);

    var entering = selector.enter();
    entering.append('div')
            .text(function(d) { return d; });
  }
When the page is first loaded, we call render, telling it to create elements in a different array.
render([10, 20, 30]);
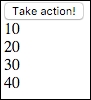
The initial page that is loaded will contain the following content:

When we press the button we call render again, but pass it four values. This results in the content on the page changing as follows:
This may appear as if the previously existing div tags were replaced with four new ones, but what happens is actually more subtle. The second time that render() is called, the call to .selectAll('div') creates a selector that has three items, each of which has DOM elements and their bound data:

Then, .data([10, 20, 30, 40]) is executed. D3.js iterates this array, and it compares the value of each datum to the item in the selector at the same index. In this case, the items at positions 0, 1, and 2 have the values 10, 20, and 30, which are each equal to the values at the same position in the data. Therefore, D3.js does not do anything to these items. But the fourth value, 40, does not have an associated item in the selector.

Therefore, D3.js will create a new item in the selector for the datum 40, and then apply the functions for creating the visuals, resulting in the following:
D3.js has left the first three items (and their DOM elements) untouched, and added new DOM elements for just the 40 datum.
Now let's look at an example where we change the value of several of the items in our data. In this case, we do not want to remove and insert a new visual in the DOM, but to simply update the properties in the DOM to represent a change in the underlying values.
To demonstrate this, let's make a quick change to the previous example, where when we click the button, we will now execute the following:
<button onclick='render([20, 30, 50])'>Take action!</button>
Note
bl.ock (2.15): http://goo.gl/nyUrRL
On pressing the button, we get the following result:

Nothing has changed on the page! Shouldn't the page be displaying 20, 30, and 50?
This gets into some of the subtleties of D3.js data binding. Let's step through this to explain this result:
            var selector = d3.select('body')
                .selectAll('div')
                .data(dataToRender);
The call to .selectAll('div') identifies the three div tags when the page was loaded:
Following that, the call to .data() binds new values to each item in the selector:
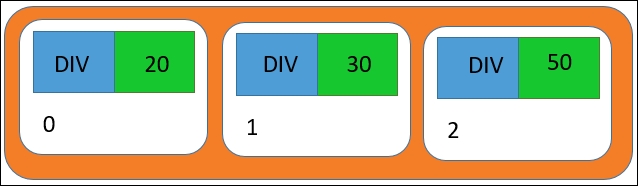
D3.js has changed the bound values, but all the items were reused, and hence, are not tagged as entering. Therefore, the following statement results in an empty set of entering items.
var entering = selector.enter();
As a result, the chained methods are not executed, and the DOM elements are not updated.
How do we fix this? It's actually quite simple: we need to handle both, the case of entering elements and the case of the already existing ones. To do this, change the render function to the following:
function render(dataToRender) {
    var selector = d3.select('body')
        .selectAll('div')
        .data(dataToRender);

    var entering = selector.enter();

    entering.append('div')
        .text(function(d) { return d; });

    selector.text(function(d) { return d; });
}
The only difference is that we have added the following line:
selector.text(function(d) { return d; });When we chain methods to the original selector, the chained functions will be applied to all the items in the selector that are neither entering nor exiting (we cover exiting in the next section). And the result is what we expected:

Now let's discuss how visuals change when items are removed from the collection of bound data. To handle exit, we simply need to use the .exit() function on the result of .data(). The return value of .exit() is a collection of the selector items which D3.js has determined need removal from the visualization based upon the change in data.
To demonstrate the removal of items, we will make a couple of simple modifications to the previous example. First, let's change the button code to render the following array upon clicking:
<button onclick='render([5, 15])'>Take action!</button>
When we execute the page with this change, we get the following result:

Conceptually, we would have expected the resulted as a page with just 5 and 15, and not 5, 15, and 30.
The reason for this result is again because of the way that D3.js handles data binding. When we call .data() with the updated data, D3.js attempts to reconcile the following:
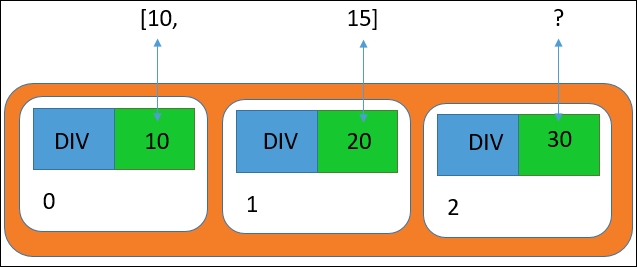
Since all that .data() does is update the bound value in each item of the selector, and since there are fewer values than the selector items, we get the following selector as a result:
We then call our code to handle the enter and update states. In this case, there are no entering items, whereas items at positions 0 and 1 are scheduled for update. Hence, the first two div tags get new text values, and the third div is left unchanged in the DOM.
All that we have to do to fix this is make a call to .exit(), and use the results of this call to remove those items from the DOM. We can modify render() to the following, which gives us our desired result:
Note
bl.ock (2.16): http://goo.gl/IkIjGY
function render(dataToRender) {
    var selector = d3.select('body')
        .selectAll('div')
        .data(dataToRender);

    var entering = selector.enter();

    entering.append('div')
        .text(function(d) { return d; });

    selector.text(function(d) { return d; });

    var exiting = selector.exit();
    exiting.remove();
}
The only change is the addition of the last two lines. Now when we press the button, we get the desired result:

To close this chapter, I'd like to emphasize several points about managing visuals based upon data using D3.js. I believe these will definitely help you avoid problems in learning D3.js. Having come from other development platforms where data binding works in a different manner, I definitely struggled with these issues, and I want to pass along the insights that have I have learned to save you a lot of stress. It's kind of a long list, but I believe it to be very valuable.
- A visualization is almost always based upon data, and is not just coded explicitly.
- Normally, a D3.js application, on page load, will perform a
.selectAll()on the document for the DOM elements that would represent data. Often, the result of this selection does not have any elements, as the page was just loaded. - A call is then made to
.data()to bind data to the selector that results from the selection. .data()iterates across the datum that are passed to it, and ensures that there are items in the selector to correlate the datum to the visuals. The value of the datum is copied into this item. DOM elements are not created by the call to.data().- Data in many apps changes dynamically over time without reloading the page, either by user interaction or through code that updates the data based upon other events. You would want to update the visualization when this happens. Therefore, you will need to call
.data()multiple times. - If the number of items in the data is more than the number of items in the selector it is applied to, then more selector items will be created at the end of the selector. These will be marked as in a state referred to as entering. These will be accessible using the
.enter()function on the selector. You then chain the function calls to create DOM elements for each new item in the selector. - If the number of items in the data is less than the number of items in the selector, then selector items will be removed from the end of the selector. These will be marked as exiting. These selector items will be available through a call to the
.exit()function. These DOM elements will not be removed from the DOM automatically, and you will need to make a call to.remove()to make this so. - To optimize this process, D3.js really only concerns itself with ensuring the number of items in the selector matches the number of datum that you specify with
.data(). - The data associated with a selector item is by value and not reference. Hence,
.data()copies data into the__data__property on the DOM element. On subsequent calls to.data(), there is no comparison performed between the datum and the value of the__data__property. - To update data, you write code to chain methods for generating DOM on the result of a selection, in addition to code that chains on the
.enter()and.exit()functions. - If a new datum has the same value as is already associated to a selector item, D3.js does not care. Even though the values have not changed, you will be rendering it again, but reusing the DOM elements. You will need to provide your own facilities to manage not setting the properties again if the data is the same, so as to optimize the browser re-rendering the elements.
- If you have 1,000,000 data items, and then change just one and call
.data()again, D3.js will inherently force you to loop through all the 1,000,000 items. There will likely be visual updates to just one set of visuals, but your application will make the effort to iterate through everything every time. However, if you have 1,000,000 data items, you probably should be looking at another means of summarizing your data before visualizing it. - D3.js optimizes around the reuse of visual elements. The assumption is that a visualization will only be periodically making updates to the exiting items, and that addition or removal of items will be relatively infrequent. Hence, the general update pattern would consist of exit, update, and exit, and not comparing data.
- Normally, the rule of thumb is that one or two thousand data items and the associated visuals are handled pretty effectively by D3.js.
Well, that's quite a long list. But as we progress through this book, all the examples will follow these guidelines. By the end, these will be second nature.