
This chapter and the next provide a basic pre-flight checklist that you need to complete before you really spread your wings and take off with your Canon EOS 90D. You won’t find a lot of detail in these first two chapters. Indeed, I’m going to tell you just what you absolutely must understand, accompanied by some interesting tidbits that will help you become acclimated to your camera. I’ll go into more depth and even repeat some of what I explain here in later chapters, so you don’t have to memorize everything you see. Just relax, follow a few easy steps, and then go out and begin taking your best shots—ever.
Even if you’re a long-time Canon shooter, I hope you won’t be tempted to skip this chapter or the next one. I realize that you probably didn’t purchase this book the same day you bought your camera and that, even if you did, the urge to go out and take a few hundred—or thousand—photos with your new camera is enticing. As valuable as a book like this one is, nobody can suppress their excitement long enough to read the instructions before initiating play with a new toy.
No matter how extensive your experience level is, you don’t need to fret about wading through a manual to find out what you must know to take those first few tentative snaps. I’m going to help you hit the ground running with this chapter, which will help you set up your camera and begin shooting in minutes. Because I realize that some of you may already have experience with Canon cameras similar to the 90D, each of the major sections in this chapter will begin with a brief description of what is covered in that section, so you can easily jump ahead to the next if you are in a hurry to get started.

TIPThroughout this book, you’ll find short highlighted tips labeled My Recommendation or My Preference, intended to help you sort through the available options for a feature, control, or menu entry. I’ll provide my recommendations, suitable for most people in most situations, or my personal preferences, which work for me, and might work for you, too. I don’t provide these recommendations for every single feature, and you should consider your own needs before adopting any of them.
First Things First
This section helps get you oriented with all the things that come in the box with your Canon EOS 90D, including what they do. I’ll also describe some optional equipment you might want to have. If you want to get started immediately, skim through this section and jump ahead to “Initial Setup” later in the chapter.
The Canon EOS 90D comes in an impressive box filled with stuff. Much of it is packaging, because Canon no longer includes a lot of the essentials they formerly provided with their cameras—including connecting cables, software CDs, and a comprehensive instruction manual of all the 90D’s features. What you do get is a camera body, lens (if you purchased the 90D in a kit), a battery/charger, neck strap, the warranty, and a miniature 4 × 6–inch starter guide with 246 pages of fine print devoted to the camera itself and an additional 58 pages on wireless connectivity. That’s it.
Checking the contents first is always a good idea. No matter who sells a camera, it’s common to open boxes, use a camera for a demonstration, and then repack the box without replacing all the pieces and parts afterward. Someone might have helpfully checked out your camera on your behalf—and then mispacked the box. At a minimum, the box should have the following:
- Canon EOS 90D digital camera. This is hard to miss. The camera is the main reason you laid out the big bucks, and it is tucked away inside a nifty envelope you should save for protection in case the 90D needs to be sent in for repair.
- Rubber eyecup Eb. This slide-on soft-rubber eyecup should be attached to the viewfinder when you receive the camera. It helps you squeeze your eye tightly against the window, excluding extraneous light, and protects your eyeglasses (if you wear them) from scratching.
- Body cap. The twist-off body cap keeps dust from entering the camera when no lens is mounted. Even with automatic sensor cleaning built into the 90D, you’ll want to keep the amount of dust to a minimum. The body cap belongs in your camera bag if you contemplate the need to travel with several lenses and pack your camera with the lens removed.
- Lens (if purchased). The 90D may come in a kit with the EF-S 18-55mm f/3.5-5.6 IS STM Canon Zoom lens or the EF-S 18-135mm f/3.5-5.6 IS USM lens, which more or less replaces an older STM version with the same specifications. You may purchase it with another lens, as discussed in Chapter 6. The lens will come with a lens cap on the front, and a rear lens cap aft.
- Battery pack LP-E6N (with cover). The power source for your 90D is packaged separately. You’ll need to charge this 7.2V, 1865mAh (milliampere hour) battery before using it. It should be charged as soon as possible (as described below) and inserted in the camera. Save the protective cover. If you transport a battery outside the camera, it’s a good idea to re-attach the cover to prevent the electrical contacts from shorting out.
- Battery charger LC-E6 or LC-E6E. One of these two battery chargers will be included, depending on where you purchased your camera.
- Wide strap/eyepiece cover. Canon provides you with a suitable neck strap, with an attached eyepiece cover that can be attached to the viewfinder window in place of the rubber eyecup. (Its purpose is ostensibly to block light from entering the viewfinder and affecting exposure when the camera is triggered using the self-timer and/or your eye is not providing a human shield from extraneous light.) The strap is also emblazoned with the Canon logo for the 90D.
My recommendation: While I am justifiably proud of owning a fine Canon camera, I prefer a low-key, more versatile and secure strap from UPstrap (www.upstrap.com). If you carry your camera over one shoulder, as many do, I particularly recommend the UPstrap shown in Figure 1.1. That patented non-slip pad offers reassuring traction and eliminates the contortions we sometimes go through to keep the camera from slipping off. I know several photographers who refuse to use anything else. If you do purchase an UPstrap, be sure you mention to photographer-inventor Al Stegmeyer that I sent you hence. You won’t get a discount, but Al will get yet another confirmation of how much I like his neck straps.
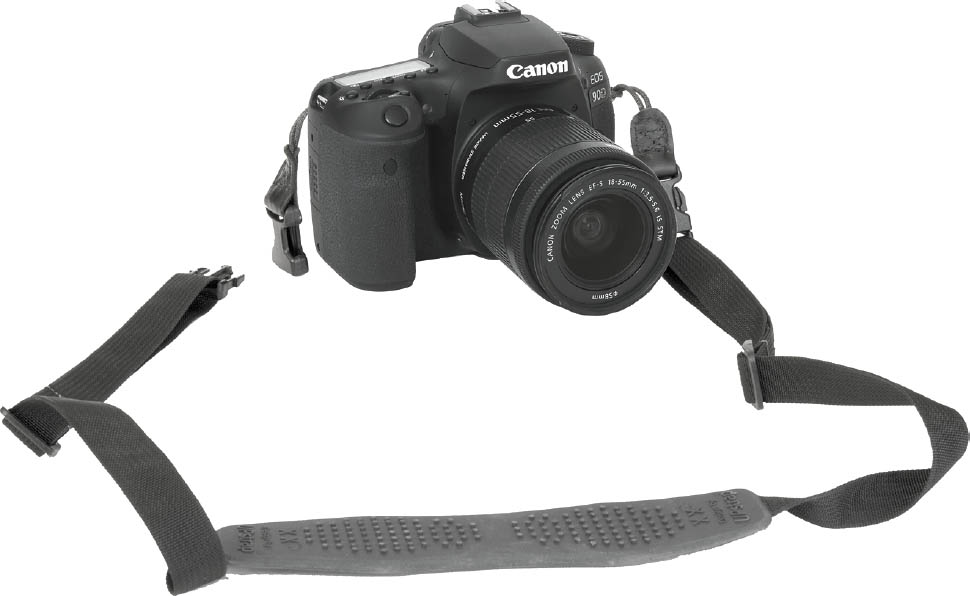
Figure 1.1 Third-party neck straps, like this UPstrap model, are often preferable to the Canon-supplied strap.
- Printed instruction manuals. These include a set of brief instruction manuals and guides for the camera’s basic features.
- Warranty and registration card. Don’t lose these! You can register your Canon 90D by mail, although you don’t really need to in order to keep your warranty in force, but you may need the information in this paperwork (plus the purchase receipt/invoice from your retailer) should you require Canon service support.
Don’t bother rooting around in the box for anything beyond what I’ve listed previously. There are a few things Canon classifies as optional accessories, even though you (and I) might consider some of them essential. Here’s a list of what you don’t get in the box but might want to think about as an impending purchase. I’ll list them roughly in the order of importance:
- Secure Digital card. First-time digital camera buyers are sometimes shocked that their new tool doesn’t come with a memory card. Why should it? The manufacturer doesn’t have the slightest idea of how much storage you require, or whether you want a slow/inexpensive card or one that’s faster/more expensive, so why should they pack one in the box and charge you for it? For a 32.5-megapixel camera, you really need a memory card that’s a minimum of 16GB in size.
Perhaps you want to use tiny 16GB cards—and lots of them. I’ve met many paranoid wedding photographers who like to work with a horde of smaller cards (and then watch over them very protectively), on the theory that they are reducing their chances of losing a significant chunk of the event or reception at one time (of course, that’s why you hire a second shooter as backup). Others, especially sports photographers, instead prefer a 32GB or 64GB card with room to spare. If you are shooting fast action at high frame rates, or transfer lots of photos to your computer with a speedy card reader, you might opt for the speediest possible memory card. Buy one (or two, or three) of your own and have your flash memory ready when you unpack your 90D.
My recommendation: I’ve recently standardized on 64GB and 128GB Lexar cards with up to 150 MB/second transfer rates. I like having that much capacity because I always shoot RAW, and frequently RAW+JPEG with my camera.
- Extra LP-E6N battery. Even though you might get as many as 960 shots from a single battery, it’s easy to exceed that figure in a few hours of shooting sports at 11 fps. Batteries can unexpectedly fail, too, or simply lose their charge from sitting around unused for a week or two. Buy an extra (I own four, in total), keep it charged, and free your mind from worry. The older 1800mAh LP-E6 battery will also work fine.
My recommendation: Buy extras (I own four, in total), keep them charged, and rotate their use to even out wear and free your mind from worry.
- Add-on Speedlite. One of the best uses for your 90D’s built-in electronic flash is as a remote trigger for an off-camera Speedlite such as the 600EX II-RT, or the more affordable 430EX III-RT or 470EX-AI strobes, which were designed especially for cameras in this class. Your built-in flash can function as the main illumination for your photo, or it can be softened and used to fill in shadows. If you do much flash photography at all, consider an add-on Speedlite as an important accessory.
My recommendation: At around $270, the Canon Speedlite 470EX-AI is an affordable flash with an excellent combination of power, compact size, and features. These include Canon’s Auto Intelligent bounce flash technology that tilts and rotates the flash automatically, then calculates an appropriate diffused “bounce” exposure for the room. I’ll offer more information on electronic flash in Chapters 11 and 12.
- Interface cable IFC-600PCU. You can use this optional USB cable to transfer photos from the 90D to your computer, although I don’t recommend that mode, because direct transfer uses a lot of battery power. You can also use the cable to upload and download settings between the camera and your computer (highly recommended), and to operate your camera remotely using the software you can download from the Canon support site.
My recommendation: The cable itself is a standard USB 2.0 mini-B cable used on many different cameras—available in a variety of lengths for as little as $4 or so. You don’t need to pay Canon’s prices for this accessory.
- HDMI cable HTC-100. Use this cable to view your camera’s LCD output on a larger high-definition television or monitor screen.
My recommendation: Purchase a generic HDMI Type A to HDMI Mini Type C cable instead. Canon’s six-foot HTC-100 cable can cost as much as $50 retail. You can find perfectly serviceable third-party cables for less than $20.
- AC Adapter Kit ACK-E6. This includes the AC Adapter AC-E6N and DC Coupler DR-E6, which are used together to power the 90D independently of the batteries. There are several typical situations where this capability can come in handy: when you’re cleaning the sensor manually and want to totally eliminate the possibility that a lack of juice will cause the fragile shutter and mirror to spring to life during the process; when indoors shooting tabletop photos, portraits, class pictures, and so forth for hours on end; when using your 90D for remote shooting as well as time-lapse photography; for extensive review of images on your television; or for file transfer to your computer. These all use prodigious amounts of power, which can be provided by this AC adapter. (Beware of power outages and blackouts when cleaning your sensor, however!)
My recommendation: Unless you regularly do time-lapse or interval photography for long periods of time, you can probably skip this expensive accessory.
- Angle Finder C right-angle viewer. This handy accessory fastens in place of the standard rubber eyecup and provides a 90-degree view for framing and composing your image at right angles to the original viewfinder, useful for low-level (or high-level) shooting. (Or, maybe, shooting around corners!)
- Magnifier MG-Eb. Provides a 1.2X magnification factor of the entire viewing area, which enlarges the center of the image, making it easier to check focus. You might have to move your eye around a little to see all the indicators outside the image frame, but this magnifier is still suitable for everyday use.
My recommendation: This is not the best accessory for those who wear glasses while shooting. I tend to flip my glasses up on my forehead, with the diopter adjusted for my vision, so this magnifying eyepiece works fine for me.
- Battery Grip BG-E14. This add-on vertical grip/battery pack can be outfitted with two LP-E18 batteries or six AA batteries for longer shooting life, and an extra shutter release and control dial for convenient shooting with the camera in a vertical orientation. The grip also can receive power from the optional AC Adapter Kit ACK-E6.
My recommendation: Many people love third-party grips from Meike, Neewer, Vivitar, and others, at a cost of less than $75 (basically, they all appear identical and made by the same company). I’ve used them and found them acceptable for occasional use. However, most people like to clamp their add-on grips and remove them only to change/recharge the main battery, subjecting the grip to a lot of abuse. If you intend to make a battery grip part of your permanent setup, the Canon version is much better made, more rugged, and guaranteed to work seamlessly with your camera.
- Remote switch RS-60E3. You can plug this two-foot-long accessory electronic release cable into the socket hidden behind a rubber cover on the side of the camera, and then fire off shots without the need to touch the camera itself. In a pinch, you can use the 90D’s self-timer to minimize vibration when triggering the camera. But when you want to take a photo at the exact moment you desire (and not when the self-timer happens to trip), or need to eliminate all possibility of human-induced camera shake, you need this release cord.
My recommendation: These sometimes get lost in a camera bag or are accidentally removed. I bought an extra RS-60E3 cable and keep it in a small box in the trunk of my car, along with an extra memory card.
- Remote Controller RC-6. The 90D has an infrared sensor that can receive signals from this optional remote control. It works best when pointed at the sensor, which resides on the front of the camera, but, unlike the plug-in remote, you can be positioned farther away than two feet.
My recommendation: Because the IR remote is easily overpowered by bright lights and can’t be used when you are behind the 90D, I use it as my secondary remote control. However, they are also cheap and small, so I’ve bought a couple to keep handy in several camera bags.
- Download manuals. Printed manuals are becoming extinct, as they are expensive to produce, and camera owners don’t find them particularly useful as anything other than a reference listing of camera controls and menu options. However, it is nice to have somewhere to go to look up an obscure error message or determine the official nomenclature or compatibility of an accessory. Your 90D’s “missing manuals” include more comprehensive guides to camera and wireless functions, lens instruction manuals, and software instructions. You can go to www.canon.com/icpd, specify your country, and download PDF versions of the manuals you need.
My recommendation: Load the factory PDF manuals onto your smartphone or tablet and use the device’s PDF reader to access the manuals when you need them. You can also copy them onto a flash drive to read them on a desktop or laptop computer. Or, store them in the cloud for easy access from any device. This book is available in a take-along e-book version, as well.
- Software. Canon was probably wise to stop including software (and PDF manuals) on CD, because Internet access among photographers is effectively universal. With software, it’s almost guaranteed that the version packaged on CD with your camera would be obsolete within a few months and you’d update online anyway. Available software you can download includes:
- Canon EOS Utility. Allows remote, “tethered” shooting, transfer of photos and video between the 90D and your computer, and transferring background music to your memory card for playback while viewing video snapshot albums, movies, or slide shows in the camera.
- Digital Photo Professional. This is a utility for viewing, editing, and printing RAW and JPEG images.
- Picture Style Editor. This program allows modifying Picture Styles (discussed in Chapter 7) and creating your own new styles.
Initial Setup
This section helps you become familiar with the important controls most used to make adjustments. You’ll also find information on charging the battery, setting the clock, mounting a lens, and making diopter vision adjustments. If you’re comfortable with all these things, skim through and skip ahead to the next section.
The initial setup of your Canon EOS 90D is fast and easy. Basically, you just need to charge the battery, attach a lens, and insert a memory card. I’ll address each of these steps separately, but if you already feel you can manage these setup tasks without further instructions, feel free to skip this section entirely. You should at least skim its contents, however, because I’m going to list a few options that you might not be aware of.
Battery Included
Your Canon EOS 90D is a sophisticated hunk of machinery and electronics, but it needs a charged battery to function, so rejuvenating the LP-E6N lithium-ion battery pack furnished with the camera should be your first step. A fully charged power source should be good for approximately 1,300 shots (50 percent with flash), based on standard tests defined by the Camera & Imaging Products Association (CIPA) document, DC-002.
A BATTERY AND A SPARE
My experience is that the CIPA figures are often a little optimistic, so it’s probably a good idea to have a spare battery on hand. I always recommend purchasing Canon-brand batteries (for less than $80) over less-expensive third-party packs. My reasoning is that it doesn’t make sense to save $20 on a component for an advanced camera, especially since batteries (from Canon as well as other sources) have been known to fail in potentially harmful ways. Canon, at least, will stand behind its products, issue a recall if necessary, and supply a replacement if a Canon-brand battery is truly defective. A third-party battery supplier that sells under a half-dozen or more different product labels and brands may not even have an easy way to get the word out that a recall has been issued.
If your pictures are important to you, always have at least one spare battery available, and make sure it is an authentic Canon product.
All rechargeable batteries undergo some degree of self-discharge just sitting idle in the camera or in the original packaging. Lithium-ion power packs of this type typically lose a small amount of their charge every day, even when the camera isn’t turned on. Li-ion cells lose their power through a chemical reaction that continues when the camera is switched off. So, it’s likely that the battery purchased with your camera is at least partially pooped out, so you’ll want to revive it before going out for some serious shooting.
There are many situations in which you’ll be glad you have that spare battery:
- Remote locales. If you like to backpack and will often be far from a source of electricity, rechargeable cells won’t be convenient. They tend to lose some charge over time, even if not used, and will quickly become depleted as you use them. You’ll have no way to recharge the cells, lacking a solar-powered charger that might not be a top priority for your backpacking kit.
- Unexpected needs. Perhaps you planned to shoot landscapes one weekend, and then are given free front-row tickets to a Major League Baseball game. Instead of a few dozen pictures of trees and lakes, you find yourself shooting hundreds of images of Mike Trout and company, which may be beyond the capacity of the single battery you own. If you have a spare battery, you’re in good shape.
- Unexpected failures. I’ve charged up batteries and then discovered that they didn’t work when called upon, usually because the rechargeable cells had past their useful life, the charger didn’t work, or because of human error. (I thought, I’d charged them!) That’s one reason why I always carry three times as many batteries as I think I will need.
- Long shooting session. Perhaps your niece is getting married, and you want to photograph the ceremony, receiving line, and reception. Several extra batteries will see you through the longest shooting session.
Power Options
Several battery chargers are available for the Canon EOS 90D. Purchasing an additional charging device offers more than some additional features: You gain a spare that can keep your camera running until you can replace your primary power rejuvenator.
Here’s a list of your power options:
- LC-E6E. This is the standard charger for the 90D (see Figure 1.2) and charges a single battery—but requires a cord. That can be advantageous in certain situations. For example, if your power outlet is behind a desk or in some other semi-inaccessible location, the cord can be plugged in and routed so the charger sits on your desk or another more convenient spot. The cord itself is a standard one that works with many different chargers and devices (including the power supply for my laptop), so I purchased several of them and leave them plugged into the wall in various locations. I can connect my 90D’s charger, my laptop computer’s charger, and several other electronic components to one of these cords without needing to crawl around behind the furniture. The cord itself draws no “phantom” power when it’s not plugged in to a charger.
- LC-E6. This charger may be the most convenient for some, because of its compact size and built-in wall plug prongs that connect directly into your power strip or wall socket and require no cord. This charger, as well as the LC-E6E, has a switching power module that is fully compatible with 100V to 240V 50/60 Hz AC power, so you can use it outside the US with no problems. When I travel to Europe, for example, I take my charger and an adapter to convert the plug shape for the European sockets. No voltage converter is needed.
- AC Adapter Kit ACK-E6. This device consists of AC Adapter AC-E6N and DC Coupler DR-E6, and it allows you to operate your 90D directly from AC power, with no battery required. Studio photographers need this capability because they often snap off hundreds of pictures for hours on end and want constant, reliable power. The camera is probably plugged into a flash sync cord (or radio device), and the studio flash are plugged into power packs or AC power, so the extra tether to this adapter is no big deal in that environment. You also might want to use the AC adapter when viewing images on a TV connected to your 90D, or when shooting remote or time-lapse photos.
- Car Battery Charger CBC-E6/CB-570 cable. This is a charger that can juice up your battery when connected to your auto’s 12V power source. The vehicle battery option allows you to keep shooting when in remote locations that lack AC power.
My recommendation: Personally, I use a more flexible alternative. I purchased a Bestek 300w/3.1A power inverter that converts my vehicle’s power to 110V and has two AC and two USB charging outlets. I can use that compact device with any AC charger, and revitalize my iPad, iPhone, or Kindle at the same time. At about $30 on Amazon, it’s roughly $100 cheaper than Canon’s car charger. That makes a capability that most people (other than campers and survivalists) won’t use very often a bit more affordable.
- Battery Grip BG-E14. This accessory holds two LP-E6 batteries (another reason to own a spare, or two), which, Canon says, will double the camera’s shooting capacity. It can also be equipped with six AA cells with the included BGM-E14A battery holder. It adds another shutter release, Main Dial, AE Lock/FE Lock, and AF point selection controls for vertically oriented shooting.
Charging the Battery
When the battery is inserted into the LC-E6/6E charger properly (it’s impossible to insert it incorrectly), a Charge light begins blinking orange-red that indicates the battery is at least partially depleted. When the device completes the charge, the Full Charge lamp glows green, approximately two hours later. When the battery is charged, remove it from the charger, flip the lever on the bottom of the camera, and slide the battery in. (See Figure 1.3.) To remove the battery, you must press a white button, which prevents the pack from slipping out when the door is opened.
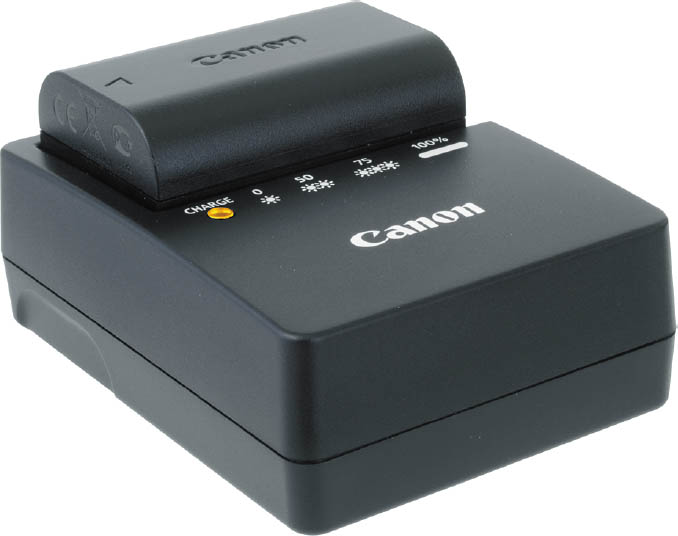
Figure 1.2 A flashing status light indicates that the battery is being charged.

Figure 1.3 Insert the battery in the camera; it only fits one way. Press the white button to release the battery when you want to remove it.
Final Steps
Your Canon EOS 90D is almost ready to fire up and shoot. You’ll need to select and mount a lens, adjust the viewfinder for your vision, and insert a memory card. Each of these steps is easy, and if you’ve used any Canon EOS camera in the past, you already know exactly what to do. I’m going to provide a little extra detail for those of you who are new to the Canon or digital SLR worlds.
Mounting the Lens
As you’ll see, my recommended lens mounting procedure emphasizes protecting your equipment from accidental damage and minimizing the intrusion of dust. If your 90D has no lens attached, select the lens you want to use and loosen (but do not remove) the rear lens cap. I generally place the lens I am planning to mount vertically in a slot in my camera bag, where it’s protected from mishaps, but ready to pick up quickly. By loosening the rear lens cap, you’ll be able to lift it off the back of the lens at the last instant, so the rear element of the lens is covered until then.
After that, remove the body cap by rotating the cap toward the shutter release button. You should always mount the body cap when there is no lens on the camera, because it helps keep dust out of the interior of the camera, where it can settle on the mirror, focusing screen, the interior mirror box, and potentially find its way past the shutter onto the sensor. (Although the 90D’s sensor-cleaning mechanism works fine, the less dust it must contend with, the better.) The body cap also protects the vulnerable mirror from damage caused by intruding objects (including your fingers if you’re not cautious).
Once the body cap has been removed, remove the rear lens cap from the lens, set it aside, and then mount the lens on the camera by matching the alignment indicator on the lens barrel (red for EF lenses and white for EF-S lenses) with the red or white dot on the camera’s lens mount (see Figure 1.4). Rotate the lens away from the shutter release until it seats securely. (You can find out more about the difference between EF and EF-S lenses in Chapter 6.) Set the focus mode switch on the lens to AF (autofocus). If the lens hood is bayoneted on the lens in the reversed position (which makes the lens/hood combination more compact for transport), twist it off and remount with the edge facing outward (see Figure 1.5). A lens hood protects the front of the lens from accidental bumps, stray fingerprints, and reduces flare caused by extraneous light arriving at the front element of the lens from outside the picture area.
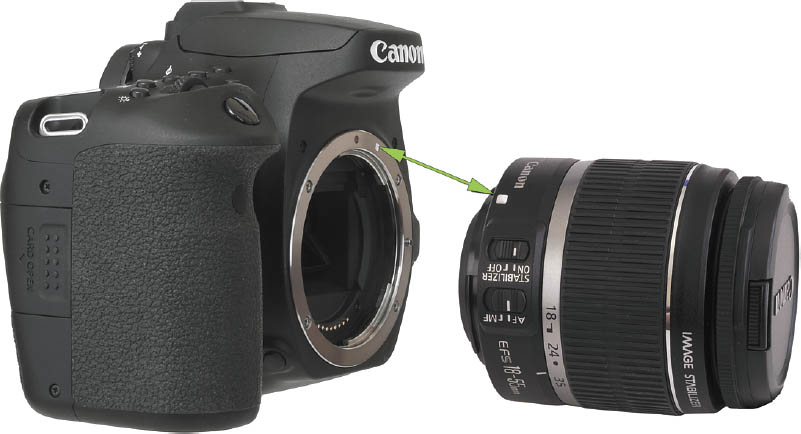
Figure 1.4 Match the white dot on EF-S lenses with the white square on the camera mount to properly align the lens with the bayonet mount. For EF lenses, use the red dots.
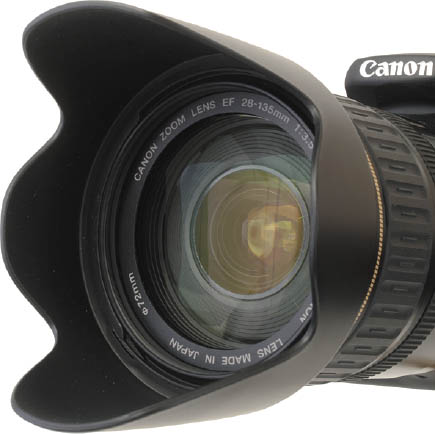
Figure 1.5 A lens hood protects the lens from extraneous light and accidental bumps.
Adjusting Diopter Correction
Those of us with less than perfect eyesight can often benefit from a little optical correction in the viewfinder. Your contact lenses or glasses may provide all the correction you need, but if you are a glasses wearer and want to use the EOS 90D without your glasses, you can take advantage of the camera’s built-in diopter adjustment, which can be varied from –3 to +1 correction. Press the shutter release halfway to illuminate the indicators in the viewfinder, then rotate the diopter adjustment knob next to the viewfinder (see Figure 1.6) while looking through the viewfinder until the indicators appear sharp.
If the available correction is insufficient, Canon offers a full range of Dioptric Adjustment Lens Series E correction lenses for the viewfinder window. If more than one person uses your 90D, and each requires a different diopter setting, you can save a little time by noting the number of clicks and direction (clockwise to increase the diopter power; counterclockwise to decrease the diopter value) required to change from one user to another. There are 18 detents in all.
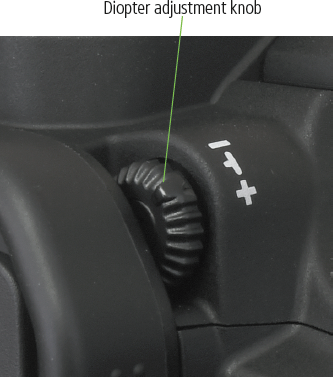
Figure 1.6 Viewfinder diopter correction from –3 to +1 can be dialed in.
Inserting a Memory Card
You can’t take photos without a memory card inserted in your EOS 90D (although there is a Release Shutter without Card entry in the Shooting 1 menu that enables/disables shutter release functions when a memory card is absent—learn about that in Chapter 7). So, your final step will be to insert a memory card. Slide the door on the right side of the body toward the back of the camera to release the cover, and then open it. (You should only remove the memory card when the camera is switched off, but the 90D will remind you if the door is opened while the camera is still writing photos to the memory card.)
Insert the memory card with the label facing the back of the camera, as shown in Figure 1.7, oriented so the edge with the connectors goes into the slot first. Close the door, and your pre-flight checklist is done! (I’m going to assume you remember to remove the lens cap when you’re ready to take a picture!) When you want to remove the memory card later, push it inward to make the memory card pop out.
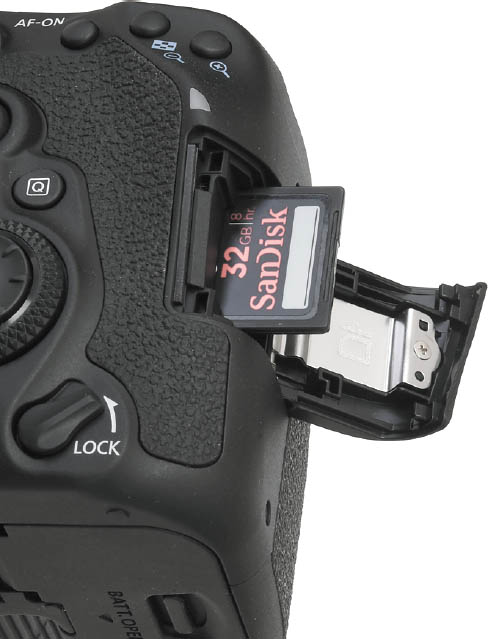
Figure 1.7 Insert the memory in the slot with the label facing the back of the camera.
Formatting a Memory Card
There are three ways to create a blank memory card for your 90D, and two of them are at least partially wrong. Here are your options, both correct and incorrect:
- Transfer (move) files to your computer. When you transfer (rather than copy) all the image files to your computer from the memory card (either using a direct cable transfer or with a card reader), the old image files are erased from the card, leaving the card blank. Theoretically. This method does not remove files that you’ve labeled as Protected (choosing the Protect Images function in the Playback menu) nor does it identify and lock out parts of your memory card that have become corrupted or unusable since the last time you formatted the card. Therefore, I recommend always formatting the card, rather than simply moving the image files, each time you want to make a blank card. The only exception is when you want to leave the protected/unerased images on the card for a while longer, say, to share with friends, family, and colleagues.
- (Don’t) Format in your computer. With the memory card inserted in a card reader or card slot in your computer, you can use Windows or Mac OS to reformat the memory card. Don’t! The operating system won’t necessarily arrange the structure of the card the way the 90D likes to see it (in computer terms, an incorrect file system may be installed). The only way to ensure that the card has been properly formatted for your camera is to perform the format in the camera itself. The only exception to this rule is when you have a seriously corrupted memory card that your camera refuses to format. Sometimes it is possible to revive such a corrupted card by allowing the operating system to reformat it first, then trying again in the camera.
- Set-up menu format. To use the recommended method to format a memory card, turn on the camera, press the MENU button, rotate the Main Dial (located on top of the camera, just behind the shutter release button), choose the Set-up 1 menu (which is represented by a wrench icon), use the up/down directional buttons (the buttons immediately above and below the SET button in the center of the Quick Control Dial) to navigate to the Format entry, and press the SET button to access the Format screen. Press the left/right multi-controller directional buttons (located to the left and right of the SET button) again to select OK and press the SET button one final time to begin the format process.
LOW-LEVEL FORMAT
You can also press the Trash button, located in the lower-right corner of the back of the camera, to mark the Low-level format box on the Format screen. This tells the 90D to perform an additional, more thorough, formatting of the card after the initial format is finished. The low-level format serves to remove data from all writable portions of your memory card while locking out “bad” sectors, and can be used to restore a memory card that is slowing down as it “trips” over those bad sectors. This extra step takes a bit longer than a standard reformat and need not be used every time you format your card. However, once activated, the low-level format will be applied each time you format a new card until you uncheck the box.
Powering Up/Setting Date and Time
Rotate the On/Off switch on top of the camera to the On position. Automatic sensor cleaning takes place (unless you specifically disable this action) as the 90D powers up. The camera will remain on or in standby mode until you manually turn it off. After a period of idling (which you can adjust from 1 to 30 minutes, or disable, in the Set-up 2 menu), the 90D goes into standby mode to save battery power. Just tap the shutter release button to bring it back to life. The automatic sensor cleaning operation does not occur when exiting standby mode.
DIRECTIONAL NOMENCLATURE
Your 90D has two (count ’em) controls for navigating menus and screens horizontally and vertically (and diagonally, if necessary), but has unfortunately assigned them unnecessarily confusing names. One is the joystick-like raised button located adjacent to the upper-right corner of the LCD monitor. Its official name is Multi-controller 1, and it can be pressed (most often with your right thumb), in the left/right/up/down and intermediate diagonal directions. You can also press it inward for Enter/Return/Set–type functions.
The second directional control is the joypad-like area in the center of the rotating Quick Control Dial. (You’ll find all of these labeled in Figure 1.8.) Canon has named it Multi-controller 2, and it functions similarly to the “joystick” control (but the center SET button is a separate component). With previous cameras in this series (up to and including the 90D’s predecessor, the 80D), this control was simply called the “multi-controller.”
In this book, I will most often just refer to the “directional controls” or “multi-controller” when either control works just as well. When referring to one of them specifically, for simplicity I’ll just call Multi-controller 1 the joystick and Multi-controller 2 the directional buttons.
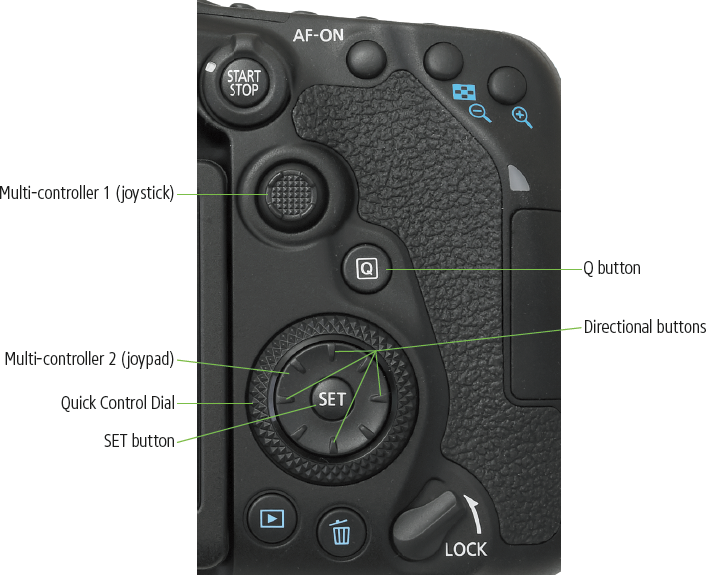
Figure 1.8 These controls are used to navigate menus.
NAVIGATIONAL CONTROLS
I’m going to introduce you to the keys/dials/wheels navigational controls first in this introductory chapter, rather than their touch-screen equivalents, because they are the most versatile (especially when you’re wearing bulky gloves!). Most functions can also be selected using the 90D’s touch screen, which I’ll explain in the Quick Start descriptions you’ll find in Chapter 2.
The first time you use the 90D, it may ask you to enter the time and date. (This information may have been set by someone checking out your camera on your behalf prior to sale.) Just follow these steps, using the controls shown in Figure 1.8.
- 1. Press the MENU button, located in the upper-left corner of the back of the 90D.
- 2. Rotate the Main Dial (near the shutter release button on top of the camera) until the Set-up 2 menu is highlighted, as shown in Figure 1.9.
- 3. Use the Quick Control Dial’s up/down directional buttons (or the multi-controller “joystick”) to move the highlighting down to the Date/Time/Zone entry, and press the SET button, located in the center of the Quick Control Dial (the large wheel located to the right of the back LCD monitor).
- 4. In the screen shown in Figure 1.10, use the same directional controls to highlight the month, day, year, hour, minutes, and seconds fields in turn.
- 5. When each setting is highlighted, press the SET button, then rotate the Quick Control Dial to adjust the value up or down. A pair of up/down pointing triangles appears above the value. Press SET again to confirm.
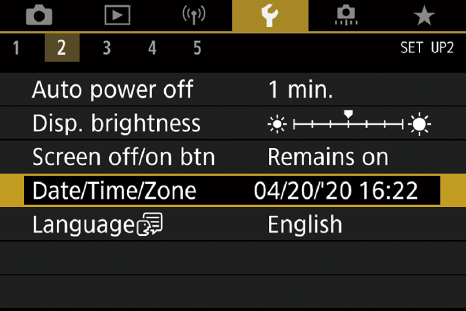
Figure 1.9 Choose the Date/Time/Zone entry from the Set-up 2 menu.
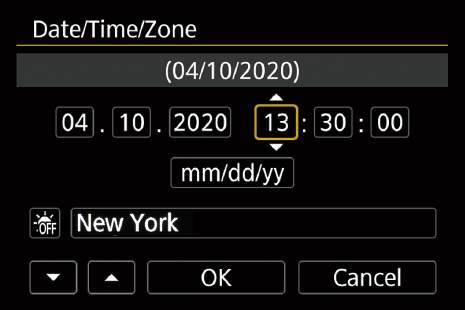
Figure 1.10 Adjust the date, time, and format used to display the date.
- 6. Repeat Step 5 to adjust each of the other date and time parameters.
- 7. Scroll to the date format line located under the Date/Time listing, press SET, and use the same procedure to adjust the way dates are displayed (that is, mm/dd/yy, yy/mm/dd, or dd/mm/yy).
- 8. Scroll down to the Daylight Savings icon and turn that option on or off, as appropriate, and then finish by moving to the Time Zone field and selecting the city in your current zone.
- 9. When all parameters are entered, highlight OK and press SET to confirm and exit.
Your Canon EOS 90D is ready to go. If you need a quick start for its basic operation, you’ll find it in Chapter 2.