
The Canon 90D is undoubtedly the most customizable, tweakable, fine-tunable camera Canon has offered non-professional users. In fact, this versatility has made the 90D surprisingly popular among professional photographers as well. If your camera doesn’t behave in exactly the way you’d like, chances are you can make a small change in the Shooting, Playback, Set-up, and Custom Function menus that will tailor the 90D to your needs. In fact, if you don’t like the menus, you can create your own using the clever My Menu system.
This chapter and the next will help you sort out the settings you can make to customize how your Canon 90D uses its features, shoots photos, displays images, and processes the pictures after they’ve been taken. As I’ve mentioned before, this book isn’t intended to replace the manual you received with your 90D, nor have I any interest in rehashing its contents. You’ll still find the original manual useful as a standby reference that lists every possible option in exhaustive (if mind-numbing) detail—without really telling you how to use those options to take better pictures. There is, however, some unavoidable duplication between the Canon manual and this chapter, because I’m going to explain the key menu choices and the options you may have in using them. You should find, though, that this chapter gives you the information you need in a much more helpful format, with plenty of detail on why you should make some settings that are particularly cryptic.
I’m not going to waste a lot of space on some of the more obvious menu choices. For example, you can probably figure out that the Beep option in the Shooting 1 menu deals with the solid-state beeper in your camera that sounds off during various activities (such as the self-timer countdown). You can certainly decipher the import of the two options available in the Shooting 1 menu for the Release Shutter without Card entry (Enable, Disable). So, in this chapter, I’ll devote no more than a sentence or two to the blatantly obvious settings and concentrate on the more confusing aspects of the 90D’s setup, such as Automatic Exposure Bracketing. Let’s start off with an overview of the 90D’s menus themselves.
Anatomy of the 90D’s Menus
With the 90D’s menu system, just press the MENU button, spin the Main Dial to highlight the menu tab you want to access, and then scroll up and down within a menu with the Quick Control Dial or multi-controller directional buttons. If you have small enough fingers, you can use the touch screen, too. What could be easier?
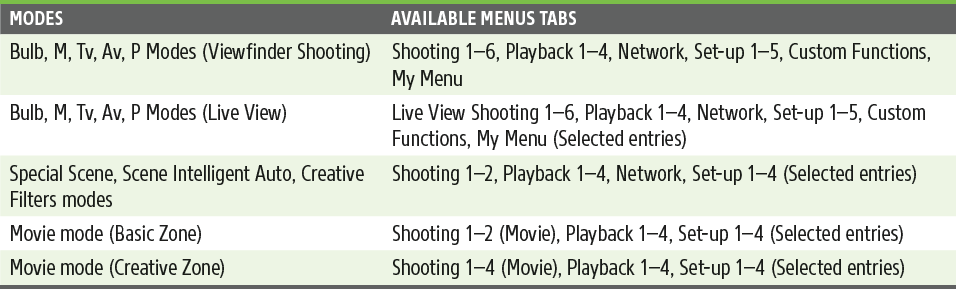
Tapping the MENU button brings up a typical menu like the one shown in Figure 7.1. (If the camera goes to “sleep” while you’re reviewing a menu, you may need to wake it up again by tapping the shutter release button.) Different menu tabs are provided, depending on the shooting mode, shown in Table 7.1. Note that the Shooting menus in viewfinder shooting mode are the most comprehensive; in Live View, Movie, Special Scene, Scene Intelligent Auto, and Creative Filters modes, only certain selected entries applicable to that mode may be available. This chapter concentrates on viewfinder shooting modes.
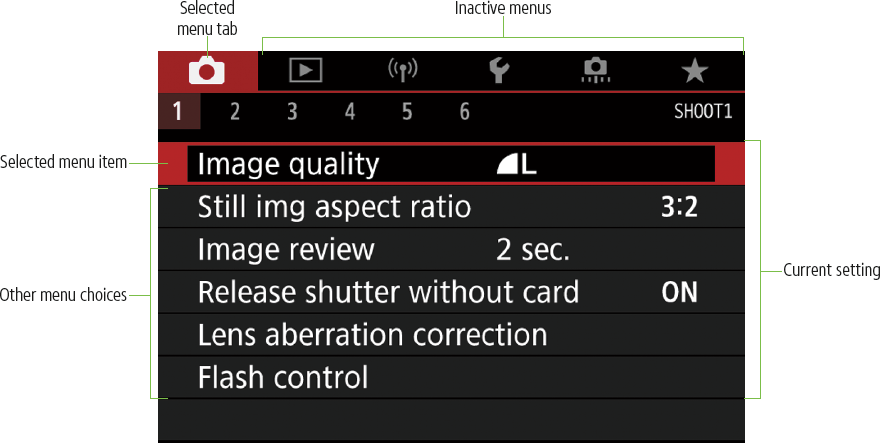
Figure 7.1 The 90D’s menus are arranged in a series of tabs.
In this chapter, I’m going to explain all the tabs and all the menu entries, and not take the time to mention which of those are not available when using Scene and other modes. The automatic modes are intended for situations when you don’t want full control over your 90D’s operation, anyway, and menu limitations go with the territory. The Live View and Movie menus will be discussed in Chapter 10 and won’t be repeated here.
The 90D’s tabs are color-coded: red for Shooting, Live View Shooting, and Movie menus; blue for Playback menus; purple for the Network menu; amber for Set-up menus; brown for the Custom Functions menu; and green for the My Menu tab. All the inactive menus are shown in dimmed gray.
MENU NAVIGATION
Remember, you can use the touch screen to move from menu to menu, or, alternatively, you can work with the Main Dial and the multi-controller directional buttons or Quick Control Dial to highlight a particular menu entry. Press SET to select a menu item.
You can jump from tab to tab even if you’ve highlighted a menu setting on another tab—and the 90D will remember which menu entry you’ve highlighted when you return to that menu. The memorization works even if you leave the menu system or turn off your camera. The 90D always remembers the last menu entry you used with a particular tab. So, if you generally use the Format Card command each time you access the Set-up 1 menu, that’s the entry that will be highlighted when you choose that tab. The camera remembers which tab was last used, too, so, potentially, formatting your memory card might take just a couple presses (the MENU button, SET to select the highlighted Format command, then a tap or a click of the multi-controller to choose OK, and another SET to start the format process).
Here are the things to watch for as you navigate the menus:
- Selected menu tab/item. The currently selected menu entry within a given tab will have a black background and will be surrounded by a box the same hue as its color code.
- Other menu choices/Inactive menus. The other menu items visible on the screen will have a dark gray background.
- Current setting. The current settings for visible menu items are shown in the right-hand column, until one menu item is selected (by choosing SET). At that point, all the settings vanish from the screen except for those dealing with the active menu choice.
When you’ve moved the menu highlighting to the menu item you want to work with, choose the SET button to select it. The current settings for the other menu items in the list will be hidden, and a list of options for the selected menu item (or a submenu screen) will appear. Within the menu choices, you can scroll up or down with the touch screen or multi-controller; choose SET to select the choice you’ve made and choose MENU again to exit.
Shooting Menu Options
You’ll find that the Shooting menu options are those that you access second most frequently when you’re using your 90D. You might make such adjustments as you begin a shooting session, or when you move from one type of subject to another. Canon makes accessing these changes easy.
This section explains the options of the six Shooting menus in viewfinder mode and how to use them.
The options you’ll find in these red-coded menus include:
Shooting 1
- Image Quality
- Still Image Aspect Ratio
- Image Review
- Release Shutter without Card
- Lens Aberration Correction
- Flash Control
Shooting 2
- Exposure Compensation/AEB (Automatic Exposure Bracketing)
- ISO Speed Settings
- Auto Lighting Optimizer
- Highlight Tone Priority
Shooting 3
- White Balance
- Custom White Balance
- WB Shift/BKT
- Color Space
- Picture Style
Shooting 4
- Long Exposure Noise Reduction
- High ISO Speed Noise Reduction
- Dust Delete Data
- Live View Shooting
- Multiple Exposure
- HDR Mode
Shooting 5
- Interval Timer
- Bulb Timer
- Anti-flicker Shooting
- Mirror Lockup
Shooting 6
- Lens Electronic Manual Focus
- AF-Assist Beam Firing
Shooting Menu Options (Live View Mode)
In live view mode, most of the entries in the Shooting menu for viewfinder mode will be available and operate similarly when using the 90D’s LCD monitor to compose your images. In general, the live view options available operate in the same way as their viewfinder mode counterparts. There are new entries, which I’ve labeled. I’ll explain how to work with the new options in Chapter 10.
Shooting 1
- Image Quality
- Still Image Aspect Ratio
- Image Review
- Release Shutter without Card
- Lens Aberration Correction
- Flash Control
Shooting 2
- Exposure Compensation/AEB (Automatic Exposure Bracketing)
- ISO Speed Settings
- Auto Lighting Optimizer
- Highlight Tone Priority
- Metering Timer (Live View)
- Exposure Simulation (Live View)
Shooting 3
- White Balance
- Custom White Balance
- WB Shift/BKT
- Color Space
- Picture Style
Shooting 4
- Long Exposure Noise Reduction
- High ISO Speed Noise Reduction
- Dust Delete Data
- Touch Shutter (Live View)
- Shutter Mode (Live View)
- Multiple Exposure
- HDR Mode
Shooting 5
- Focus Bracketing (Live View)
- Bulb Timer
Shooting 6
- AF Method (Live View)
- Eye Detection AF (Live View)
- Continuous AF (Live View)
- Lens Electronic MF (Live View)
- AF-Assist Beam Firing
- MF Peaking Settings (Live View)
Shooting Menu Options (Movie Mode)
In Movie mode, 11 of the viewfinder mode entries are retained (most of them residing in the Shooting 2 and Shooting 3 menus) in the four movie shooting menus. There are 16 new entries, not available in viewfinder mode, with most of them in the Shooting 1 and 4 menus. I’ve labeled them, and I will explain how to use them in Chapter 10.
Shooting 1
- Movie Recording Quality (Movie)
- Sound Recording (Movie)
- Movie Digital IS (Movie)
- Lens Aberration Correction
- Time-lapse Movie (Movie)
- Remote Control (Movie)
- Video Snapshot (Movie)
Shooting 2
- Exposure Compensation/AEB (Automatic Exposure Bracketing)
- ISO Speed Settings
- Auto Lighting Optimizer
- Highlight Tone Priority
- Movie Auto Slow Shutter (Movie)
- Metering Timer (Movie)
Shooting 3
- White Balance
- Custom White Balance
- WB Correction
- Picture Style
- High ISO Speed Noise Reduction
- HDMI Information Display (Movie)
Shooting 4
- AF Method (Movie)
- Movie Servo AF (Movie)
- Eye Detection AF (Movie)
- Lens Electronic Manual Focus (Movie)
- Movie Servo AF Track Sensitivity (Movie)
- Movie Servo AF Speed (Movie)
- MF Peaking Settings (Movie)
Image Quality
Options: RAW: Off (default), RAW, C RAW; JPEG Resolution: Off, Large Fine (default), Large Normal, Medium Fine, Medium Normal, Small 1 Fine, Small 1 Normal, Small 2 Fine
My preference: RAW+JPEG Fine
You can choose the image quality settings used by the 90D to store its files. You have several choices to make when selecting a quality setting—whether you want to save RAW or JPEG files (or both); whether the RAW files should be full-resolution RAW or compact C RAW files; and determining the resolution and amount of compression applied to JPEG files. The available different combinations may seem confusing, but I’m going to explain them to you clearly.
- RAW options. Your RAW files, assigned a .CR3 extension, contain the information captured by your sensor after it’s been converted from analog to digital form by the 90D’s DIGIC processing chip. You can select Off, RAW, or Compact RAW (C RAW). I’ll explain why you might select each shortly.
- JPEG resolution options. Your JPEG files, assigned a .jpg extension, have been processed to apply the image settings you specified when the picture was taken (including things like white balance, Picture Styles, and noise reduction). You can choose not to save any JPEG version (that is, save RAW only), or save a JPEG image in Large, Medium, or Small resolutions, each of those three in either Fine or Normal image compression. I’ll explain compression in more detail next.
Coming to Terms
If you’re new to using an advanced digital camera like the 90D, or need a refresher, some of the terms applied to your options may need some additional explanation:
- RAW resolution. The number of pixels captured determines the absolute resolution of the photos you shoot with your 90D. Both RAW and C RAW files have the same number of pixels and record the full image frame: 6960 × 4640 pixels, or 32.3 megapixels total. The compact (C RAW) version has a smaller file size because the 32.3 megapixels are compressed (by discarding some effectively redundant information). A typical RAW file takes up roughly 36 megabytes of storage, while a C RAW file will need only 20 megabytes. (Don’t confuse megapixels with megabytes.)
- JPEG resolution. Unlike RAW files, JPEG images can be stored at any of three different resolutions. When you choose Large, the resolution is 6960 × 4640 (32.3MP, the same resolution as either RAW format). Medium JPEG files have roughly half the resolution: 4800 × 3200 (15.4MP), while S1 and S2 (Small 1 and Small 2) files are 3472 × 2320 (8.1MP) and 2400 × 1600 (3.8MP), respectively. Obviously, the Medium and Small options reduce the size of your image files and allow more photos to be stored on your memory card, with a loss of sharpness.
- JPEG compression. Another way to make files smaller is to squeeze them down using compression. This compacting also reduces the image quality a little, so you’re offered your choice of Fine compression and Normal compression. The symbols help you remember that Fine compression (represented by a quarter-circle) provides the smoothest results, while Normal compression (signified by a stair-step icon) provides “jaggier” images. At the JPEG Large Fine setting, files are typically about 11MB in size.
- JPEG, RAW, or both. You can elect to store only JPEG versions of the images you shoot or you can save your photos as RAW files, which consume at least two to three times as much space on your memory card, compared to Large JPEG Fine images. Alternatively, you can store both at once as you shoot. Many photographers elect to save both a JPEG and a RAW file, so they’ll have a JPEG version that might be usable as-is, as well as the original “digital negative” RAW file in case they want to do some processing of the image later. You’ll end up with two different versions of the same file: one with a JPG extension, and one with the CR3 extension that signifies a Canon RAW file.
To choose the combination you want, access the menus, scroll to Image Quality, and press the SET button. A screen like the one shown in Figure 7.2 will appear with two rows of choices. Spin the Main Dial to choose from—(no RAW), RAW, or C RAW. Rotate the QCD to select one of the JPEG choices—(no JPEG), Large, Medium, or Small, in Fine or Normal compression (represented by smooth and stepped icons, respectively), plus Small 2 JPEG, at the resolutions listed above. A red box appears around the currently selected choice. If you choose—for both RAW and JPEG, then JPEG Fine will be used.
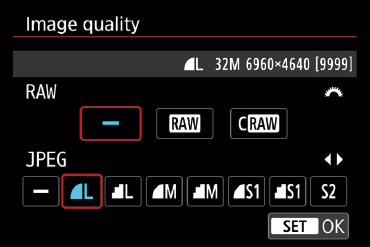
Figure 7.2 Choose your resolution, JPEG compression, and file format from this screen.
Why so many choices? There are some limited advantages to using the Medium and Small resolution settings, Normal JPEG compression setting, and the compact RAW format. They all allow stretching the capacity of your memory card so you can shoehorn quite a few more pictures onto a single memory card. That can come in useful when on vacation and you’re running out of storage, or when you’re shooting non-critical work that doesn’t require full resolution. The Small 2 setting can be appropriate for photos taken for real-estate listings, web page display, photo ID cards, or similar non-critical applications.
For most work, using lower resolution and extra compression is often false economy. You never know when you might need that extra bit of picture detail. Your best bet is to have enough memory cards to handle all the shooting you want to do until you have the chance to transfer your photos to your computer or a personal storage device.
However, reduced image quality can sometimes be beneficial if you’re shooting sequences of photos rapidly, as the 90D is able to hold more of them in its internal memory buffer before transferring to the memory card. Still, for most sports and other applications, you’d probably rather have better, sharper pictures than longer periods of continuous shooting.
JPEG vs. RAW
You’ll sometimes be told that RAW files are the “unprocessed” image information your camera produces before it’s been modified. That’s nonsense. RAW files are no more unprocessed than camera film was after it had been through the chemicals to produce a negative or transparency. Back in the film days, a lot could happen in the developer that affected the quality of a film image—positively and negatively—and, similarly, your digital image undergoes a significant amount of processing before it is saved as a RAW file. Canon even applies a name (DIGIC 8) to the digital image processing (DIP) chip used to perform this magic.
A RAW file is more like a film camera’s processed negative. It contains all the information, captured in 14-bit channels per color (and stored in a 16-bit space), with no compression, no sharpening, and no application of any special filters or other settings you might have specified when you took the picture. Those settings are stored with the RAW file so they can be applied when the image is converted to a form compatible with your favorite image editor. However, using RAW conversion software such as Adobe Camera Raw or Canon’s Digital Photo Professional, you can override those settings and apply settings of your own. You can select essentially the same changes there that you might have specified in your camera’s picture-taking options.
RAW exists because sometimes we want to have access to all the information captured by the camera before the camera’s internal logic has processed it and converted the image to a standard file format. RAW doesn’t save as much space as JPEG. What it does do is preserve all the information captured by your camera after it’s been converted from analog to digital form. Of course, the 90D’s RAW format preserves the settings information.
So, why don’t we always use RAW? Although some photographers do save only in RAW format, it’s more common to use either RAW plus one of the JPEG options or just shoot JPEG and avoid RAW altogether. That’s because having only RAW files to work with can significantly slow down your workflow. RAW is overwhelmingly helpful when an image needs to be fine-tuned; in other situations, when all you really need is a good-quality, un-tweaked JPEG image, RAW consumes time that you may not want to waste. For example, RAW images take longer to store on the memory card, and require more post-processing effort, whether you elect to go with the default settings in force when the picture was taken, or just make minor adjustments.
As a result, those who depend on speedy access to images or who shoot large numbers of photos at once may prefer JPEG over RAW. Wedding photographers, for example, might expose several thousand photos during a bridal affair and offer hundreds to clients as electronic proofs for possible inclusion in an album or transfer to a CD or DVD. These wedding shooters, who want JPEG images as their final product, take the time to make sure that their in-camera settings are correct, minimizing the need to post-process photos after the event. Given that their JPEGs are so good (in most cases thanks, in large part, to the pro photographer’s extensive experience), there is little need to get bogged down shooting RAW.
JPEG was invented as a more compact file format that can store most of the information in a digital image, but in a much smaller size. JPEG predates most digital SLRs and was initially used to squeeze down files for transmission over slow dial-up connections. Even if you were using an early dSLR with 1.3-megapixel files for news photography, you didn’t want to send them back to the office over a modem (Google it) at 1,200 bps.
But, as I noted, JPEG provides smaller files by compressing the information in a way that loses some image data. JPEG remains a viable alternative because it offers several different quality levels. At the highest quality Fine level, you might not be able to tell the difference between the original RAW file and the JPEG version. You’ve squeezed the image significantly without losing much visual information at all.
Still Image Aspect Ratio
Options: 3:2 (default), 4:3, 16:9, 1:1
My preference: 3:2
Allows you to choose an aspect ratio, or proportions of your image, from 3:2, 4:3, 16:9, or 1:1 when working in PSAM exposure modes. Selecting proportions other than the 3:2 default results in a cropped image, and the live view display provides a black border on the LCD to show the limits of the image area (see Figure 7.3). At the JPEG Large or RAW/C RAW size settings, you end up with images that measure 6960 × 4640/32MP (3:2 ratio). This choice is not available when using a Basic Zone mode. Table 7.2 shows the resolution of each of the four aspect ratios at various image sizes.
TABLE 7.2 Crop/Aspect Ratio Image Sizes

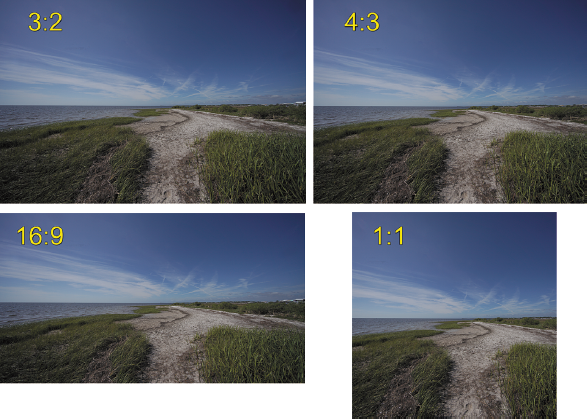
Figure 7.3 You can choose the proportions of your image.
Image Review
Options: 2 sec. (default), Off, 4 sec., 8 sec., Hold
My preference: 2 sec.
You can adjust the amount of time an image is displayed for review on the LCD after each shot is taken. You can elect to disable this review entirely (Off), or choose display times of 2, 4, or 8 seconds. You can also select Hold, an indefinite display, which will keep your image on the screen until you use one of the other controls, such as the shutter button, Main Dial, or Quick Control Dial. The Hold setting is also overridden when the time set by the Auto Power Off entry in the Set-up 2 menu (described in Chapter 9) elapses. Turning the review display off or choosing a brief duration can help preserve battery power.
Fortunately, the 90D will also override the review display when the shutter button is partially or fully depressed, so you’ll never miss a shot because a previous image was on the screen. If you want to retain an image on the screen for a longer period, but don’t want to use Hold as your default, press the Erase button located to the right of the Playback button. The image will display until you choose Cancel or Erase from the menu that pops up at the bottom of the screen. A longer review time gives you an opportunity to delete a non-keeper quickly without a visit to the menu system. Since Cancel is the default action from that screen, you generally don’t have to worry about accidentally pressing SET and deleting the photo you were examining.
Release Shutter without Card
Options: Enable (Default), Disable
My preference: Disable
This entry in the Shooting 1 menu gives you the ability to snap off “pictures” without a memory card installed—or to lock the camera shutter release if that is the case. It is sometimes called Play mode, because you can experiment with your camera’s features or even hand your 90D to a friend to let him fool around, without any danger of pictures being taken. Back in our film days, we’d sometimes finish a roll, rewind the film back into its cassette surreptitiously, and then hand the camera to a child to take a few pictures—without wasting any film. It’s hard to waste digital film, but Release Shutter without Card mode is still appreciated by some, especially camera vendors who want to be able to demo a camera at a store or trade show, but don’t want to have to equip each and every demonstrator model with a memory card. Choose this menu item, invoke SET, select Enable or Disable, and SET again to turn this capability on or off.
Lens Aberration Correction
Options: Peripheral illumination correction: Enable (default)/Disable; Distortion correction: Enable (default)/Disable; Digital Lens Optimizer (Chromatic Aberration and Diffraction correction): Enable/Disable (default)
My preference: Use the default values
The 90D can automatically partially correct for lens aberrations in several different ways using three different settings if you are using a lens for which correction data is available. Several of these corrections were previously available only when post-processing the image in Digital Photo Professional or another utility. The three choices, all described in detail in the following sections, are as follows:
- Peripheral illumination correction. Fixes light fall-off at the edges of an image.
- Distortion correction. Adjusts for barrel and pincushion distortion.
- Digital lens optimizer. Corrects for a variety of characteristics, considering the lens, subject distance, focal length, aperture, and low-pass (anti-aliasing) filter over the sensor. It corrects for both chromatic aberration (color fringes around the edges of subjects) and diffraction for moiré effects produced when shooting at a very small aperture).
Canon has compiled a database of corrections needed for many lenses in Canon’s own product line (third-party lenses are not included), and you can enable or disable each of the three processing options, depending on how much of a problem they are for you.
When you select this menu option from the Shooting 1 menu, the screen shown at left in Figure 7.4 appears. The lens currently attached to the camera is shown, along with a notation whether correction data needed to brighten the corners is already registered in the camera. (Information about the most popular lenses is included in the camera’s firmware.) If so, you can use the touch screen or multi-controller directional buttons to choose Enable to activate the feature or Disable to turn it off. Select SET to confirm your choice. By default, Peripheral Illumination and Chromatic Aberration are set to Enable, and Digital Lens Optimizer is set to Disable. All three types of corrections are discussed next.
Note that in-camera correction must be specified before you take the photo, so that the magical DIGIC 8 processing engine can improve the photo before it is saved to the memory card. If you see the message “Cannot Correct—No Data,” the lens you have mounted is not included in the 90D’s built-in database. You can use the EOS Utility software to check which lenses are included and to transfer information about unregistered lenses to your camera.

Figure 7.4 The Lens Aberration Correction entry can help eliminate three kinds of lens defects (left). The settings screen for an individual lens (right).
Peripheral Illumination Correction
One key defect is caused by a phenomenon called vignetting, which is a darkening of the four corners of the frame because of a slight amount of fall-off in illumination at those nether regions. This menu option allows you to activate Peripheral Illumination Correction, which partially (or fully) compensates for this effect. Depending on the f/stop you use, the lens mounted on the camera, and the focal length setting, vignetting can be non-existent, slight, or may be so strong that it appears you’ve used a too-small hood on your camera. (Indeed, the wrong lens hood can produce a vignette effect of its own.) Vignetting can be affected using a telephoto converter.
Peripheral illumination drop-off, even if pronounced, may not be much of a problem for you. I add vignetting, sometimes, in my image editor when shooting portraits and some other subjects. Slightly dark corners tend to focus attention on a subject in the middle of the frame. On the other hand, vignetting with subjects that are supposed to be evenly illuminated, such as landscapes, is seldom a benefit.
When you select this menu option from the Shooting 1 menu, a screen (see Figure 7.4, right) appears with the name of the lens currently attached to the camera, along with a notation whether correction data needed to brighten the corners is already registered in the camera. (Information about the most popular lenses is included in the camera’s firmware.) If so, you can use the Quick Control Dial to choose Enable to activate the feature or Disable to turn it off. Press the SET button to confirm your choice. Note that in-camera correction must be specified before you take the photo, so that the DIGIC 8 processing engine can lighten the corners of your photo before it is saved to the memory card.
To minimize the effects of corner light fall-off, you can also process RAW files using Digital Photo Professional (DPP), or, if you prefer to have your JPEG files fixed as you shoot them, use this menu option. Figure 7.5 shows an image without peripheral illumination correction at top, and a corrected image at bottom. I’ve exaggerated the vignetting a little to make it more evident on the printed page. Keep in mind that the amount of correction available with Digital Photo Pro can be a little more intense than that applied in the camera. In addition, the higher the ISO speed, the less correction is applied. If you see severe vignetting with a lens, focal length, or ISO setting, you might want to turn off this feature, shoot RAW, and apply correction using DPP instead.

Figure 7.5 Vignetting (top) is undesirable. You can correct this defect in the camera (bottom).
Distortion Correction
This option adjusts to correct barrel and pincushion distortion, based on information in the camera’s database. Barrel distortion is found in some wide-angle lenses, and causes straight lines to bow outward, with the strongest effect at the edges. In fisheye (or curvilinear) lenses, this defect is a feature. (See Figure 7.6, left.) When distortion is not desired, you’ll need to use a lens that has corrected barrel distortion. Manufacturers like Canon do their best to minimize or eliminate it (producing a rectilinear lens), often using aspherical lens elements (which are not cross-sections of a sphere). You can also minimize less severe barrel distortion simply by framing your photo with some extra space all around, so the edges where the defect is most obvious can be cropped out of the picture. If none of the above work, you can apply this feature, which is disabled by default, to “undistort” your image with some bending of its own.
Pincushion distortion is a trait of many telephoto lenses, producing lines that curve inward toward the center of the frame. (See Figure 7.6, right.) You might find after a bit of testing that it is worse at certain focal lengths with your zoom lens. Like chromatic aberration, it can be partially corrected using tools like Photoshop’s Lens Correction filter and Photoshop Elements’ Correct Camera Distortion filter, Digital Photo Professional, or this in-camera feature.
Figure 7.6 Extreme barrel distortion can be a “feature” (left). Pincushion distortion causes lines to bow toward the center of the image (right).
Digital Lens Optimizer
This option is a general-purpose fixer-upper based on the 90D’s database understanding of its list of lenses and characteristics of the camera and sensor. It applies a whole range of corrections and can apply them separately to the center or edges of the frame, fixing spherical aberration, axial chromatic aberration, curvature of field, astigmatism, chromatic aberration, sagittal halo, and chromatic magnification. Many of these are technical aspects that are beyond the scope of this book.
Another defect fixed by the Digital Lens Optimizer involves fringes of color around backlit objects, produced by chromatic aberration, which comes in two forms: longitudinal/axial, in which all the colors of light don’t focus in the same plane, and lateral/transverse, in which the colors are shifted in one direction. (See Figure 7.7, top.) When this feature is enabled, the camera will automatically correct images taken with one of the supported lenses to reduce or eliminate the amount of color fringing seen in the final photograph. (See Figure 7.7, bottom.)
The final defect corrected by the Digital Lens Optimizer is diffraction, a phenomenon that can cause a reduction in the apparent sharpness of your image due to scattering and interference of photons as they pass through smaller lens openings. In effect, the edges of your lens aperture affect proportionately more photons as the f/stop grows smaller. The relative amount of space available to pass freely decreases, and the amount of edge surface that can collide with incoming light increases.
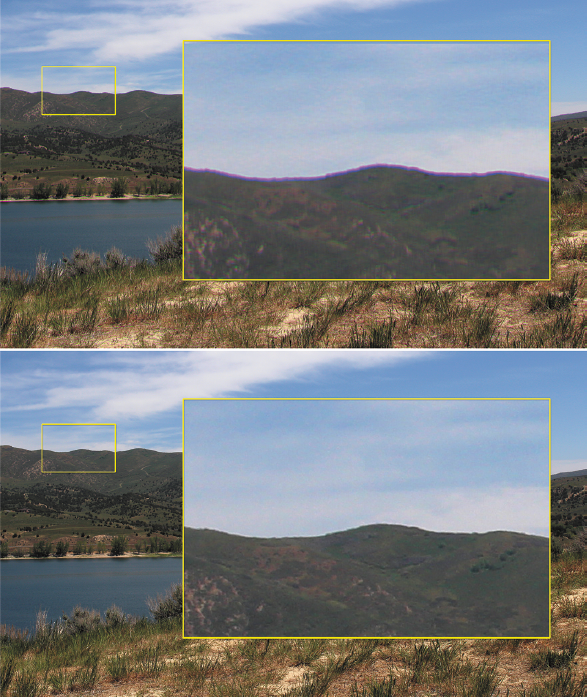
Figure 7.7 Color fringes (top) can be corrected using the Digital Lens Optimizer feature (bottom).
Flash Control
This multi-level menu entry includes seven settings for controlling the Canon 90D’s built-in electronic flash unit, as well as accessory flash units you can attach to the camera (see Figure 7.8). I’ll provide in-depth coverage of how you can use these options in Chapter 11, but I will list the main options here for reference.
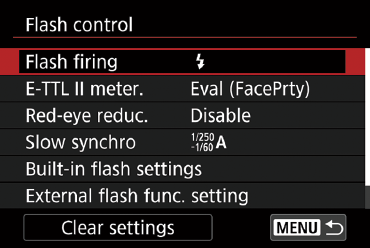
Figure 7.8 The Flash Control menu entry has seven setting submenus.
Flash Firing
Use this option to enable or disable the electronic flash. You might want to totally disable the 90D’s flash (both built-in and accessory flash) when shooting in sensitive environments, such as concerts, in museums, or during religious ceremonies. When disabled, the flash cannot fire even if you accidentally elevate it, or have an accessory flash attached and turned on. If you turn off the flash here, it is disabled in any exposure mode. However, the AF-assist beam may operate, if needed to focus, even when the flash itself is disabled. If you truly want the flash to never emit a burst, use the AF-Assist Beam Firing entry in the Shooting 6 menu to completely disable it.
In Basic Zone and P modes, an additional Flash Auto setting (represented by the flash icon and the letter A) tells the 90D to fire the built-in flash as needed.
E-TTL II Metering
You can choose Evaluative (Matrix), Evaluative (Face Priority), or Average metering modes for the electronic flash exposure meter. Either Evaluative mode looks at selected areas in the scene to calculate exposure and is the best choice for most images because it attempts to interpret the type of scene being shot. The Face Priority variation gives the greatest weight to faces within your image. The Average metering mode calculates flash exposure by reading the entire scene, and it is possibly a good option if you want exposure to be calculated for the overall image. Note that Evaluative (Face Priority) slows down your effective continuous shooting speed.
Red-eye Reduction
Your 90D has a Red-Eye Reduction flash mode. Unfortunately, your camera is unable, on its own, to always completely eliminate the red-eye effects that occur when an electronic flash (or, rarely, illumination from other sources) bounces off the retinas of the eye and into the camera lens. Animals seem to suffer from yellow or green glowing pupils, instead; the effect is equally undesirable. The effect is worst under low-light conditions (exactly when you might be using a flash) as the pupils expand to allow more light to reach the retinas. The most you can hope for is to reduce or minimize the red-eye effect.
The best way to truly eliminate red-eye is to raise the flash up off the camera so its illumination approaches the eye from an angle that won’t reflect directly back to the retina and into the lens. The extra height of the built-in flash may not be sufficient, however. That alone is a good reason for using an external flash. If you’re working with your 90D’s built-in flash, your only recourse may be to switch on the Red-Eye Reduction feature. It causes a lamp on the front of the camera to illuminate with a half-press of the shutter release button, which may cause your subjects’ pupils to contract, decreasing the amount of the red-eye effect. (You may have to ask your subject to look at the lamp to gain maximum effect.)
Your results may vary, depending on your subject and conditions. You’re better off using an external flash, which raises the light source enough to possibly minimize red-eye (and off-camera flash is even better). Red-eye correction is also available after the fact using an entry in the Playback 2 menu, or the editing facilities found in all image editors.
Slow Synchro
You can select the flash synchronization speed that will be used when working in Av (Aperture-priority) or P (Program) exposure modes; choose from 1/250–30 sec. auto (the 90D selects the shutter speed from 30 seconds to 1/250th second), to a range embracing only the speeds from 1/250 to 60 sec. auto, or fixed at 1/250th second.
Normally, in Aperture-priority mode when using flash, you specify the f/stop to be locked in. The camera then adjusts exposure by varying the output of the electronic flash. In Program mode, the camera chooses the f/stop. Because the primary exposure comes from the flash, the main effect of the shutter speed selected is on the secondary exposure from the ambient light remaining on the scene. When Slow Synchro is enabled, the 90D will choose a shutter speed that balances the flash exposure and available, ambient light.
- 1/250–30 sec. auto. Enables slow sync at all shutter speeds between 30 seconds and the 90D’s 1/250th second maximum sync speed. You may need to mount the camera on a tripod to avoid a blurry secondary (“ghost”) exposure at the longest shutter speeds. (I’ll explain sync speed and “ghost” images in detail in Chapter 11, which concentrates on use of electronic flash.)
- 1/250–1/60 sec. auto. Locks out shutter speeds slower than 1/30th second, preventing blur from camera/subject movement in the secondary (“ghost”) exposure. You’ll find this setting most useful if you plan to shoot handheld. However, the background may be rendered dark if the flash is not strong enough to illuminate it.
- 1/250 sec. (fixed). Disables slow sync. A shutter speed of 1/250th second is always used in Av and P modes. This minimizes blur from subject and camera movement, but in low light, the background may come out darker than with the other two modes.
Built-in Flash Settings
There is a total of four main choices for this menu screen, plus Clear Settings. There are additional options that appear when you enable wireless flash mode. All these are explained in Chapters 11 and 12. The Built-in Flash Settings screen is available only if you do not have an external flash connected to the accessory/flash shoe on top of the camera. (Whether that flash is powered up or not is irrelevant.)
- Flash mode. This entry allows you to choose from automatic exposure calculation (E-TTL II) or manual flash exposure.
- Shutter sync. Available only in E-TTL II mode, you can choose 1st curtain sync, which fires the pre-flash used to calculate the exposure before the shutter opens, followed by the main flash as soon as the shutter is completely open. This is the default mode, and you’ll generally perceive the pre-flash and main flash as a single burst. Alternatively, you can select 2nd curtain sync, which fires the pre-flash as soon as the shutter opens, and then triggers the main flash in a second burst at the end of the exposure, just before the shutter starts to close. (If the shutter speed is slow enough, you may clearly see both the pre-flash and main flash as separate bursts of light.) This action allows photographing a blurred trail of light of moving objects with sharp flash exposures at the beginning and the end of the exposure. This type of flash exposure is slightly different from what some other cameras produce using 2nd curtain sync. I’ll explain how it works in Chapter 11.
- Flash exposure compensation. If you’d rather adjust flash exposure using a menu than with the ISO/Flash exposure compensation button, you can do that here. Select this option with the SET button, then dial in the amount of flash EV compensation you want using the multi-controller. The EV that was in place before you started to make your adjustment is shown as a blue indicator, so you can return to that value quickly. Use SET again to confirm your change, then tap MENU or press the MENU button twice to exit.
- Wireless functions. These choices appear when you’ve enabled Wireless flash operation. I’m going to leave the explanation of these options for Chapter 12, which is an entire chapter dedicated to using the 90D’s wireless shooting capabilities.
External Flash Function Setting
You can access this menu only when you have a compatible electronic flash attached and switched on. If you press the INFO. button while adjusting flash settings, both the changes made to the settings of an attached external flash and to the built-in flash will be cleared. The available settings from this screen are like those found under Built-in Flash Settings, as described above. One key difference is if you have an external compatible Speedlite attached, in addition to 1st curtain and 2nd curtain sync, you can also choose High-speed sync, which allows you to use shutter speeds faster than 1/250th second.
External Flash C.Fn Setting
Many external Speedlites from Canon include their own list of Custom Functions, which can be used to specify things like flash metering mode and flash bracketing sequences, as well as more sophisticated features, such as modeling light/flash (if available), use of external power sources (if attached), and functions of any slave unit attached to the external flash. This menu entry, visible when you scroll down the Flash Control list, allows you to set an external flash unit’s Custom Functions from your 90D’s menu. The functions you can select vary depending on the Speedlite you are using.
Clear Settings
This entry allows you to zero-out any changes you’ve made to your flash’s settings and return them to their factory default settings. You can individually clear built-in flash settings, external flash settings, and external flash’s Custom Function settings.
Exposure Compensation/Automatic Exposure Bracketing
Options: Exposure Comp/Auto Exposure Bracketing
My preference: N/A
The first entry on the Shooting 2 menu is Expo. Comp./AEB, or exposure compensation and automatic exposure bracketing. (See Figure 7.9.) As you learned in Chapter 4, exposure compensation (added/subtracted by pressing the multi-controller while this menu screen is visible) increases or decreases exposure from the metered value.
Exposure bracketing using the 90D’s AEB feature is a way to shoot several consecutive exposures using different settings, to improve the odds that one will be exactly right. Automatic exposure bracketing is also an excellent way of creating the base exposures you’ll need when you want to combine several shots to create a high dynamic range (HDR) image. (You’ll find a discussion of HDR photography in Chapter 4, too.)

Figure 7.9 Exposure compensation/automatic exposure bracketing is the first entry in the Shooting 2 menu.
To activate automatic exposure bracketing, select this menu choice, then rotate the Main Dial to spread or contract the three dots beneath the scale until you’ve defined the range you want the bracket to cover, shown as full-stop jumps in Figure 7.10. Then, use the touch screen, QCD, or multi-controller to move the brackets right or left, biasing the bracketing toward underexposure (move left) or overexposure (move right).
When AEB is activated, the three bracketed shots will be exposed in this sequence: metered exposure, decreased exposure, increased exposure. You’ll find more information about exposure bracketing in Chapter 4.
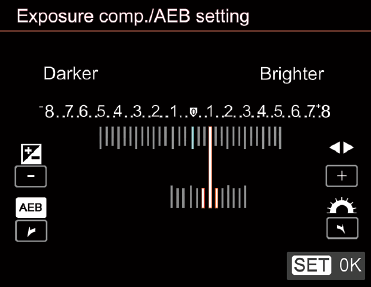
Figure 7.10 Set the range of the three bracketed exposures.
ISO Speed Settings
Options: ISO Speed (Default: Auto), ISO Speed Range (Default: 100–25600), Auto Range (Default: 100–6400), Minimum Shutter Speed (Default: Auto)
My preference: N/A
Use this entry to select a specific ISO speed using a menu instead of the top-panel ISO button/menus, or to limit the range of ISO settings and shutter speeds that the camera selects automatically. The four subentries include:
- ISO Speed. You can choose Auto (the 90D will choose an ISO sensitivity appropriate for the light levels/exposure settings you’ve specified) or a fixed sensitivity from ISO 100 to ISO 25600, in 1/3- stop increments (for example, ISO 100, 125, or 160). If you’ve set ISO Speed Setting Increments to 1-stop using C.Fn I-02, the increments will be ISO 100, 200, 400, etc. When ISO expansion has been enabled using the ISO Speed Range choice (next), you can also choose H (51200 equivalent). Press INFO. when the scale is visible to quickly switch to Auto.
- ISO Speed Range. This option lets you specify both a minimum and maximum ISO sensitivity that can be selected manually using the ISO Speed option (above). Perhaps you have a preferred range and don’t want to accidentally use any ISO setting below ISO 200 or higher than ISO 3200. You can specify those limits here. Available ranges are ISO 100 to ISO 12800 for the minimum and ISO 200 to H for the maximum, if you expand the ISO range to H (equivalent of ISO 51200).
- Auto Range. Ordinarily, the 90D in Auto ISO mode will select only ISO sensitivities between ISO 100 and ISO 6400. You can change this range to set the minimum to ISO 100 to ISO 6400 and the maximum up to ISO 25600, using whole stop limits (for example ISO 100, 200, or 400, but not ISO 125 or 160). Note that you can’t set a minimum that’s higher than the maximum, or vice versa. This option allows advanced shooters to enable automated ISO selection within limits they can tightly control. If you were shooting indoor sports in Shutter-priority (Tv) mode, you might want to specify a 1/500th second shutter speed, and allow the camera to adjust the ISO between, say, ISO 400 and ISO 3200. Limits you set here will also be applied to the ISO Speed Safety Shift feature.
- Minimum Shutter Speed. Use this when working with Program (P) or Aperture-priority (Av) modes to specify the slowest shutter speed that will be used when Auto ISO is enabled. (In Shutter-priority [Tv] mode, you always choose the shutter speed.) This option ensures that the Auto ISO changes will kick in before the camera reduces the shutter speed below a value you select.
You can select Auto and the 90D will choose an appropriate minimum shutter speed. Rotate the QCD to tell the 90D to allow slower shutter speeds (–1 to –3) or faster speeds (+1 to +3). The default is the 0 (standard) setting. Or you can select Manual and choose minimum shutter speeds from 1 second to 1/8000th second by rotating the Main Dial. For example, perhaps you are shooting indoor sports and elect to choose Aperture-priority instead of Shutter-priority (say, your lens works better at f/4 than its maximum aperture of f/2.8, and you want to work with f/4 all the time). Set 1/250th second as a minimum shutter speed, and if a correct exposure calls for a shutter speed slower than that at f/4, Auto ISO will be used to boost the sensitivity instead.
However, if you’ve handicapped the 90D by selecting an Auto ISO range that doesn’t include a sensitivity high enough, the camera will override this setting and use a shutter speed lower than the minimum you specify anyway. The camera assumes (rightly or wrongly) that your upper ISO boundary is more important than your lower shutter speed limit. The lesson here is that if you really, really want to enforce a minimum shutter speed when using Auto ISO, make sure your upper limit is high enough. Note that the Minimum Shutter Speed setting is ignored when using flash.
Auto Lighting Optimizer
Options: Disable, Low, Standard, High
My preference: Disable
The Auto Lighting Optimizer provides a partial fix for images that are too dark or flat. Such photos typically have low contrast, and the Auto Lighting Optimizer improves them—as you shoot—by increasing both the brightness and contrast as required. The feature can be activated in Program, Aperture-priority, and Shutter-priority modes. You can select from four settings: Standard (the default value, which is always selected when using Scene Intelligent Auto and Creative Auto modes, and used for Figure 7.11), plus Low, High, and Disable. Press the INFO. button to add/remove a check mark icon that indicates the Auto Lighting Optimizer is disabled during manual and bulb exposure. Since you’re likely to be specifying an exposure in those modes, you probably don’t want the optimizer to interfere with your settings, so disabling the feature is the default.
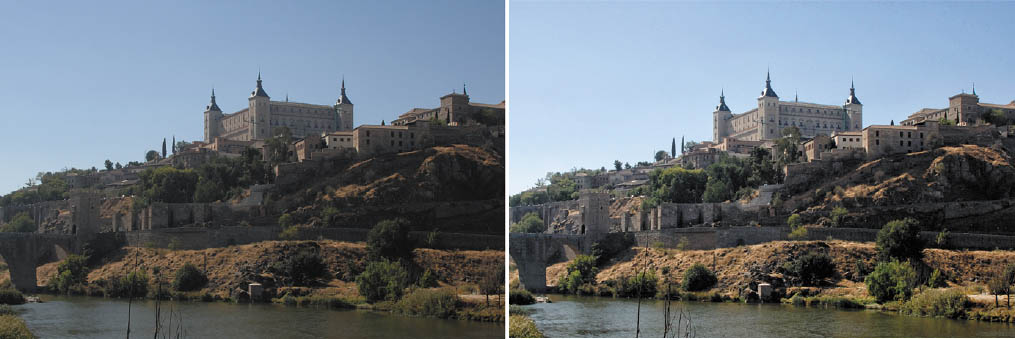
Figure 7.11 Auto Lighting Optimizer can brighten dark, low-contrast images (left), giving them a little extra snap and brightness (right).
Highlight Tone Priority
Options: Disable/OFF (default), Enable D+, Enhanced D+2
My preference: Disable
This setting concentrates the available tones in an image from the middle grays up to the brightest highlights, in effect expanding the dynamic range of the image at the expense of shadow detail. You’d want to activate this option when shooting subjects in which there is lots of important detail in the highlights, and less detail in shadow areas. Highlight tones will be preserved, while shadows will be allowed to go dark more readily (and may exhibit an increase in noise levels). Bright beach or snow scenes, especially those with few shadows (think high noon, when the shadows are smaller) can benefit from using Highlight Tone Priority. Your choices:
- Disable/OFF. The 90D’s normal dynamic range is applied. Note that when Highlight Tone Priority is switched off, the related Auto Lighting Optimizer setting (discussed earlier in this chapter) functions normally.
- Enable D+. Highlight areas are given expanded tonal values, the tones available for shadow areas are reduced, and the gradation between them smoother. The ISO 100 sensitivity setting is disabled and only ISO 200 to ISO 25600 (or ISO 200–12800 for movies) are available. You can tell that this restriction is in effect by viewing the D+ icon shown in the viewfinder, on the ISO Selection screen, and in the shooting information display for a particular image. Image noise may slightly increase as the camera manipulates the image. Note that this setting disables the Auto Lighting Optimizer.
- Enhanced D+2. More aggressive preservation of overexposed highlights. Use this with caution, as your images can be changed rather drastically. This setting is not available when shooting movies.
White Balance
Options: Auto (default), Daylight, Shade, Cloudy, Tungsten, White Fluorescent, Flash, Custom, Color Temperature
My preference: N/A
This is the first entry in the Shooting 3 menu. (See Figure 7.12.) If automatic white balance or one of the six preset settings available (Daylight, Shade, Cloudy, Tungsten, White Fluorescent, or Flash) aren’t suitable, you can set a custom white balance using this menu option or a specific color temperature value. The screen shown in Figure 7.12 is identical to the one that pops up when you select White Balance from the Quick Control screen (except for the color of the highlighting). If you choose the “K” entry, you can select an exact color temperature from 2,500K to 10,000K using the Main Dial.

Figure 7.12 The Shooting 3 menu.
Of course, unless you own a specialized tool called a color temperature meter, you probably won’t know the exact color temperature of your scene. However, knowing the color temperatures of the six preset options can help you if you decide to tweak them by choosing a different color temperature setting. The values used by the 90D are as follows:
- Auto (AWB). 3,000K–7,000K Press the INFO. button when this is selected to toggle between Ambience-priority (to keep warm color under tungsten light) or White-priority (to produce neutral whites even under tungsten illumination).
- Daylight. 5,200K
- Shade. 7,000K
- Cloudy. 6,000K
- Tungsten. 3,200K
- White Fluorescent. 4,000K
- Flash. 6,000K
- Custom. 2,000K to 10,000K
- Color Temperature. 2,500K to 10,000K (Settable in 100K increments)
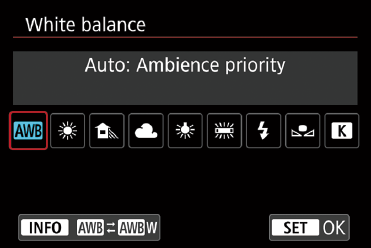
Figure 7.13 White balance presets can be chosen here.
The problem with the available presets (Daylight, Shade, etc.) is that you have only six of them, and in any given situation, all of them are likely to be wrong—strictly speaking. The good news is that they are likely to be only a little bit wrong. The human eye is very adaptable, so in most cases you’ll be perfectly happy with the results you get if you use Auto or choose a preset that’s in the white balance ballpark.
But if you absolutely must have the correct color balance, or are frequently dissatisfied with the color balance the 90D produces when using Auto or one of the presets, you can always shoot RAW, and adjust the final color balance in your image editor when converting the .cr3 file. Or you can use a custom white balance procedure, described next.
Custom White Balance
Options: White balance setting
My preference: N/A
If automatic white balance or one of the six preset settings available (Daylight, Shade, Cloudy, Tungsten, White Fluorescent, or Flash) aren’t suitable, you can set a custom white balance using this menu option. The custom setting you establish will then be applied whenever you select Custom using the White Balance menu.
To set the white balance to an appropriate color temperature under the current ambient lighting conditions, focus manually (with the lens set on MF) on a plain white or gray object, such as a card or wall, making sure the object fills the spot metering circle in the center of the viewfinder. Then, take a photo. Next, press the MENU button and select Custom WB from the Shooting 3 menu. Use the multi-controller until the reference image you just took appears and choose SET to store the white balance of the image as your Custom setting. Only compatible images that can be used to specify a custom white balance will be shown on the screen. Custom white balance images are marked with a custom icon and cannot be removed (although they can be replaced with a new custom white balance image).
Using an ExpoDisc
As I mention in Chapter 9, many photographers prefer to use a gadget called an ExpoDisc, from ExpoImaging, Inc. (www.expoimaging.com), which fits over (or attaches to) the front of your lens and provides a diffuse neutral (or semi-neutral) subject to measure with your camera’s custom white balance feature. ExpoDiscs cost $75 to $100 or so, depending on the filter size of your lens, but many just buy the 77mm version and hold it in front of their lens. (There’s a strap attached, so you won’t lose it.) Others have had mixed success using less-expensive alternatives (such as the lid of a Pringles can). ExpoImaging also makes ExpoCap lens caps with similar diffusing features, and you can leave one of them on your lens at all times (at least, when you’re not shooting).
There are two models, the standard ExpoDisc Neutral and a Portrait model that produces a slightly warmer color balance suitable for portraits. The product produces the best results when you use it to measure the incident light; that is, the light falling onto your subject. In other words, instead of aiming your camera at your subject from the shooting position, take the time (if it’s possible) to position yourself at the subject position and point your ExpoDisc-equipped lens toward the light source that will illuminate the scene. (However, don’t point your camera directly at the sun! Aim at the sky instead.)
I like to use the ExpoDisc in two situations:
- Outdoors under mixed lighting. When you’re shooting outdoors, you’ll often find that your scene is illuminated by direct sunlight as well as by open shade, full shade, or a mixture of these. A custom white balance reading can help you zero in on the correct color balance in a situation that’s hard to judge visually.
- When using studio flash. It’s a nasty secret that many studio flash units change color temperature when you adjust the power slider to scale down the output. Perhaps your 1600ws (watt second) flash puts out too much light to allow you to use a larger f/stop for selective focus. So, you dial it down to 1/4 power. That will likely change the color temperature of the unit slightly, particularly when compared to your 800ws fill light, which you’ve reduced to half power. You can use the ExpoDisc to measure the color temperature of your main light at its new setting or aim it between two lights to obtain an average reading. The result will probably be close enough to the correct color temperature to satisfy most studio shooters.
A WHITE BALANCE LIBRARY
Shoot a selection of blank-card images under a variety of lighting conditions on a spare memory card. If you want to “recycle” one of the color temperatures you’ve stored, insert the card and set the Custom white balance to that of one of the images in your white balance library, as described above.
White Balance Shift and Bracketing
Options: WB bias and WB bracketing
My preference: N/A
White balance shift allows you to dial in a white balance color bias along the blue-yellow/amber and/or green-magenta scale. In other words, you can set your color balance so that it is a little bluer or yellower (only), a little more magenta or green (only), or a combination of the two bias dimensions. You can also bracket exposures, taking several consecutive pictures each with a slightly different color balance biased in the directions you specify.
The process is a little easier to visualize if you look at Figure 7.14. The center intersection of lines BA and GM (remember high school geometry!) is the point of zero bias. Move the point at that intersection using the multi-controller to locate it at any point on the graph using the blue-yellow/amber and green-magenta coordinates. The amount of shift will be displayed in the Shift box to the right of the graph.
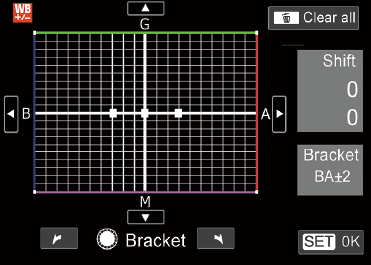
Figure 7.14 Use the touch screen or QCD to specify color balance bracketing using green-magenta bias or to specify blue-yellow/amber bias.
White balance bracketing is like white balance shifting, only the bracketed changes occur along the bias axis you specify. The three squares in Figure 7.14 show that the white balance bracketing will occur in two-stop steps along the blue-yellow/amber axis. The amount of the bracketing is shown in the lower box to the right of the graph.
This form of bracketing is like exposure bracketing, but with the added dimension of hue. Bias bracketing can be performed in any JPEG-only mode. You can’t use any RAW format or RAW+JPEG format because the RAW files already contain the information needed to fine-tune the white balance and white balance bias.
When you select WB Shift/BKT, the adjustment screen appears. First, you press the Quick Control Dial to set the range of the shift in either the green-magenta dimension (rotate clockwise to change the vertical separation of the three dots representing the separate exposures) or in the blue-yellow/amber dimension by rotating the QCD counterclockwise. Use the multi-controller to move the bracket set around within the color space, and outside the green-magenta or blue-yellow/amber axes.
In most cases, it’s fairly easy to determine if you want your image to be more green, more magenta, more blue, or more yellow, although judging your current shots on the LCD screen can be tricky unless you view the screen in a darkened location so it will be bright and easy to see. Bracketing is covered in Chapter 4.
Color Space
Options: sRGB (default), Adobe RGB
My preference: I use the expanded Adobe RGB color space
When you are using one of the Creative Zone modes, you can select one of two different color spaces (also called color gamuts) using this menu entry. One color space is named Adobe RGB (because it was developed by Adobe Systems in 1998), while the other is called sRGB (supposedly because it is the standard RGB color space). These two color gamuts define a specific set of colors that can be applied to the images your 90D captures.
The Color Space menu choice applies directly to JPEG images shot using P, Tv, Av, and M exposure modes. When you’re using Scene Intelligent Auto mode, the 90D uses the sRGB color space for all the JPEG images you take. RAW images are a special case. They have the information for both sRGB and Adobe RGB, but when you load such photos into your image editor, it will default to sRGB (with Scene Intelligent Auto or Creative Auto shots) or the color space specified here, unless you change that setting while importing the photos. (See the “Best of Both Worlds” sidebar that follows for more information.)
You may be surprised to learn that the 90D doesn’t automatically capture all the colors we see. Unfortunately, that’s impossible because of the limitations of the sensor and the filters used to capture the fundamental red, green, and blue colors, as well as that of the elements used to display those colors on your camera and computer monitors. Nor is it possible to print every color our eyes detect, because the inks or pigments used don’t absorb and reflect colors perfectly. In short, your sensor doesn’t capture all the colors that we can see, your monitor can’t display all the colors that the sensor captures, and your printer outputs yet another version.
You’re probably surprised that the camera doesn’t automatically capture all the colors we see. Unfortunately, that’s impossible because of the limitations of the sensor and the filters used to capture the fundamental red, green, and blue colors, as well as that of the phosphors used to display those colors on the LEDs in your camera and computer monitors. Nor is it possible to print every color our eyes detect, because the inks or pigments used don’t absorb and reflect colors perfectly.
On the other hand, the 90D does capture quite a few more colors than we need. A 14-bit RAW image contains a possible 281 trillion different hues (16,384 colors per red, green, or blue channel), which are condensed down to a mere 16.8 million possible colors when converted to a 24-bit (eight bits per channel) image.
The set of colors, or gamut, that can be reproduced or captured by a given device (scanner, digital camera, monitor, printer, or some other piece of equipment) is represented as a color space that exists within the larger full range of colors. That full range is represented by the odd-shaped splotch of color shown in Figure 7.15, as defined by scientists at an international organization back in 1931. The colors possible with Adobe RGB are represented by the black triangle in the figure, while the sRGB gamut is represented by the smaller white triangle. The location of the corners of each triangle represent the position of the primary red, green, and blue colors in the gamut.
A third color space, ProPhoto RGB, represented by the yellow triangle in the figure, has become more popular among professional photographers as more and more color printing labs support it. While you cannot save images using the ProPhoto gamut with your 90D, you can convert your photos to 16-bit Pro-Photo format using Adobe Camera RAW when you import RAW photos into an image editor. ProPhoto encompasses virtually all the colors we can see (and some we can’t), giving advanced photographers better tools to work with in processing their photos. It has richer reds, greens, and blues, although, as you can see from the figure, its green and blue primaries are imaginary (they extend outside the visible color gamut). Those with exacting standards need not use a commercial printing service if they want to explore ProPhoto RGB: many inkjet printers can handle cyans, magentas, and yellows that extend outside the Adobe RGB gamut.

Figure 7.15 The outer curved figure shows all the colors we can see; the outlines show the boundaries of Adobe RGB (black triangle), sRGB (white triangle), and ProPhoto RGB (yellow triangle).
Regardless of which triangle—or color space—is used by the 90D, you end up with some combination of 16.8 million different colors that can be used in your photograph. (No one image will contain all 16.8 million! Think about it: the only way a 24-megapixel image could include that many colors would be if two-thirds of the pixels were each a unique hue!) But, as you can see from the figure, the colors available will be different.
Adobe RGB, like ProPhoto RGB, is an expanded color space useful for commercial and professional printing, and it can reproduce a wider range of colors. It can also come in useful if an image is going to be extensively retouched, especially within an advanced image editor, like Adobe Photoshop, which has sophisticated color management capabilities that can be tailored to specific color spaces. As an advanced user, you don’t need to automatically “upgrade” your 90D to Adobe RGB, because images tend to look less saturated on your monitor and, it is likely, significantly different from what you will get if you output the photo to your personal inkjet. (You can profile your monitor for the Adobe RGB color space to improve your on-screen rendition using widely available color calibrating hardware and software.)
While both Adobe RGB and sRGB can reproduce the exact same 16.8 million absolute colors, Adobe RGB spreads those colors over a larger portion of the visible spectrum, as you can see in the figure. Think of a box of crayons (the jumbo 16.8 million crayon variety). Some of the basic crayons from the original sRGB set have been removed and replaced with new hues not contained in the original box. Your “new” box contains colors that can’t be reproduced by your computer monitor, but which work fine with a commercial printing press. For example, Adobe RGB has more “crayons” available in the cyan-green portion of the box, compared to sRGB, which is unlikely to be an advantage unless your image’s final destination is the cyan, magenta, yellow, and black inks of a printing press.
The other color space, sRGB, is recommended for images that will be output locally on the user’s own printer, as this color space matches that of the typical inkjet printer fairly closely. You might prefer sRGB, which is the default for the 90D and most other cameras, as it is well suited for the range of colors that can be displayed on a computer screen and viewed over the Internet. If you plan to take your image file to a retailer’s kiosk for printing, sRGB is your best choice, because those automated output devices are calibrated for the sRGB color space that consumers use.
BEST OF BOTH WORLDS
If you plan to use RAW+JPEG for most of your photos, go ahead and set sRGB as your color space. You’ll end up with JPEGs suitable for output on your own printer, but you can still extract an Adobe RGB version from the RAW file at any time. It’s like shooting two different color spaces at once—sRGB and Adobe RGB—and getting the best of both worlds.
Of course, choosing the right color space doesn’t solve the problems that result from having each device in the image chain manipulating or producing a slightly different set of colors. To that end, you’ll need to investigate the wonderful world of color management, which uses hardware and software tools to match or calibrate all your devices, as closely as possible, so that what you see more closely resembles what you capture, what you see on your computer display, and what ends up on a printed hardcopy. Entire books have been devoted to color management, and most of what you need to know doesn’t directly involve your 90D, so I won’t detail the nuts and bolts here.
To manage your color, you’ll need, at the bare minimum, some sort of calibration system for your computer display, so that your monitor can be adjusted to show a standardized set of colors that is repeatable over time. (What you see on the screen can vary as the monitor ages, or even when the room light changes.) I use the Spyder5 Pro monitor color correction system from Datacolor (www.datacolor.com) for my computer’s three 26-inch widescreen LCD displays. The unit checks room light levels every five minutes and reminds me to recalibrate every week or two using a small sensor device, which attaches temporarily to the front of the screen and interprets test patches that the software displays during calibration. The rest of the time, the sensor sits in its stand, measuring the room illumination, and adjusting my monitors for higher or lower ambient light levels. Datacolor has recently introduced SpyderX available in Pro ($170) and Elite ($270) versions with faster, more accurate color correction.
If you’re willing to make a serious investment in equipment to help you produce the most accurate color and make prints, you’ll want a more advanced system (up to $500) like the various Spyder products from Datacolor or Colormunki from X-Rite (www.colormunki.com).
Picture Style
Options: Auto (default), Standard, Portrait, Landscape, Fine Detail, Neutral, Faithful, Monochrome, three User Styles
My preference: Auto
The Picture Styles feature is one of the most important tools for customizing the way your 90D renders its photos. It carries the “ambience” idea of tweaking images as they are shot to a new level. Picture Styles are a type of fine-tuning you can apply to your photos to change certain characteristics of each image taken using a particular Picture Style setting. The parameters you can specify for full-color images include the amount of sharpness, degree of contrast, the richness of the color, and the hue of skin tones. For black-and-white images, you can tweak the sharpness and contrast, but the two color adjustments (meaningless in a monochrome image) are replaced by controls for filter effects (which I’ll explain shortly), and sepia, blue, purple, or green tone overlays.
The Canon 90D has six preset color Picture Styles, for Standard, Portrait, Landscape, Fine Detail, Neutral, and Faithful pictures, plus Auto, and three user-definable settings called User Def. 1, User Def. 2, and User Def. 3, which you can define to apply to any sort of shooting situation you want, such as sports, architecture, or baby pictures. There is also a seventh, Monochrome, Picture Style that allows you to adjust filter effects or add color toning to your black-and-white images. See Figure 7.16, which shows Auto and the first five of the pre-set styles (you must scroll down to see the others).
Picture Styles are extremely flexible. Canon has set the parameters for the six predefined color Picture Styles and the single monochrome Picture Style to suit the needs of most photographers. But you can adjust any of those “canned” Picture Styles to settings you prefer. Better yet, you can use those three User Definition files to create brand-new styles that are all your own. If you want rich, bright colors to emulate Velvia film or the work of legendary photographer Pete Turner, you can build your own color-soaked style. If you want soft, muted colors and less sharpness to create a romantic look, you can do that, too. Perhaps you’d like a setting with extra contrast for shooting outdoors on hazy or cloudy days.
The current settings for each are arrayed along the top in Figure 7.16 as icons, left to right: S (sharpness strength), F (sharpness fineness), T (sharpness threshold), Contrast (a half white/half black circle), Saturation (a triangle composed of three circles), and Color Tone (a circle divided into thirds). When you scroll down within the Monochrome Picture Style, Filter Effect (overlapping circles) and Toning Effect (paintbrush tip) appear.
When a Picture Style is highlighted, you can press the INFO. button to view and adjust the Detail Settings of that style. Figure 7.17 shows the initial Detail Setting screen with Sharpness and Contrast parameters shown. You can use the touch screen, Quick Control Dial, or multi-controller directional buttons to scroll down to reveal the Saturation and Color tone adjustments.
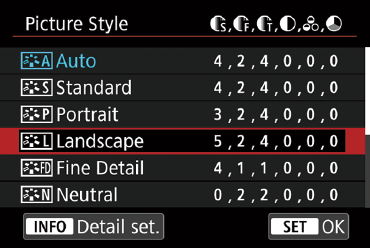
Figure 7.16 Eight different Picture Styles are available from this scrolling menu; these six plus Faithful, Monochrome, and three User Def. styles not shown.

Figure 7.17 Use the Detail Settings screen to adjust parameters.
- Sharpness. This parameter determines the apparent contrast between the outlines or edges in an image, which we perceive as image sharpness. When adjusting sharpness, remember that more is not always a good thing. A little softness is necessary (and is introduced by a blurring “anti-alias” filter in front of the sensor) to reduce or eliminate the moiré effects that can result when details in your image form a pattern that is too close to the pattern, or frequency, of the sensor itself. The default levels of sharpening were chosen by Canon to allow most moiré interference to be safely blurred to invisibility, at the cost of a little sharpness. As you boost sharpness (either using a Picture Style or in your image editor), moiré can become a problem, plus, you may end up with those noxious “halos” that appear around the edges of images that have been oversharpened. Use this adjustment with care. You have three individual parameters within this setting that you can adjust individually:
- Strength. Set the intensity of the sharpening on an eight-step scale from 0 (weak outline emphasis) to 7 (strong outline emphasis). Adding too much strength can result in a halo and excess detail around the edges within your image.
- Fineness. This determines which edges will be emphasized, on a scale of 1 (sharpens the finest lines in your image) to 5 (sharpens only larger, coarser lines). Use a lower number if you anticipate your image will have a wealth of fine detail that you want to emphasize, such as a heavily textured subject. A larger number might be better for portraits, so that eyes and hair might be sharpened, but not skin defects. Changes in Fineness and Threshold (which follows) do not apply when shooting movies.
- Threshold. This setting uses contrast between the edges being sharpened and the surrounding areas, to determine the degree of sharpening applied to the outlines. It uses a scale from 1 to 5, with lower numbers allowing sharpening when there is less contrast between the edge and surroundings. There is an increase in noise when a low threshold is set. Higher numbers produce sharpening only when the contrast between edge and adjacent pixels is already high. The highest numbers can produce excessive contrast and a poster-like effect.
- Contrast. Use this control, with values from –4 (low contrast) to +4 (higher contrast), to change the number of middle tones between the deepest blacks and brightest whites. Low-contrast settings produce a flatter-looking photo, while high-contrast adjustments may improve the tonal rendition while possibly losing detail in the shadows or highlights.
- Saturation. This parameter, adjustable from –4 (low saturation) to +4 (high saturation), controls the richness of the color, making, say, a red tone appear to be deeper and fuller when you increase saturation, and tend more toward lighter, pinkish hues when you decrease saturation of the reds. Boosting the saturation too much can mean that detail may be lost in one or more of the color channels, producing what is called “clipping.” You can detect this phenomenon when using the RGB histograms, as described in Chapter 4.
- Color tone. This adjustment has the most effect on skin tones, making them either redder (0 to –4) or yellower (0 to +4).
- Filter effect (Monochrome only). Filter effects do not add any color to a black-and-white image. Instead, they change the rendition of gray tones as if the picture were taken through a color filter. I’ll explain this distinction more completely in the sidebar “Filters vs. Toning” later in this section.
- Toning effect (Monochrome only). Using toning effects preserves the monochrome tonal values in your image but adds a color overlay that gives the photo a sepia, blue, purple, or green cast.
The predefined Picture Styles are as follows:
- Auto. Adjusts the color to make outdoor scenes look more vivid, with richer colors.
- Standard. This Picture Style applies a set of parameters, including boosted sharpness, that are useful for most picture taking, and which are applied automatically when using Basic Zone modes other than Portrait or Landscape.
- Portrait. This style boosts saturation for richer colors when shooting portraits, which is particularly beneficial for women and children, while reducing sharpness slightly to provide more flattering skin texture. The Basic Mode Portrait setting uses this Picture Style. You might prefer the Faithful style for portraits of men when you want a more rugged or masculine look, or when you want to emphasize character lines in the faces of older subjects of either gender.
- Landscape. This style increases the saturation of blues and greens and increases both color saturation and sharpness for more vivid landscape images. The Basic Zone Landscape mode uses this setting.
- Fine Detail. Use this when you want to emphasize texture and the outlines of a subject. Saturation is slightly enhanced.
- Neutral. This Picture Style is a less-saturated and lower-contrast version of the Standard style. Use it when you want a more muted look to your images, or when the photos you are taking seem too bright and contrasty (say, at the beach on a sunny day).
- Faithful. The goal of this style is to render the colors of your image as accurately as possible, roughly in the same relationships as seen by the eye.
- Monochrome. Use this Picture Style to create black-and-white photos in the camera. If you’re shooting JPEG only, the colors are gone forever. But if you’re shooting JPEG+RAW, you can convert the RAW files to color as you import them into your image editor, even if you’ve shot using the Monochrome Picture Style. Your 90D displays the images in black and white on the screen during playback, but the colors are there in the RAW file for later retrieval.

TIPYou can use the Monochrome Picture Style even if you are using one of the RAW formats alone, without a JPEG version. The 90D displays your images on the screen in black and white and marks the RAW image as monochrome so it will default to that style when you import it into your image editor. However, the color information is still present in the RAW file and can be retrieved, at your option, when importing the image.
Selecting Picture Styles
Canon makes selecting a Picture Style for use easy, and, to prevent you from accidentally changing an existing style when you don’t mean to, divides selection and modification functions into two separate tasks.
There are two different ways to choose from among your existing Picture Styles.
- Picture Styles menu. Use this menu entry and scroll down the list shown earlier in Figure 7.16 with the Quick Control Dial until the style you want to use is highlighted. Then press SET. You can see that even with this method, switching among Picture Styles is fast and easy enough to allow you to shift gears as often as you like during a shooting session.
- Quick Control screen. Press the Q button and navigate to the Picture Styles icon at far left in the third column from the top. With the icon highlighted, you can rotate either dial or use the left/right directional buttons to choose the Style you want to use and press the Q button again to confirm. When you use this method, the current settings for a style are shown only when you’ve highlighted that style.
Defining and Registering Picture Styles
As you saw earlier, the current settings of the visible Picture Style options are shown as numeric values on the menu screen. Some camera vendors use word descriptions, like Sharp, Extra Sharp, or Vivid, More Vivid that are difficult to relate to. The 90D’s settings, on the other hand, are values on uniform scales, with steps.
You can change one of the existing Picture Styles or define your own whenever the Shooting 3 menu version of the Picture Styles menu is visible (you can also select and modify Picture Styles by choosing Picture Styles from the Quick Control menu). Just follow these steps:
- 1. Choose a style to modify. Highlight the style you’d like to adjust.
- 2. Activate adjustment mode. Press the INFO. button to choose Detail Set. The screen that appears next will be like the one shown earlier in Figure 7.17 for the six color styles or three User Def. styles. In addition to the Sharpness and Contrast adjustments shown in the figure, you can scroll down to two more: Saturation and Color Tone. The Monochrome screen looks similar, but substitutes Filter Effect and Toning Effect (discussed later) for Saturation and Color Tone.
- 3. Choose a parameter to change. Use the Quick Control Dial to scroll among the parameters, plus Default Set. at the bottom of the screen, which restores the values to the preset numbers.
- 4. Activate changes. Press SET to change the values of a highlighted parameter.
- 5. Adjust values. Use the Quick Control Dial to move the triangle to the value you want to use. Note that the previous value remains on the scale, represented by a gray triangle. This makes it easy to return to the original setting if you want.
- 6. Confirm changes. Press the SET button to lock in that value, then press the MENU button three times to back out of the menu system.
Any Picture Style that has been changed from its defaults will be shown in the Picture Style menu with blue highlighting the altered parameter. You don’t have to worry about changing a Picture Style and then forgetting that you’ve modified it. A quick glance at the Picture Style menu will show you which styles and parameters have been changed.
Making changes in the Monochrome Picture Style is slightly different, as the Saturation and Color Tone parameters are replaced with Filter Effect and Toning Effect options. (Keep in mind that once you’ve taken a photo using a Monochrome Picture Style, you can’t convert the image back to full color.) You can choose from Yellow, Orange, Red, or Green filters, or None, and specify Sepia, Blue, Purple, or Green toning, or None. You can still set the Sharpness and Contrast parameters that are available with the other Picture Styles. Figure 7.18 shows filter effects being applied to the Monochrome Picture Style.
FILTERS VS. TONING
Although some of the color choices overlap, you’ll get very different looks when choosing between Filter Effects and Toning Effects. Filter Effects add no color to the monochrome image. Instead, they reproduce the look of black-and-white film that has been shot through a color filter. That is, Yellow will make the sky darker and the clouds will stand out more, whereas Orange makes the sky even darker and sunsets more full of detail. The Red filter produces the darkest sky of all and darkens green objects, such as leaves. Human skin may appear lighter than normal. The Green filter has the opposite effect on leaves, making them appear lighter in tone. Figure 7.18, left, shows a scene shot with no filter, then Yellow, Green, and Red filters.
The Sepia, Blue, Purple, and Green Toning Effects (shown in Figure 7.18, right), on the other hand, all add a color cast to your monochrome image. Use these when you want an old-time look or a special effect, without bothering to recolor your shots in an image editor.
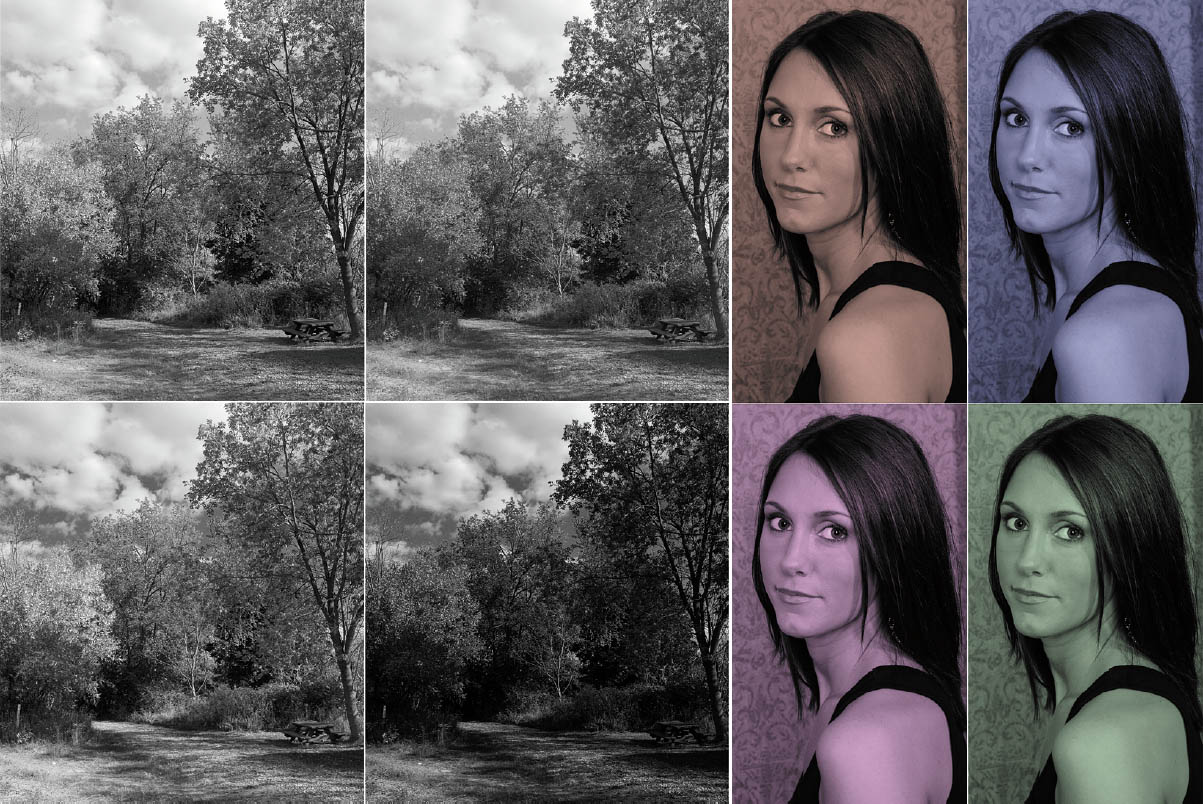
Figure 7.18 Left: No filter (upper left); Yellow filter (upper right); Green filter (lower left); and Red filter (lower right). Right: Select from among four color filters in the Monochrome Picture Style, including Sepia (top left); Blue (top right); Purple (lower left); and Green (lower right).
Adjusting Styles with the Picture Style Editor
If you’d rather edit Picture Styles in your computer, the Picture Style Editor available for download for your camera in versions for both Windows and Macs, allows you to create your own custom Picture Styles, or edit existing styles, including the Standard, Landscape, Faithful, and other predefined settings already present in your 90D. You can change sharpness, contrast, color saturation, and color tone—and a lot more—and then save the modifications as a PF2 file that can be uploaded to the camera, or used by Digital Photo Professional (also available to download from Canon) to modify a RAW image as it is imported.
To create and load your own Picture Style, just follow these steps:
- 1. Load the editor. Launch the Picture Style Editor (PSE, not to be confused with the other PSE, Photoshop Elements).
- 2. Access a RAW file. Load a RAW CR2 image you’d like to use as a reference into PSE. You can drag a file from a folder into the editor’s main window or use the Open command in the File menu.
- 3. Choose an existing style to base your new style on. Select any of the base styles except for Standard. Your new style will begin with all the attributes of the base style you choose, so start with one that already is fairly close to the look you want to achieve (“tweaking” is easier than building a style from the ground up).
- 4. Split the screen. You can compare the appearance of your new style with the base style you are working from. Near the lower-left edge of the display pane are three buttons you can click to split the old/new styles vertically, horizontally, or return to a single image.
- 5. Dial in basic changes. Click the Advanced button in the Tool palette to pop up the Advanced Picture Style Settings dialog box that appears at left in the figure. These are the same parameters you can change in the camera. Click OK when you’re finished.
- 6. Make advanced changes. The Tool palette has additional functions for adjusting hue, tonal range, and curves. Use of these tools is beyond the scope of a single chapter, let alone a notation in a list, but if you’re familiar with the advanced tools in Photoshop, Photoshop Elements, Digital Photo Pro, or another image editor, you can experiment to your heart’s content. Note that these modifications go way beyond what you can do with Picture Styles in the camera itself, so learning how to work with them is worth the effort. Figure 7.19 shows an image taken using the Standard Picture Style (left) and a custom User Def. style with enhanced saturation, sharpness, and contrast (right).
- 7. Save your Picture Style. When you’re finished, choose Save Picture Style File from the File menu to store your new style as a PF2 file on your hard disk. Add a caption and copyright information to your style in the boxes provided. If you click Disable Subsequent Editing, your style will be “locked” and protected from further changes, and the modifications you did make will be hidden from view (just in case you dream up your own personal, “secret” style). But you’ll be unable to edit that style later. If you think you might want to change your custom Picture Style, save a second copy without marking the Disable Subsequent Editing box.

Figure 7.19 Image taken using Standard Picture Style (left) and custom User Def. Picture Style with enhanced saturation, sharpness, and contrast (right).
Uploading a Picture Style to the Camera
Now it’s time to upload your new style to your Canon 90D into one of your three User Def. slots in the Picture Style array. Just follow these steps:
- 1. Link your camera for upload. Connect your camera to your computer using the USB cable, turn the 90D on, launch the EOS Utility, and click the Camera Settings/Remote Shooting choice in the splash screen.
- 2. Choose the Shooting menu. It’s marked with an icon of a white camera on a red background, from the menu bar located about midway in the control panel that appears on your computer display.
- 3. Select Register User Defined Style. Click on the box, outlined in red in the figure, to produce the Register Picture Style dialog box.
- 4. Choose a User Def. tab. Click on one of the three tabs, labeled User Def. 1, User Def. 2, or User Def. 3. Each tab will include the name of the current Picture Style active in that tab.
- 5. Click the Open File button and choose the Picture Style file to load. The Picture Styles you’ve saved (or downloaded from another source) will appear with a PF2 extension. Click on the one you want to use, and then click the Open button in the Open dialog box.
- 6. Upload Picture Style to the camera. The Register Picture Style File dialog box will return. Click OK and the Picture Style will be uploaded to the camera in the User Def. “slot” represented by the tab you’ve chosen. The name of the Picture Style will appear in the 90D’s menu in place of User Def. 1 (or User Def. 2/User Def. 3).
Changing a Picture Style’s Settings from the EOS Utility
You can modify the settings of a Picture Style that’s already loaded into your camera from the EOS Utility when your camera is linked to your computer.
- 1. Link your camera to the computer. Connect your camera to your computer using a mini-B USB cable, turn the 90D on, launch the EOS Utility, and click the Camera Settings/Remote Shooting choice in the splash screen.
- 2. Choose the Shooting menu. It’s marked with an icon of a white camera on a red background, from the menu bar located about midway in the control panel that appears on your computer display.
- 3. Access the Picture Style. Click on the Picture Style choice. The currently active Picture Style in the camera will be shown, along with its detail settings.
- 4. Choose a Picture Style to modify. Click the Picture Style box to produce a listing of all the available Picture Styles.
- 5. Click Detail Set. At lower left, Landscape is now highlighted. When you click on Detail Set., a dialog box appears at lower right. You can move the sliders to change the settings, as described earlier. You can also click the Default Set. button to return the settings to their original values.
- 6. Confirm choice. Click Return when you’ve finished making changes, and the Picture Style you’ve modified will be changed in the camera.
- 7. Exit EOS Utility. Disconnect your camera from your computer, and your modified style is ready to use.
Getting More Picture Styles
I’ve found that careful Googling can unearth other Picture Styles that helpful fellow EOS owners have made available, and even a few from the helpful Canon company itself. (Note that some so-called Picture Styles are intended for movie-making rather than still photography; the download sites will make that clear in their descriptions.)
My own search turned up this link: https://global.canon/en/imaging/picturestyle/file/index.html, where Canon offers a half dozen or more useful PF2 files you can download and install on your own. Remember that Picture Style files are compatible between various Canon EOS camera models (that is, you can use a style created for the Canon 40D with 90D), but you should be working with the latest software versions to work with the latest cameras and Picture Styles. If you owned an earlier EOS and haven’t re-installed the software since your camera upgrade, you might need to re-install the software. It’s available for download from the Canon website.
Try the additional styles Canon offers. They include:
- Studio Portrait. Compared to the Portrait style built into the camera, this one, Canon says, expresses translucent skin in smooth tones, but with less contrast. (Like films in the pre-digital age that were intended for studio portraiture.)
- Snapshot Portrait. This is another “translucent skin” style, but with enhanced contrast indoors or out.
- Reference: Portrait. This version adds vivid colors to your portrait.
- Nostalgia. This style adds an amber tone to your images, while reducing the saturation of blue and green tones.
- Clear. This style adds contrast for what Canon says is additional “depth and clarity.”
- Twilight. Adds a purple tone to the sky just before and after sunset or sunrise.
- Emerald. Emphasizes blues and greens.
- Autumn Hues. Increases the richness of browns and red tones seen in fall colors.
- Video Camera X Series Look. Mimics the look of Canon’s X Series professional digital video cameras, providing softer contrast than the 90D’s Standard Picture Style.
Long Exposure Noise Reduction
Options: Disable, Auto, Enable
My preference: Auto
This entry, the first in the Shooting 4 menu (see Figure 7.20), allows you to enable or disable long exposure noise reduction, or allow the 90D to evaluate your scene and decide whether to use this noise-canceling adjustment. Visual noise is that graininess that shows up as multicolored specks in images, and this setting helps you manage it. In some ways, noise is like the excessive grain found in some high-speed photographic films. However, while photographic grain is sometimes used as a special effect, it’s rarely desirable in a digital photograph.
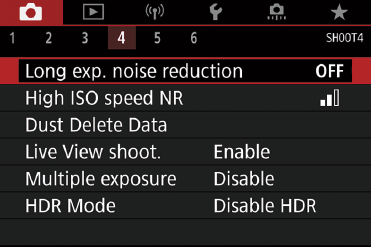
Figure 7.20 The Shooting 4 menu.
The visual noise-producing process is something like listening to music in your car, and then rolling down all the windows. You’re adding sonic noise to the audio signal, and while increasing the infotainment system’s volume may help a bit, you’re still contending with an unfavorable signal-to-noise ratio that probably mutes tones (especially higher treble notes) that you really want to hear.
The same thing happens when the analog signal is amplified: You’re increasing the image information in the signal but boosting the background fuzziness at the same time. Tune in a very faint or distant AM radio station, then turn up the volume. After a certain point, turning up the volume further no longer helps you hear better. There’s a similar point of diminishing returns for digital sensor ISO increases and signal amplification as well.
These processes create several different kinds of noise. Noise can be produced from high ISO settings. As the captured information is amplified to produce higher ISO sensitivities, some random noise in the signal is amplified along with the photon information. Increasing the ISO setting of your camera raises the threshold of sensitivity so that fewer and fewer photons are needed to register as an exposed pixel. Yet, that also increases the chances of one of those phantom photons being counted among the real-life light particles, too.
Fortunately, the 90D’s sensor and its digital processing chip are optimized to produce the low noise levels, so ratings as high as ISO 1600 can be used routinely (although there will be some noise, of course), and even ISO 3200 and higher can generate good results.
A second way noise is created is through longer exposures. Extended exposure times allow more photons to reach the sensor but increase the likelihood that some photosites will react randomly even though not struck by a particle of light. Moreover, as the sensor remains switched on for the longer exposure, it heats, and this heat can be mistakenly recorded as if it were a barrage of photons. This entry can be used to tailor the amount of noise-canceling performed by the digital signal processor.
- Disable. This setting disables long exposure noise reduction. Use this setting when you want the maximum amount of detail present in your photograph, even though higher noise levels will result. This setting also eliminates the extra time needed to take a picture caused by the noise reduction process. If you plan to use only lower ISO settings (thereby reducing the noise caused by ISO amplification), the noise levels produced by longer exposures may be acceptable. For example, you might be shooting a river spilling over rocks at ISO 100 with the camera mounted on a tripod, using a neutral-density filter and long exposure to cause the pounding water to blur slightly. To maximize detail in the non-moving portions of your photos, you can switch off long exposure noise reduction. Because the noise-reduction process used with Auto and Enable can effectively double the time required to take a picture, Disable is a good setting to use when you want to avoid this delay when possible.
- Auto. The 90D examines your photo taken with an exposure of one second or longer, and if long exposure noise is detected, a second, blank exposure is made and compared to the first image. Noise found in the “dark frame” image is subtracted from your original picture, and only the noise-corrected image is saved to your memory card.
- Enable. When this setting is activated, the 90D applies dark frame subtraction to all exposures longer than one second. You might want to use this option when you’re working with high ISO settings (which will already have noise boosted a bit) and want to make sure that any additional noise from long exposures is eliminated, too. Noise reduction will be applied to some exposures that would not have caused it to kick in using the Auto setting.
TIPWhile the “dark frame” is being exposed, the LCD screen will be blank during Live View mode, and the number of shots you can take in Continuous shooting mode will be reduced. White balance bracketing is disabled during this process.
High ISO Speed Noise Reduction
Options: Disable, Low, Standard (default), High, Multi Shot Noise Reduction
My preference: Low, with further noise reduction as required in an image editor
The other type of noise results from using higher ISO settings. This entry allows you to specify just how much or how little of this noise reduction to apply, which can be a valuable option because noise reduction does eliminate detail while blurring the amount of noise. The default is Standard noise reduction, but you can specify Low or High noise reduction, or disable noise reduction entirely. At lower ISO values, noise reduction improves the appearance of shadow areas without affecting highlights; at higher ISO settings, noise reduction is applied to the entire photo. Note that when the High option is selected, the maximum number of continuous shots that can be taken will decrease significantly, because of the additional processing time for the images.
- Disable. No additional noise reduction will be applied.
- Low. A smaller amount of noise reduction is used. This will increase the grainy appearance but preserve more fine-image detail.
- Standard. At lower ISO values, noise reduction is applied primarily to shadow areas; at higher ISO settings, noise reduction affects the entire image.
- High. More aggressive noise reduction is used, at the cost of some image detail, adding a “mushy” appearance that may be noticeable and objectionable. Because of the image processing applied by this setting, your continuous shooting maximum burst will decrease significantly.
- Multi Shot Noise Reduction. When this option is active, the 90D takes four separate shots continuously. It then aligns them (in case there was movement between images) and then merges them, using the dark frame subtraction technique to ignore random pixels caused by noise. The result is a JPEG image that is of better quality than the High setting.
Multi Shot NR works best if the camera is mounted on a tripod and your subject is not moving. It is not available when Image Quality is set to RAW or RAW+JPEG, nor when using flash, live view, shooting multiple or Bulb exposures, or performing autoexposure/white balance bracketing.
Dust Delete Data
Options: Store Delete Data
My preference: N/A
This menu choice lets you “take a picture” of any dust or other particles that may be adhering to your sensor. The 90D will then append information about the location of this dust to your photos, so that the Digital Photo Professional software can use this reference information to identify dust in your images and remove it automatically. You should capture a Dust Delete Data photo from time to time as your final line of defense against sensor dust.
To use this feature, select Dust Delete Data, select OK and choose SET. The camera will first perform a self-cleaning operation by applying ultrasonic vibration to the low-pass filter that resides on top of the sensor. Then, a screen will appear asking you to press the shutter button. Point the 90D at a solid-white card with the lens set on manual focus and rotate the focus ring to infinity. When you press the shutter release, the camera takes a photo of the card using Aperture-priority and f/22 (which provides enough depth-of-field [actually, in this case, depth-of-focus] to image the dust sharply). The “picture” is not saved to your memory card but, rather, is stored in a special memory area in the camera. Finally, a “Data obtained” screen appears.
The Dust Delete Data information is retained in the camera until you update it by taking a new “picture.” The 90D adds the information to each image file automatically.
Live View Shooting
Options: Enable (default), Disable
My preference: N/A
This setting simply keeps the Start/Stop button from activating live view when the Live View/Movie switch is in the Live View position. Use this to avoid accidentally entering live view when in view-finder mode. If this is not a serious problem for you, just keep the default setting. It has no effect when the switch is rotated to the Movie position; pressing the Start/Stop button begins/ends movie capture.
Multiple Exposure
Options: Multiple Exposure (Enable/Disable), Multiple Exposure Control, Number of Exposures, Save Source Images, Continue Multiple Exposures/1 Shot
My preference: N/A
This option, shown in Figure 7.21, lets you combine two to nine separate images into one photo without the need for an image editor like Photoshop, and can be an entertaining way to return to those thrilling days of yesteryear, when complex photos were created in the camera itself. In truth, prior to the digital age, multiple exposures were a cool, groovy, far-out, hep/hip, phat, sick, fabulous way of producing composite images. Today, it’s more common to take the lazy way out, snap two or more pictures, and then assemble them in an image editor like Photoshop.
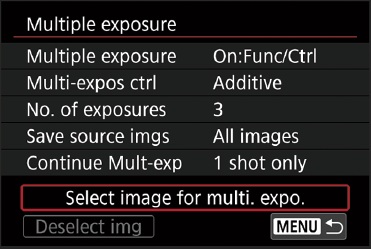
Figure 7.21 Set these parameters to configure your multiple exposures.
However, if you’re willing to spend the time planning a multiple exposure (or are open to some happy accidents), there is a lot to recommend the multiple exposure capability that Canon has bestowed on the 90D. For one thing, the camera can combine two or more images using the RAW data from the sensor, producing photos that are blended together more smoothly than is likely for anyone who’s not a Photoshop guru. In addition, Canon has eliminated one annoying aspect of the feature found in some cameras: it’s not necessary to return to the menu to activate multiple exposure for each and every set. If you want to take a series of pictures, you can set it once, and forget it. (But don’t forget to turn it off when you’re done!)
Multiple exposures cannot be captured if white balance bracketing, HDR shooting, or movie-making modes are in use. Before you begin snapping your own multiexposures, you’ll need to set your parameters using the following options:
Multiple Exposure
The Disable option deactivates the multiexposure feature, but you can quickly choose either of the two On variations. This is the “master control” that allows you to turn multiple exposure on and off (leaving the other parameters you’ve set unchanged).
- Disable. Deactivates multiple exposure.
- Enable. Turns multiple exposure functions on.
Multiple Exposure Control
This essential parameter can determine how successful your multiple exposure is, by controlling how each individual exposure is merged with the overlapping portions of the other images in the series. Picture an image like the one shown at left in Figure 7.22. The performer, Todd Cooper of the Alan Parsons Live Project, was photographed against a plain, dark background. He happened to be moving, so neither of the two images overlapped with each other, or with any details of the featureless background. But in Figure 7.22, right, the dancer remained in place, so that each subsequent image overlapped the others slightly.
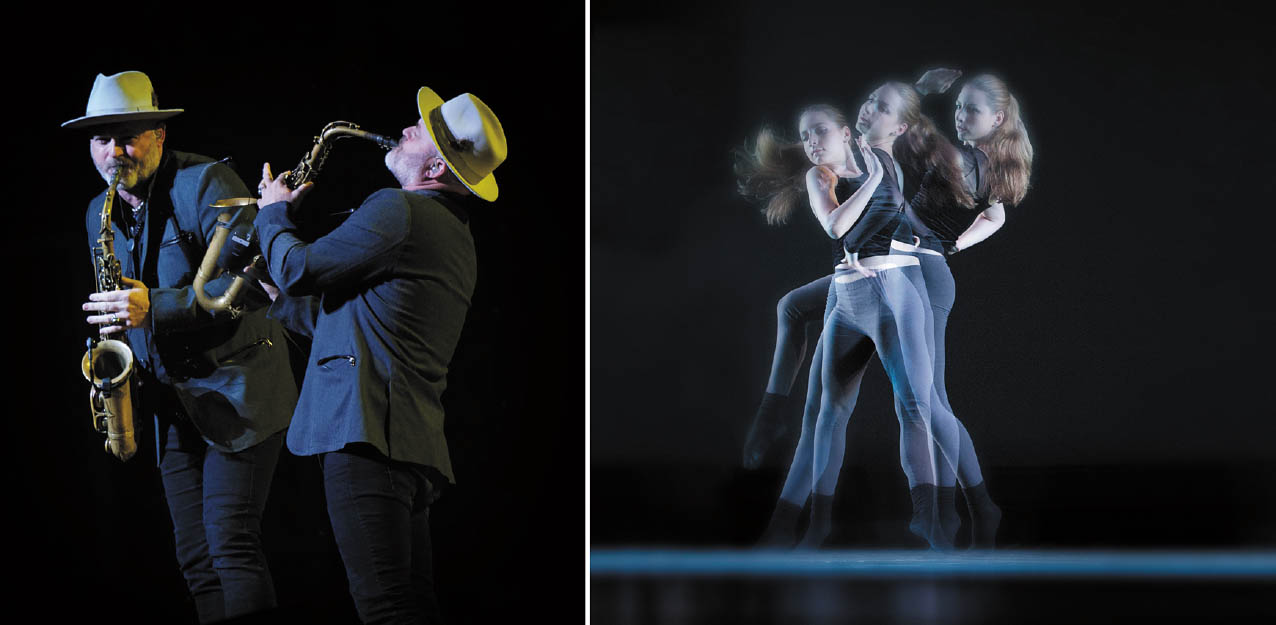
Figure 7.22 Left: Multiple exposure using Additive exposure, and no exposure compensation. Right: Multiple exposure using Average exposure.
The Multi Exposure Control feature allows you to specify how the images are combined with these choices:
- Additive. Each individual shot in the series is by default given the full exposure, which is what I used for Figure 7.22, left. Because the background was totally black and the subject was moving and did not overlap, the effect was to combine three separate images into one image.
However, you can manually adjust the amount of exposure each shot is given by dialing in exposure compensation, making this mode useful for overlapping images as well. The customary procedure is to specify –1 stop exposure compensation for two shots, –1.5 EV for three-shot multiple exposures, and –2 EV for four-shot multis. Manually calculating the amount of negative exposure compensation allows you to fine-tune the look of overlapping images.
- Average. Choose this option and the 90D will apply appropriate negative exposure compensation for you, based on the number of exposures you’re combining into a single image. If your multiple exposures happen to be of the same scene (rather than separate subjects), the camera will attempt to ensure that the background receives the equivalent of a full exposure. I used this option for Figure 7.22, right.
Number of Exposures
You can choose from 2 to 9 exposures in each multiple exposure set. There is no selection screen for this option; highlight it and spin the QCD to choose the number of exposures. I recommend starting out with three multiple exposures when you begin exploring this tool; you’ll quickly discover picture opportunities that call for more combined shots in a single image.
Continue Multiple Exposures/1 Shot
Choose 1 Shot Only or Continuously. Choose the former if you want to take a single multiple exposure series and then return to normal shooting with Multiple Exposure then disabled. Select Continuously if you plan to shoot a batch of different multiple exposures and don’t want to return to the menu system to reactivate the feature after each shot.
Select Image for Multi-Exposure
If you like, you can use an image you already took as the base image for a subsequent multi-exposure. The base image can only be a RAW image (not M RAW or S RAW). When RAW images taken with your camera (other RAW images on the card cannot be used) are available, this option will be selectable. However, a RAW image that is already a multiple exposure can be used as your base image (the mind boggles at the possibilities).
With the option highlighted, press SET and choose the image you want to use. Rotate the QCD to view compatible RAW images and press SET to choose one. Press OK. You can then take the remaining exposures in your set. That is, if you’ve chosen to combine three shots in a multiple exposure, the base image counts as one, so you’ll be able to add two more by pressing and holding the shutter release.
Note that images using Highlight Tone Priority or an Aspect Ratio other than 3:2 cannot be used as your base image, and Lens Aberration Correction and Auto Lighting Optimizer will not be applied to your set. If the RAW image specifies the Auto Picture Style, the camera will revert to Standard for the rest of the images.
MULTI NOTES
Some special conditions are required for your 90D to shoot multiple exposures. Some features are disabled, and others are locked in at particular values.
- Auto Lighting Optimizer, Highlight Tone Priority, and Peripheral Illumination/Chromatic Aberration Correction are disabled, and the Standard Picture Style will be used if you’ve chosen the Auto Picture Style setting. Multiple exposures are disabled if your camera is connected to a computer or printer via the USB cable.
- Most settings used for the first shot in a series are locked in for all subsequent images in that series, including image recording quality, ISO sensitivity, Picture Style, High ISO Noise Reduction, and color space.
- Other functions that cannot be changed while shooting multiple exposures will be dimmed in the camera menu.
HDR Mode
Options: Adjust Dynamic Range, Effect, Continuous HDR, Auto Image Align
My preference: N/A
I described using the 90D’s HDR Mode in detail in Chapter 4. To recap, this menu entry has four subentries you can adjust:
- Adjust Dynamic Range. Select Disable HDR, allow the camera to select a dynamic range automatically, or select the range yourself to achieve a particular look. You can choose plus/minus 1, 2, or 3 EV.
- Effect. You can add special effects on top of any Picture Style you are using to produce an even more dramatic HDR image. Your choices are as follows:
- Natural. Provides the most useful range of highlight and shadow details.
- Art Standard. Offers a great deal of highlight and shadow detail, but with lower overall contrast and outlines accentuated, making the image look more like a painting. Saturation, bold outline, and brightness are adjusted to the default levels, and tonal range is lower in contrast.
- Art Vivid. Like Art Standard, but saturation is boosted to produce richer colors, and the bold outlines not as strong, producing a poster-like effect.
- Art Bold. Even higher saturation than Art Vivid, with emphasized edge transitions, producing what Canon calls an “oil painting” effect.
- Art Embossed. Reduced saturation, darker tones, and lower contrast give the image a faded, aged look. The edge transitions are brighter or darker to emphasize them.
- Continuous HDR. Choose 1 Shot Only if you plan to take just a single HDR exposure and want the feature disabled automatically thereafter, or Every Shot to continue using HDR mode for all subsequent exposures until you turn it off. This is like the multiple exposure option described earlier.
- Auto Image Align. You can choose Enable to have the camera attempt to align all three HDR exposures when shooting handheld or select Disable when using a tripod. The success of the automatic alignment will vary, depending on the shutter speed used (higher is better), and the amount of camera movement (less is better!).
Interval Timer
Options: Disable (default), Enable, Interval, Number of Shots
My preference: N/A
This is the first entry on the Shooting 5 tab. (See Figure 7.23.)Press the INFO. button to enter parameters for your timed shoot.
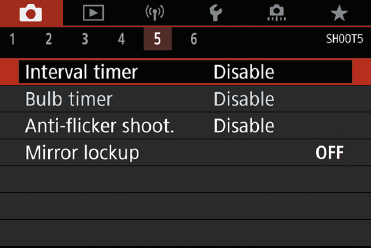
Figure 7.23 The Shooting 5 menu.
- Disable/Enable. Turn the feature on or off.
- Interval. Choose the interval between shots up to 99 hours, 59 minutes, and 59 seconds.
- Number of shots. Select up to 99 total shots.
Bulb Timer
Options: Disable (default), Enable, Exposure Time
My preference: N/A
This feature, available only when the Mode Dial is set to the B (Bulb) position, allows you to specify exposure times up to 99 hours, 59 minutes, and 59 seconds.
Anti-Flicker Shooting
Options: Enable, Disable (default)
My preference: Disable, unless shooting under flickering light source
Novice sports photographers often ask me why shots they take in certain gymnasiums or arenas have inconsistent exposure, wildly varying color, or banding. The answer is that certain types of artificial lighting have a blinking cycle that is imperceptible to the eye, but which the camera can capture. This setting, when enabled, detects the frequency (it’s optimized for 100 to 120 Hz illumination) of the light source that is blinking, and takes the picture at the moment when the flicker has the least effect on the final image. It cannot be used in live view or movie shooting.
You may experience a slight shutter release time lag as the camera “waits” for the proper instant, and your continuous shooting speed may be reduced, which makes this setting a necessary evil for sports and other activities involving action. Your results may vary when using P or Av modes, because the shutter speed can change between shots as proper exposure requires. You’re better off using Tv or M mode, so the shutter speed remains constant.
A handy Flicker! warning will appear in the viewfinder, alerting you that the feature is enabled, as long as you’ve set Viewfinder Display in the Set-up 2 menu to include that alert. (Don’t worry, I’ll explain Viewfinder Display completely in Chapter 10.) Anti-Flicker is disabled when using Mirror Lockup (explained next), and may not work as well with dark backgrounds, a bright light within the image area, when using wireless flash, and under other shooting conditions. Canon recommends taking test shots to see how effective the feature is under the light source you are working with.
Mirror Lockup
Options: Enable, Disable (default)
My preference: Disable, unless shooting under flickering light source
This option, available only when Anti-Flicker Shooting is disabled, allows you to flip up the 90D’s mirror prior to exposure. Note that the camera has a second mirror lockup option available under Sensor Cleaning in the Set-up 3 menu. You should be extra careful not to confuse the two.
- Mirror Lockup. This option is used while shooting. When enabled from this menu entry, the camera flips the mirror up out of the way when you press the shutter button down all the way. At that point, the viewfinder image will vanish (the mirror is no longer reflecting the image toward the focus screen), and a blinking mirror-up icon appears on the LCD panel. Shooting function settings and menu adjustments are disabled at this point. You must press the shutter release fully a second time to take the photo. The net result is that the (minor) vibration caused by the action of the mirror is eliminated, which can be important when shooting with a very long telephoto lens or taking close-ups.
- Clean Manually. Select Clean Manually from the Sensor Cleaning entry in the Set-up 3 menu. The mirror will flip up immediately and the shutter will open, exposing the sensor. You can then safely clean your sensor using your favorite method. The shutter won’t close, and the mirror won’t flip down until you power off the camera. The function can’t be activated unless your battery or external source has enough power to maintain this configuration.
In general, only advanced dSLRs like the 90D offer the Mirror Lockup option in Shooting mode, so you might not even be familiar with its advantages. In recent years, only the cleaning mode mirror flip-up feature has been common. When using Mirror Lockup, keep the following in mind:
- Avoid excessive lockup times. Unlike cleaning mode, the shutter remains closed while the mirror is locked up, and, in virtually all cases, a lens will be attached to the camera and focusing light on the sensor plane (or shutter curtains, before exposure). This bright light can damage the shutter, particularly if the camera is accidentally pointed toward the sun. So, a good rule of thumb is to lock up the mirror only just before you want to take the picture (the mirror’s vibration will be damped within about one second), and never shoot directly toward the sun. If you lock the mirror up and don’t take a picture, the mirror will flip back down after 30 seconds automatically.
- Use a tripod. Obviously, if you’re using mirror lockup to avoid vibration, you’re almost certainly working with the camera on a tripod, too. Even with image stabilization, a handheld camera will produce more vibration than any mirror action.
- Self-timer or remote release recommended. Even though you’ve delayed the exposure until mirror vibration has damped, pressing the shutter release (even gently) can introduce a bit of motion to a camera mounted on the sturdiest tripod. The 90D’s self-timer can be used, but that option doesn’t allow you to select the precise moment of exposure. Instead, use a remote release. Perhaps you’ve framed a shot of some distant wildlife with a super-telephoto. Your first press flips the mirror up to ready the camera for the shot; then, a second or two later your quarry looks toward the camera and you press again to take the picture. With a self-timer, you don’t have that flexibility.
- Self-timer with Bulb exposures. This combination can be problematic. You’ll need to hold the shutter button down during the self-timer countdown when using a Bulb exposure. Releasing the button before the countdown has elapsed eliminates the actual exposure. You’ll hear a shutter click, but no picture will be taken. You’re better off using a remote release for mirror-up Bulb exposures.
- No continuous shooting. Sorry, but you can’t lock up the mirror and take a series of shots. Continuous shooting is disabled when Mirror Lockup is active.
Lens Electronic MF
Options: Enable after One-Shot AF, Disable after One-Shot (default), Disable in AF mode
My preference: Enable after One-Shot AF
This is one of only two entries found on the Shooting 6 menu (not illustrated with a figure). Although the 90D’s autofocus system is quite powerful, sometimes it’s desirable to adjust focus slightly after the AF system has done its job. Some macro photography and candid portrait work come to mind. For example, you might want to adjust the plane of focus so that the eye of your subject closest to the camera is sharp.
Certain Canon lenses include electronic focusing rings you can use to fine-tune focus manually in One-Shot AF mode. You may need to check your lens’s MF specifications in its manual to see if yours is compatible, especially if it’s a newer lens. At the time this book was published, the following extra-fast Canon prime lenses and one zoom—all of them L lenses with ultrasonic motors—included super-sensitive electronic focusing rings you can use to fine-tune focus manually after focus has been locked in using One-Shot AF.
EF50mm f/1.0L USM
EF85mm f/1.2L USM
EF85mm f/1.2L II USM
EF500mm f/4.5L USM
EF50mm f/1.8 STM
EF300mm f/2.8L USM
EF400 f/2.8L USM
EF400mm f/2.8L II USM
EF28-80mm f/2.8-4L USM
EF24-105mm f/3.5-5.6 STM
EF600mm f/4L USM
EF1200 f/5.6L USM
EF200mm f/1.8L USM
EF40mm f/2.8 STM
As noted, this feature works only when using One-Shot AF. You might want to disable the use of this feature when using one of the compatible lenses, because even a casual bump against the focus ring can change focus significantly. Or, you may find it difficult to do this fine-tuning when photographing especially active or unpredictable subjects, such as children. You have three choices:
- Enable after One-Shot AF. When active, you can continue to hold the shutter release halfway, while adjusting focus manually. I use this when shooting portraits with my 85mm f/1.2 lens at a large aperture, allowing me to zero focus in on the near eye of a subject seated on a diagonal angle.
- Disable after One-Shot AF. Manual focus is disabled. Use this when you are satisfied with the focus set by the camera’s autofocus system and don’t want to manually tweak it. Remember that if you truly want to use manual focus and bypass the AF system entirely, just slide the AF/MF switch on the lens to the MF position.
- Disable in AF mode. Turns off the feature entirely.
AF-Assist Beam Firing
Options: Enable (default), Disable, Enable External Flash Only, IR AF Assist Beam Only
My preference: IR AF assist beam only
This setting determines when bursts from an electronic flash are used to emit a pulse of light that helps provide enough contrast for the EOS 90D to focus on a subject. You can select Enable to use an attached Canon Speedlite to produce a focus assist beam. Use Disable to turn this feature off if you find it distracting. Keep in mind that if you select Enable and the Speedlite’s own AF-Assist Beam Firing is set to Disable, the AF-assist beam will not be emitted (the flash’s setting takes precedence).
- Enable. The AF-assist light is emitted whenever light levels are too low for accurate focusing using the ambient light. You can press the Flash button on the left front surface of the camera (just below the pentaprism) to fire the AF-assist beam from the built-in flash (if it is elevated, of course).
- Disable. The AF-assist illumination is disabled. You might want to use this setting when shooting at concerts, weddings, or darkened locations where the light might prove distracting or discourteous.
- Enable External Flash Only. Disables the AF-assist lamp on the camera, but enables the beam on an external flash, if mounted and powered up.
- IR AF Assist Beam Only. Some Canon flash units, such as the Speedlite 600EX-RT II, have a near-infrared pattern assist beam. Select this option to disable visible light flashes and activate only the less-obtrusive IR beam. Because AF assist is intrusive for the types of subjects I shoot, I prefer to use it only when an IR assist is available from my Speedlite.
Playback Menu Options
The four blue-coded Playback menus are where you select options related to the display, review, and printing of the photos you’ve taken. Note that many of the Playback menu entries are functions, rather than settings, and so have no default values.
The choices you’ll find include:
Playback 1
- Protect Images
- Rotate Image
- Erase Images
- Print Order
- Photobook Set-up
- Creative Filters
Playback 2
- RAW Image Processing
- Creative Assist
- Quick Control RAW Processing
- Red-eye Correction
- Create Album
Playback 3
- Cropping
- Resize
- Rating
- Slide Show
- Set Image Search Conditions
- Image Jump with Main Dial
Playback 4
- Playback Information Display
- Highlight Alert
- AF Point Display
- Playback Grid
- View From Last Seen
Protect Images
Options: Select Images, Select Range, All Images in Folder, Unprotect All Images in Folder, All Images on Card, Unprotect All Images on Card
My preference: N/A
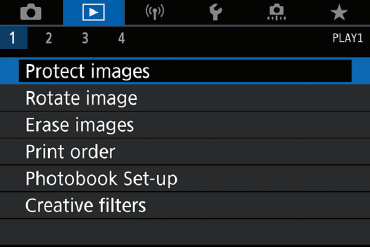
Figure 7.24 The Playback 1 menu.
This is the first of six entries in the Playback 1 menu (see Figure 7.24). If you want to keep an image from being accidentally erased (either with the Erase button or by using the Erase Images entry in the Playback menu), you can mark that image for protection. Use the Protect entry in the Playback version of the Quick Control menu (described next) or use this menu item. To protect one or more images, press the MENU button while viewing an image and choose Protect from the Playback 1 menu. Then, select from the following options:
- Select Images
- Select Range
- All Images in Folder
- Unprotect All Images in Folder
- All Images on Card
- Unprotect All Images on Card
If you choose the first option, you can view and select individual images with the left/right directional controls, Main Dial, or touch screen, followed by pressing the SET button when the image you want to protect is displayed on the screen. A key icon will appear at the upper edge of the information display while still in the protection screen, and when reviewing that image later. Choose Select Range and you can mark the first of a string of images by highlighting it and pressing SET. Then navigate to the last image to be protected and press SET again.
To remove protection, repeat the process. You can scroll among the other images on your memory card and protect/unprotect them in the same way. Image protection will not save your images from removal when the card is reformatted.
A fast way to protect images is to press the Q button when an image is displayed, then navigate to the Protect “key” icon that appears at top in the left-hand column. (See Figure 7.25.) When Enable is highlighted, press SET to protect the current image, or press INFO. to select multiple images using the Select Range, All Images on Card, or Unprotect All Images on Card options that appear.
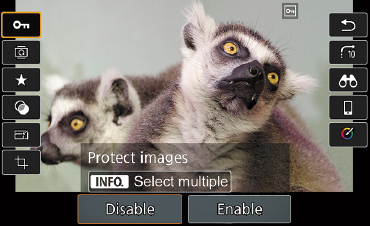
Figure 7.25 Protected images can be locked against accidental erasure (but not preserved from formatting).
Rotate Image
Options: Rotates image
My preference: N/A
While you can set the 90D to automatically rotate images taken in a vertical orientation using the Auto Rotate option in the Set-up 1 menu (as described in Chapter 9), you can manually rotate an image during playback using this menu selection. Select Rotate Image from the Playback 1 menu, use the touch screen or multi-controller to page through the available images on your memory card until the one you want to rotate appears, then choose SET. The image will appear on the screen rotated 90 degrees, as shown in Figure 7.26. Select SET again, and the image will be rotated 270 degrees.
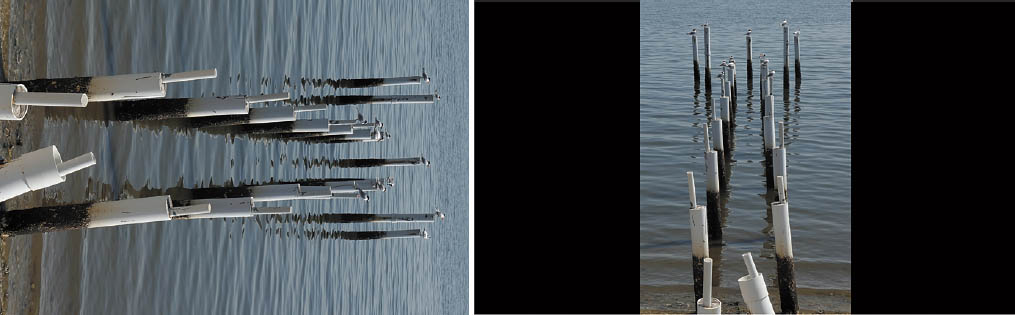
Figure 7.26 A vertically oriented image that isn’t rotated appears larger on the LCD, but rotation allows viewing the photo without turning the camera.
Erase Images
Options: Select and Erase Images, Select Range, All Images in Folder, All Images on Card
My preference: N/A
Choose this menu entry and you’ll be given four choices: Select and Erase Images, Select Range, All Images in Folder, and All Images on Card. You can use the first three to selectively remove images, while the third option deletes all the pictures on a card. But, using the Format command is usually faster and more thorough.
- Select and Erase Images. View the images on your card by pressing the left/right directional buttons to scroll through them. To mark an image for deletion or to remove a check mark, press the SET button. When you’re finished selecting, press the Trash button (to the lower right of the LCD) and you’ll be asked to confirm. Choose Cancel or OK and SET to finish.
- Select Range. Operates similarly to the range protect option listed earlier. Choose Select Range and you can mark the first of a string of images by highlighting it and pressing SET. Then navigate to the last image to be erased and press SET again.
- All Images in Folder. You’ll be shown a list of the available folders on your memory card. Select SET, and a prompt will appear asking you to confirm, and reminding you that Protected images will not be removed.
- All Images on Card. A prompt will ask you to confirm this step. The All Images on Card choice removes all the pictures on the card, except for those you’ve marked with the Protect command, and does not reformat the memory card.
Print Order
Options: Select Image, Multiple: Select Range, Mark/Clear All in Folder, Mark All/Clear All on Card; Set Up: Print type (Standard, Index, Both); Date (On/Off); File Number (On/Off)
My preference: N/A
The 90D supports the DPOF (Digital Print Order Format) that is now almost universally used by digital cameras to specify which images on your memory card should be printed, and the number of prints desired of each image. This information is recorded on the memory card and can be interpreted by a compatible printer. Photo labs are also equipped to read this data and make prints when you supply your memory card to them.
Once marked for DPOF printing, you can print the selected images, or take your memory card to a digital lab or kiosk, which is equipped to read the print order and make the copies you’ve specified. (You can’t “order” prints of RAW images or movies.) To create a DPOF print order, just follow these steps:
- 1. Access Print Order screen. In the Playback 1 menu, navigate to Print Order. Press SET.
- 2. Access Set-up. The Print Order screen will appear. (See Figure 7.27.) Use the directional buttons to highlight Set Up. Press SET.
- 3. Select Print type. Choose Print Type (Standard, Index/Thumbnails print, or Both), and specify whether Date or File Number imprinting should be turned on or off. (You can turn one or the other on, but not both Date and File Number imprinting.) You cannot set print type individually; all images in the print order will use the same print type. Press MENU to return to the Print Order screen.
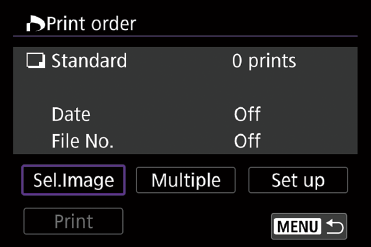
Figure 7.27 Select the images to be printed individually, by range, by folder, or all the images on your memory card.
- 4. Choose selection method. Highlight Sel. Image (choose individual images) or Multiple.
- Select individual images. With Sel. Image, use the directional buttons to view the images, and press SET to mark or unmark an image for printing. If you’d rather view thumbnails of images, press the Thumbnail button. Press the Magnify button to return to single-image view.
- When an image to be printed is highlighted, press the SET button, then use the up/down buttons to specify 0 to 99 copies of that image.
- Press SET to confirm.
- Highlight and select additional images as described. When finished, press MENU to return to the printing screen.
- Multiple images. This option allows you to select a Range, Mark All in Folder, Clear All in Folder, Mark All on Card, or Clear All on Card. Highlight the option you want, press SET, and choose your images. Press SET to confirm and MENU to return to the print order screen.
- Select individual images. With Sel. Image, use the directional buttons to view the images, and press SET to mark or unmark an image for printing. If you’d rather view thumbnails of images, press the Thumbnail button. Press the Magnify button to return to single-image view.
- 5. Output your hardcopies. If the camera is linked to a PictBridge-compatible printer, an additional option appears on the Print Order screen—Print. You can select that; optionally, adjust Paper Settings as described in the previous section, and start the printing process. Alternately, you can exit the Print Order screen by tapping the shutter release button. Then turn off the camera and printer, remove the memory card, and insert it in the memory card slot of a compatible printer, retailer kiosk, or digital minilab.
Photobook Set-up
Options: Select Images, Multiple
My preference: N/A
You can select up to 998 images on your memory card, and then use the EOS Utility to copy them all to a specific folder on your computer. This is a handy way to transfer only specific images to a folder and is especially useful when you’re collecting photos to assemble in a photobook. Your choices for image selection are like those described above for compiling a print order. They include:
- Select images. You can mark individual images from any folder on your memory card.
- Multiple. You can choose Select Range, All Images in Folder, Clear All in Folder, All Images on Card, or Clear All on Card.
Once you have marked the images you want to transfer to the specified folder, use the EOS Utility to copy them.
Creative Filters
Options: Grainy B/W, Soft Focus, Fish-Eye, Art Bold, Water Painting, Toy Camera, Miniature, HDR Art Effect
My preference: N/A
One useful feature of the 90D is the ability to apply Creative Filters to images as you take the picture and preview their effect before shooting when using live view. However, the original method of applying interesting effects to images you’ve already taken remains available. You can process an image using one of these filters and save a copy alongside the original. When you select this menu entry, you’ll be taken to a screen that allows you to choose an image to modify. You can scroll through the available images with the touch screen or multi-controller or press the Index/Reduce button to view thumbnails and select from those. (Press the Magnify button to return to single image view.) Only images that can be edited are shown. Then, select SET, and choose the filter you want to apply from a list at the bottom of the screen using the left/right multi-controller. Choose SET to activate the filter, then use the touch screen or left/right buttons or multi-controller again to adjust the amount of the effect (or, when using the miniature effect, to select the area to be adjusted). Choose SET once more to save your new image.
The eight effects include the following. Four of them (Grainy B/W, Soft Focus, Fish-Eye, Toy Camera Effect) are shown in Figure 7.28, and the Miniature Effect is shown in Figure 7.29.
- Grainy B/W. Creates a grainy monochrome image. You can adjust contrast among Low, Normal, and Strong settings.
- Soft Focus. Blur your image using Low, Normal, and Strong options.
- Fish-eye Effect. Creates a distorted, curved image.
- Art Bold Effect. Produces a three-dimensional oil painting effect. You can adjust contrast and saturation.
- Water Painting Effect. Gives you soft colors like a watercolor painting and allows you to adjust color density.
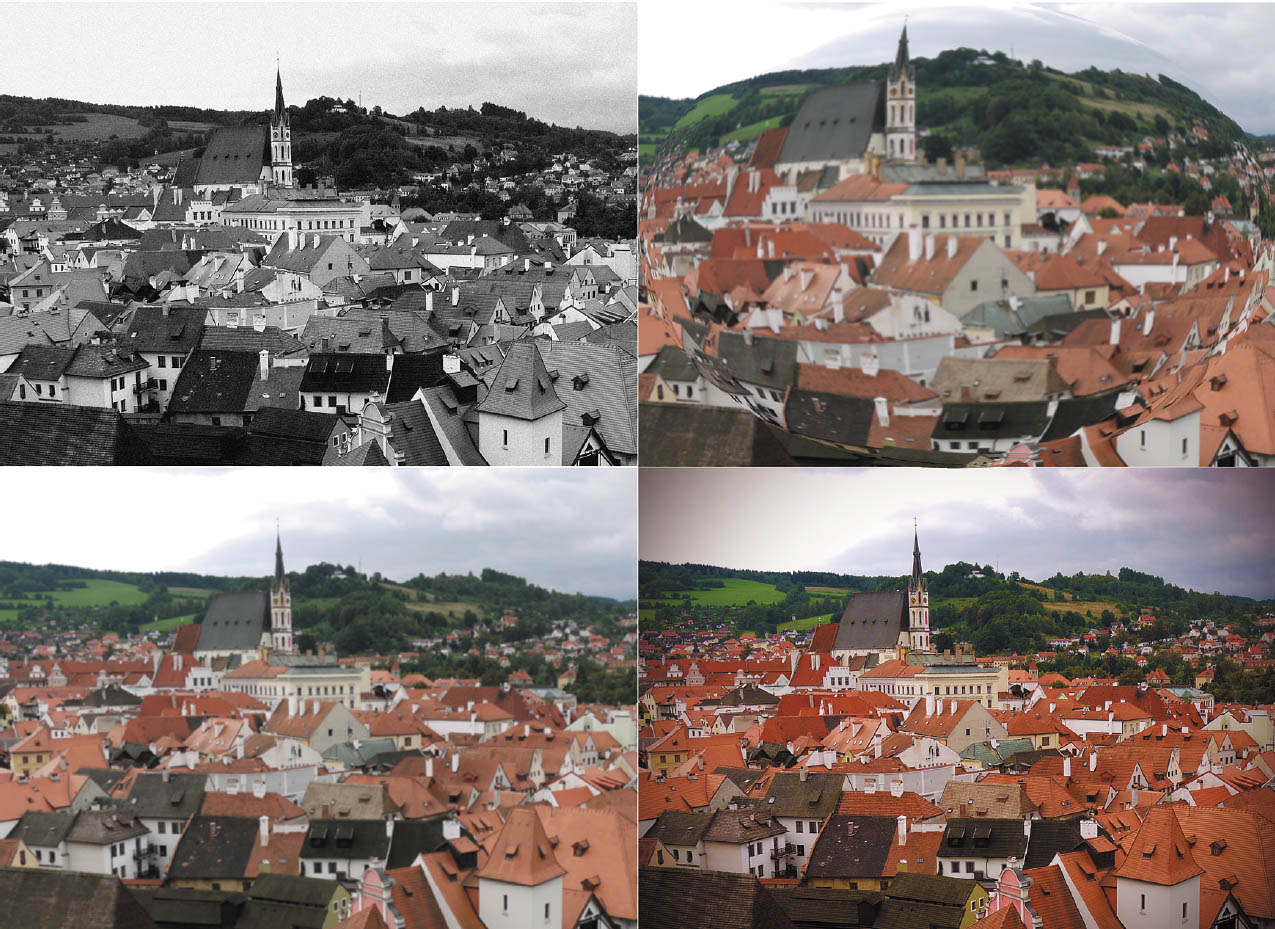
Figure 7.28 Clockwise from upper left: Grainy B/W, Fish-Eye, Toy Camera Effect, Soft Focus.
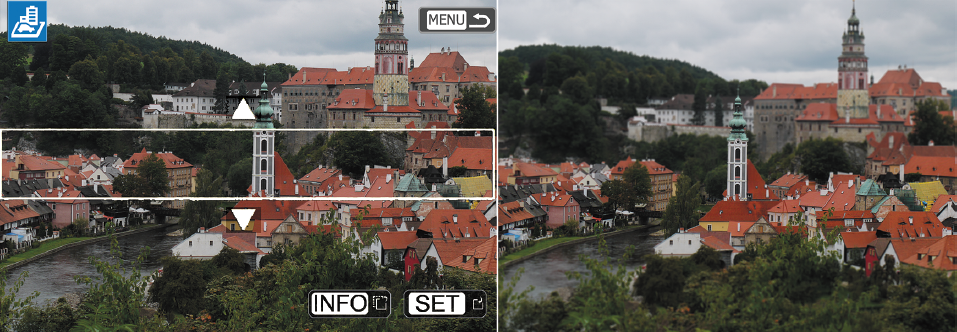
Figure 7.29 Left: Choose the area for sharp focus by moving the white box within the frame. Right: The resulting image looks like a miniature town, perhaps for a toy train layout.
- Toy Camera Effect. Darkens the corners of an image, much as a toy camera does, and adds a warm or cool tone (or none), as you wish.
- Miniature Effect. This is a clever effect, and it’s hampered by a misleading name and the fact that its properties are hard to visualize (which is not a great attribute for a visual effect). This tool doesn’t create a “miniature” picture, as you might expect. What it does is mimic tilt/shift lens effects that angle the lens off the axis of the sensor plane to drastically change the plane of focus, producing the sort of look you get when viewing some photographs of a diorama, or miniature scene. Confused yet? All you need to do is specify the area of the image that you want to remain sharp (see Figure 7.29, left) and you’ll end up with a version like the one shown in Figure 7.29, right.
- HDR Art Effect. This high dynamic range filter has four modes, Standard, Vivid, Bold, and Art Embossed.
RAW Image Processing
Options: Select Images, Select Range; Use Shot Settings; Customize RAW Processing: Brightness, White Balance, Picture Style, Auto Lighting Optimizer, High ISO Noise Reduction, Image Quality, Color Space, Lens Aberration Correction
My preference: N/A
This is the first entry on the Playback 2 menu (see Figure 7.30). You can produce JPEG versions of your full-size RAW images (but not C RAW files) right in the camera. The original RAW shot is not modified. When you select this menu entry, only compatible RAW images are offered for your selection. Just follow these steps:
- 1. View RAW images. Choose Select Images or Select Range to choose individual images or a selection of index images.

Figure 7.30 The Playback 2 menu.
- 2. Choose image(s) to process. Highlight one of the two options below on the screen that appears, and press SET to specify image(s) for processing.
- Select images. Rotate the QCD to scroll through compatible images. Press SET to mark them, then the Q button to proceed.
- Select range. Scroll through the index thumbnails. When you highlight the first image to process, press SET. Use the directional controls to highlight the last image and press the Q button to proceed.
- 3. Use Shot Settings or Customize RAW Processing. If you select Use Shot Settings in the next screen, the 90D will immediately create JPEG copies of the RAW image(s) you specified. If you want to customize settings, choose Customize Raw Processing and proceed to Step 4.
- 4. Specify parameters. The Customize Raw Processing screen produces a selection of parameters you can adjust. Navigate to the parameter you want to manipulate using the multi-selector. The current settings for each (those applied when the shot was taken) are displayed within each of the choices, which include:
- Brightness
- White Balance
- Picture Style
- Auto Lighting Optimizer
- High ISO Noise Reduction
- Image Quality
- Color Space
- Lens Aberration Correction
- 5. Make adjustments. When a parameter is highlighted, you can rotate the QCD or press SET to change the settings. Press the Trash button to reset the settings to the original values of the RAW image. Press the Magnify button to zoom in on the image.
- 6. Save JPEG. Navigate to the Save icon at the bottom left of the screen, highlight OK in the Save as New File screen that appears, and choose OK to save as a new file, or Cancel to abort the process. If the original was shot using live view and an aspect ratio other than 3:2, the image will be displayed in those proportions, and the JPEG will be saved in that aspect ratio.
Creative Assist
Options: Preset, Brightness, Contrast, Saturation, Color Tone 1, Color Tone 2, Monochrome
My recommendation: N/A
This entry lets you take a RAW image and create a new JPEG after applying your choice of an array of Picture Styles–like special effects to the image. It’s particularly useful when you’d like to make adjustments to an image you’ve already captured, but don’t want to (or can’t) use an image editor. Just follow these steps:
- 1. Access the Creative Assist entry and press SET.
- 2. Navigate among available RAW images using the Quick Control Dial or left/right directional buttons. Press SET to select an image to process.
- 3. A screen like the one shown in Figure 7.31 appears, with an array of effects displayed along the bottom.
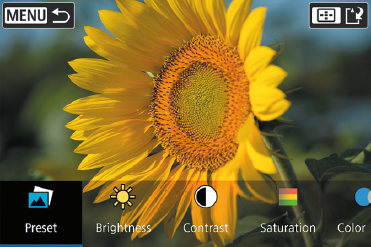
Figure 7.31 Creative Assist adjustments.
- 4a. To work with a Preset adjustment, highlight the Preset icon and press SET. Auto1, Auto2, and Auto3 preset can be selected from the array that appears, along with others, including Vivid, Soft, Cool, Green, Shine, Lime, Peach, B&W, Blue, Purple, and Normal. As each effect is highlighted, a preview of its effect is shown on the display. Press SET to select.
- 4b. To make your own adjustments, instead, highlight the Brightness, Contrast, Saturation, Color Tone 1, Color Tone 2, or Monochrome adjustments. Press SET to modify the highlighted setting with the left/right directional buttons. Reset an effect by pressing the Trash button, or the AF Point button to confirm.
- 5. When finished, highlight OK and press SET to save a new JPEG version of the image.
Quick Control RAW Processing
Options: Creative Assist, RAW Image Processing
My recommendation: N/A
This setting determines which of the two RAW adjustment options appears in the Quick Control menu. Your choice should be based on whether you want to be able to apply special effects quickly (Creative Assist) or perform more traditional RAW settings while creating a new JPEG file with those adjustments.
Red-eye Correction
Options: None
My preference: N/A
If you’ve already taken a picture that shows red-eye effects in your human subject(s), it’s not too late to take remedial action. Select this menu entry, then use the QCD to locate an image in need of a red-eye fix. Touch the red-eye icon on the LCD or press SET. The 90D will search for red-eyes and display white frames around the corrected images. Highlight OK and press SET to save the corrected photo as a separate file. Your original image is not changed; you may find you can sometimes do a better job fixing red eyes in an image editor if this automated method isn’t satisfactory.
Create Album
Options: Select Movies, Rearrange, Save
My recommendation: N/A
Your 90D allows you to create video snapshots in Movie mode, each clip 4, 6, or 8 seconds long (your choice). You can save any snapshot as a separate album or keep adding snapshots to a single video album to create a longer clip. This entry adds the ability to combine individual albums into one longer sequence, and to rearrange them in any order you like. I’ll provide complete instructions for shooting, saving, and editing albums in Chapter 10.
Cropping
Options: Aspect Ratio, Orientation, Magnification
My preference: N/A

Figure 7.32 The Playback 3 menu.
This is the first entry on the Playback 3 menu. (See Figure 7.32.) Sometimes images contain extraneous material, and you want to crop them before, say, sending via e-mail to a friend or colleague. You can crop JPEG images but not RAW files and save as a new image in a trimmed size. If you’ve cropped an image, that image cannot be cropped or resized again. Just follow these steps:
- 1. Select Cropping and press SET.
- 2. Select your image, either by paging through available full-size images, or through Index thumbnails (press the Index/Reduce button to view thumbnails and the Magnify button to return to single image view).
- 3. Press SET to display the green cropping frame and an array of option icons at the top of the frame. (See Figure 7.33.) From left to right, the icons represent Size of Cropping Frame, Straighten Image (Tilt), Aspect Ratio, Crop and Save, and Exit. Rotate the Main Dial to highlight each of these icons in turn.
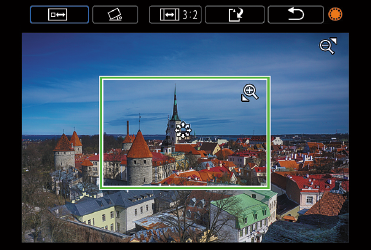
Figure 7.33 Cropping an image.
- 4. Size of cropping frame. When this icon is highlighted, you can use the Magnify and Reduce buttons to increase or decrease the size of the cropping frame. You can move the cropping frame around within the image using the directional buttons or multi-controller.
- 5. Straighten image. Highlight this icon and press SET. A grid appears you can use to check alignment. To straighten the image, tap the left or right wedge shown at the upper left of the screen to correct the tilt in one-half-degree increments. Or, rotate the Quick Control Dial to make adjustments in one full degree. The image can be tilted a maximum of 10 degrees total. When satisfied, press SET to confirm.
- 6. Change the Aspect Ratio. When this icon is highlighted, press the SET button repeatedly to cycle among 3:2, 4:3, 16:9, or 1:1 ratios. When satisfied, don’t press SET again. Rotate the Main Dial to highlight another parameter to change or highlight the Crop and Save icon and then press SET to store the cropped copy on your memory card and exit.
Resize
Options: Medium, Small 1, Small 2
My preference: N/A
If you’ve already taken an image and would like to create a smaller version (say, to send by e-mail), you can create one from this menu entry. Just follow these steps:
- 1. Choose Resize. Select this menu entry from the Playback 2 menu.
- 2. View images to resize. You can scroll through the available images with the touch screen or multi-controller or press the Index/Reduce button to view thumbnails and select from those. Only images that can be resized are shown. They include JPEG Large, Medium, and Small 1 images. Small 2 and RAW images of any type cannot be resized.
- 3. Select an image. Choose SET to select an image to resize. A pop-up menu will appear on the screen offering the choice of reduced-size images. The final sizes of your reduced images include M (Medium: 15.4MP, 4800 × 3200 pixels); S1 (Small 1: 8MP, 3472 × 2320 pixels); or S2 (Small 2: 3.8MP, 2400 × 1600 pixels). You cannot resize an image to a size that is larger than its current size; that is, you cannot save a JPEG Medium image as JPEG Large.
- 4. Resize and save. Choose SET to save as a new file and confirm your choice by selecting OK from the screen that pops up or cancel to exit without saving a new version. The old version of the image is untouched.
Rating
Options: One to Five Stars
My preference: N/A
If you want to apply a quality rating to images or movies you’ve shot (or use the rating system to represent some other criteria), you can use this entry to give particular images one, two, three, four, or five stars, or turn the rating system off. The Image Jump function can display only images with a given rating. Suppose you were photographing a track meet with multiple events. You could apply a one-star rating to jumping events, two stars to relays, three stars to throwing events, four stars to hurdles, and five stars to dashes. Then, using the Image Jump feature, you could review only images of one type.
With a little imagination you can apply the rating system to all sorts of categories. At a wedding, you could classify pictures of the bride, the groom, guests, attendants, and parents of the couple. If you were shooting school portraits, one rating could apply to first grade, another to second grade, and so on. Given a little thought, this feature has many more applications than you might think. To use it, just follow these steps:
- 1. Choose the Rating menu item.
- 2. Use the touch screen or multi-controller to select an image or movie. Press the Index/Reduce button to display three images at once. Press the Magnify button to return to a single image.
- 3. When an image or movie is visible, press the up/down buttons to apply a one- to five-star rating. The display shows how many images have been assigned each rating so far.
- 4. When finished rating, choose MENU to exit.
Slide Show
Options: Display Time, Repeat, Transitional Effect, Background Music
My preference: N/A
Slide Show is a convenient way to review images one after another, without the need to manually switch between them. To activate, just choose Slide Show from the Playback 2 menu. During playback, you can press the SET button to pause the “slide show” (in case you want to examine an image more closely), or the INFO. button to change the amount of information displayed on the screen with each image. For example, you might want to review a set of images and their histograms to judge the exposure of the group of pictures. To set up your slide show, follow these steps:
- 1. Begin setup. If you want to display all images on your memory card, choose Slide Show from the Playback 3 menu to display the screen shown in Figure 7.34. Then, skip to Step 3.
Figure 7.34 Set up your slide show using this screen.
- 2. Choose image selection method. You can limit your slide show to only the images specified by the Set Image Search Conditions entry, which is the entry discussed after this one. Use that feature to select images according to Rating, Date, Folder, Protection status, or Type of File. (Review the Set Image Search Conditions description that follows if you need to learn how to do this.)
Tip: To easily specify images that are not in a particular folder or taken on a particular date, assign a specific rating (such as one star) to the images you want to include, or mark those images as Protected, and then use either of those criteria as your selection method.
Once you’ve selected the images to show, choose Slide Show from the Playback 3 menu.
- 3. Choose Options. Highlight Setup and choose SET to produce a screen with these options:
- Display time. Playing time (1, 2, 3, 5, 10, or 20 seconds per image).
- Repeat. Repeating options are Enable and Disable.
- Transition Effect. You can specify how the slide show moves transitions from each image to the next. Your choices include two Side In options (left to right and right to left) and three Fade In variations.
- Background music. Choose Off or select from a music file you’ve previously added to your memory card. (On or Off).
- 4. Exit Setup. When you’ve specified your playback parameters, select MENU to confirm your choice, and press MENU again to return to the main Slide Show screen.
- 5. Start the show. Highlight Start and choose SET to begin your show. (If you’d rather cancel the show you’ve just set up, select MENU.) During playback, the 90D’s Auto Power Off setting will be ignored. Note that the playback time for individual images may vary, as the time required to load an image from the memory card depends on the physical file size of the image.
- 6. Use show options during display. You have several options while the show is being displayed.
- Adjust volume using the up/down directional buttons if you are using a music track.
- Press SET to pause/restart.
- Press INFO. to cycle among the playback information displays.
- Press MENU to stop the show.
Set Image Search Conditions
Options: Filter by: Rating, Date, Folder, Protection, or File Type
My preference: N/A
You don’t need to see every image on your memory card as you play them back or search for them when you compile a slide show. This entry allows you to specify which images are shown during image review, available in a slide show, or subject to the Protect and Erase features. Just follow these steps:
- 1. Choose Set Image Search Conditions. Highlight the entry and press SET.
- 2. Select condition. A vertical column at left appears with the conditions available, listed, from top to bottom: Rating, Date, Folder, Protection, or File Type. Use the up/down buttons to highlight a condition. (See Figure 7.35.)
- 3. Enter parameter. Use the left/right buttons to set the parameter for a particular condition:
- Rating. You can choose one to five stars.
- Date. Select a specific date that includes photos taken. (That is, you cannot select a date on which no images where taken with this card.)
- Folder. Select from among the various folders on your card. If only one folder is available, that is chosen by default.
- Protected. Choose Protected or Unprotected images.
- Type of File. Choose to show only stills, various combinations of RAW, RAW+JPEG, and JPEG, plus movie files.

Figure 7.35 Setting image search parameters.
- 4. Set condition. When parameters are set for a condition, press INFO. to add it to your conditions. You can press INFO. again to unselect it. Mix and match conditions, choosing any one, or any combination of the five parameters. Press Trash to remove all conditions.
- 5. Confirm. Press SET to exit. An informational screen will appear. Press OK to confirm.
Image Jump with Main Dial
Options: 1 Image, 10 Images, Specified number, Date, Folder, Movies, Stills, Protected, Rating
My preference: 10 Images
As first described in Chapter 2, you can leap ahead or back during picture review by swiping across the touch screen with two fingers, or by rotating the Main Dial. You can select from a variety of increments that will be used with this menu entry. The Jump method is shown briefly on the screen as you leap ahead to the next image displayed, as shown in Figure 7.36. Your options are as follows:
- 1 image. Rotating the Main Dial one click or swiping jumps forward or back 1 image.
Figure 7.36 The Jump method is shown on the LCD briefly when you leap forward or back using the Main Dial or a two-fingered touch screen swipe.
- 10 images. Rotating the Main Dial one click or swiping jumps forward or back 10 images.
- Specified number. When this option is highlighted, rotate the Main Dial to select the number of images to jump by, from 1 to 100. Thereafter, rotating picture review will jump by that number each time you rotate the Main Dial one click or swipe.
- Date. Rotating the Main Dial one click or swiping jumps forward or back to the first image taken on the next or previous calendar date.
- Folder. Rotating the Main Dial one click or swiping jumps forward or back to the first image in the next folder available on your memory card (if one exists).
- Movies. Rotating the Main Dial one click or swiping jumps forward or back, displaying movies you captured only.
- Stills. Rotating the Main Dial one click or swiping jumps forward or back, displaying still images only.
- Protected. Rotating the Main Dial one click or swiping jumps forward or back, displaying protected images only.
- Rating. When this parameter is highlighted, rotate the Main Dial or tap the touch screen to select All Rated Images, One to Five stars, or Off. Note: The All Rated Images choice is represented by an unadorned star, the numbered ratings are enclosed in brackets. So * would display All Rated Images, and [*] would display only one-star rated images. Thereafter, during playback you rotate the Main Dial one click or swipe the touch screen to jump using the rating parameter you specify here. I explained how to apply and use ratings earlier in this chapter.
Playback Information Display
Options: Enable or Disable 9 different informational screens
My recommendation: N/A
This is the first entry on the Playback 4 menu. (See Figure 7.37.) When you press the INFO. button during Playback, the 90D cycles among three different screens, shown in Figure 7.38. They include an uncluttered screen with no overlaid information, a basic information screen, and a shooting information screen that provides more complete information and can include several additional optional panels of data. Use this entry to specify which of the optional screens you want to display. Just follow these steps to include/exclude the available displays:
- 1. Access with menu entry. A screen like the one shown in Figure 7.39 appears. Check marks appear next to any of the nine available screen options.
- 2. Highlight the screens from 1 to 9 that you want to see, and press SET to add a check mark. To hide a display, highlight a check marked option from 1 to 9 and press SET to unmark it.
- 3. You can mark or unmark any or all. If none are selected, only the No Information screen will be displayed during Playback. (See Figure 7.38, upper left.)
- 4. The nine available screens are as follows:
- The Basic Information screen. (See Figure 7.38, center, right.) This shows a limited amount of information, such as battery status, picture number, shutter speed, aperture, exposure compensation, ISO setting, highlight priority, and image quality.
- The Shooting Information screen, which provides more detailed information like that shown in Figure 7.38, lower left. Note the scroll bar at lower right. Options 2–9 in the Playback Information Display represent additional panels that can be appended to the scroll and described next. By default, a brightness/luminance histogram is displayed at upper right in the Shooting Information Screen. You can press INFO. while activating this entry to substitute an RGB histogram instead. I showed you how to work with histograms in Chapter 4.
Figure 7.37 The Playback 4 menu
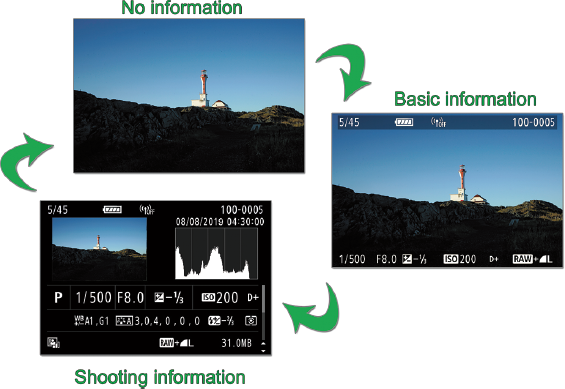
Figure 7.38 Press INFO. to cycle among these three screens: No information (upper left); Basic Information (center right); Shooting Information (lower left). You can enable or disable all but the No Information version.
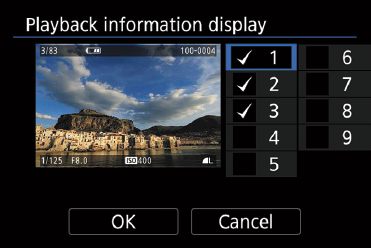
Figure 7.39 Mark any, all, or none of the Playback display options using this screen.
-
- Alternate Histogram/Lens information. Activate this option and scrolling down from the main Shooting Information screen displays information about the lens used to take the current photo, as well as the other histogram display. (If the main screen shows the Brightness histogram, the RGB histogram appears here, and vice versa.) You can press INFO. and exchange the order of the two histograms if you wish.
- White balance. Adds WB information to the scrolling screen, including a color bias display.
- Picture Control. Displays current Picture Control settings.
- Color Space/Noise Reduction. Appends these details to the display.
- Peripheral Illumination/Distortion Correction/Digital Lens Optimizer. Shows Lens Aberration Correction settings.
- Image Sent To. Lets you know that the image has been transferred to your smart device.
- GPS Information. Appears only if the image was taken using a GPS device.
- 5. When finished adding screen options, highlight OK at the bottom left of the Playback Information Display screen and press SET.
- 6. During Playback, when the Shooting Information screen is displayed (press INFO. to make it appear, if necessary), you can scroll among the activated options using the up/down directional buttons.
Highlight Alert
Options: Disable, Enable
My preference: Disable
Choose Enable, and overexposed highlight areas will blink on the LCD screen during picture review. Set to Disable if you find this alert distracting. Many 90D users use the histogram displays during playback as a more precise indicator of over- (and under-) exposure.
AF Point Disp.
Options: Disable, Enable
My preference: Enable
Specifies whether the autofocus points used to determine focus are displayed on the playback image. I always like to have this information, both as confirmation that focus was achieved using the best AF point, and as a way of troubleshooting out-of-focus conditions caused by the camera or my bad judgment.
Playback Grid
Options: Off, 3 × 3, 6 × 4, 3 × 3+diagonal
My preference: Off
You can superimpose a 3 × 3, 6 × 4, or 3 × 3 plus diagonal lines grid over your image during playback, or disable the grid display entirely. I turn it on only when evaluating images that have important straight lines, such as landscape photos in which the horizon is visible. (See Figure 7.40.)
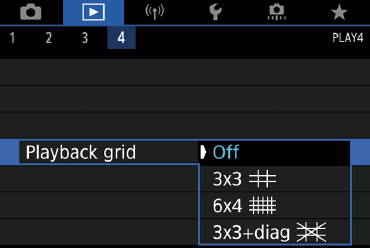
Figure 7.40 Playback grid choices.
View from Last Seen
Options: Enable (default), Disable
My recommendation: N/A
This option allows you to specify which image is shown first when you press the Playback button.
- Enable. The 90D will show you the last image you were viewing during picture review. This is useful when you check your shots, exit Playback, and then want to pick up where you left off. However, if you take a photo in the meantime, the camera will start from the image you just captured instead.
- Disable. Playback always begins from your most recent shot. This may be your best option when shooting events or sports and you always want quick access to the last photo you captured.