
One thing that surprises new owners of the Canon EOS 90D is that the camera has a total of 496 buttons, dials, switches, levers, latches, and knobs bristling from its surface. Okay, I lied. The real number is closer to two dozen controls and adjustments, just among the physical components and not counting the virtual controls on the touch screen. But that’s still a lot of components to master, especially when you consider that many of these controls serve double duty to give you access to multiple functions.
Traditionally, there have been two ways of providing a roadmap to guide you through this maze of features. One approach uses a few tiny 2 × 3–inch black-and-white line drawings or photos impaled with dozens of callouts labeled with cross-references to the actual pages in the book that tell you what these components do. You’ll find this tactic used in the miniature pocket-sized basic printed manual Canon provides with the 90D, and most of the other third-party guidebooks as well. Deciphering one of these miniature camera layouts is a lot like being presented with a world globe when what you really want to know is how to find the capital of Belgium.
I originated a more useful approach in my field guides, providing you, instead of a satellite view, a street-level map that includes close-up, full-color photos of the camera from several angles (see Figure 3.1), with a smaller number of labels clearly pointing to each individual feature. And, I don’t force you to flip back and forth among dozens of pages to find out what a component does. Each photo is accompanied by a brief description that summarizes the control, so you can begin using it right away. When a feature deserves a lengthy explanation, I direct you to a more detailed write-up later in the book.
Using Cross References
“I wish I could learn everything I need to know about a feature in one place!”
Some readers find cross references inconvenient. They’d like to open the book to one page and read everything there is to know about using, for example, the bracketing feature. Unfortunately, it’s not possible to explain everything there is to know about every button and control (or indeed, any feature of the 90D) with anything less than a mammoth 100-page chapter.
So, after I explain how to use the ISO button to change the sensitivity of the 90D, I will provide a cross-reference to a longer explanation later in the book that clarifies noise reduction, ISO, and its effects on exposure. I think this kind of organization works best for a camera as sophisticated as the 90D, because producing 100-page chapters that include all the basics plus all the background for each feature simply isn’t practical. I’ll always give you what you need to get started.
In all cases, however, by the time you finish this chapter, you’ll have a good understanding of every control and of the various roles each can take on. I’ll provide a lot more information about items in the menus and submenus in Chapters 7 to 10, but the following descriptions should certainly satisfy the button pusher and dial twirler in you.
Front View
When we picture a given camera, we always imagine the front view. That’s the view that your subjects see as you snap away, and the aspect that’s shown in product publicity and on the box. The frontal angle is, for all intents and purposes, the “face” of a camera like the 90D. But, not surprisingly, most of the “business” of operating the camera happens behind it, where the photographer resides. The front of the 90D actually has very few controls and features to worry about. Several of them are readily visible in Figure 3.1:
- Shutter release. Angled on top of the hand grip is the shutter release button. Press this button down halfway to lock exposure and focus (in One-Shot mode and AI Focus with nonmoving subjects). The 90D assumes that when you tap or depress the shutter release, you are ready to take a picture, so the release can be tapped to activate the exposure meter or to exit from most menus.
- Main Dial. This dial is used to change shooting settings. When settings are available in pairs (such as shutter speed/aperture), this dial will be used to make one type of setting, such as shutter speed. The other setting, say, the aperture, is made using an alternate control, such as spinning the Quick Control Dial on the back of the camera.
- Memory card access door. Slide this panel toward the back of the camera to gain access to the memory card.
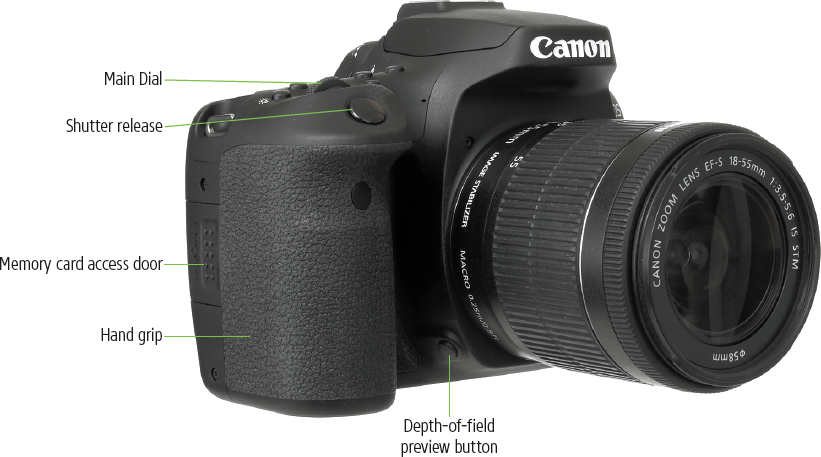
Figure 3.1
- Depth-of-field preview button. This button, adjacent to the lens mount, stops down the lens to the aperture that will be used to take the picture, so you can see in the viewfinder how much of the image is in focus. The view grows dimmer as the aperture is reduced.
- Hand grip. This provides a comfortable handhold and contains the 90D’s battery.
When viewed from the front with the lens removed, you can see more components, as shown in Figure 3.2:
- Red-eye reduction/Self-timer lamp. This LED provides a blip of light shortly before a flash exposure to cause the subjects’ pupils to close down, reducing the effect of red-eye reflections off their retinas. When using the self-timer, this lamp also flashes to mark the countdown until the photo is taken.
- Remote control sensor. The sensor behind this window receives signals from the optional Canon infrared remote controls. The RC-6 release gives the choice of triggering the camera immediately, or with the two-second delay. Note that the sensor is on the hand grip and thus would be blocked if you happened to be holding the 90D when trying to take a picture. In practice, of course, the camera will be mounted on a tripod or supported in some other way when using the remote control. The remote control generally must be used in front of the camera for the sensor to detect its signal.
- Stereo microphones. A pair of microphones located above and on either side of the lens capture sound while shooting video. Keep in mind that their close proximity to the lens means the microphones are prone to recording autofocus motor noise, as well as any sounds you make with your hands while rotating the zoom ring. Certain Canon lenses, such as those with STM motors or the most recent USM motors, are almost silent, and the Canon EF-S 18-135mm f/3.5-5.6 IS USM kit lens equipped with the PZ-E1 Power Zoom adapter is especially quiet. The $150 addon clips onto the lens and offers two zoom speeds. You can attach an external microphone, as described below.
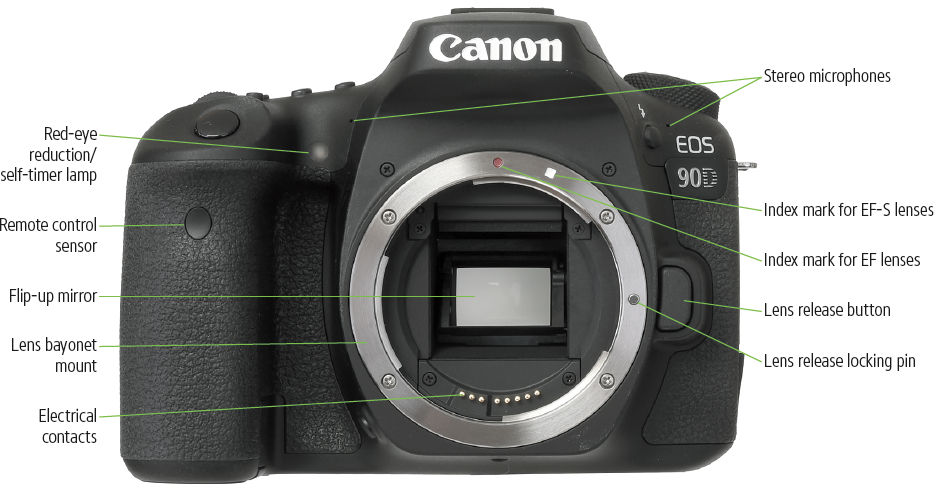
Figure 3.2
- Lens bayonet mount. This sturdy component mates with the matching bayonet mount on the lens to secure it to the camera body.
- Index mark for EF lenses. Match the round red bump on the lens with this mark to align EF-series lenses for mounting.
- Index mark for EF-S lenses. Match the raised white square on the lens with this mark to align EF-S-series lenses for mounting.
- Electrical contacts. Mates with matching contacts on the rear of the lens to provide two-way communication between the camera and the lens’s operational features, such as image stabilization, autofocus, and aperture.
- Lens release button/locking pin. Press this button to retract the lens release locking pin so the lens can be rotated toward the shutter release and removed.
- Flip-up mirror. This partially silvered reflective component directs most of the light that passes through the lens upward toward the focus screen, exposure metering system, and viewfinder eyepiece. Some illumination is directed downward to the 45-point autofocus system in the floor of the mirror chamber.
You’ll find more controls on the other side of the 90D, shown in Figure 3.3.
- Flash button. This button releases the built-in flash so it can flip up (see Figure 3.4) and start the charging process. If you decide you do not want to use the flash, you can turn it off by pressing the flash head back down.
- Lens switches. Canon autofocus lenses have a switch to allow changing between automatic focus and manual focus, and, in the case of IS lenses, another switch to turn image stabilization on and off.

Figure 3.3
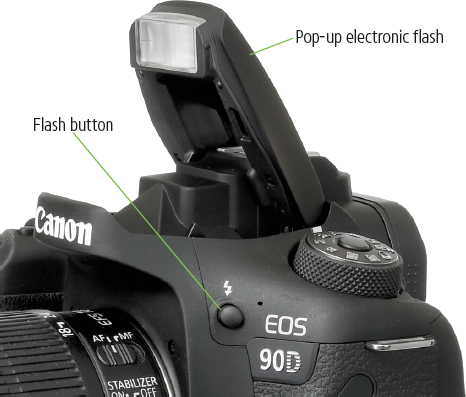
Figure 3.4 Pressing the Flash button (which has an arrow/lightning bolt symbol) pops up the built-in flash unit and starts the charging process.
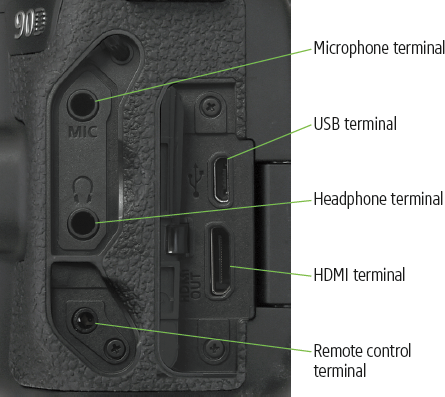
Figure 3.5
- Neck strap mount. This is one of two neck strap mounts (the other is on the other side of the camera).
- Port covers. These flip-away panels protect the connector ports underneath.
The main feature on this side of the 90D is a trio of flexible covers that protect the five connector ports underneath from dust and moisture. The five connectors, shown in Figure 3.5, are as follows:
- Microphone terminal. Plug a stereo microphone into this jack.
- Headphone terminal. You can monitor your movie audio with headphones plugged into this connector.
- Remote control terminal. You can plug various Canon remote release switches, timers, and wireless controllers into this connector.
- USB terminal. Plug in an optional USB 2.0 mini-B cable and connect the other end to a USB port in your computer to transfer photos.
- HDMI terminal. Use a Type C HDMI cable (also not included in the box with your camera) to direct the video and audio output of the 90D to a high-definition television (HDTV) or HD monitor.
The Canon EOS 90D’s Business End
The back panel of the 90D (see Figure 3.6) bristles with nearly a dozen different controls, buttons, and knobs. That might seem like a lot of controls to learn, but you’ll find it’s a lot easier to press a dedicated button and spin a dial than to jump to a menu every time you want to change a setting.
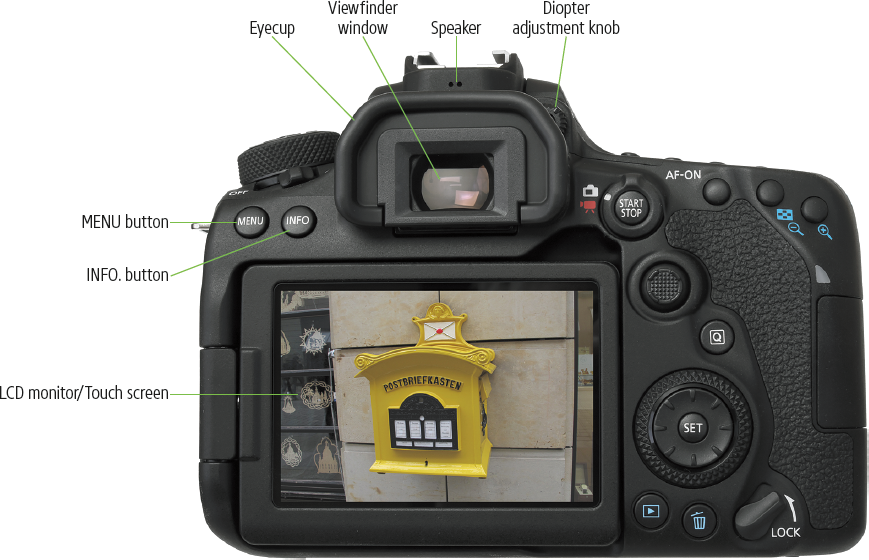
Figure 3.6
You can see the controls clustered on the top-back edge of the 90D in the figure. The key buttons and components and their functions are as follows:
- LCD monitor/Touch screen. This is the three-inch display that shows your Live View preview/image review after the picture is taken, shooting settings display before the photo is snapped, and all the menus used by the 90D. A significant feature is the swiveling LCD, which can be folded with the display screen facing inward to protect it or reversed into the normal position, flipped out, swiveled, or even turned around to allow you to view yourself while shooting self-portraits or selfies and while vlogging. (See Figure 3.7.)
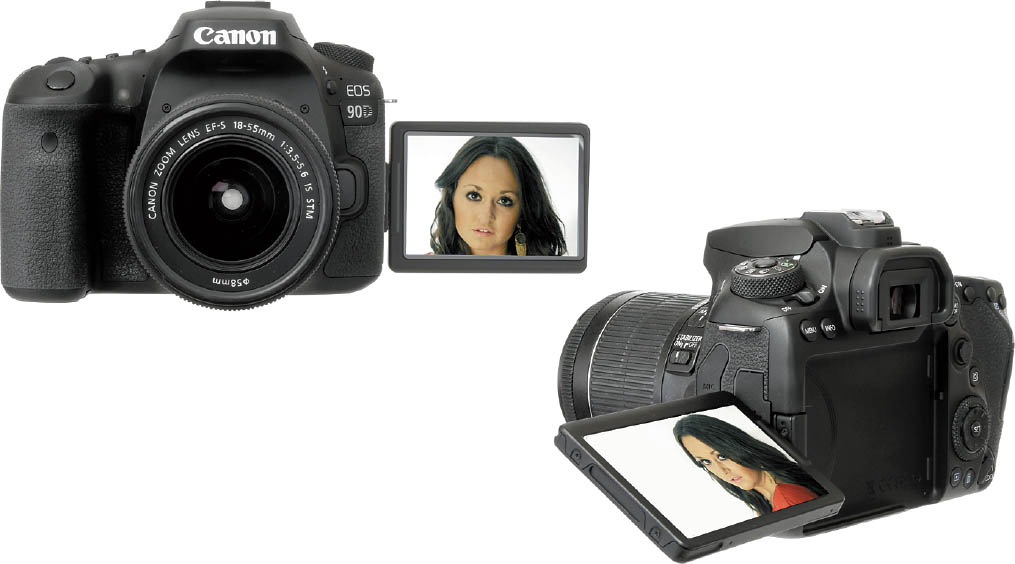
Figure 3.7
- MENU button. Summons/exits the menu displayed on the rear LCD of the 90D. When you’re working with submenus, this button also serves to exit a submenu and return to the main menu.
- INFO. button (Shooting mode). When pressed, cycles among Electronic Level, Quick Control screen, and Off (no information displayed). You can disable any of these (except Off) using the INFO. Button Display Options entry in the Set-up 4 menu, as described in Chapter 9. Electronic Level allows you to orient the camera. When the Quick Control screen is visible, you can adjust the values of many settings by pressing the Q button. Choose Off when you want a blank screen and no distractions or to save power.
- Electronic level. This readout includes indicators that show the amount of horizontal rotation of the camera (along the axis passing through the center of the lens). Front/back tilt is not displayed. (See Figure 3.8.) This feature can be disabled if you find it distracting. An additional electronic level can be activated for the viewfinder in the Set-up 4 menu, as described in Chapter 9. (It’s shown in Figure 3.12 later in this chapter.)
- Quick control screen. Displays the current shooting settings of the camera, including shutter speed, aperture, ISO sensitivity, battery status, and image quality settings. (See Figure 3.9.) Press the Q button on the back of the camera, and the adjustment screen appears, as described in the sidebar that follows.
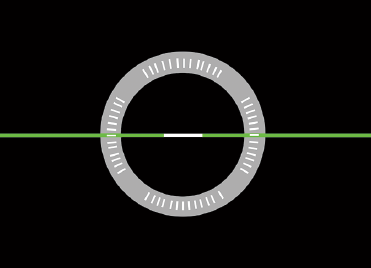
Figure 3.8 The outer ring shows the amount of horizontal rotation. When the bar turns from red to green, the camera is level.
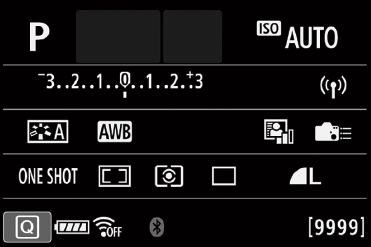
Figure 3.9 Quick Control screen.
- INFO. button (Live View/Movie mode). When pressed repeatedly while using Live View or Movie mode, the INFO. button cycles among a slightly different set of informational screens. I’ll show you those screens, and how to use them, in Chapter 10, which shows you how to use Live View mode and shoot video clips with your EOS 90D.
- INFO. button (Playback mode). In Playback mode, while reviewing images, pressing the INFO. button cycles among basic display of the image; a detailed display with a thumbnail of the image, shooting parameters, and a brightness histogram; and a display with less detail but with separate histograms for brightness, red, green, and blue channels. I’ll show you the screens with the histograms—and how to use the histograms—in Chapter 4.
- INFO. button (other modes). When setting Picture Styles, the INFO. button is used to select a highlighted Picture Style for modification. When trimming an image, the INFO. button selects the orientation.
- Viewfinder eyepiece. You can frame your composition by peering into the viewfinder. It’s surrounded by a soft rubber eyecup frame that seals out extraneous light when pressing your eye tightly up to the viewfinder, and it also protects your eyeglass lenses (if worn) from scratching.
- Speaker. Located above the viewfinder, this speaker emits the electronic sounds emanating from your camera.
- Diopter adjustment knob. Use of this knob to adjust the viewfinder sharpness was explained in Chapter 1.
The most-used controls reside on the right side of the 90D (see Figure 3.10). There are more than a dozen buttons, wheels, and switches, many of which do double-duty to perform several functions:
- Movie/Stills Live View switch. Rotate the switch to either the Movie or Live View positions to activate those modes.
- Movie capture/Live View start/stop. Press this button to start/stop video/audio recording, or to activate/deactivate live view.
- AF-ON button. Press this button to activate the autofocus system without needing to partially depress the shutter release. This control, used with other buttons, allows you to lock exposure and focus separately. Lock exposure by pressing the shutter release halfway, or by pressing the AE lock button; autofocus by pressing the shutter release halfway, or by pressing the AF-ON button. Functions of this button will be explained in more detail in Chapter 5.
- AE lock/FE lock/Index/Reduce-Zoom button. This button, which has a * label above it (on the top panel), has several functions, which differ depending on the AF point and metering mode. You can find more about these variations, available in Creative Zone modes only, in Chapter 4.
Shooting mode: The button locks the exposure or flash exposure that the camera sets when you partially depress the shutter button. In Evaluative exposure mode, exposure is locked at the AF point that achieved focus. In Partial, Spot, or Center-weighted modes, exposure is locked at the AF center point. The exposure lock indication (*) appears in the viewfinder and on the shooting settings display. If you want to recalculate exposure with the shutter button still partially depressed, press the * button again. The exposure will be unlocked when you release the shutter button or take the picture. To retain the exposure lock for subsequent photos, keep the * button pressed while shooting.

Figure 3.10
When using flash, pressing the * button fires an extra pre-flash that allows the unit to calculate and lock exposure prior to taking the picture. The characters FEL will appear momentarily in the viewfinder, and the exposure lock indication and a flash indicator will appear. (See the description of the viewfinder display later in this chapter.)
Playback mode: Press this button to switch from single-image display to 4-, 9-, 36-, and 100-image thumbnail index displays. (See Figure 3.11.) Move highlighting among the thumbnails with the touch screen, directional controls (multi-controller joystick or joypad), or Main Dial. To view a highlighted image, press the Magnify button.
In Playback mode, when an image is zoomed in, press this button to zoom out, or use the touch screen.
Figure 3.11 The Index/Reduce button changes the playback display from single image to 4, 9, 36, or 100 thumbnails.
- Magnify/AF point selection button. In Shooting mode, this button activates autofocus point selection. (See Chapter 4 for information on setting autofocus/exposure point selection when using Creative Zone exposure modes.) In Playback mode, if you’re viewing a single image, this button zooms in on the image that’s displayed. If thumbnail indexes are shown, pressing this button switches from nine thumbnails to four thumbnails, or from four thumbnails to a full-screen view of a highlighted image.
- Quick Control (Q) button. Press this button to produce the Quick Control screen, which gives you access to many features when in Shooting mode. When you’re reviewing images in Playback, a different Quick Control screen pops up that allows you to protect or rate images, change jump method, resize, or perform other functions.
- Quick Control Dial (QCD). Used to select shooting options, such as f/stop or exposure compensation value, or to navigate through menus. It also serves as an alternate controller for some functions set with other controls, such as AF point.
- Multi-controller 1 (joystick). This joystick-like control is one of two directional controls on the back of the camera. It can be shifted up, down, side to side, and diagonally, for a total of eight directions. It can be used for several functions, including AF point selection, scrolling around a magnified image, image browsing during playback, trimming a photo, navigating menus, or setting white balance correction.
- Multi-controller 2 (joypad). This thumbpad, located inside the Quick Control Dial, can be shifted up, down, side to side, and diagonally for a total of eight directions. It can be used for several functions, including AF point selection, scrolling around a magnified image, trimming a photo, or setting white balance correction.
Note: In general, I’ll use the term “directional controls” rather than Multi-controller 1/2 or joystick/joypad, as the two are virtually interchangeable.
- SET button. Located in the center of the joypad multi-controller, this button is used to confirm a selection or activate a feature, similarly to the SET icon on the touch screen.
- Multi-function lock switch. Set in the upward position, it prevents the Main Dial, QCD, and multi-controller from changing a setting. If you try to use one of these locked controls, an L warning will be displayed in the optical viewfinder and the LCD panel; in the Shooting Settings display, Lock will be shown. You can select which of the three are locked out using the Multi Function Lock entry in the Set-up 4 menu. Choose any combination of one, two, or all three controls to freeze with this lock switch.
- Playback button. Displays the last picture taken. Thereafter, you can move back and forth among the available images by pressing the left/right multi-controller pad to advance or reverse one image at a time, or the Main Dial, to jump forward or back using the jump method you’ve selected. (See the section below for more on jumping.) To quit playback, press this button again. The 90D also exits playback mode automatically when you press the shutter button (so you’ll never be prevented from taking a picture on the spur of the moment because you happened to be viewing an image).
- Erase button. Press to erase the image shown on the LCD during Playback mode. A menu will pop up displaying Cancel and Erase choices. Use the left/right multi-controller pad to select one of these actions, then press the SET button to activate your choice.
- Memory card access lamp. When lit or blinking, this lamp indicates that the memory card is being accessed.
- Memory card door. This is another view of the door covering the memory cards slot. Slide it toward the back of the camera and to swing outward to gain access to the SD card.
ON THE LEVEL
The 90D has two different display modes for the electronic level, using the back-panel LCD monitor and viewfinder. The INFO. button produces the electronic level on the LCD monitor in both still shooting and Live View/Movie shooting modes (the level display is switched off once movie capture begins, however).
You can also view a slightly different leveling display in the optical viewfinder. The one that can be viewed during shooting is shown in Figure 3.12, left. That viewfinder Electronic Level must be activated in the Viewfinder Display entry in the Set-up 2 menu, as described in Chapter 9. Five different icons are overlaid on the viewfinder screen (see Figure 3.12, right), showing when the camera is level, tilted one degree, or tilted two degrees or more in either direction. The viewfinder level can be used in both horizontal and vertical shooting orientations. It’s best suited for hand-held shooting.

Figure 3.12 The view-finder electronic level for hand-held photography.
Jumping Around
When a photo you’ve taken is displayed on the color LCD, you can move forward or backward one image at a time or “jump” ahead or back in different increments by rotating the Main Dial. As you jump, an overlay appears on the screen briefly showing the size of the leap you’re making. (See Figure 3.13.)

Figure 3.13 Rotate the Main Dial to jump ahead or back during image playback.
As I’ll describe in Chapter 7, you can specify the exact increment using the Image Jump with Dial entry in the Playback 3 menu. Your options are as follows:
- 1 image. Rotating the Main Dial one click or swiping jumps forward or back one image.
- 10 images. Rotating the Main Dial one click or swiping jumps forward or back ten images.
- Specified number of images. You can specify any number from 1 to 100 for your image jump. Press SET when this option is highlighted, then rotate the Main Dial to choose the number of images to jump.
- Display by Date. Rotating the Main Dial one click or swiping jumps forward or back to the first image taken on the next or previous calendar date.
- Display by Folder. Rotating the Main Dial one click or swiping jumps to the next folder on your memory card.
- Display Movies only. Tells the 90D to jump only among movie images when using a card that contains both video clips and still images. This option is useful when you prefer to view only one kind of file.
- Display Stills only. Specifies jumping only between still images when using a card that has both video clips and still images.
- Display protected images only. Only images you have marked with the Protect option (described in Chapter 7) will be shown.
- Display by Image Rating. As explained in Chapter 7, you can rate a movie or still photo by applying from one to five stars, using the Rating menu entry in the Playback 2 menu. This Jump choice allows you to select a rating rank, and then jump among photos with that rating applied.
Going Topside
The top surface of the Canon EOS 90D has a few frequently accessed controls of its own. The key controls, shown in Figure 3.14, are as follows:
- Mode Dial. Rotate this dial to switch among exposure/scene modes, and to choose the camera Custom Shooting Mode (C1 or C2) and Creative Filters. You’ll find these modes and options described in more detail in Chapter 9 (where I show you how to register your settings in the C1 and C2 “slots”).
- Mode Dial lock release. You’ll need to depress this button to free the Mode Dial to rotate.

Figure 3.14
- Sensor focal plane. Precision macro and scientific photography sometimes requires knowing exactly where the focal plane of the sensor is. The symbol on the side of the pentaprism marks that plane.
- Power switch. Turns camera on and off.
- Hot shoe. Slide an electronic flash into this mount when you need a more powerful Speedlite. A dedicated flash unit, like those from Canon, can use the multiple contact points shown to communicate exposure, zoom setting, white balance information, and other data between the flash and the camera. There’s more on using electronic flash in Chapter 11.
- LCD panel illumination button. Press this button to turn on the amber LCD panel lamp that backlights the LCD status panel for about six seconds, or to turn it off if illuminated. The lamp will remain lit beyond the six-second period if you are using the Mode Dial or other shooting control.
- AF button. Press once and then rotate the Main Dial or Quick Control Dial to change between One-Shot, AI Focus, and AI Servo autofocus modes (you’ll find more about those modes in Chapter 5).
- Drive button. Press once and then change Drive mode settings rotating the Main Dial or Quick Control Dial. Your options include Single Shooting, High-Speed Continuous (up to 11 fps), Low-Speed Continuous shooting (up to 3 fps), Single Silent Shooting, Silent Continuous shooting (at up to 3 fps), and 10- or 2-second self-timer/remote control and multiple shot continuous self-timer/remote.
- ISO button. Press and rotate the Main Dial or Quick Control Dial to choose an ISO setting. You can press the INFO. button when this button is active to quickly change to Auto ISO mode. You’ll find more about ISO options in Chapter 4.
- Metering mode button. Rotate the Main Dial or Quick Control Dial after pressing this button to change between Evaluative, Partial, Spot, or Center-weighted metering.
- LCD panel. The LCD panel provides information about the status of your camera and its settings, including exposure mode, number of pictures remaining, battery status, and many other settings. I’ll illustrate all these in the next section.
- Main Dial. This dial is used to make many shooting settings. When settings come in pairs (such as shutter speed/aperture in Manual shooting mode), the Main Dial is used for one (for example, shutter speed), while the Quick Control Dial is used for the other (aperture). When an image is on the screen during playback, this dial also specifies the leaps that skip a particular number of images during playback of the shots you’ve already taken, as I described earlier. This dial is also used to move among tabs when the MENU button has been pressed and is used within some menus (in conjunction with the Quick Control Dial) to change pairs of settings.
- Shutter release button. Partially depress this button to lock in exposure and focus. Press all the way to take the picture. Tapping the shutter release when the camera has turned off the autoexposure and autofocus mechanisms reactivates both. When a review image is displayed on the back-panel color LCD, tapping this button removes the image from the display and reactivates the autoexposure and autofocus mechanisms.
- AF area selection mode button. Changes the AF Area Selection Mode from among Spot AF (Manual Selection), 1-point AF (Manual Selection), Zone AF (Manual Zone Selection), Large Zone AF (Manual Selection of Zone), and Automatic Selection AF, as explained in Chapter 5.
LCD Panel Readouts
The top panel of the EOS 90D (see Figure 3.15) contains an amber-colored (when backlit) monochrome LCD readout that displays status information about most of the shooting settings. All the information segments available are shown in Figure 3.16. I’ve color-coded the display to make it easier to differentiate them; the information does not appear in color on the actual 90D. Many of the information items are mutually exclusive (that is, in the autofocus area at upper left, only one of the possible settings illustrated will appear).
Some of the items on the status LCD also appear in the viewfinder, such as the shutter speed and aperture (pictured in the middle of the display in blue in the figure), and the exposure level (in yellow at the bottom).
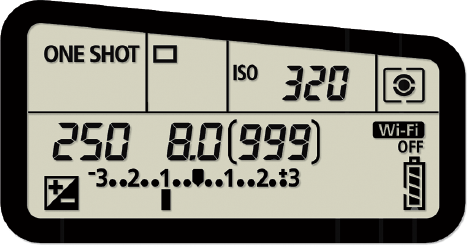
Figure 3.15

Figure 3.16
Underneath Your 90D
There’s not a lot going on with the bottom panel of your 90D (see Figure 3.17). You’ll find a tripod socket, which secures the camera to a tripod, and is also used to lock on the optional BG-E14 battery grip, which provides more juice to run your camera to take more exposures with a single charge. It also adds a vertically oriented shutter release, Main Dial, AE lock/FE lock, and AF point selection controls for easier vertical shooting. To mount the grip, slide the battery door latch to open the door, then push gently toward the outside edge of the camera to free the hinge pins from their sockets. That will let you remove the battery door. Then slide the grip into the battery cavity, aligning the pin on the grip with the small hole on the other side of the tripod socket. Tighten the grip’s tripod socket screw to lock the grip onto the bottom of your 90D.

Figure 3.17
Lens Components
The typical lens, like the ones shown in Figures 3.18 and 3.19, has seven or eight common features. Not every component appears on every lens. The lens on the right, for example, lacks the distance scale and distance indicator that the lens on the left has. Lenses that lack image stabilization will not have a stabilization switch.
- Filter thread. Lenses have a thread on the front for attaching filters and other add-ons. Some also use this thread for attaching a lens hood (you screw on the filter first, and then attach the hood to the screw thread on the front of the filter).
- Lens hood. Shields the front element of the lens from extraneous light arriving from outside the image area and serves as protection.
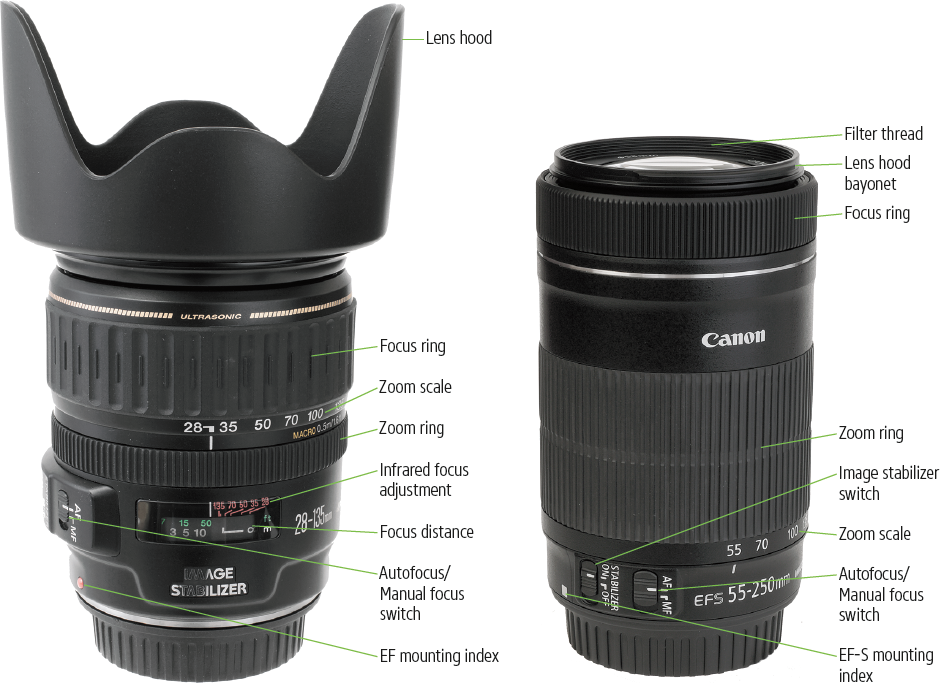
Figure 3.18
- Lens hood bayonet. This is used to mount the lens hood for lenses that don’t use screw-mount hoods (the majority).
- Zoom ring. Turn this ring to change the zoom setting.
- Zoom scale. These markings on the lens show the current focal length selected.
- Focus ring. This is the ring you turn when you manually focus the lens.
- Focus distance. This is a readout that rotates in unison with the lens’s focus mechanism to show the distance at which the lens has been focused. It’s a useful indicator for double-checking autofocus, roughly evaluating depth-of-field, and for setting manual focus guesstimates.
- Infrared focus adjustment. IR illumination doesn’t focus on the exact same plane as visible light, so if you’re shooting infrared photos, move the focus ring to line up to the appropriate focal length opposite the distance determined by normal focusing.
- Autofocus/manual focus switch. Allows you to change from automatic focus to manual focus.
- Image stabilizer switch. Lenses with IS include a separate switch for adjusting the stabilization feature.
- EF-S/EF mounting index. EF-S lenses have a raised white square, while EF lenses have a raised red bump; line up these indexes with the matching white and red indicators on the camera lens mount to attach the lens.
- Electrical contacts. On the back of the lens (see Figure 3.19) are electrical contacts that the camera uses to communicate focus, aperture setting, and other information.
- Lens bayonet mount. This mount is used to attach the lens to a matching bayonet on the camera body.
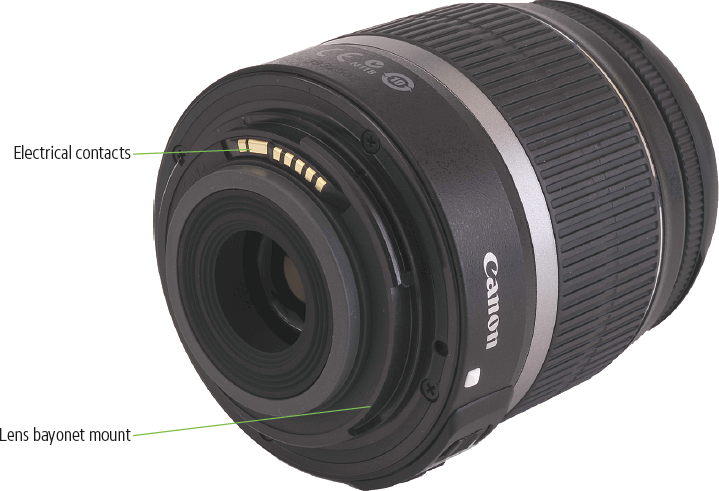
Figure 3.19
Looking Inside the Viewfinder
Much of the important shooting status information is shown inside the viewfinder of the 90D. As with the displays shown on the color LCD, not all this information will be shown at any one time. Figure 3.20 shows what you can expect to see. I’ll explain all these readouts later in this book, with those pertaining to exposure in Chapter 4, and those relating to flash in Chapter 11. These readouts include:
- Autofocus (AF) points. Shows the areas used by the 90D to focus. The camera can select the appropriate focus zone for you, or you can manually select one or all the zones, as described in Chapter 4.
- AF area modes. At the top of the frame, indicators will appear showing the current AF area selection mode—Spot AF, 1-point AF, Zone AF, Large Zone AF, or Automatic Selection.
- AF area frame. Shows the area in which the available AF points reside. The full frame is shown in the figure; smaller frames appear when fewer points are in use.
- Electronic level. Shows the degree of tilt when the camera is held horizontally or vertically.
- Warning symbol. Appears to alert you of various conditions.
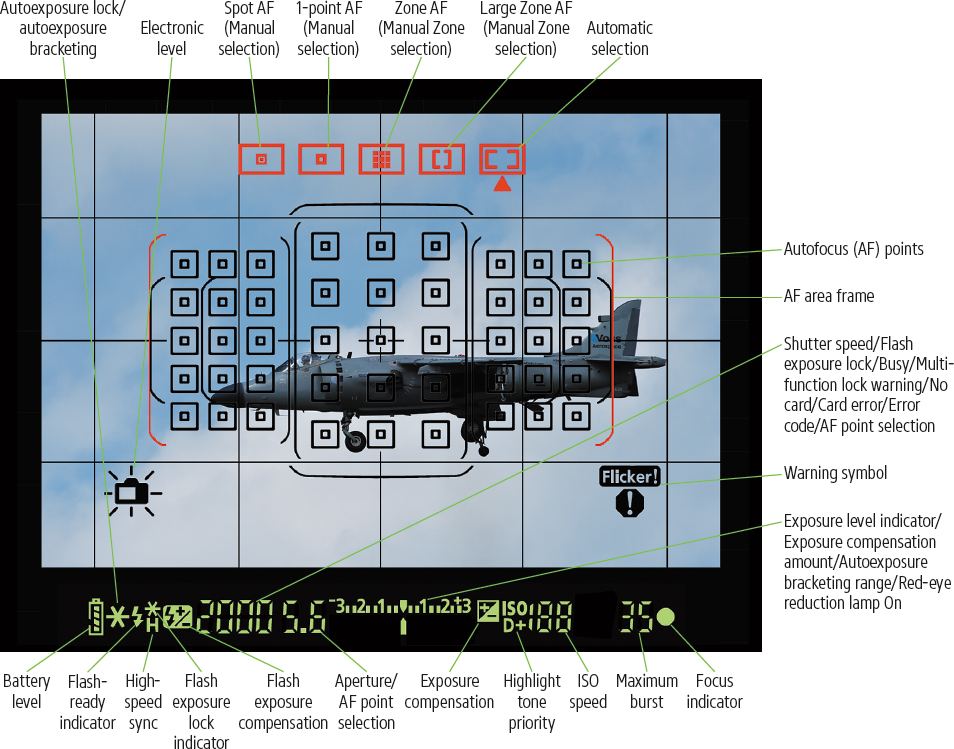
Figure 3.20
- Battery level. Displays how much power remains in your battery.
- Autoexposure lock/autoexposure bracketing. Shows that exposure has been locked. This icon also appears when an automatic exposure bracketing sequence is in process.
- Flash-ready indicator. This icon appears when the flash is fully charged.
- Flash exposure lock warning. This shows when the flash exposure lock has been applied or a flash exposure bracketing sequence is underway.
- High-Speed sync. The H is shown when high-speed (focal plane) flash sync is being used. The * appears when flash exposure lock or a flash exposure bracketing sequence is underway.
- Flash exposure compensation. Appears when flash EV changes have been made.
- Shutter speed/Flash exposure lock/Busy/Multi-function lock warning/No card/Card error/Error code/AF point selection. Most of the time, these readouts show the current shutter speed and aperture. This pair can also warn you of memory card conditions (full, error, or missing), ISO speed, flash exposure lock, and a buSY indicator when the camera is busy doing other things (including flash recycling).
- Exposure level indicator/Exposure compensation amount/Autoexposure bracketing range/Red-eye reduction lamp On. This scale shows the current exposure level, with the bottom indicator centered when the exposure is correct as metered. The indicator may also move to the left or right to indicate under- or overexposure (respectively). The scale is also used to show the amount of EV and flash EV adjustments and the number of stops covered by the current automatic exposure bracketing range and is used as a red-eye reduction lamp indicator.
- Exposure compensation. Shows the amount of adjustment to the metered exposure you’ve specified.
- ISO speed. This useful indicator shows the current ISO setting value. Those who have accidentally taken dozens of shots under bright sunlight at ISO 1600 because they forgot to change the setting back after some indoor shooting will treasure this addition.
- Maximum burst. Changes to a number to indicate the number of frames that can be taken in continuous mode using the current settings.
- Focus indicator. This green dot appears when the subject covered by the active autofocus zone is in sharp focus.
- Highlight tone priority. Shows status of this feature, which allows the 90D to adjust the rendition of the lighter tones in an image to provide full detail, possibly at the expense of shadow detail.