
Now it’s time to fire up your EOS 90D and take some photos. The easy part is turning on the power—that On/Off switch on the left side, just south of the Mode Dial. Turn on the camera, and, if you mounted a lens and inserted a fresh battery and memory card—as I prompted you in the last chapter—you’re ready to begin. You’ll need to select a shooting mode, metering mode, focus mode, and, if need be, elevate the 90D’s built-in flash.
Navigating the Menus
While you’ll find complete instructions for using every menu option the 90D offers in Chapters 8 and 9, the next few chapters will often ask you to use the camera’s menu system to make adjustments. The 90D often provides several different ways of performing an action, and menu navigation is one of them. The traditional way is to use the physical controls:
- Access menus. You can produce the 90D’s main menus by pressing the MENU button, located at the far-left corner of the back of the camera (and shown at left in Figure 2.1).

Figure 2.1 Your basic controls include the MENU button (left); Quick Control Dial, Multi-controllers, SET button, Q button (center); and Main Dial (right). The AF Area/AF Method Selection button’s autofocus function is described later.
- Navigate among menus. Use the Quick Control Dial or the directional controls (the Multi-selector 1 joystick or Multi-selector 2 joypad, shown in the middle in Figure 2.1) to move within the menu system. Press SET to activate your choice or confirm a selection.
- Main Dial. This dial (shown at right in Figure 2.1) can often be used to move highlighting left and right, say, to scroll among the main menu heading tabs.
- Quick Control button. The Quick Control button (Q button) (shown in the center in Figure 2.1) produces a Quick Control menu (described later), which offers fast access to many adjustments.
Mastering the Touch Screen
When a main menu, adjustment screen, or the Quick Control menu is displayed, you may elect to use the 90D’s touch screen to make your changes. Optionally, you can resort to the physical controls that provide the equivalent functions, including the available buttons and directional key navigational buttons. However, I think that once you become familiar with the speed with which the touch screen allows you to make these adjustments, you’ll be reluctant to go back to the “old” way of doing things.
The 90D’s touch screen is capacitive rather than resistive, making it more like the current generation of smartphones than earlier computer touch-sensitive screens. The difference is that your camera’s LCD responds to the electrical changes that result from contact rather than the force of pressure on the screen itself. That means that the screen can interpret your touches and taps in more complex ways. It “knows” when you’re using two fingers instead of one, and can react to multi-touch actions and gestures, such as swiping (to scroll in any direction), and pinching/spreading of fingers to zoom in and out. Since you probably have been using a smartphone for a while, these actions have become ingrained enough to be considered intuitive. Virtually every main and secondary function or menu operation can be accessed from the touch screen. However, if you want to continue using the buttons and dials, the 90D retains that method of operation.
Here’s what you need to know to get started:
TIP: YOUR CHOICE
Throughout this book, I may not explicitly say “tap the screen (or use the button)” for every single operation, in order to simplify descriptions and avoid extra verbiage. I’m assuming that once you master the touch screen using the information in this section, you’ll make your own choice and use whichever method you prefer. Unless I specifically say to use only the touch screen or physical controls, assume I mean you can use either one.
- Enable/Disable touch features. As I’ll explain in Chapter 9, you can set the touch screen to Standard or Sensitive response or disable touch operation completely in the Set-up 3 menu under the Touch Control entry. You can also turn the click sound the touch feature makes on or off using the Beep setting in the Setup 3 menu.
- Tap to select. Tap (touch the LCD screen briefly) to select an item, including a menu heading or icon. Any item you can tap will have a frame or box around it. Figure 2.2 shows the taps needed to select a menu tab and specific entry within that menu.
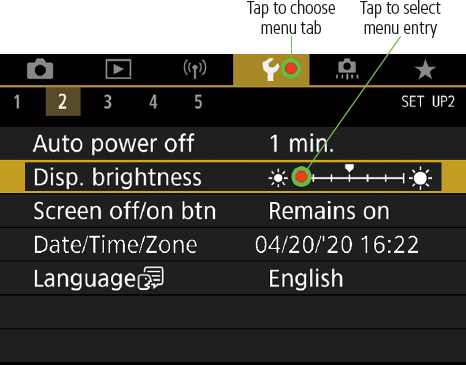
Figure 2.2 Tap menu tabs or entries to select them.

Figure 2.3 Tap or swipe to adjust sliding scales.
- Drag/swipe to select. Many functions can be selected by touching the screen and then sliding your finger to the right or left until the item you want is highlighted. For example, instead of tapping, you can slide horizontally along the main menu’s tabs to choose any Shooting, Playback, Custom, or My Menu tab, and slide vertically to choose an individual menu entry.
- Drag/swipe to adjust scales. Screens that contain a sliding scale (say, to make an image brighter or darker) can be adjusted by dragging. Figure 2.3 shows how you can drag along the Display Brightness scale to select a value or, alternatively, tap the left/right arrow icons to either side of the scale. (Note that you can also press the left/right directional keys if you prefer.)
- Drag/swipe to scroll among images. In Playback mode, as you review your images, drag your finger left and right to advance from one image to another, much as you might do with a smartphone or tablet computer. This is probably the coolest use for the touch screen. Figure 2.4 shows you can use either one finger to scroll or two fingers to jump among playback images.
- Pinch to reduce/enlarge. During playback, you can use two fingers to “pinch” the screen to zoom out from single-frame display to multiple thumbnails, and spread those two fingers apart to zoom in again to a single frame and magnified image—also very cool and intuitive. (See Figure 2.5.)
- Avoid “protective” sheets, moisture, and sharp implements. The LCD uses capacitive technology to sense your touch, rather than pressure sensitivity. Some thicker LCD protectors or moisture can interfere with the touch functions, and styluses or sharp objects (such as pens) won’t produce the desired results. However, I have, in fact, used “skins” on my 90D’s LCD with good results (even though the screen is quite rugged and really doesn’t need protection from scratches), but there is no guarantee that all such protectors will work for you. My recommendation: Thin tempered glass protectors available from many sources work for me. They cost less than $20 and can easily be removed if they don’t work for you. It might be worth taking a chance on one.
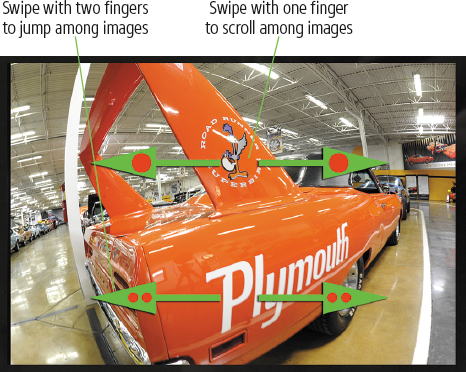
Figure 2.4 Swipe left or right with one finger to scroll among images; swipe with two fingers to jump.

Figure 2.5 Spread two fingers apart to enlarge/zoom in, or pinch two fingers together to zoom out/view thumbnails.
As I noted, the choice of whether to use the traditional buttons or touch screen is up to you. I’ve found that with some screens, the controls are too close together to be easily manipulated with my wide fingers. The touch screen can be especially dangerous when working with some functions, such as card formatting. In screens where the icons are large and few in number, such as the screen used to adjust LCD brightness, touch control works just fine. Easiest of all is touch operation during Playback. It’s a no-brainer to swipe your finger from side to side to scroll among images and pinch/spread to zoom out and in. Another helpful use is the ability to snap a photo by tapping the shutter release icon that can be enabled in the lower-left corner of the screen (not shown).
Selecting a Shooting Mode
The following sections show you how to choose Scene, semi-automatic, or automatic shooting (exposure) modes; select a metering mode (which tells the camera what portions of the frame to evaluate for exposure); and set the basic autofocus functions. If you understand how to do these things, you can skip ahead to “Other Settings.”
You can choose a shooting method from the Mode Dial located on the top left of the Canon EOS 90D. (See Figure 2.6.) There are Basic Zone automatic and Scene shooting modes, in which the camera makes virtually all the decisions for you (except when to press the shutter). The camera also offers five Creative Zone modes, which allow you to provide input over the exposure and settings the camera uses. You’ll find a complete discussion of both Basic Zone and Creative Zone modes in Chapter 4.
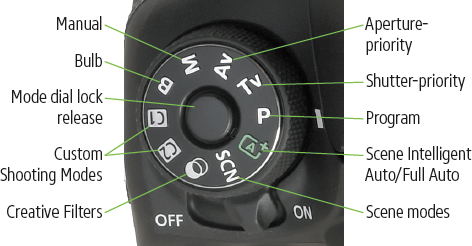
Figure 2.6 The Mode Dial includes both Basic Zone and Creative Zone settings.
Turn your camera on by flipping the power switch (located under the Mode Dial) to On. Next, you need to select which shooting mode to use. Hold down the Mode Dial lock release button and rotate the dial. If you’re very new to digital photography, you might want to set the camera to Scene Intelligent Auto (the green frame on the Mode Dial) or P (Program mode) and start snapping away. Either mode will make all the appropriate settings for you for many shooting situations.
- Scene Intelligent Auto/Full Auto. In this mode, marked with a green A+ icon, the EOS 90D makes all the exposure decisions for you, and will suggest popping up the flash if necessary, under low-light conditions.
- Creative Filters. At this Mode Dial position, you’ll gain access to 10 special effects you can apply to the images you shoot. Press/tap the Q button or Q icon and the SET button to select from Grainy B/W, Soft Focus, Fish-eye, Water Painting, Toy Camera, Miniature, and four types of HDR (high dynamic/extended tonal range) special effects, which I’ll explain in Chapter 4.
With the dial in the SCN position, you can also select additional Special Scene modes. Turn the Mode Dial to the SCN position, then press the Q button (or tap the Q icon in the lower left of the LCD monitor screen). You can then rotate the Quick Control Dial or Main Dial to choose one of the following SCN modes:
- Portrait. Use this mode when you’re taking a portrait of a subject standing relatively close to the camera and want to de-emphasize the background, maximize sharpness, and produce flattering skin tones.
- Group Photo. This is a good mode when you are shooting small- to medium-sized groups and want settings that will help ensure that everyone is in focus.
- Landscape. Select this mode when you want extra sharpness, abundant depth-of-field, and rich colors of distant scenes.
- Sports. Use this mode to freeze fast-moving subjects.
- Kids. This mode produces pleasant skin tones, with bright colors and a fast-enough shutter speed and continuous shooting at up to 11 frames per second to allow a series of sharp pictures of rampaging children.
- Panning. Use this mode to choose settings that will reduce blur as you photograph a subject while rotating the camera from side to side to follow its movement.
- Close-up. This mode is helpful when you are shooting close-up pictures of a subject from about one foot away or less.
- Food. This mode gives you bright and vivid colors to make your food look more appetizing than it probably was in real life. Shooting pictures of your food has become almost mandatory when dining out, thanks to Instagram.
- Candlelight. Preserves the warm, pleasant colors found in subjects illuminated by candlelight. The built-in flash is disabled, but if you have an external Speedlite connected and powered up, it will fire anyway and spoil your picture. Turn it off!
- Night Portrait. Choose this mode when you want to illuminate a subject in the foreground with flash, but still allow the background to be exposed properly by the available light. Be prepared to use a tripod or an image-stabilized (IS) lens to reduce the effects of camera shake. (You’ll find more about IS and camera shake in Chapter 6.)
- Handheld Night Scene. The 90D takes four continuous shots and combines them to produce a well-exposed image with reduced camera shake.
- HDR Backlight Control. The 90D takes three continuous shots at different exposures and combines them to produce a single image with improved detail in the highlights and shadows.
If you have more photographic experience, you might want to opt for one of the Creative Zone modes. These, too, are described in more detail in Chapter 4. These modes let you apply a little more creativity to your camera’s settings. These modes are indicated on the Mode Dial by letters M, Av, Tv, and P, plus B.
- M (Manual). Select when you want full control over the shutter speed and lens opening, either for creative effects or because you are using a studio flash or other flash unit not compatible with the 90D’s automatic flash metering.
- Av (Aperture-priority). Choose when you want to use a particular lens opening, especially to control sharpness or how much of your image is in focus. The 90D will select the appropriate shutter speed for you. Av stands for aperture value.
- Tv (Shutter-priority). This mode (Tv stands for time value) is useful when you want to use a shutter speed to stop action or produce creative blur effects. The 90D will select the appropriate f/stop for you.
- P (Program). This mode allows the 90D to select the basic exposure settings, but you can still override the camera’s choices to fine-tune your image.
- B (Bulb). When the shutter release button is held down, or activated by a remote control, the shutter remains open until you release it, allowing you to take exposures longer than the 30 seconds allowed in the other Creative Zone modes.
- C1, C2 (Custom Shooting Modes). These are not exposure modes, even though they appear on the Mode Dial. Instead, they are “memory” slots that store a group of camera settings that you want quick access to. I’ll show you how to save settings in the C1 and C2 slots in Chapter 10.
You can change some settings when the shooting settings display is shown on the screen (press the INFO. button to the left of the viewfinder window if you want to make the display visible). Press the Quick Control button and then tap the touch screen or use the directional keys to navigate to the setting you’d like to adjust. The available adjustments change, depending on what Basic Zone or Creative Zone exposure mode you’re using. (See Figure 2.7 for a typical Creative Zone shooting settings display.)

Figure 2.7 Some settings can be made quickly when the shooting settings display is visible.
Choosing a Metering Mode
You might want to select a particular metering mode for your first shots, although the default Evaluative metering (which is set automatically when you choose a Basic Zone mode) is probably the best choice as you get to know your camera. To change metering modes when using a Creative Zone mode, you’ll need to press the Metering button on top of the camera or use the Q button. The options are shown in Figure 2.8.

Figure 2.8 Metering modes (left to right): Evaluative, Partial, Spot, Center-weighted averaging.
- Evaluative metering. The standard metering mode; the 90D attempts to intelligently classify your image and choose the best exposure based on readings from 216 different zones in the frame measured using a 220,000-pixel RGB plus infrared sensor, with emphasis on the autofocus points.
- Partial metering. Exposure is based on a central spot, roughly 6.5 percent of the image area.
- Spot metering. Exposure is calculated from a smaller central spot, about 2.0 percent of the image area.
- Center-weighted averaging metering. The 90D meters the entire scene, but it gives the most emphasis to the central area of the frame.

NOTE Metering areas vary slightly from these specifications in Live View mode.
You’ll find a detailed description of each of these modes in Chapter 4.
Choosing a Focus Mode
You can easily switch between automatic and manual focus by moving the AF/MF switch on the lens mounted on your camera. However, if you’re using a Creative Zone shooting mode, and you are using autofocus, you’ll still need to choose an appropriate autofocus mode, which Canon calls “AF Operation.” (You can read more on selecting focus parameters in Chapter 5.) If you’re using a Basic Zone mode, the focus method is set for you automatically.
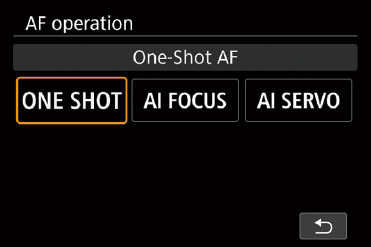
Figure 2.9 Choosing AF Operation (AF focus mode).
To set the AF focus mode, you must first have set the lens to the AF position (instead of the manual focus MF position). Then press the AF button on the top of the camera to produce the selection screen shown in Figure 2.9. Choose the focus mode you want and select SET to confirm your focus mode.
The three choices available in Creative Zone modes are as follows:
- One Shot. This mode, sometimes called single autofocus, locks in a focus point when the shutter button is pressed down halfway, and the focus confirmation light glows in the viewfinder. The focus will remain locked until you release the button or take the picture. If the camera is unable to achieve sharp focus, the focus confirmation light will blink. This mode is best when your subject is relatively motionless. Portrait, Food, Kids, Candlelight, Night Portrait, and Landscape modes use this focus method exclusively.
- AI Servo. This mode, sometimes called continuous autofocus, sets focus when you partially depress the shutter button, but continues to monitor the frame and refocuses if the camera or subject is moved. This is a useful mode for photographing sports and moving subjects. The Sports and Kids modes use this focus method exclusively.
- AI Focus. In this mode, the 90D switches between One-Shot and AI Servo as appropriate. That is, it locks in a focus point when you partially depress the shutter button (One-Shot mode) but switches automatically to AI Servo if the subject begins to move. This mode is handy when photographing a subject, such as a sleeping pet that might wake up and move unexpectedly. The Flash Off Basic Zone mode uses this focus method.
Selecting an AF Area/Point Selection Mode
When composing through the viewfinder, the Canon EOS 90D uses 45 different focus points to calculate correct focus. In any of the Basic Zone shooting modes, the focus point is selected automatically by the camera. In the Creative Zone modes, you can allow the camera to select the focus point automatically, or you can specify which focus point should be used. There are five AF Area/Point Selection modes, which I’ll explain in detail in Chapter 5. They are as follows:
- Spot AF (Manual Selection). The camera uses its smallest AF point, represented by the smaller boxes shown in Figure 2.10.
- 1-point AF (Manual Selection). You can choose one larger AF point for focus, represented by the larger boxes in the figure.
- Zone AF (Manual Zone Selection). Select any of eight different focus zones, each a cluster of nine of the larger points in a 3 × 3 pattern you can relocate within the larger array.
- Large Zone AF (Manual Zone Selection). Three focus zones are available at the left, right, and center areas of the middle of the frame.
- 45-point Automatic Selection AF. The camera will choose the focus point for you. This mode is always used in Basic Zone exposure modes.

Figure 2.10 Focus points.
To get up and running with this Quick Start, you should set the 90D to 45-point Automatic Selection AF mode. If you want to choose an individual point or zone yourself, skip ahead to Chapter 5 after you’ve finished reading this chapter.
For now, just follow these steps:
- 1. Make sure the lens AF/MF switch is set to AF, and you are using a Creative Zone mode.
- 2. Tap the shutter release to activate the focus system.
- 3. Press the AF Area/AF Method Selection button shown earlier in Figure 2.1. The current focus selection indicators will be highlighted in red.
- 4. Continue pressing, if necessary, until the 45-point Automatic Selection AF icon has an up-pointing triangle underneath it, as seen in Figure 2.11.

Figure 2.11 Select the 45-point Automatic Selection AF mode.
Other Settings
There are a few other options, such as ISO, using the self-timer, or working with flash. Use these right away if you’re feeling ambitious, but don’t feel ashamed if you postpone using these features until you’ve racked up a little more experience with your EOS 90D.
Adjusting ISO
If you like, you can custom tailor the ISO sensitivity setting when you’re using one of the five Creative Zone modes. To start out, it’s best to set ISO to ISO 100 or ISO 200 for daylight photos, and to ISO 400 for pictures in dimmer light. You can adjust ISO now by pressing the ISO button (shown earlier in Figure 2.1) and then navigating with the touch screen or either Main Dial or Quick Control Dial until the setting you want appears on the LCD.
Using the Self-Timer
If you want to set a short delay before your picture is taken, you can use the self-timer when using a Creative Zone mode. Press the Drive button on top of the camera, and rotate the Main Dial or QCD until Self-timer: 10 sec./remote control (which also can be used with the optional RC-6 infrared remote control), Self-timer: 2 sec./remote control, or Self-Timer: Continuous is highlighted (see Figure 2.12). (For the last setting, you can rotate the QCD to specify 2 to 10 shots, which will be taken following a 10-second delay.) Select SET to confirm your choice, and a self-timer icon will appear on the shooting settings display on the back of the 90D. Press the shutter release to lock focus and start the timer. The self-timer lamp will blink, and the beeper will sound (unless you’ve silenced it in the menus) until the final two seconds, when the lamp remains on and the beeper beeps more rapidly.
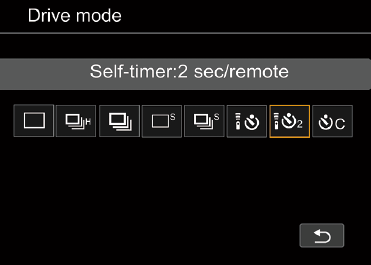
Figure 2.12 The drive modes include (left to right) Single shooting; High-speed continuous shooting (10 shots/second); Low-speed continuous shooting (3 shots/second); Silent single shooting; Silent continuous shooting (3 shots/second); Self-timer: 10 sec./remote control; Self-timer: 2 sec./remote control; Self-timer: Continuous shooting.
Canon recommends slipping off the eyepiece cup and replacing it with the viewfinder cap that’s attached to your camera strap in order to keep extraneous light from reaching the exposure meter through the viewfinder “back door.” Unless it’s nighttime (in which case no precautions are generally needed), I usually just shade the viewfinder window with my hand (if I’m using the self-timer to reduce camera shake for a long exposure) or drape a jacket or sweater over the back of the camera (if I’m scurrying to get into the picture myself).
Using the Built-in Flash
The EOS 90D’s built-in flash and external flash units deserve their own chapters, and I’m providing them (see Chapters 11 and 12). But the built-in flash is easy enough to work with that you can begin using it right away, either to provide the main lighting of a scene or as supplementary illumination to fill in the shadows. The 90D will automatically balance the amount of light emitted from the flash so that it illuminates the shadows nicely, without overwhelming the highlights and producing a glaring “flash” look. (Think Baywatch re-runs when they’re using too many reflectors on the lifeguards!)
The 90D’s flash has a power rating of 12/39.4 (meters/feet) at ISO 100, using the GN (guide number) system that dates to the film era and before electronic flash units had any sort of automatic features. In plain terms, the flash’s rating means that the unit is powerful enough to allow proper illumination of a subject that’s 10 feet away at f/4 at the lowest ISO (sensitivity) setting of your camera. Boost the ISO (or use a wider f/stop) and you can shoot subjects that are located at a great distance. For example, at ISO 800, the 90D’s flash is good enough for a subject at 20 feet using f/5.6 or, alternatively, you can expose that scene at the original 10-foot distance at f/11. Ordinarily, the 90D takes care of all these calculations for you. If you need a bigger blast of light, you can add one of the Canon external flash units, described in Chapter 11.
A flash indicator in the viewfinder will blink when flash is suggested while using any of the Basic Zone modes except for Landscape, Sports, or Handheld Night Scene modes. When the indicator appears (or when you are using a Creative Zone mode), just press the flash button (marked with a lightning bolt as shown in Figure 2.13). In Creative Zone modes, the flash functions in the following way:
- P (Program mode). The 90D selects a shutter speed from 1/60th to 1/250th second and appropriate aperture automatically.
- Tv (Shutter-priority mode). You choose a shutter speed from 30 seconds to 1/250th second, and the 90D chooses the lens opening for you, while adjusting the flash output to provide the correct exposure.
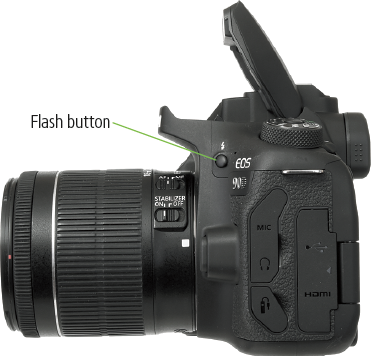
Figure 2.13 The built-in electronic flash can be used as the main light source, or for supplemental illumination.
- Av (Aperture-priority mode). You select the aperture you want to use, and the camera will select a shutter speed from 30 seconds to 1/250th second, and it will adjust the flash output to provide the correct exposure. In low light levels, the 90D may select a very slow shutter speed to allow the flash and background illumination to balance out, so you should use a tripod.
- M (Manual mode). You choose both shutter speed (up to 1/250th second) and aperture, and the camera will adjust the flash output to produce a good exposure based on the aperture you’ve selected.
You can read about flash exposure compensation, red-eye reduction options, and other built-in flash features in Chapter 11.
Taking a Picture
These final sections of the chapter guide you through taking your first pictures, reviewing them on the LCD, and transferring your shots to your computer.
Press the shutter release button halfway to lock in focus at the selected autofocus point. When the shutter button is in the half-depressed position, the exposure, calculated using the shooting mode you’ve selected, is also locked.
Press the button the rest of the way down to take a picture. At that instant, the mirror flips up out of the light path to the optical viewfinder (assuming you’re not using Live View mode, discussed in Chapter 10), the shutter opens, the electronic flash (if enabled) fires, and your 90D’s sensor absorbs a burst of light to capture an exposure. In fractions of a moment, the shutter closes, the mirror flips back down restoring your view, and the image you’ve taken is escorted off the CMOS sensor chip very quickly into an in-camera store of memory called a buffer, and the EOS 90D is ready to take another photo. The buffer continues dumping your image onto the Secure Digital card as you keep snapping pictures without pause (at least until the buffer fills and you must wait for it to get ahead of your continuous shooting, or your memory card fills completely).
Reviewing the Images You’ve Taken
The Canon EOS 90D has a broad range of playback and image review options, including the ability to jump ahead 10 or 100 images at a time. I’ll cover them in more detail in Chapter 3. For now, you’ll want to learn just the basics. Here is all you really need to know at this time, as shown in Figure 2.14, with the touch screen options shown earlier in Figures 2.4 and 2.5.
- Display last image captured/Exit image display. Press the Playback button (marked with a blue right-pointing triangle to the lower right of the LCD monitor) to display the most recent image on the LCD in full-screen Single Image mode. If you last viewed your images using the thumbnail mode (described later in this list), the Index display appears instead.
- View next and previous images. Use the left and right directional keys or swipe the touch screen left or right to view the next or previous image. Use a two-finger swipe to jump quickly among the images.

Figure 2.14 Review your images.
- Change type of image information displayed. Press the INFO. button repeatedly to cycle among overlays of basic image information, detailed shooting information, or no information at all.
- Zoom in/out on an image. When an image is displayed full screen on your LCD, magnify the image by spreading two fingers apart on the touch screen, or reduce the image to thumbnails by pinching two fingers together on the touch screen. You can also press the Magnify button repeatedly to zoom in. The Magnify button is in the upper-right corner of the back of the camera, marked with a blue magnifying glass with a plus sign in it. The Index/Reduce button, located to the left of the Magnify button, zooms back out. Press the Playback button to exit magnified display.
- View thumbnail images. You can rapidly move among many images using the Index mode described in the section that follows this list. The Index/Reduce button in full-frame view switches from single-image display to 4, 9, 36, or 100 reduced-size thumbnails. To change from a larger number of thumbnails to a smaller number (from nine to four to single image, for example), press the Magnify button until the display you want appears. You can also tap the highlighted image on the touch screen to view a full-screen rendition of that thumbnail.
- Jump forward or back. (Not shown.) You can set the jump increment in the Playback 3 menu. (I’ll explain all the jump options in Chapter 3.) Once a jump increment has been selected, you can leap forward or back that number of pictures by rotating the Main Dial or by swiping the touch screen from left to right with two fingers. If using the Main Dial, turn it counterclockwise to review images from most recent to oldest, or clockwise to start with the first image on the memory card and cycle forward to the newest, using the jump size you’ve selected.
- Erase image displayed on screen. Press the Trash button to delete the currently displayed image.
Cruising Through Index Views
You can navigate quickly among thumbnails representing a series of images using the 90D’s Index mode. Here are your options.
- Display thumbnails. Press the Playback button to display an image on the color LCD. If you last viewed your images using Index mode, an Index array of 4, 9, 36, or 100 reduced-size images appears automatically (see Figure 2.15). If an image pops up full-screen in single-image mode, press the Index/Reduce button once to view four thumbnails, twice to view nine thumbnails, and continue pressing to see 36 and 100 images. You can switch by pressing the Index/Reduce button to see more/smaller versions of your images, and the Magnify button to see fewer/larger versions of your images.

Figure 2.15 Review thumbnails of nine images in Index review. You can also arrange to see 4, 36, or 100 images.
- Navigate within a screen of index images. In Index mode, use the up/down/left/right directional keys or the touch screen to move the blue highlight box around within the current index display screen. Swipe the scroll bar at the right of the touch screen to scroll down or up.
- View more index pages. To view additional index pages, rotate the Main Dial. The display will leap ahead or back by the jump increment you’ve set in the Playback 3 menu (as described in Chapter 7), 1, 10, or a specified number of images, by index page, by date, or by folder.
- Check image. When an image you want to examine more closely is highlighted, press the Magnify button or tap the thumbnail on the touch screen until the single-image version appears full-screen on your LCD.
Transferring Photos to Your Computer
The final step in your picture-taking session will be to transfer the photos you’ve taken to your computer for printing, further review, or image editing. Your 90D allows wireless transfer using the Wi-Fi/Bluetooth features of the camera, as explained in Chapter 8. You can also use a memory card reader or an optional USB cable to transfer images.
For now, you’ll probably want to transfer your images either by removing the memory card from the 90D and transferring the images with a card reader or by using a cable transfer from the camera to the computer if you buy or already own the required USB cable. The former option is usually the best because it’s typically much faster and doesn’t deplete the battery of your camera. However, you can use a cable transfer when you have the cable and a computer, but no card reader (perhaps you’re using the computer of a friend or colleague, or at an Internet café).
To transfer images from a memory card to the computer using a card reader:
- 1. Turn off the camera.
- 2. Slide open the memory card door and press on the card, which causes it to pop up so it can be removed from the slot.
- 3. Insert the memory card into your memory card reader. Your installed software detects the files on the card and offers to transfer them. The card can also appear as a mass storage device on your desktop, which you can open, and then drag and drop the files to your computer.
To transfer images from the camera to a Mac or PC computer using the USB cable:
- 1. Turn off the camera.
- 2. Pry back the rubber cover that protects the 90D’s USB port (located closest to the LCD monitor) and plug in a USB 2.0 mini-B cable (available from many sources, as mentioned in Chapter 1). (See Figure 2.16.)
- 3. Connect the other end of the USB cable to a USB port on your computer.
- 4. Turn the camera on. Your installed software usually detects the camera and offers to transfer the pictures, or the camera appears on your desktop as a mass storage device, enabling you to drag and drop the files to your computer.

Figure 2.16 Images can be transferred to your computer using a USB cable.
Shooting Tips
In this section, you’ll find tables with tips on settings to use for different kinds of shooting, beginning with recommended settings for many (but not all) Shooting, Set-up, and Custom Function menu options. In particular, the Custom Function III: Operation/Others choices are personal preferences. You can set up your camera to shoot the main type of scenes you work with, then use the charts that follow to make changes for other kinds of images. Most will set up their 90D for my All-Purpose settings and adjust from there.
You’ll find additional advice on selecting these options, explanations of what they do, and the rationale behind my recommendations in Chapters 7, 8, and 9. This section is simply a set-up guide you can use as a reference as you learn how to use your 90D’s features.
TABLE 2.1 Default, All Purpose, Sports—Outdoors, Sports—Indoors
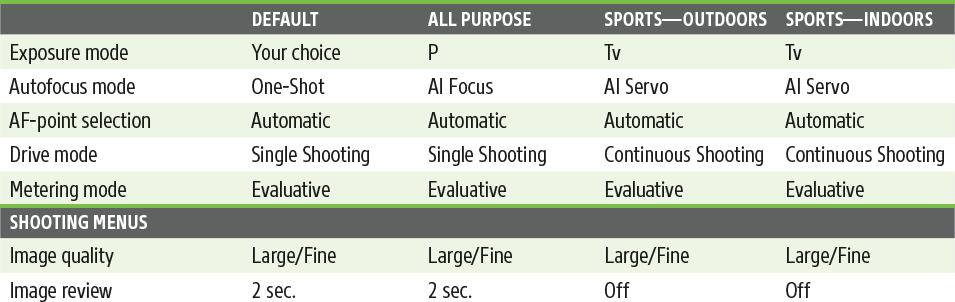
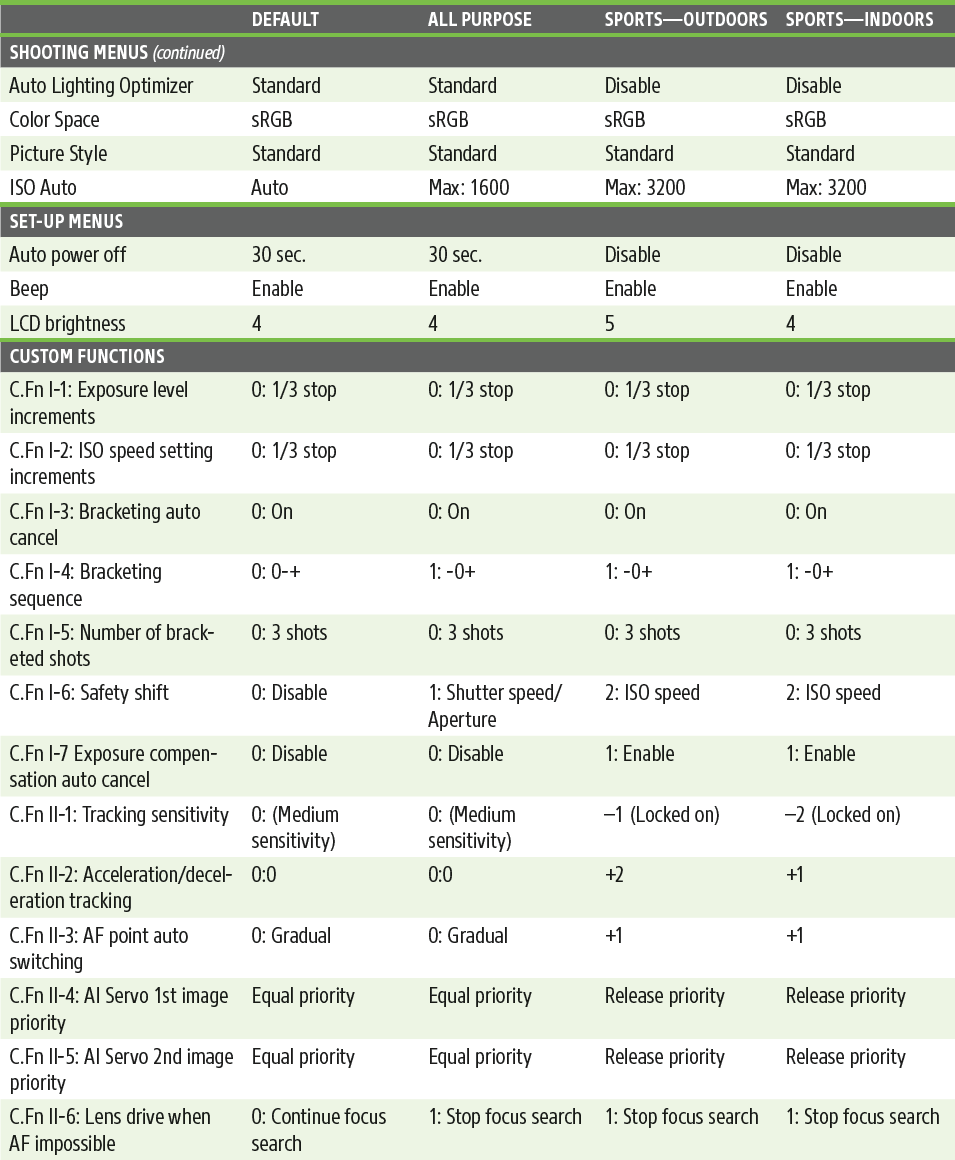

TABLE 2.2 Stage Performance, Long Exposure, HDR, Portrait

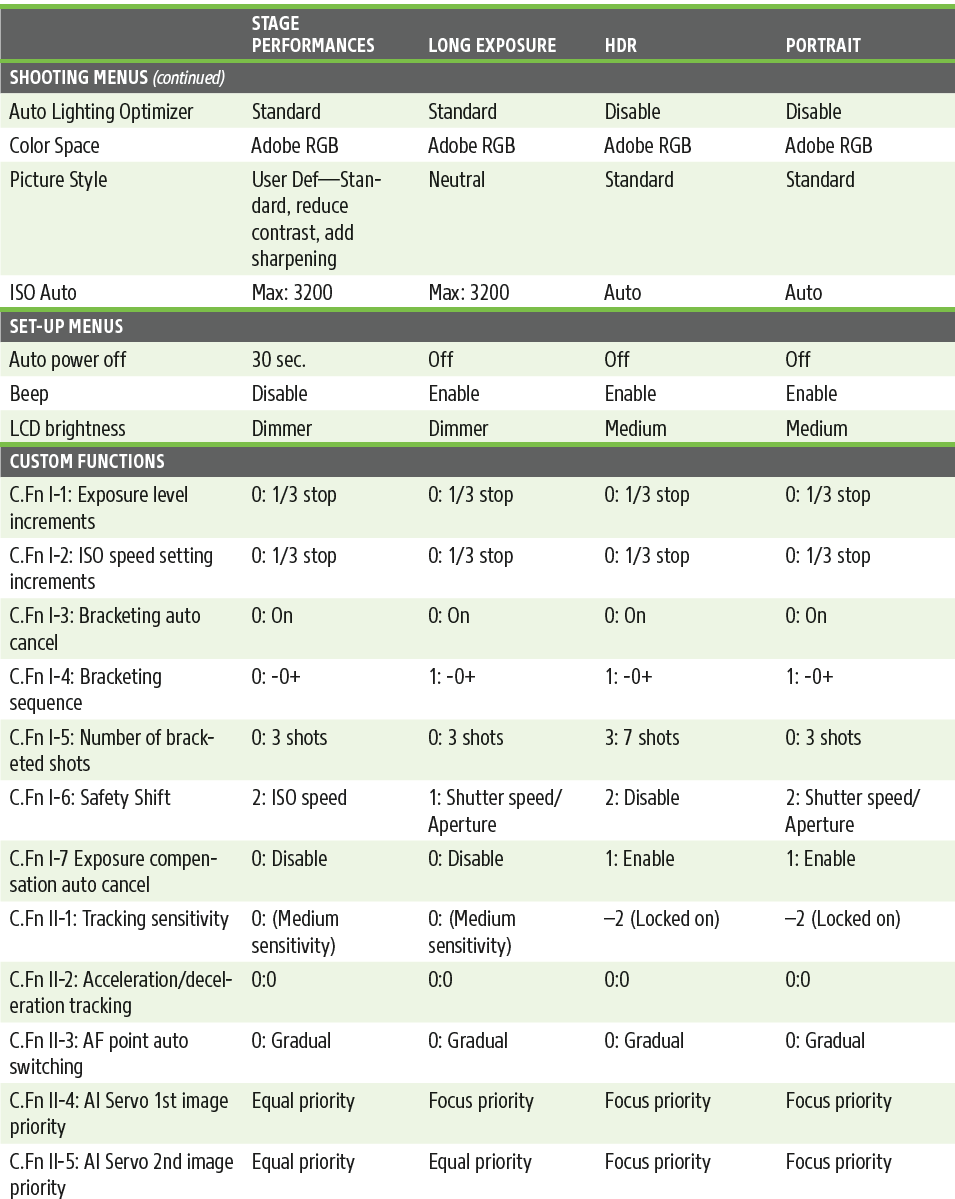
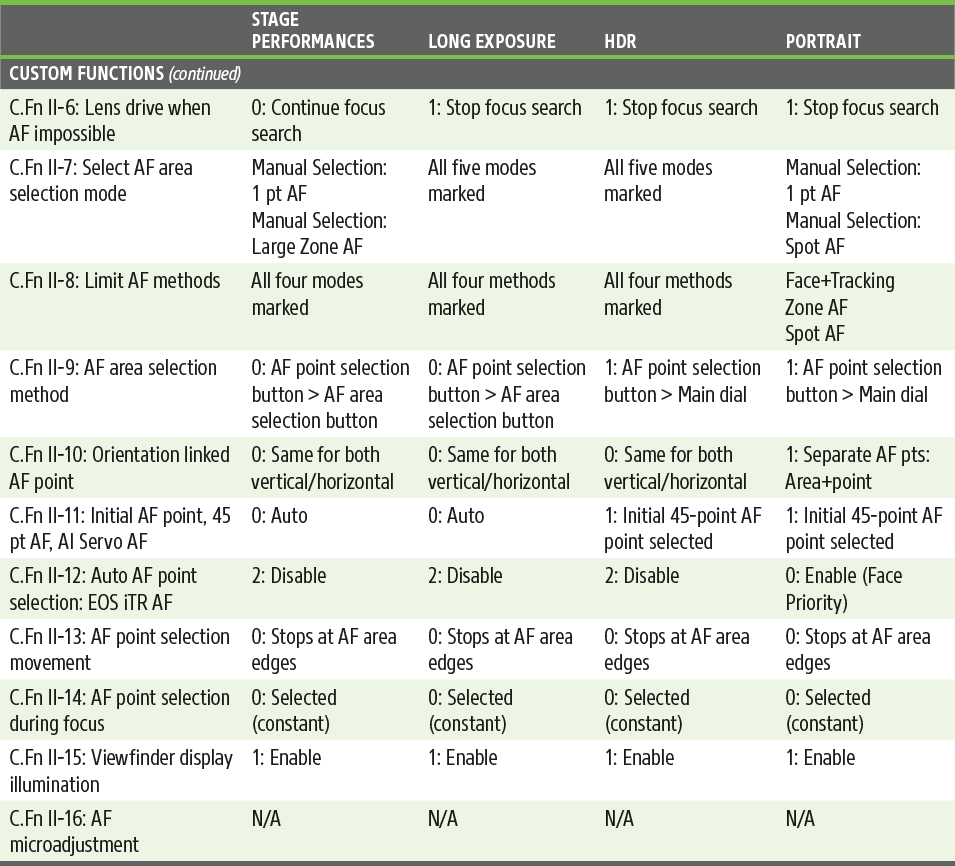
TABLE 2.3 Studio Flash, Landscape, Macro, Travel, E-Mail


