
Your 90D has built-in wireless communications capabilities that allow you to link the camera to multiple devices, as I’ll describe in this chapter. In addition, you’ll want to study Canon’s online guides for advanced networking techniques and settings, and the latest information on using the software Canon offers for the 90D. Visit the Canon website for your country for more information and/or downloadable manuals on:
- EOS Utility for Windows and Macintosh. As I write this, Version 3.12 is the latest edition. Canon offers a downloadable PDF manual that will help you use its functions. With this utility, you can download and display images, perform remote shooting, and adjust camera controls after you’ve connected to the 90D using the steps I outline in this chapter.
- Wireless Help. I’ll show you how to connect using Bluetooth, the 90D’s built-in Wi-Fit hot spot, and access points. For more advanced LAN information, Canon’s online Wireless Help tool can be useful.
- Digital Photo Professional (DPP) for Windows and Macintosh. The application for your Windows or Mac computer, in Version 4.12 as I write this, is a powerful RAW processor that you may be familiar with. Canon provides a manual for it on its website. However, you may not be familiar with DPP Express, a wireless tool for recent iPads that works in conjunction with the Camera Connect app that installs on your smartphone. You can use DPP Express to view images and adjust settings on your 90D, and save files to the cloud, a computer, or your camera.
Applications, especially, are updated frequently enough that instructions provided in this book would likely be out-of-date before the book is even published. That’s why you’ll find little discussion of software like Adobe Photoshop, Digital Photo Professional, or apps like Camera Connect. The software has been designed to be easy to use with plenty of built-in help files. In addition, this book concentrates on still photography rather than information technology, obviously, so I’m not going to go into fine detail on LAN configuration and other IT topics. However, I think you’ll find enough information in the following sections to get you up and running with the basics.
First, here is a list of the connections you can make with the 90D’s built-in Wi-Fi:
- Phones and tablets. You can connect to a smartphone or tablet and use an app on the device to operate the camera remotely or review images on your memory card. Both Android and iOS are supported.
- Connect and control your camera from your computer. The EOS Utility will allow you to connect your 90D to your computer over Wi-Fi and operate it remotely. The Image Transfer Utility 2 can be used to send images from the camera automatically to your computer.
- Print images. If you have a PictBridge-compatible printer with wireless local area network (WLAN) features, you can print images directly from your camera.
- Web upload. The Canon iMAGE Gateway can be used to share your images with colleagues, family, or friends over the Internet once you’ve registered for a free account.
I’ll explain all of these in the next sections, but the first step is helping you get connected using the most common methods. You have your choice of linking your camera using Bluetooth, Wi-Fi using the 90D’s built-in access point (“hot spot”), or your existing home/office network that operates using a router.
Connecting to a Smartphone via Bluetooth
Connecting your smart device to your 90D is most easily done using a Bluetooth connection, which is available on virtually all smart devices introduced within the last three or four years. After making sure Bluetooth is enabled on your smartphone, just follow these steps:
- 1. In the Network 1 menu (see Figure 8.1, left), select Wi-Fi/Bluetooth Connection. In the screen that appears (see Figure 8.1, right), highlight the Connect to Smartphone icon (leftmost in the top row).
- 2. Press MENU to confirm and exit.
- 3. Select Add a Device to Connect To. If the Camera Connect app is already installed on your phone, select Do Not Display; otherwise choose Android or iOS to display a QR code you can scan with your phone to access the Google Play or Apple App Store to install the Camera Connect app.
- 4. Select Pair with Bluetooth to enable pairing with your smartphone on the camera. (See Figure 8.2.)
- 5. Open the Camera Connect app on your phone. Follow the directions for the screens that appear to pair the camera and phone. You’ll see a message on the order of “New Bluetooth Enabled Camera Found. Choose Camera for Pairing,” then a Bluetooth Pairing Request screen. Tap Pair. (See Figure 8.3.)
- 6. Continue following the prompts to join the two devices using Camera Connect.

Figure 8.1 The Network menu (left); choosing a function (right).
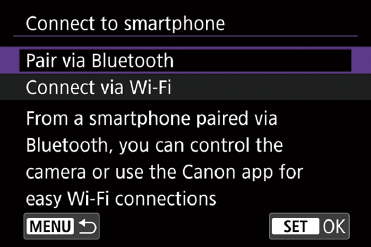
Figure 8.2 Pair using Bluetooth.

Figure 8.3 Prompts on the smartphone.
INSTALL CAMERA CONNECT
All the instructions that follow which require using Camera Connect will assume you have already installed the app as directed in Step 3 above. You can safely choose Do Not Display when the screen described in the step is shown.
Once you’ve connected using Bluetooth you can easily keep in touch. Just choose Stay Connected If Off in the Bluetooth Function menu, and the 90D will remain connected to your device even if you turn the camera off. Low-energy Bluetooth requires little power, so you can safely enable the camera and device to remain connected when they are in range of each other. Just launch Camera Connect on your device, select Images on Camera (tap Join if using iOS), and you’ll be able to view a list of images on the camera.
Connecting to a Smartphone Using Wi-Fi
If you cannot or do not want to connect your camera to your smartphone using Bluetooth, you can connect using Wi-Fi alone. Just follow these steps:
- 1. In the Network 1 menu (see Figure 8.1, left, shown earlier), select Wi-Fi/Bluetooth Connection. In the screen that appears (see Figure 8.1, right), highlight the Connect to Smartphone icon (leftmost in the top row).
- 2. Press MENU to confirm and exit.
- 3. Select Add a Device to Connect To. As I noted, if the Camera Connect app is already installed on your phone, select Do Not Display; otherwise, choose Android or iOS to display a QR code you can scan with your phone to access the Google Play or Apple App Store to install the Camera Connect app.
- 4. Select Connect Via Wi-Fi to connect your smartphone to the camera.
- 5. Check the SSID (network name) and password. The password will appear only if you have specified one in the Wi-Fi settings entry (as I’ll explain later). (See Figure 8.4.)
- 6. Go to the Settings page of your smartphone and choose Wi-Fi settings. The 90D’s built-in network will appear among the available networks. Select it and enter the password (if necessary). Figure 8.5 shows the steps I use for my iOS phone.
- 7. Open the Camera Connect app on your phone. Follow the directions for the screens that appear to pair the camera and phone. You’ll see a message on the order of “New Camera Found. Choose Camera To Connect to.”

Figure 8.4 Check SSID and password.
- 8. To specify viewable images, press the INFO. button.
- 9. The main window of the Camera Connect app will appear on the smartphone with a message “The Wi-Fi Connection to a smartphone is now complete.”
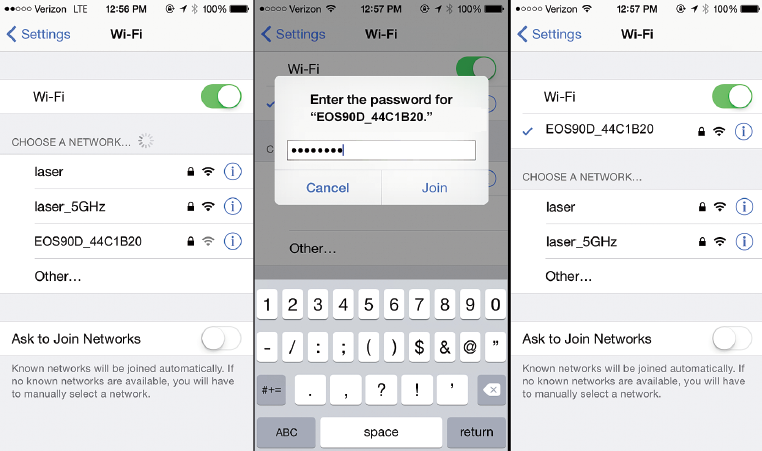
Figure 8.5 Screens displayed on a typical smartphone.
Connecting to a Computer Using Wi-Fi
While you can control your 90D using the Camera Connect app on your smartphone as described above, you can also use a laptop or desktop computer to wirelessly operate your camera using the free EOS Utility that can be downloaded from the Canon website.
Connection is done in a similar way:
- 1. In the Network 1 menu, select Wi-Fi/Bluetooth Connection. In the screen that appears (see Figure 8.6), highlight the Remote Control (EOS Utility). Press MENU to confirm and exit.
- 2. Select Add a Device to Connect To.
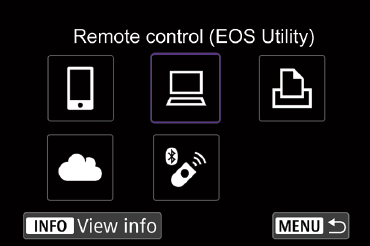
Figure 8.6 Link using the EOS Utility.
- 3. Check the SSID (network name) and password, as shown earlier in Figure 8.4. The password will appear only if you have specified one in the Wi-Fi settings entry (as I’ll explain later).
- 4. Access your computer/operating system’s wireless settings. Keep in mind that while virtually all laptops have wireless built-in, not all desktop computers do. The screen shown for my Windows 10 OS appears in Figure 8.7.
- 5. Select the camera’s SSID from the list and enter the password/encryption/network security key.
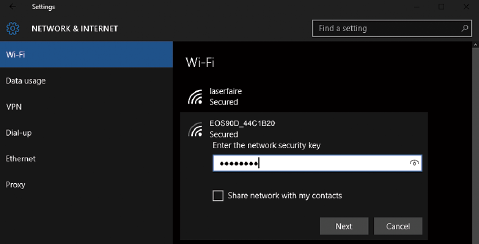
Figure 8.7 Select the camera’s SSID from your Windows or Mac operating system’s Network settings.
- 6. Start the EOS Utility 3 on your computer and select Pairing Over Wi-Fi/LAN.
- 7. Choose OK when the Start Pairing Device notice shows up on the 90D. (See Figure 8.8.)
- 8. Follow the prompts on the camera and computer to complete the linkup.
- 9. When pairing is accomplished, you will be able to access the camera wirelessly using the EOS Utility.

Figure 8.8 Use the EOS Utility.
Wi-Fi Connection Using an Access Point
This wireless option allows you to join a Wi-Fi network using an access point that uses the WPS (Wi-Fi Protected Setup) security standard. If your home/office router is a recent one, your network is probably set up to use a password that’s encrypted with the WPA Personal or WPA2 Personal security protocols. If that’s the case, you can avoid all the complex LAN setup procedures and link your 90D to the network simply by pressing the WPA button on your router. It’s usually labeled WPA or has the WPA symbol ![]() as a label.
as a label.
- 1. In the Network 1 menu, select Wi-Fi/Bluetooth Connection. In the screen that appears, highlight the Connect to Smartphone icon.
- 2. Press MENU to confirm and exit.
- 3. Select Add a Device to Connect To. On the next screen, select Connect Via Wi-Fi.
- 4. Select Switch Network. (See Figure 8.9, upper left.)
- 5. The available Wi-Fi network will be displayed, as shown in Figure 8.9, upper right. Select Connect with WPS.
- 6. Select WPS (PBC Mode), which allows you to connect using Push Button Configuration. If your router requires a PIN, choose WPS (PIN Mode) instead. (Figure 8.9, lower left.)
- 7. Connect to the network by pressing the WPS button on the router. Select OK on the prompt screen that pops up.
- 8. Select Auto Setting to allow the IP address to be supplied automatically. IT types can use Manual Setting instead if they want a specific IP address to be applied. (Figure 8.9, lower right.)

Figure 8.9 Select Switch Network (upper left); available Wi-Fi networks (upper right); choose WPS (PBC mode) (lower left); select Auto Setting for IP address (lower right).
- 9. Finally, connect to your smartphone, the EOS Utility, Wi-Fi printer, or Canon iMAGE Gateway, which will be explained in sections that follow this one.
- Smartphone. Start Camera Connect and tap the camera name to connect by Wi-Fi.
- EOS Utility. Start the EOS Utility and click Pairing over Wi-Fi/LAN.
- Wi-Fi Printer. In the list of detected printers, select the printer to connect to, or choose Search Again to find it.
- iMAGE GATEWAY. Log into the website.
Printing from a Wi-Fi Printer
Many (perhaps most) printers today have built-in wireless capabilities, allowing you to print out directly from your computer without a physical link between the computer and printer. The 90D adds the same function to your camera/printer setup, so you can make hard copies of your images from files in your camera without the bother of transferring them to a computer first. All you need is your 90D and a PictBridge-compatible printer that conforms to the DPS over IP standard. (More alphabet soup: Digital Photo Solutions and Internet Protocol.) To use this feature, you must:
- Configure your printer for wireless printing. The instructions vary from printer to printer, so you should consult your printer manual for the procedures. Once you’ve done this, you’ll be able to print photos from your camera, plus files from your computer and other compatible devices, such as smartphones. Wireless printing is not limited to camera-to-printer communications.
- Link your camera to the printer. The procedures are like those mentioned earlier. Multiple printer connections can be registered.
- Printing images. Once linked, you can print by pressing the Playback button and scrolling to the image you want to output. Select printing parameters, number of prints, and other settings just as you would for printing over a wired connection to a PictBridge printer.
To print from a wireless printer, just follow these steps:
- 1. In the Network 1 menu, select Wi-Fi/Bluetooth Connection. The screen that appears was shown previously in Figure 8.6. Highlight the Print from Wi-Fi Printer icon. Press MENU to confirm and exit.
- 2. Select Add a Device to Connect To.
- 3. Check the SSID (network name) and password, as shown earlier. The password will appear only if you have specified one in the Wi-Fi settings entry.
- 4. Select from the available Wi-Fi-connected printers. (I have several on my office network; you may have only one.)
- 5. When connected to your printer, select an image to be printed (see Figure 8.10, left). You can use the Index/Reduce button to view thumbnails.
- 6. To print a single image, highlight Print Image and press Set (see Figure 8.10, center). To print several shots, create a Print Order instead.

Figure 8.10 View available images (left); select individual or multiple images (center); specify parameters (right).
- 7. In the screen that appears (see Figure 8.10, right), select printing parameters, such as paper size, number of copies, printing effects (such as vivid), page layout (bordered, borderless), and other parameters. You can even crop the image in the camera before printing.
- 8. Select Print and then OK to start printing.
Uploading to a Web Service
This wireless option, the cloud icon leftmost on the bottom row of the Wi-Fi/Bluetooth Connections screen shown in Figure 8.6, allows you to select images and upload them to the Canon iMAGE Gateway, which is a free-of-charge service. You can register online through your computer and through this entry. Once you’ve become a member, you can upload photos, create photo albums, and use other Canon Image Gateway services. The site also can interface with other web services you have an account with, including e-mail, Twitter, YouTube, and Facebook.
All you need is your 90D and a computer with the EOS Utility installed. Before you can interface with the Canon gateway wirelessly, you must connect your camera and computer using the conventional digital/USB connection, log onto the Gateway through the “cloud” icon, and configure the camera’s settings to allow access to the web services. (Remember that Wireless capabilities must be set to Disable any time you want to use a wired connection between your camera and computer.)
Then, you can remove the direct link, turn wireless features back on, and connect to your computer through the wireless access methods described earlier in this chapter. Still images can be uploaded to the Gateway, and movies to YouTube. Images can be uploaded directly to Facebook or shared with Facebook and Twitter users by posting a link back to the Canon Image Gateway location of the files. As with the image transfer features described earlier, you can resize images before uploading, and send photos one by one or in batches.
Connecting to Wireless Remote Control
The fifth and last icon on the Wi-Fi/Bluetooth Connection screen shown earlier in Figure 8.6 is the Connect to Wireless Remote entry, which allows you to link your 90D to the optional Canon Wireless Remote-Control PR-E1, which uses Bluetooth. When you reach the Add a Device to Connect To screen as you did when linking to your phone, computer, or web service above, choose Wireless Remote. When the Pairing screen appears, hold down the W and T buttons on the BR-E1 remote simultaneously for at least three seconds, until a message appears confirming the pairing. Then press SET to exit.
Set the 90D Drive mode to one of the Remote Self-Timer settings when shooting stills, and the Remote Control entry in the Shooting menu to Enable when capturing movies.
Geotagging
Geotagging is a way to associate the geographical location where the photographer was when a picture was taken, with the actual photograph itself. Geotagging can also be done by attaching geographic information to the photo after it’s already been taken. This is often done with online services which allow you to associate your uploaded photographs with a map, city, street address, or postal code. When properly geotagged and uploaded to compatible sites, users can browse through your photos using a map, finding pictures you’ve taken in a given area, or even searching through photos taken at the same location by other users.
Your 90D can work with the GPS information supplied by your smartphone. Or, you can use the optional Canon GP-E2 GPS Receiver (about $240). It records locational data such as latitude, longitude, and altitude, and saves it to the EXIF metadata in your image files, where it can be retrieved by compatible software to plot to maps or insert into your uploads to Flickr or other sites. You can even track your trajectory of movement with the receiver’s logging function.
If your familiarity with GPS is limited to that gadget in your vehicle, you’ll be pleasantly surprised at the things that a GPS-equipped camera can do with location information. When active, the GPS system records the latitude and longitude of each location where a picture is snapped, the elevation, Coordinated Universal Time Code (UTC), and the satellite reception status. This information is embedded in the EXIF metadata included in each photo, where it can be read and manipulated by compatible software. That includes Canon utilities, such as the Map Utility, Digital Photo Professional, and ImageBrowser EX programs; third-party image-editing software, including iPhoto for the Mac and the Map Module in Lightroom; and many photo-sharing sites that can display the location where each image was taken when you upload your pictures to an online album. Google Earth can also use your EXIF data.
You can view GPS data on the 90D’s display as you review images. Press the INFO. button until the view with a histogram appears, then scroll down using the directional buttons until you reach the screen shown at left in Figure 8.11. When the GPS is active, you can also view the information for your current location in the GPS menu, as I’ll describe shortly. I often use this feature when I am traveling around and want to record a specific site that I want to return to at a later time. I can view the latitude and longitude and enter them into my portable Garmin Etrex GPS (used for hiking), or the GPS in my car, and then return by accessing the data I’ve saved. There are also photo-oriented tracking apps for your phone that can work with this kind of GPS information. While GPS data is most often used to pinpoint the shooting location of individual images, the receiver’s logging function allows you to re-create the route you took in capturing those photos, thanks to the Canon Map Utility.

Figure 8.11 Display GPS information about an image (left) or your camera’s current location (right).
Getting GPS from Your Smartphone
To embed GPS information provided by your smartphone in your photos, just follow these steps:
- 1. Activate Location Services on your phone. The procedure varies by operating system but is typically found in the Privacy settings. On my iPhone, for example, I can turn Location Services on or off, or enable them only for specific applications. You need to turn the feature on for the Camera Connect app.
- 2. Establish a Bluetooth connection between your 90D and your phone as described previously.
- 3. In the Network menu, select GPS Device Settings (see Figure 8.12, left), then choose Smartphone from the screen that pops up (see Figure 8.12, right).
- 4. That’s all you need to do. As you take photos, your images are geotagged based on the phone’s GPS information.
Using the GP-E2 Receiver
To activate your 90D’s external GPS receiver, just follow these steps:
- 1. In the Network menu, select GPS Device Settings, then choose GPS Receiver from the screen that pops up. The GPS Settings screen will appear (see Figure 8.13, left).
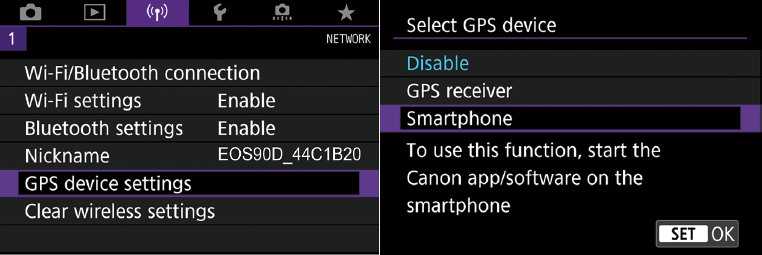
Figure 8.12 Choose GPS information source (left); select smartphone (right).

Figure 8.13 GPS settings (left); Enable, disable logger; transfer log data to a memory card; delete log data (right).
- 2. Set GPS mode. You can disable GPS here (to save power) or choose one of two modes:
- Mode 1. When the camera is powered down, the GPS receiver still functions at intervals, keeping track of your location. That’s useful if you’ll be using GPS a lot during a shooting session and don’t want to wait for the receiver to re-acquire GPS satellites (it can take valuable seconds or even minutes). The penalty is that the 90D draws power continually and your battery life is shortened. Carry plenty of extra batteries if you use this mode.
- Mode 2. When you turn the camera off, GPS is turned off too and no longer drains power. However, if the camera goes to “sleep” due to your auto power off setting, the GPS will receive signals at intervals and draw some power. This mode uses less power than Mode 1, but gives you the option of shutting off the GPS when you know you won’t be using it for a while, but not disabling it when your auto power off setting kicks in.
- 3. Choose time update. With the Auto time setting option, the 90D can use time data embedded in the GPS signal to set the camera’s internal clock accurately. You can choose Auto Update to set the time automatically whenever the camera is powered up and GPS data is available; disable this function or select Set Now to update immediately. The receiver must be able to link with at least five GPS satellites for the time function to operate; when activated, the time setting in your camera will maintain +/– one-second accuracy. (This feature is great for synchronizing several GPS-equipped cameras, especially when shooting and editing videos and still shots contemporaneously.)
- 4. Position update timing. Use this to specify the interval the GPS device uses to update position information. Choose from every 1, 5, 10, 15, or 30 seconds, or every 1, 2, or 5 minutes. Select a shorter interval when you are moving and/or accuracy is critical, or a longer interval to save power, when GPS reception is not optimal, or you are shooting from one position for a longer period.
- 5. GPS information display. This entry simply displays a screen of current GPS information, including latitude, longitude, elevation, UTC time (essentially Greenwich Mean Time), and Satellite reception strength/status, as shown earlier in Figure 8.13, left.
- 6. GPS logger. Allows you to enable or disable tracking of GPS position data, transfer log data to your memory card for later manipulation by an appropriate software program, or to delete the camera’s current GPS log. (See Figure 8.13, right.) Nature and wildlife photographers (now, where did I photograph those rare flowers?), law enforcement personnel, business users, and anyone wandering through a strange city during a vacation will love the ability to track not only individual locations but the routes taken to get from one shooting spot to another.
Your Canon Map Utility, when connected to the Internet through your computer, can easily trace a path for you on a standard road map or satellite view (see Figure 8.14). The logger’s NMEA-0813 format log file, which includes all the information for a single day’s shooting, can be converted by the utility to a .KMZ file and uploaded to Google Earth, where it can be shared and viewed. A new log is created each day, or each time you change time zones. Depending on how often the position update timing is recorded (from every second to every five minutes), the 90D can store from less than a week to as much as 100 days’ worth of data. However, you’ll probably use the Transfer Log Data to Card option more often than that.
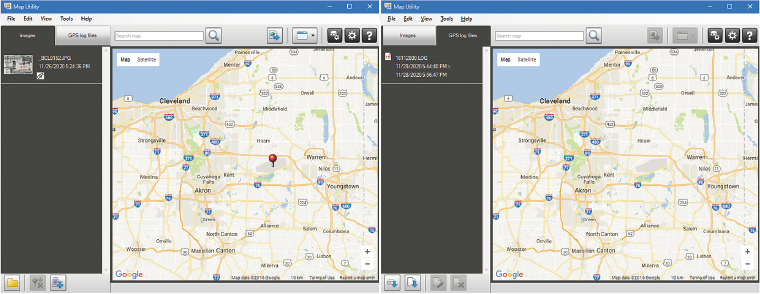
Figure 8.14 Canon’s Map Utility can display the GPS data for an image (left) or show you the log data for a shooting session (right).
- 7. Begin using GPS. After a delay of about 30 to 60 seconds while the receiver connects to the optimum number of satellites, GPS functions will be activated, and remain so until you return to the menu to disable GPS features. If you turn the camera off, it will automatically re-acquire the satellites within a few seconds when it’s powered up again, assuming that GPS reception is available at that location.
Ready to Go
By now you should be comfortable with the full range of wireless capabilities the 90D offers. I recommend connecting the camera to your smartphone using the 90D’s built-in Wi-Fi hot spot and exploring the options available with Camera Connect, an app that is still under development and changing constantly. Figure 8.15 shows you the key screens you’ll be working with to perform the following tasks.
- Main screen. At upper left in Figure 8.15 is the main screen, which is your gateway to:
- Accessing images on your camera.
- Remote live view shooting.
- Automatic transfer of images from your camera to your smart device.
- Location information for individual images.
- Adjusting camera settings.
- Remote Shooting. This screen lets you preview the same image your 90D’s sensor sees, adjust exposure settings and other parameters, and take a picture by tapping the red circle at the bottom. (Figure 8.15, upper center.)
- Camera Settings. You can adjust individual settings of the camera here. At upper right in Figure 8.15 you can see the settings for Date/Time.
- Auto Transfer. This screen (lower left in the figure) allows you to set up automatic transfer of your still images from the camera to your device. (Video cannot be transferred for practical reasons; they are generally too long and require too much storage space/bandwidth for efficient wireless transfer.) You have the option of reducing the image size (to save space and speed transfer) and including or deleting location information during transfer. Note that RAW images are transferred in JPEG format, again because of their size and because most smart devices don’t handle RAW files well.
- Select Images. You can preview thumbnails of images on your memory card and select the ones to be transferred individually. (See Figure 8.15, lower center.)
- Location Information. Use this screen to enable/disable logging of GPS information with your phone and embedding it into your image files. (See Figure 8.15, lower right.)
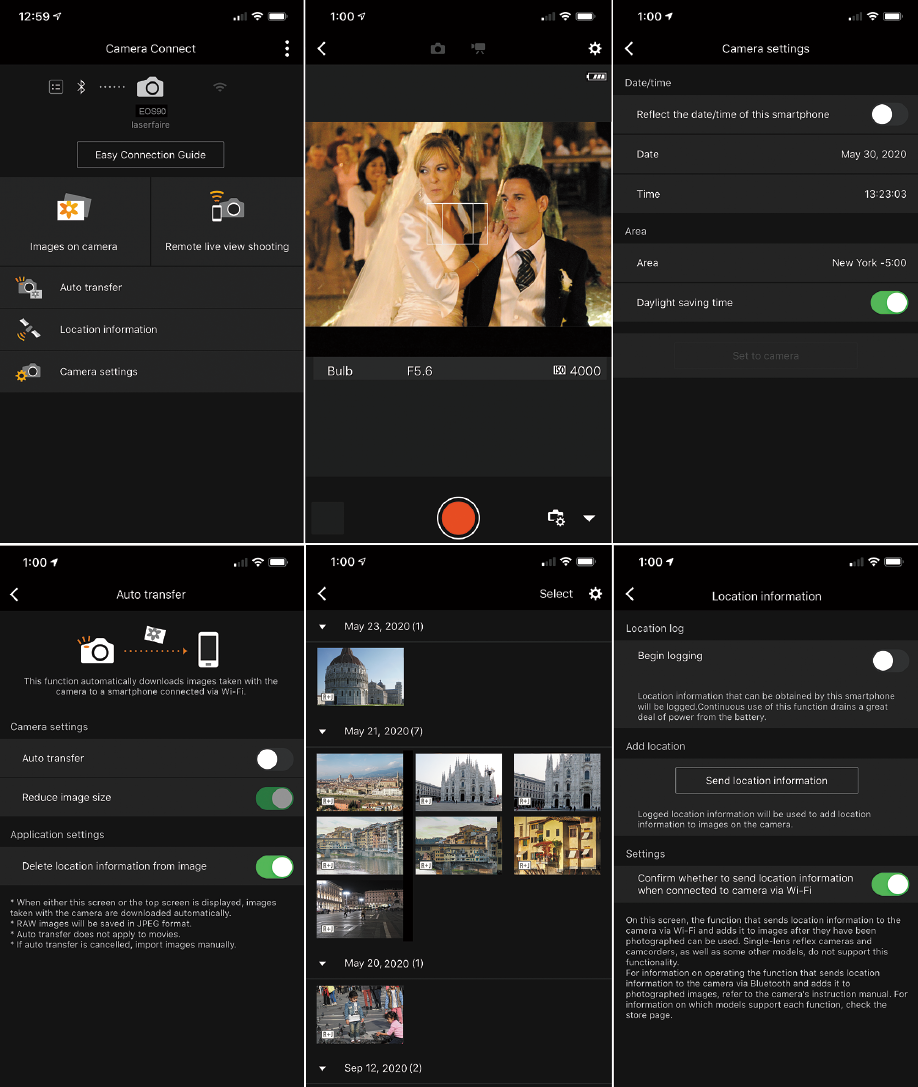
Figure 8.15 Camera Connect main screen (upper left); Remote Shooting (upper center); Camera Settings (upper right); Auto Transfer (lower left); Select Images (lower center); and Location Information (lower right).
You can fine tune your wireless connections using the other tools available in the Network menu. Here’s a summary:
- Change Nickname. This option is available from the main Network menu. You can specify a nickname for your 90D using the standard text-entry screen. This is especially useful if you own several Canon cameras (a pro might even own more than one 90D). I use it because in addition to the 90D I also own and use the EOS R mirrorless camera that has similar wireless capabilities.
- Password. In the Wi-Fi Settings screen you’ll find the option to require a password to connect, which I recommend highly. You can also disable this feature if you choose. However, a password will still be required when connecting to an access point with Wi-Fi, even if this parameter is set to None. (See Figure 8.16, left.)
- Connection History. This setting displays the history of Wi-Fi devices that are connected to the camera. You can set it to Show or Hide.
- Auto Send Images To Computer. You’re not locked into sending your images to your smart device. Studio and event photographers who want to transfer their images to a computer can do so with the Image Transfer Utility 2 after enabling this setting.
- Send to Smartphone After Shot. This setting enables/disables automatic transmitting of images to your connected smart device.
- MAC Address. If you need the unique media access control (MAC) address of your camera, you can see it by clicking this entry.
- Check Connection Information. This is one of three additional options in the Bluetooth Settings entry (see Figure 8.16, right). It shows the camera’s connection data, including device and connections. Clear these settings by pressing the INFO. button.
- Bluetooth Address. This displays the six-number hexadecimal address of your Bluetooth connection, which will look something like this: 00:9B:6D:4B:0A:A5.
- Stay Connected If Off. You can enable or disable this feature here. It allows you to keep your 90D and smartphone device linked even when the camera is turned off. That’s because the 90D’s implementation uses Bluetooth LE (for low energy), which has much lower power demands than traditional Wi-Fi or even the NFC protocol that Canon formerly used to link its cameras to Android devices. So, under many circumstances, it’s practical to allow your smart device and 90D to keep in touch even when the camera is powered down.
When enabled, you can view images on the camera with your smartphone and control the camera in other ways even when the camera is off.
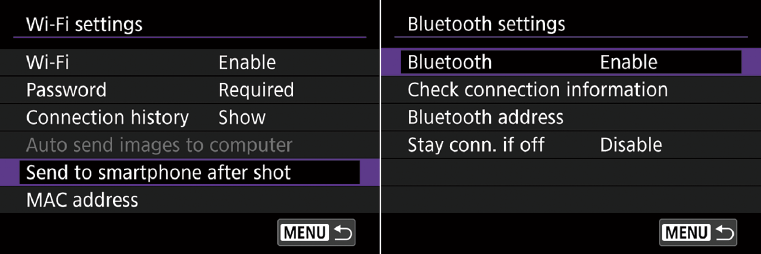
Figure 8.16 Wi-Fi Settings (left); Bluetooth Settings (right).