
The popularity of mirrorless cameras (including Canon’s own EOS M and 90D series) has brought capturing movies with digital cameras into the mainstream. Movie-making with still cameras, which was once a “bonus” feature, has become so widely used that the video specs of any new camera like the 90D are evaluated carefully by potential buyers. You can now buy fancy harnesses, rigs, and Steadycam setups for Canon digital cameras, turning the more ambitious among us into one-person motion-picture studios, ready and able to shoot everything from family vacation movies suitable for broadcasting on PBS during pledge week to full-length feature films. It’s mind-boggling to see how far movie-shooting still cameras have progressed in the past several years.
At the same time, live view in digital SLRs has become more popular—with the ability to preview on the LCD screen the exact image that will be captured and more accurate manual focusing for macro subjects and other scenes. The truly “silent” shooting that’s possible when the clanking noises of the mirror and mechanical shutter are bypassed in favor of live view’s electronic shutter is prized by event and stealth photographers alike. This chapter will show you how to get the most from your 90D’s innovative live view and movie-capture capabilities.
CREATIVE FILTERS LIVE
One cool feature of live view in the 90D is the ability to apply Creative Filters as you shoot images—and preview their looks before snapping a photo. You’ll find the Creative Filters options in the lower-right corner of the live Quick Control screen when the Mode Dial is set to Creative Filters.
Live View Shooting Menus
As I noted in Chapter 7, the live view version of the Shooting menu differs slightly from the view-finder shooting version. In this section, I’m going to skip the entries that are identical, and describe those available only in the live view (and movie) versions of the Shooting menus.
Shooting 2
- Metering Timer
- Exposure Simulation
Shooting 4
- Touch Shutter
- Shutter Mode
Shooting 5
- Focus Bracketing
Shooting 6
- AF Method
- Eye Detection AF
- Continuous AF
- Lens Electronic Manual Focus
- MF Peaking Settings
Metering Timer
Options: 4 sec., 8 sec. (default), 16 sec., 30 sec., 1 min., 10 min., 30 min.
My preference: 8 sec. most of the time; I switch to 10 min. when shooting sports.
Located in the Shooting 2 menu, this option allows you to specify how long the 90D’s metering system will remain active before switching off. Tap the shutter release to start the timer again after it switches off.
Exposure Simulation
Options: Enable (default), During DOF Preview, Disable
My preference: During DOF Preview
This Shooting 2 menu option allows you to choose whether the live view image mimics the exposure level of the final image, or whether the screen displays a bright image (dependent on the Display Brightness setting you’ve specified in the Set-up 2 menu) that may be easier to view under high ambient lighting conditions. Your choices are as follows:
- Enable. The image on the screen corresponds to the brightness level of the actual image based on the current exposure settings, including any exposure compensation you’ve specified. Use this option when you want to be able to roughly (but not precisely) monitor the effects of your exposure settings in live view.
- During DOF Preview. The image is displayed at standard brightness but will be adjusted to simulate your exposure settings when you press the button you have defined as a depth-of-field preview button. This is your best option when you might want to check exposure from time to time during a shooting session. It’s the setting I use most often, because I can compose with a big, bright screen, but still stop down to the aperture that will be used and view the effects.
- Disable. The 90D ignores any exposure settings and compensation and shows the image at standard brightness. This setting is useful outdoors in full sunlight when using the LCD screen because any exposure simulation causing a dimmed LCD will be difficult to interpret under high ambient lighting anyway.
Touch Shutter
Options: Enable (default), Disable
My preference: Disable
Located in the Shooting 4 menu, the Touch Shutter feature allows you to tap the LCD screen to focus and snap a picture with one gesture. It’s easy to accidentally trigger the Touch Shutter, so I generally leave it off. However, it’s quite useful when your camera is on a tripod and you want to be able to snap a picture of some portion of your scene quickly and with minimal vibration. I’ll describe the 90D’s Touch Focus/Shutter feature shortly.
Shutter Mode
Options: Mechanical, Electronic 1st-curtain (default), Electronic
My preference: Electronic 1st-curtain
You can choose among the mechanical shutter, electronic 1st-curtain shutter, or an all-electronic version. With the latter, your 90D can shoot completely silent electronic capture instead of the mechanical shutter. There are some limitations: you can use it only in single shot or self-timer modes. Nor can you use flash (the flash burst tends to be more disruptive than even the loudest camera shutter, anyway) or automatic exposure bracketing.
- Mechanical. At this setting, the 90D’s mechanical 1st- and 2nd-curtain shutters are used to make the exposure. This is the best mode to use for high-speed shooting, and it reduces distortion produced by the electronic shutter because of camera or subject motion. This setting has the additional benefit of notifying you and those around you that a picture has been taken, thanks to the noise produced by the movement of the mechanical shutter curtains.
- Electronic 1st-curtain. The mechanical 1st-curtain shutter is not used. Instead, the sensor image is “dumped,” and exposure begins when the electronic 1st-curtain shutter “opens.” The exposure ends when the mechanical second curtain closes. This mode is quieter than the all-mechanical version.
- Electronic. No mechanical curtains are used; the exposure is captured electronically. In addition to being silent, this mode allows you to use shutter speeds as high as 1/16000 second. You cannot use flash with the electronic shutter, or any continuous shooting modes, including Self-timer Continuous. You would not want to leave this feature active all the time. In addition to disabling flash and other features, the rolling shutter effect can cause distortion in fast-moving subjects, because the first portion of the subject captured will have moved by the time the last portion is exposed.
Focus Bracketing
Options: Focus Bracketing: Enable, Disable (default); Number of Shots: 2–999, default: 100; Focus Increment: 1–10, default 5; Exposure Smoothing: Enable, Disable (default)
My preference: N/A
Focus stacking is a great technique that allows combining a series of photos each taken using a different plane of focus, so that they can be combined in an image editor to produce a single image with greatly enhanced depth-of-field. Macro photographers (in particular) have long used focus stacking in their work. The 90D’s new Focus Bracketing feature, found in the live view Shooting 5 menu, greatly simplifies capture of the individual shots, which can include up to 999 different images.
When you use this feature, the 90D captures an initial image at the closest focusing distance. You then merge them using Digital Photo Pro or Photoshop to create a deep-focus composite, like one seen at right in the figure. I will cover this feature in detail in Chapter 13 and will not repeat the instructions here.
- Focus Bracketing. Enable or disable the feature with this setting.
- Number of Shots. Select from 2 to 999 individually focused exposures.
- Focus Increment. Choose a range from 1 (very small) to 10 (large).
- Exposure smoothing. Enable to account for exposure differences as exposure changes.
AF Method
Options: Face Detection+Tracking, Spot AF, 1-Point AF, Zone AF
My preference: N/A
This is the first entry in the live view Shooting 6 menu. Autofocus in live view is quite similar to AF in viewfinder mode, with the exception that only One-Shot and Servo AF are available for AF Operation modes. To determine the area of the frame used to calculate focus, in live view you have your choice of four AF methods. Note that in live view you can use the touch screen to specify a face or subject to focus on.
- Face Detection+Tracking. The 90D finds and focuses on human faces, and then tracks to follow them as they move within the frame. If more than one face is found, you can move from one to the other with the left/right directional controls (see Figure 10.1). You can also enable Eye Detection AF (discussed next) to focus on the subjects’ eyes. If no face is detected, the entire AF area is used and an area selected automatically. With Servo AF, you can specify the initial position of the focus point. Press the multi-selector joystick to move the AF point to the face of the person in the center of the focus frame.
- Spot AF. You can move the small focus point to any of the zones with the multi-selector or QCD directional buttons. Press the multi-selector button, SET, or the Trash button to center the AF point.
- 1-Point AF. You can choose one larger AF point for focus, represented by a larger box on the screen. Press the multi-selector button, SET, or the Trash button to center the AF point.
- Zone AF. Selects a zone covering a larger area, prioritizing the nearest subject and/or human faces. You can move the small focus point to any of the zones with the multi-selector or QCD directional buttons. Press the multi-selector button, SET, or the Trash button to center the AF point.
MAGNIFIED VIEW
In Spot AF, 1-Point AF, and Zone AF modes, you can check autofocus in a magnified view of either 5X or 10X, simply by pressing the Magnify button or by tapping the Magnify icon on the screen. (See Figure 10.1.) The magnified frame will be centered on the AF point for your particular AF method. While the display is magnified in 1-Point AF or Spot AF, you can initiate autofocus by pressing the shutter release halfway. In Servo AF mode, pressing the button halfway returns you to normal view for focusing. Continuous AF is not available in magnified view.
Eye Detection AF
Options: Enable, Disable
My preference: N/A
This feature is easy to implement: just choose Enable to activate it. When a human eye is detected, an AF point is displayed around it. (See Figure 10.1.) You can tap the screen to select an eye for focus. The entire face is selected when you tap on other facial features, such as the nose or mouth. In that case, eyes are selected automatically. If more than one eye is available, you can press the left/right directional keys to specify an eye. (It’s usually best to focus on the eye nearest the camera.)
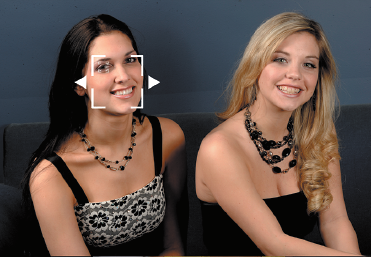
Figure 10.1 Face Detection+Tracking highlights a detected face; you can switch to a different face with the left/right directional controls. When Eye Detection AF is activated, an additional box will appear around an eye.
Eye Detection works only with the Face Detection+ Tracking. You can quickly disable/enable eye detection by pressing the Area Selection button and INFO. button one after the other. Press the INFO. button a second time to turn Eye Detection back on.
Continuous AF
Options: Enable, Disable (default)
My preference: N/A
This setting eliminates the need to start autofocus by pressing the shutter button. When enabled, the 90D will focus continuously in live view, so the camera is already focused and ready to shoot when you do press the shutter release button. As you might expect, continually focusing and refocusing as you frame your shots uses a lot of juice and may limit the number of shots you can take on a continuous battery charge.
Lens Electronic Manual Focus
Options: Disable After One-Shot AF (default), Enable After One-Shot AF
My preference: Enable after One-Shot AF
Some lenses allow manually adjusting focus electronically after autofocus has been achieved using One-Shot AF. This allows you to fine-tune focus, which is especially useful for macro photography. You can turn the feature on or off.
- Disable After One-Shot AF. Once One-Shot AF has set focus, you cannot fine-tune. Use this if you don’t need to make these adjustments or want to ensure that you don’t accidentally change focus.
- Enable After One-Shot AF. As long as you hold the shutter button down halfway, you can manually rotate the lens’s focus ring and fine-tune exposure. This is my default setting, as I’ve mastered the art of keeping my fingers off the focus ring when I don’t want to accidentally mess up One-Shot AF’s focus setting.
MF Peaking Settings
Options: Peaking: Off (default), On; Level: High (default), Low; Color: Red (default), Yellow, Blue
My preference: On, High, Red
This is a useful manual focusing aid that’s difficult to describe and to illustrate. You’re going to have to try this feature for yourself to see exactly what it does. Focus peaking is a technique that outlines the area in sharpest focus with a color; as discussed below, that can be red, yellow, or blue. The colored area shows you at a glance what will be very sharp if you take the photo at that moment. If you’re not satisfied, simply change the focused distance (with manual focus). As the focus gets closer to ideal for a specific part of the image, the color outline develops around hard edges that are in focus. You can choose how much peaking is applied (High and Low), select a specific accent color (Red, Yellow, or Blue), or turn the feature off.
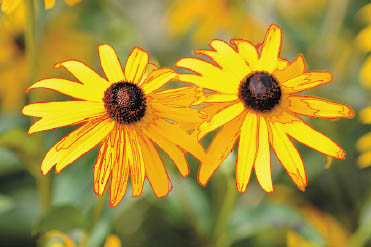
Figure 10.2 You can choose any of three colors for peaking color (for manual focus), but only if you have activated the Peaking Level item. For these blossoms, I thought red was a better choice than blue or yellow.
Peaking Color allows you to specify which color is used to indicate peaking when you use manual focus. Red is the default value, but if that color doesn’t provide enough contrast with a similarly hued subject, you can switch to a more contrasting color, such as blue or yellow. (See Figure 10.2.)
Using Touch Focus/Touch Shutter
Touch Shutter is enabled or disabled by tapping the Touch Shutter icon, shown at lower left in Figure 10.3. Its function is part of the Touch Focus feature of the 90D when the camera is in live view mode. You can also enable/disable the feature in the Touch Shutter entry of the live view version of the Shooting 4 menu. The setting you specify in the menu entry is reflected on the LCD screen, and vice versa. In other words, disabling Touch Shutter in the menu does not prevent you from enabling it by tapping its icon on the screen.
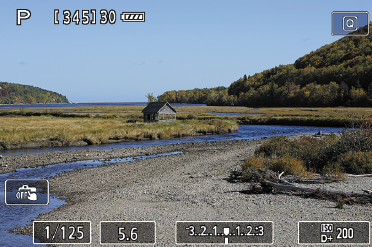
Figure 10.3 The live view basic information screen, with Touch Shutter control at the bottom-left edge.
Touch Focus
The Touch Focus feature is active any time the 90D is in live view mode. Just follow these steps to use it:
- 1. Tap Focus Point. Touch the face or position on the screen where you want to focus the image. The 90D will use the AF method you’ve specified (Face+Tracking, Spot AF, 1-Point AF, or Zone AF) to achieve focus.
- 2. Single Focus. One-Touch AF will be used, even if the camera is set to Servo AF. When focus is achieved, the AF point turns green briefly as an indicator, then changes to white to show that focus is locked. If focus is not possible, the focus point turns orange.
- 3. No magnified view. Touch focus is not possible in magnified view.
- 4. Refocus. To refocus, simply tap the screen again. You can press the Trash or SET buttons to move the focus point to the center of the screen.
- 5. Take picture. Press the shutter release down all the way to take a picture.
Touch Shutter
Touch Shutter is a convenient way of activating focus and capturing an image with one gesture. The feature is disabled when the Touch Shutter icon label says OFF. As I noted above, you can toggle it either in the Shooting 4 menu or by using the icon on the LCD screen.
Note that Touch Shutter always uses the Single Shooting drive mode, even if you’ve chosen one of the continuous shooting options. With the Fish-eye Creative Filter, the camera ignores your focus point and always uses the center point. Touch Shutter is not available in magnified view or when using the Miniature Effect Creative Filter.
Just follow these steps to focus and take a picture with the tap of a finger:
- 1. Enable Touch Shutter. If Touch Shutter is OFF, tap its icon in the lower-left edge of the screen.
- 2. Tap Focus Point. Touch the face or position on the screen where you want to focus the image. The 90D will use the AF method you’ve specified (Face+Tracking, Spot AF, 1-Point AF, or Zone AF) to achieve focus.
- 3. Single Focus. One-Touch AF will be used, even if the camera is set to Servo AF. When focus is achieved, the AF point turns green briefly as an indicator, then changes to white to show that focus is locked. If focus is not possible, the focus point turns orange.
- 4. Take picture. The photo will be captured automatically, except when the Mode Dial is set to Bulb. In that case, tapping the screen focuses and begins exposure; you must tap the screen again to stop the exposure.
Live View Displays
As I mentioned in Chapter 9, the Set-up 4 menu in live view has a Shooting Information Display that allows you to specify what information appears on the LCD screen. In live view, when you press the INFO. button repeatedly the screen cycles among four possible displays. You can specify which of these are shown by editing the Shooting Information Display, and edit them to show just what you want to see. By default, all four are enabled, and your INFO. displays will include:
- Blank screen. Only the focus point is shown on the screen, giving you an uncluttered view to compose your image.
- Basic information. This contains basic exposure and status information. It was shown earlier in Figure 10.3.
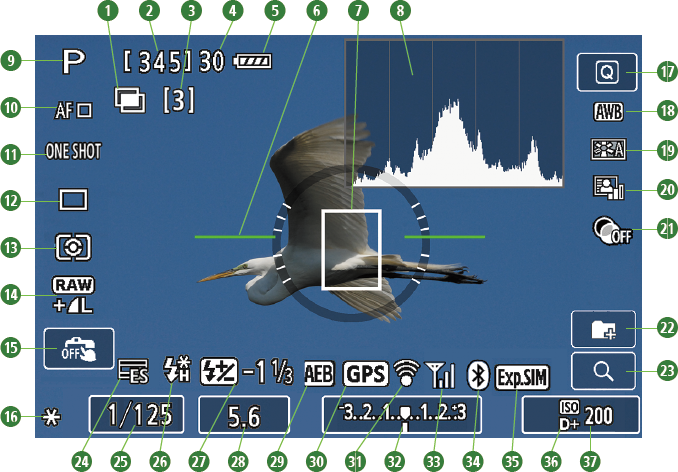
- Full information plus. This screen potentially contains a full range of information, including a histogram and on-screen electronic level, as shown in Figure 10.4. Note that not all of this data can or will be displayed at one time; I’ve included a comprehensive range of the available icons.
- Full information. This screen is like the one above, but it lacks the histogram and electronic level.
You can hide your choice of up to three of these screens (at least one must be available), and edit the contents of them using the Shooting Information Display menu entry found in the live view version of the Set-up 4 menu, discussed next.
![]() Focus bracketing/HDR/Multiple exposures/Multi Shot Noise Reduction/Bulb Timer/Interval Timer
Focus bracketing/HDR/Multiple exposures/Multi Shot Noise Reduction/Bulb Timer/Interval Timer
![]() Possible shots/Seconds remaining
Possible shots/Seconds remaining
![]() Shots remaining for focus bracket/multiple exposures/interval timer
Shots remaining for focus bracket/multiple exposures/interval timer
![]() Maximum burst/Remaining multiple exposures
Maximum burst/Remaining multiple exposures
![]() Battery level
Battery level
![]() Electronic level
Electronic level
![]() AF point
AF point
![]() Histogram
Histogram
![]() Shooting mode
Shooting mode
![]() AF method
AF method
![]() AF operation
AF operation
![]() Drive mode
Drive mode
![]() Metering mode
Metering mode
![]() Image recording quality
Image recording quality
![]() Touch shutter
Touch shutter
![]() AE lock
AE lock
![]() Quick control
Quick control
![]() White balance
White balance
![]() Picture Style
Picture Style
![]() Auto lighting optimizer
Auto lighting optimizer
![]() Creative filters
Creative filters
![]() New folder
New folder
![]() Magnified view
Magnified view
![]() Electronic shutter
Electronic shutter
![]() Shutter speed
Shutter speed
![]() Flash status
Flash status
![]() Flash exposure compensation
Flash exposure compensation
![]() Aperture
Aperture
![]() Autoexposure/Flash exposure bracketing
Autoexposure/Flash exposure bracketing
![]() GPS connection
GPS connection
![]() Wi-Fi
Wi-Fi
![]() Exposure indicator/Autoexposure bracketing
Exposure indicator/Autoexposure bracketing
![]() Signal strength
Signal strength
![]() Bluetooth
Bluetooth
![]() Exposure simulation
Exposure simulation
![]() Highlight tone priority
Highlight tone priority
![]() ISO setting
ISO setting
Figure 10.4 Full information screen, plus electronic level and histogram.
Shooting Information Display
Options: Screen Information Settings, Grid Display, Histogram Display
My recommendation: N/A
One of the advantages of live view displays on the LCD screen is that a wealth of relevant information can remain in constant view as you shoot. Virtually everything you need to know can be shown on the LCD.
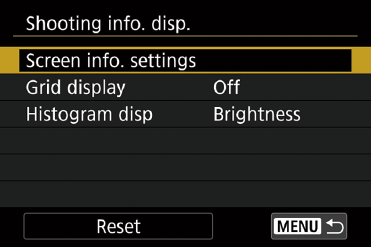
Figure 10.5 Shooting Information Display options.
One of the disadvantages of cameras that have electronic displays of this sort is that all that data must be overlaid on the image frame, which can be quite cluttered—sometimes with information that you really don’t care about at the moment. Fortunately, you can customize what information appears on the shooting information displays, segregating some data onto alternate screens, and cycle among the screens you do want to see at the press of the INFO button.
You can define up to four different LCD screen layouts using this menu entry, which has three options, plus Reset. I’m going to explain each of them in turn.
Screen Info Settings
This is where you activate/deactivate and edit up to four LCD screen displays. Figure 10.6 (left) shows the enable/disable options, shown numbered from 1 to 4 in the right column. To enable one of the four screens, highlight it using the up/down buttons and press SET to activate (marking with a check) or deactivate (removing a check that is already there). At least one screen must be active; you can’t hide them all.
To edit the type of information that appears on a given screen, highlight it and press INFO. An Edit Screen like the one shown at right in Figure 10.6 appears. Five information types appear in the right column, representing (top to bottom): Basic Shooting Information, Detailed Shooting Information, On-Screen Buttons (display of icons, such as Focus Method, you can tap to make adjustments), Histogram Display, and Electronic Level. As with the numbered screens, you can activate any combination of information types for a given screen.

Figure 10.6 Enable/disable specific screens (left); edit each screen’s contents (right).
You obviously won’t want all information to appear on all screens; it makes sense to reserve one screen for Basic Shooting Information, another for Detailed Shooting Information, and using the others either to provide one specific type of data or a combination you find useful. When you’re finished, highlight OK to confirm or Cancel to eliminate your changes, then SET to exit.
When you’re using the LCD screen, cycle among the displays you’ve set up by pressing the INFO. button.
Grid Display
Those helpful grids are available for use while shooting. You can superimpose a 3 × 3, 6 × 4, or 3 × 3 plus diagonal lines grid over your image during shooting or disable the grid display entirely.
Histogram Display
There’s only room for one histogram on the screen when shooting, but you can choose whether the histogram displayed by your selected LCD screens is a brightness or RGB histogram, and whether it is displayed in large or small size. Choose the configuration you prefer, but for most the brightness histogram provides sufficient information while shooting. The RGB histogram may be one to study during playback (although it’s not live) to see exactly what went right (or wrong) with the tonal rendition of your image.
Reset
Highlight Reset and press SET to return all the shooting information displays to their default values. The Screen Info/VF Info screens are all enabled with preset values; viewfinder vertical rotation and grid display are on, histograms are set to Brightness, and focus distance display is returned to In MF Mode only.
LIVE VIEW QUICK CONTROL MENU
The Quick Control menu in live view serves much the same function as its viewfinder shooting counterpart, but it uses an overlay configuration like the one shown in Figure 10.7. The Return/Exit icon is highlighted in the figure. When one of the adjustable functions is highlighted, the available options appear along the bottom edge of the screen.

Figure 10.7 Live view Quick Control screen.
Shooting Movies
The Canon EOS 90D can shoot full HDTV movies with stereo sound using the built-in microphones or an external unit at 1920 × 1080 resolution, or Standard HD video at 1280 × 720 resolution.
To shoot in Movie mode, just rotate the Live View/Movie switch to the Movie position. By default, Movie Servo AF is enabled, so the camera always keeps focusing during capture. When you press the shutter button halfway, the camera will focus using the currently set AF method. Press the Start/Stop button to begin/end capture. The screen will look like the one shown in Figure 10.8, with the red REC indicator in the upper-right corner of the LCD screen.
In Basic Zone modes, ISO speed will automatically be set in the range ISO 100–12800. You can specify ISO speed yourself in P, Tv, Av, and B modes. If your Speedlite has a built-in LED lamp, it will illuminate under low-light conditions. All that’s quite simple, but there are some additional things you need to keep in mind before you start, as I’ll explain in the section that follows this one.
In some ways, the camera’s Movie mode is closely related to the 90D’s Live View Still mode. In fact, the 90D uses live view-type imaging to show you the video clip on the LCD as it is captured. Many of the functions and setting options and their menu entries are the same, so the information earlier in this chapter will serve you well as you branch out into shooting movies with your camera.

![]() Movie recording time available/Elapsed recording time
Movie recording time available/Elapsed recording time
![]() Battery level
Battery level
![]() Temperature warning
Temperature warning
![]() AF point (1-Point AF)
AF point (1-Point AF)
![]() 4K movie cropping prohibited
4K movie cropping prohibited
![]() Histogram (for manual exposure)
Histogram (for manual exposure)
![]() Movie recording in progress
Movie recording in progress
![]() Movie recording mode/Timelapse movie/Scene icon
Movie recording mode/Timelapse movie/Scene icon
![]() AF method
AF method
![]() Movie recording size
Movie recording size
![]() Movie digital IS
Movie digital IS
![]() Sound-recording level (manual)
Sound-recording level (manual)
![]() Headphone volume
Headphone volume
![]() Sound-recording level indicator (manual)
Sound-recording level indicator (manual)
![]() Movie Servo AF
Movie Servo AF
![]() White balance/White balance correction
White balance/White balance correction
![]() Picture Style
Picture Style
![]() Auto Lighting Optimizer
Auto Lighting Optimizer
![]() Creative filters
Creative filters
![]() Video snapshot
Video snapshot
![]() Magnify button
Magnify button
![]() AE lock
AE lock
![]() Shutter speed
Shutter speed
![]() Aperture value
Aperture value
![]() Exposure level indicator
Exposure level indicator
![]() Exposure compensation
Exposure compensation
![]() GPS acquisition status
GPS acquisition status
![]() Wi-Fi function
Wi-Fi function
![]() Wi-Fi signal strength
Wi-Fi signal strength
![]() Bluetooth function
Bluetooth function
![]() Highlight tone priority
Highlight tone priority
![]() ISO speed
ISO speed
Figure 10.8 Movie Shooting screen.
Movie Mode Shooting Menus
Before you begin capturing video, you’ll want to make certain basic setup adjustments. The next sections will show you everything you need to know before you begin capturing video in earnest. We’ll start with the new entries in the four movie mode Shooting menus that become visible when the Still/Movie selector switch is rotated to the Movie camera icon. The entries related to movie shooting include:
Shooting 1
- Movie Recording Quality
- Sound Recording
- Movie Digital IS
- Lens Aberration Correction
- Time-lapse Movie
- Remote Control
- Video Snapshot
Shooting 2
- Movie ISO Speed Settings
- Movie Auto Slow Shutter
- Metering Timer
Shooting 3
- HDMI Information Display
Shooting 4
- AF Method
- Movie Servo AF
- Eye Detection AF
- Lens Electronic Manual Focus
- Movie Servo AF Track Sensitivity
- Movie Servo AF Speed
- MF Peaking Settings
Movie Recording Quality
The Canon 90D has a large number of video-recording quality settings, including ultra-high-resolution 4K video. (See Figure 10.9.) I’ll explain the use of these settings in more detail later in this chapter, but, in brief, your choices are summarized below.
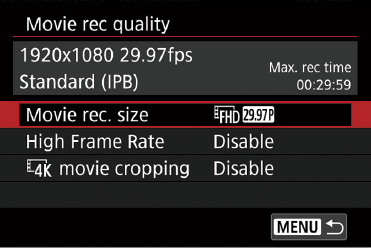
Figure 10.9 Movie Recording Quality settings.
Movie Recording Size
This setting determines resolution, frame rate, and image quality using these parameters:
- Image size. This is the resolution of the movie: 4K (3840 × 2160), Full HD (1920 × 1080), or Standard HD (1280 × 720).
- Frame rate. The number of individual frames or fields captured per second. These are commonly expressed as 60 fps and 30 fps (in NTSC mode, used in North American, Japan, and other countries; frame rates are 50 and 25 fps, respectively, in Europe and other areas using the PAL specification). Note that the actual frames-per-second is a fraction less than the nominal value, as I’ll explain below.
Frame rates of 60p and 30p are available for 4K and Full HD video; for standard HD, only 60p can be selected. The 90D also has a special High Frame Rate movie setting that records silent slow-motion Standard HD video (1280 × 720) at 120p for NTSC (100p for PAL), with some restrictions I’ll explain later in this chapter.
- Compression method. To save space and reduce demands on the transmission rates of the captured frames to your storage device, each frame is compressed, using either IPB (Standard), which compresses multiple frames simultaneously at the highest quality the 90D can achieve, or IPB (Light), which uses a lower transfer rate to produce smaller files. I’ll explain these in more detail later. Time-lapse movies use a different compression method, ALL-I, which I’ll explain later in this chapter.
All movies are stored using the MP4 format as the “container” for your video files, with the MPEG4 AVC/H.264 codec (coder/decoder). MP4 is an international standard and widely supported/used and recorded using progressive scan, described shortly.
High Frame Rate
You can enable or disable this feature, which is a slow-motion video option that allows you to capture movies that play back at 1/4 speed—not slow enough to highlight the flaws in your golf swing, but enough of a special effect to allow you to add Baywatch-style running sequences to your next Dwayne Johnson (or David Hasselhoff) parody. Your high frame rate video is Standard HD (1280 × 720) resolution without sound. The maximum recording time is 7 minutes, 29 seconds. Autofocus and digital image stabilization are disabled.
The slow-motion secret, of course, is that the video is recorded at nominally 120p (actually 119.9) for NTSC and 100p (PAL), and then played back as if it were captured at 30/25 fps. So, each frame is displayed for 4X longer than the time at which it was captured. The resulting sequences are pretty good, although you can expect some flickering when shooting under fluorescent or LED lighting, and other weirdness when outputting to HDMI. Time codes are not recorded when Count Up is set to Free Run. Canon cautions you to check your Movie Recording Size Setting once you’ve disabled High Frame Rate video.
4K Movie Cropping
You can enable or disable this feature, too. The actual area of the 90D’s full image size that is captured is always cropped to a certain extent. Because the High Definition and Ultra High Definition aspect ratios are 16:9 rather than the 3:2 ratio used for still photography, a certain amount is cropped off the top and bottom of your frame. The remaining area may be further cropped depending on your movie mode and the lenses you are using. This setting gives you some control over the image crop used.
- Movie Cropping: Disable. As shown in Figure 10.10, the full width of the sensor is used for 4K Ultra HD, Full HD, and Standard HD video, as well as time-lapse movies, as these are assembled in the camera using still frames captured using the full width of the frame.
- Movie Cropping: Enable. With this setting, your 4K video (only) is always cropped, and the resulting image area corresponds to that outlined in green in the figure. Full HD, Standard HD, and time-lapse movies are not cropped even when this setting is enabled.

Figure 10.10 4K movie cropping.
Sound Recording
This setting lets you choose Auto, Manual, or Disable; plus, Enable or Disable the wind filter/attenuator. (See Figure 10.11.)
- Auto. The 90D sets the audio level for you.
- Manual. Choose from 64 different sound levels. Select Rec Level and rotate the QCD while viewing the decibel meter at the bottom of the screen to choose a level that averages –12 dB for the loudest sounds. (See Figure 10.11.)
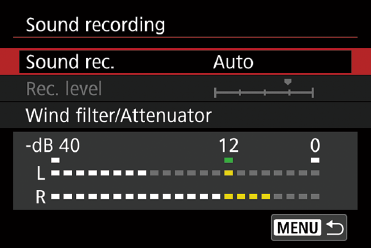
Figure 10.11 Sound recording options.
- Disable. Shoot silently, and add voice over, narration, music, or other sound later in your movie-editing software. Note that if you are connected to an external device, including recorders using HDMI, sound is not output when sound recording is disabled in the camera.
- Wind filter/Attenuator. Enable to reduce the effects of wind noise on the built-in microphone. This also reduces low tones in the sound recording. If wind is not a problem, you’ll get better quality audio with this option disabled. Even better is to use an external microphone with a wind shield. The Attenuator suppresses distortion caused by loud noises, which can affect audio even when Auto sound level is in use.
You can use your 90D’s built-in stereo microphone or plug in a stereo microphone into the 3.5mm jack on the left side of the camera. An external microphone is a good idea because the built-in microphone can easily pick up camera operation, such as the autofocus motor in a lens. Headphones are useful for monitoring sound. Press the Q button, select Headphone (it’s located at the bottom of the left column of the Quick Control menu), and rotate the Main Dial to adjust headphone volume.
Movie Digital IS
Although the 90D relies on the image stabilization built into some EF-/EF-S-mount lenses, it can supplement this optical image stabilization (OIS) with an electronic version that can be activated when shooting movies. Digital image stabilization takes advantage of the fact that cropped video frames contain some image information outside the boundaries of the actual frame displayed. The camera can monitor movement and compensate for it by shifting the pixels of the entire frame slightly so that subject matter that is not moving remains in the same relative position in the frame. That is, if the camera image shakes a few pixels to the left, the frame area is moved an equivalent amount the same number of pixels to the right. Because some pixels at the edges of the frame must be trimmed to compensate for this adjustment, the resulting movie is slightly cropped, adding a small amount of magnification.
You must use this feature in conjunction with the built-in optical image stabilization of your lenses that have stabilization (it won’t work if your lens has IS and it is turned off). Canon provides a list of lenses that are compatible with what it terms “combination IS” (when both digital and optical image stabilization are combined). Movie IS does not work with lenses with a focal length greater than 800mm and is not recommended with tilt/shift (TS-E), fisheye, or third-party lenses.
- Disable. No digital IS is applied. Use this setting when the camera is mounted on a tripod.
- Enable. A great deal of camera shake will be corrected; the image will be slightly cropped, producing a slight magnification effect. This setting works best with wide-angle lenses.
- Enhanced. Even more pronounced camera shake is compensated for, and the image will be magnified a bit more. Use this as a last result, as there may be a noticeable blurring of the image while viewing and an increase in visual noise.
Time-lapse Movie
This setting allows you to record movies captured frame-by-frame over an extended period. The 90D takes still photos in 16:9 format and stitches them together to produce a Full HD or 4K movie. I’ll provide complete step-by-step instructions on how to create a time-lapse movie in Chapter 13.
Remote Control
Choose Enable and you can start or stop movie and time-lapse shooting using the Canon RC-6 wired remote or BR-E1 wireless remote. With the RC-6 remote, the remote control icon is displayed on the LCD screen. Set the release timing switch to 2 and press Transmit. If you’re using the BR-E1 wireless remote, you must first pair the remote with your 90D using the instructions supplied with the remote.
Video Snapshot
Video snapshots are movie clips, all the same length, assembled into video albums as a single movie. You can choose a fixed length of 2, 4, or 8 seconds for all clips in a particular album. I’ll show you how to collect and compile them later in this chapter.
Movie ISO Speed Settings
You can separately specify ISO parameters for movie shooting using this entry. Select a specific ISO speed or specify limits on the range of ISO settings and shutter speeds that the camera selects automatically. The subentries include:
- ISO speed. In Movie M (Manual exposure) mode, you can select a specific ISO speed from ISO 100 to 12800 or choose Auto to allow the 90D to select an appropriate sensitivity. The latter effectively gives you an autoexposure mode when using manual exposure: you select the shutter speed and aperture manually, and the camera adjusts the ISO to produce the right exposure.
- ISO speed range. Available when recording Standard HD and Full HD movies, or Full HD timelapse movies, you can specify an ISO range from a minimum of ISO 100 to H (ISO 6499 equivalent) and a maximum of ISO 200 to H (ISO 25600 equivalent). The default range is ISO 100 to 25600. I find myself using this feature frequently to keep me from accidentally switching to a setting I’d rather (or need to) avoid. For example, at concerts I may switch from ISO 1600 to 6400 as the lighting changes, and I set those two values as my minimum or maximum. Outdoors in daylight, I might prefer to lock out ISO values lower than ISO 100 or higher than ISO 800.
- Max for Auto. This is the equivalent “safety net” for Auto ISO operation for a maximum setting. The default maximum is ISO 12800, but you can specify 6400 or H (25600 equivalent).
- Time-lapse max for Auto. Set the maximum ISO for 4K/Full HD time-lapse movie shooting in Program, Tv, Av, or Manual exposure mode and ISO Auto. The default maximum is 6400, but you can specify another value between ISO 400 and 12800.
Movie Auto Slow Shutter
Use this setting to allow the 90D to select a slower shutter speed no faster than 1/30th second when shooting with Program or Av (Aperture-priority) at a frame rate of 60p. (I’ll provide more detail on how choice of frame rates affects your movies later in this chapter.) You can select Enable or Disable. Here’s the difference:
- Disable. Frame rates of 1/60th second or faster will be chosen in Program and Av exposure modes when shooting 60p video. The video will be smoother and more natural looking, and individual frames will be sharper because of this “higher” shutter speed. However, under low light, your video may appear to be underexposed.
- Enable. Shutter speeds of 1/30th second or slower are enabled, producing better-exposed movies that may have less noise (because a lower ISO setting may be used). However, moving subjects may be blurry or leave a visible “trail” caused by the longer exposure.
Metering Timer
To keep the 90D’s exposure meters active for a suitable period of time as you shoot. Specify how long the metering system remains active before switching off. You can select 4, 16, or 30 seconds, plus 1, 10, or 30 minutes. Tap the shutter release to restart the timer.
HDMI Information Display
When an external device is connected to the 90D through the HDMI port, the video is sent through the port to an external monitor or recorder. You can simultaneously display the video on the color LCD as it is recorded to your memory card. Your options are as follows:
- With Info. You can choose whether to display the captured image and scene and camera shooting information (such as settings and AF point) on the external device as you shoot. (The 90D’s LCD screen is turned off.) Recorded video is saved to the memory card in the camera, and not on the external device.
- Clean/4K Output. The camera shooting information is displayed on the 90D’s LCD screen, but the video is not saved to the camera’s memory card. Instead, 4K “clean” video is directed to the external device. If the device is a recorder (instead of just a monitor) it can be saved there. Wi-Fi communication is not available.
- Clean/FHD Output. This option functions the same as the choice above, but for Full HD movies instead.
AF Method
These are the same AF modes available in live view, as described earlier in this chapter.
Movie Servo AF
If you enable this menu item, the 90D will focus continually during movie shooting, even if you are not pressing the shutter release halfway. To stop focusing or to pause, tap the Servo AF icon at the lower-left corner of the LCD screen. Movie Servo AF will reactivate automatically if you resume shooting after performing tasks such as using menus, using Playback, or adjusting the AF method. Choose Disable, and AF will take place only when you press the AF-ON button or press the shutter release halfway.
Eye Detection AF
This feature functions the same as live view eye detection, as explained earlier in the chapter.
Lens Electronic Manual Focus
This is another feature that operates in the same way as its live view counterpart, as described earlier.
Movie Servo AF Track Sensitivity
Here you can specify how quickly the Movie Servo AF tracking locks onto a moving subject. Changing the tracking sensitivity can come in useful when an intervening subject passes through the frame in front of the subject you were capturing. It’s also helpful when panning. A sliding scale can be adjusted from Locked On (–3 to –1) to Responsive (+1 to +3) or standard at the 0 position. Locked On tells the camera to stick with the subject currently in focus—like that referee at a football game, or a passerby in an urban scene. Responsive settings tell the camera to switch to track a subject located at the current focus point, even if it’s the same subject now moving toward you at a rapid rate, or a different subject that comes into view.
This setting requires the AF method to be set to 1-Point AF. If you choose another AF method, the 90D defaults to the standard (0) setting and does not vary.
Movie Servo AF Speed
You can enable or disable this feature, which enables the 90D to focus on the subject continuously during movie shooting—even if the shutter button is not held down halfway. It’s a battery hog, and the constant refocusing may be undesirable if the noise is picked up by the camera’s built-in microphone. To temporarily disable movie servo AF, tap the Servo AF icon in the lower-left corner of the LCD monitor screen, or press the Flash button, or a button you have defined for that function using Custom Controls in the Custom Functions 3 menu. After resuming movie shooting and pressing the MENU or Playback button, or changing the AF method, Movie Servo AF will resume automatically. If you’ve disabled Movie Servo, press the shutter button or AF-ON button halfway to initiate autofocus. This choice is available when Movie Servo AF is set to Enable, and AF Method is set to 1-Point AF. The function is also enabled when using lenses released after 2009 that have USM or STM motors. Your choices, shown in Figure 10.12:
- When Active. Always On activates the AF adjustment speed setting automatically before and during movie shooting. During Shooting AF speed adjustment is active only when you are capturing video.
- AF Speed. Highlight this option and press SET. You can then adjust the AF speed using the touch screen, QCD, or directional buttons along a sliding scale from Slow (–7 to –1) to Standard (0) to Fast (+1 to +2).

Figure 10.12 Movie Servo AF speed.
MF Peaking Settings
Manual focus peaking works in movie mode, too. I already described the options for this feature earlier in the chapter.
Exposure Options
When shooting movies, you can select fully automatic exposure, elect to specify exposure manually, or choose a shutter speed or aperture setting that you prefer for creative reasons. The 90D will select an ISO speed for you automatically in all cases, generally sticking to the range ISO 100 to ISO 12800. Exposure can be locked with the * button and cancelled with the AF point selection button located to the right of the * button. Here are your options:
- Fully automatic exposure. The 90D will automatically select an appropriate exposure for you if the Mode Dial is set to Basic Zone modes, such as Scene Intelligent Auto or Special Scene modes. If the mode dial is set to P (program auto exposure), Tv (Shutter-priority), Av (Aperture-priority), or B (bulb exposure), exposure will be set as if you had selected P. Note that B will not produce a bulb or time exposure; the camera defaults to P when you use the B position. The idea is to prevent you from losing video capture capabilities if you accidentally select B by mistake.
- Exposure compensation. When using Creative Zone modes, flip the Lock switch to the down position, and you can rotate the Quick Control Dial to specify exposure compensation.
- Speedlite movie light. In exposure modes other than M (Manual), if you have a Canon Speedlite with a built-in movie LED light mounted and powered on (such as the Speedlite 320EX), the 90D will automatically activate the lamp under low-light conditions.
- Manual exposure. Choose M on the Mode Dial and you can specify ISO speed, shutter speed, and aperture.
- ISO. Press the ISO/Flash Exposure Compensation button on top of the camera to view the ISO speed setting screen. Adjust with the Main Dial. Choose Auto and the camera will select an appropriate ISO based on the shutter speed and aperture you have selected. During Manual exposure, the * button locks ISO at its current setting if you have selected Auto.
- Shutter speed. Use the Main Dial to select a shutter speed, within the limitations described under Shutter-priority AE earlier.
- Aperture. Use the Quick Control Dial to adjust aperture.
When choosing shutter speed or aperture, you can monitor exposure using the exposure level scale at the bottom of the LCD screen. For an additional check, you can press the INFO. button to view a live histogram.
Formats, Compression, and Frame Rates
Even intermediate movie shooters can be confused by the nomenclature for format, compression, and frame rates. This section will help clarify things for you by explaining what each of these terms mean, and what options are available to you.
MP4 Format
MP4 format was derived from the original MOV format developed by Apple for its QuickTime movie player. MP4 is now the dominant industry standard. It uses lossy video compression to save space and can be smoothly translated from one to the other as long as the same codec (video encoder, such as H.264) was used for both.
Compression
The actual compression method used by the MP4 format is easy to understand. The 90D stores files using the standard H.264/MPEG-4 codec (“coder-decoder”), all resolution settings, using one of the following compression methods.
- ALL-I (All Intraframe). In this mode, used for time-lapse movies, the camera takes each individual frame that you shoot and attempts to compress it before writing the frame to your memory card. You can think of ALL-I compression as a series of still images, each squeezed down by discarding (hopefully) redundant information. While this compression method is not the most efficient way to reduce file size, because individual frames are stored in their entirety, the resulting files are easier to edit.
- IPB (I-frame/P-frame/B-frame) Standard and Light. IPB is a newer compression method used with MP4 format. It employs interframe compression; that is, only certain “key” frames are saved, with other frames “simulated” or interpolated from information contained in the frames that precede and succeed them. I-frames are the complete frames or intraframes (the only kind used by ALL-I compression); P-frames are “predicted picture” frames, which record only the pixel changes from the previous frame (say, a runner traveling across a fixed background); B-frames are “bi-predictive picture” frames, created by using the differences from the preceding and following frames. This interpolation produces image quality that is a bit lower and which requires more of your camera’s DIGIC 8 processing power, but file sizes are smaller.
Video encoded using IPB must be converted or transcoded to a format compatible with your video-editing software. The compression scheme can produce more artifacts, particularly in frames with lots of motion throughout the frame. I use this method only when the ability to shoot longer is very important.
The 90D offers both the Standard version, which compresses multiple frames simultaneously for greater efficiency and smaller file sizes, and a Light version that records at a slower bit transfer rate than Standard, producing a smaller file size and greater compatibility with more playback systems.
Frame Rate
In the 90D world, in which all video is shot using progressive scan with no interlaced scan option, frame rates are easy to choose. (Interlacing is a capture method in which even/odd numbered lines of each frame are captured alternately; with progressive scan, all the lines in a frame are captured consecutively.) Fortunately, one seemingly confusing set of alternatives can be dispensed with quickly: The 50/25 fps and 60/30 fps options can be considered as pairs of video- oriented frame rates. The 60/30 fps rates are used only where the NTSC television standard is in place, such as North America, Japan, Korea, and a few other places. The 50/25 frame rates are used where the PAL standard reigns, such as Europe, Russia, China, Africa, Australia, and other places. For simplicity, I’ll refer just to the 60/30 frame rates in this section; if you’re reading this in India, just convert to 50/25.
If you’ve shot video before, you might wonder about a third possibility, 24 fps, which is a standard frame rate used for motion pictures. The 90D does not offer that option, which gives your movie a “film” look, excellent for showing fine detail. However, if your clip has moving subjects, or you pan the camera, 24 fps can produce a jerky effect called “judder.” A 30 or 60 fps rate produces a home-video look that some feel is less desirable, but which is smoother and less jittery when displayed on an electronic monitor. Canon has opted to provide only 30 and 60 fps for the 90D.
High Frame Rate Video
The 90D’s High Frame Rate slow-motion video option allows you to capture movies that play back at 1/4 speed. The cool feature comes at a cost. Your high-definition video is Standard HD (1280 × 720) resolution and is silent. The maximum recording time is 7 minutes, 29 seconds, which should be sufficient for most purposes; a longer slo-mo clip would be excruciating to watch. Autofocus is disabled, so Movie Servo AF is out of the picture, and the high frame rate renders digital IS non-functional as well.
The slow-motion secret, of course, is that the video is recorded at nominally 120p (actually 119.9) for NTSC and 100p (PAL), and then played back as if it were captured at 30/25 fps. So, each frame is displayed for 4X longer than the time at which it was actually captured. The resulting sequences are pretty good, although you can expect some flickering when shooting under fluorescent or LED lighting, and other weirdness when outputting to HDMI. Canon cautions you to check your Movie Recording Size Setting once you’ve disabled High Frame Rate video.
HDR Movies
You can extend the dynamic range of your movies in high-contrast situations by shooting HDR movies. Effectively, this mode is a type of in-camera bracketing to provide an expanded dynamic range and improved highlight rendition. Just rotate the Mode Dial to the SCN position to activate HDR movie-making. The video will be recorded at the FHD HD 29.9P IPB or Full HD 25.00P IPB setting. Highlight Tone Priority and Time Lapse Movies must be disabled.
Then shoot a movie conventionally. Multiple frames are merged to create an HDR movie. You may see excessive noise or some distortion, so you’ll want to experiment with this feature to see how useful it is to you.
Video Snapshots
Video snapshots are movie clips, all the same length, assembled into video albums as a single movie. You can choose a fixed length of 2, 4, or 8 seconds for all clips in an album. I use the 2-second length to compile mini-movies of fast-moving events, such as parades, giving me a lively album of clips that show all the things going on without lingering too long on a single scene. The 8-second length is ideal for landscapes and many travel clips, because the longer scenes give you time to absorb all the interesting things to see in such environments. The 4-second clips are an excellent way to show details of a single subject, such as a cathedral or monument when traveling, or an overview of the action at a sports event.
First, activate the video snapshot feature in the Movie Shooting 1 menu:
- 1. Activate. Select Video Snapshot from the Movie Shooting menu. The screen shown in Figure 10.13 will appear.
- 2. Enable Snapshots. Highlight the Video Snapshot entry, press SET, select Enable, then press SET again to confirm.
- 3. Select Album. Next, highlight Album Settings and choose either Create a New Album or Add to Existing Album.
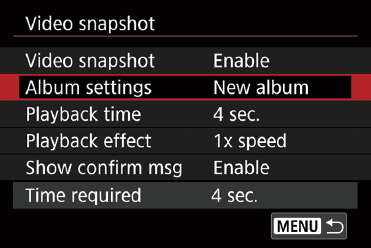
Figure 10.13 Video Snapshot options.
- 4. Specify Snapshot Length. If you choose to Create a New Album, a screen appears with the message “The next video snapshot will be added to a new album” along with the option to choose Snapshot Length. Highlight that option, press SET, and choose 2 Sec. Movie, 4 Sec. Movie, or 8 Sec. Movie. Press SET to confirm your choice.
- 5. Confirm settings. You’ll be taken back to the previous screen. Highlight OK and tap OK or press SET.
- 6. Enable/Disable Confirm Msg. When enabled, a message will appear on the screen inviting you to Add to Album, Save As a New Album, Playback Video Snapshot, or Delete Without Saving to Album. If you select Disable, the camera skips this step, automatically saves your video snapshot, and is then ready to capture another. You’d want to disable the confirmation message if you planned to shoot several video snapshots one after the other and not have to respond to the confirmation message each time.
- 7. Exit. Press/Tap MENU to exit Video Snapshot setup.
When Video Snapshot is enabled, conventional movie shooting is disabled. Instead, every time you press the Start/Stop button, the 90D captures a clip of the length you’ve specified. The procedure goes something like this:
- 1. Capture Video Snapshot. In Movie mode, press the Start/Stop button. The 90D will begin shooting a clip, and a blue bar appears showing you how much time remains before shooting stops automatically.
- 2. Save your clip as a video snapshot album. If you’ve disabled the confirmation message, the clip will be saved to the current album, and you’ll be ready to capture another snapshot. Note that the confirmation message is overlaid on whichever Playback screen you’ve specified using the INFO. button. The figure illustrates the display when No Information is shown on playback.
- 3. Choose confirmation option. You can use the left/right multi-controller directional buttons or touch screen to select Save As Album/Add To Album (depending on whether this is the first clip for an album, or an additional clip), Save to New Album, Playback Video Snapshot (that you just took), or Do Not Save to Album/Delete Without Saving to Album (exit without adding to an album). (See Figure 10.14.)
- 4. Press SET. Your first clip will be saved as the start of a new album.
- 5. Shoot additional clips. Press the Movie button to shoot more clips of the length you have chosen and as indicated by the blue bars at the bottom of the frame. At the end of the specified time, the confirmation screen will appear again.
- 6. Add to album or create new album. Select the left-most icon again if you want to add the most-recent clip to the album you just started. Alternatively, you can press the left/right multi-controller directional buttons to choose the second icon from the left, Save as a New Album. That will complete your previous album and start a new one with the most-recent clip.
Or, if you’d like to review the clip first to make sure it’s worth adding to an album, select the Playback Video Snapshot icon (second from the right) and review the clip you just shot. You can then Add to Album, Create New Album, or Delete the Clip.
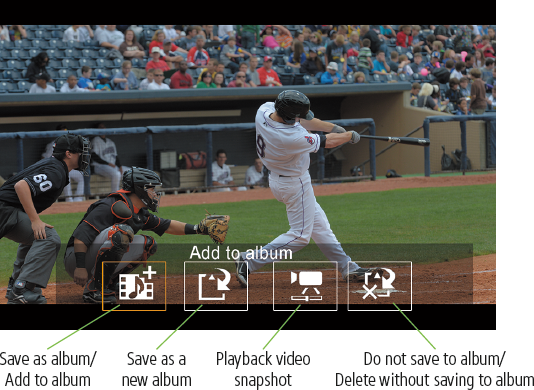
Figure 10.14 Recording a video snapshot.
- 7. Delete most recent clip. If you decide the clip is not one you’d like to add to your current album, you can select Do Not Save to Album/Delete without Saving to Album (the right-most icon).
- 8. Switch from Video Snapshots to conventional movie clips. If you want to stop shooting video snapshots and resume shooting regular movie clips (of a variable length), navigate to the Shooting 1 menu again, and disable Video Snapshot.
Note: Once you’ve set up the Video Snapshot feature, you can quickly enable or disable it using the Quick Control menu, which is illustrated later in this chapter. The Video Snapshot icon is the bottom icon in the left row of the Quick Control menu.
Shooting Movies with Creative Filters
When you rotate the Mode Dial to the Creative Filters position, you can shoot movies using any of five different special effects. These include Dream, Old Movies, Memory, Dramatic B&W, and my personal favorite, Miniature Effect movies. You’ll have to try the others out for yourself to see exactly what they do, but the Miniature Effect is probably already well-known to you. It’s also known as the Tilt/Shift Effect, named after the (expensive!) Canon Tilt/Shift lenses that are required to dramatically change the plane of focus. You can shoot movies with a diorama effect and have them play back at a herky-jerky high speed to enhance the toy-like look of your clip.
To use Creative Filters, press the Q button when in Movie mode. Only the Miniature Effect choice has any additional settings to make. You’ll need to set one of them, Playback Speed, before you select the Creative Filters option. A playback speed of 5x, 10x, or 20x can be chosen using the second entry from the top in the Movie Quick Control screen. Then, highlight the Creative Filter icon just above it, and press SET.
A screen will appear with the five movie Creative Filter effects. Select the one you want and press SET again. If you’re using Miniature Effect, a horizontal bar will appear as an overlay on the LCD monitor screen, as shown in Figure 10.15. Use the up/down arrows to position the bar over the area you want to be in sharp focus. Press the Magnify button or tap the orientation icon at the lower-right corner of the screen (press INFO. to make it appear, if necessary) to switch the bar to a vertical orientation. Everything outside the frame will be blurred, as you can see in Figure 10.16. When your (silent) clips are played back they will be speeded up from 5 to 20 times, depending on your selection.
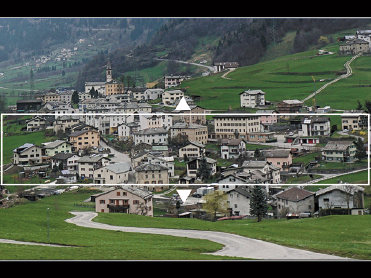
Figure 10.15 Move the frame over the area you want to remain in focus.
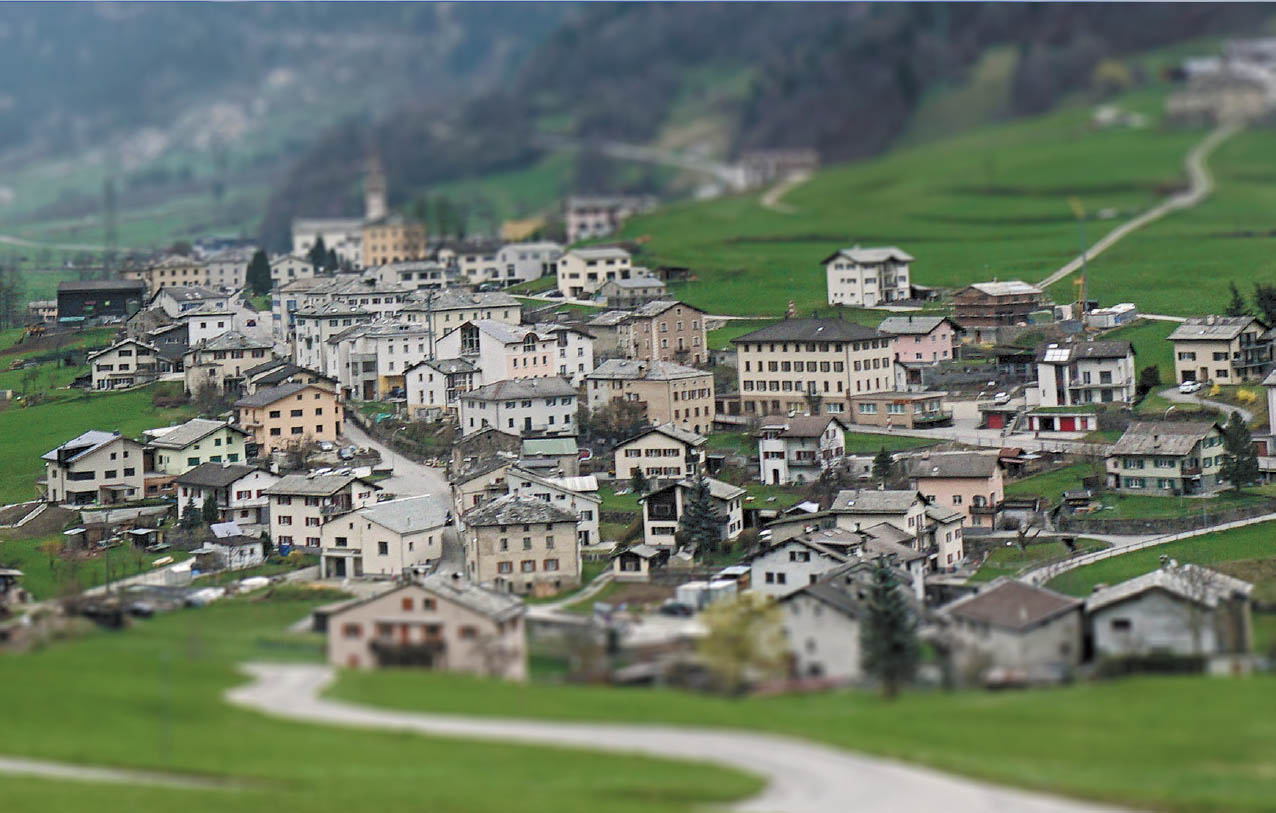
Figure 10.16 Your miniature effect movie will be played back at 5x, 10x, or 20x normal speed.
Playback and Editing
As a movie is being played back, a screen of options appears at the bottom of the screen, as shown in Figure 10.17, upper left. When the icons are shown, use the left/right directional keys to highlight one, and then press the SET button to activate that function:
- MENU. Exits playback mode.
- Playback. Begins playback of the movie or album. To pause playback, press the SET button again. That restores the row of icons so you can choose a function.
- Slow motion. Displays the video in slow motion.
- First frame. Jumps to the first frame of the video, or the first scene of an album’s first video snapshot.
- Previous frame. Press SET to view the previous frame; hold down SET to rewind movie.
- Next frame. Press SET to view the next frame; hold down SET to fast forward movie.
- Last frame. Jumps to last frame of the video, or the last scene of the album’s last video snapshot.
- Edit. Summons an editing screen.

Figure 10.17 Play back video (upper left), Cut beginning (upper right), Cut end (lower left), Save edited video (lower right).
- Frame grab (not shown). This icon is located to the right of the Edit scissor icon and is available only when a 4K movie is being viewed. You can grab the displayed frame and save it as a JPEG image. I’ll explain Frame Grab in the next section.
- Background music/volume. Select to turn background music on/off. Rotate the Main Dial to adjust the volume of the background music.
While reviewing your video, you can trim from the beginning or end of your video clip by selecting the scissors symbol. The icons that appear have the following functions:
- Cut beginning. Trims off all video prior to the current point. (See Figure 10.17, upper right.)
- Cut end. Removes video after the current point. (See Figure 10.17, lower left.)
- Play video. Play back your video to reach the point where you want to trim the beginning or end.
- Save. Saves your video to the memory card. A screen appears offering to save the clip as a New File, or to Overwrite the existing movie with your edited clip. (See Figure 10.17, lower right.)
- Exit. Exits editing mode.
- Adjust volume. Modifies the volume of the background music.
Frame Grabs
You cannot capture stills while shooting movies. You must stop video capture first, take your stills, and then resume movie shooting. However, you can grab an 8.3-megapixel 3840 × 2160 JPEG still image from any 4K video or 4K time-lapse movie during playback, using the 90D’s Frame Grab feature. Just follow these steps:
- 1. Press the Playback button and select a 4K movie/time-lapse video. They are designated with a 4K icon on the shooting information screen. Press SET to begin playing the video.
- 2. As the movie plays, the movie playback panel appears. Press Pause to stop the movie on the frame you want to grab.
- 3. Use the directional buttons to select the Frame Grab icon. It’s located at lower far right, next to the Scissors icon.
- 4. A message “Save as a New Still Image” appears. Highlight OK to save that frame as a still JPEG.