Sound Editing
Overview
A sound editor is called upon to complete a multitude of tasks including designing, syncing, and organizing audio clips and tracks. Many of the seemingly routine editing tasks can become creative opportunities when approached with a design mindset. Editors learn to prioritize tasks, working quickly on some tasks to create time for more complex edits. There are many software applications and associated plug-ins designed for media production. Pro Tools is one such application and is fully representative of the tools required for completing a soundtrack. Regardless of the specific technologies used, the goal of sound editing is to support story telling. Thus, editing is most effective when transparent to the narrative process. This transparency is why sound editing is referred to as the invisible art.
Syncing Sound to Picture
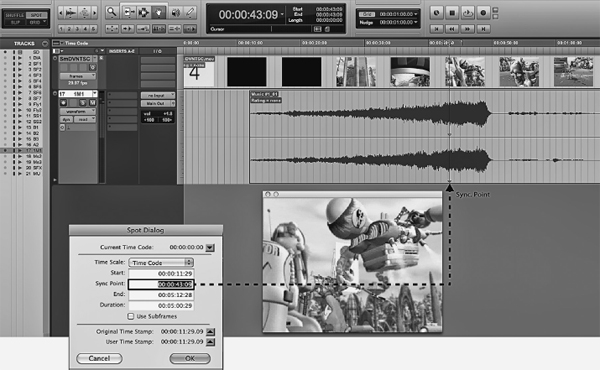
Editors are routinely called on to cut sound to picture in sync. In most cases, this means aligning the header of a clip to a specific frame or time code location. Often, additional adjustments to the initial placement are needed to tighten/slip the sync or re-conform to a new picture edit. This can be accomplished by nudging by frame, snapping to position using keyboard shortcuts, or spotting to time code. When the sync point occurs within the clip, that specific location is marked, providing the editor with a spotting reference (Figure 8.1). The clip is aligned to the sync point rather than the clip header. The editor must then determine how best to approach and exit the sync point. This technique is referred to as backtiming.
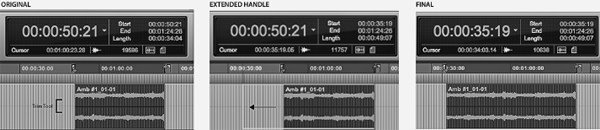
Whether the goal is to adjust the length of a clip or remove unwanted sound, trimming and cutting are two of the most basic edits performed by sound editors. The trim tool is used for reducing or extending the length of a clip from the header and tail (Figure 8.2). Lengthening is only possible if hidden material (handle) already exists.
Cutting differs from trimming in that it removes sound from a specified edit selection rather than adjusting length (Figure 8.3). Some editors substitute the delete key for the cut command, though, unlike the delete key, the cut command creates break points that preserve the underlying automation that exists before and after the edit.

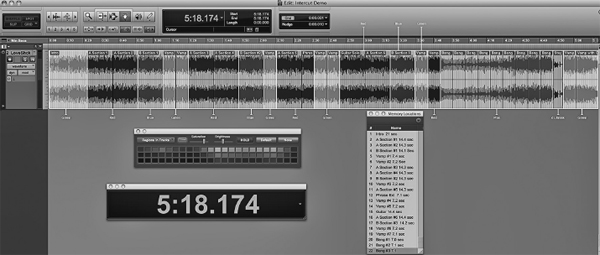
Intercuts are applied to edit selections within a clip. Intercuts are a common technique used by music editors to conform songs and production music to specified lengths (Figure 8.4). Intercuts reduce the length of a cue while preserving the song introductions and endings. Intercuts are typically performed in shuffle mode, allowing the remaining clips to snap together once the intercut is made. Several musical factors must be considered when performing an intercut, including lyrics, form, tempo, instrumentation, and key signature.
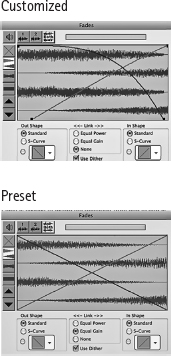
Fades are commonly applied to the head and tail of clips to eliminate the sonic ticks or pops that occur when the audio is not trimmed at the zero crossing. Cross-fades are applied to edit seams to smooth out differences in volume levels that often occur. They are useful when compositing, intercutting, or looping clips. Pre-set fades are fast and easy, but for highly exposed edits, customized fades will often produce a more transparent transition across the edit seam (Figure 8.5).
Compositing Takes
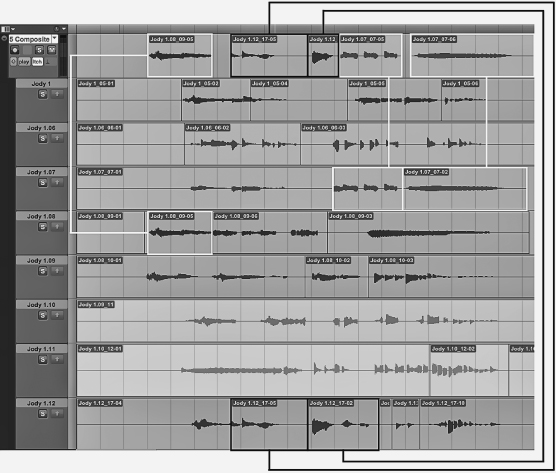
Compositing is a technique where a single take is assembled using selected portions of alternate takes (Figure 8.6). One of the first tasks in compositing is to develop a unique set of criteria for rating takes. The play listing feature in Pro Tools greatly facilitates this process, allowing the editor to view, audition, cut, and promote all related takes within the same playlist. Fades are then added to the new edit seams and the composite track is auditioned to determine if the edits work in context.
Ring-Outs
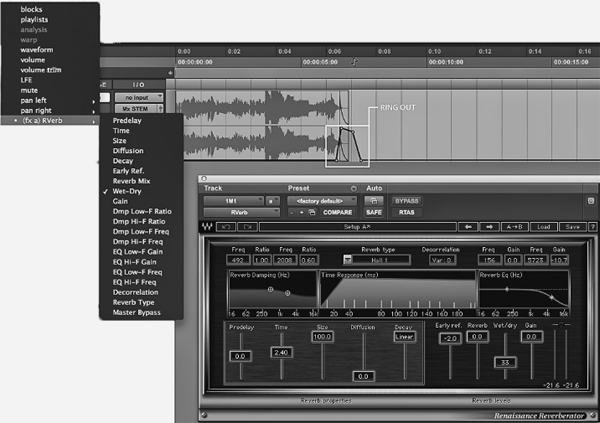
Abrupt edits can be smoothed by adding reverb just prior to the tail of an audio clip, effectively extending the clip length in proportion to the reverb decay time. Editors use this technique to create ring-outs for dialogue, FX, and music. This technique is most effective if reverb is introduced late enough that it will not draw attention, but early enough to generate sufficient energy to sustain beyond the edit point. Ring-outs are created by automating the wet/dry ratio on the reverb plug-in (Figure 8.7). Dialogue ring-outs are common near picture edits that represent a jump in time. For example, screams or sinister laughter are made to postlap into the following scene for emphasis. When working with production music libraries or source music, it is often necessary to make an abrupt edit for timing purposes.
Ring-outs smooth music edits, making the termination point of the cue sound natural.
Time-scaling or Time Compression/Expansion (TC/E) involves changing the clip length without losing any of the original material. Time-scaling is accomplished by adding or subtracting samples from an audio clip. This process can alter the pacing or tempo of a clip without affecting the underlying pitch. The percentage of TC/E that can be achieved while still maintaining sonic transparency (no audible artifacts) is dependent on the length of the file, type of material being processed, sample rate of the session, and the effectiveness of the algorithm. The following are typical scenarios where time-scaling techniques are useful.
- To conform an existing clip to a specified length where no additional handle exists.
- To move transients within a clip without changing the clip’s head or tail position. For example, tightening dialogue sync or making a specific point in a music cue hit to specific on-screen action.
- Speeding up the disclaimer dialogue for a TV commercial.
- Superimposing phrasing on a line of dialogue or a lyric.
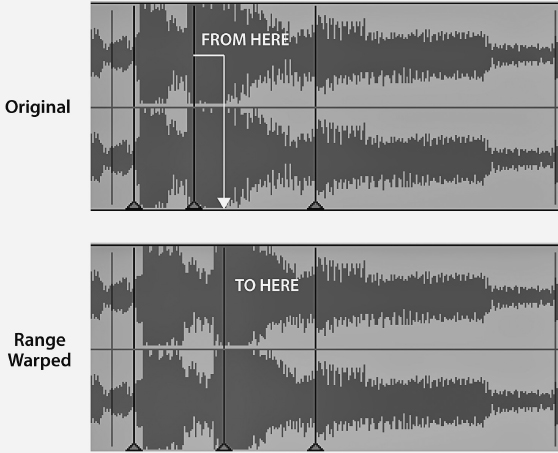
Pro Tools has a time-scaling feature called elastic audio that is built into its application. The range warping feature is particularly useful for tightening sync or making a cue hit precisely on the action (Figure 8.8). Vocalign (discussed in Chapter 3) is an industry standard for tightening dialogue sync and superimposing phrasing.
Pitch shifting is one of the primary means of creating variation in repetitive sounds. It can be applied to a clip to change a subject’s age, size, or gender. Pitch shifting can also be used to enhance our perception of speed. SFX can be pitch shifted to create harmonic or dissonance relationships with a music cue or SFX. Some pitch-shifting plug-ins split the signal to produce harmonizing effects. Harmonizing is an effective way to fatten sounds and give them additional emotional weight. In a subjective sense, minor 2nds, tri-tones, and major 7ths are intervals capable of producing tension. Minor 3rds and 6ths can promote a dark, sad, or foreboding feel. Perfect 4ths and 5ths are neutral, and major 3rds and 6ths are consonant. Sounds can be pitched by cents, semitones, or octaves. There are 100 cents for each semitone and 12 semitones per octave. Like TC/E, there are limits to the extent to which a signal can be pitched without producing audible artifacts.
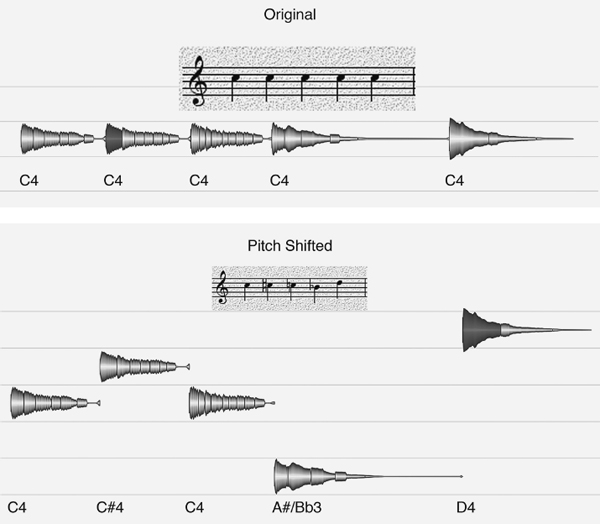
Figure 8.9 Repetitive SFX Are Being Pitch Shifted with Melodyne to Create Variation
It should be noted that pitch shifting is more transparent when processed in sessions of higher sample rates.
Vari-Speed
Linking TC/E with pitch shifting processing results in a vari-speed effect. This digital technique emulates pitch and time characteristics associated with analog devices like tape decks and vinyl recordings. Vari-speed is used to create acceleration/de-acceleration effects for powered objects like engines or generators (Figure 8.10). The ability to customize the rate at which these objects power up or down is useful when matching on-screen movements or implying dynamic change. Vari-speed is also used to support comic misdirection. In this application, the sound of an object losing power becomes an analogy for the misdirection. Vari-speed effects are also used in narrative moments when a character transitions from fantasy to reality.

Figure 8.10 A Vari-speed Process Is Applied to a Jet Throttle Using Pitch’n Time
Reverse and Rewind
Reverse is an audio-suite or rendered process used by editors for a variety of creative applications such as designed languages, terminating effects, and transitional sounds. For example, the terminating sound of a sci-fi door closing is achieved by reversing compressed air. Whooshes are often reversed and used to support transitional moments or shots where the visuals are also rewound. The pre-verb effect used in horror films is created by reversing dialogue, adding reverb, and re-reversing the dialogue. When played back, we hear the reversed reverb just prior to the dialogue. Rewind is a reverse effect produced by scrubbing the audio backwards in time. This effect is often used in scenes where the image plays back in reverse, usually indicating a time shift in the narrative. Capturing a rewind effect requires the outputting of the DAW signal to an additional recording device and importing the captured sound back into the session.
Sound Replacement
Requests to substitute one sound for another are a common occurrence in sound editing. If multiple versions of a sound already exist, sound replacement can become time consuming. Most audio editing programs have sound replacement functionality built within or achieve replacement with plug-ins (Figure 8.11). Sound replacement parameters can be configured to work at the track or session level. Once the clips are replaced, the editor must revisit each clip to insure that no additional editing is required.
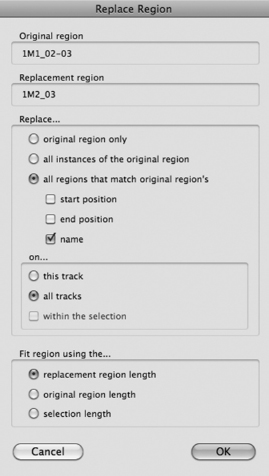
Figure 8.11 Sound Replacement Software Provides a Variety of Options for Batch Replacement
Noise Reduction
Noise reduction is often needed to clean up tracks before they are sent to the final mix. This is especially true for field recordings that were captured under less than ideal conditions. Equalizers, gates, and specialized noise reduction plug-ins are essential tools for cleaning up tracks. Equalizers approach noise reduction from the frequency domain. They can be used to roll-off noise that occurs above and below a desired signal, or they can be used to filter a selected range of frequencies that might mask a given signal. Peak filters are like sonic erasures; some are wider and impact a larger portion of the signal while some are more narrow and discrete. The control that adjusts the width of frequency impacted by an equalizer is referred to as the Q. Gates and expanders approach noise reduction from the amplitude domain. The better the signal-to-noise ratio, the more effective they become. Gates and expanders operate by setting a threshold for amplitude. Any signal that drops below the threshold is effectively muted. Noise reduction is most transparent when multiple approaches are used. Thus, noise reduction software often incorporates both EQ and Expansion/Gating. Noise reduction plug-ins can manipulate a multitude of narrow frequency bands or notch filters to achieve substantial reduction of unwanted noise while preserving the intended signal.
Side-Chain Gate
Sounds are often given greater weight when layered with additional sounds. When this approach involves multiple iterations of the sound, side-chain gating becomes a practical alternative to multiple edits. As discussed earlier, the gate is a signal processor that uses amplitude thresholds to determine whether a sound will play or be muted (gated). One common application to side-chain gating is to create a secondary track that hosts a constant signal (typically low frequency). The gate is placed on the secondary track but receives its input (key) from the primary track. When the sound on the primary track exceeds the threshold (like a gun going off), the gate opens and the secondary track is un-muted. When the primary tracks signal falls below the threshold, the secondary track returns to its muted state, effectively automating cuts.
Futzing
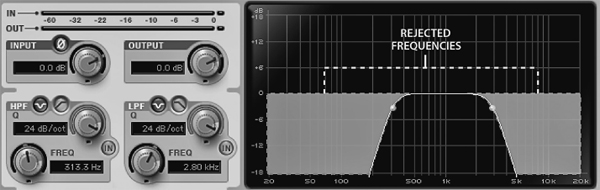
Futzing involves the digital processing of a signal to imply that it is transmitting from a specific playback device. Futzing is also used to transition a cue from source to underscore or to move from an exterior shot to an interior shot. One of the key elements of futzing is bandwidth limiting. Bandwidth limiting involves the paired use of low and high-pass filters to create a narrow frequency response associated with many playback devices (Figure 8.12).
Televisions, radios, phones, and public address system are commonly futzed to imply source or diegesis. A good example of futzing can be heard in the scene from Iron Giant (1999) where Eli and his mother converse by phone. In this scene, Mrs. Hughes’ voice is futzed only when she is off-screen. For additional realism, the sound editor included futzed BGs in Eli’s phone, representing the diner where his mother was working. Futzing is not limited to frequency bandwidth limiting. Third party plug-ins like Speakerphone (Figure 8.13) and Futzbox provide the sound editor with additional futzing parameters. These include physical modeling of devices and spaces and the addition of sonic artifacts such as radio squelch, vinyl ticks, and pitch warping. One advantage to using futzing plug-ins is that all of the parameters can be automated to transition from source to underscore or vice versa.
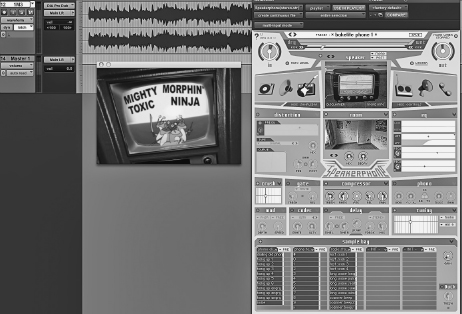
Figure 8.13 Speakerphone Applied to the Source Music
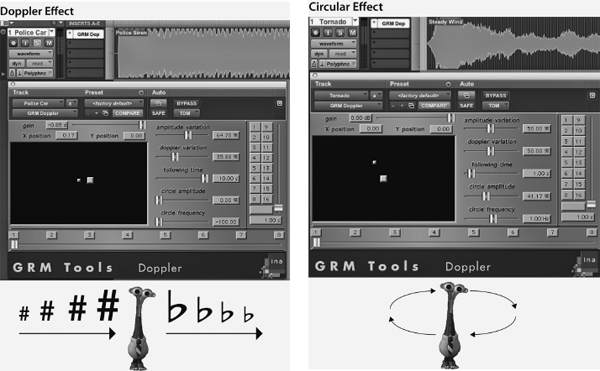
The Doppler effect combines pitch variation with volume and panning to enhance the sound of an object as it passes. This perceptual phenomenon reflects the perspective (point of view) of an observer in relation to a moving object (Figure 8.14). As an object approaches, it travels into its own sound waves, compressing them and causing the observer to perceive a rise in pitch. The opposite occurs as the object moves away. Many SFX are recorded with Doppler, oftentimes making more work for the editor as they attempt to match the clip to the picture. Doppler plug-ins allow the editor to take a static version of a sound and customize the pitch variation, volume, and panning to match the on-screen movements with exacting levels of realism. Doppler is frequently added to vehicles that pass or fly by a character. They are also added to whoosh effects to give them additional motion. The GRM Doppler plug-in can also generate circular or rotating effects such as tornadoes, helicopter blades, or twirling particles radiating from an explosion.
In some cases it is necessary to extend the length of the clip beyond the range in which time-compression tools are practical or transparent. In these situations, the sound editor may opt to extend the audio by means of looping. Music editors use looping to vamp a selection within a cue to meet certain length requirements. When looping musical material, it is important that the loop point match rhythmically, harmonically, and dynamically. If lyrics or a melodic line is involved, care should be taken to observe the line. FX editors commonly loop BGs for extended scenes. When looping BGs, the editor should avoid using portions of a clip that contain spikes or patterns that might advertise the loop. Most DAWs have a batch-fading feature that allows the editor to customize and apply a cross fade at the edit seam of each loop.
Preparing Tracks for Delivery to the Mix
Even in short form animation, clip and track counts can accumulate and become overwhelming if not properly managed. Tracks and clips should be ordered and labeled in a clear and logical manner so as not to confuse or create additional work for the mixer. Any unused tracks, plug-ins, or busses should be removed to optimize the system’s resources and storage requirements. If a unique plug-in was used, duplicate the track and render the effect, providing the mixer with both a processed and unprocessed version in the event that the particular plug-in is not available on the mix stage. Sessions must be properly archived and labeled to insure that all assets are present.