The Final Mix
Overview
The Warner Brothers animated short Rhapsody in Rivets (1941) created an analogy between the construction of a building and the performance of a symphony (Figure 9.1). This analogy can be extended to the mixing of a soundtrack as well. The conductor for the mix is the film’s director, responsible for articulating a vision that guides the performance. Sound elements are the individual instruments of the soundtrack. Just as related instruments meet in sectionals to work on timing, balance, and blend, similar elements are combined in a process known as pre-dubbing. Sectionals are followed by a dress rehearsal where all of the instruments are brought together and placed (panned) in their respective string, woodwind, brass, or percussion sections. The dress rehearsal for a film mix is the point in which pre-dubs are combined to create the dialogue, music, and FX stems. During this stage, the director works to balance (level) the individual parts measure by measure (frame by frame). In film mixing, the final concert is performed by the re-recording mixer. Like the concert pianist, the re-recording mixers have a multitude of keys (faders and knobs on a large console) from which they perform with expressive control over individual entrances, dynamics, and articulations (Figure 9.2). Finally, all of the players are assembled in a performance space, and like the concert hall, the mixers select spaces for each of the movements (scenes) in their cinematic symphony.
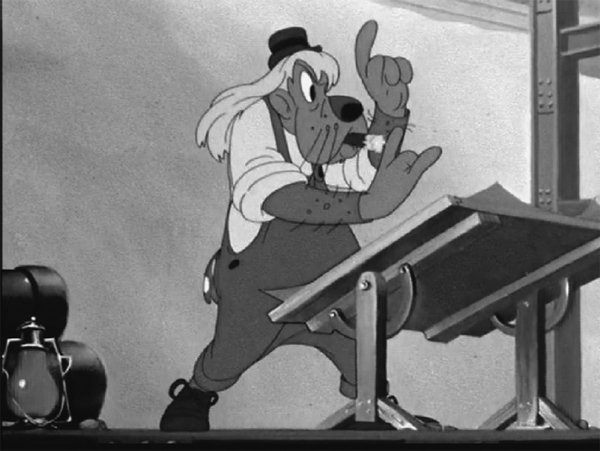
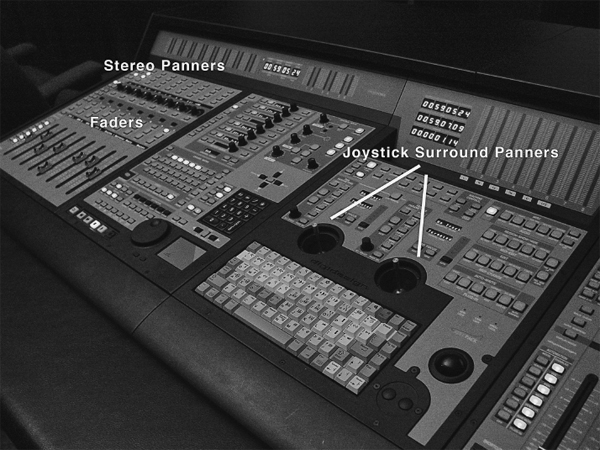
Figure 9.2 Mixing Console with Stereo and 5.1 Panners
If it sounds good, it is good.
The Re-Recording Mixer(s)
It is easy to step onto a mix stage and develop an impression that mixing is primarily technical in nature. However, in reality mixing is driven primarily by creativity, problem solving, and a strong aesthetic foundation for narrative film. It is true that mixers have a great deal of technology at their fingertips; however, they must become masters of that technology if it is to become transparent to the mixing process. Mixers are responsible for developing pre-dubs, building stems, and recording the printmaster. They are also involved with mastering and encoding the audio for various release formats. They shape a multitude of tracks created by the sound and music departments into a cohesive soundtrack that is integral to the storytelling process. They use faders and panners to focus the scene and control its intensity. They strive to understand the narrative implications of every subtle adjustment; smoothing transitions between edits or scenes, defining spaces, and developing continuity. Mixers accomplish this by being sensitive to the narrative qualities of the film and the vision of the director. Mixers work collaboratively with directors, sound editors, and other mixers. They must be able to work for long periods of time under incredible pressure while maintaining a high level of diplomacy.
When mixing a media project, it is important to differentiate mix levels from monitoring levels. Mix levels are created by adjusting individual track levels to produce inter-level differences. The changes made to individual track levels are reflected in the respective track output meters. These peak levels indicate the relative strength of the signal being sent to the monitors (speakers).
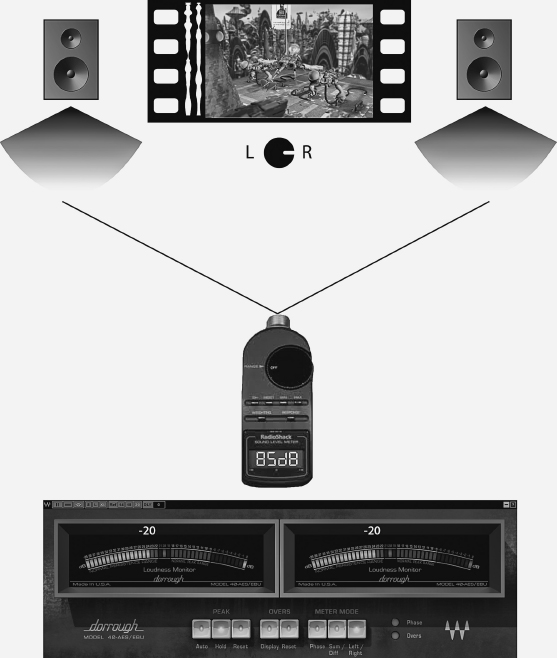
Monitor levels refer to amount of sound pressure level (SPL) created when the mix is played through a set of speakers. Consequently, a project mixed at high levels but monitored at low levels will sound dull and lifeless. Conversely, a project mixed at low levels but monitored at high levels may sound bright and noisy. To insure that a theatrical film mix will properly translate beyond the mix stage, reference levels have been established to guide the mixing process. Before mix levels can be properly set, monitor levels need to be calibrated to these reference levels. In film the most commonly accepted reference level is 85 dBspl (sound pressure levels in decibels) at -20 (Figure 9.3). When calibrating a speaker at this reference level, the engineer will play a reference tone (pink noise at -20) through each speaker, trimming the output of the speaker until it reads 85 dB on an SPL meter and -20 on the mix console meter. For television, the mix reference is often lowered to 79 dBspl, however, like the Internet and mobile applications, there currently are no standard reference levels.
Dynamic Range
Variations in dynamic range (soft to loud) contribute to the expressive quality of the film while also preventing the audience from becoming fatigued. Audiences perceive volume contextually. In other words, if a preceding scene is very soft and a loud sound is suddenly introduced, the audience will perceive it as being very loud. It is the context of changes in volume that audiences are most attuned to. Film mixers utilize approximately 40 dB of dynamic range in a theatrical mix (Figure 9.4). They pace dynamics to create interest through contrast rather than maximum volume. Figure 9.4 describes the optimum dynamic range for a theatrical presentation. Mixers for cinema can rely to a greater extent on a predictable playback system and environment. However, audiences are increasingly turning to the Internet and personal devices to acquire and experience media. This shift in delivery will require content providers to adopt new work flows and standards in an effort to create optimal mixes for these emerging formats.
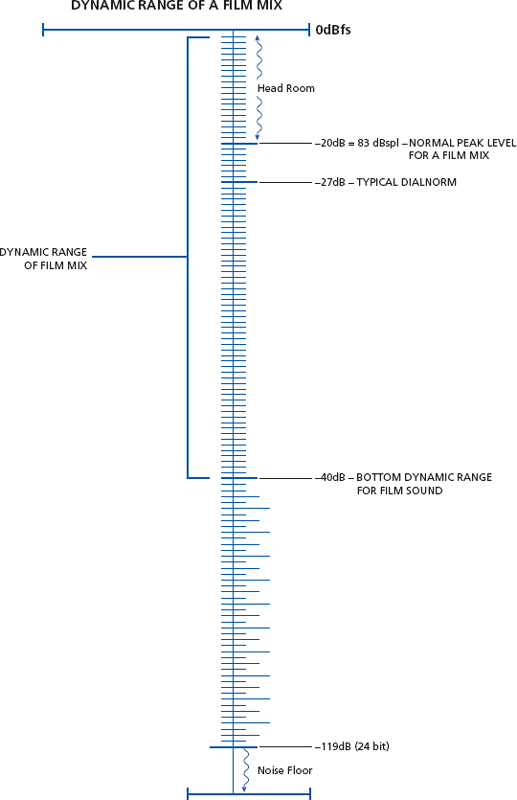
Figure 9.4 Dynamic Range of Theatrical Film Mix
It’s not how loud you make it, it’s how you make it loud.
Configuring the Session
If the sound editors have labeled and organized tracks and clips in a logical manner, the task of combining multiple sessions to create the master session will be greatly simplified. Some mixers color-code tracks by stem as a means of visually organizing a session, especially in mix view. Separating the video into shots or scenes provides a useful navigational map for the film (Figure 9.5). In addition, these regions can be used to define edit selections for static or snapshot automation. Memory locations and window configurations can be used to show or hide a variety of track configurations and display options.

Pre-Dubs
As a project grows in track count, there often comes a point where the number of tracks exceeds the practical limitations of a DAW or mix console. Pre-dubbing is the process of combining tracks of similar type to facilitate the mix. During the pre-dubs, the mixer becomes familiar with individual tracks and looks for opportunities to combine related tracks. The following are some basic guidelines for pre-dubs:
![]() Combine elements that are part of a design element.
Combine elements that are part of a design element.
![]() Combine multiple elements if they are similar in character (i.e. gun handling, gun firing, gun shells).
Combine multiple elements if they are similar in character (i.e. gun handling, gun firing, gun shells).
![]() Combined multiple elements if they can share the same panning position.
Combined multiple elements if they can share the same panning position.
![]() Combine multiple elements if they can share the same signal processing, especially reverb.
Combine multiple elements if they can share the same signal processing, especially reverb.
Mixers have the option of printing pre-dubs or creating virtual pre-dubs from tracks residing in the master session. One approach to creating virtual pre-dubs involves grouping like tracks and assigning them to a VCA or Voltage-Controlled Amplifier (Figure 9.6). With this approach, the group members are hidden unless they are needed for individual level or panning adjustments. A second approach involves bussing (pre-fade) like elements to an auxiliary track (Figure 9.7). This approach is preferable when signal processing is required and when it is necessary to meter the sum of the track outputs. Virtual pre-dubs have the advantage of being readily adjustable on the mix stage, eliminating the need to go off-line and re-import.
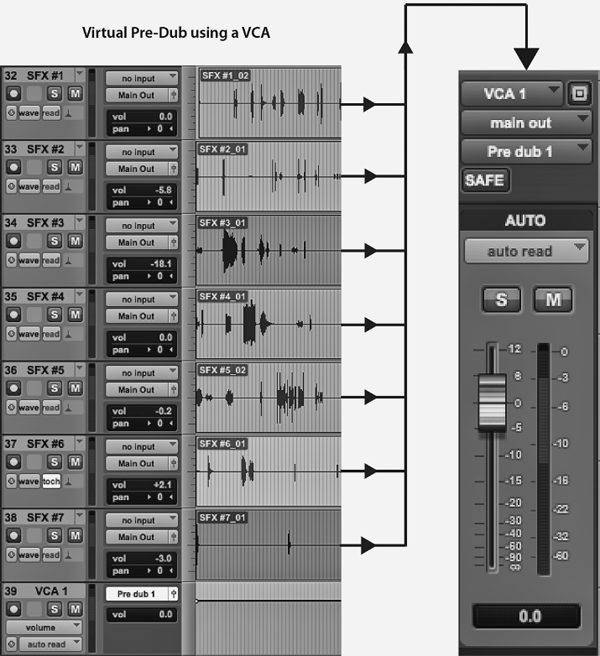
Figure 9.6 Virtual Pre-Dubs Using a VCA
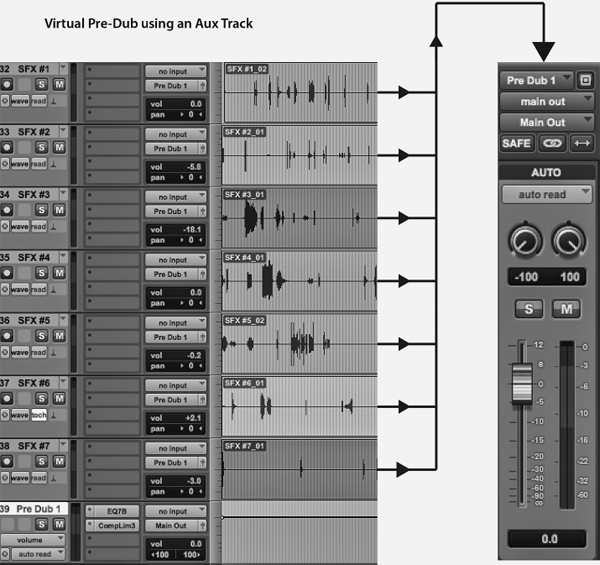
Figure 9.7 Virtual Pre-Dub Using an Aux Track
Creating the Stems and Printmaster
The dialogue, music, and SFX elements are pre-dubbed separately. Each of the pre-dubs that will become a stem are leveled and panned in the context of the full mix to create the dialogue, music, and SFX stems. Reverb is added (if needed) at this stage, reinforcing the spaces or environments that appear on-screen. Directors attend the mix at this stage to provide input and feedback as the mix progresses. In many cases, the dialogue, music, and FX editors are also on hand to perform any additional fixes that may be required. When building stems, the director and mixers are often faced with difficult choices regarding which sounds will play and how prominently they will be mixed. Dialogue, if present, will always take priority, consequently, much of the debate centers around the FX and music stems. Once these issues are resolved, the stems are combined to form the printmaster or complete soundtrack.
The Stereo Mix
Panning
The stereo mix is still the most common format for short form films. There are no specific rules for mixing but several panning conventions have emerged over the years. In most cases, principal dialogue is panned to the center, providing the most uniform coverage for the audience. Narration and Group ADR are often split out to the left and right channels to provide separation from the principal dialogue. Hard effects are panned to the position of their respective on-screen objects. Foley that is linked to dialogue (the cloth pass and footsteps) are panned to the center; otherwise Foley is panned to the on-screen position. Backgrounds or BGs are typically panned hard left and right, depending on the framing of the shot. Underscore is panned in stereo and source music is panned to the on-screen position as with hard effects.
Leveling
Where panning establishes the horizontal placement for sounds, leveling creates the perception of depth. Leveling is the principal means of clarifying which elements in the soundtrack are most critical in supporting the narrative at any given moment. There are many approaches to setting levels for a mix. One approach to leveling is to set the initial level for each track at a low but audible level. The mix begins by leveling the dialogue tracks to establish the foreground and foundation of the mix. Cinematic dialogue is generally louder than conversational dialogue, perhaps as much as 10 additional dB. Therefore 76 to 79 dBspl is a good initial level, allowing for variations in dynamic range when applicable. Once the dialogue levels are set, supporting elements from the FX and music stem are brought up at levels that do not compete with the dialogue. If the dialogue begins to get lost in the mix, supportive elements are brought down before dialogue is brought up. Using this approach, leveling decisions become focused and purposeful and the mix will quickly develop.
If the sound editors have been thorough in their work, very little corrective or sound shaping signal processing will be required at the mix stage. Signal processing is a broad and contextual topic deserving volumes of discussion. However, there are three processes that are universal to the mix process: reverb, EQ, and dynamic compression/limiting.
Reverb
Reverb is used to define the space where a given action is occurring. Reverb is processed in real time (RTAS) so that parameters can be adjusted as characters move through a variety of environments within a given scene. The primary controls for reverb include:
![]() Pre-Delay, the time interval between the direct sound and the first reflection.
Pre-Delay, the time interval between the direct sound and the first reflection.
![]() Time, determined by the rate the reverberant signal decays by 60 dB.
Time, determined by the rate the reverberant signal decays by 60 dB.
![]() Wet/Dry, the mix ratio between the dry (unprocessed) version and a wetted (processed) version.
Wet/Dry, the mix ratio between the dry (unprocessed) version and a wetted (processed) version.
![]() The Reverb Type, selectable algorithms that accurately mimic various spatial properties.
The Reverb Type, selectable algorithms that accurately mimic various spatial properties.
In addition to defining a space for principal dialogue and hard FX, a separate reverb is added to underscore and narration as a means of establishing their non-diegetic function.
Equalization (EQ)
The frequency range of human hearing can be divided up into 10 octaves, each contributing differently to our perception of the soundtrack as a whole. Re-recording mixers use EQ (equalization) to balance the frequency spectrum of a mix (Figure 9.8). EQ can also be used to pre-emphasize specific frequencies that will be most affected by the encoding process. Table 9.1 gives a breakdown of the 10 octaves and their specific contribution or affect on the mix.
Table 9.1 Characteristics of the 10 Octave Frequency Range
1st Octave (20 Hz to 40 Hz). This octave is more heard than felt. Few speakers can reproduce these frequencies with adequate power. There is little musical content at this range. The LFE in a Dolby or DTS file starts at 20 Hz and extends to 120 Hz. |
2nd Octave (40 Hz to 80 Hz). This octave is associated with the rumble of an LFE associated with SFX like earthquakes and the bottom end of an explosion. This octave can reduce the headroom in a mix without making it sound louder. |
3rd Octave (80 Hz to 160 Hz). This is the octave where the lower end of the music score and SFX can be pushed with less risk of rumble. |
4th Octave (160 Hz to 320 Hz). This octave is sometimes referred to as the mud-range when given too much level. However, this octave also contributes to the fullness of a mix when properly leveled. |
5th Octave (320 Hz to 640 Hz). This is the lower portion of the mid-range where most of the dialogue, SFX, and Music compete for the foreground. Watch for masking of dialogue in this octave. When properly balanced, this octave can contribute to the subjective fullness and roundness to the mix. Our ears are most sensitive to the 5th and 6th octaves. Most playback devices are capable of reproducing these octaves accurately. Consequently, this component of the mix will effectively translate across multiple playback devices. |
6th Octave (640 Hz to 1.28 kHz). Shares characteristics with the 5th octave. Excessive cuts and boosts in this range are responsible for nasal characteristics in the mix. |
7th Octave (1.28 kHz to 2.56 kHz). This is the upper mid-range. Use this octave to add volume and definition to the 5th and 6th octaves. This is the bottom range for sibilance. Too much level at this range can create a harsh sounding mix that is fatiguing. |
8th Octave (2.56 kHz to 5.12 kHz). This is the lower range of the treble portion of the mix. This octave is sometimes referred to as the presence range since boosting these frequencies brings out the consonants in words that contribute to intelligibility. This octave brings out articulations and transient details as well as making the mix brighter. Boosting too aggressively at this range will bring out sibilance. |
9th Octave (5.12 kHz to 10.24 kHz). This octave emphasizes the brightness and high frequency details of the mix. |
10th Octave (10.24 kHz to 20 kHz and up). Like the 1st octave, this octave is often more felt than heard. It is generally associated with a subjective airiness or open feeling. Too much level at this octave can bring out unwanted noise. |
Peak Limiting
Mixes can get very loud at times, approaching and exceeding full scale (clipping) when tracks are summed. To prevent clipping and the distortion that follows, a peak limiter is often placed on the master fader (Figure 9.9). Notice in the screenshot shown that both the ratio and threshold are extremely high (83.2:1 at -2.7 dB). When properly mixed, little or no signal will exceed the threshold of the limiter. However, having one in place provides a useful safety net.
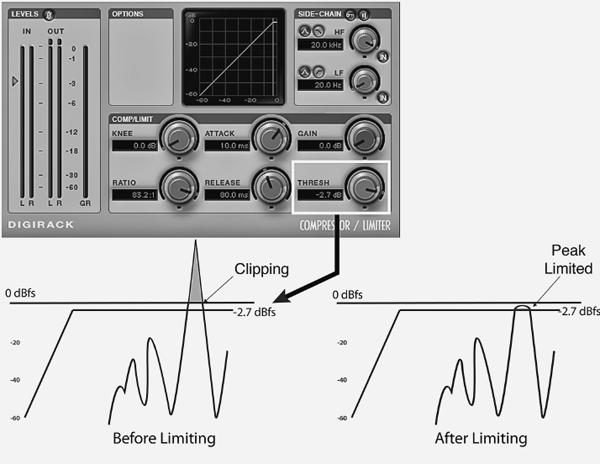
Figure 9.9 A Limiter is Designed to Prevent Occasional Peaks from Clipping
The Multi-Channel Mix
Multi-channel formats are standard for large budget theatrical releases and most video games. The multi-channel mix format expands the stereo field by adding a discrete center channel, a pair of surrounds (LsRs), and a LFE or low frequency effects channel (Figure 9.10). The most common format for multi-channel mixing is 5.1. The consumer or home theater layout for 5.1 places the left and right screen channels at roughly 30 degrees off axis from the center channel. The surrounds are angled at 110 degrees to the optimal listening position. The LFE channel is mostly non-directional allowing for flexibility in speaker placement. The theatrical layout differs slightly in that the left and right screen channels are not angled and the surrounds are placed on the left and right walls rather than behind the listener. There are two basic approaches to 5.1 mixing: direct/ ambient and inside the band. Many festivals (especially student festivals) screen films in stereo so it is important to clarify the mix format prior to submitting.
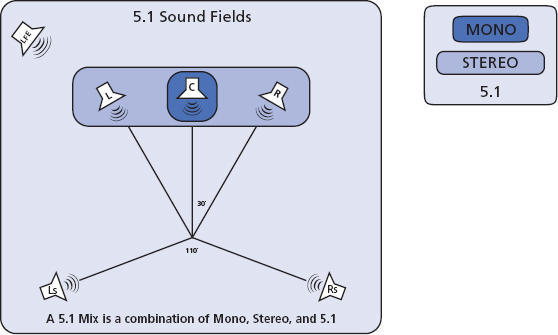
Figure 9.10 A 5.1 Mix is an Extension of a Stereo Mix, Having Mono Components As Well
The Direct/Ambient Perspective
The direct/ambient perspective is the most widely accepted approach to mixing film in multi-channel. With this approach the discrete center channel carries the dialogue but can also be used to smooth the transition of sounds panned from left to right. As with stereo mixing, Foley elements linked to the dialogue are mixed in the center channel. The left and right channels carry underscore, hard effects, Walla, group ADR, and some BGs. BGs are also placed in the surrounds to envelop the audience in the environment. The surrounds can be used judiciously to enhance front to back movements such as a jet flyby. The LFE is used to carry the low frequency components of events like explosions, earthquakes, or the footsteps of a giant dinosaur. With the Direct/Ambient approach, audiences are listening in on a scene rather than being placed directly in the scene.
The “Inside the Band” Perspective
Mixing a film “inside the band” is an unconventional approach that stirs up much controversy with conventional re-recording mixers. With this approach, the surrounds are used more aggressively to deliver discrete sounds as well as BGs and underscore. The movement of off-screen objects can be exaggerated by panning dynamically around the room rather than moving from left to right in the screen channels. This approach to mixing is common in video games and to a lesser degree in films with 3D projection. The two main problems that arise when using this approach are exit sign effects and issues resulting from downmixing. The exit sign effect refers to discrete sounds playing in the surround channels that draw the audience away from the screen, thereby taking them out of the narrative experience. Downmixing (fold down) occurs when a mono or stereo playback system is used to playback a 5.1 soundtrack. The center channel and surrounds are redirected to the left and right channels to prevent the consumer from losing essential content. The center channel is lowered by -3 dB so that it sums in the phantom center at no additional level (unity gain). The left and right surround channels are also lowered by -3dB or more to prevent peaking and masking in the left and right channels. The need for a 5.1 mix to fold down to a stereo mix is one reason that traditional mixers use the surrounds conservatively. The additional content redirected from the surrounds can cause phase, peaking, and masking issues in the down-mixed version.
Mastering for Various Release Formats
In the mid 1980s, THX theaters were developed to match the mix environment to the playback environment. This meant that mixers could predict to a greater extent how their mixes would translate to theaters around the world. At that time, theatrical exhibition was the consumer’s initial experience with a film. Soon after, the film would be released on various formats for home viewing. Gradually, the film would be premiered on a network. At each stage, the film would be modified to optimize playback for the specific release format. Today, the distribution model for media has expanded to include online delivery and personal devices. Content developers must consider these release formats and consumer monitoring options when developing mixes. Headphones or earbuds represent the single biggest shift in consumer listening habits. Consequently, it is now necessary to audition a mix on a good set of reference monitors, television speakers, and a set of ear buds, each time, noting differences that exist between playback and monitoring devices and adjusting the mix accordingly. With the exception of film and television, there are currently no mix standards for online delivery formats or personal devices. However, there are some guidelines that will contribute to a mix that effectively translates over multiple playback and monitoring devices:
![]() Mix at a level that approximates the listening habits of your target audience (reference level).
Mix at a level that approximates the listening habits of your target audience (reference level).
![]() A/B your mixes on the playback devices and monitors that consumers will be using and note how the mix is translating; a basic concept of mastering.
A/B your mixes on the playback devices and monitors that consumers will be using and note how the mix is translating; a basic concept of mastering.
![]() Mix and master projects through monitoring plug-ins such as the Waves 360 Manager or the Sonnox mp3/AAC encoder.
Mix and master projects through monitoring plug-ins such as the Waves 360 Manager or the Sonnox mp3/AAC encoder.
![]() Add compression, especially on dialogue for non-theatrical release formats.
Add compression, especially on dialogue for non-theatrical release formats.
![]() Use fewer channels with greater transfer rates when quality is more important than the number of channels.
Use fewer channels with greater transfer rates when quality is more important than the number of channels.
![]() Focus on the mid-range of the mix; this is the frequency range common to all playback devices and monitors.
Focus on the mid-range of the mix; this is the frequency range common to all playback devices and monitors.
![]() Codecs perform more accurately when processing files at higher sample rates and bit depths. Resolutions of 24 bit/48 kHz or higher are recommended although there is no advantage to up sampling prior to encoding.
Codecs perform more accurately when processing files at higher sample rates and bit depths. Resolutions of 24 bit/48 kHz or higher are recommended although there is no advantage to up sampling prior to encoding.
![]() Since you cannot control the levels or type of monitoring used by a consumer, create a mix that conveys your vision for how the project should be experienced.
Since you cannot control the levels or type of monitoring used by a consumer, create a mix that conveys your vision for how the project should be experienced.
Bouncing to Disk or Tracks
Regardless of release format, the multitude of tracks present in a large mix session will ultimately be reduced to a mono, stereo, or multi-channel printmaster. The printmaster can be derived from bouncing the mix to disk or to tracks. When bouncing to disk, the outputs of the individual tracks are sent to the main output. During the bounce, no additional changes in leveling or panning can occur. When bouncing to tracks (internal layback), the outputs of individual tracks are hard bussed to one or more outputs, facilitating the printing of multiple printmasters in a single pass. When bouncing to tracks, additional fader and panner movements are possible. If the bounce is interrupted for any reason, the remaining portion of the mix can be punched in using the destructive record mode. In general, most mixers prefer bouncing to tracks.
Encoding
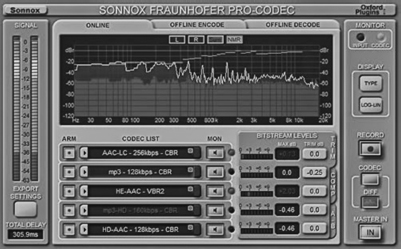
DVD, BluRay, Internet, and personal devices all use codecs to address storage and transfer rate issues. These codecs utilize a variety of perceptual or redundancy encoding schemes to achieve data reduction and to set transfer rates. Audio resolution is affected to varying degrees with all lossy codecs. Content developers often pre-emphasize aspects of their mix to offset losses in frequency and dynamic range that result from encoding. It is important for the mixer to be able to monitor the mix through an encoder. In film, this is accomplished by monitoring the mix through hardware Dolby and DTS encoders. For mp3 and AAC encoding, Sonnox has created an auditioning plug-in that allows the mixer to compare settings of up to five different codecs in real-time (Figure 9.11). The user can toggle monitoring between the original input signal, the codec’s output, or the difference signal (the audio that will be removed). This plug-in also provides estimations of how the resultant file size and transfer rates.
Encoding is an art unto itself, requiring a well-trained ear, a variety of monitoring options, and a bit of experimentation to optimize the mix for a multitude of monitoring systems and levels.
Layback
Once the printmaster(s) is completed, it is then laid back or synched to picture. In file-based workflows, the audio is imported to picture-editing software such as Premier or Final Cut. For Internet and web based delivery, files undergo additional encoding. This is the point when all eyes and ears are focused on quality control. Once the layback is completed, the answer print is screened in a variety of playback environments to determine how well the mix is translating. Issues that show up during the layback sessions include:
![]() Sync issues caused by changes in frame rates, the use of video sync offset for monitoring, or the soundtrack not being re-conformed to a recent picture edit.
Sync issues caused by changes in frame rates, the use of video sync offset for monitoring, or the soundtrack not being re-conformed to a recent picture edit.
![]() Distortion caused by the inappropriate monitoring levels, limitations in the playback device, or encoding errors.
Distortion caused by the inappropriate monitoring levels, limitations in the playback device, or encoding errors.
![]() Missing audio, signals lost due to encoding, signals muted during bounce or improperly routed to print tracks.
Missing audio, signals lost due to encoding, signals muted during bounce or improperly routed to print tracks.
![]() Dull or lifeless mix, often caused by the encoding process or when monitoring at levels that are too low. Encoding issues can sometimes be mitigated by pre-emphasizing portions of the mix prior to encoding.
Dull or lifeless mix, often caused by the encoding process or when monitoring at levels that are too low. Encoding issues can sometimes be mitigated by pre-emphasizing portions of the mix prior to encoding.
Once these issues are resolved and the printmaster is approved, the project is completed and ready for exhibition and distribution.

If you have the talent, and you keep trying … give it everything you’ve got on every job you get.