
Chapter 10. Special Processes and Your Own Behaviors
OTP behaviors, in the vast majority of cases, provide you with the concurrency design patterns you need in your projects. There might, however, be occasions where you want to create an OTP-compliant application while attaching processes that are not standard behaviors to your supervision tree. For instance, existing behaviors might have performance impacts caused by the overhead of the layers added as a result of abstracting out the generic parts and error handling. You may want to write new behaviors after separating your code into generic and specific modules. Or you might want to do something as simple as adding pure Erlang processes to a supervision tree, making your release OTP compliant beyond the capabilities provided by supervision bridges. For instance, you might have to preserve that proof of concept you wrote when you first started exploring Erlang that, against your better judgment, wound up in production.1
We refer to a process that can be added to an OTP supervision tree and packaged in an application as a special process. This chapter explains how to write your own special processes, providing you with the flexibility of pure Erlang while retaining all of the advantages of OTP. We also explain how you can take your special processes a step further, turning them into OTP behaviors by splitting the code into generic and specific modules that interface with each other through predefined callback functions. If you are not planning on implementing your own behaviors or are uninterested in how they work behind the scenes, feel free to jump to the next chapter (or go to the pub) without a bad conscience. You can always come back and read this chapter when you need to. If, on the other hand, we’ve piqued your curiosity, keep on reading.
Special Processes
In order for a process to be considered a special process, and as such be part of an OTP supervision tree, it must:
Be able to handle system messages, system events, and shutdown requests
Return the module list if running dynamic modules, as we did with event managers when defining their child specs
While optional, it is useful if the process is also capable of handling debug flags and generating trace messages.
We show you how to implement special processes by walking through an example where we implement a mutex, serializing access to critical resources.
The Mutex
Mutex stands for mutual exclusion. It ensures only one process is allowed to execute the code in the critical section at any one time. A critical resource could be a printer, shared memory, or any other device for which requests must be serialized because it can handle only one client at a time. A process executing code that accesses this resource is said to be in the critical section. It needs to finish executing all the code in the critical section and exit it before a new process is allowed to enter.
In Erlang, programmers can implement a mutex as an FSM, serializing
client requests through a process and managing the request queue using
the mailboxes and selective receives. Because we are implementing an FSM,
you must be asking yourself why we are not using the
gen_fsm behavior module. The reason is that the
gen_fsm behavior, and any of the other standard OTP behaviors, for that
matter, does not allow us to selectively receive messages through pattern
matching. Instead, the standard behaviors force us to handle events in the order in which
they arrive. In contrast, by using the process mailbox and selective
receives to manage the queue of client processes waiting for the mutex,
we simplify our code because we have to handle only one client request
at a time, without having to worry about the others waiting in the
queue.
Mutexes are FSMs with two states, free and
busy. A client wanting to enter the
critical section does so by calling the client function
mutex:wait(Name), where Name is the variable
bound to the registered name associated with the mutex. The
wait call is synchronous, returning only when the calling
process is allowed to enter the critical section. When that occurs, the
FSM transitions to state busy.
Requests are stored in the mailbox and handled on a first in,
first out basis. If the mutex is being blocked by another process in
state busy, the request is left in
the mailbox and handled when the mutex returns to state free. When the busy process is ready to leave
the critical section, it calls mutex:signal(Name), an
asynchronous call that releases the mutex. When that occurs, the FSM
transitions back to state free, ready
to handle the next request. Figure 10-1 shows the
state transitions of a mutex.
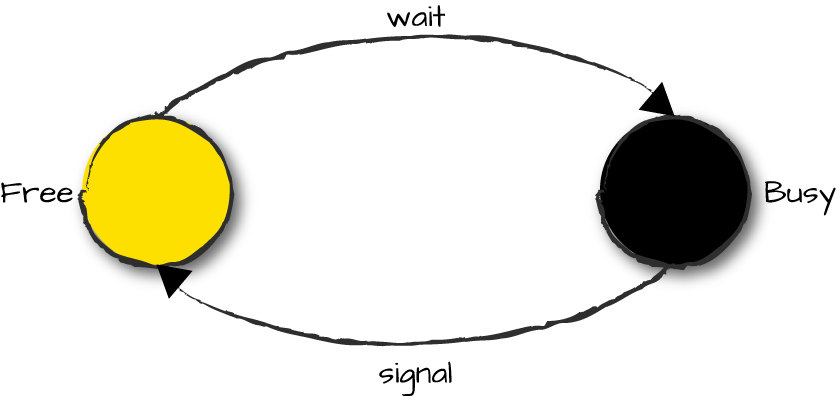
Figure 10-1. State transitions in a mutex
Let’s have a look at the mutex module, starting with
the client functions (other exported functions will be defined
shortly):
-module(mutex).-export([start_link/1,start_link/2,init/3,stop/1]).-export([wait/1,signal/1]).wait(Name)->Name!{wait,self()},Mutex=whereis(Name),receive{Mutex,ok}->okend.signal(Name)->Name!{signal,self()},ok.
Lots of borderline cases are handled gracefully in standard OTP
behaviors and are often taken for granted by the programmer. You might
have seen them yourself when looking at the code in the
gen_server or gen_fsm modules. When
implementing special processes, however, you need to decide which
borderline cases to handle and take care of them yourself. In our
example, we’ve opted for simplicity and do not cover any of them. But to
give you an idea of what we are talking about, have a look at the
wait/1 function, where we do not check if Name
exists. We do not monitor whether the mutex terminates while the client
process is suspended in its receive clause. Nor are we
handling the case where the mutex terminates right before
whereis/1 and is restarted and reregistered immediately,
leaving wait/1 in a receive clause waiting for a message
from a live process it will never receive. Nor have we implemented any
timeouts if the mutex process is deadlocked or hanging.
Starting Special Processes
When starting special processes, use the start and spawn
functions defined in the proc_lib
library module instead of Erlang’s standard spawn and
spawn_link BIFs. The proc_lib functions store the process’s name,
identity, parent, ancestors, and initial function call in the process
dictionary. If the process terminates abnormally, SASL crash reports are
generated and forwarded to the error logger. They contain all the
process info stored at startup, together with the reason for
termination. And like with other behaviors, there is functionality allowing
for a synchronous startup with an init phase.
A common error is to attach a process that doesn’t implement a
behavior to the supervision tree. There are no warnings at compile time
or runtime for this, as the only check made by the supervisor is to
ensure the tuple {ok, Pid} is returned. No checks are made
on Pid either. You will notice things going wrong only
after a crash, restart, or upgrade. And because these processes do not
follow standard behaviors, unless you’ve tested your restart strategy,
hunting down the issue will resemble more of a wild goose chase than a
routine and civilized troubleshooting session. For non-OTP-compliant
processes, use supervisor bridges, covered in “Supervisor bridges”. This chapter shows you how to create an
OTP-compliant process.
Basic template for starting a special process
The recommended approach to starting a special process is to use
the proc_lib:start_link(Mod, Fun, Args) call instead of the spawn_link/3 BIF. Given a
module, a function, and a list of arguments, it synchronously spawns a
process and waits for this process to notify that it has correctly
started through the proc_lib:init_ack(Value) call.
Value is sent back to the parent process, becoming the
return value of the start_link/3 call. Note how we are
passing optional DbgOpts debug option parameters in our
start_link call. We covered them in Chapter 5. For now, assume
DbgOpts is an empty list. Note also how we are passing
the Parent process ID to the init/3
function; we need it in our main loop. It is the result of the self() BIF in the
start_link/2 call.
start_link(Name)->start_link(Name,[]).start_link(Name,DbgOpts)->proc_lib:start_link(?MODULE,init,[self(),Name,DbgOpts]).stop(Name)->Name!stop.init(Parent,Name,DbgOpts)->register(Name,self()),process_flag(trap_exit,true),Debug=sys:debug_options(DbgOpts),proc_lib:init_ack({ok,self()}),free(Name,Parent,Debug).
When initializing the process state, we first register the mutex
with the alias Name. We set the trap_exit flag so we can receive exit signals from processes in our
linked set (we use links instead of monitors to notify or terminate
the caller if the mutex fails). And finally, we initialize the debug
trace flags using the sys:debug_options(DbgOpts) call. The
return value of debug_options/1 is passed as loop data
and stored in the process state. It will be needed whenever the
special process has to generate a trace message or receives a system
message requesting it to update its trace flags.
As illustrated in Figure 10-2, once the state is
initialized, we call proc_lib:init_ack(Value) to inform
the parent that the special process has started correctly.
Value is sent back and becomes the return value of the
proc_lib:start_link/3 call. Although it isn’t mandatory,
it is common practice to return {ok, self()} because
supervisors expect their children’s start functions to return
{ok, Pid}. If any part of the initialization fails before
calling init_ack/1, proc_lib:start_link/3
terminates with the same reason. Have a look at the last line of the
init/3 function and differentiate between the function
call free, which points to the FSM’s first state, and
Name, Parent, and Debug, which
is the process state.
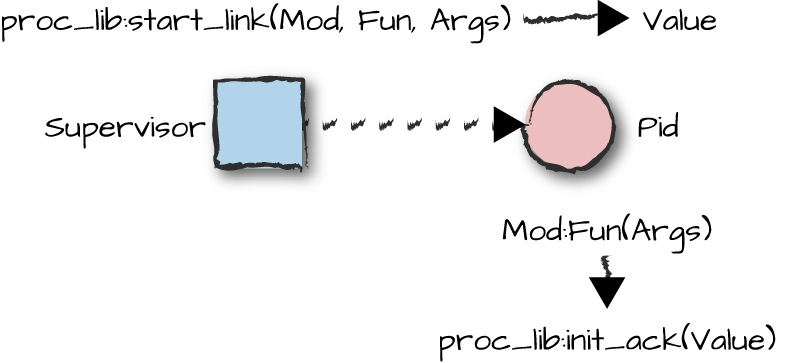
Figure 10-2. Starting special processes
The calls you can use to synchronously start a special process are:
proc_lib:start(Module, Function, Args)proc_lib:start(Module, Function, Args, Time)proc_lib:start(Module, Function, Args, Time, SpawnOpts) -> Retproc_lib:start_link(Module, Function, Args)proc_lib:start_link(Module, Function, Args, Time)proc_lib:start_link(Module, Function, Args, Time, SpawnOpts) -> Retproc_lib:init_ack(Ret)proc_lib:init_ack(Parent, Ret) -> ok
The Ret return value of the
start/3,4,5 and start_link/3,4,5 functions comes from
the init_ack/1,2 call. As with other behaviors,
SpawnOpts is a list containing all options the spawn BIFs
accept, monitor excluded. If within
Time milliseconds init_ack is not called,
the start function returns {error, timeout}. If you use
spawn or spawn_opt, do not forget to link
the child to the parent process, either through the
link/1 BIF or by passing the link option in
SpawnOpts.
Asynchronously starting a special process
The following variations on the standard spawn and spawn_link
functions are used in situations where you need asynchronous starts,
such as the simultaneous launch of hundreds of new processes. They
spawn the child process and immediately return its pid:
proc_lib:spawn(Fun)proc_lib:spawn_link(Fun)proc_lib:spawn_opt(Fun, SpawnOpts) -> Pidproc_lib:spawn(Module, Function, Args)proc_lib:spawn_link(Module, Function, Args)proc_lib:spawn_opt(Node, Function, SpawnOpts) -> Pid
Other options to synchronously start special servers include
spawning a process using a fun and spawning a process with the spawn
options SpawnOpts.
Use asynchronous spawning with care, because the functions might cause multiple processes to run in parallel, resulting in race conditions that make your program nondeterministic. The same arguments we put forward in “Starting a Server” when discussing generic servers are valid here. A startup error might be hard to reproduce if it is dependent on a certain number of concurrent events happening in a specific order, an issue that is becoming more evident with multicore architectures. To be able to deterministically reproduce a startup error, create your process synchronously.
Regardless of how you start your special processes, they always have to
be linked to their parent (by default, the supervisor). This
happens automatically if you use start_link,
spawn_link, or pass the link option in SpawnOpts. However, no
checks are made to ensure that the process is actually linked to the
supervisor, so even here, omissions of this type can be difficult to
troubleshoot and detect.
The Mutex States
As we saw, a mutex has two states, free and busy, that are implemented as tail-recursive functions. The synchronous wait and asynchronous signal
events are sent as messages together with the client pid. The
combination of state and event dictates the actions and state
transitions. Note how when in the free state, we accept only the
wait event, informing the client
through the message {self(), ok} that it is allowed to
enter the critical section. The mutex will then transition to the busy
state, where the only event that will pattern match is signal, sent by Pid. You should
have noticed that Pid was bound in the function head to the
client holding the mutex. Upon receiving the signal event, the mutex transitions back to the
free state:
free(Name,Parent,Debug)->receive{wait,Pid}->Pid!{self(),ok},busy(Pid,Name,Parent,Debug);stop->okend.busy(Pid,Name,Parent,Debug)->receive{signal,Pid}->free(Name,Parent,Debug)end.
Note how we accept the stop
message only if the mutex is in the free state. If you stop the mutex in
the busy state, you’ll leave the client executing the code in its
critical section in an unknown and possibly corrupt state, because the
mutex might have been restarted and blocked by other client processes.
By stopping the mutex only in the free state, you can guarantee a clean
shutdown.
So far, so good. We are going back to Erlang 101 with the basics of FSMs. Let’s now start expanding the states to handle the system messages required by special processes.
Handling Exits
If the parent of your special process terminates, your process must
terminate as well. If your process does not trap exit signals, the
runtime will take care of this for you because you should be linked to
your parent. Non-normal exit signals propagate to all processes in the
link set, terminating them with the same reason that terminated the
original process. An exit with reason normal doesn’t propagate, but in OTP, the
supervisor guarantees that a parent will never terminate with that
reason, so you don’t have to worry about it.
Special processes that trap exits have to monitor their parents, as they might receive messages of the format:
{'EXIT',Parent,Reason}
where
Parent is the parent pid and Reason is the
reason for termination. If they do, they should clean up after
themselves, possibly in their terminate or cleanup function, followed
by a call to the exit(Reason) BIF.
In our previous example, the mutex is trapping exits, so we have
to monitor parent termination. Let’s expand the state functions,
handling the EXIT messages from the parent process by
calling terminate/2. We also call terminate/2
when receiving the stop message. If
the parent terminates in state busy, we terminate the process holding
the mutex before calling terminate/2:
free(Name,Parent,Debug)->receive{wait,Pid}->link(Pid),Pid!{self(),ok},busy(Pid,Name,Parent,Debug);stop->terminate(shutdown,Name);{'EXIT',Parent,Reason}->terminate(Reason,Name)end.busy(Pid,Name,Parent,Debug)->receive{signal,Pid}->free(Name,Parent,Debug);{'EXIT',Parent,Reason}->exit(Pid,Reason),terminate(Reason,Name)end.terminate(Reason,Name)->unregister(Name),terminate(Reason).terminate(Reason)->receive{wait,Pid}->exit(Pid,Reason),terminate(Reason)after0->exit(Reason)end.
The first thing terminate/2 does is unregister the
mutex, ensuring that any processes that try to send it requests
terminate with reason badarg. The
mutex goes on to terminate all processes in the queue by traversing its
mailbox and extracting wait requests. When done, it knows no client
processes are kept hanging and terminates itself with reason Reason.
System Messages
In addition to monitoring parents, special processes need to manage system messages of the format:
{system,From,Msg}
where From is the request originator and
Msg is the system message itself. They could be messages
originating from the supervisor used to suspend and resume processes
during software upgrades or from a client manipulating or retrieving
trace outputs using the sys module. What
they are, however, is irrelevant to you as a developer, as you handle
them as opaque data types and just pass them on.
No matter what the request is, these calls are handled behind the
scenes in the sys:handle_system_message(Msg, From, Parent, Mod,
Dbg, Data) function, as seen in Figure 10-3. The arguments to the
sys:handle_system_message/6 call, although numerous, are
straightforward:
MsgandFromare provided by the system message.Parentis the parent pid, passed when spawning the special process.Modis the name of the module implementing the special process.Dbgis the debug data, initially returned by thesys:debug_options/1call.Datais used to store the loop data of the process.
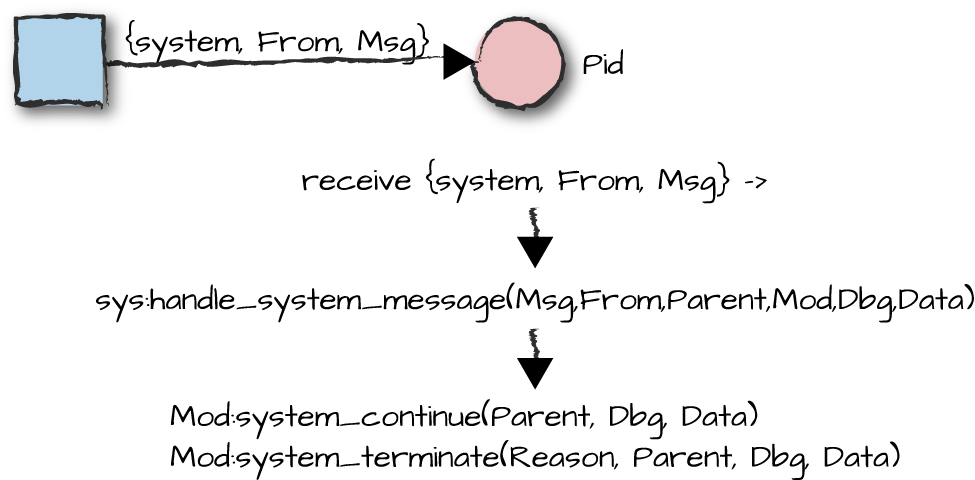
Figure 10-3. Handling system messages
The functions in the special process module that
executes the call must be tail recursive as they never return. Not
making them tail recursive will cause a memory leak every time a system
message is received. Control is handed back to the special process in
the Mod module by calling one of the following callback
functions:
Mod:system_continue(Parent,Debug,Data)Mod:system_terminate(Reason,Parent,Debug,Data)
If control is returned through the system_continue/3 callback function, your
special process needs to return to its main loop. If system_terminate/4 is instead
called, probably as a result of the parent ordering a shutdown, the
special process needs to clean up after itself and terminate with reason
Reason. We show you all of this in the mutex example, but
first, let’s understand how debug printouts work.
Trace and Log Events
When we covered the start functions earlier in this chapter, we discussed the
SpawnOpts argument, which among other options allows us to
pass debug flags to special processes. In our
mutex:start_link/2 call, we can pass these debug options in
the second argument, binding them to the DbgOpts variable.
DbgOpts contains zero or more of the trace,
log, statistics, and {log_to_file,
FileName} flags described in Chapter 5. This list is passed by the
special process to the sys:debug_options(DbgOpts) call,
which initiates the debug routines. Unrecognized or unsupported debug
options are ignored. The return value of the call, stored in the
variable Debug in our example, is kept in the special
process loop data passed to all system calls. Remember the example in
“Tracing and Logging” where we turned the trace and logs
on or off during runtime, printing them in the shell and diverting them
to a file? If everything is initialized correctly, you can generate
similar trace logs with your special processes, turning the options on
and off at runtime. All requests originating from calls such as sys:trace/3 or sys:log/2
are received and handled as system messages. What might change in
between calls are the contents of the Debug list, returned
as part of the system_continue/3 callback function.
Generating trace events is a straightforward operation done by calling this function:
sys:handle_debug(Debug,DbgFun,Extra,Event)
where:
Debugis the initialized debug options.DbgFunis a fun of arity 3 that formats the trace event.Extrais data that can be used when formatting the event, usually the process name or the loop data.Eventis the trace event you want to print out.
DbgFun is a fun that formats the event, sometimes by
calling another function to do so. The arguments passed to it by the
sys module include the I/O device
you are writing to, which can be either the standard_io or standard_error atom or the pid returned by the
file:open call. Extra and Event
come from the arguments to the handle_debug/4 call:
fun(Dev,Extra,Event)->io:format(Dev,"mutex~w:~w~n",[Extra,Event])end
You can also add your own trace functions at runtime using the sys:install/2 call, using pattern
matching in the fun head to examine events and decide on the flow of
execution. With system messages and trace outputs in place, let’s see
how it all fits together by adding them to our mutex example.
Putting It Together
For your convenience, we’ve put the whole mutex example in one place. Note how we’ve expanded the free and busy states to include trace messages and system messages. Let’s focus on this functionality, starting with trace messages.
When we receive the wait and
signal events, we call sys:handle_debug(Debug, fun debug/3, Name,
Event), where Event is either {wait,
Pid} or {signal, Pid}. This call hands control over
to the sys module, which eventually
calls the debug fun. In our case, it is the local function
debug/3. Have a look at it, paying special attention as to
how the I/O device, extra arguments, and events passed to it are used.
handle_debug/4 returns NewDebug, which is
passed as an argument to the next state. When reviewing the example,
remember the mutex process does not implement the services it protects.
It just implements the semaphore that gives other processes access to
these services. The complete mutex example looks like this:
-module(mutex).-export([start_link/1,start_link/2,init/3,stop/1]).-export([wait/1,signal/1]).-export([system_continue/3,system_terminate/4]).wait(Name)->Name!{wait,self()},Mutex=whereis(Name),receive{Mutex,ok}->okend.signal(Name)->Name!{signal,self()},ok.start_link(Name)->start_link(Name,[]).start_link(Name,DbgOpts)->proc_lib:start_link(?MODULE,init,[self(),Name,DbgOpts]).stop(Name)->Name!stop.init(Parent,Name,DbgOpts)->register(Name,self()),process_flag(trap_exit,true),Debug=sys:debug_options(DbgOpts),proc_lib:init_ack({ok,self()}),NewDebug=sys:handle_debug(Debug,fundebug/3,Name,init),free(Name,Parent,NewDebug).free(Name,Parent,Debug)->receive{wait,Pid}->%% The user requests.NewDebug=sys:handle_debug(Debug,fundebug/3,Name,{wait,Pid}),Pid!{self(),ok},busy(Pid,Name,Parent,NewDebug);{system,From,Msg}->%% The system messages.sys:handle_system_msg(Msg,From,Parent,?MODULE,Debug,{free,Name});stop->terminate(stopped,Name,Debug);{'EXIT',Parent,Reason}->terminate(Reason,Name,Debug)end.busy(Pid,Name,Parent,Debug)->receive{signal,Pid}->NewDebug=sys:handle_debug(Debug,fundebug/3,Name,{signal,Pid}),free(Name,Parent,NewDebug);{system,From,Msg}->%% The system messages.sys:handle_system_msg(Msg,From,Parent,?MODULE,Debug,{busy,Name,Pid});{'EXIT',Parent,Reason}->exit(Pid,Reason),terminate(Reason,Name,Debug)end.debug(Dev,Event,Name)->io:format(Dev,"mutex~w:~w~n",[Name,Event]).system_continue(Parent,Debug,{busy,Name,Pid})->busy(Pid,Name,Parent,Debug);system_continue(Parent,Debug,{free,Name})->free(Name,Parent,Debug).system_terminate(Reason,_Parent,Debug,{busy,Name,Pid})->exit(Pid,Reason),terminate(Reason,Name,Debug);system_terminate(Reason,_Parent,Debug,{free,Name})->terminate(Reason,Name,Debug).terminate(Reason,Name,Debug)->unregister(Name),sys:handle_debug(Debug,fundebug/3,Name,{terminate,Reason}),terminate(Reason).terminate(Reason)->receive{wait,Pid}->exit(Pid,Reason),terminate(Reason)after0->exit(Reason)end.
When the free and busy functions receive
{system, From, Msg}, they tail recursively invoke
sys:handle_system_msg(Msg, From, Parent, ?MODULE, Debug, {State,
      LoopData})
, handing control over to the sys module. The system message is handled
behing the scenes, after which the function returns by calling
either system_continue/3 or system_terminate/4 in the
mutex module. If the function is
not tail recursive, there will be, as we mentioned earlier, a memory
leak for every system message received.
In our example, if system_continue is called,
we just return to the state we were in, determined by the
Name loop data in state free and the {Name, Pid} loop data
in busy, where we wait for the next
event or system call. In the case of system_terminate, if
in state busy, we
terminate the process that held the mutex (potentially leaving the
system in an inconsistent state), followed by calling terminate/2.
If in state free, we just call
terminate/2. In both cases, we employ pattern matching on
the final argument to ensure we take the correct actions for
continuation and termination.
System messages and debug options are straightforward to handle in your own special processes. All you need to do is reuse the code from this example, ensuring that when you get handed back the control, you go back into your loop or state with a tail-recursive function. Before looking at the trial run of the mutex, read through the code one more time and make sure you understand the what, why, and hows of special processes.
In our trial run, we create a child specification for our special
process, starting it as a dynamic child in a supervisor
mutex_sup. We’ve not included the supervisor code in this
example, as it is boilerplate code. All init/1 does is
return the supervisor specification with a restart tuple with a
one_for_one strategy allowing a maximum of five restarts
per hour and an empty child list. You can find the source code in the
book’s GitHub repository.
Note how in the mutex:start_link/2 arguments of the
child specification, we turn on the trace flag. This leads to the trace
printout when the mutex is started as a result of shell command 3. We
turn on other debug options using the sys module in shell
commands 4 and 5:
1>ChildSpec = {mutex, {mutex, start_link, [printer, [trace]]}, transient, 5000, worker, [mutex]}.{mutex,{mutex,start_link,[printer,[trace]]}, transient,5000,worker, [mutex]} 2>mutex_sup:start_link().{ok,<0.35.0>} 3>supervisor:start_child(mutex_sup, ChildSpec).mutex printer: init {ok,<0.37.0>} 4>sys:log(printer, {true,10}).ok 5>sys:statistics(printer, true).ok 6>mutex:wait(printer), mutex:signal(printer).mutex printer: {wait,<0.32.0>} mutex printer: {signal,<0.32.0>} ok 7>sys:log(printer, get).{ok,[{{wait,<0.32.0>},printer,#Fun<mutex.1.94496536>}, {{signal,<0.32.0>},printer,#Fun<mutex.2.94496536>}]} 8>sys:log(printer, print).mutex printer: {wait,<0.32.0>} mutex printer: {signal,<0.32.0>} ok 9>sys:get_status(printer).{status,<0.37.0>, {module,mutex}, [[{'$ancestors',[mutex_sup,<0.32.0>]}, {'$initial_call',{mutex,init,3}}], running,<0.35.0>, [{statistics,{{{2014,1,6},{8,50,36}},{reductions,66},0,0}}, {log,{10, [{{signal,<0.32.0>},printer,#Fun<mutex.2.94496536>}, {{wait,<0.32.0>},printer,#Fun<mutex.1.94496536>}]}}, {trace,true}], {free,printer}]} 10>exit(whereis(printer), kill).mutex printer: init true 11>exit(whereis(mutex_sup), shutdown).mutex printer: {terminate,shutdown} ** exception exit: shutdown
In shell command 6, we wait for the mutex and then signal for it
to be released, and each request generates a trace event. In shell
commands 7, 8, and 9, we retrieve some of the trace and status
information through the sys module, followed by some tests
with termination and restarts in shell commands 10 and 11.
Do some tests of your own, experimenting with multiple clients,
the SASL report browser, and other sys commands such as
suspending and restarting the modules.
Dynamic Modules and Hibernating
You might recall from Chapter 8 that we need
to provide the list of modules implementing the behavior in the child
specification. They are used to determine which processes to suspend
during software upgrades. There are occasions, as is the case with event
managers and handlers, where the modules are not known at compile time.
In the supervisor child specification module list, these behaviors were
tagged with the atom dynamic. Special
processes can also have dynamic modules.
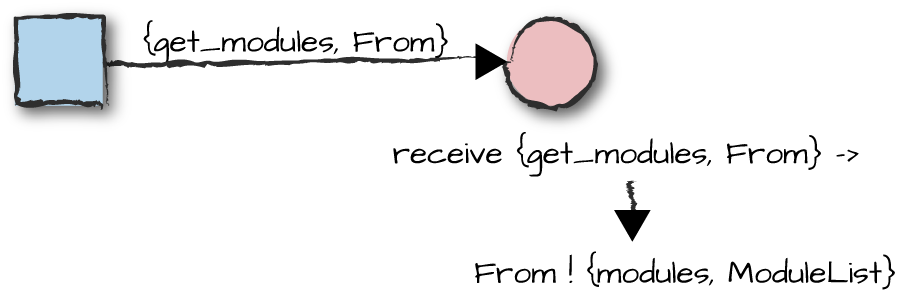
Figure 10-4. Retrieving dynamic modules
If your special process modules are tagged as dynamic in the child specification, then as
Figure 10-4 illustrates, you need to handle the
system message {get_modules, From}. From is the pid of the supervisor, used to
return the list of modules in the From ! {modules,
ModuleList} expression.
If you need to hibernate your special processes, instead of the BIF, use:
proc_lib:hibernate(Mod,Fun,Args)
It hibernates the process just like the BIF and the standard OTP behavior return values, but as an added feature, it also ensures that logging and debugging still function when the process wakes up.
Your Own Behaviors
Now that you understand special processes, let’s take the concept further by splitting the code into generic and specific parts to implement our own behaviors. You will want to implement your own behaviors when several processes follow a pattern that cannot be expressed using existing OTP behaviors. Generic servers, FSMs, and event managers cater to most programmers’ needs, so don’t get caught up in the excitement and start writing new behaviors in every project. Chances are you are overengineering a solution that could easily be abstracted in a simple library module.
Having said that, there will be times when there are good reasons to
implement your own behaviors. Patterns can be abstracted in generic and
specific modules, when the generic part is substantial enough to make it
worthwhile. If you go down this route, chances are good that your behavior
(or library) can be built on top of generic servers. If not, or if you
prefer to avoid generic servers because of the performance overhead, make
sure your behavior follows the design rules required by special processes
using the sys and proc_lib modules.
Note
If you are into software archeology and have an interest in the
evolution of software, try to get your hands on the source code of the
early versions of Erlang/OTP. Skim through the old behavior code and you
will find that most of the behaviors were built on top of generic
servers. Current OTP behaviors, generic servers included, are built
using a module called gen. It is a
wrapper on top of the sys and
proc_lib modules, handling a lot of
the tricky and borderline cases associated with concurrent and
distributed programming we’ve discussed in previous chapters. Look for
it in the source directory of your stdlib application and
look through the code. If you are implementing your own behaviors and do
not want to get caught out, you might want to use gen
instead of rolling your own. Be warned, however, as it is undocumented,
and it might change in between releases with little or no notice.
Rules for Creating Behaviors
The steps to creating your own behavior are straightforward, requiring you to break up your code into generic and specific modules and define the callback functions and their return values. When doing so, you need to follow these simple rules:
The name of the generic module has to be the same as the behavior name.
You need to list the callback functions in the behavior module.
In your callback module, include the
-behavior(BehaviorName).directive.
Once you’ve compiled your generic behavior code, compiling your callback modules with the behavior directives will result in warnings should you omit any callbacks.
An Example Handling TCP Streams
Let’s have a look at some parts of an example in which we implement our own
behavior, focusing on the code specific to our behavior’s
implementation. We’ve omitted functions not relevant to the example,
marking them with ... in the code. If you want to look at
the whole module, you can find it in the code repository with the book’s
examples. There is no need, however, to view the full example if you are
interested only in understanding the specifics of implementing your own
behavior.
Our example is a wrapper that encapsulates activities associated with TCP streams, including connections, configuration, and error handling, exposing only the stream of data being received. Upon receiving a socket accept request, the behavior spawns a new process that is kept alive for as long as the socket is open. The behavior receives the packets, forwarding them to the callback module as they arrive. The socket can be closed by the callback module through a return value of a callback function, or indirectly when the TCP client closes its side of the connection.
The callback functions in the callback module consist of an initialization function called once when the socket is opened, a data handling call invoked for every packet received, and a termination function called when the socket is closed:
-module(tcp_print).-export([init_request/0,get_request/2,stop_request/2]).-behavior(tcp_wrapper).init_request()->io:format("Receiving Data~n."),{ok,[]}.get_request(Data,Buffer)->io:format("."),{ok,[Data|Buffer]}.stop_request(_Reason,Buffer)->io:format("~n"),io:format(lists:reverse(Buffer)),io:format("~n").
The callback function init_request/0 returns {ok,
LoopData}. The get_request/2 function receives the
TCP packet bound to the variable Data and the
LoopData, returning either {ok, NewLoopData}
or {stop, Reason, NewLoopData}. In this example,
LoopData is a buffer of received TCP packets bound to the
variable Buffer. Upon closing the socket,
stop_request/2 is given the Reason for
termination and the LoopData, and has to return the atom
ok.
Note how we have included the -behavior(tcp_wrapper).
directive in the code. This points to the tcp_wrapper module, where the behavior is
implemented.
When starting the tcp_wrapper
behavior, we pass the callback module Mod and the
Port number. We spawn a process that initializes the
behavior state, opens a listener socket, and eventually makes its way to
the accept/4 function. For every concurrent stream, we
accept a connection on the listener socket, spawn a new process that
starts executing in the init_request/2 function, and handle
the stream through the callback module. In the accept call,
we specify a timeout to keep from blocking infinitely so we can yield
control back to the main loop (not shown in the example) every second,
ensuring we can handle system messages and the EXIT signal
from the parent process. We also export the cast/3 call,
which allows us to create a connection and send a request asynchronously
to the server:2
-module(tcp_wrapper).-export([start_link/2,cast/3]).-export([init/3,system_continue/3,system_terminate/4,init_request/2]).-callbackinit_request()->{'ok',Reply::term()}.-callbackget_request(Data::term(),LoopData::term())->{'ok',Reply::term()}|{'stop',Reason::atom(),LoopData::term()}.-callbackstop_request(Reason::term(),LoopData::term())->term().start_link(Mod,Port)->proc_lib:start_link(?MODULE,init,[Mod,Port,self()]).cast(Host,Port,Data)->{ok,Socket}=gen_tcp:connect(Host,Port,[binary,{active,false},{reuseaddr,true}]),send(Socket,Data),ok=gen_tcp:close(Socket).send(Socket,<<Chunk:1/binary,Rest/binary>>)->gen_tcp:send(Socket,[Chunk]),send(Socket,Rest);send(Socket,<<Rest/binary>>)->gen_tcp:send(Socket,Rest).init(Mod,Port,Parent)->{ok,Listener}=gen_tcp:listen(Port,[{active,false}]),proc_lib:init_ack({ok,self()}),loop(Mod,Listener,Parent,sys:debug_options([])).loop(Mod,Listener,Parent,Debug)->receive{system,From,Msg}->sys:handle_system_msg(Msg,From,Parent,?MODULE,Debug,{Listener,Mod});{'EXIT',Parent,Reason}->terminate(Reason,Listener,Debug);{'EXIT',Child,_Reason}->NewDebug=sys:handle_debug(Debug,fundebug/3,stop_request,Child),loop(Mod,Listener,Parent,NewDebug)after0->accept(Mod,Listener,Parent,Debug)end.accept(Mod,Listener,Parent,Debug)->casegen_tcp:accept(Listener,1000)of{ok,Socket}->Pid=proc_lib:spawn_link(?MODULE,init_request,[Mod,Socket]),gen_tcp:controlling_process(Socket,Pid),NewDebug=sys:handle_debug(Debug,fundebug/3,init_request,Pid),loop(Mod,Listener,Parent,NewDebug);{error,timeout}->loop(Mod,Listener,Parent,Debug);{error,Reason}->NewDebug=sys:handle_debug(Debug,fundebug/3,error,Reason),terminate(Reason,Listener,NewDebug)end.system_continue(Parent,Debug,{Listener,Mod})->loop(Mod,Listener,Parent,Debug).system_terminate(Reason,_Parent,Debug,{Listener,_Mod})->terminate(Reason,Listener,Debug).terminate(Reason,Listener,Debug)->sys:handle_debug(Debug,fundebug/3,terminating,Reason),gen_tcp:close(Listener),exit(Reason).debug(Dev,Event,Data)->io:format(Dev,"Listener~w:~w~n",[Event,Data]).init_request(Mod,Socket)->{ok,LoopData}=Mod:init_request(),get_request(Mod,Socket,LoopData).get_request(Mod,Socket,LoopData)->casegen_tcp:recv(Socket,0)of{ok,Data}->caseMod:get_request(Data,LoopData)of{ok,NewLoopData}->get_request(Mod,Socket,NewLoopData);{stop,Reason,NewLoopData}->gen_tcp:close(Socket),stop_request(Mod,Reason,NewLoopData)end;{error,Reason}->stop_request(Mod,Reason,LoopData)end.stop_request(Mod,Reason,LoopData)->Mod:stop_request(Reason,LoopData).
The generic code handling the TCP stream is straightforward. It is
a process loop that initializes the stream state, receives the packets,
and terminates when the callback module returns a stop
tuple, or when the TCP client decides to close its side of the
connection. For initialization, receiving packets, and termination,
appropriate callback functions in the Mod callback module
are called.
One item that stands out in our behavior implementation—probably
the most important one alongside the calling of the callback
functions—is the callback specification. It lists the callback functions
that need to be exported in the callback module, following the
directives set out in the Erlang type and function specifications. The
callback specifications are mapped to the
behavior_info(callbacks) function, which returns a list of
the form {Function, Arity}. You can bypass the callback
specifications altogether, directly implementing and exporting the
behavior_info/1 call in your generic behavior module (which
is how behaviors were required to be implemented with older releases of
Erlang/OTP prior to R15B). Compare the callback specifications to the
callback functions in the tcp_print module. Do they
match?
-module(tcp_wrapper)....-export([behavior_info/1]).behavior_info(callbacks)->[{init_request,0},{get_request,2},{stop_request,2}]....
The advantages of using callback specifications over the
behavior_info/1 function is that the dialyzer tool will
find discrepancies between your callback modules and the specs, a
welcome addition to the undefined callback function compiler warnings.
The dialyzer enables behavior callback warnings by default. Remember to
compile your generic behavior module and make it available in the code
search path before compiling your callback module, or else you will
get an undefined
behavior warning.
Summing Up
In this chapter, we’ve introduced you to the ins and outs of implementing special processes, making them OTP compliant and including them as part of OTP supervision trees. We’ve also taken special processes a step further, allowing you to split the code into generic and specific modules and turning them into behaviors complete with callback modules, behavior directives, and associated compiler warnings.
When starting and hibernating special processes, instead of the
standard BIFs, you must use the functions in the proc_lib
module, listed in Table 10-1.
| Function call | Callback function or action |
|---|---|
proc_lib:spawn_link/1,2,3,4 | None |
proc_lib:spawn_opt/2,3,4,5 | None |
proc_lib:start/3,4,5 | proc_lib:init_ack(Parent, Reply),
proc_lib:init_ack(Reply) |
proc_lib:start_link/3,4,5 | proc_lib:init_ack(Parent, Reply),
proc_lib:init_ack(Reply) |
| proc_lib:hibernate/3 | None |
The system message calls in Table 10-2 and their respective
callbacks need to be managed by your process, either by responding
directly to the process sending the request or by using the
sys module.
| Message | Callback function or action |
|---|---|
{system, From, Request} | Mod:system_continue(Parent, Debug, LoopData),
Mod:system_terminate(Reason, Parent, Debug, LoopData) |
{'EXIT', Parent, Reason} | exit(Reason) |
{get_modules, From} | From ! {modules, ModuleList} |
You can read more about the sys and
proc_lib modules in their respective manual pages. There is
an example covering special processes and user-defined behaviors in the
“sys and proc_lib” section of the OTP Design Principles User’s Guide. And
finally, you can find more information on type and function specifications
used in defining your own callback definitions in the Erlang Reference
Manual and User’s Guide.
If you feel like coding, we suggest you download the mutex example from the book’s code repository and implement some of the edge cases that can occur in concurrent applications. In your client function, when requesting the mutex, add references guaranteeing the validity of your reply together with optional timeouts. You will also want to monitor the mutex in case it terminates abnormally while you are executing in the critical section.
What’s Next?
Special processes and user-defined behaviors are the foundations used to build existing and new behaviors, allowing us to glue them together in a supervision tree and package them in an application. In the next chapter, on release handling and system principles, we group applications in a release and see how we can configure, start, and stop an Erlang node as a whole.
1 For those of you working in large companies, we’re referring to the projects where we’ve spent more time in meetings discussing and trying to get approval for a migration to OTP than it would have actually taken to refactor the code.
2 An alternative to this timeout approach is to use the
prim_inet:async_accept/2 function, which sends the
calling process a message when a new connection is accepted, but
that function is intended to be private to Erlang/OTP and so is not
part of its documented and supported set of API functions.