
Chapter 11. System Principles and Release Handling
Now that we know how to implement and use existing OTP behaviors,
organize them in supervision trees with special processes, and package them
in applications, the time has come to group these applications together into
an Erlang node that can be started up as one unit. In many programming
languages, packaging is a problem handled by the operating system. In
Erlang, this is handled in OTP by creating a release,
where a system consists of one or more possibly different releases. Each
node runs a release, either on a single host or in a distributed
environment. Standard releases allow your system to follow a generic
structure that not only is target independent, but can be managed and
upgraded with tools independent of the underlying operating system. So,
while Erlang’s release process might appear complicated, it is as easy to
create a release (if not easier) as it would be to create a non-Erlang
package. If we think of the packaging hierarchy in Erlang, we start with a
function, followed by a module bundled in an application. An Erlang node consists of a set of
loosely coupled applications, grouped together in a release.
You might not have realized it, but when you installed Erlang on your
computer, you installed the standard release. What differs between a
standard release and the ones you create yourself are the applications that
are loaded and started together, along with their configuration parameters.
The underlying Erlang runtime system does not differentiate between
user-defined applications and applications that come as part as the
Erlang/OTP distribution, but rather treats them in the same manner. Releases
have the same directory structure, their own copy of the virtual machine,
and manage release and configuration files in a similar way. Because of
this, it should not come as a surprise that Erlang releases you start with
the erl command are created with the same
underlying tools, structure, and principles you use when defining your own
releases.
In this chapter, we walk you through the steps needed to build a
target release, explaining how it all hangs together. We cover the different
release types, from simple and interactive target systems, which give you
the flexibility of loading modules and easily starting applications at
runtime, to embedded target systems, where applications are loaded and
started at startup under strict version control. To create target systems,
we cover systools, an Erlang library used when integrating the
creation of releases in an existing tool chain or build process, and the use
of rebar3 for greenfield projects or when
dependency management becomes complicated.
System Principles
An Erlang release is defined as a standalone node consisting of:
A set of OTP applications written or reused as part of the project, typically containing the system’s business logic. The applications can be proprietary, open source, or a combination thereof.
The OTP applications from the standard distribution that the aforementioned applications depend on.
A set of configuration and boot files, together with a start script.
The Erlang runtime system, including a copy of the virtual machine.
There are tools that help you create and package a standalone node, but before introducing them, we cover all the components in detail and step you through a build manually. This will help you better understand how a release is structured and how it works, along with what options you have available.
The simplest way to start an Erlang node is using the
erl command. You can start your program from the Erlang shell
itself by typing in the module and function name or by passing the -s flag to erl:
$erl -smodulefunctionarg1arg2...
The function and arguments are optional.
If only the module is listed, the command will invoke
module:start(). If the module and
function are listed, the command will invoke
module:function().
We refer to this method of starting your node as a basic target system, where you
create a Unix shell script that initializes your state and calls the
erl -s command. This approach should be used only when
coding, for basic proofs of concepts, or for quick hacks. Using basic
target systems in production is not recommended, as you lose a lot of the
benefits that come with OTP. There are better alternatives.
Warning
Do not ship basic target systems unless they are proofs of
concepts or quick hacks. If your program is started by a script that
invokes erl -s myprojectsup -noshell, you lose all of the
benefits gained by OTP applications and their startup, supervision, and
upgrade procedures. You have everything to gain from using boot files
and shipping your systems as embedded target systems.
The next way of starting your node is as a simple target system. It makes use of a boot script and tools shipped with the sasl application, facilitating controlled software upgrades at runtime. To understand how simple target systems work, let’s start by examining your Erlang installation and investigating its directory structure and all the files and scripts associated with it. You need to create some of these files yourself when generating the release, using tools such as systools, reltool, or relx, while you can just copy other files from a repository or the installation in your target environment.
Start by finding the top-level directory, often called the
Erlang root directory. It is the location where you
(or the scripts you used) installed Erlang. If you don’t know that
location, start an Erlang node and call code:root_dir().:
$erlErlang/OTP 18 [erts-7.2] [smp:8:8] [async-threads:10] [kernel-poll:false] Eshell V7.2 (abort with ^G) 1>code:root_dir()."/usr/local/lib/erlang" 2>q().ok $cd /usr/local/lib/erlang$lsInstall erts-6.4 erts-7.1 misc bin erts-6.3 erts-7.2 releases erts-6.2 erts-7.0 lib usr
The contents of the directory are the output of creating a release. They vary depending on how (and from where) you installed Erlang, the number of upgrades you’ve done throughout the years, and the customizations made by those who built the release. There is, however, a set of basic files and directories that are required and will always be there, appearing with your first installation.
Release Directory Structure
In this section we explore the files needed for a release. Your own releases will have the same directories and file structures as the Erlang root, so we spend some time looking at that. The only differences between the root and your own releases are the applications that are loaded and started, their versions, and the version of the runtime system. This becomes evident in the next few sections, where we create our own base station controller release that follows these very principles.
Four directories are mandatory in every OTP release, as shown in Figure 11-1. We have already looked at lib, which contains all of the applications with their version numbers appended to their directory names. You rummaged through it in “The Application Structure” when reading about applications and their directory structures. After upgrades, you could end up with multiple versions of a single application, differentiated by a version number in the application directory name. With multiple instances, the code search path defined when creating the release usually points to the ebin directory of the latest version of the application.

Figure 11-1. Release directory structure
The erts directory contains binaries for the Erlang runtime system. Even here, if you have at some point upgraded your installation, you might find multiple instances of the directory, distinguished by the erts version number appended to the directory name. In erts the most interesting subdirectory is bin. It contains executables and shell scripts related not only to the virtual machine, but also to all the tools that can be invoked from the shell. Look around in the directory and you will find the following:
- erl
A script or program (depending on the target environment) that starts the runtime system and provides an interactive shell.
- erlexec
- erlc
A common way to run Erlang-specific compilers. The compiler chosen depends on the extension of the file you are trying to compile.
- epmd
The Erlang port mapper daemon. It acts as a name server in distributed Erlang environments, mapping Erlang nodes to IP addresses and port numbers.
- escript
Allows you to execute short Erlang programs as if they were scripts, without having to compile them.
- start
Starts an embedded Erlang target system in Unix environments. This kind of release runs as a daemon job without a shell window. We look at embedded target systems in “Creating a Release Package”.
- run_erl
The binary called by start to start Unix-based embedded systems, where I/O is streamed to pipes.
- to_erl
Connects to the Erlang I/O streams with nodes started by run_erl in an embedded target system.
- werl
Starts the runtime system in Windows environments, in a separate window from the console.
- start_erl
Part of the chain of commands to start embedded target systems, setting the boot and config files in Unix systems. In Windows environments, this is similar to the Unix start command previously described.
- erlsrv
Similar to run_erl but for Windows environments, allowing Erlang to be started without the need for the user to log in.
- heart
Monitors the heartbeat of the Erlang runtime system and calls a script if the heartbeat is not acknowledged.
- dialyzer
A static analysis tool for beam files and Erlang source code. It finds, among other things, type discrepancies and dead or unreachable code. The dialyzer should be part of everyone’s build process.
- typer
Infers variable types in Erlang programs based on how the variables are used. It adds type specifications derived from your source code and provides input data to the dialyzer.
Programmers use several of the executables listed in the bin directory when creating and starting an Erlang release. The ones we list are the most important and most relevant to what we cover in more detail later in this chapter. But the list is nowhere near complete, as the full contents depend on the Erlang/OTP version and operating system you are running.
These contents of the erts-version/bin
directory are similar to those of bin
in the Erlang root directory. The version-specific directory contains
links and copies to the scripts and executables of the bin directory of the Erlang runtime version
you start by default. This directory is needed because you might have
several versions of a release installed and running at any one time.
Although typing erl would point to the script in the
bin directory, environment variables
would redirect it to the erts-version/bin
version you are using. Let’s have a look at the contents of the erl script. With release 18.2 on a Mac running
OS X Yosemite, it looks like this:
#!/bin/sh## %CopyrightBegin%## Copyright Ericsson AB 1996-2012. All Rights Reserved.## Licensed under the Apache License, Version 2.0 (the "License");# you may not use this file except in compliance with the License.# You may obtain a copy of the License at## http://www.apache.org/licenses/LICENSE-2.0## Unless required by applicable law or agreed to in writing, software# distributed under the License is distributed on an "AS IS" BASIS,# WITHOUT WARRANTIES OR CONDITIONS OF ANY KIND, either express or implied.# See the License for the specific language governing permissions and# limitations under the License.## %CopyrightEnd%#ROOTDIR="/usr/local/lib/erlang"BINDIR=$ROOTDIR/erts-7.2/binEMU=beamPROGNAME=`echo$0|sed's/.*///'`exportEMUexportROOTDIRexportBINDIRexportPROGNAMEexec"$BINDIR/erlexec"${1+"$@"}
ROOTDIR and BINDIR, along with other environment variables, are set when installing
or upgrading Erlang. Note how BINDIR points to the
$ROOTDIR/erts-7.2/bin directory we
inspected at the beginning of this section and ends up executing
erlexec. Look in the erts-7.2/bin directory for erl.src and you will find the source file
used to create the erl script.
Similar source files exist for start_erl and start. We cover .src files in “Creating a Release”.
If you enter the releases directory, also located in the Erlang root directory, you will find a subdirectory for every release you’ve installed on your machine. There should be a one-to-one mapping to the erts directories, because most new releases come with a new version of the runtime system. Inspect the contents of any of the start_erl.data files and you will see two numbers, the first referring to the emulator version used in the current installation of Erlang and the second referring to the directory of the OTP release being used:
$cd releases$ ls 17 18 RELEASES RELEASES.src start_erl.data $cat start_erl.data7.2 18 $ls 18OTP_VERSION start.boot start_sasl.boot installed_application_versions start.script start_sasl.rel no_dot_erlang.boot start_all_example.rel start_sasl.script no_dot_erlang.rel start_clean.boot no_dot_erlang.script start_clean.rel
If you list the contents of the directory specified in start_erl.data—we’ve picked version 18 in our example—you will find files with .rel, .script, and .boot extensions. Files with the .rel suffix list the versions of the applications and runtime system for a particular release. The .boot file is a binary representation of the .script file, which contains commands to load and start applications when the system is first started. Enter the subdirectory of the latest release and look at any of the .rel and .script files to get a feel for what they might do. We create our own scripts in an upcoming section.
You can override the default location of the
releases directory by setting the
sasl application configuration variable releases_dir or the OS environment variable RELDIR. The Erlang runtime system must have
write permissions to this directory for upgrades to work, as it updates
the RELEASES file in conjunction
with upgrades.
Release Resource Files
All your project’s OTP applications, including those that come as part of the standard distribution, and proprietary as well as open source applications, are bundled up in a release specification containing their versions. This specification also includes the system release version and name, together with the version of the runtime system. The build system uses this information to do sanity checks, create the boot files, and create the target directory structure.
The minimal (and default) release consists of the kernel and stdlib applications, but most releases also include and start sasl because it contains all of the tools required for a software upgrade. You might not think about upgrades when creating your first release, but you’ll probably need to do so at a later date. You are given the option of including sasl by default when installing Erlang from source, but if you are using third-party binaries, this choice will have already been made for you.
Let’s look at the rel files more closely. If, from the Erlang root directory, you enter into the releases directory and from there move into any of the subdirectories, you will find at least one file with the .rel suffix. As an example, we’ve picked the releases/18/start_sasl.rel file, stripping out the comments:
{release,{"Erlang/OTP","18"},{erts,"7.2"},[{kernel,"4.1.1"},{stdlib,"2.7"},{sasl,"2.6.1"}]}.
As we can see, this release will run emulator version 7.2, starting kernel version 4.1.1, stdlib version 2.7, and sasl version 2.6.1. The name of the release is “Erlang/OTP” and its version is “18.” Other examples and versions of the rel files and corresponding boot and script files in the directory specify how other systems are grouped together.
Let’s create a release file named basestation.rel to use in our base station controller example. The release name is “basestation” and we’ve given it version “1.0.” Along with the standard included applications, we’ll include version 1.0 of bsc. The file is fairly straightforward and differs very little from the previous example:
{release,{"basestation","1.0"},{erts,"7.2"},[{kernel,"4.1.1"},{stdlib,"2.7"},{sasl,"2.6.1"},{bsc,"1.0"}]}.
The resource file is by convention named
ReleaseName.rel.
Following this convention is not mandatory, but doing so makes life
easier for those supporting and maintaining your code. The resource file
contains a tuple with four elements: the release atom, a
tuple of the format {ReleaseName, RelVersion}, a tuple of
the format {erts, ErtsVersion}, and a list of tuples
containing information about the applications and their versions. The
application tuples we’ve seen so far were of the format
{Application, AppVersion}, but as the following shows,
other formats exist as well:
{release,{ReleaseName,RelVersion},{erts,ErtsVersion},[{Application,AppVersion},{Application,AppVersion,Type},{Application,AppVersion,IncludedAppList},{Application,AppVersion,Type,IncludedAppList}]}.
All of the version fields for the various elements in the tuple
are strings. In your application tuple, you can also add an application
Type. You can include the types we covered in “Application Types and Termination Strategies”, as well as load and
none:
loadnoneLoads the modules in the application, but not the application itself.
permanentShuts down the node when the top-level supervisor terminates. When the application terminates, all other applications are cleanly taken down with it. This is the default chosen if no restart type is specified.
transientShuts down the node when the top-level supervisor terminates with a non-
normalreason. This is useful only for library applications that do not start their own supervision trees, because top-level supervisors will always terminate with the non-normalreasonshutdown, yielding the same outcome as a permanent application.temporaryApplications that terminate, normally or abnormally, are reported in the SASL logs, but do not affect other applications in the release.
Finally, you can specify a list of included applications in
IncludedAppList. The list must be a subset of the
applications specified in the application app file.
Creating a Release
Having defined what is included in our release, the time has come to create it in a few simple steps, as shown in Figure 11-2:
Start by creating a binary boot file, which contains the commands required to load modules and start applications.
With your boot file in place, create a directory structure that includes all application directories, release directories, and, if required, the emulator. This package is target independent, but could be OS and hardware specific. Your directory structure must follow the directives described in “Release Directory Structure”, making it compatible with the boot file you created.
Create a start script defining your configurations, system limits, code search paths, and other system-specific environment variables, including a pointer to the boot file. Your script will be based on the .src files you saw in the bin directory of the emulator. The script will depend on the directory structure you have created and how you want your target system to behave.
With the start script in place, create a deployment package specific to your target environment. It could be a tar file, a Debian or Solaris package, a container, or any other instance that you can configure and deploy with tools of your choice or the hype of the moment.

Figure 11-2. Creating an OTP release
In our example, we keep it simple by creating and deploying a tar
file using the systools library that comes as part of
the SASL application in the OTP distribution. The typical target
directory structure includes all of the applications listed in the
release file and, in the majority of cases, the Erlang runtime system.
Once we’ve created our tar file, we will want to untar it and fix
scripts, configuration files, and other target-specific environment
variables before creating the final package. This step could be done
manually or as part of your automated build process. It could be done
locally on your computer or in your target environment. How you do it
depends on the development and target environments as well as the tools
you pick. There never has been, and never will be, a “one size fits all”
approach.
Creating the Boot File
Let’s start by creating our boot file. To do this, we need the systools:make_script/2 library function. This function creates a binary boot file used by
a start script to boot Erlang and your system. To get the
start_script/2 function to work, we need to copy the
bsc application example, ensuring it
follows the directory structure we covered in “The Application Structure”. The structure is available in this
chapter’s directory of the GitHub repository. If you download it and
recreate the example on your computer, don’t forget to compile the
Erlang files and place them into the ebin
directory.
The script starts off by looking for the application versions
specified in the basestation.rel
file. It does so using the code search path, and any other paths you
might have included in your {path, PathList} environment
variable. In our example, assuming we started Erlang in the same
directory as the bsc directory, we would use the
[{path, ["bsc/ebin"]}] option or start Erlang using
erl -pa bsc/ebin. Remember, PathList is a list
of lists, so even if you have only one directory, the directory must be
defined in a list: [Dir]. Let’s try it out:
$erl -pa bsc/ebin/Erlang/OTP 18 [erts-7.2] [smp:8:8] [async-threads:10] [kernel-poll:false] Eshell V7.2 (abort with ^G)1> systools:make_script("basestation", [{path, ["bsc/ebin"]}]).Duplicated register names: overload registered in sasl and bsc error ok
Oops, systools detected a
problem when building the script. Remember how, in your app file, you
specified a list of registered processes? Apparently, there is another
process defined in the sasl app file with the name
overload. We actually introduced
freq_overload in Chapter 7, and before changing it, had it
registered with the name overload in
Chapter 8. When creating the first app
file, we ended up using the wrong name.
If you are running the script on your laptop, you might get errors informing you that the script was unable to find a certain version of the app file, an error that is easily reproducible if you change any of the versions in basestation.rel. This is where version control becomes important. You need to know exactly which module, application, and release versions you are running in production, because your system may be running for years on end and is likely to be managed by other people. Should you get called in to support someone else’s mess, at least you’ll know what version of the mess you have to deal with.
When creating your boot file, sanity checks are run to:
Check the consistency and dependencies of all applications defined in the rel files. Do all the applications exist, and are there no circular dependencies? Ensure that the versions defined in the app files match those specified in the rel files.
Ensure that the kernel and stdlib applications of type
permanentare part of the release. Warnings will be raised if sasl is not part of the release, but the script and boot file generation will not fail. You can suppress these warnings by passingno_warn_saslas one of the options when creating the boot file.Detect clashes in the registered process names defined in the application app files, ensuring that no two processes are registered with the same name.
Ensure that all modules defined in the app files have corresponding beam files in the ebin directory. While doing so, the sanity check detects any module name clashes, where the same module (or module name) is included in more than one application. If you want to ensure that the beam files match the latest version of the source code, include
src_testsin the options.
As we look at our release, we see that the registered process name
clash arises as an error in our app file. Changing overload to freq_overload in the registered process names
of the bsc.app file fixes the
problem.
When viewing the resulting contents of the directory as shown in the following example, we discover two new files, basestation.script and basestation.boot. Before investigating them further, let’s use the boot file to start the base station release:
1>systools:make_script("basestation", [{path, ["bsc/ebin"]}]).ok 2>q().ok $lsbasestation.boot basestation.rel basestation.script bsc $erl -pa bsc/ebin -boot basestationErlang/OTP 18 [erts-7.2] [smp:8:8] [async-threads:10] [kernel-poll:false] =PROGRESS REPORT==== 25-Dec-2015::20:37:46 === supervisor: {local,sasl_safe_sup} started: [{pid,<0.35.0>}, {id,alarm_handler}, {mfargs,{alarm_handler,start_link,[]}}, {restart_type,permanent}, {shutdown,2000}, {child_type,worker}] ...<snip>... =PROGRESS REPORT==== 25-Dec-2015::20:37:46 === supervisor: {local,bsc} started: [{pid,<0.43.0>}, {id,freq_overload}, {mfargs,{freq_overload,start_link,[]}}, {restart_type,permanent}, {shutdown,2000}, {child_type,worker}] =PROGRESS REPORT==== 25-Dec-2015::20:37:46 === supervisor: {local,bsc} started: [{pid,<0.44.0>}, {id,frequency}, {mfargs,{frequency,start_link,[]}}, {restart_type,permanent}, {shutdown,2000}, {child_type,worker}] =PROGRESS REPORT==== 25-Dec-2015::20:37:46 === supervisor: {local,bsc} started: [{pid,<0.45.0>}, {id,simple_phone_sup}, {mfargs,{simple_phone_sup,start_link,[]}}, {restart_type,permanent}, {shutdown,2000}, {child_type,worker}] =PROGRESS REPORT==== 25-Dec-2015::20:37:46 === application: bsc started_at: nonode@nohost Eshell V7.2 (abort with ^G)1> observer:start().ok
Because the bsc application was not placed in
the lib directory, we have to
provide the code search path to the .app and .beam files using the -pa
directive to the erl command. Note all the progress reports
that start appearing as soon as sasl is started
(we’ve removed a few in our example). Just to be completely sure that
the supervision tree has started, start the
observer tool, select the Applications tab (Figure 11-3), and have a look at the
bsc supervision tree.
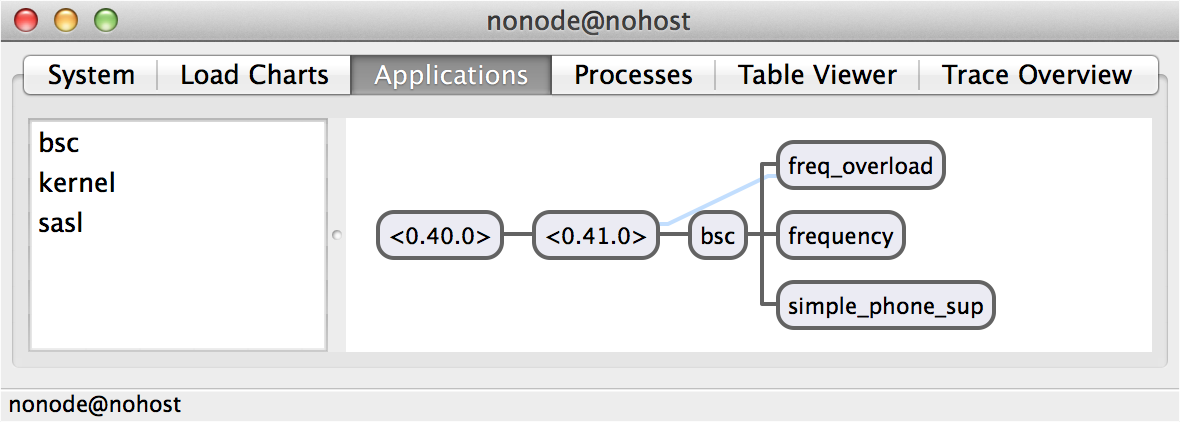
Figure 11-3. The observer Applications tab
This is how we start OTP-compliant simple target systems. Simple
target systems are used by several popular open source projects, are
more robust than basic target systems, and represent a step in the right
direction. But we can (and will) do better! Before discovering how,
let’s review in more detail the contents of the files we’ve generated
and the parameters we can pass to systools:make_script/2.
Script files
Figure 11-4 shows the basic relationships between files used to build a
release. The basestation.boot
file is a binary file containing all of the commands executed by the
Erlang runtime system and needed to start the release. Unlike other
files we look at, the boot file has to be a binary because it contains
the commands that load the modules that allow the runtime system to
parse and interpret text files. You can find the textual
representation of the boot file’s commands in basestation.script. And even better, for
those of you who like to tinker, you can edit the file or write your
own. (Do this while sparing a thought for those using OTP R1 back in
1996, when make_script/2 had not yet been
written.)
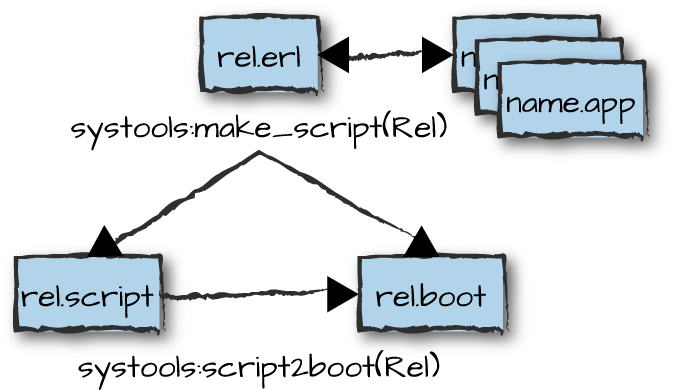
Figure 11-4. Creating boot and release files
Have a look at the contents of a script file. It is a file
containing an Erlang term of the format {script, {ReleaseName,
ReleaseVsn}, Actions}:
{script,
    {"basestation","1.0"},
    [{preLoaded,
         [erl_prim_loader,erlang,erts_internal,init,otp_ring0,prim_eval,
          prim_file,prim_inet,prim_zip,zlib]},
     {progress,preloaded},
     {path,["$ROOT/lib/kernel-4.1.1/ebin","$ROOT/lib/stdlib-2.7/ebin"]},
     {primLoad,[error_handler]},
     {kernel_load_completed},
     {progress,kernel_load_completed},
     {path,["$ROOT/lib/kernel-4.1.1/ebin"]},
     {primLoad, KernelModuleList},  %%
     {path,["$ROOT/lib/stdlib-2.7/ebin"]},
     {primLoad, StdLibModuleList},
     {path,["$ROOT/lib/sasl-2.6.1/ebin"]},
     {primLoad, SASLModuleList},
     {path,["$ROOT/lib/bsc-1.0/ebin"]},
     {primLoad, BscModuleList},
     {progress,modules_loaded},
     {path,
         ["$ROOT/lib/kernel-4.1.1/ebin","$ROOT/lib/stdlib-2.7/ebin",
          "$ROOT/lib/sasl-2.6.1/ebin","$ROOT/lib/bsc-1.0/ebin"]},
     {kernelProcess,heart,{heart,start,[]}},
     {kernelProcess,error_logger,{error_logger,start_link,[]}},
     {kernelProcess,application_controller,
         {application_controller,start, KernelAppFile}}
     {progress,init_kernel_started},
     {apply, {application,load, StdLibAppFile}},
     {apply, {application,load, SASLAppFile}},
     {apply, {application,load, BscAppFile}},
     {progress,applications_loaded},
     {apply,{application,start_boot,[kernel,permanent]}},
     {apply,{application,start_boot,[stdlib,permanent]}},
     {apply,{application,start_boot,[sasl,permanent]}},
     {apply,{application,start_boot,[bsc,permanent]}},
     {apply,{c,erlangrc,[]}},
     {progress,started}]}.
We replaced the kernel, stdlib, sasl, and bsc applications’ module lists and app file contents with variables shown in italics to make the file more book-friendly and readable. The script file starts off by defining any modules that have to be preloaded before any processes are spawned. Let’s step through these commands one at a time. Although you need not understand what they all mean if all you need to do is get a system up and running, having knowledge of the various steps helps when you have to dive into the internals of the kernel or need to troubleshoot why your system is not starting (or even more worrisome, not restarting):
preLoadedContains the list of Erlang modules that have to be loaded before any processes are allowed to start. You can find them in the erts application located in the lib directory. Of relevance to this section are the
initmodule, which contains the code that interprets your boot file, and theerl_prim_loadermodule, which contains information on how to fetch and load the modules.progressLets you report the progress state of your initialization program. The progress state can be retrieved at any time by calling the function
init:get_status/0. The function returns a tuple of the format{InternalState, ProgressState}, whereInternalStateisstarting,started, orstopping.ProgressStateis set to the last value executed by the script. In our example, the only progress state that matters to the startup procedure is the last one,{progress, started}, which changesInternalStatefromstartingtostarted. All other phases have no use other than for debugging purposes.kernel_load_completedIndicates a successful load of all the modules that are required before starting any processes. This variable is ignored in
embeddedmode, where loading of the modules happens before starting the system. We discuss theembeddedandinteractivemodes in more detail later in this chapter.pathA list of directories, represented as strings. They can be absolute paths or start with the
$ROOTenvironment variable. These directories are added to the code search path (together with directories supplied as command-line arguments using-pa,-pz, and-path) and used to load modules defined inprimLoadentries. Note how the generated paths—specifically, the one in the bsc application—assume that the beam files of the target environment are located in $ROOT/lib/bsc-1.0/ebin and not bsc/ebin. Note also how the application version numbers in the start scripts have been added to the path, assuming a standard OTP directory structure.primLoadProvides a list of modules loaded by calling the
erl_prim_loader:get_file/1function. If loading a module fails, the start script terminates and the node is not started. Modules may fail to be loaded when the beam files are missing, are corrupt, or were compiled by a wrong version of the compiler, or when the code search path is incorrect (e.g., if you forgot to add your application to the lib directory or have omitted the directory version number). In various places throughout this chapter we explain how to troubleshoot startup errors.{kernelProcess, Name, {M, F, A}}Starts a kernel process by calling
apply(M, F,
              A)
. In our file,kernelProcessis used for three modules:heart,error_logger, andapplication_controller. You already know what the error logger and the application controller do. We look atheartin more detail in “Heart”. Once started, the kernel process is monitored, and if anything abnormal happens to it the node is shut down.{apply, {M, F, A}}Causes the process initializing the system to execute the
apply(M, F, A)BIF, where the first argument is the module, the second is the function, and the third is a list of arguments for the function. If this function exits abnormally, the startup procedure is aborted and the system terminates. A function started in this manner may not hang and has to return, because starting the node is a synchronous procedure. If anapplydoes not return, the next command will not be executed.
Now that we are enlightened about each line of the script file, we can follow what is happening in our start script:
We start off by preloading all of the modules in the erts application, together with the
error_handlerin the kernel application. Once they load, we inform the script interpreter with{kernel_load_completed}and issue a progress report.For all applications listed in the release file, we add the path to the end of the code search path and use
primLoadto load all of the modules listed in the respective application app files. We then issue amodules_loadedprogress report.We start all of the kernel processes, starting with
heart, theerror_logger, and theapplication_controller(you already know about the latter two). We issue aninit_kernel_startedprogress report.We call
application:load(AppFile)to load all the applications that are part of this release. This loads the four applications listed in our rel file: kernel, stdlib, sasl, and bsc. When complete, we issue anapplications_loadedprogress report.Now that we’ve started the kernel processes and loaded all of the applications, it is time to start them. Note how, instead of calling
application:start/1in the{apply, {M, F, A}}tuple, we are callingapplication:start_boot/2. This is an undocumented function that, unlikeapplication:start/2, assumes that the application has already been loaded and asks the application controller to start it.Before issuing the final
startedprogress report, we callc:erlangrc(). This function is not documented, but reads and executes the .erlang file in your home or Erlang root directory. This is a useful place to set code paths and execute other functions.
Be very careful of the code search paths in your target
environment. The only reason our example can start the bsc application is that we provide the path
to the beam files using -pa in the command-line prompt
when starting Erlang. Our base station script expects them to be in
$ROOT/lib/bsc-1.0/ebin. When
generating the start script for the target environment, all
applications are assumed to be in the directory
AppName-version
within the root directory $ROOT/lib/. This will become evident when
we generate the target directory structure and files.
The make_script parameters
Let’s look in more detail at all the options we can pass to the
make_script/2 call. We already know that Name is the name of
the release file:
systools:make_script(Name,OptionsList).
Options include:
src_testsBy default,
systoolsassumes that the beam files are up to date and represent the latest version of the source code. This flag causes it to instead verify that the beam files are newer than their corresponding source files and that no source files are missing, and issue warnings otherwise.{path,DirList}Adds paths listed in
DirListto the code search path. This option can be used along with passing the-paand-pzparameters when starting the Erlang VM that executes thesystoolsfunctions. You can include wildcards in your path, so"lib/*/ebin"expands to contain all of the subdirectories in lib containing an ebin directory.localPlaces local paths instead of absolute paths in the start script. This flag is ideal for testing boot scripts using your code and the Erlang runtime system on your local machine.
{variables,[{Prefix, Var}]}Replaces path prefixes with variables. This allows you to specify alternative target paths for some or all of your applications. Defining a prefix such as
{"$BSC",
              "/usr/basestation/"}
results in the path $BSC/lib/bsc-1.0/ebin, if the app and beam files are found in /usr/basestation/lib/bsc/ebin. Similarly, it results in the path $BSC/ernie/lib/bsc-1.0/ebin if the local path is /usr/basestation/ernie/lib/bsc/ebin.{outdir, Dir}Puts the boot and script files in
Dir.exrefand{exref, AppList}Tests the release with the Xref cross-reference tool, which looks for calls to undefined and deprecated functions.
silentReturns a tuple of the format
{ok, ReleaseScript, Module, Warnings}or{error, Module, Error}instead of printing results to I/O. Use this option when callingsystoolsfunctions from scripts or integrating the call in your build process where you need to handle errors.no_dot_erlangRemoves the instructions that load and execute the expressions in the .erlang file.
no_warn_saslCan be used if you are not including sasl as one of your default applications and are not interested in the warnings that are generated.
warnings_as_errorsTreats warnings as errors and refuses to generate the script and boot files if warnings occur.
You can write your own script files, generate them with
systools:make_script/2, or change existing ones. If you
need to generate a release boot file from a script file, use the systools:script2boot(File)
function.
Changing script files was a necessity in the good old days when
debugging startup issues. In order to pinpoint exactly where the
problems occurred, we had to add progress reports after every
operation. When working with projects with thousands of modules, if
one of the beam files installed on the target machine got corrupted
during the build or transfer process, the only way to find it was by
adding progress reports after every primLoad command in
the boot file. It told us in which application directory we had a
problem, after which we loaded all of the modules individually,
finding the culprit.
Today, you can turn on the startup trace functionality by
passing the -init_debug flag to the erl
command. It makes the startup phases much more visible. When users are
unaware of this option, debugging startup errors can end up being
worse than looking for a needle in a haystack. But there are still
reasons for manipulating and writing your own release files: to reduce
startup times by loading only specific modules and starting specific
applications, or to change their start order.
Creating a Release Package
Now that we know the ins and outs of creating and starting a simple target system and have a boot file at hand, let’s have a look at how the experts package, deploy, and start their releases. The most solid and flexible way of deploying an Erlang node is as an embedded target system. Unfortunately Erlang/OTP uses the term “embedded” in several contexts, which we explain in this chapter, so please don’t assume it means the same thing each time we use it. Here, by embedded we mean our target system becomes part of a larger package running on the underlying operating system and hardware. It is capable of executing as a daemon job in the background, without the need to start an interactive shell or keep it open all the time, and it typically starts when the operating system is booted. To communicate without a shell, an embedded target system streams all I/O through pipes.
Because target environments differ based on design and operational choices, there is no “one size fits all” solution. The basic steps when creating a release package are as follows, but in practice you will often find the need to tweak them based on the details of what you are trying to achieve:
Create a target directory and release file.
Create the lib directory with the application versions specified in the rel file.
Create the release directory with the boot scripts and the application configuration file.
Copy the erts executable and binaries to the target directory.
Create a bin directory and copy the configuration files and the start scripts to it.
These steps are, at least in part, usually integrated in an automated build system and the install scripts executed on the target machine or run by one of the many available tools. Because OTP originally did not ship with tools to create target releases, and eventually included a complex tool focused on batch handling, the boundary for what is done by the build environment and what is done by the installation scripts on the target host varies among users. What also vary are the manual versus the automated steps. If you are doing your build on the same hardware and operating system as your target environment, you might be better off getting everything ready in one place. If you do not have this luxury, do not know where (or on what target machine) your deployment will be running, or need other target-specific configuration files created on the fly, parts of the procedure may have to be performed on the target environment.
Now we make our way through the steps required to manually create a target system, assuming that our development and target environments are the same. Based on how you are used to building, deploying, and configuring your target systems, it should be straightforward to understand where you should be drawing the boundary between what you do in your build process and what you do on the target host. We also cover some tools that can be used to automate this process.
We start off by creating the target directory, which we are going
to call ernie,1 and adding the releases and lib directories to it. Along with standard
Unix commands, we use the systools:make_tar/2 library
function. We start in the same directory as the
bsc application directory. The
make_tar call also expects the system release and boot
files to be located here, alongside a config file.
The configuration file is optional at this stage. You might want to generate target-specific values at install time, overriding those specified in the app files. If you choose to omit it at this stage, you must not forget to add it when installing the system, as otherwise your system will not start. The configuration file must be named sys.config, although you can change the name by tweaking the arguments you pass to the emulator when starting it.
We create our ernie target directory, rename the configuration file sys.config, and place it in the same directory as the bsc application and the rel and boot files. When done, we can create our tar file:
$mkdir ernie$cp bsc.config sys.config$erlErlang/OTP 18 [erts-7.2] [smp:8:8] [async-threads:10] [kernel-poll:false] Eshell V7.2 (abort with ^G) 1>systools:make_tar("basestation", [{erts, "/usr/local/lib/erlang/"}, {path, ["bsc/ebin"]}, {outdir, "ernie"}]).ok 2>q().ok 3> $cd ernie$lsbasestation.tar.gz $tar xf basestation.tar.gz$lsbasestation.tar.gz lib erts-7.2 releases $ls lib/bsc-1.0 kernel-4.1.1 sasl-2.6.1 stdlib-2.7 $ls releases/1.0 basestation.rel $ls releases/1.0/basestation.rel start.boot sys.config $ls erts-7.2/bin/beam dialyzer erl.src heart start.src beam.smp dyn_erl erlc inet_gethost start_erl.src child_setup epmd erlexec run_erl to_erl ct_run erl escript start typer $rm basestation.tar.gz
Our call to systools:make_tar(Name, OptionsList)
generates the basestation.tar.gz package.
Name is the name of the release and
OptionsList accepts all of the options
make_script takes, together with the {erts,
Dir} directive. We give this directive if we wish to include the
runtime system binaries, resulting in the erts-7.2
directory. That is not always the case, because the runtime system
binaries might already be installed on the target machine, or a single
version of Erlang might be used to run multiple nodes. Also note that
the sys.config file is included in the releases/1.0 directory. If it is in a
different directory from the rel file, you have to copy it in a later
stage of the installation.
You could deploy basestation.tar.gz to your target machine and run your local configuration scripts when you install the node, or do it in your build environment and create a single tar file for all deployments of this particular node. Keep in mind that your node might run in tens of thousands of independent installations—one for every base station controller your company sells—or, if hosted, in multiple occurrences of the node, all in a single installation. Your configuration parameters will depend on your needs and the type of installation; they might be the same across all tens of thousands of deployments, or may have to be individually customized when installing the software on each target environment. Often, it is a combination of both. Configuration scripts could be proprietary to your system and be included in the tar file, or be managed by third-party deployment and configuration tools such as Chef, Puppet, or Capistrano.
In our example, we untar the
basestation.tar.gz file manually. The remaining
steps could run either on the target or in our build environment. When
untarring the file, we find three new directories: the lib directory containing all of the
application directories (including their version numbers), the releases directory, and the erts directory. The erts directory is there because we included
the {erts, Dir} directive in the
sys_tools:make_tar/2 call.
We already know that Name is the name of the release
file:
systools:make_tar(Name,OptionsList).
OptionsList is a list that can be empty or can
contain some combination of the following elements:
{dirs, IncDirList}Copies the specified directories (in addition to the defaults
privandebin) to the application subdirectories. Thus, to addtests,src, andexamplesto the release, set theIncDirListto[tests, src, examples].{path, DirList}Adds paths to the code search path. This option can be used along with the
-paand-pzparameters passed when starting the Erlang VM that runs the system. You can include wildcards in your path. For instance,["lib/*/ebin"]will expand to contain all of the subdirectories in lib that contain an ebin directory.{erts, Dir}Includes the binaries of the Erlang runtime system found in directory
Dirin the target tar file. The version of the runtime system is extracted from the rel file. Make sure that the binaries have been compiled and tested on your target operating system and hardware platform.{outdir, Dir}Puts the tar file in directory
Dir. If omitted, the default directory is the same directory as that of the rel file.exrefand{exref, AppList}Tests the release with the Xref cross-reference tool, which looks for calls to undefined and deprecated functions. This is the same test executed by the
systools:make_script/2call when passing the same option.src_testsIssues a warning if there are discrepancies between the source code and the beam files. This is the same test executed by the
systools:make_script/2call when passing the same option.silentReturns a tuple of the format
{ok, ReleaseScript, Module, Warnings}or{error, Module, Error}instead of printing the results to I/O. You can get formatted errors and warnings by callingModule:format_error(Error)andModule:format(Warning), respectively. Use this option if you are integratingsystoolsin your build process; it works in the same way for this as for thesystools:make_script/2call.
Two additional options, {variables,[{Prefix, Var}]}
and {var_tar,VarTar}, allow you to change and manipulate
the way target libraries and packages are created. Use them when
deviating from the standard Erlang way of doing things; for example, if
you prefer to deploy your release as deb,
pkg, rpm, or other packages or
containers. They allow you to override the application installation
directory (by default set to lib)
and influence where and how the packages are stored. We do not cover
these options in this chapter; for more information and some examples,
read the systools reference manual
page.
Start Scripts and Configuring on the Target
Now that we have our target files in place, we need to configure our start scripts. Here we go through these steps manually, later introducing tools that automate the process:
In the target directory (ernie, in our case), create a bin directory in which to place and edit the start scripts that will boot our system.
Create the log directory, to which all debug output from the start scripts is sent. It will be one of the first points of call when the system fails to start.
Create a file called start_erl.data in the releases directory containing the versions of the Erlang runtime system and its release.
If the original tar file did not contain a sys.config file, create one (possibly empty) and place it in the release version directory.
At this point, fingers crossed, everything will start. Let’s go through these steps in more detail, adding and editing files as we go along. All of this is in the ernie directory:
$mkdir bin$cp erts-7.2/bin/start.src bin/start$cp erts-7.2/bin/start_erl.src bin/start_erl$cp erts-7.2/bin/run_erl bin$cp erts-7.2/bin/to_erl bin$mkdir log
In our example, we create the bin directory and copy start.src and start_erl.src to it, renaming them start and start_erl, respectively. We also copy over run_erl, which the start scripts expect to be available locally, and to_erl, which we will use to connect to an embedded Erlang shell. The start script initializes the environment for the embedded system, after which it calls start_erl, which in turn starts Erlang via the run_erl script.
Think of start_erl as an embedded version of erl and start as a script you can use and customize as you please. Depending on your needs and requirements, you might also want your own version of the erl and heart scripts and, if running distributed Erlang, the epmd binary. All of these can be copied from the bin directory of the runtime system.
Now that the files and binaries are in place, we need to edit them
accordingly. We modify the start
file, replacing %FINAL_ROOTDIR% with the absolute path to
the new Erlang root directory. In our case, this directory is ernie, and we change the file using
perl with its -i in-place modification option,
using the value of our shell’s PWD variable for the
replacement text. We then show you the before and after versions using
the diff command:
$pwd/Users/francescoc/ernie $perl -i -pe "s#%FINAL_ROOTDIR%#$PWD#" bin/start$diff erts-7.2/bin/start.src bin/start27c27 < ROOTDIR=%FINAL_ROOTDIR% --- > ROOTDIR=/Users/francescoc/ernie $echo '7.2 1.0' > releases/start_erl.data$bin/start$bin/to_erl /tmp/Attaching to /tmp/erlang.pipe.1 (^D to exit)1> application:which_applications().[{bsc,"Base Station Controller","1.0"}, {sasl,"SASL CXC 138 11","2.6.1"}, {stdlib,"ERTS CXC 138 10","2.7"}, {kernel,"ERTS CXC 138 10","4.1.1"}]2>[Quit] $ls /tmp/erlang.*/tmp/erlang.pipe.1.r /tmp/erlang.pipe.1.w
Having modified the start file, we create the start_erl.data file in the releases directory. It contains the version of the Erlang runtime system and the release directory containing all the boot scripts and configuration files for the release. These two items, in our example both numbers, are separated by a space.
We are now able to boot our system with the start command. Notice how, unlike when using the erl command, this release starts as a background job. To connect to the Erlang shell, we use the to_erl command, passing it the /tmp directory where the read and write pipes reside.
Warning
When running an embedded Erlang system, you might out of habit
exit the shell using Ctrl-c a. Ctrl-c
invokes the virtual machine break handler, after which you can execute
one of the following commands:
BREAK: (a)bort (c)ontinue (p)roc info (i)nfo (l)oaded
       (v)ersion (k)ill (D)b-tables (d)istribution
As indicated, the a terminates the Erlang
node.
To avoid termination, be careful to exit the shell using Ctrl-d. If you type
q(), halt(), or Ctrl-c a out of
habit, you will kill the whole background job. By using
Ctrl-d, you exit the to_erl shell while keeping the Erlang VM
alive running in the background.
If you are trying to connect to the pipes on your computer and get an error of the form No running Erlang on pipe /tmp/erlang.pipe: No such file or directory, look in the log directory to find out why your Erlang node failed to start. All start errors in your scripts will be recorded there. Problems might include wrong paths, missing sys.config files, a corrupt boot file, or an incorrectly named binary.
It is good practice to always include the erl command in the bin directory of your target system. This will come as a blessing when, after a failure of some sort, you are unable to restart your node. Your first point of call in these situations will be the SASL report logs, where crash and error reports will in most cases tell you what triggered the chain of errors that caused the node to fail. The last thing you want to do is to have to move the SASL logs to a remote computer every time you want to view them just because your Erlang nodes will not start. Be safe and always generate a second boot file similar to start_sasl.boot that contains the same application versions of kernel, stdlib, and sasl as your system.
In our example, we used the /tmp directory for the read and write pipes,
as it is the default directory used by our scripts. If you plan on
running multiple embedded nodes on the same machine, though, this will
cause a problem. A good practice is to redirect your pipes to a
subdirectory of your Erlang root directory in your target structure.
This allows multiple node instances to run on the same computer, a
common practice in many systems. If you look at the last line of the
start script, you will see where to replace /tmp/ with the
absolute path of your new pipes in the root directory. You can also
redirect all of the logs elsewhere:
$ROOTDIR/bin/run_erl-daemon/tmp/$ROOTDIR/log"exec ..."
Arguments and Flags
So far, so good. But what if we want to start a distributed Erlang node or
add a patches directory to the code
search path? Or maybe we have developed a dislike for the sys.config filename and want to retain the
original bsc.config file. Or, even
more importantly, are there flags we can pass to the emulator that will
disable the ability to kill the node via Ctrl-c a?
When starting Erlang, we can pass three different types of arguments to the runtime system. They
are emulator flags, flags, and plain
arguments. You can recognize emulator flags by
their initial + character. They control the
behavior of the virtual machine, allowing you to configure system
limits, memory management options, scheduler options, and other items
specific to the emulator.
Flags start with - and are passed to the Erlang part
of the runtime system. They include code search paths, configuration
files, environment variables, distributed Erlang settings, and
more.
Plain arguments are user-defined and not interpreted by the runtime system. You first came across them in “Environment Variables” to override application environment variables in app and configuration files from the command line. You can use plain arguments in your application business logic.
The following sample command uses several different arguments:
erl -pa patches -boot basestation -config bsc -init_debug +Bc
This starts Erlang with the patches directory added to the beginning of
the code search path. It also uses the basestation.boot and bsc.config files to start the system, and
sets the init_debug flag, increasing the number of
debug messages at startup. The +Bc emulator flag disables
the shell break handler, so when you press the sequence Ctrl-c a,
instead of terminating the virtual machine you terminate just the shell
process and restart it.
Let’s look at some of the emulator flags in more detail. We’ve
picked high-level flags and system limit flags that do not deal with
memory management, multicore architectures, ports and sockets, low-level
tracing, or other internal optimizations. The internal optimizations are
outside the scope of this book and should be used with care, only if you
are sure of what you are doing. You can read more about the arguments we
cover (and those we don’t) in the manual pages for erl. The
ones we list are those we have used ourselves in some shape or form
before the need to optimize our target systems:
+BcIt is dangerous to keep the break handler enabled in live systems, as your fingers are often faster than your mind (especially if this is a support call in the middle of the night when your mind is still fast asleep). If you are used to terminating the shell that way, you will be inclined to do it on production systems as well. Using the
+Bcflag makesCtrl-ca terminate the current shell and start a new one without affecting your system. This is the option to enable for all your live systems.+BdThis allows you to terminate the Erlang node using simply
Ctrl-c, bypassing the break handler altogether.+BiThis makes the emulator ignore
Ctrl-c, in which case the only way to terminate your Erlang virtual machine is using the shell commandq()or thehalt()BIFs. This option is dangerous because it does not allow you to recover should an interactive call fail to return, thereby hanging the shell.+eNumThis sets the maximum number of ETS tables, which defaults to 2,053. With Erlang/OTP R16B03 or newer, you can obtain the value of the maximum number of ETS tables at runtime by calling
erlang:system_info(ets_limit).+PNumThis changes the system limit on the maximum number of processes allowed to exist simultaneously. The limit by default is 262,144, but it can range from 1,024 to 134,217,727.
+QNumThis changes the maximum number of ports allowed in the system, set by default to 65,536. The allowable range is 1,024 to 134,217,727.
+tNumThis allows you to change the maximum number of allowed atoms, set by default to 1,048,576. These limits are specific to Erlang 17 or newer and to Unix-based OSs. Default values might differ on other operating systems.
+RRelThis allows your Erlang node to connect using distributed Erlang to other nodes running an older, potentially non–backward-compatible version of the distribution protocol.
Regular flags are defined at startup, retrieved in the Erlang side of the runtime system, and used by standard and user-defined OTP applications alike. Remember that large parts of the Erlang kernel and runtime system are written in Erlang, so how you define and retrieve flags in your application is identical to how Erlang defines and retrieves them in its runtime. Here are the main flags:
-Application Key ValueSets
Application’s environment variableKeytoValue. We covered this option in “Environment Variables”.-args_fileFileNameAllows you to list all of the flags, emulator flags, and plain arguments in a separate configuration file named
FileName, which is read at startup. The file can also contain comments that start with a#character and continue until the end of the line. Using an arguments file is the recommended approach, so as to avoid the need to mess with the start scripts to set or change arguments. This approach can also allow you keep the arguments file under version control with the rest of your code.-async_shell_startAllows the shell to start in parallel with other parts of the system, rather than the default of not processing what you type in the shell until the system has been completely booted. This is useful when you are trying to debug startup issues or figure out where timeouts are occurring.
-bootfilenameSets the name of the boot file to
filename.boot. If you do not include an absolute path, the emulator assumes the boot file is in the $ROOT/bin directory.-configfilenameSets the location and name of the configuration file to
filename.config.-connect_all falseStops the
globalsubsystem from maintaining a fully connected network of distributed Erlang nodes, in effect disabling the subsystem.-detachedStarts the Erlang runtime system in a manner detached from the system console. You need this option when running daemons and background processes. The
-detachedoption implies-noinput, which basically starts the Erlang node but not the shell process that runs the read-evaluate loop interpreting all the commands you type. The-noinputoption in turn implies the-noshellcommand, which starts the Erlang runtime system without a shell, potentially making it a component in a series of Unix pipes.-emu_argsPrints, at startup, all of the arguments passed to the emulator. Keep this on all the time in your production systems, as you never know when you will need access to the information.
-init_debugProvides you with detailed debug information at startup, outlining every step executed in the boot script. The overheads of using
-init_debugand-emu_argsare negligible, but the information they provide is priceless when troubleshooting.-envVariable ValueAn alternate (and convenient) way to set host operating system environment variables. It is mainly used for testing, but is also useful when dealing with Erlang-specific values.
-evalParses and executes an Erlang expression as part of the node’s initialization procedure. If the parsing or execution fails, the node shuts down.
-hiddenWhen using distributed Erlang, starts the Erlang runtime system as a hidden node, publishing neither its existence nor the existence of the nodes to which it is connected.
-heartStarts the external monitoring of the Erlang runtime system. If the monitored virtual machine terminates, a script that can restart it is invoked. We cover heart in detail in “Heart”.
-modeModeEstablishes how code is loaded in the system. If
Modeisinteractive, calls to modules that have not been loaded are automatically searched for in the code search path. Your target systems should run inembeddedmode, where all modules should be loaded at startup by the boot file, and calls to nonexisting modules should result in a crash. You can still load modules inembeddedmode using thel(Module)orcode:load_file(Module)calls from the shell.Running in
embeddedmode is recommended for all production systems. It ensures that in the middle of a critical call, you do not pause the process while traversing the code search path looking for a module that has not been loaded.-nostickDisables a feature that prevents loading and overriding modules located in sticky directories. By default, the ebin directories of the kernel, compiler, and stdlib applications are sticky, a measure intended to prevent key elements of the system from being accidentally corrupted.
-paand-pzAdd directories containing beam files to the beginning and end of the code search path, respectively. One common use is to add
-pa patchesto point to a directory used to store temporary patches in between releases.-remshnodeStarts a shell connected to a remote
nodeusing distributed Erlang. This is useful when running nodes with no shells or when you need to remotely connect to a node.-shutdown_timeTimeSpecifies the number of milliseconds the system is allowed to spend shutting down the supervision trees. It is by default set to infinity. Use this option with care, though, because it overrides the shutdown values specified in the behavior child specifications.
-namenameand-snamenameWhen working with distributed Erlang, these start distributed nodes with long or short names, respectively. If nodes are to communicate with each other, they must share a cookie, which can be set using the
-setcookiedirective, and all have either long or short names. Nodes with short and long names cannot communicate with each other.-smodule,-smodulefunction,-smodulefunctionargsThe first of these forms executes, at startup,
module:start()module:function()argsare passed as atoms. The-runoption works similarly, except that if arguments are defined, they are passed as a list of strings tomodule:function/1-runand-smust return, or the startup procedure will hang. If they terminate abnormally, they will cause the node to terminate as well, aborting the startup procedure.
When troubleshooting systems, you can connect to a remote node
using distributed Erlang. For instance, assume you want to connect to
node foo@ramone, which has cookie abc123. You would do so by starting an Erlang
VM with the –remsh flag:
$erl -sname bar -remsh foo@ramone -setcookie abc123Erlang/OTP 18 [erts-7.2] [smp:8:8] [async-threads:10] [kernel-poll:false] Eshell V7.2 (abort with ^G)(foo@ramone)1> node().foo@ramone(foo@ramone)2> nodes().[bar@ramone](foo@ramone)3>BREAK: (a)bort (c)ontinue (p)roc info (i)nfo (l)oaded (v)ersion (k)ill (D)b-tables (d)istributiona$
All commands will be executed remotely in foo, with
the results displayed locally. Be careful of how you exit the local
shell. Using halt() and q() will terminate the
remote node. Always use Ctrl-c a.
Let’s now try using -s, -eval, and
-run in the shell to get a feel for how they work:
$erl -s observerErlang/OTP 18 [erts-7.2] [smp:8:8] [async-threads:10] [kernel-poll:false] Eshell V7.2 (abort with ^G) 1>q().ok $erl -noshell -eval 'Average = (1+2+3)/3, io:format("~p~n",[Average]), erlang:halt()'2.0 $erl -run io format 1 2 3Erlang/OTP 18 [erts-7.2] [smp:8:8] [async-threads:10] [kernel-poll:false] 123Eshell V7.2 (abort with ^G) 1>q().ok $erl -s io format 1 2 3Erlang/OTP 18 [erts-7.2] [smp:8:8] [async-threads:10] [kernel-poll:false] {"init terminating in do_boot", {badarg,[{io,format,[<0.24.0>,['1','2','3'],[]],[]}, {init,start_it,1,[]},{init,start_em,1,[]}]}} Crash dump is being written to: erl_crash.dump...done init terminating in do_boot ()
We successfully use erl -s observer to call
observer:start(). You do not see it in the shell output shown here, but it opens
up an observer wxWidgets window. This is an efficient way to start
debugging tools when starting the emulator. We then use the -eval flag to calculate the average of three integers, print out the
result, and stop the emulator, all without starting the Erlang shell. In
our third and fourth examples, we use -run io format 1 2 3 to call
io:format(["1","2","3"]) and -s io format 1 2
3 to call io:format(['1','2','3']). The latter
crashes because it attempts to call io:format/1 with a list
of atoms, when it is expecting a string.
When using the -run and -s flags,
beware of calling functions such as
spawn_link and start_link that link themselves
to the initialization process, because the process is there to
initialize the system and not act as a parent. Although the process
currently continues running after executing the initialization calls,
you should not depend on that behavior because it is not documented and
might change in a future release.
Applications can use the init:get_arguments() and
init:get_argument(Flag) functions to retrieve flags. Flag can be one of the
predefined flags root, progname, and home, together with all other command-line
user-defined flags.
Plain arguments include all arguments specified before emulator
flags and regular flags, after the -extra flag, and in
between the -- directive and the next flag. We can retrieve
plain arguments using the init:get_plain_arguments/0 call:
$erl one -two three -pa bin/bsc -- four five -extra 6 7 eightErlang/OTP 18 [erts-7.2] [smp:8:8] [async-threads:10] [kernel-poll:false] Eshell V7.2 (abort with ^G) 1>init:get_plain_arguments().["one","four","five","6","7","eight"] 2>init:get_argument(two).{ok,[["three"]]} 3>init:get_argument(pa).{ok,[["bin/bsc"]]} 4>init:get_argument(progname).{ok,[["erl"]]} 5>init:get_argument(root).{ok,[["/usr/local/lib/erlang"]]} 6>init:get_argument(home).{ok,[["/Users/francescoc"]]}
Heart
It is customary to run your embedded Erlang systems as daemon jobs, automatically starting them when the computer they are supposed to run on is booted. This means if there is a power outage or any other failure, or a maintenance procedure is performed that requires a reboot, your system will start automatically. But what happens if only the Erlang node itself crashes or stops responding? It could be an unexpected memory spike, a top-level supervisor terminating, a dodgy NIF causing a segmentation fault in the virtual machine, or even a rare bug in the virtual machine that causes the system to hang. This is why you need to enable heart. Heart can be seen as the supervisor of the node itself.
Heart is an external program that monitors the virtual machine, receiving regular heartbeats sent by an Erlang process through a port. If the external program fails to receive a heartbeat within a predefined interval, it attempts to terminate the virtual machine and invokes a user-defined command to restart the runtime system.
Let’s write a very simple script, bsc_heart, that simply calls the bin/start command. We could just set start as the heart command, but real-world scenarios tend to be too complex for a blind restart and so a restart script is typically used. We could, after failed restart attempts, come to the conclusion that this is a cyclic restart from which we cannot recover, and opt to cease attempting to restart the node. Or, after a certain number of restart attempts, allowed only at variable (but increasing) time intervals, we could reboot the operating system. Or we could trigger other autodiagnostic scripts that would run sanity tests on the surrounding environment. The options are many, typically depending on your deployment environment and monitoring/alerting facilities, so restart scripts can be as simple or as complex as you want them to be. Let’s use the following bsc_heart script, which we place in the bin directory of our target installation:
#!/bin/sh#Basic Heart Script for the Base Station ControllerROOTDIR=/Users/francescoc/ernie$ROOTDIR/bin/start
We then set the HEART_COMMAND environment variable
to call this script, edit the start_erl script to include
-heart, and then start the base station controller. We
then kill it in a variety of different ways. Despite killing the
system, every time we connect to the I/O pipes, it’s up and
running:
$$ cp bsc_heart ernie/bin/.$export HEART_COMMAND=/Users/francescoc/ernie/bin/bsc_heart$vim bin/start_erl$diff erts-7.2/bin/start_erl.src bin/start_erl47c47 < exec $BINDIR/erlexec ... -config $RELDIR/$VSN/sys ${1+"$@"} --- > exec $BINDIR/erlexec ... -config $RELDIR/$VSN/sys ${1+"$@"} -heart $bin/start$bin/to_erl /tmp/Attaching to /tmp/erlang.pipe.5 (^D to exit) 1>halt().heart: Sat Aug 23 12:49:47 2014: Erlang has closed. [End] $bin/to_erl /tmp/Attaching to /tmp/erlang.pipe.5 (^D to exit) 1> BREAK: (a)bort (c)ontinue (p)roc info (i)nfo (l)oaded (v)ersion (k)ill (D)b-tables (d)istribution a [End] $bin/to_erl /tmp/Attaching to /tmp/erlang.pipe.5 (^D to exit) 1>
We see that using halt() or Ctrl-c a
kills the node, because every time we connect, the command prompt is 1
again. The heart system immediately restarts the
process.
The following OS environment variables, all optional, can be set either
in the start scripts, when booting your system using the -env flag, or wherever else you might
choose to configure such variables:
HEART_COMMANDThe name of the script triggered when the timeout occurs. If this variable is not set, a timeout will trigger a warning indicating the system would have been rebooted, and the system will not be restarted.
HEART_BEAT_TIMEOUTThe number of seconds heart waits for a heartbeat before terminating the virtual machine and invoking the heart command. In Erlang 17 or newer, it can be a value greater than 10 and less than or equal to 65,535. Omitting this setting defaults the timeout to 60 seconds.
ERL_CRASH_DUMP_SECONDSHow long the virtual machine is allowed to spend writing the crash dump file before being killed and restarted. Because crash dump files can be substantial, the virtual machine can take its time writing them to disk. The default setting when using heart and not setting this variable is
0, meaning that no crash dump file is written; the virtual machine is immediately killed and the heart command is immediately invoked. Setting the value to-1(or any other negative number) allows the virtual machine to complete writing the crash dump file no matter how long it takes. Any other positive integer denotes the number of seconds allowed to the virtual machine to write the crash dump file before it terminates and is restarted.
In our example, we decided to set the environment variables in
the Unix shell, but we could just as easily have edited the start_erl file or passed them as flags to
erl using the -env
argument:variable
value
erl -heart -env HEART_BEAT_TIMEOUT 10 -env HEART_COMMAND boot_bsc
Warning
Race conditions between heart, heartbeats, and
restarts can occur. If you do not anticipate and check for these
race conditions, they will leave you scratching your head when you
are trying to figure out what went wrong. There have been cases
where an Erlang virtual machine was chugging away under extreme
heavy load, but the heartbeat never reached
heart because of underlying OS issues, perhaps
as a result of I/O starvation together with a low HEART_BEAT_TIMEOUT value. The lack of
heartbeat caused heart to terminate the Erlang
VM and restart it. No crash dump was generated because
heart, at least on Unix-like systems,
terminates its target with extreme prejudice via SIGKILL, which the target cannot catch.
Killing the Erlang VM (and possibly rebooting the OS itself) might
have been the solution to the problem, but it was not of any help to
the poor developers who were looking for an Erlang-related VM crash,
trying to figure out why there was no crash dump file.
Heart works on most operating systems. Discussing how it executes on Windows and other non-Unix-based OSs is beyond the scope of this book, as is exploring the ability to connect and configure it to work with the Solaris hardware watchdog timer. For more information, read the manual page for heart that comes with the standard Erlang distribution.
The Erlang loader
You might sometimes run a release on embedded devices with little or no disk space
and want to change the method the runtime system uses to load modules.
Instead of reading them from a file, you might want to load them from
a database or from another node across the network. The
-loader argument specifies how the erl_prim_loader
fetches the modules. The default loader, efile, retrieves the modules from the local
filesystem. If you want to use the boot server on another machine, you
must specify the inet loader. When
using inet, you must include the
name of the remote node where the boot server is running through the
-id name argument, where
name comes from the -name or -sname flags
issued when starting the remote node. You must also include the IP
address of that machine using the -hosts
address flag, where
address is a string IP address, such as one
consisting of four integers separated by periods. An example is
-id foo -hosts "127.0.0.1", which specifies that the boot
server is running in the foo Erlang virtual machine on
the local host.
To see loading in action, we first generate a basestation.boot file using the
local option to systools:make_script/2. The
local option is critical, as it ensures that our local copies of the
bsc beam files can be found without us having to
install them into the lib
directory of the official release. It basically adds the local path to
the bsc application into the boot server’s load
path so that generating the basestation.boot file
succeeds:
$erl -pa bsc/ebinErlang/OTP 18 [erts-7.2] [smp:8:8] [async-threads:10] [kernel-poll:false] Eshell V7.2 (abort with ^G)1> systools:make_script("basestation", [local]).ok
Next, we start the boot server:
$erl -name [email protected] -setcookie cookieErlang/OTP 18 [erts-7.2] [smp:8:8] [async-threads:10] [kernel-poll:false] Eshell V7.2 (abort with ^G) ([email protected])1>erl_boot_server:start([{127,0,0,1}]).{ok,<0.42.0>}
With the boot server started and ready to serve requests, we can
start our bar node:
$erl -name [email protected] -id foo -hosts 127.0.0.1 -loader inet -setcookie cookie -init_debug -emu_args -boot basestationExecuting: /usr/local/lib/erlang/erts-7.2/bin/beam.smp /usr/local/lib/erlang/erts-7.2/bin/beam.smp -- -root /usr/local/lib/erlang -progname erl -- -home /Users/francescoc -- -name [email protected] -id foo -hosts 127.0.0.1 -loader inet -setcookie cookie -init_debug -boot basestation {progress,preloaded} {progress,kernel_load_completed} {progress,modules_loaded} {start,heart} {start,error_logger} {start,application_controller} {progress,init_kernel_started} ...<snip>.... =PROGRESS REPORT==== 26-Dec-2015::12:59:05 === supervisor: {local,bsc} started: [{pid,<0.50.0>}, {id,simple_phone_sup}, {mfargs,{simple_phone_sup,start_link,[]}}, {restart_type,permanent}, {shutdown,2000}, {child_type,worker}] {apply,{c,erlangrc,[]}} =PROGRESS REPORT==== 26-Dec-2015::12:59:05 === application: bsc started_at: '[email protected]' {progress,started} Eshell V7.2 (abort with ^G)([email protected])1> application:which_applications().[{bsc,"Base Station Controller","1.0"}, {sasl,"SASL CXC 138 11","2.6.1"}, {stdlib,"ERTS CXC 138 10","2.7"}, {kernel,"ERTS CXC 138 10","4.1.1"}]
As the output shows, our node was able to boot by loading from the remote boot server. Although our example uses the local host (127.0.0.1), thus making one wonder whether loading is occurring over the network or from the local filesystem, you can try this on your own network on two different hosts and see for yourself that the necessary files are loaded from the remote boot server.
The init Module
The init module is preloaded in the Erlang runtime system. It manages
arguments and the startup and shutdown procedures of your release. At
startup, it executes all the commands in the boot file. Of interest to
us is the ability the module gives us to restart the system, cleanly
shut down all applications, and stop the node, as well as the ability to
reboot the virtual machine. Here is a list of common uses for the
module:
init:restart/0Restarts the system in the Erlang node without restarting the emulator. Applications are taken down smoothly, modules are unloaded, and ports are closed, after which the boot file is executed again, using the same boot arguments originally provided. You can use the
-shutdown_timeflag to limit the amount of time spent taking down the applications.init:reboot/0Like
restart, except that the emulator is also shut down and restarted. Heart, if used, will attempt to restart the system, causing a potential race condition that will resolve itself when it kills the emulator and restarts it. Timeout values set with the-shutdown_timeflag will be followed.init:stop/0Takes the system down smoothly and stops the emulator. If running, heart is also stopped before any attempts to restart the node are made. This is the correct way to stop running nodes, because it allows the applications to terminate and clean up after themselves and properly shut down. Calling
init:stop(Status)has the same effect as callinghalt(Status). Timeout values set with the-shutdown_timeflag will be followed.init:get_status()Determines whether the system is being started, is stopped, or is currently running. It returns a tuple of the format
{InternalStatus, ProvidedStatus}, whereInternalStatusis one ofstarting,started, orstopping. When starting the system,ProvidedStatusindicates what part of the boot scriptinitis currently running. It getsInfostatus from the last{progress, Info}term interpreted by the boot.
We have already covered other useful functions in the
init module, including get_arguments/0,
get_argument/1, and get_plain_arguments/0, in
“Arguments and Flags”.
Rebar3
Many of the manual tasks we have gone through in this chapter are automated by various tools. Automation is required to generate templates, build the release, and generate the target structure. Because there have been no standards or comprehensive ways of shipping releases developed to date—just preferred or recommended approaches—tools that are now shipped with Erlang/OTP are complemented by tools developed by the community, and sometimes they overlap in functionality. In the remainder of this chapter, we cover rebar3, a general build tool that also manages releases and dependencies.
The rebar3 tool is the second generation of rebar, one of the most widely used Erlang build tools and one that originated in the Erlang community. Rebar3 is a comprehensive tool that addresses a number of project management needs, including dependency management, compilation, and release generation. You can also enhance or extend its functionality via plug-ins.
To obtain rebar3, you can either download a prebuilt version from its website:
$ curl -LO https://s3.amazonaws.com/rebar3/rebar3or clone the rebar3 Git repository and build it from source:
$git clone https://github.com/erlang/rebar3.git$cd rebar3$./bootstrap===> Updating package registry... ...<snip>... ===> Compiling rebar ===> Building escript...
Some Erlang projects that have been around for a few years still include their own first-generation rebar executables in their source repositories. This was originally done to make it easier for users to build projects without forcing them to first build rebar, but given how widespread rebar became, following that outdated tradition and including your own copy of rebar3 in your project is not necessary. A user need only place a copy of rebar3 somewhere in the shell path, such as /usr/local/bin, and use it from there.
Running rebar3 with no arguments provides information about how to use it. Here is part of its output:
$ rebar3
Rebar3 is a tool for working with Erlang projects.


Usage: rebar [-h] [-v] [<task>]

  -h, --help     Print this help.
  -v, --version  Show version information.
  <task>         Task to run.


Several tasks are available:
...<snip>...

Run 'rebar3 help <TASK>' for details.
Elided from this output is the list of tasks that rebar3 supports. That list is too long to show here in its entirety, but in general, rebar3 tasks fall into the following categories:
- Build commands
Support compilation of Erlang and non-Erlang sources and cleaning of build artifacts
- Project creation commands
Generate skeleton projects based on templates
- Dependency management commands
Support the retrieval, building, updating, cleaning, and removal of project dependencies
- Release generation commands
Support the creation of releases and upgrades
- Test commands
Support running unit tests, common_test suites, and property-based tests
Rebar3 also provides other miscellaneous commands that support project activities such as documentation, generating escript archives, and starting an Erlang shell with all project files and dependencies on the load path.
Generating a Rebar3 Release Project
You can use rebar3 together with an appropriate project template to generate a project skeleton for a system like our base station controller example. Although our example uses only a single user-defined application, bsc, we use an approach that can accommodate multiple apps, since that is typical of most projects.
First, let’s create a new directory, ernie2, and within it use rebar3 to generate a new bsc release project:
$mkdir ernie2$cd ernie2$rebar3 new release bsc desc="Base Station Controller"===> Writing bsc/apps/bsc/src/bsc_app.erl ===> Writing bsc/apps/bsc/src/bsc_sup.erl ===> Writing bsc/apps/bsc/src/bsc.app.src ===> Writing bsc/rebar.config ===> Writing bsc/config/sys.config ===> Writing bsc/config/vm.args ===> Writing bsc/.gitignore ===> Writing bsc/LICENSE ===> Writing bsc/README.md
As the output shows, rebar3 generates a number of directories and files for our release, including skeleton source files under the apps/bsc/src directory, a sys.config file under the config directory, and a rebar.config file. The latter provides directives that supply rebar3 with project-specific details such as compiler flags, release information, and dependencies. Here’s the basic rebar.config that rebar3 generated for our bsc release project:
$cd bsc$cat rebar.config{erl_opts, [debug_info]}. {deps, []}. {relx, [{release, {'bsc', "0.1.0"}, ['bsc', sasl]}, {sys_config, "./config/sys.config"}, {vm_args, "./config/vm.args"}, {dev_mode, true}, {include_erts, false}, {extended_start_script, true}] }. {profiles, [{prod, [{relx, [{dev_mode, false}, {include_erts, true}]}] }] }.
This particular rebar.config file contains four tuples, each described in the following list. You can modify any of these settings or add others as required for your project:
The
erl_optstuple provides compiler options for the erlc compiler.The
depstuple declares dependencies for the project. Fortunately, bsc depends on nothing outside of standard Erlang/OTP.The
relxtuple provides settings for release generation. Rebar3 uses the relx tool to generate releases. Because our goal in this section is to use rebar3 to generate a bsc release, we investigate these settings in detail later.The
profilestuple provides a way of having different settings for different development tasks or roles. Theprodprofile generated here is, as its name implies, intended to provide settings for generating a production release.
Among the generated source file skeletons, take special note of
the application resource file skeleton, apps/bsc/src/bsc.app.src. Rebar3 generates this file rather than
creating an actual application resource file because later, as part of
its compilation process, it takes the bsc.app.src skeleton, automatically fills in
its modules definition with the names of all the
application source modules, and generates the bsc.app application resource file from that.
We can see this by compiling our newly generated files, after first
changing the "0.1.0" version numbers rebar3 generated in the bsc.app.src file and rebar.config to the correct
"1.0" bsc version (any text-filtering
tool can be used for this purpose; we’ve entered a Perl one-liner here):
$perl -i -pe 's/0.1.0/1.0/' ./apps/bsc/src/bsc.app.src ./rebar.config$rebar3 compile===> Verifying dependencies... ===> Compiling bsc
and then looking at the _build/default/lib/bsc/ebin/bsc.app file generated by the compilation process:
$ cat _build/default/lib/bsc/ebin/bsc.app
{application,bsc,
             [{description,"Base Station Controller"},
              {vsn,"1.0"},
              {registered,[]},
              {mod,{bsc_app,[]}},
              {applications,[kernel,stdlib]},
              {env,[]},
              {modules,[bsc_app,bsc_sup]},
              {contributors,[]},
              {licenses,[]},
              {links,[]}]}.
As the file contents show, rebar3 created the modules
definition for us based on the Erlang modules present in the src directory. When we add more modules,
rebar3 automatically adds them to the
application resource file for us during its compilation phase, which is
much easier than manually editing the resource file ourselves. The only
tricky part is that if you want to modify other fields of the
application resource file, you have to remember to edit the bsc.app.src file rather than the generated
bsc.app file.
To run the skeleton application, we can just start a rebar3 shell, which ensures that all the appropriate project paths are on the Erlang load path. When the shell starts, it also starts our application:
$rebar3 shell===> Verifying dependencies... ===> Compiling bsc Erlang/OTP 18 [erts-7.2] [smp:8:8] [async-threads:0] [kernel-poll:false] ===> Booted bsc ===> Booted sasl ...<snip>... =PROGRESS REPORT==== 26-Dec-2015::21:58:36 === application: sasl started_at: nonode@nohost Eshell V7.2 (abort with ^G)1> application:which_applications().[{sasl,"SASL CXC 138 11","2.6.1"}, {bsc,"Base Station Controller","1.0"}, {inets,"INETS CXC 138 49","6.1"}, {ssl,"Erlang/OTP SSL application","7.2"}, {public_key,"Public key infrastructure","1.1"}, {asn1,"The Erlang ASN1 compiler version 4.0.1","4.0.1"}, {crypto,"CRYPTO","3.6.2"}, {stdlib,"ERTS CXC 138 10","2.7"}, {kernel,"ERTS CXC 138 10","4.1.1"}]
Our generated skeleton application contains no actual code, but still, it starts and runs correctly. Note that a rebar3 shell starts some other applications bsc doesn’t need, such as inets and ssl; if we were to start our application manually, these would not be present.
To fill out our project we can retrieve our original sources by copying our bsc example code, which is available in this chapter’s directory of the book’s GitHub repository:
$ cp -v <path-to-bsc-example-dir>/src/*.erl apps/bsc/src
<path-to-bsc-example-dir>/src/bsc.erl -> apps/bsc/src/bsc.erl
...
When that’s complete, we can again use rebar3 to clean and compile the project:
$ rebar3 do clean, compile
===> Cleaning out bsc...
===> Verifying dependencies...
===> Compiling bsc
If we again start a rebar3 shell, we can see that our application runs as expected:
$rebar3 shell...<snip>...1> application:which_applications().[{sasl,"SASL CXC 138 11","2.6.1"}, {bsc,"Base Station Controller","1.0"}, {inets,"INETS CXC 138 49","6.1"}, {ssl,"Erlang/OTP SSL application","7.2"}, {public_key,"Public key infrastructure","1.1"}, {asn1,"The Erlang ASN1 compiler version 4.0.1","4.0.1"}, {crypto,"CRYPTO","3.6.2"}, {stdlib,"ERTS CXC 138 10","2.7"}, {kernel,"ERTS CXC 138 10","4.1.1"}]
Creating a Release with Rebar3
The rebar3 tool uses relx, rather than the standard Erlang/OTP reltool facility, in an effort to make it easier for developers to create releases, due to reltool being widely viewed as being difficult to configure and use correctly.
Creating a release with rebar3 is straightforward:
$ rebar3 release
===> Verifying dependencies...
===> Compiling bsc
===> Starting relx build process ...
===> Resolving OTP Applications from directories:
          /Users/francescoc/ernie2/bsc/_build/default/lib
          /Users/francescoc/ernie2/bsc/apps
          /usr/local/lib/erlang/lib
===> Resolved bsc-1.0
===> Dev mode enabled, release will be symlinked
===> release successfully created!
Once we’ve generated the release, we can verify that it works as expected:
$_build/default/rel/bsc/bin/bsc consoleExec: /usr/local/lib/erlang/erts-7.2/bin/erlexec -boot ... Root: /Users/francescoc/ernie2/bsc/_build/default/rel/bsc /Users/francescoc/ernie2/bsc/_build/default/rel/bsc Erlang/OTP 18 [erts-7.2] [smp:8:8] [async-threads:30] [kernel-poll:true] =PROGRESS REPORT==== 27-Dec-2015::11:37:56 === supervisor: {local,sasl_safe_sup} started: [{pid,<0.49.0>}, {id,alarm_handler}, {mfargs,{alarm_handler,start_link,[]}}, {restart_type,permanent}, {shutdown,2000}, {child_type,worker}] ...<snip>... =PROGRESS REPORT==== 27-Dec-2015::11:37:56 === application: sasl started_at: bsc@francescoc Eshell V7.2 (abort with ^G)(bsc@francescoc)1>application:which_applications(). [{sasl,"SASL CXC 138 11","2.6.1"}, {bsc,"Base Station Controller","1.0"}, {stdlib,"ERTS CXC 138 10","2.7"}, {kernel,"ERTS CXC 138 10","4.1.1"}]
Instead of the console argument to
_build/default/rel/bsc/bin/bsc shown in this example, which
starts the application and gives us an Erlang shell, you can instead
specify start to start the release in the
background, attach to get a shell attached to an
already-started release, or stop to stop an
already-started release. Run the command
_build/default/rel/bsc/bin/bsc with no arguments to see a
list of all its arguments and options.
Because of the default release settings in the relx
tuple in rebar.config, this
generated release is intended for development, not production. The
default configuration sets dev_mode to true,
which means application source files used to create the release are
links to sources under the apps/bsc/src directory. The
dev_mode setting also sets include_erts to
false, which keeps the Erlang runtime from being included
in the release. These settings are handy for development because they
allow developers to edit their files under the apps area and have those changes instantly
available for either building into a release or recompiling and
reloading into an already-running release. The settings also allow
developers to use the Erlang installation on the system rather than
having to build one into each release, which enables quick testing of
the release against multiple runtime versions.
Fortunately, though, building a production release is easy, even
with these default settings in place, thanks to rebar3 profiles. The profiles
tuple in rebar.config includes a
profile named prod that sets dev_mode to
false and include_erts to true.
To use the prod profile, we just specify it using the
rebar3 as
directive on the command line:
$ rebar3 as prod release
===> Verifying dependencies...
===> Compiling bsc
===> Starting relx build process ...
===> Resolving OTP Applications from directories:
          /Users/francescoc/ernie2/bsc/_build/default/lib
          /Users/francescoc/ernie2/bsc/apps
          /usr/local/lib/erlang/lib
===> Resolved bsc-1.0
===> Including Erts from /usr/local/lib/erlang
===> release successfully created!
The as directive instructs rebar3 to run the specified commands using the
given profile. Pay particular attention to the text in bold near the
bottom of this example; it shows that relx includes the Erlang runtime system this
time, as directed by the prod profile. And because the
prod profile sets dev_mode to
false, if you look under _build/prod/rel/bsc/lib/bsc-1.0/src you’ll
see that the source files have been copied into the release, rather than
linked back to the apps source area
as with the default release.
The rebar3
tar directive makes it trivial to create a tar
file containing a release:
$ rebar3 as prod tar
===> Verifying dependencies...
===> Compiling bsc
===> Starting relx build process ...
===> Resolving OTP Applications from directories:
          /Users/francescoc/ernie2/bsc/_build/prod/lib
          /Users/francescoc/ernie2/bsc/apps
          /usr/local/lib/erlang/lib
          /Users/francescoc/ernie2/bsc/_build/prod/rel
===> Resolved bsc-1.0
===> Including Erts from /usr/local/lib/erlang
===> release successfully created!
===> Starting relx build process ...
===> Resolving OTP Applications from directories:
          /Users/francescoc/ernie2/bsc/_build/prod/lib
          /Users/francescoc/ernie2/bsc/apps
          /usr/local/lib/erlang/lib
          /Users/francescoc/ernie2/bsc/_build/prod/rel
===> Resolved bsc-1.0
===> tarball /Users/francescoc/ernie2/bsc/_build/prod/rel/bsc/bsc-1.0.tar.gz
         successfully created!
Rebar3 Releases with Project Dependencies
So far our rebar3 example has been limited to including only a single application, bsc, which has no dependencies, but in practice Erlang applications often depend on other applications. Fortunately, rebar3 is able to fetch such dependencies and compile them together with the application that depends on them.
Let’s assume we decide to change bsc logging
using the popular open source lager framework so
that our logfiles can work with existing log rotation tools, and so that
we can count on lager to protect our application
from running out of memory should it attempt to emit a storm of log
messages because of some unexpected persistent error condition. Adding a
dependency on lager to the bsc
application is easy—we just specify it in the deps tuple in
the rebar.config
file:
{deps,[{lager,{git,"git://github.com/basho/lager.git",{tag,"3.0.2"}}}]}.
This directive tells
rebar3 that
lager is a source dependency, with the
git tuple telling rebar3
the location from which it can fetch the lager
source code and the tag tuple indicating the version of
lager on which the bsc
application depends.
With this directive in place, we can ask rebar3 what our dependencies are:
$ rebar3 deps
lager* (git source)
Asking rebar3 to compile causes it to fetch the source for the lager dependency as well as the sources for any dependencies lager itself has:
$ rebar3 compile
===> Verifying dependencies...
===> Fetching lager ({git,"git://github.com/basho/lager.git",
                                 {tag,"3.0.2"}})
===> Fetching goldrush ({git,"git://github.com/DeadZen/goldrush.git",
                                    {tag,"0.1.7"}})
===> Compiling goldrush
===> Compiling lager
===> Compiling bsc
This compilation occurs under the default profile, so
if we look under _build/default/lib
after it completes, we see directories for bsc, for
lager, and also for goldrush,
a dependency of lager:
$ ls _build/default/lib
bsc		goldrush	lager
To build a release including lager, we first
need to modify apps/bsc/src/bsc.app.src to add
lager into the applications list, following
kernel and stdlib. With these changes in
place, we can build a release under the default
profile:
$ rebar3 release
===> Verifying dependencies...
===> Compiling bsc
===> Starting relx build process ...
===> Resolving OTP Applications from directories:
          /Users/francescoc/ernie2/bsc/_build/default/lib
          /Users/francescoc/ernie2/bsc/apps
          /usr/local/lib/erlang/lib
          /Users/francescoc/ernie2/bsc/_build/default/rel
===> Resolved bsc-1.0
===> Dev mode enabled, release will be symlinked
===> release successfully created!
If we look at the contents of the _build/default/rel/bsc/lib directory, we can see that rebar3 built all the applications necessary to include in the release:
$ ls _build/default/rel/bsc/lib
bsc-1.0		goldrush-0.1.7	lager-3.0.2
We can then run our application and see that all the applications we expect to see are indeed running:
$_build/default/rel/bsc/bin/bsc console...<snip>....(bsc@francescoc)1> application:which_applications().[{sasl,"SASL CXC 138 11","2.6.1"}, {bsc,"Base Station Controller","1.0"}, {lager,"Erlang logging framework","3.0.2"}, {goldrush,"Erlang event stream processor","0.1.7"}, {compiler,"ERTS CXC 138 10","6.0.2"}, {syntax_tools,"Syntax tools","1.7"}, {stdlib,"ERTS CXC 138 10","2.7"}, {kernel,"ERTS CXC 138 10","4.1.1"}]
Not only are bsc, lager,
and goldrush running, but the standard
compiler and syntax_tools
applications were started as well because goldrush
uses them, which you can see by examining the applications
list in the _build/default/lib/goldrush/src/goldrush.app.src
file.
There is much more to rebar3 than what our bsc application requires. It has a plug-in system that makes it extensible and customizable, ties into Erlang’s common-test, dialyzer, and eunit facilities to support testing and code coverage and analysis, and supports publishing packages into the Erlang/Elixir hex package management system. And as we show next, in Chapter 12, rebar3 also supports release upgrades.
Wrapping Up
You’ve got to agree that everything we presented here is a mouthful,
and probably more detail than what you had originally bargained for when
you started reading this chapter! Having said that, the steps involved in
bundling up your OTP applications in a release and starting them as one
unit are not many and are relatively straightforward. The reason we’ve
gone into so much detail is that we want to explain not just how, but also
why. You will thank us when you need to integrate Erlang/OTP releases in
your build system or troubleshoot why a node that was running for years on
end is refusing to start. You can’t even begin to imagine how many systems
we’ve reviewed that, despite being responsible for tens of thousands of
transactions per day, hour, or minute (and in many cases even seconds!)
are started using erl -s Module,
are not OTP compliant, do not have heart configured,
or are not set up as embedded target systems running as daemons. Start by
creating a proper OTP release, integrating the process in your build
system, and the rest will follow.
The preferred way to deploy your Erlang nodes that must run for years on end and be available 24/7 is as embedded target systems. You must be strict with revision control and be aware of the exact versions of your modules, applications, and configuration files. You will want to access the Erlang shell through I/O streams sent to a directory in your Erlang root directory (not /tmp), allowing you to run multiple embedded nodes on that host.
Start your Erlang system as a daemon job, ensuring it is
automatically started every time your computer or image is rebooted.
Always ensure that you have the erl
command at hand with a boot file that starts kernel,
stdlib, and sasl, giving you
access to the SASL logs on your local machine when your nodes have crashed
and are refusing to start. And don’t forget to set your emulator flags,
normal flags, and plain arguments, adapting them to your internal
operational requirements. Do you want to disable the break handler using
+Bc but still allow the user to kill the shell? What about
printing out the arguments passed to the emulator using
-emu_args and printing startup trace reports using the
-init_debug flag? And how do you want to implement and
configure your heart script to handle emulator
crashes? The combinations are many, and getting the right configuration in
place that works for you and your organization can take years of
operational experience and firefighting. You will eventually get there,
but hopefully, taking into consideration all that we have covered in this
chapter, the pager calls will be few and far apart, and never in the
middle of the night.
Having said that, we know that not all systems are mission critical and require this level of supervision, complexity, and professionalism. Simple target systems can be both acceptable and respectable if they do their job and fulfill your requirements. If running many nodes on a single machine sharing the same Erlang installation works for you, there is no need to ship every release with its own Erlang virtual machine. You will not be able to individually upgrade applications and emulators, but then again, you might not care! The type of release that works for you, your organization, and the types of systems you are deploying is for you to judge. It can be as simple or as complicated as you need it to be. What is important is that you understand the tradeoffs involved in your choices, and do things without cutting corners, otherwise you will end up paying for it at a later date.
The process we have covered in this chapter, automated using libraries or tools, includes the following steps:
Create a release resource file for your node, defining what will be included in your release.
The rel file will contain all of the applications and their respective versions, together with the version of the emulator to be used in the target deployment.
Create a boot file containing all of the commands required to start your node.
Create the file structure you will deploy to your target system.
It will contain the lib, releases, and bin directories and, if you plan to ship it with its own emulator, the erts directory.
Specific to your deployment (and possibly on the target host), configure your start scripts.
This will include your start_erl.data file and config files containing deployment-specific configurations, as well as any target-specific configuration scripts.
You can find an additional example of these steps in “Creating a Release Upgrade”, where we create a release of the coffee FSM example described in Chapter 6, preparing it for a software upgrade. But if you are too lazy to do these chores every time (we are) and do not need to integrate in existing build and release infrastructure, use existing tools and libraries for the bulk of the work and automate the rest. Rebar3 simplifies all of this a great deal.
So far in this book, you have come across many different file types, all held together in a release. We’ve listed them in Table 11-1, as there is no better time than now to review them.
We cover .appup and relup files in Chapter 12. They are used for live upgrades of the applications and regular upgrades of the emulator.
If you haven’t had enough and want to read more about creating releases, head straight to the documentation that ships with Erlang/OTP. The OTP Design Principles User’s Guide will tell you more about releases and release handling, going as far as creating the first release package ready for deployment in your target environment. The OTP System Principles User’s Guide has sections that cover the starting, restarting, and stopping of systems, as well as describing in more detail the difference between the embedded versus interactive code-loading strategies. It overlaps with the OTP Design Principles User’s Guide, which also covers the creation and configuration of target systems. In doing so, the user’s guide introduces the target_system.erl module shipped in the sasl application’s examples directory as well as in this chapter’s directory in the book’s GitHub repository. It is an example that automates many of the steps we covered manually when explaining how to build a release and target system, a necessity prior to the existence of rebar and rebar3, relx, and reltool. Have a look at it, as it has for many years been a good source of inspiration for those integrating Erlang into their existing build systems.
The user’s guides are complemented by reference manual pages, of which the following are relevant to what we have just covered and so are worth mentioning:
If you need more information on the rel file, look up the rel reference manual page. Given a rel file,
systoolsdescribes the functions you need to create script, boot, and target tar files. The contents of the binary boot file and its script text counterpart are described in more detail in the script reference manual page. To find out more on how they are executed, review theinituser manual pages.There might be times when you need to automate tasks on the target machine and integrate the release process with other tools you might be using (possibly for non-Erlang parts of your system). If that is the case, read the
release_handlermanual page. It describes functions that allow you to unpack and install the tar file created by thesystoolscalls. However, it does assume an installation of Erlang is already running on the target host, which might not always be the case. We cover this library in more detail in the next chapter when looking at live upgrades.If you need to load code remotely and the example in this chapter is not enough, the
erl_boot_server,erl_prim_loader, andinituser manual pages will help you.The
erlandinitmanual pages describe most of the emulator flags and command-line flags, some of which we have not covered in this chapter. For plain arguments, you will have to refer to the user manual pages of the modules and applications using those arguments.The
heartmanual page is the place to look for more information on automated restarts, including configuration details and required environment variables when implementing your script. You will find the environment variables described in theerlmanual page.If you are running on Windows, read the start_erl manual page. It is the equivalent of the start command we have been using in this chapter, allowing you to start your embedded system in Windows environments.
Reltool, which we did not cover, has both a user’s guide and reference manual pages you will have to study in detail in the unlikely event your system requires the configuration complexity not handled by rebar3, which you can find at https://www.rebar3.org, or relx, which you can get either with rebar3 or from GitHub.
If all this seems intimidating, the best thing to do is to simply use rebar3. It can build and create releases for a wide variety of project types, can be extended for special cases through its plug-in system, and can download and help manage dependencies on other projects, and it works with the hex package management system for publishing your system so others in the Erlang community can use it. For more information about rebar3 and hex, see the rebar3 documentation.
What’s Next?
Erlang has been called the language of the system. It is not just a language suitable for solving a particular type of problem, but rather a language and a set of tools that allow you to develop, deploy, and monitor predictable and maintainable systems. While in this chapter we have covered how to package and deploy your first target systems, that is just the beginning of your adventure. What we cover next is how to manage bug fixes and deploy new functionality by doing live upgrades. We do so by introducing the upgrade tools and functionality that come as part of OTP and its behaviors. You’ve heard about Erlang achieving five-nines availability, software maintenance and upgrades included? Continue on to find out how we do it.
1 Ernie is the username of the account where the AXD301 ATM switch runs its Erlang nodes—a trip down memory lane for those who contributed to Erlang in some shape or form in the early days, including many of the reviewers of this book.