Chapter 6. Finite State Machines
Now that we’ve become experts at writing generic servers, the time has come to master our next behavior. When prototyping systems with what eventually became Erlang, language inventors Joe Armstrong, Mike Williams, and Robert Virding were implementing a soft telephony switch allowing them to phone each other and say hello.1 Each phone accessing the switch was prototyped as a process acting as an FSM. At any one time, the function would represent the state the phone was in (on hook, off hook, dialing, ringing, etc.) and receive events associated with that state (incoming call, dial, off hook, on hook, etc.).
One of the outcomes of this prototyping activity was to ensure that Erlang became a language suited for and optimized for building nontrivial and scalable FSMs, a key component in many complex systems. Developers use FSMs to program protocol stacks, connectors, proxies, workflow systems, gaming engines, and simulations, to mention but a few examples. So it was no surprise that when OTP behaviors came along, they included generic FSMs.
In this chapter, we introduce FSMs implemented in pure Erlang. We
break an example up into generic and specific code, migrating it to the
gen_fsm behavior. The good news is that all
the borderline cases relating to concurrency and error handling that apply
to generic servers also apply to FSMs. So while we might mention some of
them, there will be no need for us to go into the same level of detail.
After all, an FSM implementation is essentially a special variant of a
generic server.
Finite State Machines the Erlang Way
Before diving into our examples, let’s get a bit of automata theory out of the way. An FSM is an abstract model consisting of a finite number of states and incoming events. When the program is in each state, it can receive certain events from the environment—and only those events. When an event arrives and the FSM is in a certain state, the program executes some predetermined actions associated with that state and transitions to a new state. The FSM then waits for a new event, in the new state.
For instance, in the FSM shown in Figure 6-1, the state day can handle events eclipse and sunset. eclipse keeps the FSM in its current state, while event sunset causes a transition to state night. In state night, event sunrise causes a transition back to state day. Any other events coming out of sequence (such as sunrise when in state day) are handled only after a transition to a state where they can be dealt with.
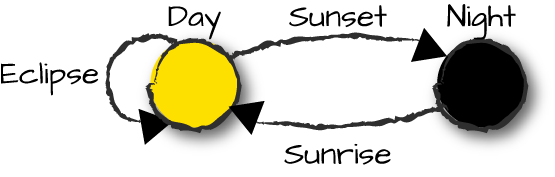
Figure 6-1. Erlang FSM
In Erlang, each state is represented within a tail-recursive function and events are represented as messages. So for Figure 6-1, the code for state day would look as follows:
day()->receiveeclipse->day();sunset->night()end.
Upon receiving an incoming event, the FSM executes one or more
actions before transitioning to its next state. The state transition is
achieved by calling the next function, determined by the combination of
the current state and inbound event. In the following example, the
combination of the event sunrise in
state night will result in the action
defined in the function make_roosters_crow/0, followed by a
transition to state day. Note how we
are not allowing solar eclipses to take place at night. If the FSM
receives an eclipse event, it remains
in the process mailbox until the FSM transitions to a state that can
handle it:
night()->receivesunrise->make_roosters_crow(),day()end.
When you start an FSM, you need to give it a starting state and
initialize it. As in the next code example, we could initialize the FSM by
spawning the init/0 function and create the Earth
there2 before moving on to state day:
start()->spawn(?MODULE,init,[]).init()->create_earth(),day().
This is how we do FSMs in Erlang. The keys to keeping FSMs simple are selective receives, tail-recursive functions, and the ability to initialize the FSM when spawning the process.
You should completely design your FSM, perhaps by drawing out a diagram like the ones in this chapter, before you start coding. You want to know what your states, events, actions, and state transitions are. If they get complex, see whether your FSM can be split up into smaller FSMs that, during execution, pass the flow between each other. They will be easier to both implement and maintain.
FSMs Versus Generic Servers
Beware of the common beginner error where instead of using a generic FSM, you use a generic server and unknowingly store the FSM state in the loop data. Ask yourself when designing the system whether you need an FSM or a client-server behavior. The answer is usually obvious if you consider the question in the design phase of the project.
Coffee FSM
To keep our Java aficionados happy, let’s use a coffee vending machine as an FSM example. It will be an embedded application interfacing the hardware through a specific hardware module. The implementation we are about to study has three states:
Selection, allowing the customer to select the desired coffee brew
Payment, allowing the customer to insert coins and pay for the selected item
Remove, a state where the FSM waits for the user to remove the drink from the machine
These states are linked by four events that trigger actions and transitions to next states. Events triggered by the customer include:
Making a coffee selection
Dropping a coin of any value in the slot to pay for the selection
Pressing the cancel button
Successful removal of the cup of coffee from the machine
Note that most of these events can be triggered in most states. If the FSM is in the payment state, there is nothing stopping a user from pressing the coffee selection buttons, or if we are in state selection, the user can always insert a coin. If the events can be triggered, they have to be managed regardless of the state. When events are received in a particular state, actions can be executed before transitioning to the next state. The actions in our example include:
Display text in the coffee machine’s LED display
Return change or inserted coins to the client
Drop the cup in the machine
Prepare the selected drink
Reboot the coffee machine (not user-initiated)
A simplified version of the FSM can be seen in Figure 6-2. Note that it does not depict a complete set of events and actions. Coins can be inserted in states other than payment, the cancel button can be pressed in the selection or remove states, or the hardware could be reset when starting the FSM. The figure does, however, provide an overview of all the state transitions and events that trigger them. The figure annotates each transition with the actions that are executed when that transition is taken. Actions appear in brackets (<>) and events are in bold.
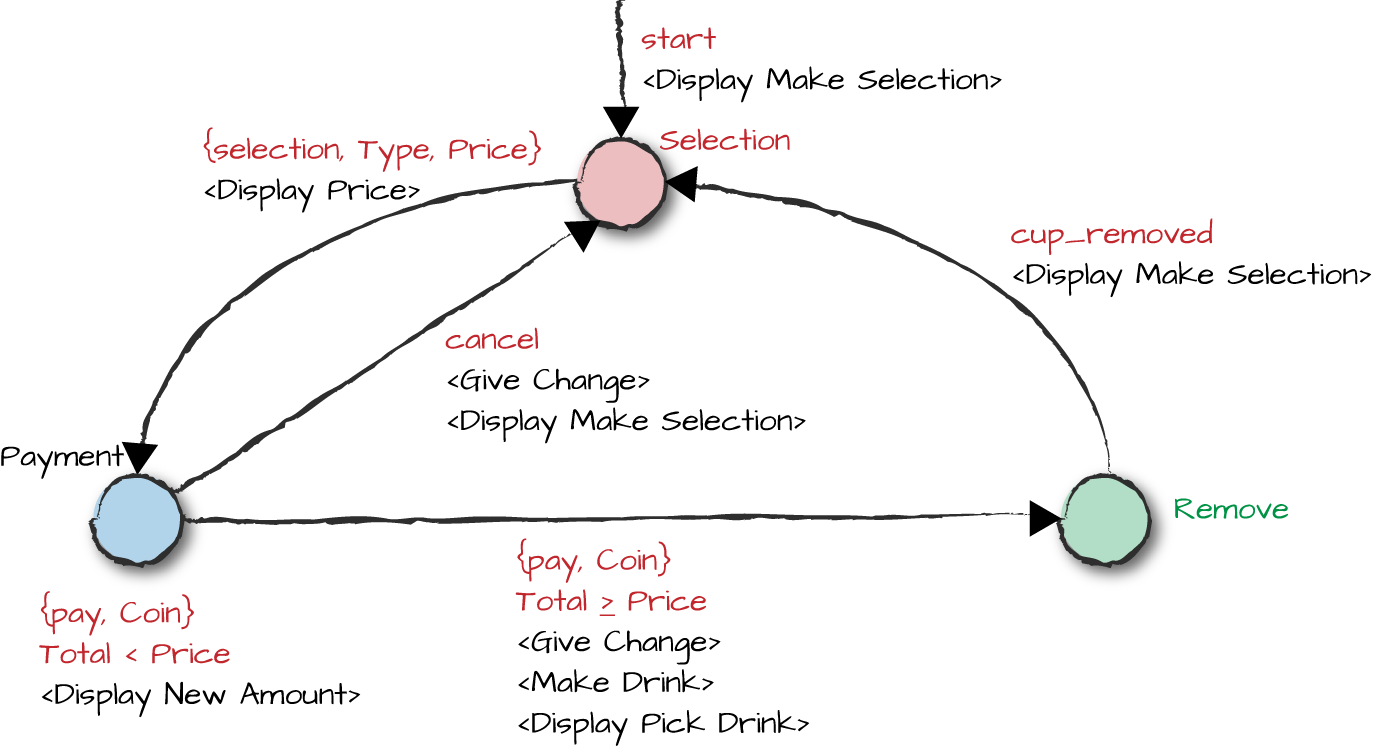
Figure 6-2. Coffee machine FSM
With this model in mind, let’s start by stepping through a pure Erlang implementation of the FSM. After that, we migrate the implementation to the generic FSM behavior module.
The Hardware Stub
Embedded systems that require sensors and hardware interactions include device drivers written in C interfacing to the Erlang code. To keep the example simple, we have stubbed this interaction in the hw.erl module. We use this module in both the Erlang implementation and the generic FSM behavior implementation:
-module(hw).-compile(export_all).display(Str,Arg)->io:format("Display:"++Str++"~n",Arg).return_change(Payment)->io:format("Machine:Returned~win change~n",[Payment]).drop_cup()->io:format("Machine:Dropped Cup.~n").prepare(Type)->io:format("Machine:Preparing~p.~n",[Type]).reboot()->io:format("Machine:Rebooted Hardware~n").
You will see calls to this module in the FSM implementations. Functions being called as a result of the sensors in the coffee machine call the client functions in the coffee.erl module directly. For testing purposes, we instead call them from the shell. With this out of the way, let’s start looking at the implementation itself.
The Erlang Coffee Machine
In this section we create the Erlang part of the application, keeping in mind throughout how the FSM in this example can be generalized and made into a reusable behavior in OTP.
Starting
We start the FSM using the start_link/0 function.
It spawns a new process that starts executing in the
init/0 function and registers itself using the name
coffee, the same name as the
module. Here, we use the ?MODULE preprocessor construct
to refer to the module name rather than using the module name
explicitly, which we did for clarity in previous chapters. The
init/0 function reboots the coffee machine and shows
Make Your Selection in the display.
We then enter into our first state by calling the tail-recursive
function selection/0. Have a look at it and try to split
it up into generic and specific code:
-module(coffee).-export([tea/0,espresso/0,americano/0,cappuccino/0,pay/1,cup_removed/0,cancel/0]).-export([start_link/0,init/0]).start_link()->{ok,spawn_link(?MODULE,init,[])}.init()->register(?MODULE,self()),hw:reboot(),hw:display("Make Your Selection",[]),selection().
The generic code, highlighted in this example, includes
spawning the process that runs in the init/0 function,
registering it, and transitioning to the first state. The code specific
to the coffee machine is the process name, the callback module, and
the hardware-specific operations executed in init/0,
along with any arguments we pass on to that call. The first state is
also specific, as is any loop data we might pass on to that state. In
our example, there is no state needed at startup.
The events
Two sets of client functions generate events that are passed on to
the coffee FSM as asynchronous calls. The first four functions inform the FSM of
the drink selection the user made, together with the price. The
cup_removed event is triggered by hardware
sensors when a cup is removed. If a coin is inserted,
pay/1 is called, with the value of the coin passed as an
argument. Finally, cancel is called when the
cancel button is pressed. As we mentioned earlier, these events can be triggered in any
state. There is nothing stopping a user from pressing the cancel
button when the drink is being prepared, or inserting a coin without
having made a selection. The client functions are as follows:
%% Client Functions for Drink Selectionstea()->?MODULE!{selection,tea,100}.espresso()->?MODULE!{selection,espresso,150}.americano()->?MODULE!{selection,americano,100}.cappuccino()->?MODULE!{selection,cappuccino,150}.%% Client Functions for Actionscup_removed()->?MODULE!cup_removed.pay(Coin)->?MODULE!{pay,Coin}.cancel()->?MODULE!cancel.
In these client functions, the tags and any data (such as the
price) associated with the events are specific. What is generic are
the sending of the events to the FSM and the possibility of having
synchronous and asynchronous calls. In our example, the calls are all
asynchronous. Had some of them been synchronous, the return value
would also have been specific, but the protocol and the receive statement
receiving the reply would have been generic.
The selection state
In the init/0 function, after having initialized
the coffee machine, we make the transition to our first state. This is
the selection state, where the customer picks a drink. Upon
receiving the event {selection, Type, Price}, we display
the price of the drink and move to the next state, payment. In this
state, we pass the arguments Type, Price,
and amount Paid, initially set to 0. These three
arguments are the loop data needed in the payment state.
If a customer inserts a coin without having made a selection, we have to return it. If the customer presses the cancel button, we need to remove the event from the process mailbox, ensuring that it is not accidentally received in a later state:
%% State: drink selectionselection()->receive{selection,Type,Price}->hw:display("Please pay:~w",[Price]),payment(Type,Price,0);{pay,Coin}->hw:return_change(Coin),selection();_Other->% cancelselection()end.
Every combination of state and event will result in a specific set of actions and a transition to the next state. The generic code consists of the sections receiving events, handling state transitions, and storing the loop data. The specific code relates to handling the events, namely updating the display, returning the coins, and deciding on the next state.
The payment state
When the customer has picked a drink, it is time to either
pay for it or cancel the selection. Every coin inserted will result in
the event {pay, Coin} being generated, where
Coin is the amount that has been inserted. This amount is
added to the total. If the total is greater than or equal to the price
of the drink, the code will trigger actions terminating with the
transition to the remove state. If not enough money has been inserted,
the remaining amount to be paid is updated and the FSM remains in the
payment state. If the cancel button is pressed, any payment made is
returned to the user and the FSM returns to the selection state. Any
other event—more specifically, pressing any of the selection
buttons—is ignored. The way we ignore an event is to reinvoke the
current state:
%% State: paymentpayment(Type,Price,Paid)->receive{pay,Coin}->ifCoin+Paid>=Price->hw:display("Preparing Drink.",[]),hw:return_change(Coin+Paid-Price),hw:drop_cup(),hw:prepare(Type),hw:display("Remove Drink.",[]),remove();true->ToPay=Price-(Coin+Paid),hw:display("Please pay:~w",[ToPay]),payment(Type,Price,Coin+Paid)end;cancel->hw:display("Make Your Selection",[]),hw:return_change(Paid),selection();_Other->%selectionpayment(Type,Price,Paid)end.
As in the selection state, the generic code includes receiving events, state transitions, and storing the loop data. Specific code includes the events themselves, the actions executed as a result, and the next state. Storing the loop data could have been done in one variable containing a record, but as different states need a different number of arguments, this solution is cleaner for this particular example.
The remove state
The FSM enters the remove state when the coffee is paid for and
has been brewed. It is a state of its own because the machine cannot
be used to brew other beverages until the user removes the cup. When
that happens, sensors will trigger the cup_removed event
and reset the display. This allows us to transition to the selection
state, where the activity can start all over again. There is nothing
stopping the customer from inserting coins, and if this happens, they have
to be returned. The same applies to the customer pressing the cancel
or selection buttons, events that have to be ignored:
%% State: remove cupremove()->receivecup_removed->hw:display("Make Your Selection",[]),selection();{pay,Coin}->hw:return_change(Coin),remove();_Other->% cancel/selectionremove()end.
Before starting the next section about the FSM behavior, download the code and stub modules and try it out. When doing so, take a moment to think of other possible implementations of an Erlang-based FSM. What parts of them are specific and what parts are generic? Of the generic parts, how would you package the generics into a callback-based library module?
Generic FSMs
To separate the generic from the specific functionality in an FSM, we’ll take the same course we took with generic servers. Table 6-1 lists the major generic and specific parts of the FSM.
| Generic | Specific |
|---|---|
|
|
Spawning the FSM, ensuring it has started correctly, and registering it do not change from one implementation to another. What do change are the local or global registered name of the process (if registered at all), debugging options, and arguments needed for the initialization. Initializing the FSM is specific, including determining the initial state and binding the loop data. Both are returned to the generic FSM receive-evaluate loop, which generically stores the data and state.
Sending both synchronous and asynchronous events and requests to the FSM is generic, as is receiving replies. What is specific are the contents of the events and requests and how they are handled based on the FSM state.
The states are all specific, as are the actions that have to be executed, choosing the next state to transition the FSM to, and updating loop data. Handling of timeouts, within both the client and the FSM itself, is generic. What happens when the timeout is triggered, on the other hand, is specific. Finally, stopping the FSM is generic, while cleaning up prior to termination is specific.
We can view the FSM as an extension of the generic server, with
state handling added on top. Messages become events and callback functions
that receive the messages become states. All of the generic code is placed
in a library module called gen_fsm,
while all of the specifics are placed in a callback module. The architecture is illustrated in Figure 6-3, which you can compare to Figure 4-1.
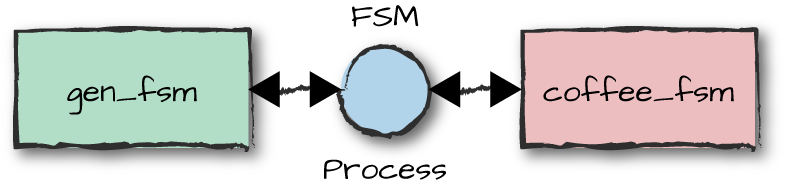
Figure 6-3. The FSM callback module
A Behavior Example
Using the coffee machine example, let’s have a look at all the library APIs
and associated callback functions of the gen_fsm behavior module. We explore starting and stopping the generic FSM, as
well as synchronous and asynchronous events. When stepping through the
code, compare the gen_fsm behavior with
gen_server. If you want to take
it for a practice run, download the code from the book’s repository.
Starting the FSM
Every behavior callback module starts with module, behavior, and
export directives. It also contains all of the state
callback functions. While not mandatory, it is good practice to also
include all of the client functions that generate the events in one
place. Our coffee_fsm module looks like this:
-module(coffee_fsm).-behavior(gen_fsm).-export([start_link/0,stop/0]).-export([init/1,terminate/3,handle_event/3]).% Callback functions-export([selection/2,payment/2,remove/2]).% States-export([americano/0,cappuccino/0,tea/0,espresso/0,% Client functionspay/1,cancel/0,cup_removed/0]).
The -behavior directive specifies the atom
gen_fsm, used for compile-time warnings if callback
functions are not implemented or exported. Exported functions include
the start and stop functions with their
respective callbacks, the client functions, and state callback
functions.
The coffee machine is started using the gen_fsm:start_link/4 call, which spawns
the FSM and links it to the parent. It returns the tuple {ok,
Pid}, where Pid identifies the spawned process, or
{error, Reason} if something goes wrong. We cover possible
error reasons later; for now, let’s focus on the example.
As with all OTP behaviors, we prefer to wrap the
start_link/4 call in a client function, located in the
callback module. In our example, we’ve called this function
coffee_fsm:start_link/0, but it could take on any name you
like. What is important is that it eventually calls
gen_fsm:start_link and returns whatever this call returns:
most commonly {ok, Pid} or {error, Reason}, as
seen in Figure 6-4, or the atom ignore. These values become relevant when we
look at supervisors in Chapter 8.
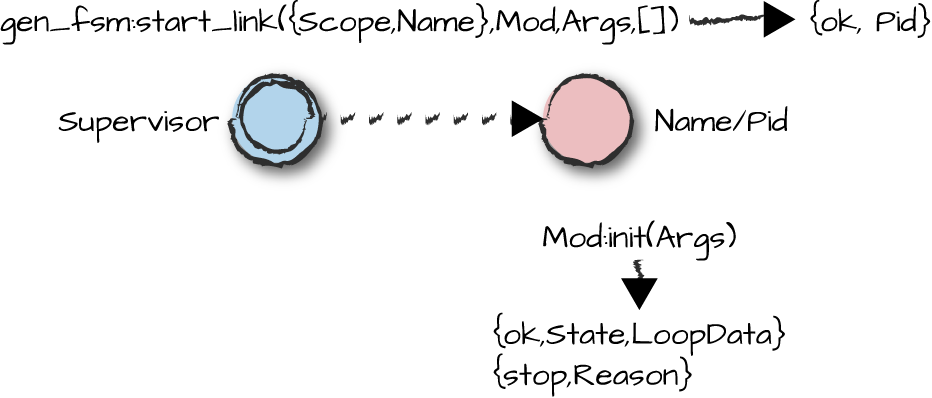
Figure 6-4. Starting a gen_fsm
As soon as the generic FSM process has been spawned, the
init/1 function in the callback module is invoked. Just as with generic
servers, this function contains all the specific initialization code. In
our example, it will reboot the hardware, reset the display, and return
a tuple of the format {ok, StartState, LoopData}, where
StartState denotes the state the FSM will be in when it
receives its first event. LoopData contains the data passed
to the state callback functions. We are also trapping exits in this
example, for reasons that will become obvious when we look at
termination:
start_link()->gen_fsm:start_link({local,?MODULE},?MODULE,[],[]).init([])->hw:reboot(),hw:display("Make Your Selection",[]),process_flag(trap_exit,true),{ok,selection,[]}.
In our example, the StartState is
selection and the LoopData is not used, so we
simply return the empty list value, []. When
the init/1 callback returns control to the generic module, the
synchronous gen_fsm:start_link call returns.
We register the process locally and set the callback module using
the ?MODULE macro, which at compile time is replaced with
the atom coffee_fsm. We pass [] as an argument
to the init/1 callback function and set no options.
The following functions, identical to the ones exported by the generic server module, start an FSM:
gen_fsm:start_link(NameScope,Mod,Args,Opts)gen_fsm:start(NameScope,Mod,Args,Opts)gen_fsm:start_link(Mod,Args,Opts)gen_fsm:start(Mod,Args,Opts)->{ok,Pid}{error,Error}ignoreMod:init/1->{ok,NextState,LoopData}{stop,Reason}ignore
NameScope defines how we register our behavior. Just
as with generic servers, it can be set to {local, Name},
{global, Name}, or {via, Module, ViaName},
where the via tuple points to a user-defined process
registry exporting the same API as the global module,
all previously covered in “Going Global”. We can use
the start functions to avoid linking the FSM process to its
parent, and we can also decide not to register it. Opts
(covered in Chapter 5) can also be
passed. They include timeout, debug, and spawn options. Here, we just
pass an empty list for Opts.
If something goes wrong in the init/1 callback, you
can either terminate abnormally or
return the tuple {stop, Reason}. It will propagate the
error to the parent process calling the gen_fsm start
function (typically via one of the callback module’s start functions),
causing it to terminate as well. If the parent process happens to be a
supervisor, it will in turn terminate all of its children and abort the
startup procedure. Although things can go wrong when the system is
running, by default, the system cannot recover from a fault in the
init/1 callback function.
The most common failure reason you will encounter when testing
your FSM from the shell is {error, {already_started, Pid}}.
It occurs if another process with the same registered name already
exists:
1>coffee_fsm:start_link().Machine:Rebooted Hardware Display:Make Your Selection {ok,<0.38.0>} 2>coffee_fsm:start_link().{error,{already_started,<0.38.0>}}
If you want to let the supervisor continue to start workers when
init/1 fails, return the atom ignore. Instead
of aborting the startup procedure, the supervisor will store the child
specification and continue starting other behaviors. We cover the
ignore and stop options in more detail in
Chapter 8 when we look at
supervisors.
Until then, the following example should give you an overview of
the different behaviors. Pay particular attention to what causes the
process calling the start and start_link
functions to terminate. We’ve omitted the module headers from this
example. If you want to view them, download the test_fsm.erl module from the book’s code
repository:
start_link(TimerMs,Options)->gen_fsm:start_link(?MODULE,TimerMs,Options).start(TimerMs,Options)->gen_fsm:start(?MODULE,TimerMs,Options).init(0)->{stop,stopped};init(1)->{next_state,selection,[]};init(TimerMs)->timer:sleep(TimerMs),ignore.
Let’s run the code. In the first set of tests, we stop the FSM by
returning {stop, Reason}:
1>test_fsm:start_link(0, []).** exception exit: stopped 2>test_fsm:start(0, []).{error,stopped}
Note the difference when the shell is linked to the behavior and when it is not.
In shell commands 3 and 4, we initialize the FSM with the
test_fsm:init(1) call, which accidentally specifies
next_state instead of ok as the first element
of the return tuple in the callback function. This results in an invalid
return value not recognized by the FSM back-end module, a mistake the authors have
made many times:
3>test_fsm:start_link(1, []).** exception exit: {bad_return_value,{next_state,selection,{}}} 4>test_fsm:start(1, []).{error,{bad_return_value,{next_state,selection,{}}}}
A behavior module will terminate with the reason
bad_return_value whenever you return a control tuple that
does not follow the predefined protocol.
When reading through this example, make sure you understand the
effect of the EXIT signal propagation when the shell
process is linked to the FSM and when it is not. In shell command 5, we
pass a 1,000-millisecond argument to init/1 to cause it to
sleep for that long, but set the timeout option to 100 milliseconds; this
triggers a timeout in the startup process that results in the
{error, timeout} tuple. This will be returned whether or
not the process is linked to the shell process:
5> test_fsm:start_link(1000, [{timeout, 100}]).
{error,timeout}
In our last set of tests, in shell commands 6 and 7, our
init/1 function returns ignore. This does not
result in the behavior terminating abnormally, and as a result, does not
propagate further:
6>test_fsm:start_link(2, []).ignore 7>test_fsm:start(2, []).ignore
Although these examples specifically use the gen_fsm
behavior, they are valid for all OTP workers.
Enough on starting and initializing our FSMs. Let’s move on to important things in life and figure out how to get this coffee brewed.
Sending Events
Having started our coffee FSM, we need to be able to define the states and send both synchronous and asynchronous events. When handled, they trigger state transitions. Events are usually sent in client functions defined in the callback module. Let’s start looking at asynchronous events in our FSM and see how they are handled in the different states.
Asynchronous events
Asynchronous events are sent using the gen_fsm:send_event(Name, Event)
library function. This sends the Event to the FSM, which
handles it in the callback function State(Event,
LoopData) in the callback module. After handling the request,
the State/2 function returns the new loop data with the
next_state or the stop reason (Figure 6-5).
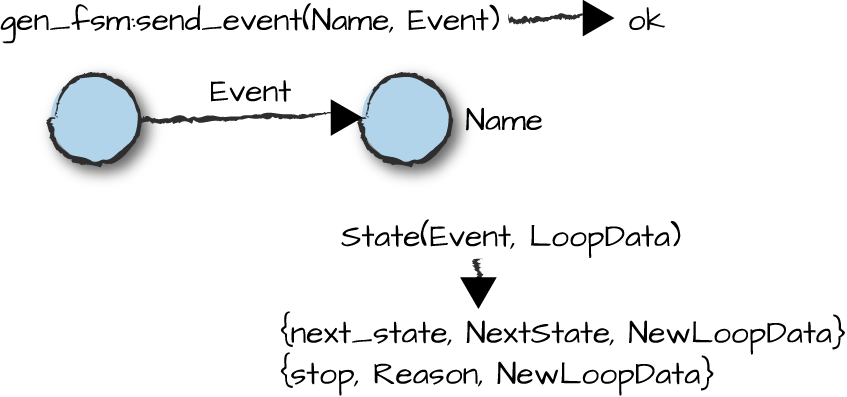
Figure 6-5. Sending events
Our FSM event functions are split into two categories. The first
are customer drink selections. These send events of the format
{selection, Type, Price}, where Type is one
of the atoms tea, espresso,
americano,3 or cappuccino. Price is either
100 or 150 units:
tea()->gen_fsm:send_event(?MODULE,{selection,tea,100}).espresso()->gen_fsm:send_event(?MODULE,{selection,espresso,100}).americano()->gen_fsm:send_event(?MODULE,{selection,americano,150}).cappuccino()->gen_fsm:send_event(?MODULE,{selection,cappuccino,150}).
The second set of events include actions where the user inserts
a coin, presses the cancel button, or removes a cup. There are no
rules stating that events must comprise only static values. Note how
in the pay/1 function we pass a variable as part of our
event—the value of the inserted coin is bound to Coin
and passed through the event {pay, Coin}:
pay(Coin)->gen_fsm:send_event(?MODULE,{pay,Coin}).cancel()->gen_fsm:send_event(?MODULE,cancel).cup_removed()->gen_fsm:send_event(?MODULE,cup_removed).
Defining states
States in FSMs are defined in callback functions, where the name of the function is
the name of the state, Event is the first argument, and
LoopData is the second one. Remember that state
callback functions are defined in the callback module and have to be
exported. The first state we look at is
selection, where the customer is prompted to
choose a drink. It was the start state returned by the
init/1 function when we started the FSM:
selection({selection,Type,Price},_LoopData)->hw:display("Please pay:~w",[Price]),{next_state,payment,{Type,Price,0}};selection({pay,Coin},LoopData)->hw:return_change(Coin),{next_state,selection,LoopData};selection(_Other,LoopData)->{next_state,selection,LoopData}.
Upon choosing a drink,
one of the functions tea/0, espresso/0,
americano/0, or cappuccino/0 is called. This
sends an asynchronous event of the format {selection, Type,
Price} to the FSM. Regardless of which drink the
customer chooses or its price, the selection gets handled generically. This event
is pattern matched in the first clause of the state callback function,
displaying the price the customer has to pay. By returning the tuple
{next_state, NextState, NewLoopData}, we return the
control to the gen_fsm module and
wait for the next event. In this case, NextState is bound
to the payment state and
LoopData to a tuple denoting the selection
(Type), the price, and the amount paid so far, which is
initially set to 0. Note how we ignore the incoming loop data, set to
the empty list in the init/1 callback function, but
create it for the next state.
What happens if a customer walks up to the coffee machine when it is in
the selection state and inserts a coin? In our example, we programmed
the FSM to return the coin using the hw:return_change/1
call, remaining in the selection state and not changing the loop data
(which is set to the empty list anyhow). If you prefer to keep the
coin, just delete that line of code. Or, if you are implementing a
deluxe variant of a coffee machine, add functionality to block the
coin insert facility until the selection has been entered.
When in the selection state, clients can generate events that do
not require any actions or state changes. They include pressing the
cancel button or setting off the cup removed sensors, events that need
to be handled but can be ignored in the sense that they change neither
the current state nor the loop data. Had we not included the third
function, a customer pressing the cancel button would have triggered
a call to selection(cancel, []), causing a runtime error,
because none of the function clauses would have matched.
If the customer selects an Americano coffee, the FSM displays the amount owed and moves to the state payment, eagerly awaiting the next event:
payment({pay,Coin},{Type,Price,Paid})whenCoin+Paid<Price->NewPaid=Coin+Paid,hw:display("Please pay:~w",[Price-NewPaid]),{next_state,payment,{Type,Price,NewPaid}};payment({pay,Coin},{Type,Price,Paid})whenCoin+Paid>=Price->NewPaid=Coin+Paid,hw:display("Preparing Drink.",[]),hw:return_change(NewPaid-Price),hw:drop_cup(),hw:prepare(Type),hw:display("Remove Drink.",[]),{next_state,remove,null};payment(cancel,{_Type,_Price,Paid})->hw:display("Make Your Selection",[]),hw:return_change(Paid),{next_state,selection,null};payment(_Other,LoopData)->{next_state,payment,LoopData}.
The customer now has to
pay for the coffee. Every time a coin is inserted, the {pay,
Coin} event is generated. We add the value in Coin
to the amount Paid, and, if the sum is less than the
price of the drink, we display the remaining amount to pay. By
returning payment as the next state, we keep the FSM in
that state, changing the loop data to reflect the amount paid so
far.
If the customer has inserted enough change to pay for the drink,
we trigger a chain of actions that start by changing the display, indicating we are preparing the drink. We return any change and drop
the cup. We brew the drink, returning from the synchronous
hw:prepare(Type) call only when the drink is finished. At
this point, we tell the customer to remove the drink and return the
control to the gen_fsm control loop, indicating that the
next state is remove.
While paying for their coffee, customers could change their minds and press the cancel button. If they do, we change the display to “Make Your Selection,” return any coins they might have paid, and indicate that the next state is selection. Finally, if a customer triggers the cup removed sensors or presses any of the drink selection buttons, we ignore the event and remain in the state payment.
Let’s assume the customer has paid for a drink and received the appropriate change, and the drink has been brewed. The FSM would at this stage be in the state remove:
remove(cup_removed,LoopData)->hw:display("Make Your Selection",[]),{next_state,selection,LoopData};remove({pay,Coin},LoopData)->hw:return_change(Coin),{next_state,remove,LoopData};remove(_Other,LoopData)->{next_state,remove,LoopData}.
Sensors in the coffee
machine will be triggered when the customer removes the cup. This will
trigger the coffee_fsm:cup_removed() call, resulting in
the cup_removed event being handled in the first clause.
The coffee machine updates its display to “Make Your Selection” and
the function returns, setting the next state to selection. In the remove
state, customers can also insert coins, which we return in the second
function clause, or they can press the cancel or drink selection
buttons, which we ignore in the third clause.
The moment of truth has arrived. Will we get our coffee? Let’s
test our program and see if it works. When compiling your behavior, as
we saw in “Generic Servers”, you get a warning over
the missing code_change/3 callback when compiling the
code in this chapter. We cover this in Chapter 12 when looking at software
upgrades.
To better understand what is going on, we’ll use the debug
options built into OTP and described in “Tracing and Logging”. We start the FSM, select tea, change
our mind to an Americano coffee, and insert two 100-unit coins. We get our change,
and while waiting to remove the cup, we insert a 50-unit coin just for
the sake of testing out the FSM. As you step through the example, you
can distinguish the code you input by the prompts (such as
1>), and debugger printouts by the *DBG*
prefix. Output from io:format/2 in the hw.erl module starts with a hint of what
parts of the system it represents (Display: or
Machine:), and the rest of the output is actual return
values from the function calls:
1>{ok, Pid} = coffee_fsm:start_link().Display:Make Your Selection {ok,<0.68.0>} 2>sys:trace(Pid, true).ok 3>coffee_fsm:cancel().*DBG* coffee_fsm got event cancel in state selection ok *DBG* coffee_fsm switched to state selection 4>coffee_fsm:tea().*DBG* coffee_fsm got event {selection,tea,100} in state selection ok Display:Please pay:100 *DBG* coffee_fsm switched to state payment 5>coffee_fsm:cancel().*DBG* coffee_fsm got event cancel in state payment ok Display:Make Your Selection Machine:Returned 0 in change *DBG* coffee_fsm switched to state selection 6>coffee_fsm:americano().*DBG* coffee_fsm got event {selection,americano,150} in state selection ok Display:Please pay:150 *DBG* coffee_fsm switched to state payment 7>coffee_fsm:pay(100).*DBG* coffee_fsm got event {pay,100} in state payment ok Display:Please pay:50 *DBG* coffee_fsm switched to state payment 8>coffee_fsm:pay(100).*DBG* coffee_fsm got event {pay,100} in state payment ok Display:Preparing Drink. Machine:Returned 50 in change Machine:Dropped Cup. Machine:Preparing americano. Display:Remove Drink. *DBG* coffee_fsm switched to state remove 9>coffee_fsm:pay(50).*DBG* coffee_fsm got event {pay,50} in state remove ok Machine:Returned 50 in change *DBG* coffee_fsm switched to state remove 10>coffee_fsm:cup_removed().*DBG* coffee_fsm got event cup_removed in state remove ok Display:Make Your Selection *DBG* coffee_fsm switched to state selection 11>sys:trace(Pid, false).ok
Timeouts
We are not sure if this has ever happened to you, but imagine you’re standing patiently in line to buy your coffee. While doing so, you decide what you want and prepare the exact change, and are ready to go. But the person in front of you is apparently not in the same rush. After spending ages reading through all the options, they make their selection and get shown the price. Only then do they dip into their purse or pocket and start looking not just for change, but for the exact change. They insert a penny and go back in looking for another one, until they find no more. After which they start looking for nickels and dimes. It can be aggravating, and not only for impatient authors. Luckily, we control the coffee machine now, so we can take advantage of that to implement punishment and revenge to discourage this type of behavior.
Timeouts can be specified within the FSM as an integer in
milliseconds or as the atom infinity. We can include them
in the init/1 and State callback functions.
When a timeout is triggered, the event is sent to the state the FSM is
currently in. As we are controlling the code for the coffee machine,
let’s put a bit of stress into the lives of those who do not have any
by triggering a timeout if a user waits more than 10 seconds between
one coin insertion and another. First, let’s refactor the payment state by adding a timeout:
-define(TIMEOUT,10000)....selection({selection,Type,Price},_LoopData)->...{next_state,payment,{Type,Price,0},?TIMEOUT};payment({pay,Coin},{Type,Price,Paid})whenCoin+Paid>=Price->...{next_state,remove,[]};payment({pay,Coin},{Type,Price,Paid})whenCoin+Paid<Price->...{next_state,payment,{Type,Price,NewPaid},?TIMEOUT};payment(timeout,{Type,Price,Paid})->hw:display("Make Your Selection",[]),hw:return_change(Paid),{next_state,selection,[]};payment(_Other,LoopData)->{next_state,payment,LoopData,?TIMEOUT}.
Customers inserting coins will now have to hurry. If they take longer than 10 seconds to insert a coin, their selections will be canceled and their money returned. There is a risk that they’ll figure that out that by pressing one of the drink selection buttons they will get an extra 10 seconds, but let’s assume for now that they are too wrapped up looking for their next penny to work this out.
In place of a timeout value, we can alternatively return
hibernate if we want to reduce the generic FSM’s memory
footprint. Use hibernate only if you are not expecting
the FSM to receive events for a while, with benchmarks showing you
have memory issues. We can also stop the FSM, something we cover later
in this chapter:
gen_fsm:send_event(NameScope,Event)->okMod:State/2->{next_state,NextState,NewLoopData}{next_state,NextState,NewLoopData,Timeout}{next_state,NextState,NewLoopData,hibernate}{stop,Reason,NewLoopData}
Asynchronous events to all states
If you want to send an asynchronous event but are not concerned about
the state in which it is received, you can use the
send_all_state_event/2 call. This could be useful if you
want to execute actions such as formatting and printing the loop data or
stopping the FSM. Events are passed as the first argument to the
handle_event/3 callback function, which executes the
actions and then returns the {next_state, NextState,
NewLoopData} tuple back to the gen_fsm control
loop (Figure 6-6).
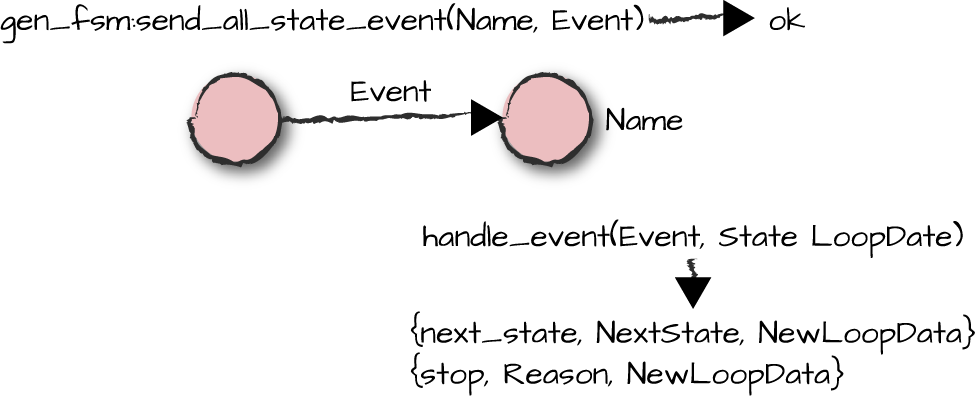
Figure 6-6. Sending events to all states
As with generic servers, the handle_info/3 callback
function takes care of all non-OTP-compliant messages such as exit
signals, monitors, and messages sent using the
Pid!Msg construct. The handle_info/3
callback returns the same range of control tuples as
handle_event/3 and State/2:
gen_fsm:send_all_state_event(NameScope,Event)->okMod:handle_info/3,Mod:handle_event/3->{next_state,NextState,NewLoopData}{next_state,NextState,NewLoopData,Timeout}{next_state,NextState,NewLoopData,hibernate}{stop,Reason,NewLoopData}
Synchronous events
Although all the events sent in our FSM examples were asynchronous,
sometimes we want to ensure clients can’t generate a new event until
their previous one is handled. For example, a diagnostic client might
want to ask the FSM to set a particular value into a hardware register
and take no further action until the FSM indicates the setting was
successful. As illustrated in Figure 6-7, this is when we use the sync_send_event/2 (or
sync_send_all_state_event/2) call.
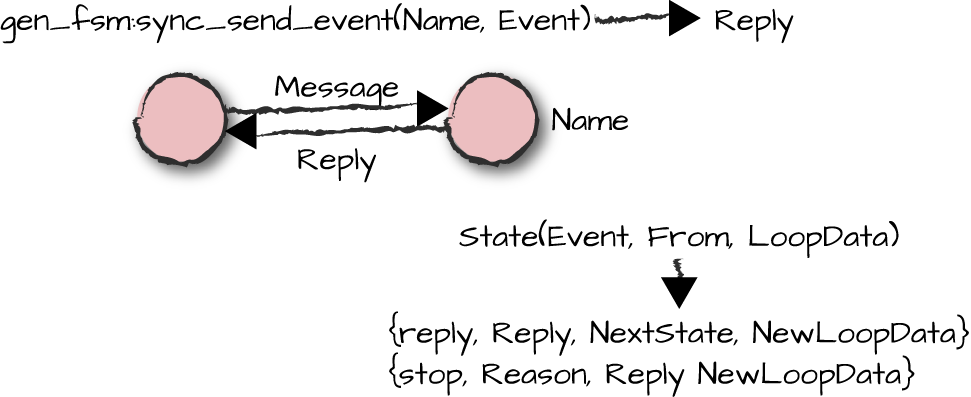
Figure 6-7. Synchronous events
This call and its callback are a middle ground between using the
call/2 and handle_call/3 functions in the
generic server and using asynchronous events and event handling in
FSMs. Events are handled in the State(Event, From,
LoopData) callback, where From is a tuple denoting
the client and the request reference. Instead of returning the
next_state tuple, the callback returns a tuple of the
format {reply, Reply, NextState, NewLoopData}.
Reply is sent back to the client and becomes the return
value of the gen_fsm:sync_send_event/2 call.
Just as with generic servers, we can use the From
in a gen_fsm:reply(From, Reply) call to send
Reply back to the original caller identified by
From, returning {next_state, NextState,
NewLoopData} in the State/3 callback function
itself.
The gen_fsm:sync_send_all_state_event/2 function
(Figure 6-8) sends synchronous requests
to the FSM regardless of its current state. The event is handled in
the handle_sync_event/4 callback function, which returns a Reply sent back
to the original caller, either through the use of From or
in the control tuple sent back to the gen_fsm
module.
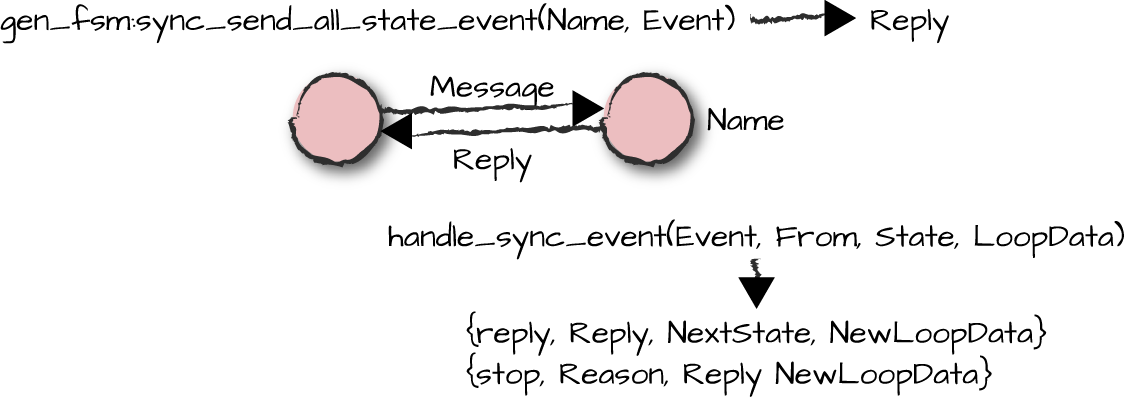
Figure 6-8. Synchronous all state events
gen_fsm:sync_send_event(NameScope,Event)->Replygen_fsm:sync_send_event(NameScope,Event,Timeout)->Replygen_fsm:sync_send_all_state_event(NameScope,Event)->Replygen_fsm:sync_send_all_state_event(NameScope,Event,Timeout)->ReplyMod:State/3,Mod:handle_sync_event/4->{reply,Reply,NextState,NewLoopData}{reply,Reply,NextState,NewLoopData,Timeout}{reply,Reply,NextState,NewLoopData,hibernate}{next_state,NextState,NewLoopData}{next_state,NextState,NewLoopData,Timeout}{next_state,NextState,NewLoopData,hibernate}{stop,Reason,Reply,NewLoopData}{stop,Reason,NewLoopData}
Let’s use the sync_send_all_state_event/2 function
to trigger the actions for normal termination of our coffee machine.
After all, it doesn’t really matter what state it is in, as long as it stops.
Termination
Our coffee machine can terminate for two reasons. It is either
stopped normally, or the process
terminates abnormally if the exit
BIFs are used or a runtime error occurs. For abnormal termination, if
the FSM is trapping exits as a result of a process_flag(trap_exit,
true) call, terminate/3 (Figure 6-9) is invoked in the callback module. If the FSM
is not trapping exits, the FSM terminates and its exit signal propagates
to other processes linked to it.
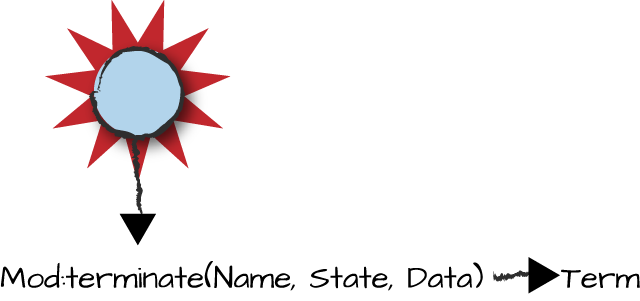
Figure 6-9. Termination
If a stop event is sent using
sync_send_all_state_event/2, the event is handled in handle_sync_event/4. Note that
unlike the stop atom returned in the tuple, the
stop we pass through the
sync_send_all_state_event/2 call has no meaning other than
one given to it in the program. This also contrasts with the
stop parameter in {stop, Reason, LoopData},
which is interpreted and used by the gen_fsm module to
terminate the FSM. This is exactly the same principle we discussed when
we looked at generic server termination in “Termination”:
stop()->gen_fsm:sync_send_all_state_event(?MODULE,stop).handle_sync_event(stop,_From,_State,LoopData)->{stop,normal,LoopData}.terminate(_Reason,payment,{_Type,_Price,Paid})->hw:return_change(Paid);terminate(_Reason,_StateName,_LoopData)->ok.
Note also how, in the terminate function,
we handle the cleanup for the states individually. If customers have started paying for their drinks, they should receive a
refund. By doing this in terminate/3, we are also able to
refund users after an abnormal termination. Here’s an example of what happens:
1>{ok, Pid} = coffee_fsm:start_link().Display:Make Your Selection {ok,<0.35.0>} 2>coffee_fsm:americano().Display:Please pay:150 ok 3>coffee_fsm:pay(100).Display:Please pay:50 ok 4>exit(Pid, crash).Display:Shutting Down true Machine:Returned 100 in change =ERROR REPORT==== 3-Mar-2013::12:01:25 === ** State machine coffee_fsm terminating ** Last message in was {'EXIT',<0.33.0>,crash} ** When State == payment ** Data == {americano,150,100} ** Reason for termination = ** crash ** exception exit: crash
Summing Up
We’ve now introduced the principles behind the generic FSM behavior. Although it might not be the most commonly used behavior, when it fits your application it will greatly simplify your task, making your code more readable and easier to maintain. Table 6-2 lists the most important functions we covered in this chapter.
| gen_fsm function or action | gen_fsm callback function |
|---|---|
gen_fsm:start/3, gen_fsm:start/4, gen_fsm:start_link/3,
gen_fsm:start_link/4 | Module:init/1 |
gen_fsm:send_event/2 | Module:StateName/2 |
gen_fsm:send_all_state_event/2 | Module:handle_event/3 |
gen_fsm:sync_send_event/2,
gen_fsm:sync_send_event/3 | Module:StateName/3 |
gen_fsm:sync_send_all_state_event/2,
gen_fsm:sync_send_all_state_event/3 | Module:handle_sync_event/4 |
Pid ! Msg, monitors, exit messages, messages from ports and
socket, node monitors, and other non-OTP messages | Module:handle_info/2 |
Triggered by returning {stop, ...} or when terminating
abnormally while trapping exits | Module:terminate/3 |
Review the manual pages for the gen_fsm module. You can
find the code implementing the behavior library in the gen_fsm.erl source file. If you previously
looked at the gen_server.erl code,
pay particular attention to how they both interact with the gen.erl helper module, since other behaviors
use it as well.
Get Your Hands Dirty
Before moving on to the next chapter, why not have a go at implementing an
FSM to get a feel for the process of designing, coding, and testing it? If
you are not up to coding, download the code from the Chapter 8 examples, read through it, and take
it for a trial run, since we use the controller in future examples. What
makes this example interesting is that different instances of the
behaviors, each representing a cell phone, will speak to each other. It is
a typical example of a massively concurrent application where processes
are used to represent and control resources or devices. The cell phones
use the home location register, the database that maps users registered on
the network to unique phone numbers that we implemented in “ETS: Erlang Term Storage” in the hlr module.
The Phone Controllers
In our cellular system, there is no central switch. Instead, for every phone attached to the network, we create a phone controller that interacts with other controllers. Each controller is a process implemented as an FSM holding the state of a single phone. All communication between the phone controllers must be asynchronous so as to prevent blocking of the system. Fulfill the following API to implement the phone controllers in the phone_fsm.erl module:
start_link(PhoneNumber) -> {ok,
          FsmPid}.
Starts a new phone controller FSM process for the phone number linked to the calling process. This should also attach the phone controller process to its phone number in the home location register (HLR).
stop(FsmPid) ->
          ok.
Stops a phone controller FSM at
FsmPid. This should also detach it from its phone number in the HLR.connect(FsmPid) -> ok.,disconnect(FsmPid) -> ok.Called by a phone to attach itself to a phone controller FSM process. This must be done so that the phone controller knows where to send the phone replies that provide information about incoming and outgoing calls. The
connectfunction call usually occurs when a phone is started, or when it is connecting to another FSM process. Note that we connect to an FSM process by its pid and not its number. Thedisconnectfunction detaches a phone from a phone controller FSM process.action(FsmPid, Action) -> ok.Sends an action from the phone to the phone controller at
FsmPid. The legal actions are:{outbound,PhoneNumber}Try to connect to another phone.
acceptAccept a call request.
rejectReject a call request.
hangupHang up an ongoing call.
The following calls send events between the phone controllers inside the switch:
busy(FsmPid) ->
          ok.
Sends a
busyevent toFsmPid, generally as a reply to an inbound request indicating that this phone is busy and can’t accept the callreject(FsmPid) -> ok.Sends a
rejectevent toFsmPid, generally as a reply to an inbound request indicating that we refuse the callaccept(FsmPid) -> ok.Sends an
acceptevent toFsmPid, generally as a reply to an inbound request indicating that we accept the callhangup(FsmPid) -> ok.Sends a
hangupevent toFsmPidto terminate an ongoing callinbound(FsmPid) -> ok.Sends an
inboundevent toFsmPidrequesting that a call be set up
Given this API, Figure 6-10 shows what the controller FSM might look like. Note that the FSM is not complete: events can come out of sequence as a result of race conditions or go missing in action as a result of network or software errors. Before coding, make sure you have reviewed it and added the missing events and state transitions. You’ll figure out what they are when reviewing the interfaces.
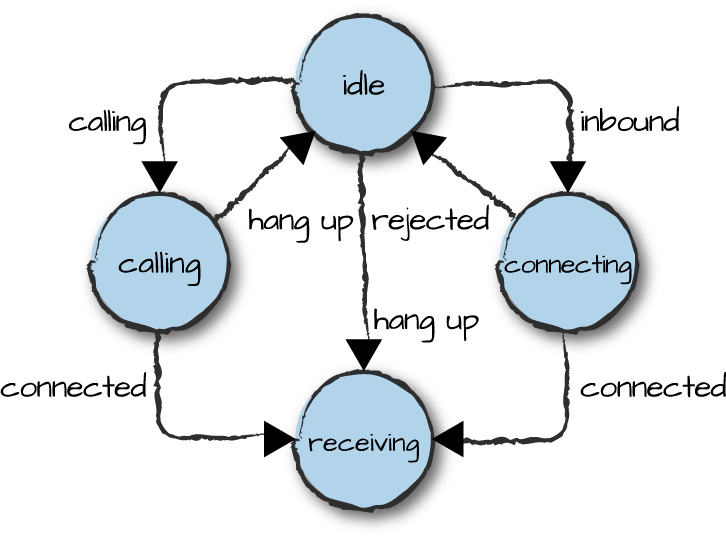
Figure 6-10. Phone controller FSM
Let’s Test It
Each phone controller is connected to a mobile phone. You do not have to write the code for the phone. It is provided in the module phone.erl and has the following API:
start_link(PhoneNumber) -> {ok,
          PhonePid}.
Starts a new phone for number
PhoneNumber, which is linked to the calling process.stop(PhonePid) -> ok.Stops the phone at
PhonePid.action(PhonePid, Action) -> ok.Performs an action requested by the phone user for the phone at
PhonePid. The legal actions are:{call,PhoneNumber}Start a call to
PhoneNumber.acceptAccept a call request.
rejectReject a call request.
hangupHang up an ongoing call.
Calling an action will result in events being sent to the phone’s phone controller using the API for the phone controller that we defined in the previous section.
reply(PhonePid, Reply) ->
          ok.
Sends a reply event from the phone controller to the phone. The legal reply events are:
{inbound,PhoneNumber}.An inbound call has arrived from
PhoneNumber.acceptAn outbound call has been accepted.
invalidAn outbound call was attempted to an invalid number.
rejectAn outbound call has been rejected.
busyAn outbound call was attempted to a busy phone.
hangupAn outbound call has hung up.
These reply events will result in the phone process printing information on the console of the format
PhonePid:PhoneNumber:Event. For example:<0,459,0>: 103618: hangup
You should start your phones in a different node from those
running the hlr and the phone
controllers. The ultimate test is for a phone to call itself and return
a busy signal. Here is a trial test run with three phones:
1>hlr:new().{ok,<0.34.0>} 2>phone_fsm:start_link("123").{ok,<0.36.0>} 3>phone_fsm:start_link("124").{ok,<0.38.0>} 4>phone_fsm:start_link("125").{ok,<0.40.0>} 5>{ok,P123}=phone:start_link("123").{ok,<0.42.0>} 6>{ok,P124}=phone:start_link("124").{ok,<0.44.0>} 7>{ok,P125}=phone:start_link("125").{ok,<0.46.0>} 8>phone:action(P123, {call,"124"}).<0.44.0>: 124: inbound call from 123 ok 9>phone:action(P124, accept).<0.42.0>: 123: call accepted ok 10>phone:action(P125, {call,"123"}).<0.46.0>: 125: busy ok 11>phone:action(P125, {call,"124"}).<0.46.0>: 125: busy ok
What’s Next?
In the next chapter, we look at another worker behavior, the generic event manager. It is a slightly different from a generic server and an FSM in that a single instance of an event manager is allowed to have multiple callback modules. These callback modules are called handlers, and if implemented generically, they can be reused across multiple managers. We use them to add visibility into what is going on in our base station controller.
1 Movie fans will have seen this switch in the blockbuster production of Erlang the Movie. It was filmed when the language was still evolving, so observant fans will have noticed the old syntax in some of the examples. If you have not viewed it, look for it on YouTube. It is a must-see!
2 This would be an interesting function to benchmark.
3 An Americano coffee is an espresso topped up with water—it could not be omitted as it is our favorite.