Chapter 11. Interoperability Standards
Interoperability is the most significant challenge to any enterprise contemplating building an identity management infrastructure. As a result, there are a number of standards bodies working to build a common foundation in some of the areas of digital identity management that we’ve already discussed, including:
Integrity and non-repudiation
Confidentiality
Authentication and authorization
Directories
Representing and managing authorization policy
This chapter briefly describes the problem domains and some of the standards being developed to address them. The idea is not to provide detailed tutorials on any standard, but rather to familiarize you with the ideas, concepts, and working models behind them.
Standards and the Digital Identity Lifecycle
This chapter will discuss several specific standards in these problem domains, including SAML, SPML, and XACML. Of these, SAML has wide industry adoption and the standard is well developed. The other two are not as widely supported. SPML has some adoption, but the standard is still undergoing transition and improvement. I’m not convinced that XACML, as it is defined now, will ever be widely adopted.
Why discuss standards that aren’t fully baked? Simply because such standards represent a class that fits a problem domain. If XACML doesn’t make it, something like it will. In Chapter 5, we discussed the digital identity management lifecycle. Figure 11-1 shows the lifecycle annotated with the name of a standard that supports that phase. You can see that SPML and XACML both fill important needs in the lifecycle.

These standards are all based on XML. XML is the de facto language for designing standards because of the wide variety of tools for creating, managing, and using XML. While using these standards to solve identity problems requires XML expertise, our discussion will not require much more than a passing acquaintance with XML.
Integrity and Non-Repudiation: XML Signature
XML Signature is used to ensure message integrity on all or part of an XML document. The standard doesn’t define new signature methods, but instead specifies how the digital signature technology we’ve already discussed can be used inside XML documents. As we’ve seen, digital signatures can be used to ensure message integrity by showing that data has not been changed through some error during transport or as the result of a malicious attack. Digital signatures also prevent a signer from repudiating a message. XML Signature is a foundational standard that is used by other standards we’ll discuss in this chapter, such as SAML, because they are also based on XML.
Like any standard, XML Signature has options for numerous contingencies that make it seem complicated, but at its heart it is quite simple. An XML Signature is contained in a <Signature/> element and consists of three main parts:
The
<SignedInfo/>element contains a reference to the data that has been signed along with information about how it was made canonical, what signature method was used, relevant digest information, and any transformations that were applied.The
<SignatureValue/>element contains the actual signature.The
<KeyInfo/>element contains the key information necessary to validate the signature.
Using the XML Signature standard, parts of a document can be signed, and multiple entities can sign the same or different parts of a single document.
The following example of an XML Signature shows all three parts:
    <Signature xmlns="http://www.w3.org/2000/09/xmldsig#">

     <SignedInfo Id="fizz">
      <CanonicalizationMethod
        Algorithm=
           "http://www.w3.org/TR/2001/REC-xml-c14n-20010315"/>
      <SignatureMethod
        Algorithm="http://www.w3.org/2000/09/xmldsig#dsa-sha1" />
      <Reference
        URI="http://www.fizzco.com/news/2003/07/27.xml">
       <DigestMethod
         Algorithm="http://www.w3.org/2000/09/xmldsig#sha1" />
       <DigestValue>f7dhfj38sdjdf89fjskfhweol=</DigestValue>
      </Reference>
     </SignedInfo>

     <SignatureValue>KLUR~HF=...Ax54</SignatureValue>

     <KeyInfo>
      <X509Data>
       <X509SubjectName>
         CN=Phil Windley,O=The Windley Group LLC,ST=Utah, C=US
       </X509SubjectName>
       <X509Certificate>
         MIID5jCCA0+gA...lVN
       </X509Certificate>
      </X509Data>
     </KeyInfo>

    </Signature>
Much of the example is self-explanatory. The signature method, digest method, and certificate data refer to the algorithms and formats that were described in Chapter 6 such as the X.509 standard; they are just enclosed in XML. Other elements require some explanation.
One such element is <CanonicalizationMethod/>. XML documents must be made canonical, because there is more than one way to represent a single base document in XML. As a simple example, consider that the element <foo/> is the same as <foo></foo>. Consequently, before the document can be signed, it has to be rendered in a canonical form so that the signatures match. Several canonization methods are available, and the <SignedInfo/> block specifies which was used.
This XML Signature used to sign the document is enclosed in the <SignatureValue/> element. You won’t find the signed document here, however. The signature is applied to all or part of the XML document using the <Reference/> element. In the example, the <Reference/> element points to an XML document on http://www.fizzco.com by giving its URL. The <Reference/> element also specifies the digest method used to create the hash and its value.
Confidentiality: XML Encryption
Like any other communication on the Internet, any XML document can be encrypted in its entirety and sent across the wire to be decrypted at the other end. The problem with this, however, is that encrypting obfuscates the entire message. Frequently, parts of an XML message need to be sent in the clear. For example, SOAP is an XML format that computers use to exchange remote procedure calls over the Web. In use, all or part of the body of a SOAP message may need protection but the headers must be sent in the clear so that intermediaries can see routing and other information.
Alternately, the channel could be encrypted—using SSL, for example—ensuring that any message transferred across that channel is protected in transit. The problem with channel encryption is that the message is in the clear on any intermediate machines. To get around these problems, the XML Encryption standard is designed to allow partial encryption of an XML document.
Like the XML Signature standard, the XML Encryption standard has many parts to deal with multiple contingencies, but understanding the core functionality is not difficult. Any encrypted data in an XML document is identified using the <EncryptedData/> element. The <EncryptedData/> element consists of two parts:
An optional
<EncryptionMethod/>element that gives<KeyInfo/>information. The<KeyInfo/>element is the same as the one defined for the XML Signature specification.A
<CipherData/>element that can either include the actual encrypted data inside a<CipherValue/>element or a reference to the encrypted data enclosed in a<CipherReference/>element.
As an example of how XML Encryption might be used, consider an online payment system that transmits an order by using an XML document. The order document contains all the information about the order and includes the credit card information for the purchaser in a <PaymentInfo/> element. We would like most of the order to be left in the clear so that it can be processed, but would like to protect the credit card information and decrypt it only when the payment is processed. XML Encryption allows us to do that. The following is an example of an <EncryptedData/> element inside the <PaymentInfo/> element:
    <PaymentInfo>
      <CardName>John Smith</CardName>
      <BillingAddress>...</BillingAddress>
      <EncryptedData
          Type='http://www.w3.org/2001/04/xmlenc#Element'
          xmlns='http://www.w3.org/2001/04/xmlenc#'>
        <CipherData>
          <CipherValue>sh748fjl4...</CipherValue>
        </CipherData>
      </EncryptedData>
    </PaymentInfo>
In this example, the cipher value field would hold the encrypted credit card number and expiration date. I’ve left out the <EncryptionMethod/> element in this example, because we can presume that the information is encrypted and decrypted by systems under the control of a single organization that has set the method and controls the keys. The values will be available only to processes that possess the private key for the payment system.
Authentication and Authorization Assertions
Automated identity systems need a way of creating and distributing authentication and authorization assertions . Kerberos, for example, is one system that does this. Recently, SAML, or the Security Assertion Markup Language, has gained considerable traction as a security credential standard. In addition to standardizing ways to use XML to represent security credentials, SAML defines a protocol for requesting and receiving credential data from a SAML authority service. We’ll see in Chapter 12 that SAML is used as part of several other standards for creating federated identity systems.
In practice, SAML usage is straightforward. A client makes a request about a subject to a SAML authority, and the authority returns assertions about the identity of the subject for a particular security domain. For example, the subject might be a person identified by his email address in a DNS domain (e.g., [email protected]). There are several common SAML usage patterns that we’ll explore later in this section.
A SAML authority is an online service that responds to SAML requests. SAML responses are called assertions. SAML authorities come in three types: authentication authorities, attribute authorities, and policy decision points (PDPs). These three types of authorities return three distinct types of assertions:
- SAML authentication assertions
When a SAML authentication authority receives a request about a particular subject’s credentials, the result is returned as a SAML authentication assertion. An authentication authority assets that subject S was authenticated by means M at time T. For example, “Subject Alice in company http://windley.com was authenticated using a password at time 2003-05-06T13:20:00-05:00.”
- SAML attribute assertions
Once an authentication assertion is returned, a SAML attribute authority can be asked for the attributes associated with the subject. These are returned as a SAML attribute assertion. An attribute authority asserts that subject S is associated with attributes A, B, etc. with values X, Y, etc. For example, “Subject Bob is associated with attribute Department with value Engineering and attribute Email with value [email protected].”
- SAML authorization assertions
A PDP returns a SAML authorization assertion in response to a request about a subject’s permissions with respect to certain resources. A PDP asserts that subject S has (or has not) been granted permissions for action A on resource R given evidence E. For example, “Subject http://A.com/services/foo is granted permission to read the file at http://B.com/bar as evidenced by assertions A1, A2, and A8.”
In practice, a single authority can produce all three types of assertions, or authorities may produce a subset. Authorities can be both producers of assertions as well as consumers of assertions from other authorities.
Assertions contain the following common elements:
Issuer ID and issuance timestamp
A globally unique assertion ID
Subject, including a name and security domain and optionally the subject’s authentication data
Optional, additional information provided by the issuing authority; this is called advice
Conditions under which the assertion is valid such as the assertion validity period (e.g.,
NotBeforeandNotOnOrAfter)Audience restrictions
Target restrictions such as the intended URLs for the assertion
Application-specific conditions
The following example shows a SAML attribute request:
    <samlp:Request ...>
      <samlp:AttributeQuery>
        <saml:Subject>
          <saml:NameIdentifier
            SecurityDomain="A.com"
            Name="cn=Bob"/>
        </saml:Subject>
        <saml:AttributeDesignator
          AttributeName="Department"
          AttributeNamespace="A.com"/>
      </samlp:AttributeQuery>
    </samlp:Request>
This request asks the attribute authority which department
[email protected]
is associated with.
The following XML is an example of a SAML authentication assertion:
    <samlp:Response
      MajorVersion="1" MinorVersion="0"
      RequestID="128.14.234.20.90123456"
      InResponseTo="123.45.678.90.12345678"
      StatusCode="Success">

      <saml:Assertion
        MajorVersion="1" MinorVersion="0"
        AssertionID="123.45.678.90.12345678"
        Issuer="Example Company, Inc."
        IssueInstant="2003-01-14T10:00:23Z">

        <saml:Conditions
          NotBefore="2003-01-14T10:00:30Z"
          NotAfter="2003-01-14T10:15:00Z" />

        <saml:AuthenticationStatement
              AuthenticationMethod="Password"
              AuthenticationInstant="2003-01-14T10:00:20Z">
          <saml:Subject>
            <saml:NameIdentifier
              SecurityDomain="A.com"
              Name="cn=Alice" />
          </saml:Subject>
        </saml:AuthenticationStatement>
      </saml:Assertion>
    </samlp:Response>
In this example response, the authentication authority is asserting that
[email protected]
was authenticated on January 14, 2003 at 10:00:23 using a password, and that this authentication is valid between 10:00:30 and 10:15:00 on the same day.
As you can see, SAML requests and responses do not define a wire-level protocol, but are rather carried on some other form of transport, such as HTTP, from the client to the SAML authority. There are any number of possibilities about how SAML might be used. The following section explores four likely scenarios.
Example SAML Use Cases
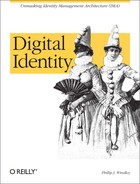
We’ll look at four primary SAML use cases: two for web browsers and two that use SOAP. The first, called the pull profile
, shows how SAML can be used to create a single sign-on between two web sites. The pull profile uses SAML artifacts (in essence, tokens) that are passed from one site to another using a URL query string. The site making the assertion (the source site) creates a link to the destination site containing the artifact in the URL, and when the user clicks on it, the destination site receives the artifact as part of the HTTP GET request. The artifact is a key that the second site can then use to pull the actual assertion from the source site.
The pull profile is illustrated in Figure 11-2. In the example,
Mary visits http://Airline.com and purchases airline tickets. During her interactions with http://Airline.com, she has logged in and has been authenticated.
At the point of purchase, http://Airline.com recommends that Mary rent a car from http://RentalCar.com and provides a link containing an embedded SAML artifact.
When Mary clicks on the link, the artifact is transferred to http://RentalCar.com.
http://RentalCar.com makes a SAML request using the artifact.
http://RentalCar.com receives an authentication assertion in return, allowing Mary to use the services on http://RentalCar.com without signing onto http://RentalCar.com directly.

These examples assume that there is a contractual arrangement between http://Airline.com and http://RentalCar.com, and that Mary has given her consent for http://Airline.com and http://RentalCar.com to federate her identity. We’ll discuss those issues more in Chapter 12.
Another way of using SAML with browsers is called the push profile
. Here, the source site creates a web form containing the complete assertion. When the user submits the form, it is sent to the destination site using an HTTP POST, effectively pushing the assertion from the source site to the destination site using the HTML form mechanism. In this scenario, the source site digitally signs the assertion using XML Signature so that the destination site can be assured of its authenticity.
The push profile is illustrated in Figure 11-3. In this example, the following occurs:
Mary visits http://Airline.com just as she did in the last example.
At some point in the session, http://Airline.com returns an HTML form that contains the complete, digitally signed identity assertion.
Mary submits the form to http://RentalCar.com. http://RentalCar.com checks the digital signature and, being satisfied with the credentials, processes Mary’s request.
Suppose Mary decides to rent a car. http://RentalCar.com might need additional information from http://Airline.com. To get that information, http://RentalCar.com can make an attribute request, perhaps asking for Mary’s credit card and address information to complete the purchase. Attribute requests and http://Airline.com's responses would be
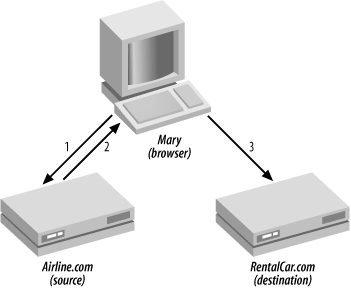
packaged and sent across the wire in the bodies of SOAP messages, as shown in Figure 11-4. This use case is called a direct request and response. In this example:
http://RentalCar.com makes a request.
http://Airline.com responds.
In the example shown in Figure 11-4, the SAML requests and responses are the payload of the SOAP message, because they are the data of interest. Sometimes, however, SAML is used to authenticate a SOAP message itself. In this case, called the web services profile, the SAML assertion is about the contents of the SOAP body and is contained in the SOAP header. The assertion in the header is a SAML artifact or digitally signed assertion, just as in the pull and push profiles, that pertains to the action being taken in the body. The web services profile is illustrated in Figure 11-5.

The primary benefit of SAML is that the security context for a subject travels with the subject (in the form of the assertion) so that a new context doesn’t need to be recreated at each associated site. This reduces the need to store and synchronize identification, authentication, and authorization information at each site. The data is more secure, single sign-on can be implemented, attributed-based authorization can be supported, and multiple service providers can be federated using the same language and protocols.
Identity Provisioning
SAML addresses the problem of how to exchange identity information between systems. That begs the question: how do these various systems set up the accounts and services that are being accessed? We learned in Chapter 5 that this happens in the provisioning and propagation phases of the digital identity lifecycle. Because a single identity may need to be used in multiple systems, automated provisioning is necessary. Automated provisioning is supported through the use of provisioning standards.
SPML , or Service Provisioning Markup Language, is an XML-based language for exchanging provisioning requests and responses. As mentioned at the beginning of this chapter, SPML is rather new and supported only by a few vendors, but it, or something like it, will be necessary to create automated identity systems. The goal of the SPML specification is to support the automation of all aspects of managing an identity throughout its entire lifecycle, including creating, amending, or revoking the identity. This section will discuss SPML and its use in automated provisioning.
SPML is defined in terms of three primary roles:
- Requesting Authority (RA)
The entity making the provisioning request.
- Provisioning Service Provider (PSP)
A SPML-enabled software service that responds to SPML requests from the RA.
- Provisioning Service Target (PST)
The entity that performs the provisioning. Sometimes the PSP and PST are the same software agent, but they needn’t be. The crucial difference is that while the PSP is required to understand SPML, the PST is not. So the PSP may be a frontend for other software services that do not understand SPML.
Like SAML, SPML defines a request-response protocol, with the RA making a request, in SPML, and the PSP returning a response or appropriate error code, in SPML.
There must be a preexisting trust relationship between the RA and the PSP. This trust relationship could be represented using SAML and transported using the web services profile shown in Figure 11-5. The SAML assertions would be carried in the SOAP header, and the SPML request and response would be transported as the payload in the SOAP body.
PSPs can make requests of other PSPs. So, for example, while the PST is not required to understand SPML, if it does, then the PSP communicating with it is functioning as an RA making a request of another PSP.
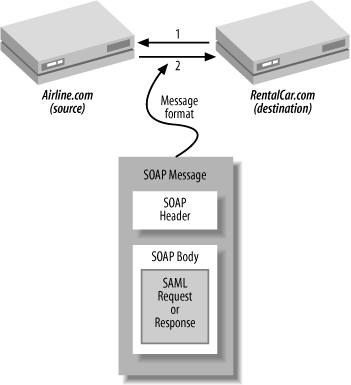
An example will serve to clarify the relationships and responsibilities of RAs, PSPs, and PSTs. Figure 11-6 diagrams an example of the provisioning activities related to creating a new account in an e-commerce system. The e-commerce sign-up process, acting as an RA, sends a SPML request to the e-commerce provisioning server, acting as the PSP, asking that a new e-commerce account be created. As we’ve seen, the SPML request could be carried in a SOAP message with a SAML authentication in the header establishing the identity of the RA. The e-commerce provisioning server, acting as the PSP, would use the SAML assertion to determine whether the RA is authorized to create an account of the type specified in the request and, if so, proceed.
The e-commerce provisioning server completes four different actions with four different PSTs to complete the provisioning action:
The e-commerce provisioning server creates an appropriate record in the account database. In this case, the account database is acting as a PST. This action is authenticated in whatever manner the database is configured to use, and the e-commerce provisioning server translates the SPML request into SQL and sends it to the account database using JDBC or something similar.
The e-commerce provisioning server creates a directory on the filesystem for storing files related to the new account using JNDI or something similar. Again, the commands and authentication are those appropriate to the PST, in this case, a filesystem.
The e-commerce provisioning server requests that the web server’s authentication system, perhaps an LDAP server, create an account. Like actions 1 and 2, this task is accomplished by translating the SPML request into the native command set of the LDAP server, perhaps JNDI.
The e-commerce provisioning server, acting as an RA, sends a new SPML request to the credit card company’s PSP, requesting that a merchant account be provisioned. The credit card company’s PSP, in turn, makes some number of requests of other PSTs or PSPs to service the request.
Note that in all but the last task, the PSP translated the SPML request into the native API of the PST, because none of these servers understood SPML.
As a provisioning language, SPML creates and manages identifiers. There are two kinds of identifiers: those used globally within the provisioning system and those used by each of the target systems, or PSTs. These identifiers might be used to refer to subjects or resources.
The identifiers created by the PSTs need to be unique only within the PST’s namespace. For example, in the e-commerce system discussed previously, the identifier in the accounts database would be the record ID. The identifiers associated with an individual PST are called Provisioning Service Target Data Identifiers (PSTD-IDs).
To be useful, PSTD-IDs must be related to some global identifier in the overall system. The SPML standard refers to this as a Provisioning Service Object Identifier (PSO-ID). The RA might choose the PSO-ID, or the PSP might manage it. In our example, the user is probably prompted for a memorable ID when she signs up, and so the RA would choose it, ensuring that it’s unique. The PSP or RA must keep track of the PSO-IDs, and map them to the various PSTD-IDs associated with the identity.
SPML Requests and Responses
SPML requests take one of several forms:
-
<addRequest/> Used to request the creation of an account
-
<modifyRequest/> Used to request that an account be updated
-
<deleteRequest/> Used to request that an account be deleted
-
<searchRequest/> Used to query the PSP about accounts and their properties
-
<schemaRequest/> Allows an RA to request the provisioning schema from the PSP
These requests can have operational attributes attached and can be done in batch as well as singleton mode. The requests for adding, modifying, deleting, and searching the PSP are self-explanatory—they correspond to the types of actions you would expect to see in any data store. The schema request allows an RA to discover the types of requests it is allowed to use so that it can build appropriate add, modify, delete, and search requests. Discovery allows SPML to be flexible, because RAs can, if properly fashioned, react to changing PSP provisioning schema and adjust their actions accordingly.
To see how this might work, consider an employee provisioning system that manages the accounts on a Windows domain, GroupWise system, corporate HR directory, and Unix file server. Whenever a new employee is hired, new accounts are provisioned on each of these systems from a single action on the HR system. Now, imagine that the company has added a new corporate intranet that requires that an identity be provisioned on a web server. Rather than hardcoding into the RA the list of systems on which employees should receive accounts, we could write RA to query the PSP before making its request for the list. Now, by merely adding the new system to the schema of the PSP, any RA can create the right accounts.
To give you an idea of what a SPML request-response pair looks like, consider the following example of an <addRequest/> element that creates an email account for a user:
    <addRequest>
      <attributes>
        <attr name="objectclass">
          <value>urn:...:SPML:interop:interopUser</value>
        </attr>
        <attr name="cn">
          <value>Jane Doe</value>
        </attr>
        <attr name="mail">
           <value>[email protected]</value>
        </attr>
        <attr name="description">
          <value>Jane Doe interopUser Subscription</value>
        </attr>
        <attr name="memberLevel">
          <value>1</value>
        </attr>
        <attr name="company">
          <value>Jane Doe Supply Co</value>
        </attr>
        <attr name="registrationTime">
          <value>17-Nov-2004 12:00 </value>
        </attr>
      </attributes>
    </addRequest>
As usual, the XML is verbose, but perfectly readable. The PSP might respond to this request as follows:
    <addResponse result = "urn:...:SPML:1:0#success">
      <identifier type= "urn:...:SPML:1:0#EMailAddress">
        <id>[email protected]</id>
      </identifier>
      <attributes>
        <attr name="mailBoxLimit">
          <value>50MB</value>
        </attr>
      </attributes>
    </addResponse>
This response returns the new identifier and an attribute giving the mailbox size. Other examples of SPML requests and responses can be found in the OASIS Core document on SPML at the Oasis Provisioning Services Technical Committee’s web site.[*]
Representing and Managing Authorization Policies
As we’ll see in Chapter 18, policies play an important role in building an identity infrastructure, because they help define the context within which systems are built and operated. However, merely writing a policy does not ensure that it’s correctly promulgated and implemented throughout the IT infrastructure.
For example, in the State of Utah, there are over 1,000 separate systems, not including desktop computers, that are affected by IT policies created by the CIO’s office. What’s more, several hundred people administer these systems. In this situation, there is little hope that any policy made will be consistently executed on these many disparate systems.
This problem plagues large enterprises. Access-control policies are written in English and then implemented on dozens or even hundreds of different systems individually. Each of these systems has a proprietary configuration language. Compounding the problem, policies change frequently. Every time the access control policy is changed, the entire configuration has to be redone. Only a hopeless optimist would believe that this job is done correctly.
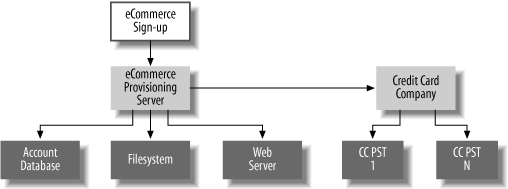
Figure 11-7 shows how a policy server might solve this problem. In the figure, the policy is translated to some machine language and placed on the policy server where it can be sent directly to the various systems in the enterprise. As we discussed in Chapter 3, current state of the art in policy languages is a far cry from the ideal situation pictured here.

eXtensible Access Control Markup Language (XACML), is one standard that is addressing this problem. XACML is an XML-based language for storing and sharing access-control policies. XACML is a language for the policy decision point (PDP). As illustrated in Figure 11-7, the goal of XACML is that each PDP in the organization could use a single policy without constant manual configuration and reconfiguration. There are significant hurdles to achieving this result, including the variety of meanings that a single policy can have in various systems and contexts. As I mentioned at the beginning of this chapter, XACML is not widely accepted yet, and there are other, competing standards, but it serves as a good example of the type of language that will fill this need.
Whereas SAML provides a format for exchanging identity and access information, XACML provides a format for describing what to do with that information. There is some overlap between SAML and XACML: both provide a request/response language. The two standards are complimentary, however, using the same definitions for subjects and actions. But XACML goes beyond SAML in creating a rule-based language for expressing access-control policies.
Because XACML is at its core a programming language, it is much more complicated than the other standards that we’ve discussed, which are used for merely representing data. Policy rules can be created to allow fine-grained control over access. These rules can be based on items such as:
Attributes of the user making the request (e.g., only people who work in accounting are allowed to access this document)
The action to be taken (e.g., reading a document versus updating a document)
The time of day (e.g., users can log in only between 9 a.m. and 5 p.m., or during their shifts)
The authentication mechanism (e.g., allow only users who present a digital signature as their authentication mechanism to log in)
The protocol used for access (e.g., allow HTTPS access, but not HTTP access for this resource)
These can be combined using Boolean connectives to create complex policies (e.g., allow users from accounting to update this document only over HTTPS but allow users from other departments to read it anytime over HTTP). XACML also has a concept called a “combining algorithm,” which allows multiple, perhaps conflicting, policies to be applied to a resource and some action taken as a result. For example, the combining algorithm might simply state “deny access if any policy denies” or it might be more complicated.
The following example is taken from “XACML: A New Standard Protects Content in Enterprise Data Exchange” on the Sun Developer web site.[*] The XACML request states that an unstated subject wants to log into a server called “SomeServer.” The request has three primary parts: it identifies the subject making the request, names the resource, and describes the action.
    <Request>
      <Subject/>
      <Resource>
        <Attribute
          AttributeId="urn:oasis:...:resource-id">
          <AttributeValue>SomeServer</AttributeValue>
        </Attribute>
      </Resource>
      <Action>
        <Attribute AttributeId="ServerAction">
          <AttributeValue>login</AttributeValue>
        </Attribute>
      </Action>
    </Request>
This request would be processed using a policy statement that is expressed in XACML’s rule language. Reading through this example will give you an idea of what XACML policies look like. These policies are human readable, but for the most part, they would be created using an access control-policy tool rather than being written by hand. We’ll step through one.
The top-level element in an XACML policy is <Policy/>:
    <Policy
      PolicyId="SamplePolicy"
      RuleCombiningAlgId=
      "urn:...:xacml:1.0:rule-combining-algorithm:first-applicable">
The <Policy/> element contains a <Target/> element and zero or more <Rule/> elements. The <Target/> element defines the class of subjects, resources, and actions to which the policy is applied. The <Rule/> element defines an action, permit or deny, and the conditions under which that action is taken.
Here’s an example of a <Target/> element that applies to any subject, and any action, on a resource identified by the string “SomeServer.”
    <Target>
     <Subjects>
       <AnySubject/>
     </Subjects>
     <Resources>
      <Resource>
       <ResourceMatch
          MatchId="urn:...:xacml:1.0:function:string-equal">
         <AttributeValue>
             SampleServer
         </AttributeValue>
         <ResourceAttributeDesignator
             AttributeId="urn:...:xacml:1.0:resource:resource-id"/>
       </ResourceMatch>
      </Resource>
     </Resources>
     <Actions>
      <AnyAction/>
     </Actions>
    </Target>
Notice that operators and types are long and unwieldy in the style of XML-based languages. This is a reflection of the truth that XACML is not designed to be written by humans, but rather by programs. After the <Target/> element, the <Policy/> contains <Rules/>. The following two rules, taken together, require that a subject log in.
The first rule requires the login and further stipulates that it must be between the hours of 9 a.m. and 5 p.m. Its effect, given as an attribute to the <Rule/> element, is to Permit. The <Rule/> begins with an ID and its effect:
<Rule RuleId="LoginRule" Effect="Permit">
The first part of any rule can be a target that is matched to determine whether this rule applies or not. Somewhat confusingly, these conditions are also called <Target/>. The following target ensures that this rule is used only when the action is “Login.”
     <Target>
      <Subjects>
       <AnySubject/>
      </Subjects>
      <Resources>
       <AnyResource/>
      </Resources>
      <Actions>
       <Action>
        <ActionMatch
           MatchId="urn:...:xacml:1.0:function:string-equal">
         <AttributeValue
             Login
         </AttributeValue>
         <ActionAttributeDesignator AttributeId="ServerAction"/>
        </ActionMatch>
        </Action>
       </Actions>
      </Target>
Also included in the <Rule/> is a condition that enables the rule’s action (“permit,” in this case) only if the condition is true. The following condition is true only between 9 a.m. and 5 p.m.
      <Condition FunctionId="urn:...:xacml:1.0:function:and">
       <Apply
        FunctionId=
        "urn:...:xacml:1.0:function:time-greater-than-or-equal">
       <Apply
        FunctionId="urn:...:xacml:1.0:function:time-one-and-only">
        <EnvironmentAttributeDesignator
            AttributeId=
             "urn:...:xacml:1.0:environment:current-time"/>
       </Apply>
       <AttributeValue>
        09:00:00
       </AttributeValue>
      </Apply>
      <Apply
       FunctionId=
        "urn:...:xacml:1.0:function:time-less-than-or-equal">
       <Apply
        FunctionId="urn:...:xacml:1.0:function:time-one-and-only">
        <EnvironmentAttributeDesignator
          DataType="http://www.w3.org/2001/XMLSchema#time"
          AttributeId=
            "urn:...:xacml:1.0:environment:current-time"/>
       </Apply>
       <AttributeValue>
        17:00:00
       </AttributeValue>
      </Apply>
     </Condition>
This condition looks very complicated but is, in fact, quite simple when reduced to pseudocode:
    ($ENV(current_time) >= "09:00:00")
      AND ($ENV(current_time) <= "17:00:00")
If the first rule is inapplicable because of either its target or condition, then the default action, defined by the second rule, is to deny access (note that its effect attribute is Deny). Since it has no target or condition, this rule is always applicable.
    <!-- A final, "fall-through" Rule that always Denies -->
    <Rule RuleId="FinalRule" Effect="Deny"/>
The response generated from the application of this rule is simple, and contains a decision (Permit, in this case) and a status.
    <Response>
      <Result>
        <Decision>Permit</Decision>
        <Status>
          <StatusCode Value="urn:...:xacml:1.0:status:ok"/>
        </Status>
      </Result>
    </Response>
Since XACML is a complete declarative programming language, there is much more to it than can be covered in this simple example. XACML may not, in its present form, become the standard language of the PDP, but the problem is real and requires a standardized solution, and I’m convinced that XACML or something very similar to it will eventually be available for configuring policy on multiple systems from a single specification.
Conclusion
Standards such as XML Encryption, XML Signature, SAML, SPML, and XACML are important factors in the interoperability of components in an enterprise-wide digital identity infrastructure. The wide-scale use of standardized languages by vendors of products that operate at various phases of the identity lifecycle will do much to automate the routine operational tasks of identity management.