I have been trying to pin down the difference in attitude that it takes to switch from copying the model (or model sheet) to creating from the model. At best, everything that has turned up has been either nebulous, arcane, or ethereal (to me it’s all very concrete). But I am relentless. A couple of times I used the right and left-brain activities to clarify it. Simply put, the left brain loves to name the parts and place them in their proper places, which can be factual but sterile. On the other hand, the right brain is not interested in the parts per se (anatomy, for instance), only in so far as they can be assembled into some desired use; to bring meaning to them, or better yet, use them to create something meaningful. The left brain couldn’t care less about telling a story. It only cares that the proper language was used or the parts are authentic. The right brain will gladly sacrifice scrupulous adherence to facts, as long as it can tell a story or describe a mood or gesture. To accomplish this the right brain will even stretch the facts, that is, caricature them.
True, as Glen Keane pointed out recently, knowing the parts well will help in many ways, especially in building confidence. This means if you know your anatomy well, you are free to manipulate it to your purposes. Whereas if you don’t know your anatomy you are striving to capture it as you draw and deflecting your attention from what should be your goal — storytelling.
I continue to rack my brain for other ways to help you break away from copying. Here is another one prompted by the current persimmon season (I’m a persimmon addict). An unripe persimmon has all the physical parts of a respectable persimmon but will cause your mouth to pucker up if you bite into it. But when the fruit looks like it’s ready to be thrown out, then a bite of it yields its true essence.
While we’re on food, how about an apple pie. The apples, the sugar, the flour, and the printed recipe are certainly all factual ingredients but hardly say, “apple pie,” as yet. It’s a real expressive apple pie, though, when it comes out of the oven, warm and toasty looking, with that fresh baked apple and cinnamon odor wafting forth — that’s apple pie!
Try this one. Consider the picture screen on your television. There are adjustments to manipulate when the picture is unclear. One knob controls the vertical hold, one the horizontal; one knob adjusts the color, one the hue, and one the intensity of the image. When all the knobs are adjusted properly, you get a clear picture. When drawing there are several “knobs” that need to be constantly adjusted — they clarify the image in a way that will help transfer it to paper. They are the principles of perspective. When any or all of them are off, you will have various combinations of flatness, tangents, parallels, direction-less lines, nebulous or missing parts necessary to tell the story, and the usual “snowy” veil of confusion (next you will find six of those principles of perspective in an ultra-simple form).
Maybe I’m stretching this whole thing too far, but I feel things like this when I draw. The essence is there — the ripeness, the proper combination of parts, angles, and shapes. It’s a kind of shifting of gears (maybe shifting to the right brain mode) and going for the “ripe persimmon,” or the full baked “apple pie,” or the “sharp TV image.”
You all know how putting on dark glasses brings out the clouds in a sky, cuts through the haze, and intensifies the lights and darks in a landscape. That is what should happen when you look at the model for your first impression. Try this experiment. Look at a scene with “naked” eyes, then alternately with dark glasses. You will notice that the glasses separate objects in space, almost as if they were 3D glasses. A more clarified reality is born. That is the kind of viewing you should be striving for while drawing. Not merely outlines, with their lateral predominance but rather three dimensionally, with depth employed to disentangle the shapes and lines, which in a two-dimensional drawing, try to occupy the same space, like a tree growing between two sheets of glass.
The scene you used for that experiment, of course, had light, shade, color, and aerial perspective to sculpt it. Drawing has but one thing — line. To get that same clarifying dark-glasses effect with line alone you have to incorporate these principles of perspective (or principles of drawing if you prefer).

These may seem simple to the point of absurd, but believe me, every drawing you ever make will (or should) have all of these principles present.
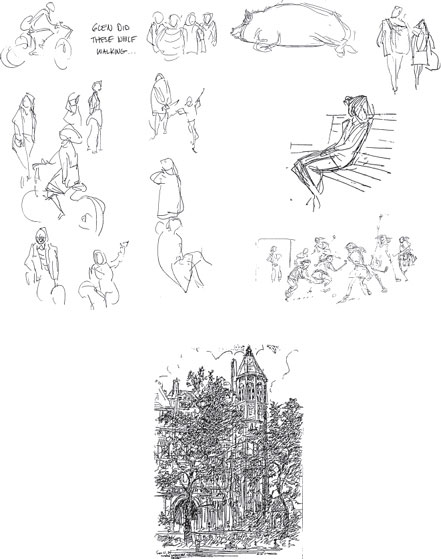
I was fortunate to be able to Xerox some drawings from Glen Keane’s sketchbooks from his recent trip to England and France. I want you to enjoy them for their excellence and beauty, but also to look at them critically; that is, analytically, especially with those rules of perspective in mind. I will break one of them down to get you started. (My apologies to Glen for performing vivisection on his drawings.)
Here is a quick sketch made in a park in London. See how he has created both a plane and depth by placing the feet higher than the hands (rules 1, 2, and 3). He meant to have the right hand higher and smaller (rules 1, 2, and 3), but when in his haste he realized the arm was already too low, he stopped drawing there. Finishing off the hand would have tipped the ground off kilter. Being a quick sketch he didn’t bother to alter it. (Am I close, Glen?) How nicely the upper left leg overlaps (rule 4) the right leg, then the ankles cross over and the right foot then overlaps the left. Look how deftly the ear/or earring overlaps the subtle suggestion of a cheek. The knees, shorts cuffs, and blouse bottom display rule 5 surface lines. Foreshortening (rule 6) was acquired by making the legs diminish in size from the arms. Compare the leg size to the closest arm. Also he has made a very simple back bend whose curved line works so well with the straight arms. Compare the leg size to the closest arm. Also he has made a very simple back bend whose curved line works so well with the straight line of the right arm. Notice that since the shoulders are being forced to their maximum breadth by the posture, the cloth from the neck is stretched into a pull. Notice how the neck continues the stretch of the back. You can’t see it but you feel a squash at the front of the neck, since she appears to be looking slightly down. Anatomy? It’s there, but it’s not an anatomical drawing. It’s a drawing of a girl sitting on the grass in the park. The presence of all those principles of perspective have helped to make this an excellent drawing.

I’ll spare you any further analysis (at this time) but I do hope you will study the rest of the drawings for the presence of these rules. I’m not inferring, by the way that Glen has ever heard of or seen these principles in the form I present them. But he has learned them somehow, and learned them well. When you are conscious of these rules, they are easier to incorporate into you drawing. Even as Glen said about anatomy, knowing them and how to use them will add to your confidence, and to your excellence in drawing. Be relentless in searching for ways to improve your drawings. Learn to apply these principles. Here are some of my favorites from Glen’s sketchbooks.