
Inbetweening is not merely putting line in between line but actually moving shapes and volumes to conform to some predetermined action. True, when inbetweening a slow movement where the volumes are very close together, one sees only line going between line
![]()
but when inbetweening a broader movement the lines will be further apart and the volume itself must be considered or
![]()
in the first case, inbetweening is usually pretty mechanical, i.e., put one line in between two others and that’s it. In the broader movement the lines may be so far apart as to forgo any attempt to merely inbetween lines. However, there is a short cut to doing such drawings, which is called superimposing or place and trace. This is simply putting the two extremes on the pegs, say #1 and #5 plus a blank sheet for #3. After sketching in roughly the character’s inbetween position plus an accurate drawing of all lines close enough to inbetween, extreme #1 is left on the pegs while extreme #5 is placed over it in a superimposed position and taped to the desk leaving the part to be flipped free. Then superimpose the sketch and tape down also. You may double-check the position of #3 by “eyeing” the corners of the paper to see if they line up. (This will only work if all the papers were punched alike.)
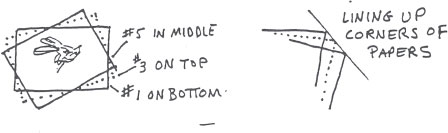
In extremely critical and/or exacting work the dot system may be employed. This entails placing three dots near the corners of all three drawings (#1, #3, and #5) traced accurately one over the other.
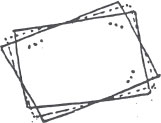
Then in the same manner as in the above method, line up the dots as if “inbetweening” them, tape all papers to the desk and proceed with inbetween. Make sure the dots are out of the field lest they show up on the Xerox cel. Another aid when inbetweening a particular shape is to be conscious of these things: note the angle, length, width, and overall shape of the extremes and keep these things in mind while drawing. For instance, if you have a shape like this
![]()
to inbetween, first of all establish the angle of the extremes and indicate an inbetween angle lightly on your paper.

Then establish the length of the extremes and indicate the inbetween length on your paper with a couple of dots.
Then, starting at one of the dots, proceed to draw the inbetween with its width and overall shape, plus any subtleties constantly in mind, drawing your way to the other dot.

Then add the details. This may seem mind-boggling but is really quite simple. Once the procedure is learned and becomes second nature, it is much faster and much more accurate than floundering amidst a maze of confusing lines — with a hesitant approach with stops and starts, a little drawing here, a little drawing there technique with its enervating and time-consuming meandering. And soon all of this can be handled with a minimum of consternation — even on a Monday!
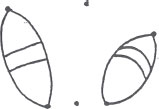
Another technique may be especially helpful when working on the “microscopic” drawings that are so small that flipping hardly differentiates the lines. This technique forgets trying inbetween lines but rather concentrates on the shape and its details; for instance, a leg. Note first the angle of the upper leg, the lower leg, and the foot.
Note that there is a hip, a knee, and an ankle, for all cartoons are constructed roughly on human anatomy, unless it’s an animal’s hind foot that also has a hip, a knee, and an ankle only in a slightly different arrangement.

You have started with the basic structure, flipping often to make sure your drawing is falling in place (inbetween), then add details until the drawing is complete, having had all this time, running constantly through your mind, all those elements of drawing that are contained in the extremes.

Very often, if not most of the time, an action does not move in a straight line but in an arc. Sometimes the animator will indicate the arcs lightly with a blue pencil. But whether there is an indication or not, one should place several drawings on the pegs and check. Let’s say if drawings #17 and #21 look like this.
![]()
it might be tempting to make the inbetween look like this.
![]()
But if drawings #13, #17, #21, and #25 are placed on the pegs, they may look like this.
![]()
This calls for an arc to assure a smooth flow from one drawing to another.

Meaning the inbetweens #15, #19, and #23 should follow the arc.

If they were merely inbetweened the action would be jerky.
![]()
Try to swing your arm or move your head like that and you will see how important establishing the arcs are before attempting a drawing.
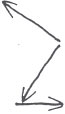
Another consideration is timing. Again, whether there is a chart on the extreme or not, one should check to be sure. Actions are full of slow-outs
![]()
and slow-ins
![]()
and if they are not heeded the action will lose its snap. Rolling several extremes on the pegs will reveal any need for slow-in or slow-out consideration. It takes just a moment to check for arcs and slow-ins, but in the long run may save either later rework or avoid a possible not too crisp movement. If there is any question about whether or not to do this on your own, discuss it with the animator — he will be pleased that you have shown an interest. Slow-outs occur when a character or a part of a character, having been still, begins to move. It will not take off like a bullet out of a gun, it has to start slowly and gain speed. At the other end of the action it will slow-in, meaning it cannot just stop abruptly but must ease into the pose.
Any “follow through” on clothing (sleeves, coat tails, dress hems, ties), long hair, tails, ears, etc., will involve slow-outs and slow-ins. For instance, when a character with a long tail comes to a halt after a move, the body may go into trace backs (or a held cel when permissible) while the tail eases into its final position, perhaps many frames later.