I am often asked what is the right way to draw this or that, and of course, I am always hard pressed for an answer. So many things depend on what you have to work with and what it is you want to say.
In a dialog practice scene for the between pictures “jobless,” it is impossible to pick a right way to solve the problem. There is merit in the practice and its intention was to make the artists think about it rather than just do straight inbetweens. One would need to hear the dialog recording and see the dialog reading on the exposure sheet to be sure. Using the simple principles of animation such as squash and stretch, anticipation, and timing will help in doing dialogue. Simply inbetweening the extremes would cause an undesirable mushiness. Dialog usually has a snap to it, in animation that snap even has to be accented. Also, in real life we rarely form every vowel and consonant with our mouth. We group similarly shaped sounds and words into phrases, saving the broad accents for dramatic effect. For instance, if you were delivering the line, “What do you think I should do with the rest of this stuff?,” you more than likely would move only your tongue until you got to the word “rest” and would probably accent that word. Try it. Notice there is very little lip and jaw movement. Try it again accentuating every syllable using the lips and jaw. It feels silly doesn’t it? Overdoing dialog in animation destroys credibility.
Let’s say the character is saying “fly.” Ideally there would be time for a squeezed up “f” with a drawing before or after to show it either forming or unforming. By that I mean a soft “f” that is not yet squeezed tight; that way you see the “f” happening and have enough of its shape on the screen to see it. Just one or two frames is hardly enough time to register, and if the adjoining mouths are similar in shape and position you will have something like this.
![]()
That closed mouth will “flash” on the screen because in among several frames of inside mouth color you will have one closed mouth surrounded by flesh color, and possibly two white teeth flashing like a strobe light.
A lot depends on how the “f” is spoken and how much time you have to spend on it as to whether you will show the upper teeth, turn down the corners of the lips, raise the cheeks, narrow down the eyes, or wrinkle the nose. The “right way?” Well, those diagrams of mouth action in various animation books are a good place to start, but into that stir a little common sense and logic and you will likely get something that works. So you can see why I am wishy-washy when it comes to coming up with an answer to the question: “What’s the right way…?
Drawing from the model is fraught with many similar problems. How to draw something always depends on what you (or your character) are trying to say. (I’m not speaking about dialog here.) But anyway, are you drawing the part where the character is saying “What do you think I should do with the…” or the accented, “…rest…” You have to have that in mind or your drawing will just lie there and say nothing at all. The most horrible fate any drawing can be subjected to is to have nothing to say. That is why I encourage everyone to form a story in their minds as they draw, so they will have a direction in which to go. Most drawing problems are solved by the answer to, “What is it doing?”
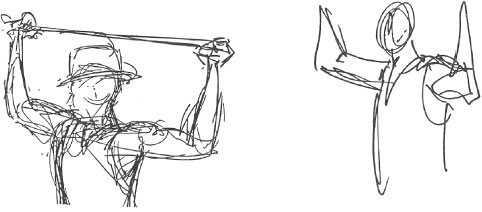
Following are some drawings that were made in one of the drawing classes. In my accompanying sketches I try to demonstrate the importance of having the figure doing something — anything! If the model’s pose is unclear and you want to clarify it, or if you want to plus the pose or even change it, or if you want to change the character to Mickey or Ariel, do it. It has to be doing something, saying something, telling a story … in a word, acting.
I try to have the models pose in a costume — a waiter, sailor, hula-dancer, carpenter, etc. I think it’s as important to analyze how a carpenter saws a board as it is to search for the best way to animate an “f”.
This all may seem rather involved to some of you, but I think it can make the difference between a Doonesbury or a Kathy drawing and a scene from Bambi.
Analyzing a gesture doesn’t take a long time, nor does it use up a lot of energy (actually it’s quite invigorating). All you have to do is decide what you want your character to do (that should take but a split second) and, then without getting sidetracked by fascinating and eye-catching details, get it down on paper. For instance, here’s a student’s sketch of a character supposedly leaning on the back of a chair, in a somewhat reflective attitude. His head says “reflective mood” but cover up the head with your fingertip and then name the pose. In my sketch (and this only took about ten or fifteen seconds) he is leaning back on the chair, his left hip is jutting out because all the weight is on his left leg, and the arm is relaxed along the left side with the hand dangling free. Between the support he gets from leaning on the chair and the placement of the weight on the left leg, he can relax and reflect to his heart’s desire:

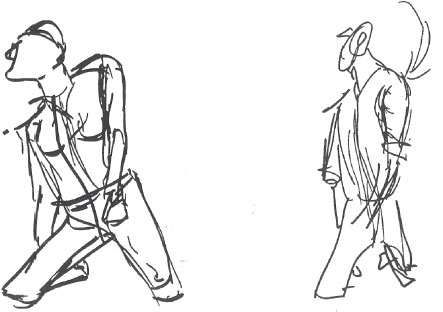
Here is another pose where the character is sitting in the chair, leaning on the back of the chair, again, in a reflective attitude. As you can see the student was struggling with how to draw the various parts of the body rather than having concentrated on the desired gesture and going for that. Notice in my sketch I made no effort to draw anything. I was drawing just the gesture — the parts seemed to fall into place. I concentrated on leaning him forward so the weight of the head and shoulders was on the chair back. That made the right arm look more like it was dangling out beyond (helping the attitude). Since he is seated backwards in the chair, I spread his legs apart (around the chair back) and in doing so brought his left leg out toward us, while the far leg appears to be going away from us, creating a feeling of third dimension. As you can see in the student’s drawing both legs (and both arms) are profile, flat, and parallel to the picture plane.

While parallels are fresh in our minds, here is another student’s drawing where the arms are both profiles. Nothing will flatten your drawing better than parallel lines, shapes, and directions. Blatant verticals and horizontals are also undesirable. Add them to your unwelcome list. In my sketch I brought the left elbow forward to overcome that problem and to create some third dimensional space in the drawing.
In this last example the pose was a complicated one. The model planted his knees on the floor in one direction and then twisted his body and head progressively to his right. In the student’s drawing nearly everything is pointed in the same direction, obviating any twist.
Due to an overwhelming desire to go to Yosemite for a couple of days to kick (autumn) leaves, and the need to build an addition to our (covered) patio to protect our ever growing accumulation of plants from the soon-to-come killer frosts, I am taking a two-week vacation. Consequently, there will be no Stanchfield drawing classes nor Stanchfield handouts during this time. Eat your hearts out!
If in that interim you decide you are better off without me, give me a call and I’ll retire for the fifth time.