Yes, yes, let's talk about the weather. | ||
| --W. S. Gilbert, The Pirates of Penzance, or, The Slave of Duty | ||
Even if you're never called upon to re-create the extreme weather events depicted in The Day After Tomorrow, climate conditions along with natural elements of water and wind are a constant in dramatic storylines. You may need to re-create these effects from scratch, or you may be called upon to subtly tweak what's already in the shot.
This chapter will give you some pointers on creating such natural elements as particulate matter in the air, replacement skies, mist, fog, smoke, the effects of wind, and water in its three states.
Why would you want to do this? Simply because the crew couldn't get the conditions the story required on the day of the shoot? Well, in extreme cases, yes. But actually, any large exterior shot will exhibit some sort of meteorological influence, and everything in the shot is interrelated. In this chapter, you'll investigate the phenomena that you can influence or even replace wholesale, including
Particulate matter in the air: The look of particles in the air can give you important clues to your scene. Is it ever complicated to deal with particulate matter? Where does it not apply?
Sky replacement: This is one of those straightforward requests that comes up for effects compositors all the time. What is involved?
Clouds of fog, smoke, or mist: You can sense motion, color, and even depth in this element. How can these be created in After Effects?
Billowing smoke: What about thick plumes of smoke? Those need to be created with some sort of complex 3D dynamics system, right? Wrong.
Wind: How do you re-create something you can't see? Figuring out cheap and easy ways to show its presence via secondary animation can really sell your shot.
Water and precipitation: The presence of water can influence your shot either onscreen or off. How do you handle rain and snow?
It's rare indeed that weather conditions cooperate on location. Transforming the appearance of a scene using natural elements is one of the most satisfying things you can do as a compositor. The before and after comparison alone can be stunning, and the result can be worthy of a blockbuster film that is specifically about heavy weather.
Particulate matter in the air influences how objects appear at different depths. What is this matter? Fundamentally, it is water, another gas, dust, or some other type of visible particulate usually called pollution. Even an ideal, pristine, pollution-free environment has water in the air—even in the desert. The amount in the air gives you clues to
The distance to the horizon and where objects lie in relation to it
The basic type of climate; the aridness or heaviness of the weather
The time of year and the day's weather
The air's stagnancy
The sun's location
The color of the particulate matter offers clues to how much pollution is present and what it is: dust, smog, dark smoke from a fire, and so on (Figure 13.1).
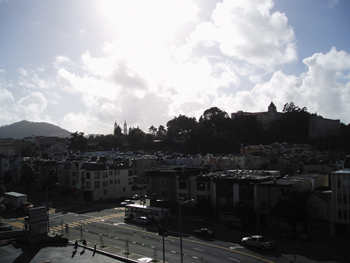
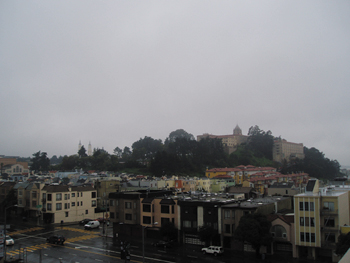
Figure 13.1. The same location looks very different under different weather conditions. But if you start to photograph and study the same location under various circumstances, you begin to get a sense of subtleties, such as how backlighting emphasizes even low levels of haze and reduces color saturation, and how the flat lighting of a foggy day might desaturate and obscure the horizon, but may also bring out colors more.
The basic visual result of particulate matter in the air is to lower the apparent contrast of visible objects; the secondary effects are that objects take on the color of the atmosphere around them and become slightly diffuse (Figure 13.2). This is a subtle yet omnipresent depth cue: With any particulate matter in the air at all, optics become less contrasty the further they are from the camera, and they may change color and become blurrier. As a compositor, you must use this to your advantage, not only to match the real world, but also to provide clues to the shot's environment.
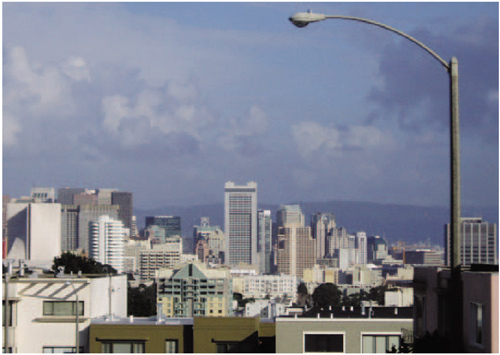
Figure 13.2. This shot was taken with a long lens. The structures one block away retain a good deal in the black of their shadows; buildings a mile or two away, far less; and the foothills ten miles away are so desaturated they begin to fade right into the sky—at first you don't even notice them. The feeling of the shot is one of proximity to a crowded urban environment but with nature always waiting just beyond.
As an example, consider Figure 13.2, which was shot with a long lens. Zoom or telephoto lenses bring background elements more prominently into the frame; and a common dramatic use of the camera is to employ a long lens when something in the background is meant to loom large. If something that is supposed to be far away looks not only large but crystal clear in the background, however, it will simply look wrong. With the right amount of haze for the weather conditions, even a shot highly compressed with a very long lens will be something the viewer simply believes.
The most straightforward scenario in which atmospheric particles come into play is when you place an object in the distance by matching it to a source plate. If the added object is meant to be coplanar with an object already present in the plate, you need only match contrast values using Output Black and Output White in the Levels effect. If you make your adjustments channel by channel (as suggested in Chapter 5, “Color and Light: Adjusting and Matching”), discoloration due to such factors as smog and reflected light simply come along for free.
Similarly, if the added object is meant to be further than one object in the plate but closer than another, you should average the contrast values proportionally.
Where this process can get tricky is if your background does not contain objects with pure black or pure white in the distance. This is less common than you might think because most backgrounds contain shadows that although not pure black are close. In these cases, you're no longer matching exactly, you're eyeballing the shot until the depth looks right (Figure 13.3).
Figure 13.3. Not all shots provide a nice, gently shaded white object such as this to match; and yet, if the object you are matching into this scene is hard and metallic, you'd actually want to sample the white of that car in front. But what about placing an item in the background sky, when you can't see any horizon? You start by matching the background and dial down the contrast (using Levels) until it looks right.
If the foreground layer lacks pure black, pure white, or both, that's less of a big deal. You can always start with a small solid set with the default Ramp effect, set Levels to give it the proper depth cueing, and then apply those levels to whatever layer belongs at that depth (Figures 13.4a, b, and c).
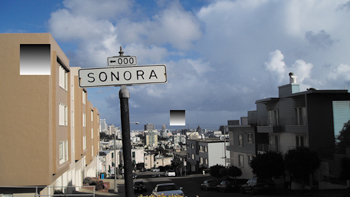

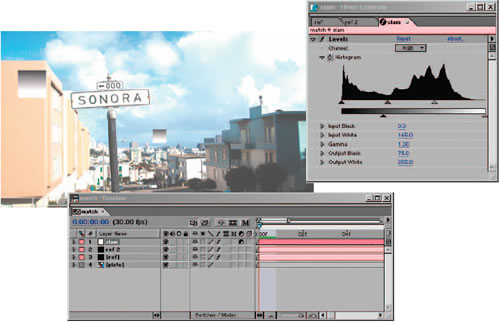
Figure 13.4a, b, and c. If a foreground element you are trying to match to a background lacks the full contrast range, you can use stand-ins (13.4a). You apply your Levels adjustments to those (13.4b matches them to foreground and background), matching contrast channel by channel (see Chapter 5 for details). Remember that slamming your comp, temporarily exposing it to higher contrast whites and lower contrast blacks (13.4c), is an effective way of magnifying and checking Levels.
What do you do when you don't have a photographed background plate to match or when your task is to change the conditions in the plate that you do have? Although you no longer have reference built into the shot, you can still use reference. If you can find a photo that contains the conditions you wish to re-create, you can match to that instead.
To start, you must somehow organize the shot into planes of distance. If the source imagery is computer-generated, the 3D program that created it can also generate a depth map for you to use (Figure 13.5). If not, you can slice the image into planes of distance, or you can make your own depth map to weight the distance of the objects in frame.
Figure 13.5. A basic depth map of a cartoonish 3D city. A map such as this obviates the need for individual layered planes to be rendered separately, to some extent. You can apply this map directly to an adjustment layer as a Luma Inverted Matte (inverted in this example because the most distant objects should be most affected), and then dial in any contrast (via Levels) and softening (via Fast Blur) effects; they are weighted to affect the background more than the foreground, and the contrast of the map itself can be adjusted to change the relative weighting. (Image courtesy of Fred Lewis/Moving Media.)
This brings up one of the main reasons that beginning with a basic 3D render of a scene can be useful for matte painters: Not only is perspective and lens distortion included in the render, but a depth map is also easy to generate, and it remains valid as the painting evolves toward completion.
More extreme conditions may demand actual particles, and the phenomena that goes along with them. The rest of the chapter examines these conditions.
Sky replacement is one of the cheapest and easiest improvements you can make to a shot. It opens up all kinds of possibilities for shooting faster and more cheaply: You don't have to wait for particular conditions, and you can swap in not only a different sky but also a skyline from a different location.
The sky, after all, is usually part of the story, often a subliminal one but occasionally a starring element. In Vanilla Sky, for example, the surreal-looking sky was the first clue we got that maybe Tom Cruise's character was not in the real world. An interior with a window could be anywhere, but show a Manhattan skyline outside the window and New Yorkers will try to place the exact neighborhood and city block of that location, along with the time of day, time of year, weather, outside temperature, and so on, possibly without ever really paying conscious attention to it.
Why spend extra time and money to get the exact distant background conditions you want, if you can get the shot cheaper and more quickly by taking it elsewhere? Why spend tens or hundreds of thousands of dollars for that view apartment on Central Park East and try to get the whole scene done at golden hour (the beautiful time of the sunset, an “hour” that typically lasts about 20 minutes and doesn't show up on an overcast day)? Instead, you could take it in your friend's apartment, shoot all day, and add the sunset view in post. True, sometimes there is no replacement for a real environment. Days of Heaven, for example, is as close to being a film about golden hour as you're ever likely to see, and it took a couple of years to shoot. Often, the real story is elsewhere, and the sky is a subliminal (even if beautiful) backdrop that must serve that story (Figures 13.6a through d).
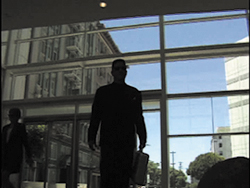
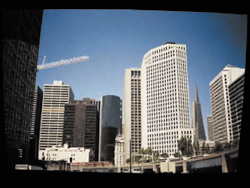
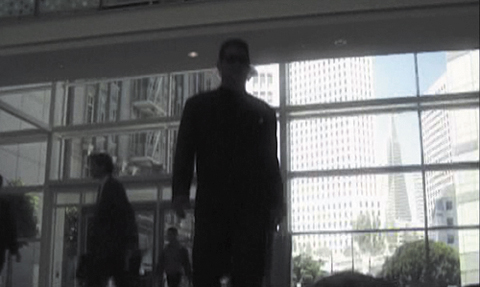
Figure 13.6a through d. For an independent film with no budget set in San Francisco, the director had the clever idea of shooting it in a building lobby across the bay in lower-rent Oakland (13.6a), pulling a matte from the blue sky (13.6b), and match moving a still shot of the San Francisco skyline (from street level, 13.6c) for a result that anyone familiar with that infamous pyramid-shaped building would assume was taken in downtown San Francisco. (Images courtesy of The Orphanage.)
Only on the clearest, bluest days does the sky approach any kind of ideal as a keyable background. The color tends to wash out toward the horizon, cloudless skies are not always so easy to come by, and even clear blue skies are not as saturated with color as they might sometimes seem.
Still, some combination of a color keyer, such as Keylight, and a hi-con luminance matte pass or a garbage matte, as needed, can key out the existing infinite depth in your shot. Chapter 6, “Color Keying,” focuses on strategies for employing these, and Chapter 7, “Rotoscoping and Paint,” describes the alternative, rotoscoping, when keys and garbage mattes aren't doing the trick.
In any case, the first step of sky replacement is making the existing “sky” (which may include other items at infinite distance, such as buildings and clouds) transparent by developing a matte for it. As you do this, place the replacement sky in the background; a sky matte typically does not have to be as exacting as a blue-screen key because the replacement sky often bears a resemblance to the source (Figure 13.7).

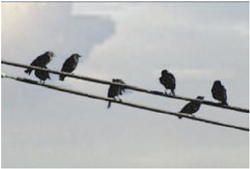
Figure 13.7. This rather poor blue-screen matte is acceptable for this type of shot because the color range and contrast of the target background are not so different from the source. The holes in the matte are the result of reflected sky color in the highlights of the foreground; this looks acceptable in the final shot.
If your shot is locked off, your job is already complete with the creation of the matte. If, however, there is camera movement in the shot, you might think that you need a 3D track to properly composite in a new sky element.
Typically, that's overkill. Instead, you should consider these options:
If you are matching motion from the original shot and anything in the source sky can be tracked, by all means track the source.
If only your foreground is trackable and you're following the suggestions in Chapter 8, “Effective Motion Tracking,” for applying a track to a 3D camera, move the replacement sky to the far background. (This may require a Z Position value in the four or five digits, depending on camera settings.) Scale it up to compensate for the distance. In this case you must essentially eyeball the depth.
If the shot contains a push or zoom (Chapter 9, “Virtual Cinematography,” describes the difference), these may be more easily re-created using a 3D camera (although you should look at Chapter 8 for tips on getting away with a 2D track). If you're adding them from scratch, place the sky in the far background as with the last tip and add your camera animation. If the push or zoom is in your source shot, you may need camera data from third-party 3D tracking software (see Chapter 8).
The basic phenomenon you're trying to re-create is that scenery at infinite distance moves less than objects in the foreground, the basic parallax effect. This effect is less pronounced with a long, telephoto lens, and more pronounced in a wide angle. For the match in Figure 13.6, a still shot (no perspective) was skewed to match the correct angle and tracked in 2D; the lens angle was long enough and the shot brief enough that they got away with it.
Adding an animated layer of translucent clouds to a shot is easily enough done in After Effects. You can create the basic element by applying the Fractal Noise effect to a solid, and then use a blending mode such as Add or Screen to layer it in with the appropriate Opacity setting.
Note
Be sure not to confuse the eminently useful Fractal Noise effect, found in the Noise & Grain category, with the far less useful (albeit pretty) Fractal effect in the Render category.
Fractal Noise, at the default Fractal Type setting of Basic, already looks smoky (Figure 13.8); you can refine the look of it somewhat by switching the Noise Type setting from the default, Soft Linear, to Spline. Go ahead and check out the other Fractal Types if you're curious; most of them are more synthetic looking, although some can be appropriate for alternative effects, such as lava. The main thing you must add is motion.
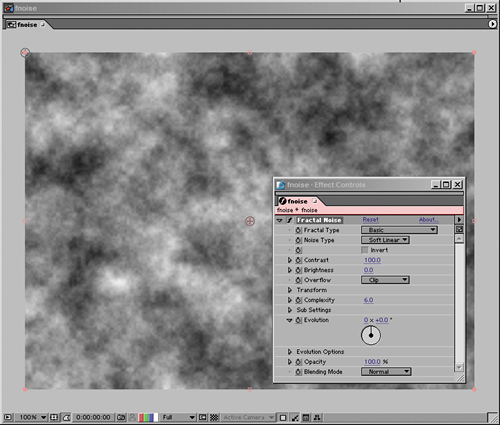
Figure 13.8. Fractal Noise (shown here at the default setting) is a decent stand-in for organic-looking fog. You can try varying the Fractal Type or Noise Type to get different looks, and you must animate the Evolution if you want any billowing of the element.
There are two types of motion you typically may want to add: an Evolution animation to cause internal movement, and possibly Transform animations to cause the overall layer to move, as if being blown by wind (Figure 13.9). There is no need to create a huge layer and animate its Position value. The Offset Turbulence setting under Transform will do the job for you, and you can reposition it infinitely without running out of space to move. The question of how much the settings should change over time is largely one of trial and error according to what your shot demands.
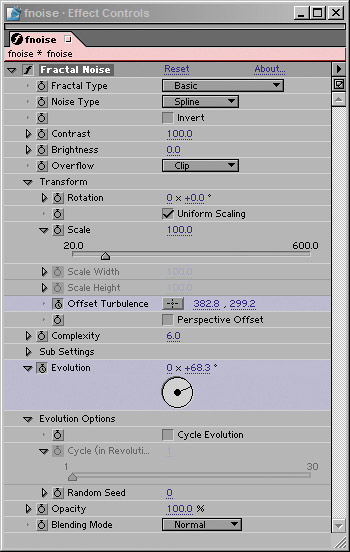
Figure 13.9. The highlighted controls are keyframed; these are the keys to putting your fog element in motion. Note that you can also add Scale and Rotation animations.
The other main settings to consider are those affecting the apparent scale and density of the noise layer. To influence these, first adjust the Scale (under Transform) and Contrast settings. You will not, generally speaking, want to stray too far from the defaults for Complexity and Sub Settings; these also affect apparent scale and density, but with all kinds of undesirable side effects that make the smoke look artificial.
Note
If you ever find yourself using Fractal Noise to design a texture map and you need to map the loop seamlessly, go into Evolution Options and check the box marked Cycle Evolution. Now animate Evolution in whole cycles. Try setting the first keyframe to 0° and the final frame to, say, two revolutions and 0° (written as 2 x 0. 0°). Set the Cycle (in Revolutions) parameter to the number of total revolutions that complete the loop (2 in this case). The first and last keyframes will now match.
So now you have an animated smoke, fog, or mist element whose motion you can continue to tweak; the only remaining question is how you layer it in. In virtually no case can you simply blend a single Fractal Noise layer over footage and end up with the look you're after. Instead, you will more effectively sell the effect by combining several layers. Time to examine how that's done.
If you're planning on covering your whole scene evenly with smoke or mist, you will achieve a more realistic look by using two or three separate layers of Fractal Noise. You can even use the same settings, choosing different portions and time offsets and positioning them in 3D space to set the scale as needed (Figure 13.10).
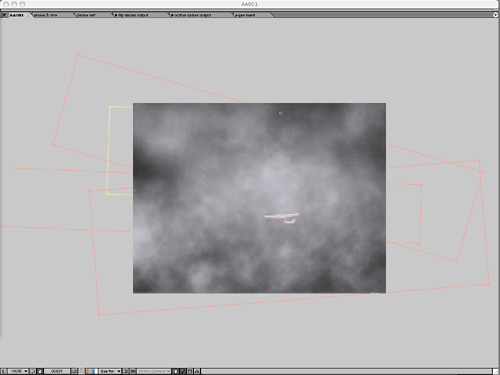

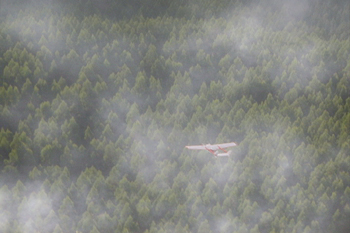
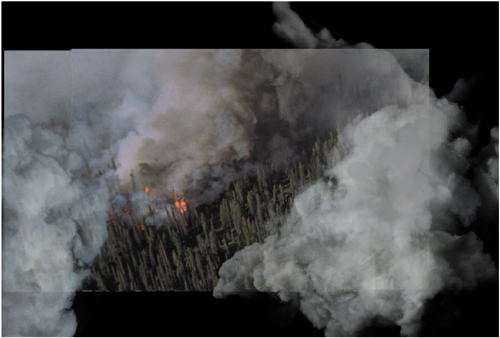
Figure 13.10. The smoke in this shot is made up of one large rendered fractal noise element that was sliced up, staggered, and animated in pseudo-3D using the technique featured at the end of Chapter 10, “Expressions.” This is a flyover, and there needs to be enough discrete overlapping elements for the smoke to hold its position but give convincing depth. (Final image courtesy of ABC-TV.)
The unexpected byproduct of layering 2D particle layers in this manner is that they take on the illusion of depth and volume. The eye perceives changes in parallax between the foreground and background, and automatically assumes these to be a byproduct of full three-dimensionality, yet you save the time and trouble of a 3D volumetric particle render. Of course, you're limited to instances in which particles don't interact with movement from objects in the scene; otherwise, you instantly graduate to some very tricky 3D effects.
The best method for blending these particle layers with your background is typically to apply each one as a luminance matte of a solid. That way, you can make the solid whatever color you choose for your particles without having to anticipate what a blending mode choice will do to them.
Often you will want to hold out the particle effect to a particular area of your frame. If you are trying to add smoke to a generalized area of the frame, a big elliptical mask with a high feather setting (in the triple digits even for video resolution) will do the trick; if the borders of the smoke area are apparent, increase the mask feather even further (Figure 13.11).

Figure 13.11. This mask of a single smoke element from the shot in Figure 13.10 has a 200-pixel feather, despite that the resolution of the shot is D1 video (720 by 486). The softness of the mask helps to sell the element as smoke and works well overlaid with other, similarly feathered masked elements.
The same effect you get when you layer several instances of Fractal Noise can aid the illusion of moving forward through a misty cloud. That's done simply enough, but how often does your shot consist of just moving through a misty cloud? Most of the time, you will be adding clouds of smoke or mist to the ground plane of an existing shot.
You can use the technique for emulating 3D tracking (see Chapter 10) to make the smoke hold its place in a particular area of the scene as the camera moves through (or above) it. To make this work, keep a few points in mind:
Each instance of Fractal Noise should have a soft elliptical mask around it.
The mask should be large enough to overlap with another masked instance, but small enough that it does not slide its position as the angle of the camera changes.
A small amount of Evolution animation goes a long way, and too much will blow the gag. Let the movement of the camera create the interest of motion.
Depending on the length and distance covered in the shot, be willing to create at least a half-dozen individual masked layers of Fractal Noise.
The shot dissected in Figures 13.10 and 13.11 features just such an effect of moving forward through clouds. It is difficult to convey with still images how the effect works in motion, but it combines the tracking of each shot carefully into place with the phenomenon of parallax, whereby overlapping layers swirl across one another in a believable manner. Mist and smoke seem to be a volume but they actually often behave more like overlapping, translucent planes—individual clouds of mist and smoke.
Selling the Effect with Diffraction
There is more to adding a cloud to a realistic shot than a simple A over B comp; water elements in the air, whether in spray, mist, or clouds, not only occlude light but diffract it. This diffraction effect can be simulated by applying Compound Blur to an adjustment layer between the fog and the background and using a pre-composed (or pre-rendered) version of the fog element as its Blur Layer.
You want details, and you'll get them, but you have to make it to the last chapter of the book, where guest author Stu Maschwitz lays it all out in detail.
Fractal Noise works fine for creating and animating thin wispy smoke and mist. It will not, however, help you re-create thick, billowing clouds. When clouds are opaque enough to have their own shape, shading, and topography, re-creating them with built-in After Effects plug-ins no longer does the job. Luckily, all you need is a good still cloud element and you can animate it in After Effects. And all you need to create the element is a high-resolution reference photo—or a bag of cotton puffs.
That's right, cotton puffs, like you get at the pharmacy. I first heard about this trick on a visit to the digital matte department at Industrial Light + Magic about a decade ago (back when the department was made up of four artists), where visionary matte painter Yusei Uesegi was given credit for devising it. He showed me a jaw-dropping shot of a pirate ship in flames, smoke billowing from the masts.
The simplest way to create your basic cloud is to arrange the cotton balls on a large piece of nonreflective black poster board. Take the board outside on a sunny day so you get some nice highlights and shadows. When you photo-graph it at different angles to the light, the results look like puffy white clouds already (Figure 13.12).
Figure 13.12. You may have noticed how cotton puffs can be arranged to resemble fluffy clouds. But who knew you could get away with sticking them in a movie?
To give your clouds some shape and contour, open the image in Photoshop, and use the Clone Stamp tool to create a cloud with the shape you want. You can do it directly in After Effects, but this is the kind of job for which Photoshop was designed. Clone in contour layers of highlights (using Linear Dodge, Screen, or Lighten blending modes) and shadows (with blending set to Multiply or Darken) until the cloud has the look you're after (Figure 13.13).
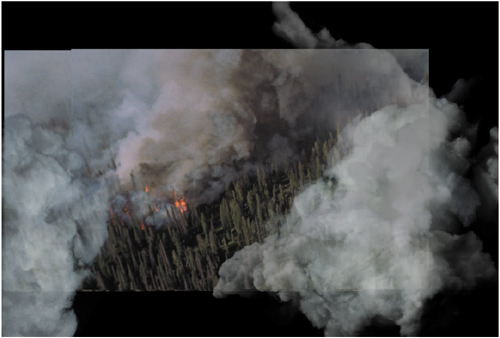
Figure 13.13. The elements from Figure 13.12 have been incorporated into this Photoshop matte painting, with the shot into which the smoke will be composited in the background for reference (the extended shot moves left to right). The cotton has been painted in via a dozen overlapping layers. The topmost use Screen mode (to highlight) or Overlay mode (to darken), bringing out the contours. Can you tell which smoke is made up of cotton?
So now you have a good-looking cloud, but it's a still. How do you put it in motion? This is where After Effects' excellent distortion tools come into play, in particular Mesh Warp and Liquify.
Note
Laying cotton on a black card or scanner is not the only way to get a cloud sample, nor is it the easiest in this digital age. Reference images of clouds at high-resolution will obviously work as well, and some matte painters are talented enough to paint dramatic, beautiful clouds from scratch. Using cotton, however, lets you be specific and creative: For example, if you want the effect of light coming through the clouds, you can hold the cotton up to an incandescent light (without the black card) and photograph that.
Mesh Warp lays a grid of Bézier handles over the frame; you animate distortion by setting a keyframe for the Distortion Mesh property at frame 0, and then moving the points of the grid, and realigning the Bézier handles associated with each point to bend to the vertices between points. The image to which this effect is applied follows the shape of the grid.
By default, Mesh Warp begins with a seven-by-seven grid. Before you do anything else, make sure that the size of the grid makes sense for your image; you might want to increase its size for a high-resolution project, and you can reduce the number of rows to fit the aspect ratio of your shot, so you begin with a grid of squares (Figure 13.14).
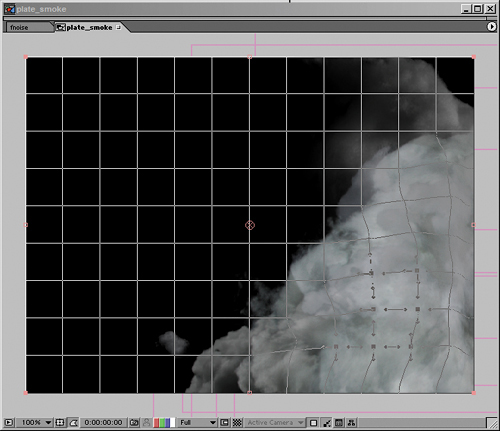
Figure 13.14. The Mesh Warp controls are really quite simple: a grid of points and vectors. You can set the number and quality, and animate the position of the grid overall (one keyframe for all grid points). Points can be multiselected and dragged (as shown) and each point contains Bezier handles for warping the adjacent vectors. It's pretty cool, especially now that machines are fast enough to render the results effectively.
You can't typically get away with dragging a point more than about halfway toward any other point; watch carefully for artifacts of stretching and tearing as you work, and preview often. If you see stretching, realign adjacent points and handles to compensate.
Note
Mesh Warp, like many distortion tools, renders rather slowly. As you rough in the motion, feel free to work at quarter-resolution. When you've finalized your animation, you can save a lot of time by pre-rendering it (see Chapter 4, “Optimizing the Pipeline”).
The Liquify effect is a brush-based system for distorting footage; as such, it is useful in cases when a Mesh Warp grid is too cumbersome and finer adjustments are needed.
Of the tools included with Liquify, the first two along the top row, Warp and Turbulence, are most likely to be useful (Figure 13.15). Warp has a similar effect to moving a point in Mesh Warp; it simply pushes pixels in the direction you drag the brush. Turbulence scrambles pixels in the path of the brush. The Reconstruction brush is like a selective undo, reversing distortions when you use the default setting; other options for this brush are contained in the Reconstruction Mode menu.
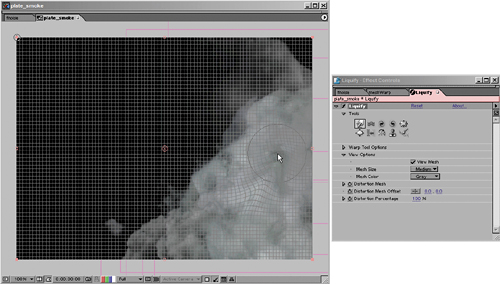
Figure 13.15. Liquify is also a mesh distortion tool, only the mesh is much finer than Mesh Warp's and it is not visible by default. You can choose to display it under View Options in the effect controls. Here the Warp tool is being used to create an effect much like that created by the Mesh Warp in the previous figure, but via a brush rather than a grid.
Liquify also has the advantage of letting you mask out areas that you don't want it to affect. Draw a mask around the area you want to leave untouched by Liquify brushes, but set the mask mode to None, disabling it. Under Warp Tool Options, select the mask name in the Freeze Area Masked menu.
Lest you think the methods described in this section are some crude kludge, inferior to procedural particle dynamic effects created by a technical director in a sophisticated 3D rendering program, here's an anecdote that demonstrates how this generalized approach (refined to a high degree) saved the day on a movie with an eight-figure budget. A few short weeks before the final deadline for all shots to be completed on The Day After Tomorrow, the render pipeline at The Orphanage was slammed, but the “super cell” element for the freezing of New York City sequence (that huge cloud bank swirling around on the horizon) had not been approved by the client other than in matte paintings.
It was clear that even if a technical director could re-create the look in 3D—and no one had done so yet—there wasn't going to be time left to render it. By animating the matte paintings using the techniques outlined in this section, the shots were completed and approved within a couple of weeks. As always, the key was breaking the problem down into component parts. The final super cell rig had over a dozen individual component layers and instances of Mesh Warp and Liquify, along with holdouts, overlays, offsets, and blending modes built up among them to give the effect the appropriate organic complexity and dimension.
Because each project varies, the techniques offered are meant to form only the basis of your finished effect. The goal is to provide you with a few keys that you can combine or part out on your own, rather than nail you down to specific steps that work only in one context.
So, for example, selling a shot of the smoke plume might involve not only warping effects, but also some thinner, faster-moving smoke nearest the flames or in the foreground of the scene, which could be created with Fractal Noise. Or, if the drifting Fractal Noise smoke needed more specific directionality—say, to flow around an object—you could apply a Mesh Warp on top of its animation, or flow it right through the Mesh Warp grid (Figure 13.16).
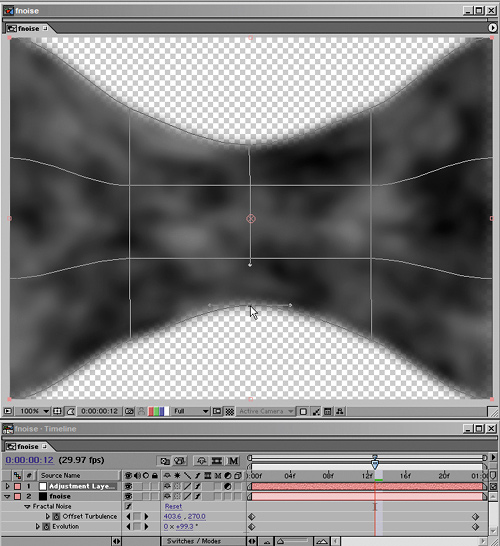
Figure 13.16. You can get pretty creative with your use for Mesh Warp: Here, Fractal Noise is animated to move left to right through a grid that deforms it as it animates. Note how the cursor changes when you are over a Mesh Warp grid point; one of the most difficult things about using this effect is that it's easy to inadvertently move a layer instead of a point.
Many effects, including smoke trails, don't require particle generation in order to be re-created faithfully. Check out the reference in Figure 13.17 and you'll notice that smoke trails are just like elongated clouds, revealed over time along a linear path.
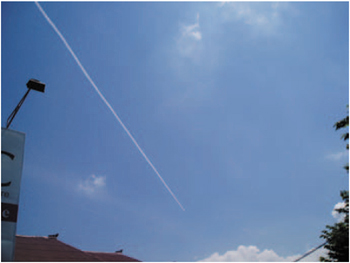
Therefore, initial setup of this effect is simply a matter of starting with a clean plate, painting the smoke trails in a separate still layer, and revealing them over time (presumably behind the aircraft that is creating them). The quickest and easiest way to reveal such an element over time is often by animating a mask, but if you want to do it the cool and automatic way, you could use techniques described in Chapter 8 to apply a motion tracker to a clone brush.
The optional second stage of this effect would be the dissipation of the trail; depending on how much wind there was that day, the trail would probably drift, spread, and thin out over time. That means that in a wide shot, the back of the trail would be more dissipated than the front.
A simple method to achieve this (which could work with a distant shot, at least) involves using a black-to-white gradient and Compound Blur. You can use the Ramp effect to create a gradient that is white at the dissipated end of the trail and black at the source (Figures 13.18a and b). Again, you can apply a motion track to the black gradient point using expressions, or you can just approximate it by hand. To animate the amount of blur applied, animate a Levels adjustment to the gradient, keeping in mind that you may need to pre-compose the result. I offer this not so much because I think your phone will ring tomorrow morning with a client wanting dissipating smoke trails, but as an example of how to combine some of what you've learned into your own effect.
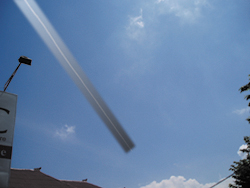
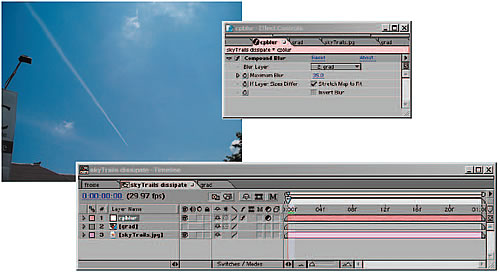
Figure 13.18a and b. Getting creative with a quick-and-dirty effect on Figure 13.17: A gradient is created to match the start and end of the plane's trajectory, masked and pre-composed (13.18a). This is then applied via a Compound Blur to the source layer (13.18b)—a simple example of building up your own effect with the tools at hand.
What is wind doing in this chapter? You can't see it. How do you composite it into your shot? Although it's invisible, re-creating the effects of wind on your shot can help sell its realism. Besides the effect of wind on particles, what other roles does wind play?
As I write this chapter, it is a warm, still, sunny day, but in my backyard leaves and tree branches do sway gently from time to time. If I wanted to re-create the scene from a still or 3D render or if I wanted to add an element to it, the result just wouldn't look right without these subtle bits of motion.
The fact is that most still scenes in the real world contain ambient motion of some kind. Not only objects directly in the scene, but reflected light and shadow might be changing all the time in a scene we perceive to be motionless.
As a compositor, part of your job is to think about these kinds of ambient effects, and to look for opportunities to add to them in ways that contribute to the realism of the scene without stealing focus. Obviously, the kinds of dynamics involved with making the leaves and branches of a tree sway are mostly beyond the realm of 2D compositing, but there are often other elements that are easily articulated and animated ever so slightly. Successful examples of this might not be consciously registered by the viewer, and they often will not have been explicitly requested, but they succeed in bringing the shot to life.
Primary and Secondary
When animating physical objects, it is traditional to speak about primary and secondary animation. Primary animation is the gross movement of the object, the movement of the object as a whole. Secondary animation is the movement of individual parts of the object as a result of inertia. So, for example, a helicopter crashes to the ground: That's the primary animation. Its rotors and tail bend and shudder at impact: That's the secondary animation. For the most part, in 2D compositing, your work is isolated to primary animation.
To make it easier on yourself, look for elements that can be readily isolated and articulated; you should be able to mask the element out with a simple roto or a hi-con matte if it's not separated to begin with. Look for the point where the object would bend or pivot, place your anchor point there, then animate a gentle rotation.
You also have the option of acquiring and adding elements that indicate or add to the effect of wind motion. Figure 13.19 shows an element of blowing autumn leaves shot against a black background for easy removal and matting; granted, you could add an element this turbulent only to a scene that either already had signs of gusts in it or that contained only elements that would show no secondary motion from wind whatsoever.

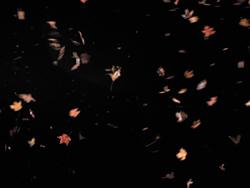
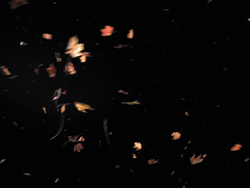
Figure 13.19. An example of an effects element that will enhance something that already is happening in your scene. It would be very difficult to create the impression of a windstorm in a shot from scratch, but if the shot is taken in windy conditions (or using large fans on set) an element like this will enhance the impression of a blustery day.
Another idea is to add the indirect effects of ambient motion generated by wind; moving shadows and the play of light also enliven a static scene, and capturing or synthesizing these elements to interact with objects in the scene will more readily appear realistic than re-creating them directly.
So, for example, adding the swaying branches of a tree to your scene is complicated, but creating a hi-con matte of existing footage of a tree and turning it into a shadow cast on the ground plane might not be as bad, if the ground plane is flat (Figure 13.20). The same goes for fire, which might flicker and reflect off the faces of characters in the scene, or water, whose rippling reflections can be more easily synthesized than the look of water itself. The simpler the plane receiving the reflection, the more likely you might get away with this.
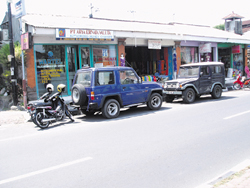

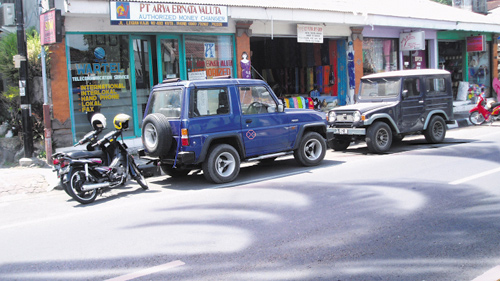
Figure 13.20. Animating your own trees swaying in the breeze just to make a shadow would be a big pain. Why not steal their silhouettes and get the motion for free? This process is detailed in Chapter 12, “Working with Light.”
You've already examined the effect of water in its gaseous form (as fog, mist, or steam); what about water in its liquid and solid states? Although it's not possible to re-create The Perfect Storm or The Day After Tomorrow without elaborate 3D and practical effects, compositing plays a pivotal role in re-creating rain and snow and in enhancing practical and computer-generated scenes.
Realistically, though, it's rare to do elaborate water effects without relying on some pretty elaborate practical or computer-generated source. I'll assume that you're trying to complete shots only in After Effects, but I'll focus on techniques that are equally valid even if your particle and water animations are coming from elsewhere.
One area where After Effects' built-in features fall short is particle generation. The Particle Playground effect, which ships with the program and hasn't changed much since around version 3.0, is slow, crude, and cumbersome. I have yet to work with anyone who had the patience to coax realistic effects out of this plug-in.
If you're called upon to create rainfall or snowfall from scratch, I highly recommend taking a look at the Particular plug-in from Trapcode (a demo is included on the book's CD-ROM). Not only does it outdo Particle Playground in features and ease of use, but also, if set up correctly, it obviates the need for creating precipitation in a dedicated 3D program.
It's nothing against dedicated 3D programs to note that a faster result, one that is better integrated with source footage, can be achieved in After Effects because of how directly you as a compositor can influence various factors in the scene. When you receive rain or snow elements from another artist working with 3D software (or even if you do them yourself), you may have to go through several rounds just to get the basic speed and density, wind, and turbulence even in the general range where the client wants them because it's so much harder to gain control of the match in 3D.
Particular has all the controls you need to create a great element of falling rain or snow. You could use a standard particle shape included with the effect, or you can create your own customized particles, such as irregular snowflake shapes. You have several choices of particle emitters; one great option is to use a spotlight as an emitter, so that all of the light layer's Transform controls are available to establish the position and direction of the particles (Figure 13.21).
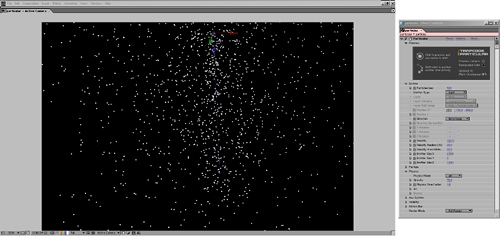
Figure 13.21. If you use a light as an emitter for Trapcode's Particular, you must begin its name with Emitter so the effect knows to use it. You are free to move the light in whatever position or direction you like in 3D space. You are not even limited to some relative size for the light as an emitter; here the emitter size has been raised on the X and Z axes to distribute particles across a wide area (with an optional Gaussian distribution).
The most important settings to adjust are in the Emitter and Physics categories; the former is where you establish the amount, velocity, and direction of your particles (along with the size of the emitter, if you use a light), and the latter contains controls for the environment itself: gravity, air resistance, wind, turbulence, and spin.
The Visibility category contains controls affecting the depth of your particles. In many scenes, the key to pulling off good-looking precipitation will be in creating at least three separate plains: foreground, mid-ground, and background. Separating these gives you far more control when adjusting the look than trying to do it all in one pass; you might find that the client likes the look of the snow except in one area of the shot (say, the foreground).
Particular resides on a 2D layer, but the effect is 3D-aware, so if you add a camera to the composition, the particles will behave as if seen through that camera. Even shots that involve a 3D camera move or a particular lens are possible.
When it comes time to integrate falling rain or snow with a background plate, you can do better than a simple A over B comp; in fact, the best way to display these elements might be to show their result in the scene rather than showing the elements themselves.
Raindrops and snowflakes are translucent. Their appearance is heavily influenced by their backdrop. You might presume, therefore, to composite them in either by dialing down Opacity, using a blending mode such as Add or Screen, or a combination of the two. You could conceivably get away with this.
Waterfalls
Creating the effect of a waterfall remains challenging in software, so here's a cheap and easy practical way to shoot this element as a miniature instead: Use sand.
You can adjust and color correct sand coming out of a funnel or trough to look a lot like a waterfall. Depending on how heavy the sand is, you might even get some of the spray at the base (as a cloud of dust). The tricky part about all this is setting up the shoot properly; everything that is not sand needs to be negative space, so you need to build a miniature stage (it can be all cardboard) in a solid color (Rosco blue, say, or flat black) and light it, then match the camera perspective you're after. Cue the sand and roll the camera.
If your waterfall is more a wall of water than a trickle, you can always consider cloning the result (camera angle permitting).
However, these individual bits of precipitation are actually like tiny lenses that diffract light, defocusing and lowering the contrast of whatever is behind them, but also picking up the ambient light themselves. Therefore, on The Day After Tomorrow our crew found success with using the rain or snow element as a track matte for an adjustment layer containing a Fast Blur and a Levels effect.
The amount of blur should be set very high (200, for example), so that whatever is behind each individual raindrop or snowflake becomes a wash of color. The Levels effect is then set with a slightly lowered Output White value, and a very much raised Output Black value. The precipitation becomes visible by its effect on the scene, lightening dark areas of the background, darkening light ones, and creating diffusion throughout (Figure 13.22).
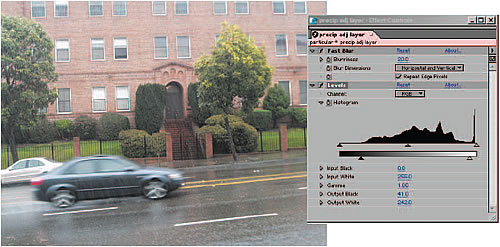
Figure 13.22. Rain is difficult to see in a still shot because it has no color of its own. For that very reason, it is best applied as a track matte for an adjustment layer that you then set to blur and raise the black values of the plate footage. (It helps if the plate shot was taken under wet conditions as well.)
Using a variation on Chapter 12, you could demonstrate the presence of water in your scene—off camera—by adding its reflected light in your scene. Light from water has a compelling shape and movement, and if you've set up the scene so that the viewer knows there's a swimming pool or a lake nearby, it will be expected.
The question is how to get the sample of the light playing off of the waves. If you're ready to do some patient adjusting, you could use Wave World, an effect that you get by registering your copy of After Effects. The default settings won't do. For one thing, you have to change the View to Height Map just to preview the effect, and you'll definitely want to raise the Grid Resolution and Pre-roll settings, as well as set Reflect Edges to All. Then the main trick is to get the Position and Amplitude adjusted for a natural look. Use the same technique as with laying in shadows: Position the plane and choose a blending mode, such as Add or Vivid Light.
The best thing about this approach is that it works virtually regardless of what is in the background. There is no need to decide the color of the element for a given shot, and shots match by virtue of retaining their source colors, with precipitation having the same influence on each shot.
To further mess with atmospheric and weather effects may require elaborate 3D simulations, but the principles of compositing them in likely still apply. The chapter's focus has been on how these elements behave in the real world, as well as how best and most simply to emulate that in After Effects. This approach will serve you well even if you have to re-create an element—frost, say, or hail—that is similar but unique from what was covered here.
The next chapter heats things up with fire, explosions, and other combustibles.