This chapter covers the following topics:
Identifying Network Requirements and the Need for Quality of Service (QoS)
Understanding Why QoS Is Needed in Networks That Have Ample Bandwidth
Describing the IntServ and DiffServ QoS Architectures
Understanding the QoS Components: Classification, Marking, Traffic Conditioning, Congestion Management, and Congestion Avoidance
Applying QoS in Each Submodule of the Enterprise Composite Network Model
Cisco Catalyst switches provide a wide range of QoS features that address the needs of voice, video, and data applications sharing a single infrastructure. Cisco Catalyst QoS technology lets you implement complex networks that predictably manage services to a variety of networked applications and traffic types.
Using the QoS features and services in Cisco IOS and Cisco CatOS Software, you can design and implement networks that conform to either the Internet Engineering Task Force (IETF) integrated services (IntServ) model or the differentiated services (DiffServ) model. Cisco switches provide for differentiated services using QoS features such as classification and marking, traffic conditioning, congestion avoidance, and congestion management.
Table 10-1 indicates the predominant Catalyst switches at the time of publication. Each Catalyst switch supports each QoS component with specific restrictions and caveats. For brevity, this chapter focuses strictly on QoS using Cisco IOS. In addition, the examples, caveats, and restrictions discussed in this chapter involve the Catalyst 3550, 3560, and 6500 families of switches. Refer to the product-configuration guides or release notes on other Catalyst switches for the latest information regarding QoS-supported features and configurations. For information regarding Catalyst QoS using Cisco CatOS, refer to the configuration guides for those specific Catalyst switches on Cisco.com.
Table 10-1. Leading Catalyst Switches Applicable to This Chapter
Cisco IOS–Based Catalyst Switches |
|---|
Catalyst 2940, 2950, 2955, 2960, and 2970 |
Catalyst 3550, 3560, and 3750 |
Catalyst 4000 or 4500 with Supervisor Engine II+, III, IV, V, VI, or VII |
Catalyst 6500 with Supervisor Engine I with MSFC or MSFC2 |
Catalyst 6500 with Supervisor Engine II with MSFC2 |
Catalyst 6500 with Supervisor Engine 720 with MSFC3 |
Cisco IOS on routers and switches support many QoS capabilities, including the following:
Control over resources—. You have control over which network resources (bandwidth, equipment, wide-area facilities, and so on) are being used. For example, critical traffic such as voice, video, and data may consume a link with each type of traffic competing for link bandwidth. QoS helps to control the use of the resources (for example, dropping low-priority packets), thereby preventing low-priority traffic from monopolizing link bandwidth and affecting high-priority traffic such as voice traffic.
More efficient use of network resources—. By using network analysis management and accounting tools, you can determine how traffic is handled and which traffic experiences latency, jitter, and packet loss. If traffic is not handled optimally, you can use QoS features to adjust the switch behavior for specific traffic flows.
Tailored services—. The control and visibility provided by QoS enables Internet service providers to offer carefully tailored grades of service differentiation to their customers. For example, a service provider can offer different SLAs for a customer website that receives 3000–4000 hits per day, compared to another customer site that receives only 200–300 hits per day.
Coexistence of mission-critical applications—. QoS technologies make certain that mission-critical applications that are most important to a business receive the most efficient use of the network. Time-sensitive multimedia and voice applications require bandwidth and minimized delays, while other applications on a link receive fair service without interfering with mission-critical traffic.
This chapter discusses the preceding features with respect to Catalyst switches. Furthermore, it discusses QoS components and features that are available on Catalyst switches from the perspective of the Catalyst 6500, Catalyst 3560, and Catalyst 3550 families of switches. Later sections discuss recommendations for deploying the QoS components in different submodules of the Enterprise Composite Network Model.
In terms of BCMSN preparation, this chapter delves deeper into the QoS technology than what is tested on the BCMSN switching examination and what is covered in the course. However, the extra content only further explains QoS and provides you with a well-rounded understanding that aids in learning QoS and preparing for QoS questions on the BCMSN switching exam. You should focus on the main components of QoS in this chapter:
Classification
Trusting
Policing
Congestion management
Go through the study tips, the summary, and the lab exercise if you are seeking to quickly study the main points of QoS.
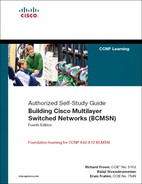
As introduced in the preceding section, even with adequate bandwidth available throughout a multilayer switched network, several network design properties may affect performance. The following network design properties may result in congestion even with networks of unlimited bandwidth; Figure 10-1 illustrates these network design properties.
Ethernet speed mismatch—. Network congestion may occur when different-speed network devices are communicating. For example, a Gigabit Ethernet–attached server sending traffic to a 100-Mbps Ethernet–attached server may result in congestion at the egress interface of the 100-Mbps Ethernet–attached server due to buffer limitations of the switch.
Many-to-one switching fabrics—. Network congestion may occur when aggregating many-to-one switches. For example, when aggregating multiple access layer switches into a distribution layer switch, the sum of the switching fabric bandwidth of all access layer switches generally exceeds the switch fabric capability of the distribution layer switch.
Aggregation—. Network congestion may occur when multiple Ethernet-attached devices are communicating over Ethernet through a single connection or to a single network device or server.
Anomalous behavior—. Network congestion may occur because of anomalous behavior or events. Faulty hardware or software on any network device may cause a broadcast storm or other type of network storm yielding congestion on multiple interfaces. In this context, faulty software includes computer worms and viruses, which may cause packet storms that congest enterprises and even service provider networks. QoS can mitigate and control the behavior of the network during these types of anomalous events well enough that VoIP phone calls continue unaffected—even during an anomalous packet storm caused by an Internet worm—until the anomaly is resolved.
Security—. As implied in the previous bullet, QoS is a security feature. Applying policies and QoS trusting and scheduling limits the effect of unwarranted traffic or malicious attacks. For example, trusting and scheduling important data network traffic over unmarked data traffic might yield additional stability in the event of a denial-of-service (DoS) attack. Through policing, QoS limits an attacker’s ability to impose or steal information. Although QoS cannot prevent theft of information, it can limit this behavior by explicitly discarding or limiting associated traffic.
Congestion greatly affects the network availability and stability problem areas, but congestion is not the sole factor for these problem areas. All networks, including those without congestion, may experience the following three network availability and stability problems:
Delay (or latency)—. The amount of time it takes for a packet to reach a destination.
Delay variation (or jitter)—. The change in interpacket latency within a stream over time.
Packet loss—. The measure of lost packets between any given source and destination.
Note
These factors are extremely crucial in deploying AVVID applications. Each network service places different expectations on the network. For example, VoIP applications require low latency and steady jitter factors, whereas storage protocols such as FCIP and iSCSI require very low packet loss but are less sensitive to jitter.
Latency, jitter, and packet loss may occur even in multilayer switched networks with adequate bandwidth. As a result, each multilayer switched network design needs to include QoS. A well-designed QoS architecture aids in preventing packet loss while minimizing latency and jitter. The following sections discuss these factors in more detail, as well as other benefits of QoS such as security and mitigating the effects of viruses and worms by using traffic conditioning.
End-to-end delay, or latency, between any given sender and receiver comprises two types of delay:
Fixed-network delay—. Includes encoding and decoding time and the latency required for the electrical and optical signals to travel the media en route to the receiver. Generally, applying QoS does not affect fixed-network delay because fixed-network delay is a property of the medium. Upgrading to higher-speed media such as 10-Gigabit Ethernet and newer network hardware with lower encoding and decoding delays, depending on application, may result in lower fixed-network delay.
Variable-network delay—. Refers to the network conditions, such as congestion, that affect the overall latency of a packet in transit from source to destination. Applying QoS does affect the variable-network delay.
In brief, the following list details the types of delay that induce end-to-end latency. (Note that the first four types of delay are fixed delay.)
Packetization delay—. Amount of time it takes to segment, sample, and encode signals, process data, and turn the data into packets.
Serialization delay—. Amount of time it takes to place the bits of a packet, encapsulated in a frame, onto the physical media.
Propagation delay—. Amount of time it takes to transmit the bits of a frame across the physical wire.
Processing delay—. Amount of time it takes for a network device to take the frame from an input interface, place it into a receive queue, and place it into the output queue of the output interface.
Queuing delay—. Amount of time a packet resides in the output queue of an interface.
Of all the delay types listed, queuing is the delay over which you have the most control with QoS features in Cisco IOS. The other types of delay are not directly affected by QoS configurations. Propagation delay is subject to the medium used for transport and hardware components. Indirectly, QoS has an overall effect on propagation delay as QoS might limit traffic on the wire, but QoS features do not directly lower propagation delay of individual frames. QoS might also reduce processing delay by limiting the amount data requiring processing. Nevertheless, QoS does not lower the processing delay of individual frames. For this reason, this chapter focuses mostly on queuing delay.
Jitter is critical to network operation in maintaining consistent data rates. All end stations and Cisco network devices use jitter buffers to smooth out changes in arrival times of data packets that contain data, voice, and video. However, jitter buffers are only able to compensate for small changes in latency of arriving packets. If the arrival time of subsequent packets increases beyond a specific threshold, a jitter buffer underrun occurs. During jitter buffer exhaustion, there are no packets in the buffer to process for a specific stream. For example, if a jitter buffer underrun occurs while you are using an audio application to listen to an Internet radio station, the audio application stops playing music until additional packets arrive into the jitter buffer.
In contrast, when too many packets arrive too quickly, the jitter buffers may fill and be unable to handle further traffic. This condition is called a buffer overrun. In this condition, for example, an audio application will skip parts of the audio file. This is a result of the audio player always having packets to play but missing several packets of the audio stream. With regards to VoIP phone calls, jitter buffer underruns and buffer overruns are usually intolerable, making the calling experience difficult.
Packet loss is a serious issue in multilayer switched networks. Packet loss generally occurs on multilayer switches when there is a physical layer issue such as an Ethernet duplex mismatch or an interface output queue full condition. A common scenario for packet loss is when an output queue is full of packets to be transmitted where there is no additional memory space for additional ingress packets; this condition is commonly referred to as an output queue full condition. In this condition, the network device that is queuing the packets has no choice but to drop the packet. For example, an output queue full condition can occur where a sender attached to an interface of a higher speed is sending to a receiver attached to an interface of a lower speed. Eventually, the output queue buffers become full, resulting in dropped packets. A specific example of this behavior is where a server attached to a Catalyst switch at Gigabit Ethernet is transmitting to a client workstation attached at 100-Mbps Fast Ethernet. In this situation, when the server sends data at a sustained rate higher than 100 Mbps, the output queue for the workstation fills and eventually the switch drops egress frames. Several QoS options are available to apply deterministic behavior to the packet drops.
In brief, QoS addresses latency, jitter, and packet-drop issues by supporting the following components and features on Cisco network devices:
Classifying and marking traffic such that network devices can differentiate traffic flows
Traffic conditioning (policing) to tailor traffic flows to specific traffic behavior and throughput
Marking traffic rates above specific thresholds as lower priority (policing)
Dropping packets when rates reach specific thresholds (congestion avoidance)
Scheduling packets such that higher-priority packets transmit from output queues before lower-priority packets (congestion management)
Managing output queues such that lower-priority packets awaiting transmit do not monopolize buffer space (congestion management)
Applying QoS components and features to an enterprise or service provider network provides for deterministic traffic behavior. In other words, QoS-enabled infrastructures allow you to do the following:
Predict response times for end-to-end packet flows, I/O operations, data operations, transactions, and so on
Correctly manage and determine abilities of jitter-sensitive applications such as audio and video applications
Streamline delay-sensitive applications such as VoIP
Configure traffic priorities across the entire network
Support applications or network requirements that entail dedicated bandwidth
Monitor and avoid network congestion
Limit anomalous behavior and maintain network stability in the event of a malicious attack
This chapter discusses in later sections how to apply QoS features to achieve deterministic traffic behavior on Catalyst switches. The next section discusses the two QoS service models that are the building blocks of any QoS implementation. These models are outside the scope of the BCMSN switching course and BCMSN switching examination; however, they provide some thoughtful insight into QoS behavior.
The two QoS architectures used in IP networks when designing a QoS solution are the IntServ and DiffServ models. The QoS service models differ by two characteristics: how the models enable applications to send data, and how networks attempt to deliver the respective data with a specified level of service.
A third method of service is best-effort service, which is essentially the default behavior of the network device without QoS. In summary, the following list restates these three basic levels of service for QoS:
Best-effort service—. The standard form of connectivity without guarantees. This type of service, in reference to Catalyst switches, uses first-in, first-out (FIFO) queues, which simply transmit packets as they arrive in a queue with no preferential treatment.
Integrated services—. IntServ, also known as hard QoS, is an absolute reservation of services. In other words, the IntServ model implies that traffic flows are reserved explicitly by all intermediate systems and resources.
Differentiated services—. DiffServ, also known as soft QoS, is class-based, where some classes of traffic receive preferential handling over other traffic classes. Differentiated services use statistical preferences, not a hard guarantee like integrated services. In other words, DiffServ categorizes traffic and then sorts it into queues of various efficiencies.
Choosing the type of service to use in a multilayer switched network depends on the following factors:
Application support
Technology upgrade speed and path
Cost
The following two subsections discuss the IntServ and DiffServ architectures in more detail.
The IntServ model, defined in RFC 1633, guarantees a predictable behavior of the network for applications. IntServ provides multiple services that accommodate multiple QoS requirements. IntServ is implemented through the use of the Resource Reservation Protocol (RSVP), enabled at both the endpoints and the network devices between. The RSVP-enabled application requests a specific kind of service from the RSVP-enabled network before it sends data. Explicit signaling via RSVP makes the request, and the application informs the network of its traffic profile and requests a particular kind of service that can encompass its bandwidth and delay requirements. The application is expected to send data only after it gets a confirmation from the network. The network also expects the application to send data that lies within its described traffic profile.
The RSVP-enabled network performs admission control based on information from the requesting host application and available network resources. It either admits or rejects the application’s request for bandwidth. The network commits to meeting the QoS requirements of the application as long as the specific traffic flow for which the request was made remains within the profile specifications. Each flow of traffic must go through the admission control process.
Using Common Open Policy Service (COPS) centralizes admission control at a Policy Decision Point (PDP). COPS provides the following benefits when used with RSVP:
Centralized management of services
Centralized admission control and authorization of RSVP flows
Increased scalability of RSVP-based QoS solutions
Together, RSVP and IntServ offer the following benefits:
Explicit resource admission control (end-to-end)
Per-request policy admission control (authorization object, policy object)
Signaling of dynamic port numbers
The drawbacks to using RSVP and IntServ are that they are not scalable and they require continuous signaling from network devices.
The DiffServ model provides multiple levels of service that satisfy differing QoS requirements. However, unlike with the IntServ model, an application that uses DiffServ does not explicitly signal the network devices before sending data. DiffServ is a QoS implementation technique that is tailored for modern networks and their solutions. DiffServ reassigns bits in the type of service (ToS) field of an IP packet header. DiffServ uses differentiated services code points (DSCP) as the QoS priority descriptor value and supports 64 levels of classification. RFC 2474 defines the use of the ToS byte for DSCP. Catalyst switch configurations support IP Precedence and DSCP values.
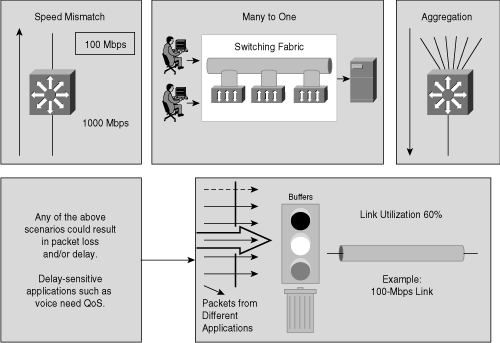
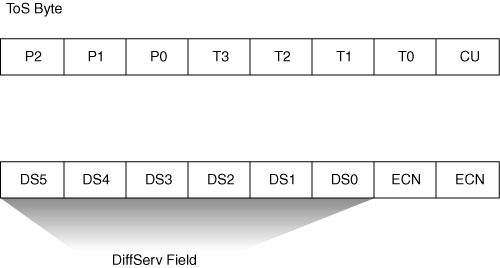
Figure 10-2 illustrates the bits used in packets for classification. Network devices use either Layer 2 class of service (CoS) bits of a frame or Layer 3 IP Precedence or DSCP bits of a packet for classification. All Catalyst switches listed in Table 10-1 support QoS by Layer 3 classification as well as Layer 2 classification. At Layer 2, 3 bits are available in 802.1Q frames and Inter-Switch Link (ISL) frames for classification for up to eight distinct values (levels of service): 0 through 7. These Layer 2 classification bits are referred to as the CoS values. At Layer 3, QoS uses the 6 most significant ToS bits in the IP header for a DSCP field definition. This DSCP field definition allows for up to 64 distinct values (levels of service)—0 through 63—of classification on IP frames. The last two bits represent the Early Congestion Notification (ECN) bits. IP Precedence is only the 3 most significant bits of the ToS field. As a result, IP Precedence maps to DSCP by using IP Precedence as the 3 high-order bits and padding the lower-order bits with 0.
A practical example of the interoperation between DSCP and IP Precedence is with Cisco IP Phones. Cisco IP Phones mark voice traffic at Layer 3 with a DSCP value of 46 and, consequently, an IP Precedence of 5. Because the first 3 bits of DSCP value 46 in binary is 101 (5), the IP Precedence is 5. As a result, a network device that is only aware of IP Precedence understands the packet priority similarly to a network device that is able to interpret DSCP. Moreover, Cisco IP Phones mark frames at Layer 2 with a CoS value of 5.
Figure 10-3 illustrates the ToS byte. P2, P1, and P0 make up IP Precedence. T3, T2, T1, and T0 are the ToS bits. When viewing the ToS byte as DSCP, DS5 through DS0 are the DSCP bits. Table 10-2 illustrates the IP Precedence value to precedence designation mapping. For more information about bits in the IP header that determine classification, refer to RFCs 791, 795, and 1349.
Using DSCP values for classification of packets is the leading method for classification in all enterprise and service provider multilayer switched networks.
For a differentiated service, the network tries to deliver a particular kind of service based on the QoS descriptor specified in each IP packet header on a per-hop basis, rather than pertraffic flow as in IntServ. You can use the DiffServ model for the same mission-critical applications as IntServ and to provide end-to-end QoS. Network devices forward each according to priorities designated within the packet on a per-device, per-hop basis. Typically, this DiffServ model is the preferable model within the multilayer switched network because of its scalability.
IntServ must maintain state information for every flow in the network. DiffServ overcomes this limitation by assigning different queuing policies, traffic policing, and drop parameters based on classification of packets to differentiate (prefer) traffic flows. In addition, DiffServ uses per-class polices instead of per-flow polices as with IntServ, such that flows can be aggregated into a small number of classes. This makes QoS administration and configuration easier than maintaining policies on a per-flow basis. Another advantage in using DiffServ is the ability to support complex traffic classification and conditioning performed at the network edge. As a result, the recommendation is to apply DiffServ QoS features in every submodule of the Enterprise Composite Network Model.
RFC 2474 introduced DSCP and 64 possible markings on a single packet. IETF decided to standardize the meanings for several codepoint values into per-hop behaviors (PHB). Two main PHBs exist:
Assured Forwarding (RFC 2597)
Expedited Forwarding (RFC 2598)
Assured Forwarding (AF) defines classes by using DSCP values. AF is important in understanding how to relate DSCP AF terminology to DSCP values. Example 10-1 illustrates an abbreviated list of configuration options for DSCP in Cisco IOS. The policy map configuration shown in this example is explained later in this chapter.
Example 10-1. DSCP Configuration in Cisco IOS
Switch(config-pmap-c)#set ip dscp ?
  <0-63>   Differentiated services codepoint value
  af11     Match packets with AF11 dscp (001010)
  af12     Match packets with AF12 dscp (001100)
! Output omitted for brevity
  af33     Match packets with AF33 dscp (011110)
  af41     Match packets with AF41 dscp (100010)
  af42     Match packets with AF42 dscp (100100)
  af43     Match packets with AF43 dscp (100110)
  cs1      Match packets with CS1(precedence 1) dscp (001000)
! Output omitted for brevity
  cs7      Match packets with CS7(precedence 7) dscp (111000)
  default  Match packets with default dscp (000000)
  ef       Match packets with EF dscp (101110)
AF has four AF classes, AF1x through AF4x, where the AF4 class is considered to have more importance than the AF1 class. Within each class, there are three drop probabilities. Depending on the policy of a given network, you can configure packets for a PHB based on required throughput, delay, jitter, loss, or according to priority of access to network services.
AF PHB defines a method by which traffic classes are given different forwarding assurances. A practical example of dividing a network into classes is as follows:
Gold: 50 percent of the available bandwidth
Silver: 30 percent of the available bandwidth
Bronze: 20 percent of the available bandwidth
Table 10-3 illustrates the DSCP coding to specify the AF class with the drop probability. Bits 0, 1, and 2 define the class; bits 3 and 4 specify the drop probability; bit 5 is always 0.
Table 10-3. Sample DSCP Coding to Specify AF Class
Class 1 | Class 2 | Class 3 | Class 4 | |
|---|---|---|---|---|
Low Drop | 001010 AF11 DSCP 10 | 010010 AF21 DSCP 18 | 011010 AF31 DSCP 26 | 100010 AF41 DSCP 34 |
Medium Drop | 001100 AF12 DSCP 12 | 010100 AF22 DSCP 20 | 011100 AF32 DSCP 28 | 100100 AF42 DSCP 36 |
High Drop | 001110 AF13 DSCP 14 | 010110 AF23 DSCP 22 | 011110 AF33 DSCP 30 | 100110 AF43 DSCP 38 |
Expedited Forwarding defines the Expedited Forwarding (EF) PHB. Network devices use EF PHB to build a low-loss, low-latency, low-jitter, assured-bandwidth, end-to-end service through DiffServ domains. EF service appears to the endpoints as a point-to-point connection. An example is to apply EF PHBs to VoIP traffic. The remaining sections of this chapter explain the application of DSCP and DiffServ on Catalyst switches.
Figure 10-4 illustrates the queuing components of a QoS-enabled Cisco IOS–based Catalyst switch. The figure illustrates the classification that occurs on ingress packets. After the switch classifies a packet, it determines whether to place the packet into a queue or drop the packet. Queuing mechanisms drop packets only if the corresponding queue is full without the use of congestion avoidance.
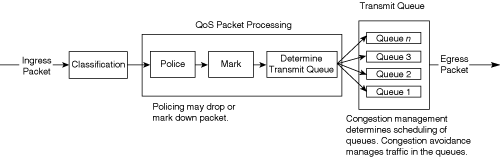
As illustrated in Figure 10-4, the queuing mechanism on Cisco IOS–based Catalyst switches has the following main components:
Classification
Marking
Traffic conditioning: policing and shaping
Congestion management
Congestion avoidance
On the current Catalyst family of switches listed in Table 10-1, classification defines an internal DSCP value. The internal DSCP value is the classification value the Catalyst switches use in determining the egress marking, output scheduling, policing, congestion management, and congestion avoidance behavior of frames as the frames traverse and exit the switch. Marking and policing may alter this internal DSCP. Figure 10-5 illustrates how Catalyst switches use internal DSCP for QoS.
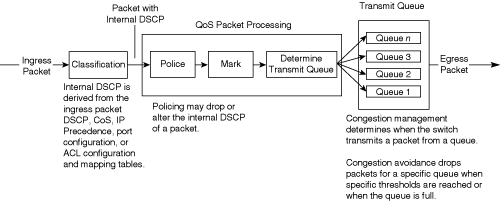
Figure 10-5 is an abbreviated logical depiction of QoS packet handling in Catalyst switches because it does not illustrate mapping tables and other QoS features. Nonetheless, the figure illustrates the basic QoS packet handling of Catalyst switches.
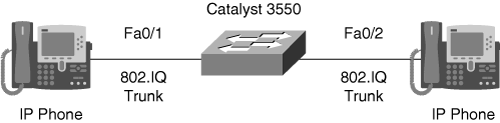
Example 10-2 introduces QoS on a Catalyst switch. In this simple example, the intended purpose of QoS is to provide a higher degree of service to VoIP traffic between Cisco IP Phones. The Catalyst switch used in this example is a Catalyst 3560 running Cisco IOS. To accomplish this configuration of applying differentiated service to VoIP traffic, the switch must classify voice frames with a DSCP value sufficient for applying high priority to the VoIP frames. By default, Cisco IP Phones mark voice frames with a DSCP value of 46; as a result, trusting is a valid option applying high priority.
A valid and simple method of classification for this example is to trust the DSCP value of ingress frames based on whether a Cisco IP Phone is attached to a Catalyst switch interface. The mls qos trust device cisco-phone interface configuration command accomplishes this configuration. Furthermore, the Cisco Catalyst 3560 family of switches uses four output queues. The default queue for frames with a DSCP value of 46 is queue 3. The Cisco Catalyst family of switches supports a priority queue option specifically for frames in queue 4. Therefore, the switch needs to map the respective CoS value of 5 (mapped from internal DSCP of 46) to queue 4 for priority queuing of the voice frames. The Catalyst 3550 interface command priority-queue out enables strict-priority queues on an interface such that the switch transmits frames out of queue 4 before servicing any other queue.
Example 10-2 illustrates the resulting configuration. Although this is a simplistic example of classification and output scheduling, it provides a brief overview of how to apply QoS. The wrr-queue cos-map commands in Example 10-2 are explained later in this section.
Example 10-2. Basic Catalyst Switch QoS Configuration Applying Classification and Congestion Management
! Output omitted for brevity
!
mls qos
!
!
! Output omitted for brevity
!
interface FastEthernet0/2
 switchport mode access
 mls qos trust device cisco-phone
 wrr-queue cos-map 1 0 1
 wrr-queue cos-map 2 2 3
 wrr-queue cos-map 3 4 6 7
 wrr-queue cos-map 4 5
 priority-queue out
 spanning-tree portfast
!
!
interface FastEthernet0/3
 switchport mode access
 mls qos trust device cisco-phone
 wrr-queue cos-map 1 0 1
 wrr-queue cos-map 2 2 3
 wrr-queue cos-map 3 4 6 7
 wrr-queue cos-map 4 5
 priority-queue out
 spanning-tree portfast
!
! Output omitted for brevity
!
Following subsections discuss each QoS component on Catalyst switches for high-speed Ethernet interfaces. In addition, the remainder of this chapter focuses on the Catalyst switches listed in Table 10-1 running Cisco IOS. The only Cisco CatOS switch to support a wide range of QoS features is the Catalyst 6500 with an MSFC.
For a complete understanding and an overview of configuring QoS with Cisco switches running CatOS, refer to Cisco.com. In addition, the following sections on QoS components cover Cisco IOS QoS in general. Not all of the switches listed in Table 10-1 support all of the features discussed in this chapter.
Classification distinguishes a frame or packet with a specific priority or predetermined criteria. In the case of Catalyst switches, classification determines the internal DSCP value on frames. Catalyst switches use this internal DSCP value for QoS packet handling, including policing and scheduling as frames traverse the switch.
The first task of any QoS policy is to identify traffic that requires classification. With QoS enabled and no other QoS configurations, all Cisco routers and switches treat traffic with a default classification. With respect to DSCP values, the default classification for ingress frames is a DSCP value of 0. The Catalyst switches listed in Table 10-1 use an internal DSCP of 0, by default, for all ingress frames regardless of the ingress DSCP value of DSCP of a frame. The terminology used to describe an interface configured for treating all ingress frames with a DSCP of 0 is untrusted. The following subsection discusses trusted and untrusted interfaces in more detail. Figure 10-6 simplistically illustrates classification and marking.
On Cisco Catalyst switches, the following methods of packet classification are available:
Per-interface trust modes
Per-interface manual classification using specific DSCP, IP Precedence, or CoS values
Per-packet based on access lists
Network-Based Application Recognition (NBAR)
In multilayer switched networks, always apply QoS classification as close to the edge as possible. This application allows for end-to-end QoS with ease of management. The following sections discuss these methods of classification. The first section, “Trust Boundaries and Configurations,” covers classification based on interface trust modes, interface manual classification, and packet-based access control lists. Classification using NBAR is then covered in the “NBAR” section.
Trust configurations on Catalyst switches allow trusting for ingress classification. For example, when a switch configured for trusting DSCP receives a packet with a DSCP value of 46, the switch accepts the ingress DSCP of the frame and uses the DSCP value of 46 for internal DSCP. Despite the ingress classification configuration, the switch may alter the DSCP and CoS values of egress frames by policing and egress marking.
The Catalyst switches support trusting via DSCP, IP Precedence, or CoS values on ingress frames. When trusting CoS or IP Precedence, Catalyst switches map an ingress packet’s CoS or IP Precedence to an internal DSCP value. Tables 10-4 and 10-5 illustrate the default mapping tables for CoS-to-DSCP and IP Precedence-to-DSCP, respectively. These mapping tables are configurable.
Figure 10-7 illustrates the Catalyst QoS trust concept using port trusting. When the Catalyst switch trusts CoS on ingress packets on a port basis, the switch maps the ingress value to the respective DSCP value in Table 10-4. When the ingress interface QoS configuration is untrusted, the switch uses 0 for the internal DSCP value for all ingress packets. Recall that switches use the internal DSCP values for policing, egress polices, congestion management, congestion avoidance, and the respective CoS and DSCP values of egress frames.
To configure a Cisco IOS–based Catalyst switch for trusting using DSCP, CoS, or IP Precedence, use the following interface command:
mls qos trust [dscp | cos | ip-precedence]
Example 10-3 illustrates a sample configuration of trusting DSCP in Cisco IOS.
Because an internal DSCP value defines how the switches handle a packet internally, the CoS-to-DSCP and IP Precedence-to-DSCP mapping tables are configurable. To configure CoS-to-DSCP mapping, use the following command:
mls qos map cos-dscp values
Here, values represents eight DSCP values, separated by spaces, corresponding to the CoS values 0 through 7; valid DSCP values are from 0 to 63. Example 10-4 illustrates an example of configuring CoS-to-DSCP mapping. In this example, the mapping table maps the CoS value of 0 to 0, 1 to 8, 2 to 16, 3 to 26, 4 to 34, 5 to 46, 6 to 48, and 7 to 56.
To configure IP Precedence-to-DSCP mapping, use the following command:
mls qos map ip-prec-dscp dscp-values
Here, dscp-values represents DSCP values corresponding to IP Precedence values 0 through 7; valid values for dscp-values are from 0 to 63.
Furthermore, it is possible to map ingress DSCP values to different internal DSCP values using DSCP mutation or a policy map. Consult the configuration guide on Cisco.com for more details on configuring DSCP mutation.
Another method of trusting ingress frames is to trust DSCP or CoS based on whether the switch learns of a Cisco IP Phone attached to an interface through the Cisco Discovery Protocol (CDP). To configure this behavior of trusting ingress frames based on the switch learning that a Cisco IP Phone is attached, use the mls qos trust device cisco-phone interface configuration command in conjunction with the mls qos trust dscp or mls qos trust cos command.
Example 10-2 in the section “Catalyst QoS Fundamentals,” earlier in this chapter, illustrates a sample configuration of trusting based on whether a Cisco IP Phone is attached to an interface.
The mls qos trust dscp and mls qos trust cos configuration options configure the switch to trust all ingress traffic, regardless. To trust only particular traffic on ingress, use traffic classes. Traffic classes apply ACLs to specific QoS functions, such as classification, marking, and policing. To configure a traffic class on a Cisco IOS–based Catalyst switch, perform the following steps:
Create a class map with a user-defined class-name. Optionally, specify the class map with the match-all or match-any option.
Switch(config)#class-map [match-any | match-all] class-name
Configure the class-map clause. Class-map clauses include matching against ACLs, the input interface, specific IP values, and so on. Note: CLI may show unsupported match clauses.
Switch(config-cmap)#match ?
  access-group         Access group
  any                  Any packets
  class-map            Class map
  destination-address  Destination address
  input-interface      Select an input interface to match
  ip                   IP specific values
  mpls                 Multi Protocol Label Switching specific values
  not                  Negate this match result
  protocol             Protocol
  source-address       Source address
  vlan                 VLANs to match
Switch(config-cmap)#match access-group acl_number
Class maps only define traffic profiles. Policy maps apply class maps to QoS functions. To define a policy map and tie a class map to a policy map, perform the following steps:
Create a policy map with a user-defined name.
Switch(config)#policy-map policy-name
Apply the class-map clause.
Switch(config-pmap)#class class-map
Configure policy map QoS actions.
Switch(config-pmap-c)#?
QoS policy-map class configuration commands:
  bandwidth  Bandwidth
  exit       Exit from QoS class action configuration mode
  no         Negate or set default values of a command
  trust      Set trust value for the class
  <cr>
  police     Police
  set        Set QoS values

Switch(config-pmap-c)#bandwidth ?
  <8-2000000>  Kilo Bits per second
  percent      % of Available Bandwidth

Switch(config-pmap-c)#trust ?
  cos            Trust COS in classified packets
  dscp           Trust DSCP in classified packets
  ip-precedence  Trust IP precedence in classified packets[0801]
  <cr>

Switch(config-pmap-c)#set ?
  cos   Set IEEE 802.1Q/ISL class of service/user priority
  ip    Set IP specific values
  mpls  Set MPLS specific values
Apply policy maps to interfaces on an ingress or egress basis. Not all Catalyst switches, including the Catalyst 6500 with a Supervisor I or II Engine, support egress policing.
Switch(config)#interface {vlan vlan-id | {FastEthernet | GigabitEthernet}
slot/interface | port-channel number}
Switch(config-if)#service-policy {input | output} policy-name
Configure the ingress trust state of the applicable interface. The trust state preserves ingress DSCP, CoS, or IP Precedence values for application to the policy map.
Switch(config)#interface {vlan vlan-id | {FastEthernet | GigabitEthernet}
slot/interface | port-channel number}
Switch(config-if)#mls qos trust [dscp | cos | ip-precedence]
Enable QoS globally, if not previously configured.
Switch(config)#mls qos
Note
Always enable QoS globally using the mls qos or qos global command to enable a Catalyst switch to enact QoS configurations.
Note
This example used a Cisco Catalyst 3560 for demonstration. Different Catalyst switches support additional or fewer options for policy maps and class maps depending on platform and software version. Check the product configuration guides on Cisco.com for exact product support of policy map and class map options.
Note
The Catalyst 4000 and 4500 families of switches running Cisco IOS do not prefix QoS configuration commands with the keyword mls. For example, to configure an interface to trust DSCP on the Catalyst 4000 and 4500 families of switches running Cisco IOS, the command is qos trust dscp instead of mls qos trust dscp.
Example 10-5 illustrates a sample configuration for a policy map and class map configuration. In this example, the switch trusts DSCP of all ingress TCP traffic destined to the 10.1.1.0/24 subnet received on interface FastEthernet0/1. The switch maps all other ingress traffic with the interface default DSCP of 0 for internal DSCP.
Example 10-5. Sample Configuration of Policy Map and Class Map for Trusting
! Output omitted for brevity
!
mls qos
!
class-map match-all Voice-subnet
  match access-group 100
!
!
policy-map Ingress-Policy
  class Voice-subnet
    trust dscp
!
(text deleted)
!
interface FastEthernet0/1
 switchport mode access
 mls qos trust dscp
 service-policy input Ingress-Policy
!
(text deleted)
!
access-list 100 permit tcp any 10.1.1.0 0.0.0.255Network-Based Application Recognition adds intelligent network classification to switches and routers. ACL-based classification uses Layer 3 and Layer 4 properties of packets, such as IP address and TCP or UDP ports, to classify packets. NBAR can classify frames based on Layer 7 information, such as application type, URL, and other protocols that use dynamic TCP and UDP assignments. For example, NBAR supports these types of classification features:
Classification of applications that dynamically assign TCP and UDP ports
Classification of HTTP traffic by URL, host, or Multipurpose Internet Mail Extensions (MIME) type
Classification of Citrix Independent Computer Architecture (ICA) traffic by application name
Classification of applications using subport information
Example 10-6 illustrates several protocols that are available for NBAR classification on a Catalyst 6500 running Cisco IOS 12.2(17a)SX1 with a Supervisor Engine 720. Always refer to the product documentation for the latest supported NBAR protocol list.
Example 10-6. Several Available NBAR Protocols on Catalyst 6500 with Sup720/MSFC3 Running Cisco IOS Version 12.2(18)SXD2B
Switch(config-cmap)#match protocol ?
  arp               IP ARP
! Output omitted for brevity
  cdp               Cisco Discovery Protocol
(text deleted)
  eigrp             Enhanced Interior Gateway Routing Protocol
  exchange          MS-RPC for Exchange
! Output omitted for brevity
  http              World Wide Web traffic
! Output omitted for brevity
  nfs               Network File System
  nntp              Network News Transfer Protocol
! Output omitted for brevity
  secure-ftp        FTP over TLS/SSL
  secure-http       Secured HTTP
  secure-irc     Internet Relay Chat over TLS/SSL
! Output omitted for brevity
  sqlserver      MS SQL Server
  ssh            Secured Shell
! Output omitted for brevity
For a complete and current list of protocols and applications that NBAR recognizes on a per-platform basis, consult Cisco.com.
NBAR configuration uses policy maps and class maps as with Cisco IOS–based classification. As such, use the following steps to configure NBAR-based classification:
Specify the user-defined name of the class map.
Switch#configure terminal
Switch(config)#class-map [match-all | match-any] class-name
Specify a protocol supported by NBAR as a matching criterion.
Switch(config-cmap)#match protocol protocol-name
Create a traffic policy by associating the traffic class with one or more QoS features in a policy map.
Switch(config)#policy-map policy-name
Specify the name of a predefined class.
Switch(config-pmap)#class class-name
Enter QoS-supported parameters in the policy map class configuration mode. These parameters include marking the DSCP value, traffic policing, and so on and vary on a Catalyst switch basis.
Switch(config-pmap-c)#?
QoS policy-map class configuration commands:
  bandwidth      Bandwidth
  exit           Exit from QoS class action configuration mode
  no             Negate or set default values of a command
  police         Police
  <cr>
  fair-queue     Flow-based Fair Queueing
  priority       Low Latency Queueing
  queue-limit    Queue Max Threshold for Tail Drop
  random-detect  Weighted Random Early Detect (Precedence based)
  set            Set QoS values
  shape          Traffic Shaping
  trust          Set trust value for the class
Switch(config-pmap-c)#exit
Switch(config-pmap)#exit
Attach the traffic policy to the interface for ingress or egress application.
Switch(config)#interface {vlan vlan-id | {FastEthernet |
GigabitEthernet} slot/interface | port-channel number}
Switch(config-if)#service-policy [input | output] policy-name
Marking in reference to QoS on Catalyst switches refers to changing the DSCP, CoS, or IP Precedence bits on ingress frames. Marking is configurable on a per-interface basis or via a policy map. Marking alters the DSCP value of packets, which in turn affects the internal DSCP. For instance, an example of marking would be to configure a policy map to mark all frames from a video server on a per-interface basis to a DSCP value of 40, resulting in an internal DSCP value of 40 as well. Marking also might be a result of a policer. An example of marking using a policer is a Catalyst switch marking DSCP to a lower value for frames above a specified rate.
Figures 10-8 and 10-9 review the associated CoS and DSCP bits in frame headers for Layer 2 and Layer 3 marking, respectively. In deploying or designing new networks, use Layer 3 whenever possible. Note: The CoS field is only applicable to 802.1Q tagged frames.

To configure DSCP and CoS marking on the ingress queue of a Cisco IOS–based Catalyst switch, use the following commands, respectively:
mls qos dscp dscp-value
mls qos cos cos-value
Here, dscp-value represents a DSCP value from 0 to 63, whereas cos-value represents a CoS value between 0 and 7. These commands effectively yield classification as the switches use the new DSCP or CoS values for determining the internal DSCP value, which consequently overrides the existing DSCP or CoS value on the ingress frame. Example 10-7 illustrates marking CoS on ingress frames on a per-interface basis on a Cisco IOS–based Catalyst switch.
To configure marking as part of the policy map for classification based on ACLs, use any of the following policy-map action commands, depending on application:
set ip dscp ip-dscp-value
set ip precedence ip-precedence-value
set cos cos-value
Example 10-8 illustrates an example of a policy map with a class-map clause of marking frames with an IP DSCP value of 45.
Example 10-8. Sample Configuration of Policy Map and Class Map for Marking
 (text deleted)
!
mls qos
!
class-map match-all Voice-subnet
  match access-group 100
!
!
policy-map Ingress-Policy
  class Voice-subnet
    set ip dscp 45
!
(text deleted)
!

interface FastEthernet0/1
 switchport mode access
 service-policy input Ingress-Policy
!
(text deleted)
!
access-list 100 permit tcp any 10.1.1.0 0.0.0.255
!Cisco routers that run Cisco IOS support two traffic-shaping methods: generic traffic shaping (GTS) and Frame Relay traffic shaping (FRTS). Cisco routers that run Cisco IOS support policing using the committed access rate (CAR) tool. Cisco Catalyst switches that run Cisco IOS support policing and shaping via slightly different methods and configurations compared to Cisco IOS on Cisco routers. The following sections discuss policing and shaping on Catalyst switches in more detail.
Both shaping and policing mechanisms control the rate at which traffic flows through a switch. Both mechanisms use classification to differentiate traffic. Nevertheless, there is a fundamental and significant difference between shaping and policing.
Shaping meters traffic rates and delays (buffers) excessive traffic so that the traffic rates stay within a desired rate limit. As a result, shaping smoothes excessive bursts to produce a steady flow of data. Reducing bursts decreases congestion in downstream routers and switches and, consequently, reduces the number of frames dropped by downstream routers and switches. Because shaping delays traffic, it is not useful for delay-sensitive traffic flows such as voice, video, or storage, but it is useful for typical, bursty TCP flows. Figure 10-10 illustrates an example of traffic shaping applied to TCP data traffic.
For more information on which Catalyst switches support shaping and configuration guidelines in regards to shaping, consult the Cisco.com website. In the multilayer switched networks, policing is more commonly used and is widely supported across the Catalyst platforms when compared to shaping.
In contrast to shaping, policing takes a specific action for out-of-profile traffic above a specified rate. Policing does not delay or buffer traffic. The action for traffic that exceeds a specified rate is usually drop; however, other actions are permissible, such as trusting and marking.
Policing on Catalyst switches follows the leaky token bucket algorithm, which allows for bursts of traffic compared to rate limiting. The leaky token bucket algorithm is as effective at handling TCP as it is at handling bursts of TCP flows. Figure 10-11 illustrates the leaky token bucket algorithm.
When switches apply policing to incoming traffic, they place a number of tokens proportional to the incoming traffic packet sizes into a token bucket in which the number of tokens equals the size of the packet. At a regular interval, the switch removes a defined number of tokens, determined by the configured rate, from the bucket. If the bucket is full and cannot accommodate an ingress packet, the switch determines that the packet is out of profile. The switch subsequently drops or marks out-of-profile packets according to the configured policing action.
It is important to note that the leaky bucket does not actually buffer packets, although the diagram in Figure 10-11 alludes to this point. The traffic is not actually flowing through the bucket; Catalyst switches simply use the bucket to determine out-of-profile packets. Furthermore, each Catalyst switch’s hardware implementation of policing is different; therefore, only use the leaky token bucket explanation as a guide to understanding the difference between policing and shaping and how policing limits traffic.
A complete discussion of the leaky token bucket algorithm is outside the scope of this book. Consult the following document on Cisco.com for more information about the leaky token bucket algorithm:
“Understanding QoS Policing and Marking on the Catalyst 3550”
Policing is configured using several parameters. Policing configurations apply the following parameters. (Not all parameters are configurable on all Catalyst switches.)
Rate—. The effective policing rate in terms of bits per second (bps). Each Catalyst switch supports different rates and different rate increments.
Burst—. The number of packets that switches allow in the bucket before determining that the packet is out of profile. Various Catalyst switches support various burst ranges with various increments.
Conforming action—. Depending on the Catalyst switch model, optional supported conforming actions include drop, transmit, and mark.
Exceed action—. Depending on the Catalyst switch model, optional supported exceed actions for out-of-profile packets are drop, transmit, and mark.
Violate action—. Applies to Catalyst switches that support two-rate policers, where there is a second bucket in the leaky token bucket algorithm. The violate action adds a third measurement for out-of-profile traffic. Applicable violate actions are drop, transmit, and mark. RFC 2698 discusses three-color marking, the basis for the addition of violate action on Cisco Catalyst switches.
There are many white papers, books, and tech notes on how to correctly configure the burst size to handle TCP traffic effectively. One leading recommended formula for configuring burst is as follows:
<burst_size> = 2 * <RTT> * rate
RTT is the round trip time for a TCP session. RTT can be determined from sophisticated methods such as traffic analysis tools or simple tools such as ping. Rate is throughput end-to-end. For more information on configuring recommended burst sizes, refer to Cisco.com.
In addition, there are three types of policing on Catalyst switches:
Individual policers—. An individual policer is a per-interface policer where the switch applies specified policing parameters on a per-interface basis. Applying a policer that limits traffic to 75 Mbps on each interface is an example of an individual policer.
Aggregate policers—. Aggregate policers are policers that apply policing parameters on a group of interfaces. For example, an aggregate policer that is defined to limit traffic to 75 Mbps to a group of interfaces limits the total traffic for all interfaces to 75 Mbps. As a result, the group of interfaces can achieve only 75 Mbps among all members with an aggregate policer, whereas an individual policer applies policing parameters on a per-interface basis.
Microflow policing—. Microflow policing is per-flow policing where a switch applies policing parameters to each class within a policy map.
Note
Several models of Catalyst switches support application of policing not only on a per-interface basis but also on a per-VLAN basis. Check the product configuration guide for support applications of policing on a per-VLAN basis.
Configuring individual or microflow policers on Catalyst switches is accomplished via policy maps. To specify an individual policer or microflow policer as a class map action clause, use the following command:
police [flow] bits-per-second normal-burst-bytes [extended-burst-bytes]
    [pir peak-rate-bps] [{conform-action action} {drop [exceed-action action]} |
    {set-dscp-transmit [new-dscp]} | {set-prec-transmit [new-precedence]} |
    {transmit [{exceed-action action} | {violate-action action}]]
Not all families of Catalyst switches and software versions support all the options listed in the preceding police command; always check the configuration guides on Cisco.com for supported actions.
To define an aggregate policer, use the following global command:
mls qos aggregate-policer policer_name bits_per_second normal_burst_bytes
    [maximum_burst_bytes] [pir peak_rate_bps] [[[conform-action {drop |
    set-dscp-transmit dscp_value | set-prec-transmit ip_precedence_value |
    transmit}] exceed-action {drop | policed-dscp | transmit}]
    violate-action {drop | policed-dscp | transmit}]
As with the policy map configuration, not all families of Catalyst switches support the entire options list with the mls qos aggregate-policer command. To tie an aggregate policer to a class map action clause in a policy map, use the following command:
police aggregate aggregate_policer_name
Example 10-9 illustrates a sample configuration of an individual policer on a Catalyst 3550 switch. This individual policer limits traffic ingress on interface FastEthernet0/3. The policer limits the traffic that matches the class map MATCH-UDP, which in turn matches access-list 101. Access-list 101 permits traffic on UDP 10000. As a result of this configuration on FastEthernet0/3, all traffic on UDP port 10000 is policed to 1,536,000 bps by dropping traffic exceeding the rate.
Example 10-9. Sample Configuration of Policing
  !
  mls qos
  !
  class-map match-all MATCH-UDP
    match access-group 101
  !
  !
  policy-map LIMIT-UDP
    class MATCH-UDP
      police 1536000 20000 exceed-action drop
  !
  ! Output omitted for brevity
  !
  interface FastEthernet0/3
   switchport mode dynamic desirable
   service-policy input LIMIT-UDP
  !
  (text deleted)
  !
The following sections discuss congestion management and congestion avoidance. Congestion management is the key feature of QoS because it applies scheduling to egress queues.
Catalyst switches use multiple egress queues for application of the congestion-management and congestion-avoidance QoS features. Both congestion management and congestion avoidance are a per-queue feature. For example, congestion-avoidance threshold configurations are per queue, and each queue may have its own configuration for congestion management and avoidance. In addition, each Catalyst switch has a unique hardware implementation for egress queues. For example, the Catalyst 3550 family of switches has four egress queues, whereas the Catalyst 6500 family of switches uses either one or two egress queues depending on line module.
Cisco IOS uses specific nomenclature for referencing egress queues. For a queue system XpYqZt, the following applies:
X indicates the number of priority queues.
Y indicates the number of queues other than the priority queues.
Z indicates the configurable tail-drop or WRED thresholds per queue.
For example, the Catalyst 4000 and 4500 families of switches use either a 1p3q1t or 4q1t queuing system, depending on configuration. For the 1p3q1t queuing system, the switch uses a total of four egress queues, one of which is a priority queue, all of which support a single congestion-avoidance threshold.
Moreover, classification and marking have little meaning without congestion management. Switches use congestion-management configurations to schedule packets appropriately from output queues once congestion occurs. Catalyst switches support a variety of scheduling and queuing algorithms. Each queuing algorithm solves a specific type of network traffic condition.
Catalyst switches transmit frames on egress with a DSCP value mapped directly from the internal DSCP value. The CoS value of egress also maps directly from the internal DSCP value where the DSCP-to-CoS value for egress frames is configurable. Table 10-6 illustrates the default DSCP-to-CoS mapping table.
To configure the DSCP-to-CoS mapping table, use the following command:
mls qos map dscp-cos dscp-values to cos_value
Congestion management comprises several queuing mechanisms, including the following:
FIFO queuing
Weighted round robin (WRR) queuing
Priority queuing
Custom queuing
Shaped round robin (SRR)
The following subsections discuss these queuing mechanisms in more detail.
The default method of queuing frames is FIFO queuing, in which the switch places all egress frames into the same queue, regardless of classification. Essentially, FIFO queuing does not use classification, and all packets are treated as if they belong to the same class. The switch schedules packets from the queue for transmission in the order in which they are received. This behavior is the default behavior of a Cisco IOS–based Catalyst switch without QoS enabled. Figure 10-12 illustrates the behavior of FIFO queuing.
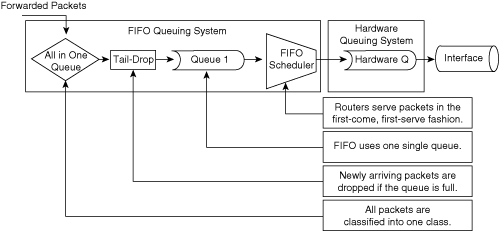
Because FIFO queuing is the default configuration of Catalyst switches, it does not require configuration commands.
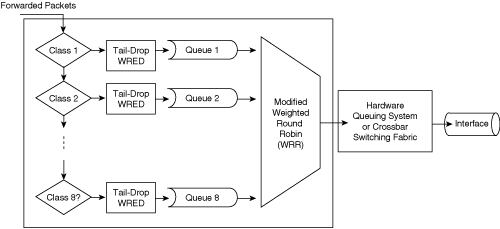
Scheduling packets from egress queues using WRR is a popular and simple method of differentiating service among traffic classes. With WRR, the switch uses a configured weight value for each egress queue. This weight value determines the implied bandwidth of each queue. The higher the weight value, the higher the priority that the switch applies to the egress queue. For example, consider the case of a Catalyst 3550 switch configured for QoS and WRR. The Catalyst 3550 uses four egress queues. If queues 1 through 4 are configured with weights 50, 10, 25, and 15, respectively, queue 1 can utilize 50 percent of the bandwidth when there is congestion. Queues 2 through 4 can utilize 10, 25, and 15 percent of the bandwidth, respectively, when congestion exists. Figure 10-13 illustrates WRR behavior with eight egress queues. Figure 10-13 also illustrates tail-drop and WRED properties, which are explained in later sections.
Although the queues utilize a percentage of bandwidth, the switch does not actually assign specific bandwidth to each queue when using WRR. The switch uses WRR to schedule packets from egress queues only under congestion. Another noteworthy aspect of WRR is that it does not starve lower-priority queues, because the switch services all queues during a finite time period.
To configure WRR on the Catalyst 6500 family of switches running Cisco IOS, perform the following steps:
Enable QoS globally, if not previously configured.
Switch(config)#mls qosSelect an interface to configure.
Switch(config)#interface {ethernet | fastethernet | gigabitethernet |
  tengigabitethernet} slot/port
Assign egress CoS values to queues and queue thresholds. The switches use the CoS mapping for congestion avoidance thresholds, which are discussed in the next section.
Switch(config-if)#wrr-queue cos-map queue-id threshold-id cos-1...cos-n
You must assign the CoS-to-queue threshold for all queue types. The queues are always numbered starting with the lowest-priority queue possible, and ending with the strict-priority queue, if one is available. A generic example follows using variable number queues, termed n:
Queue 1 will be the low-priority WRR queue.
Queue 2 will be the high-priority WRR queue.
Queue n will be the strict-priority queue.
The strict-priority queue is configured by using the priority-queue command, and the wrr-queue cos-map command configures the CoS to egress queue mapping. Repeat Step 3 for each queue, or keep the default CoS assignments.
Configure the WRR weights for the WRR queues.
Switch(config-if)#wrr-queue bandwidth weight for Q1 weight for Q2 weight
  for Qn
Weight for Q1 relates to queue 1, which should be the low-priority WRR queue. Keep this weight at a level lower than the weight for Q2. The weight can take any value between 1 and 255. Assign the ratio by using the following formulas:
To queue 1: [weight 1 / sum(weights)]
To queue 2: [weight 2 / sum(weights)]
To queue n: [weight n / sum(weights)]
You must define the weight for all types of queues. These weight types do not need to be the same.
Define the transmit queue ratio. The weights are configurable percentages between 1 and 100.
Router(config-if)# wrr-queue queue-limit  low-priority-queue-weight
  [medium-priorityqueue-weights(s)]  high-priority-queue-weights
The transmit queue ratio determines the way that the buffers are split among the different queues. If you have multiple queues with a priority queue, the configuration requires the same weight on the high-priority WRR queues and for the strict-priority queue. These levels cannot be different on the Catalyst 6500 family of switches for hardware reasons. Generally, high-priority queues do not require a large amount of memory for queuing because traffic destined for high-priority queues is delay sensitive and often low volume. As a result, large queue sizes for high- and strict-priority queues are not necessary. The recommendation is to use memory space for the low-priority queues that generally contain data traffic that is not delay sensitive to buffering. The next section discusses strict-priority queuing with WRR.
Note
The Catalyst 2950 family of switches applies WRR configuration on a global basis and not on a per-interface basis, as do the Catalyst 6500 and 3550 families of switches. The preceding steps are applicable to the Catalyst 2950 except on a per-switch basis.
Note
The Catalyst 2970 and 3750 families of switches use a specialized WRR feature referred to as shaped round robin (SRR) for congestion management. Refer to the Catalyst 2750 and 3750 QoS configuration guides detailing SSR for more details.
Note
The Catalyst 4000 and 4500 families of switches running Cisco IOS do not use WRR, specifically, for congestion management. These switches use sharing and shaping instead. Sharing is different from WRR; it differentiates services by guaranteeing bandwidth per queue. These switches do support strict-priority queuing on queue 3.
Example 10-10 illustrates a sample congestion-management configuration on a Catalyst 6500 switch running Cisco IOS. In this configuration, egress CoS values 0 through 2 map to queue 1 threshold 1, CoS value 3 maps to queue 2 threshold 2, CoS value 4 maps to queue 2 threshold 1, and CoS value 6 maps to queue 2 threshold 2. The egress CoS values of 5 and 7 map to the priority queue, which is referenced as queue 1 and threshold 1.
Example 10-10. Sample Configuration for Congestion Management for a Catalyst 6500 Switch Running Cisco IOS
 !
 interface GigabitEthernet1/1
  no ip address
  wrr-queue bandwidth 50 75
  wrr-queue queue-limit 100 50
  wrr-queue cos-map 1 1 0 2
  wrr-queue cos-map 2 2 3
  wrr-queue cos-map 2 1 4
  wrr-queue cos-map 2 2 6
  priority-queue cos-map 1 1 5 7
  switchport
!
The Catalyst 2970, 3560, and 3750 use the shaped round robin (SRR) feature for egress queuing. SRR supports the following two congestion management configurations:
Shaped mode
Shared mode
In shaped mode, egress queues are shaped to an exact percentage of interface bandwidth, similar to Cisco IOS rate limiting. As such, traffic from an egress queue cannot exceed a specified rate regardless of traffic in other queues. Shaping provides a more even flow of traffic over time and reduces the peaks and valleys of bursty traffic. Shaped mode is commonly used with delay-sensitive traffic and UDP/IP traffic flows.
In shared mode, egress queues also receive a percentage of bandwidth; however, the egress queues are not limited to that bandwidth. If other queues have no traffic to send, a single queue can consume the whole bandwidth. In other words, queues are able to use bandwidth from other queues if their queues do not have data to transmit. Furthermore, in shared mode, a percentage of bandwidth per queue is guaranteed when congestion exists. This concept is similar to Class-based Weighted Fair Queuing (CBWFQ) commonly found on Cisco IOS routers.
Because four egress queues exist on the Catalyst 3750, a hybrid configuration of shaped and shared bandwidth is possible. To configure SRR for shaping, use the following command:
srr-queue bandwidth shape weight1 weight2 weight3 weight4
For weight1 weight2 weight3 weight4, enter the weights to allocate the percentage of bandwidth that each egress queue is shaped. The inverse ratio (1/weight) controls the shaping bandwidth for this queue. If you configure a weight of 0, the corresponding queue operates in shared mode, and the weight specified with the srr-queue bandwidth shape command is ignored; instead, the weights specified with the srr-queue bandwidth share interface configuration command are used. When configuring queues in the same queue-set for both shaping and sharing, make sure that you configure the lowest number queue for shaping.
To explicitly configure the egress queue bandwidth share on an interface, use the following command:
srr-queue bandwidth share weight1 weight2 weight3 weight4
By default, all four weights are 25. For weight1 weight2 weight3 weight4, enter the weights to control the ratio of the frequency in which the SRR scheduler sends packets. The range is 1 to 255, similar to WRR configurations. The configuration of the expedite queue on the Catalyst 2960, 3560, and 3750 families of switches remains the same as the Catalyst 3560 as discussed in an earlier section. Example 10-11 demonstrates SRR queuing where queue 1 is shaped to 20 percent of the bandwidth while the rest of the queues are shared at the respective bandwidth percentages.
One method of prioritizing and scheduling frames from egress queues is to use priority queuing. Earlier sections noted that enabling QoS globally on Cisco IOS–based Catalyst switches enables the use of egress queues. When applying strict priority to one of these queues, the switch schedules frames from that queue as long as there are frames in that queue, before servicing any other queue. Catalyst switches ignore WRR scheduling weights for queues configured as priority queues; most Catalyst switches support the designation of a single egress queue as a priority queue.
Priority queuing is useful for voice applications where voice traffic occupies the priority queue. However, this type of scheduling may result in queue starvation in the nonpriority queue. The remaining nonpriority queues are subject to the WRR configurations.
Catalyst switches, in terms of configuration, refer to priority queuing as expedite queuing or strict-priority queuing, depending on the model. To configure the strict-priority queue on Catalyst 6500 switches running Cisco IOS, use the priority-queue cos-map command and assign the appropriate CoS values to the priority queue. Because voice traffic usually carries a DSCP value of 46, which maps to a CoS value of 5, the ideal configuration for priority queuing is to map the CoS value of 5 to the strict-priority queue.
On the Catalyst 3550 family of switches, use the priority-queue out command to enable strict-priority queuing on queue 4. For the Catalyst 4000 and 4500 families of switches, use the priority high command on the tx-queue 3 interface to enable strict-priority queuing on queue 3. Note that not all line modules for the Catalyst support egress priority queuing. The Catalyst 3750 uses ingress priority along with SRR instead of egress priority scheduling for priority queuing–type configurations. See the configuration guides for these switches for more details regarding strict-priority queuing configurations. Example 10-10 also illustrates the priority-queuing configuration for an interface of Catalyst 6500 running Cisco IOS using the priority-queue cos-map command.
Another method of queuing available on Catalyst switches strictly for WAN interfaces is custom queuing. Custom queuing (CQ) reserves a percentage of available bandwidth for an interface for each selected traffic type. If a particular type of traffic is not using the reserved bandwidth, other queues and types of traffic may use the remaining bandwidth.
CQ is statically configured and does not provide for automatic adaptation for changing network conditions. In addition, CQ is not popular on high-speed WAN interfaces; refer to the configuration guides for CQ support on LAN interfaces and configuration details. See the configuration guide for each Catalyst switch for supported CQ configurations.
This section highlights the most significant features of congestion management on Cisco IOS–based Catalyst switches, specifically focusing on the Catalyst 6500 family of switches. Each Catalyst switch is unique in configuration and supported congestion-management features; refer to the configuration guides and product documentation for more details.
In brief, the following additional congestion-management features are available on various Catalyst switches:
Internal DSCP to egress queue mapping
Sharing
Transmit queue size per Catalyst switch and interface type
Congestion-avoidance techniques monitor network traffic loads in an effort to anticipate and avoid congestion at common network bottleneck points. Switches and routers achieve congestion avoidance through packet dropping using complex algorithms (versus the simple tail-drop algorithm). Campus networks more commonly use congestion-avoidance techniques on WAN interfaces (versus Ethernet interfaces) because of the limited bandwidth of WAN interfaces. However, for Ethernet interfaces of considerable congestion, congestion avoidance is very useful.
When an interface of a router or switch cannot transmit a packet immediately because of congestion, the router or switch queues the packet. The router or switch eventually transmits the packet from the queue. If the arrival rate of packets for transmission on an interface exceeds the router’s or switch’s ability to buffer the traffic, the router or switch simply drops the packets. This behavior is called tail drop because all packets for transmission attempting to enter an egress queue are dropped until there is space in the queue for another packet. Tail drop is the default behavior on Cisco Catalyst switch interfaces.
Tail drop treats all traffic equally regardless of internal DSCP in the case of a Catalyst switch. For environments with a large number of TCP flows or flows where selective packet drops are detrimental, tail drop is not the best approach to dropping frames. Moreover, tail drop has these shortcomings with respect to TCP flows:
The dropping of frames usually affects ongoing TCP sessions. Arbitrary dropping of frames with a TCP session results in concurrent TCP sessions simultaneously backing off and restarting, yielding a “saw-tooth” effect. As a result, inefficient link utilization occurs at the congestion point (TCP global synchronization).
Aggressive TCP flows may seize all space in output queues over normal TCP flow as a result of tail drop.
Excessive queuing of packets in the output queues at the point of congestion results in delay and jitter as packets await transmission.
No differentiated drop mechanism exists; premium traffic is dropped in the same manner as best-effort traffic.
Even in the event of a single TCP stream across an interface, the presence of other non-TCP traffic may congest the interface. In this scenario, the feedback to the TCP protocol is poor; as a result, TCP cannot adapt properly to the congested network.
Recall that TCP increases the window size slowly (TCP slow start) and linearly until a lost acknowledgment signals lost frames along the data path. It then decreases the window size logarithmically. If there are many flows that start slowly, each flow will increase the window size until congestion occurs, and then all will fall back at the same time. As the flows become synchronized, the link is used less efficiently.
Because routers and switches handle multiple concurrent TCP sessions, and because TCP flows are generally bursty, when egress traffic exceeds the buffer limit for egress queues, it vastly exceeds the buffer limit for the egress queues. In addition, the burstiness of TCP is of short duration and generally does not result in periods of prolonged congestion. Recall that tail-drop algorithms drop all traffic that exceeds the buffer limit by default. As a result of multiple TCP flows vastly exceeding the buffer limit, multiple TCP sessions simultaneously go into TCP slow start. Consequently, all TCP traffic slows down and then slow-starts again. This behavior creates a condition known as global synchronization, which occurs as waves of congestion crest only to be followed by troughs during which link utilization is not fully utilized.
One method of handling global synchronization is to apply weighted fair queuing (WFQ). WFQ uses an elaborate scheme for dropping traffic, because it can control aggressive TCP flows via its Congestion Discard Threshold (CDT)–based packet dropping algorithm. However, WFQ does not scale to the backbone speeds used in multilayer switched networks; instead, Catalyst switches use weighted random early detection (WRED) for congestion avoidance. The next subsection discusses this feature.
Tail drop is a congestion-avoidance mechanism when applied with classification to multiple thresholds. An example of congestion avoidance is configuring a Catalyst switch to tail-drop packets with DSCP values between 0 and 5 at a 50 percent queue full threshold compared to tail-dropping packets with DSCP values between 6 and 10 at a 100 percent queue full threshold. In this configuration, the switch drops packets with DSCP values between 0 and 5 at a lower threshold to avoid congestion on packets with DSCP values between 6 and 10.
WRED is a congestion-avoidance mechanism that is useful for backbone speeds. WRED attempts to avoid congestion by randomly dropping packets with a certain classification when output buffers reach a specific threshold. WRED is essentially a combination of two QoS features: random early detection (RED) and WRR.
Figure 10-14 illustrates the behavior of TCP with and without RED. As illustrated in the diagram, RED smoothes TCP sessions because it randomly drops packets, which ultimately reduces TCP windows. Without RED, TCP flows go through slow start simultaneously. The end result of RED is better link utilization.
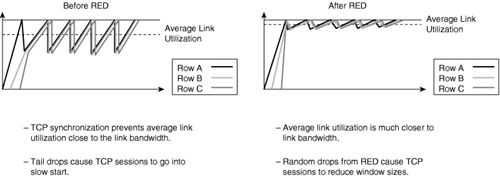
RED randomly drops packets at configured threshold values (percentage full) of output buffers. As more packets fill the output queues, the switch randomly drops frames in an attempt to avoid congestion without the “saw-tooth” TCP problem. RED only works when the output queue is not full; when the output queue is full, the switch tail-drops any additional packets that attempt to occupy the output queue. However, the probability of dropping a packet rises linearly as the output queue begins to fill above the RED threshold.
RED works very well for TCP flows but not for other types of traffic, such as UDP flows and voice traffic. WRED is similar to RED except that WRED takes into account classification of frames. For example, for a single output queue, a switch configuration may consist of a WRED threshold of 50 percent for all best-effort traffic for DSCP values up to 20, and 80 percent for all traffic with a DSCP value between 20 and 31. In this example, the switch drops existing packets in the output queue with a DSCP of 0 to 20 when the queue’s threshold reaches 50 percent. If the queue continues to fill to the 80 percent threshold, the switch then begins to drop existing packets with DSCP values above 20. If the output queue is full even with WRED configured, the switch tail-drops any additional packets that attempt to occupy the output queue. The end result of the WRED configuration is that the switch is less likely to drop packets with higher priorities (higher DSCP value). Figure 10-15 illustrates the WRED algorithm pictorially.

On most Catalyst switches, WRED is configurable per queue, with all the switches in Table 10-1 using four queues except the Catalyst 6500, for which the number of output queues varies per line card. Nevertheless, it is possible to use WRR and WRED together. A best-practice recommendation is to designate a strict-priority queue for high-priority traffic and use WRED for the remaining queues designated for data traffic.
For switches that support tail-drop and WRED configurations, the configurations vary depending on the number of output queues and whether the line modules support minimum configurable thresholds. Minimum thresholds specify the queue depth at which not to drop traffic. To configure tail-drop thresholds on the Catalyst 6500 family of switches running Cisco IOS for 1q4t or 2q2t interfaces, use the following command:
wrr-queue threshold queue-id thr1% thr2%
Here, queue-id specifies the respective queue number, and thr1% and thr2% specify the output queue full percentage at which to start dropping traffic and the maximum queue full percentage at which to apply tail-drop, respectively. Always set thr2% to 100 percent for tail-drop configurations. To configure WRED on the Catalyst 6500 family of switches running Cisco IOS for 1p2q2t, 1p3q1t, 1p2q1t, and 1p1q8t, use the following commands:
wrr-queue random-detect min-threshold queue-id thr1% [thr2% [thr3% thr4% thr5% thr6%
  thr7% thr8%]]
wrr-queue random-detect max-threshold queue-id thr1% [thr2% [thr3% thr4% thr5% thr6%
  thr7% thr8%]]
The min-threshold command specifies the low-WRED output queue percentage value for which the switch does not drop frames. The max-threshold command specifies the high-WRED queue percentage value for which to drop all frames in the queue. Example 10-12 illustrates an example of WRED on the Catalyst 6500 family of switches. In this example, the switch only applies WRED when queue 1 reaches 50 percent full for threshold 1 and 70 percent full for threshold 2. When the queue is 75 percent full in threshold 1, the switch drops all frames.
Example 10-12. Sample WRED Configuration on Catalyst 6500 Switch Running Cisco IOS
!
interface GigabitEthernet1/1
 no ip address
 wrr-queue bandwidth 50 75
 wrr-queue queue-limit 100 50
 wrr-queue random-detect min-threshold 1 50 70
 wrr-queue random-detect max-threshold 1 75 100
 wrr-queue cos-map 1 1 0 2
 wrr-queue cos-map 1 2 3
 wrr-queue cos-map 2 1 4
 wrr-queue cos-map 2 2 6
 priority-queue cos-map 1 1 5 7
 rcv-queue cos-map 1 1 0
 switchport
!
To configure all other interface output queue types on the Catalyst 6500 family of switches and all other Catalyst switches, refer to the product configuration guides for the respective Catalyst switch on Cisco.com.
Catalyst switches support WRED on ingress receive queues as well. Consult the configuration guides on Cisco.com for additional details on configuring WRED for ingress receive queues.
The QoS implementation for a campus network differs at the Campus Backbone, Building Access, and Building Distribution submodules. Because applying QoS classification at the edge is ideal, Layer 2 edge (Building Access) switches generally perform the following QoS functions:
Classification on a per-packet basis
Marking
Congestion management
Congestion avoidance
In general, backbone Layer 3 devices perform the following QoS functions, because backbone devices receive packets after classification and marking:
Congestion management
Congestion avoidance
For Edge submodules that connect Campus Backbones across MANs or WANs, deploy the following QoS features:
Classification on a per-packet basis
Policing or shaping
Fragmentation
Compression
Congestion management
Congestion avoidance
Figure 10-16 depicts the recommended QoS feature deployments.
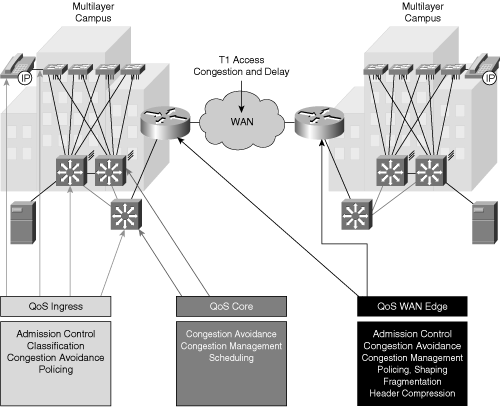
Networks with special applications of QoS may not exactly follow these guidelines, but these guidelines are a starting point for any QoS network policy.
The Building Access submodule is typically where the trust boundary is formed. In this submodule, the Catalyst switches set or trust the DSCP value of ingress packets for use through the entire network. Catalyst switches may set or trust the DSCP value of ingress packets by comparing ingress packets against an ACL or policer. When using ACLs, the Catalyst classifies or marks only packets that match specific criteria, such as TCP port number or IP addresses. In addition, using policers to set or trust DSCP values on ingress packets allows the Catalyst switches to determine the trust behavior by the traffic rate. Traffic that exceeds a specified rate and receives a lower DSCP value than traffic that complies with the specified rate is an example of the use of a policer to mark down DSCP values. These features are useful in differentiating traffic flows instead of differentiating traffic by ingress port.
Furthermore, policing is optional in the Building Access submodule. Catalyst switches in the Building Access submodule layer configured for policing apply traffic conditioning and may optionally classify or mark packets before reaching the Campus Backbone or Building Distribution submodule.
Congestion management is a requirement of the Building Access submodule for all interfaces. Classification only determines the internal DSCP of a packet as it traverses the Catalyst switch. Congestion management on the Catalyst switch acts on the internal DSCP values of packets to schedule and apply congestion avoidance accordingly. Congestion avoidance is another useful feature used in the access layer in preventing low-priority traffic from starving higher-priority traffic out of queues.
Not all the Cisco Catalyst switches support all QoS features. In addition, low-end Catalyst switches support the features with significant restrictions, such as restrictions on ACL size and types of ACLs for classification. Consult the product release notes and documentation before deciding which Catalyst switches to use in the QoS design.
Classification and marking other than trusting in the Building Distribution submodule is necessary only if the Building Access layer does not classify packets or if the Catalyst switches used in the Building Access submodule do not support adequate features necessary to apply QoS effectively. When applying QoS in the Building Distribution submodule, simply use the same principles used when applying QoS in the Building Access submodule. In this layer, configure all inter-switch links for trusting. In this manner, the Building Distribution submodule switches trust the classification from all other switches.
Policing is optional in the Building Distribution submodule as with any submodule. Policing is useful in constraining traffic flows and marking frames above specific rates. Policing is primarily useful for data flows and voice or video flows because voice and video usually maintain a steady rate of traffic.
Congestion management is necessary on all inter-switch links and any hosts or servers that may connect to the Building Distribution submodule. Congestion management applies proper scheduling of frames for differential service. Congestion avoidance is optional in any submodule but is not a requirement.
The Campus Backbone QoS application is similar to the Building Distribution submodule; use classification and marking in situations where other submodules have not classified or marked traffic. Ideally, there should not be a need to classify or mark traffic in the Campus Backbone submodule. As with other submodules, policing is optional. However, congestion management is a requirement to differentiate traffic flows through the core of the network. Congestion avoidance is optional but recommended to handle congestion effectively.
Cisco AutoQoS enables customers to deploy QoS features for converged IP telephony and data networks much more quickly and efficiently. Cisco AutoQoS generates traffic classes and policy map CLI templates. Cisco AutoQoS simplifies and automates the Modular QoS CLI (MQC) definition of traffic classes and the creation and configuration of traffic policies. Therefore, when Cisco AutoQoS is configured at the interface, the traffic receives the required QoS treatment automatically. In-depth knowledge of the underlying technologies, service policies, link efficiency mechanisms, and Cisco QoS best practice recommendations for voice requirements is not required to configure Cisco AutoQoS.
Cisco AutoQoS can be extremely beneficial for these scenarios:
Small to medium-sized businesses that must deploy IP telephony quickly but lack the experience and staffing to plan and deploy IP QoS services
Large customer enterprises that need to deploy Cisco Systems telephony solutions on a large scale, while reducing the costs, complexity, and time frame for deployment, and ensuring that the appropriate QoS for voice applications is being set in a consistent fashion
International enterprises or service providers requiring QoS for VoIP where little expertise exists in different regions of the world and where provisioning QoS remotely and across different time zones is difficult
Service providers requiring a template-driven approach to delivering managed services and QoS for voice traffic to large numbers of customer premises devices
Moreover, Cisco AutoQoS simplifies and shortens the QoS deployment cycle. Cisco AutoQoS helps in all five major aspects of successful QoS deployments:
Application classification—. Cisco AutoQoS leverages intelligent classification on routers using Cisco NBAR to provide deep and stateful packet inspection. Cisco AutoQoS uses CDP for voice packets to ensure that the device attached to the LAN is really an IP Phone.
Policy generation—. Cisco AutoQoS evaluates the network environment and generates an initial policy. The first release of Cisco AutoQoS provides the necessary Cisco AutoQoS VoIP feature to automate QoS settings for VoIP deployments. This feature automatically generates interface configurations, policy maps, class maps, and ACLs. Cisco AutoQoS VoIP automatically employs Cisco NBAR to classify voice traffic and mark the traffic with the appropriate DSCP value. Cisco AutoQoS VoIP can be instructed to rely on, or trust, the DSCP markings previously applied to the packets.
Configuration—. With one command, Cisco AutoQoS configures the port to prioritize voice traffic without affecting other network traffic, while still offering the flexibility to adjust QoS settings for unique network requirements. Not only will Cisco AutoQoS automatically detect Cisco IP Phones and enable QoS settings, it will disable the QoS settings to prevent malicious activity when a Cisco IP Phone is relocated or moved.
Monitoring and reporting—. Cisco AutoQoS provides visibility into the CoSs deployed via system logging and Simple Network Management Protocol (SNMP) traps, with notification of abnormal events (that is, VoIP packet drops).
Consistency—. When deploying QoS configurations using Cisco AutoQoS, the configurations that are generated are consistent among router and switch platforms. This level of consistency ensures seamless QoS operation and interoperability within the network.
There are two interface configuration options for enabling QoS on Catalyst switches running Cisco IOS:
VoIP Trust—. Configures the ingress classification on the interface to trust the CoS and DSCP bits received in the packet.
VoIP Cisco-phone—. Trusts ingress CoS and DSCP only if a phone is detected connected to the interface with CDP.
Furthermore, both options configure strict priority (expedited queuing) on the egress interface for voice traffic and WRR for scheduling of the voice and data traffic, where appropriate. For further details on AutoQoS, refer to the configuration guide for the respective Catalyst switch.
The following bullets review important BCMSN certification exam preparation points of this chapter. The bullets only briefly highlight the main points of this chapter related to the BCMSN exam and should be used only as supplemental study material. Consult the text of this chapter for additional information regarding these topics. Furthermore, review Chapter 13, “Best Practices for Deploying Cisco IP Telephony Using Cisco Catalyst Switches,” in regards to voice VLANs, an important feature that supplements QoS. Table 10-7 lists important commands to review for the BCMSN certification exam:
QoS, in respect to Catalyst switches, is composed of the following configuration components:
Classification
Marking
Traffic conditioning
Congestion management and avoidance
Classification associates a priority value to a frame based on properties such as ingress port, and IP packet properties such as TCP port, embedded URL, application properties, or MAC address.
Marking consists of statically marking the DSCP, CoS, or IP Precedence value of a frame (hence, classifying the frame) based on ingress port, IP packet properties, rate of traffic, and so on.
Traffic conditioning includes both shaping and policing. The purpose of this feature is to limit traffic rates and drop or mark packets exceeding the traffic rate.
Congestion management includes scheduling packets from egress queues in such a way as to provide higher priority to specific frames based on DSCP, CoS, or IP Precedence values (classified frames).
Congestion avoidance includes queue management as to manage congestion effectively.
To configure a Catalyst switch to trust DSCP on an interface, use the mls qos trust dscp Cisco IOS command.
To configure a Catalyst switch to trust CoS on an interface, use the mls qos trust cos Cisco IOS command.
To configure a Catalyst switch to override the CoS value of ingress frames on an interface, use the mls qos cos value command.
Congestion management configurations vary based on Catalyst switch; however, the typical configuration is to map high-priority traffic to a priority queue and schedule other queues appropriately.
For a single deployment of QoS where QoS technologies remain abstract, use the Cisco AutoQoS feature.
Table 10-7. Commands to Review
Description | |
|---|---|
(config) #mls qos | Enables QoS globally on a Catalyst 2950, 2960, 2960, 3550, 3560, 3750, or 6500 switch |
(config) #policy-map policy-map-name | Enters the policy-map submode for configuration of a policy map |
(config-cmap) #match access-group access-list-number | Defines matching traffic for a class map |
(config-cmap) #set ip dscp dscp-value | Configures the class action as rewriting DSCP to specified value |
(config-if) #mls qos cos value | Manually sets ingress CoS values to the specified value |
(config-if) #mls qos trust cos | Trusts CoS values of incoming frames |
(config-if) #mls qos trust device cisco-phone | Trusts either DSCP or CoS based on whether a Cisco IP Phone is learned via CDP on the respective port |
(config-if) #mls qos trust dscp | Trusts DSCP values of ingress frames |
(config-if) #service-policy [input | output] policy-map-name | Applies a policy to an interface, ingress or egress |
#show mls qos | Displays whether QoS is enabled globally |
(config-if) #wrr-queue bandwidth weight1 weight2 weight3 weight4 | Configures WRR bandwidths |
(config-if) #wrr-queue cos-map | Configures CoS-to-egress queue mapping, globally or on a per-interface basis |
QoS is an integral part of any multilayer switched network deployment. With QoS, you can build a network of predictable behavior for latency, jitter, and packet loss. In addition, QoS mitigates anomalous network behavior and provides for differentiation of traffic flows. The following list summarizes QoS:
Classification associates a priority value to a frame.
Catalyst switches support classification on a per-interface or per-packet basis using ACLs.
Marking changes the DSCP value of a packet or CoS value of a frame on ingress or egress.
Catalyst switches use policing or shaping to condition traffic rates.
Catalyst switches support congestion management through the use of WRR, sharing, and shaping scheduling mechanisms.
Congestion avoidance uses WRED on Catalyst switches to improve link utilization under congestion with TCP flows.
In brief, adhere to the following guidelines and recommendations for deploying QoS in a multilayer switched network:
Before configuring Catalyst switches for QoS, develop a QoS plan that clearly outlines the necessary traffic classification.
Opt to classify traffic based on DSCP values instead of CoS values.
Apply classification as close to the edge as possible, preferably in the Building Access submodule.
Trust interfaces that interconnect switches where classification configuration already exists.
Use policing to effectively condition traffic data rates.
Apply congestion management to all interfaces, and use priority queuing on interfaces that transmit VoIP traffic.
Use congestion avoidance on interfaces where heavy congestion exists with TCP flows.
For additional information on QoS, refer to the following resource:
“Cisco IOS Quality of Service,” at http://www.cisco.com/warp/public/732/Tech/qos/
Complete this configuration exercise to familiarize yourself with basic QoS configuration on Cisco IOS–based Catalyst switches as discussed in this chapter.
The resources and equipment required to complete this exercise are as follows. (The last two items are optional.)
Catalyst 3550.
Terminal server or workstation connected directly to the console port of the Catalyst 3550 or out-of-band access to the Catalyst 3550.
Cisco IP Phones infrastructure supporting voice calls. (This resource verifies the configuration and is not mandatory.)
Traffic generator. (This resource verifies the configuration and is not mandatory.)
The purpose of this exercise is to configure a Cisco IOS–based Catalyst switch for the following QoS features:
Classification
Marking
Policing
Congestion management
Congestion avoidance
The exercise exposes topics such as VLANs and spanning tree found in others chapters of this book. Nevertheless, the main purpose of this exercise is to demonstrate a QoS configuration. In this configuration exercise, your goal is to configure a Catalyst 3550 for the following QoS features:
Trust ingress DSCP values for interfaces FastEthernet0/1 through 0/10 when a Cisco IP Phone is attached.
Reclassify frames on interface FastEthernet0/11 for a CoS value of 4.
Mark ingress TCP Port 30000 frames on interface FastEthernet0/12 with a DSCP value of 16.
Apply strict-priority queuing for VoIP traffic.
Configure high-priority queues to have a 2-to-1 (2:1) priority over low-priority queues.
Figure 10-17 shows the network layout for this configuration exercise.
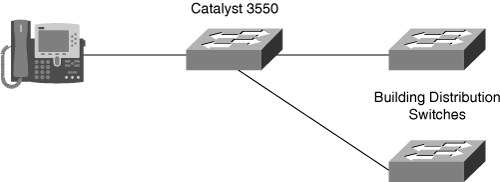
In this configuration exercise, you will use the commands listed in Table 10-8, which are in alphabetical order so that you can easily locate the information you need. Refer to this list if you need configuration command assistance during the configuration exercise. The table includes only the specific parameters used in the example and not all the available options for the command.
Table 10-8. Command List for Configuration Exercise
Command | Description |
|---|---|
access-list access-list-number .... | Access list configuration command |
class-map | Enters the class-map configuration submode |
configure terminal | Enters the configuration mode |
copy running-config start up-config | Copies the running configuration to NVRAM |
enable | Enters privileged mode |
end | Ends the configuration mode |
exit | Exits a configuration mode to its antecedent mode |
hostname hostname | Configures switch with a descriptive name |
interface FastEthernet | GigabitEthernet interface | Enters an interface configuration mode |
interface range FastEthernet | GigabitEthernet interfaces | Configures multiple interfaces simultaneously |
interface vlan vlan-id | Enters the VLAN configuration interface mode |
match access-group access-list-number | Configures class-map matching clauses |
mls qos | Globally enables QoS |
mls qos trust device cisco-phone | Trusts when a Cisco Phone is learned via CDP on the respective interface; works in conjunction with the mls qos trust dscp and mls qos trust cos commands |
mls qos trust dscp | Trusts DSCP values for ingress frames |
no shutdown | Configures an interface in the Administrative UP state |
policy-map policy_map_name | Enters the policy-map configuration submode |
priority-queue out | Configures queue 4 on the Catalyst 3550 family of switches as a priority queue |
service-policy input | output policy-map-name | Maps a policy map to an interface for ingress or egress traffic |
set ip dscp dscp_value | Marks DSCP |
show mls qos interface FastEthernet | GigabitEthernet interface | Displays the trusting configuration of an interface |
spanning-tree portfast | Configures an interface for the spanning-tree PortFast feature |
switchport | Configures an interface for Layer 2 operation |
switchport access vlan vlan-id | Configures an interface for a specific VLAN-ID |
vlan vlan-id | Adds or removes a VLAN-ID in the VLAN database |
wrr-queue bandwidth weight1 weight2 weight3 weight4 | Enters the ratio that determines the frequency in which the WRR scheduler dequeues packets; separate each value with a space (the range is 1 to 65536) |
wrr-queue cos-map queue-id cos1 ... cos8 | Configures CoS value to egress queue mapping |
Connect the Catalyst switch to a terminal server or directly to the workstation’s serial port for in-band connectivity.
Globally enable QoS features on the switch.
Switch#configure terminal
Switch(config)#mls qos
Verify that QoS is globally enabled.
Switch(config)#do show mls qos
QoS is enabled
Note
The Cisco IOS do command is a recent addition to Cisco IOS to allow execution of privileged mode commands within configuration mode. This command saves the time and annoyance of exiting out and re-entering configuration mode. The do command is found only in the most recent Cisco IOS version, so it may not be supported in your version. If not, exit configuration mode and type the command (minus the keyword do) in privileged mode.
Enter the range command to configure multiple interfaces simultaneously.
Switch(config)#interface range FastEthernet 0/1 -10Specify an access VLAN for IP Phones. (Voice VLANs are not used in this exercise.)
Switch(config-if-range)#switchport access vlan 500Configure the switch to trust DSCP for incoming frames only if Cisco IP Phones are attached to the interface.
Switch(config-if-range)#mls qos trust dscp
  Switch(config-if-range)#mls qos trust device cisco-phone
Configure the interfaces for Spanning-Tree PortFast.
Switch(config-if-range)#spanning-tree portfast
%Warning: portfast should only be enabled on ports connected to a single
 host. Connecting hubs, concentrators, switches, bridges, etc... to this
 interface when portfast is enabled, can cause temporary bridging loops.
 Use with CAUTION
%Portfast will be configured in 10 interfaces due to the range command
 but will only have effect when the interfaces are in a non-trunking mode.
Enable the interfaces.
Switch(config-if-range)#no shutdownVerify the QoS configuration.
Switch#show mls qos interface FastEthernet 0/1
FastEthernet0/1
trust state: not trusted
trust mode: trust dscp
COS override: dis
default COS: 0
DSCP Mutation Map: Default DSCP Mutation Map
trust device: cisco-phone
Enter the interface configuration mode for FastEthernet0/11.
Switch(config)#interface FastEthernet 0/11Configure the interface to classify all ingress frames with a CoS value of 4.
Switch(config-if)#mls qos cos 4Verify the QoS configuration.
Switch#(config-if)#do show mls qos interface FastEthernet 0/11
FastEthernet0/11
trust state: not trusted
trust mode: not trusted
COS override: dis
default COS: 4
DSCP Mutation Map: Default DSCP Mutation Map
trust device: none
Configure an access list to match packets on TCP port 30000.
Switch(config)#access-list 100 permit tcp any any eq 30000Configure a traffic profile using a class map.
Switch(config)#class-map TCP-PORT-30k
Switch(config-cmap)#match access-group 100
Switch(config-cmap)#exit
Configure a policy map to apply the class map in Step 2 to the class action of setting the DSCP to 16.
Switch(config)#policy-map BCMSN
Switch(config-pmap)#class TCP-PORT-30k
Switch(config-pmap-c)#set ip dscp 16
Switch(config-pmap-c)#exit
Switch(config-pmap)#exit
Apply the policy-map ingress on interface FastEthernet0/11.
Switch(config)#interface FastEthernet 0/11
Switch(config-if)#service-policy input BCMSN
Switch(config-if)#exit
Verify the policy-map configuration.
Switch#show policy-map interface FastEthernet 0/11

 FastEthernet0/11

  service-policy input: BCMSN

    class-map: TCP-PORT-30k (match-all)
      0 packets, 0 bytes
      5 minute offered rate 0 bps, drop rate 0 bps
      match: access-group 100

    class-map: class-default (match-any)
      0 packets, 0 bytes
      5 minute offered rate 0 bps, drop rate 0 bps
      match: any
        0 packets, 0 bytes
        5 minute rate 0 bps
Enter the range command to configure multiple interfaces simultaneously.
Switch(config)#interface range FastEthernet 0/1 -24Configure queue 3 with twice the service level as that of any other queue.
Switch(config-if)#wrr-queue bandwidth 20 20 40 20Verify the WRR configuration.
Switch#show mls qos interface FastEthernet 0/1 queueing
FastEthernet0/1
Egress expedite queue: ena
wrr bandwidth weights:
qid-weights
 1 - 20
 2 - 20
 3 - 40
 4 - 20    when expedite queue is disabled
Cos-queue map:
cos-qid
 0 - 1
 1 - 1
 2 - 2
 3 - 2
 4 - 3
 5 - 4
 6 - 3
 7 - 3
Switch#show mls qos interface FastEthernet 0/1 statistics
FastEthernet0/1
Ingress
  dscp: incoming   no_change  classified policed     dropped (in bytes)
Others: 97663325   87828650   9834675    0           0
Egress
  dscp: incoming   no_change  classified policed     dropped (in bytes)
Others: 30540345 n/a n/a 0 0For multiple-choice questions, there might be more than one correct answer.
True or False: You should always apply QoS classification in the access layer and as close to the network device as possible. | |
True or False: Congestion management includes the RED, WRED, and tail-drop QoS features. | |
Which command overrides CoS values on ingress frames to 1?
| |
What is the purpose of trust boundaries?
| |
Consider a network design in which a video server needs a higher class of service for video data compared to other regular data traffic. The server does not support 802.1q tagging or setting bits in the IP field for priority. Furthermore, the server transmits other management traffic besides the video. Which of the following QoS components and methods would correctly prioritize traffic from the video server?
| |
Which QoS model requires end-to-end configuration?
| |
In designing a multilayer switched network, you are required to condition traffic on a Catalyst switch such that TCP flows do not achieve more than 10 Mbps out of a 100-Mbps interface. Which of the following methods of traffic conditioning achieves link utilization closest to 10 Mbps?
| |
Which of the following methods of traffic conditioning would you use to limit VoIP traffic?
| |
Figure 10-18 illustrates an IP Phone attached to a Catalyst 3550 switch. Consider a situation in which the IP Phone is sending voice packets to another IP Phone with a DSCP value of 46 and a CoS value of 5. If the Catalyst 3550 switch is configured to trust DSCP and is using the default mapping tables, what is the internal DSCP of the frame as it traverses the switch?
| |
With regard to Figure 10-18, consider a situation in which the IP Phone is sending voice packets to another IP Phone with a DSCP value of 46 and a CoS value of 5. If the Catalyst 3550 switch is configured to trust CoS and the switch is using the default mapping tables, what is the internal DSCP of the frame as it traverses the switch?
| |
With regard to Figure 10-18, consider a situation in which the IP Phone is sending voice packets to another IP Phone with a DSCP value of 46 and a CoS value of 5. If the Catalyst 3550 switch is configured to untrusted and the switch is using the default mapping tables, what is the internal DSCP of the frame as it traverses the switch?
Example 10-13 is for use in questions 12 and 13. Example 10-13. Sample Policing Configuration ! Output omitted for brevity
!
class-map match-any LIMIT-TCP_File_Sharing
match access-group 100
match access-group 101
!
!
policy-map LIMIT_File_Sharing
class LIMIT-TCP_File_Sharing
police 1536000 20000 exceed-action drop
!
!
! Output omitted for brevity
! | |
With regard to Example 10-13, which configuration command is the class action of the policy map?
| |
With regard to Example 10-13, which action is taken for packets that conform to the policing rate?
|