Chapter 3. The Game Object and the Default Game Loop
When you create a new project, many things happen behind the scenes, and many features to help drive the game available to you. In this chapter, you learn about these features, including:
• The game class
• The standard game loop
• Game components
Up until now, you’ve created new projects and added some code to do other fancy things, but you haven’t taken a step back to look at the default game template. Now is a good time to take a look at what is provided for you automatically and the other features available.
What Is in a New Project?
Open Visual Studio and create a new Game Studio 4.0 Windows Game project. Notice that your main project includes two code files (program.cs and game1.cs), and you have a content project you previously used. You can safely ignore everything in program.cs because it is simply the stub that launches the game. As a matter of fact, this isn’t even used on Windows Phone 7.
The interesting things that are discussed in this chapter are in game1.cs. Notice first that the Game1 class that is created comes from the Game object provided by Game Studio. The initial starting project gives you everything you need to start creating a game. It has a spot for initialization, a spot to load the content your game needs, a spot to update the game state, and a spot to render everything.
More things happen behind the scenes than you are probably aware of, however. Start with the first thing you see in the constructor, creating the GraphicsDeviceManager.
graphics = new GraphicsDeviceManager(this);
This one line of code starts a chain reaction of operations. It naturally creates a new GraphicsDeviceManager (which is discussed in just a moment), but it does more than that. This object implements IGraphicsDeviceService and IGraphicsDeviceManager. When you create the object, it takes the game parameter you’ve passed in (that is, the this parameter) and adds itself to the Services property of the game object.
Note
You can create and add your own services to this property (it maintains a list of services), and it is a convenient way to get game-specific services directly from the game rather than passing them around everywhere.
After the graphics device manager has been added to the services list, the actual graphics device is created when the constructor has finished executing. The default options work just fine, but you actually do have some control over the settings the device has.
Notice that quite a few different properties on this object can be used to control how the device is created or to get information about it. The first one is the GraphicsDevice. Right now, it hasn’t been created yet, but after it has been, it can be accessed here. You most likely never need it, though, because the GraphicsDevice is a property of the Game itself.
The GraphicsProfile is another property you can access. Profiles are discussed in Chapter 4, “Introduction to 3D Graphics”. Next is the IsFullScreen property that behaves differently depending on the platform you run. The default value here is false, although on Xbox 360, it doesn’t matter what this is set as because you are always full screen on that platform. On Windows, setting this to true causes the device to be created in what is called full screen exclusive mode, and your rendering encompasses the entire screen. On Windows Phone 7, this controls whether the system tray bar is visible or not visible.
Note
Taking over the full screen in exclusive mode on Windows is not a nice thing to do without the user asking you to do so. In modern operating systems, the graphics hardware is shared nicely between games and the operating system, and forcing the operating system to yield to your game can cause behavior that some of your players may very well find annoying (the authors here included).
The next set of properties is the most commonly changed, and it includes the preferences. Because they are preferences and not requirements, the runtime attempts to use these settings, and if it cannot use them, it falls back to what it feels is the closest to what you requested. These properties are PreferMultisampling, PreferredBackBufferWidth, PreferBackBufferHeight, PreferBackBufferFormat, and PreferDepthStencilFormat.
The back buffer is where your content is rendered, and the sizes in these preferences (width and height), control how large that area is. On Windows, in nonfull screen mode, this also controls the size of the window. In full screen mode, it controls the resolution of the monitor when it takes exclusive control of it. On Xbox 360 and Windows Phone 7, the devices have a built-in native resolution. For Windows Phone 7, the device has a resolution of 480×800 (in portrait mode), whereas the Xbox is configurable. On each of these platforms, if you ask for a different back buffer resolution, it is scaled to the native device resolution.
Multisampling is the process used to remove what are called the “jaggies” from rendered images. These jagged edges are formed normally on the edges of objects or on lines that are not on pixel boundaries (for example, nonhorizontal or vertical lines). Multisampling blends each pixel with other pixels around it to help soften these jagged edges. It does this by rendering the image larger and blending multiple pixels down to a single pixel. Although it doesn’t necessarily remove the jagged edges, it certainly can help. There is a performance cost for doing this, so this defaults to false.
The last two preferences are the formats for the back buffer and the depth stencil. Formats are used to describe how data is laid out for the final rendered image. For the back buffer, this is how the color is laid out, and the default for this is actually SurfaceFormat.Color. This is a 32-bit format that has 8 bits for red, green, blue, and alpha. The depth stencil buffer formats control how many bits are used for the depth buffer and stencil buffer.
The last two properties are SupportedOrientations, which is mainly used for Windows Phone 7, and SynchronizeWithVerticalRetrace. Synchronizing with the vertical retrace is a way to prevent tearing by pausing until the device is ready to render the entire screen at once. These are discussed in depth in Chapter 11, “Understanding Performance” when performance and measurement are discussed.
There are also six different events you can hook off of the graphics object, most of which are self-explanatory based on the names. The one interesting one is PreparingDeviceSettings. This event is triggered right before the device is created, and it gives you the opportunity to override any of the settings before the device is actually created. Use this only if you know the device supports the settings you request.
There are also two methods on the object, ApplyChanges which attempts to instantly update the device to the current settings (or create a new device if required), and ToggleFullscreen, which makes a windowed game full screen and a full screen game windowed during runtime. Using either of these is rarely required.
The last thing the constructor does is set the root directory of the automatically created content manager to “Content,” which is where your content project places the content you add to your game. The content manager is created for you when the game is created, so you can begin using it immediately. The content manager is discussed more in depth in Chapter 9, “Using the Content Pipeline.”
Content.RootDirectory = "Content";
The default template has overrides for five common methods: Initialize, LoadContent, UnloadContent, Update, and Draw. Although nothing happens in Initialize and UnloadContent, the other three have basic stub code. The LoadContent method creates the sprite batch object you almost certainly need. The Draw method clears the screen to the infamous CornflowerBlue color. Finally, the Update method adds a quick check to see if you’re pressing the Back button on your controller to see if it should exit the game. We get into the flow of these methods and how they’re used in just a moment, but first, let’s take a look at the Game class itself.
Note
For Windows Phone 7 projects, there is another very important aspect to the game lifetime you need to understand called “Tombstoning”. It is discussed in depth in Appendix D, “Dealing with Tombstoning”.
The Game Class
The Game class is where all of the magic in your game takes place. Almost everything in your game is driven in some part by this class, and it is the root of your project. Let’s dive in and see what it is made of.
Virtual Methods
The Game object you’re class derives from has many knobs and buttons (figuratively) to help control your game and its flow. It has several virtual methods you can override to help control different features, some of which we’ve seen already.
Initialize, as you would expect, is called once just after the object is created. It is where you would do most of your initialization (aside from loading content) for your game. This is an ideal place to add new game components for example (which are discussed later in this chapter). LoadContent and UnloadContent are two other areas where you should load (or unload) your content. Content is loosely defined and can be any external data your game needs, whether it’s graphics, audio, levels, XML files, and so on.
The Update method is where you handle updating anything your game requires, and in many games, you can do things such as handle user input. Because most games are essentially a simulation with external forces, you need a central spot where you can perform the operations to advance that simulation. Common things you’d do include moving objects around the world, physics calculations, and other simulation updates.
Draw probably needs no further explanation. All drawing code for each scene occurs here. There are two other drawing methods you can override: BeginDraw and EndDraw. These are called directly before and after Draw is called, respectively. If you override the EndDraw call, you need to ensure you call the base.EndDraw or manually call GraphicsDevice.Present; otherwise, you never see your scenes drawn on screen.
Note
Present is the last call made at the end of drawing and tells the graphics device, “Ok, I’m done drawing now; show it all on screen.”
Much like the pre- and post-drawing methods, there are also BeginRun and EndRun methods you can override that are called before the game begins and just after the game run ends. In most cases, you do not override these, unless you are doing something such as running multiple simulations as individual game objects.
You can override the method ShowMissingRequirementMessage. Most people probably don’t even realize it is there. By default, this does nothing on non-Windows platforms, and on Windows, it shows a message box giving you the exception detail. This enables customization if the platform you run on doesn’t meet the requirements of your game, which is normally only an issue on a platform such as Windows where you can’t guarantee which features it supports.
The last three methods you can override are mirrors of events you can hook. OnActivated is called at the same time the Activated event is fired, and it happens when your game becomes activated. Your game is activated once at startup, and then anytime it regains focus after it has lost focus. To mirror that, you use the OnDeactivated method, which is called when the Deactivated event is fired, and that happens when your game becomes deactivated, such as it exits or it has lost focus. On Windows and Windows Phone 7, your game can lose focus for any number of reasons (switching to a new app, for example), whereas on Xbox 360, you see this only if the guide screen displays.
Finally, the OnExiting method is called along with the Exiting event. As you can probably guess, this happens just before the game exits.
Methods
Most of the methods on the Game class are virtual so there aren’t many here to discuss, and they’re almost all named well, so you can guess what they do. The Exit method, which causes the game to start shutting down. The ResetElapsedTime method resets the current elapsed time, and you’ll learn more about it later in this chapter. The Run method is what starts the game running, and this method does not return until the game exits. On Xbox 360 and Windows, this method is called by the autogenerated main method in program.cs at startup, and on Windows Phone 7, this method throws an exception. Due to platform rules, you can’t have a blocking method happen during startup on Windows Phone 7. A timer starts and periodically calls RunOneFrame, which does the work of a single frame. You can use this method on Xbox 360 and Windows, but you shouldn’t have to use it since the game object is doing that for you.
The SuppressDraw method stops calling Draw until the next time Update is called. Finally, the Tick method advances one frame; namely, it calls Update and Draw.
Properties
After covering all of the methods, properties are naturally the next item on the list. You’ve already seen the Services property, which enables you to add new services to the game and query for existing ones. You’ve also already seen the Content and GraphicsDevice properties, which store the default content manager and graphics device.
A property called InactiveSleepTime gives you some control of how your game handles itself when it is not the foreground window. This value tells the system how long to “sleep” when it is not the active process before checking to see if it is active again. The default value of this is 20 milliseconds. This is important on Windows were you can have many processes run at once. You don’t want your game to run at full speed when it isn’t even active.
Speaking of being active, the IsActive property tells you the current state of the game. This maps to the Activated and Deactivated events, too, as it turns true during Activated and false during Deactivated. Chapter 12, “Adding Interactivity with User Input” discusses the IsMouseVisible property, even though you can probably guess what it does.
The LaunchParameters property is used for Windows Phone 7 to get information about parameters required for launching, but this can be used for any platformand translates the command-line parameters on Windows into this object. It is a dictionary of key value pairs. On Windows, if your command line is as follows, the object would have a dictionary with three members:
game.exe /p /x:abc "/w:hello world"
The first member would have a key of “p” with a value of an empty string. The second member would have a key of “x” with a value of “abc.” The third member has a key of “w” with a value of “hello world.”
On Windows Phone 7, applications are launched with a URI that includes these parameters; for example, if your launch command is as follows, the object would have a dictionary with two members:
app://{appguid}/_default#/Main.xaml?myparam1=one&myparam2=two
The first member would have a key of “myparam1” and a value of “one.” The second member would have a key of “myparam2” and a value of “two.”
The last two properties are IsFixedTimeStep and TargetElapsedTime. Timing is so important to game development there is a whole section on that! Because anticipation is probably overwhelming, that section is next.
GameTime
You may not realize it, but a lot of things in a game depend on time. If you create a race game and your cars are going 60 miles per hour, you need to know how much to move them based on a given time. The framework tries to do a lot of the work of handling time for you.
There are two major ways to run a game, and in the framework, they are referred to as “fixed time step,” and “variable time step.” The two properties mentioned in the previous section—IsFixedTimeStep and TargetElapsedTime—control how time is handled. IsFixedTimeStep being true naturally puts the game into fixed time step mode, whereas false puts the game into variable time step mode. If you are in fixed time step mode, TargetElapsedTime is the target time for each frame. The defaults for projects are true for IsFixedTimeStep and 60 frames per second for TargetElapsedTime (which is measured in time, so approximately 16.6667 milliseconds).
What do these time steps actually mean? Variable time step means that the amount of time between frames is not constant. Your game gets one Update, then one Draw, and then it repeats until the game exits. If you noticed, the parameter to the Update method is the GameTime.
The GameTime object has three properties that you can use. First, it has the ElapsedGameTime, which is the amount of time that has passed since the last call to Update. It also includes TotalGameTime, which is the amount of time that has passed since the game has started. Finally, it includes IsRunningSlowly, which is only important in fixed time step mode.
During variable time step mode, the amount of time recorded in ElapsedGameTime passed to update can change depending on how long the frame actually takes (hence, the name “variable” time step).
Fixed time step is different. Every call to Update has the same elapsed time (hence, it is “fixed”). It is also different from variable time step in the potential order of Update and Draw calls. While in variable time step, you get one update for every draw call; in fixed time step, you potentially get numerous Update calls in between each Draw.
The logic used for fixed time step is as follows (assuming you’ve asked for a TargetElapsedTime of 60 frames per second).
Update is called as many times as necessary to catch up to the current time. For example, if your TargetElapsedTime is 16.667 milliseconds, and it has been 33 milliseconds since your last Update call, Update is called, and then immediately it is called a second time. Draw is then called. At the end of any Draw, if it is not time for an Update to occur, the framework waits until it is time for the next Update before continuing.
If at any time, the runtime detects things are going too slow (for example, you need to call Update multiple times to catch up), it sets the IsRunningSlowly property to true. This gives the game the opportunity to do things to run faster (such as rendering less or doing fewer calculations).
If the game gets extremely far behind, though, as would happen if you paused the debugger inside the Update call if your computer just isn’t fast enough, or if your Update method takes longer than the TargetElapsedTime, the runtime eventually decides it cannot catch up. When this happens, it assumes it cannot catch up, resets the elapsed time, and starts executing as normal again. If you paused in the debugger, things should just start working normally. If your computer isn’t good enough to run your game well, you should notice things running slowly instead.
You can also reset the elapsed time yourself if you know you are going to run a long operation, such as loading a level or what have you. At the end of any long operation such as this, you can call ResetElapsedTime on the game object to signify that this operation takes a while, don’t try to catch up, and just start updating from now.
Notice that in Windows Phone 7 projects, the new project instead sets the TargetElapsedTime to 30 frames per second, rather than the 60 used on Windows and Xbox 360. This is done to save battery power, among other reasons. Running at half the speed can be a significant savings of battery life.
Note
Which time step mode you actually use is a matter of personal preference. We personally choose fixed time step mode, but either can work for any type of game. During performance measurement, though, you should use variable time step mode. This is discussed in Chapter 11, “Understanding Performance.”
Game Loop
This chapter has been nothing but text so far. Words, words, and rambling—that just isn’t exciting. Let’s get something on the screen!
Update and Draw
The basic flow of your game is to initialize everything, and then call Update and Draw continually until you exit the game. This is what is called the game loop. You’ve already seen it in action in Chapter 2, “Sprites and 2D Graphics,” without even realizing it most likely. To ensure you do realize it, let’s do a slightly more complex example.
First, you need to add the XnaLogo.png file to your content project from the accompanying CD. Because you are drawing this image much like before, you need to declare a texture variable to hold it. This time, though, also declare a position variable, as follows:
Texture2D texture;
Vector2 position;
Of course, you need to load that texture, so in your LoadContent method add this line:
texture = Content.Load<Texture2D>("XnaLogo");
You should probably also initialize that position to something! Add the following to the Initialize method:
position = Vector2.Zero;
Finally, because you need to actually draw the image, replace your Draw method with the following:
protected override void Draw(GameTime gameTime)
{
GraphicsDevice.Clear(Color.CornflowerBlue);
spriteBatch.Begin();
spriteBatch.Draw(texture, position, Color.White);
spriteBatch.End();
base.Draw(gameTime);
}
Running the project now shows you (as you might have guessed) the image in the upper left corner of the window. Because of the position variable in the Draw call, you are set up to get that thing moving! Add the following to the Update method:
position = new Vector2(position.X + (float)gameTime.ElapsedGameTime.TotalSeconds,
position.Y + (float)gameTime.ElapsedGameTime.TotalSeconds);
Running the project now has the image slowly moving down and to the right, and if you leave it running long enough, it eventually goes off screen! If you want the image to bounce around the screen, though, it would be complicated code. Do you add to the position or subtract? Instead, store your direction in a new variable:
Vector2 velocity;
Then, update the Initialize method to include:
velocity = new Vector2(30, 30);
Finally, change your update method to:
position += (velocity * (float)gameTime.ElapsedGameTime.TotalSeconds);
These updates provide faster movement and easier code, although the image still goes off screen if you let it. You need to detect if the image has gone off screen and make changes to ensure it “bounces” off the edges. This is the largest section of code you’ve seen so far, but it makes the image bounce around, so modify your Update call to this:
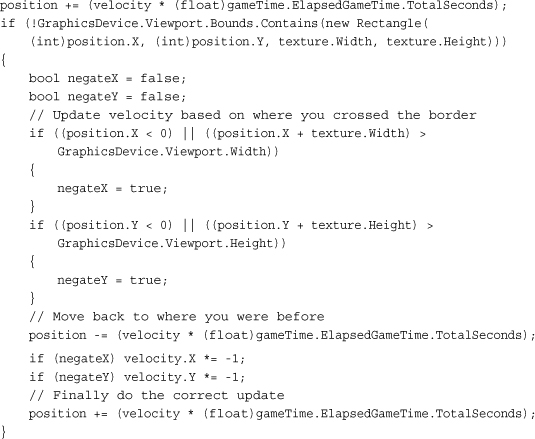
Run the project now and you can see the image bounce around the screen! You simply check to see if the image is currently in the bounds of the viewport, and if it is not, check to see which edge it is currently over. Then, move it back to where it was before the update, swap the velocity axis of the sides you’ve crossed, and update the position again.
Components
As you can probably imagine, if you had to draw everything inside a single class, your code would quick become a mess of things to keep track of!
GameComponents
Luckily, the framework provides an easy way to encapsulate objects called game components. There are three types of game components you can use for your games: GameComponent, DrawableGameComponent, and GamerServicesComponent. The latter is discussed later, but let’s dive into the others now.
First, you want to take the image-bouncing code you wrote and move it into a component, so in your main game project, right-click the project and select Add -> New Item. Choose Game Component from the list of templates (it might be easier to find if you choose the XNA Game Studio 4.0 section in the list on the left), name it BouncingImage.cs, and then click the Add button.
This adds a new file to your project with a new class deriving from GameComponent, which is close to what you want but not quite. Open up BouncingImage.cs (it should have opened when you added the component), and change it to derive from DrawableGameComponent instead:
public class BouncingImage : Microsoft.Xna.Framework.DrawableGameComponent
Now you can begin moving the code you used in your Game class to render your bouncing image to this component. Start by moving the three variables you added to the new BouncingImage class (texture, position, and velocity). Move the code initializing your two vectors into the new classes Initialize method and move the code were you modify the vectors in update to the new classes Update method. You need to do just a few things to complete your bouncing image component.
You need a way to load the texture, and DrawableGameComponent has the same virtual LoadContent method that the game has, so you can simply override it in your BouncingImage class now:
protected override void LoadContent()
{
texture = Game.Content.Load<Texture2D>("XnaLogo");
base.LoadContent();
}
Finally, all you need now is to draw the image. Just like LoadContent, DrawableGameComponent also has a Draw virtual method you can override:
public override void Draw(GameTime gameTime)
{
spriteBatch.Begin();
spriteBatch.Draw(texture, position, Color.White);
spriteBatch.End();
base.Draw(gameTime);
}
As you might have seen already, this won’t compile. The spriteBatch variable is declared in the game, and it is a private member variable. You can create a new sprite batch for this component, but it isn’t necessary. If you remember back to earlier in this chapter, we talked about the Services property on the Game class.
Go back to the game1.cs code file and to the LoadContent method. Replace the loading of the texture (which you just did in the BouncingImage class) with the following line (directly after the sprite batch has been created):
Services.AddService(typeof(SpriteBatch), spriteBatch);
This adds a “service” of type SpriteBatch to the game class and uses the just created sprite batch as the provider of that service. This enables you to use the “service” from anything that has access to the game. Back in the BouncingImage.Draw method, before the Begin call, add the following:
SpriteBatch spriteBatch = Game.Services.GetService(
typeof(SpriteBatch)) as SpriteBatch;
Now that you have your drawing code in your component compiling, you can remove it from the Draw call in the game. It should have nothing but the Clear call and the base.Draw call now. With everything compiling, you can run your project and you will see absolutely nothing except a blank cornflower blue screen. This is because your component was never actually used! Back in the Initialize method in the game, add the following:
Components.Add(new BouncingImage(this));
That’s it. Running the code gets you back to where you were before, but with everything much more encapsulated. It’s also much easier to add new instances of the bouncing image; for example, add this to your games Update method:
if ( ((int)gameTime.TotalGameTime.TotalSeconds % 5) == 4)
Components.Add(new BouncingImage(this));
Running it now adds a new set of bouncing images every 5 seconds (actually it adds quite a few because it adds one for every update that happens during that second). You can go ahead and remove that code; it is just an example of how easy it is to include more.
You might have noticed that you didn’t actually have to do anything outside of add your component to the Components collection for it to start working magically. Your Initialize method is called for you, as is your LoadContent method, and the Update and Draw methods were called for each frame.
By default, components are updated and drawn in the order they were added, and they are always updated and drawn. However, these are all changeable, too. If you set the DrawOrder property, when the components are being drawn, the components with the lower DrawOrder values are drawn first. Similarly, if you use the UpdateOrder property, the components with the lower UpdateOrder value are updated first. The higher value these properties have, the later they happen in the list of components. If you want something drawn as the last possible component, you set the DrawOrder to int.MaxValue, for example. Of course, if you have more than one component with the same UpdateOrder or DrawOrder, they are called in the order they were added.
Of course, there might be times when you don’t want your component to be drawn at all! If this is the case, you can simply set the Visible property to false, and your Draw override is no longer called until that property switches back to true. If you need to temporarily suspend updating for a while, you can just change the Enabled property to false!
There are also events (and virtual methods) to notify you when any of these properties change if you need to know about the changes.
Note
The GameComponent class has the same behavior as the DrawableGameComponent class without the extra methods and properties used for Drawing, such as LoadContent and DrawOrder.
Summary
Now you have a basic understanding of how game flow is executed and the order of operations of a normal game. You also understand components and how they interact. It is time to move into some 3D graphics before getting back to some of the more advanced 2D operations.