Chapter 2. Sprites and 2D Graphics
Now that you have had a brief introduction to what Game Studio is and how to get started, you might as well dive right in and start showing awesome things on screen! Before we get into the more complicated three-dimensional (3D) visuals you see later in this book, we first start with more simple two-dimensional (2D) graphics. In this chapter, you learn the following:
• What 2D means
• Rendering something on screen
• Using the Spritebatch object
• Rendering text
What Does 2D Mean?
What exactly does 2D mean? You can probably guess that it is short for two-dimensional, but what does that mean? Almost all games that you see have visuals on a monitor, a television, or something else that is inherently flat and two-dimensional. For the purposes of this book, when we say 2D, we mean that things are rendered using sprites in screen coordinates.
Of course, this begs the question, “What are screen coordinates?” Look at your monitor because that is where the “screen” in “screen coordinates” comes from after all. The upper, left pixel of your monitor is the screen coordinate of 0,0 (which is sometimes called the origin). In a 2D coordinate system, the first number is the X axis, whereas the second number is the Y axis, and in the case of your monitor, the X increases as you move to the right, and the Y increases as you move down. For example, if you had a resolution of 1280×720, the lower, right pixel of your monitor is at a screen coordinate of 1279,719. This means that the top, right pixel is a screen coordinate of 1279,0, whereas the bottom, left pixel is at 0,719, as seen in Figure 2.1.
Figure 2.1. 2D screen coordinates

Going back in time, you could argue that some of the earliest 3D games fit this description. After all, games such as the original Doom, Wolfenstein, and Duke Nukem 3D all claimed to be 3D, yet they were nothing more than sprites rendered onto the screen that gave the illusion of 3D. Back then, those games were referred to as 2.5D; recently, the term has been repurposed to mean games that are fully rendered in 3D but where game play happens solely in 2D.
Another early term you might not have heard of is sprite. What exactly is a sprite (aside from the soda)? In simplest terms, it is a 2D image that you render on screen. All images you see on the Web, for example, are sprites. At its simplest level, creating a 2D game is nothing more than drawing a lot of pictures on screen at once.
Show Me Something on Screen
In Chapter 1, “Getting Started,” you spent some time creating projects and saw them run with nothing showing except a solid colored background. Let’s expand on those projects and show new and hopefully interesting things instead! Start by creating a new game project in Visual Studio and add a new variable to the list of variables the project already has defined, as shown in the following:
GraphicsDeviceManager graphics;
SpriteBatch spriteBatch;
Texture2D texture;
Texture2D is a class that holds any images you might want to render on screen. In later chapters, you see how this is also used to give detail to 3D models, but for now, it is simply a data store for the image we want to show in our game. Also notice the other two variables declared by default, namely the SpriteBatch and GraphicsDeviceManager.
The GraphicsDeviceManager is discussed in more detail in later chapters, but the SpriteBatch object is what you use to do the actual rendering. This object is discussed in depth throughout this chapter, but before you learn about the intricacies of rendering 2D objects, first, you shouls just get something showing on the screen.
You need an image to draw to the screen. In your Visual Studio solution, notice that you have two projects: your code project where your game is and a content project next to it. This content project is where you add the images you want to draw and it is discussed in more detail in later chapters. Right-click your content project now, and then choose Add->New Item. Feel free to pick an image for your computer (ensure the image is a common image format such as jpg, bmp, png, or gif), or use one from the downloadable examples. The example included with the downloadable examples uses the file glacier.jpg, which is used in some of the samples you can download for Game Studio 4.0.
Content Item Properties
Selecting an item in a content project (such as the image you just added) and viewing its properties show you many different options depending on the type of item you have selected. For now, the only one that is important is Asset Name, which, by default, is the name of the file you’ve added to the content project without the extension. In the case of the code in the downloadable examples, it is glacier. The other properties are explained in more detail in later chapters.
Getting something on screen is remarkably easy from here. First, you need to scroll through your project’s game1.cs file and find the LoadContent method. As the name implies, this is where you load the content for your game, so add the following line of code to that method:
texture = Content.Load<Texture2D>("glacier");
If you used a different image other than the glacier image this example uses, you need to enter that filename (without the extension) instead. This takes the image data from your picture and loads it into the Texture2D object you specified. The Content object is an instance of the ContentManager, which was automatically created by the new project. Again, the content manager is discussed in more depth later, but for now, it is the thing that loads your content.
All that is left is to draw your image on the screen. Look through your project to find the Draw method and replace the method body with the following code:

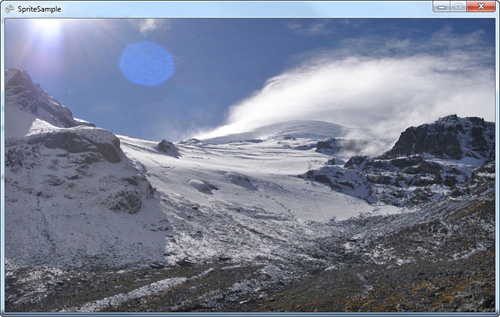
The first and last lines are the same as what is already in your project, whereas the middle three lines are where the actual drawing of your image is. Run the project and you should see an image similar to the one shown in Figure 2.2 if you used the glacier image provided with the downloadable examples or an image you chose that covered the entire window if you did not use the glacier image.
Figure 2.2. A 2D image drawn on screen
A theme you will notice throughout this book is how easy it is to do simple operations using Game Studio 4.0. This is an example of this simplicity. With a mere five lines of code, you’ve done more work than you probably realize, rendering your image on to the screen. With the instant gratification of seeing something, now it’s time to take a step back and see what has gone into rendering this picture.
Spritebatch
When you first create a new project, a SpriteBatch object is declared and instantiated in the LoadContent method. This is the main object used to render 2D graphics, and virtually all games (even full 3D games) need to render 2D graphics at some time. This object can be used to draw a single sprite like you just did, or it can draw many sprites with a wide variety of options that can be used to control exactly how you want your images drawn.
Drawing
First, let’s look at the Draw method, which is the one that actually got the picture on to the screen:
spriteBatch.Draw(texture, GraphicsDevice.Viewport.Bounds, Color.White);
This is only one overload of the Draw method (there are seven total), but it is one of the simplest. The first parameter is obvious—what texture do you want to draw? In the project earlier, you loaded your image into this texture, so that is what is rendered on the screen. This is one of the two parameters required and it is in every overload for the Draw method.
The other nonoptional parameter to Draw is the last one in the call, the color. This is the color your image is “tinted” with (in actuality, it is the color of each pixel in your image multiplied by the color specified, which is discussed later). Passing in Color.White, as done here, causes your image to appear with the same colors as the original image, whereas passing in Color.Black causes the image to be replaced by solid black. If you change this to Color.Red, and you will notice that the image is now tinted red. In many cases, you can simply leave this Color.White.
The middle parameter in the Draw call is the destination rectangle. As the name implies, it is the rectangle where you want the drawing to occur (hence, the destination). This rectangle is specified in screen coordinates where 0,0 is the upper left corner of the rendering area, which in this case is the window. When in full-screen mode, it is the upper left corner of the monitor as mentioned earlier. The destination rectangle is useful because if the image you are drawing isn’t the exact size of the rectangle you’re drawing, it automatically stretches or shrinks to fit exactly in that area.
In this case, the destination rectangle is calculated using a property of the GraphicsDevice object. The GraphicsDevice is the object that encapsulates the portions of the graphics card you can control, whereas the Viewport property contains information about where the device renders to on the screen. You used the Bounds property because it returns the rectangle that encompasses the entire rendering area, which is why the image you chose covers the entire window, regardless of what size it was originally when it was loaded.
Note
The GraphicsDevice object and its properties are discussed in depth in Chapter 3, “The Game Object and the Default Game Loop.”
Before we look at other methods used on the sprite batch, let’s look at the more overloads for drawing images on the screen. In your project, right-click the content project and add a reference to cat.jpg, which you can find in the downloadable examples. Anyone familiar with many of the samples that are available for Game Studio realizes that cats appear all over the samples. This one, however, is a different cat—it is my own. He is a little bit camera shy though, so please be gentle with him.
Change the code that loaded the previous image to load the cat image, as the following:
texture = Content.Load<Texture2D>("cat");
This image is 256×256 pixels, and your window by default is 800×480 pixels. Running the project right now shows you a stretched version of the cat covering the entire rendering surface, much like you saw earlier. Now change the Draw method to the following:
spriteBatch.Draw(texture, Vector2.Zero, Color.White);
Notice that a different parameter of type Vector2 replaced the destination rectangle. Like the name implies, Vector2.Zero returns a vector with both the X and Y value as zero. The new parameter, called the position, tells the sprite batch where to begin drawing, so the upper left pixel of the image draws at the spot specified by this parameter (in this case 0,0, or the upper, left corner of the rendering area).
Note
The Vector2 class is a value type used to store two-dimensional coordinates, namely an X and Y value.
Using this overload and specifying a position means that no stretching of the image occurs; it renders whatever size the source image actually is. Run the application and notice that the cat is now in the upper, left corner of the window, but there are large areas of empty background everywhere else. To render the cat in the center of the window, modify the Draw call as follows:
![]()
This combines information from the Viewport, along with information about the texture to properly position the image in the center of the window as in Figure 2.3. It still isn’t exciting though because it is a static image that doesn’t do anything.
Figure 2.3. The cat centered on the screen

Notice that the two overloads so far do remarkably similar things. They both draw an image to a particular place on the screen of a particular size. The only difference between them is the one with the destination rectangle requires you to specify a width, a height, and a position. As a matter of fact, these three lines produce the same results.
spriteBatch.Draw(texture, Vector2.Zero, Color.White);
spriteBatch.Draw(texture, new Rectangle(0,
0, texture.Width, texture.Height), Color.White);
Moving Things Around
You have much more control over the rendering than this, however. Change your Draw call to the following and run the application:
spriteBatch.Draw(texture, new Vector2(100,100),
null, Color.White, 0.3f, Vector2.Zero, 1.0f,
SpriteEffects.None, 1.0f);
Notice that the cat is drawn with the upper, left corner at 100,100 as you specified in the position vector, but it is now rotated slightly. This overload is more complex than the previous ones, so let’s look at the new parameters individually.
The first new parameter is the third one, which is listed as null. This is the source rectangle, and unlike the destination rectangle, it controls what you draw rather than where you draw (discussed more in depth later in the chapter). Directly after the tint color is type float, which is the rotation angle you want to render at. This angle is specified in radians.
The next parameter is the origin (another vector), which we discuss in a moment. Directly after the origin is the scale parameter, which you use to uniformly scale the image. A scale of 1.0f is normal size, 2.0f is twice the size, and 0.5f is half the size.
Next up is the SpriteEffects enumeration, which has three options: None, FlipHorizontally, and FlipVertically. Each of these do exactly as the name implies. Passing in None does no special processing of the image, whereas passing in either of the other two flips the image before drawing it, either horizontally or vertically. For example, if you use SpriteEffects.FlipVertically, the cat is drawn upside down.
The final parameter is called the layer depth. This value should be between 0.0f and 1.0f with 1.0f is “on top” and 0.0f is “on bottom.” This enables you to control how the images are sorted when you draw more than one, and it is ignored unless the sort mode is set to either BackToFront or FrontToBack. We talk about sort modes later in the chapter.
This is the largest overload, and it has every feature you need in drawing a sprite. There is another overload that has the same number of parameters, but replaces the single scale parameter with a Vector2. This enables you to scale your image with different scaling values for the X and Y axis. So if you passed in a scale vector of 2.0f, 1.0f, the image would be twice as wide, but the same height. A scale vector of 0.5f, 2.0f causes the image to be half as wide, but twice the height.
Now it is time to go back to the mysterious origin parameter. The origin is the point around which the rotation occurs. In the previous example, you used Vector2.Zero, so your rotation is around the upper left corner of the image. If you use new Vector2(texture.Width/2, texture.Height/2) instead, the image rotates around the center (see Figure 2.4).
Figure 2.4. Rotation origin

Animation
There is only one parameter to the Draw overloads left to discuss, which is the source rectangle. As mentioned, the source rectangle lets you control the portion of the image you draw. Up until now, you drew the entire image, which is the default behavior if this parameter is not specified or if it is null. What if you had a single image that had multiple smaller images inside it, and you only wanted to draw a portion of it? That is what the source rectangle is for. The cat image is 256×256 pixels, but if you specified a source rectangle of (0,0,256,128), it renders the top portion of the cat and not the bottom portion.
One common usage of the source rectangle is for simple 2D animations. Your image contains several “frames” of animation that you swap through in succession to give the illusion of motion. Cartoons have been doing this for years, and it is a common technique.
In your content project, add another existing item and this time, include the spriteanimation.png image from the downloadable examples. Like before, update the LoadContent method to change which texture you load.
texture = Content.Load<Texture2D>("spriteanimation");
If you run the project now, you can see a weird image. It looks like there are several images instead of just a single one. That is exactly what the image is—a lot of smaller images stored in a larger one. In this case, there are ten separate 96×96 images stored within a single 960×96 image. If you change the Draw call in the Draw method as in the following, a single image is now drawn:
spriteBatch.Draw(texture, new Vector2(100, 100),
new Rectangle(0, 0, 96, 96), Color.White);
The source rectangle of 0,0,96,96 tells the sprite batch to render only from the first smaller image within the file and to ignore the rest. By itself, though, it is still bland. Replace the Draw call with the following code to see the animation play out:
int frame = (int)(gameTime.TotalGameTime.TotalSeconds * 20) % 10;
spriteBatch.Draw(texture, new Vector2(100, 100),
new Rectangle(frame * 96, 0, 96, 96), Color.White);
Now you see a guy running in place at a position of 100,100! What you’ve done here is select which portion of the source image to draw from based on the current amount of time the game has run. You’ve taken the total number of seconds the game has run (this is a fractional value, so it records portions of a second, too), and multiplied it by 20, which forces the animation to run 20 times per second. You then pick the current frame by doing a modulus against the total number of frames and some quick math to pick the correct source rectangle based on that frame.
This technique is a common way 2D games render animations.
Controlling State
With all of the possible parameters of the Draw overloads discussed, now it is time to look at the multiple overloads of the Begin method. Although we use this method in every example up until this point, you used only the overload with no parameters, and that doesn’t require much explanation. Each example up until now has had only a single Draw call, but as the name sprite batch implies, you can draw many images at once, and you need some way to control how each image interacts with every other. This is what the Begin overloads do.
Before we get into that, however, add an existing item to your content project and include the image layers.jpg from the downloadable examples. This image has a few pictures and numbers on it to help better demonstrate the behavior of multiple Draw calls in a single batch. Update your load content method as always when you add new content to your project:
texture = Content.Load<Texture2D>("Layers");
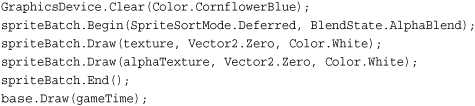
Again, replace the contents of your Draw method with the following:

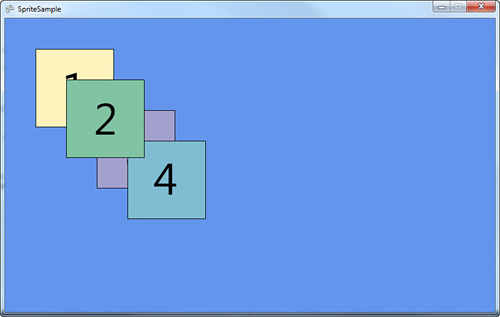
This uses the largest overload of the Draw method and renders four different squares of the texture each at a different spot on the screen. Notice also the layer depth is passed so that each image is rendered at a different depth with the image containing the number 1 drawn at a depth of 0.1f and with the image containing the number 4 drawn at a depth of 0.4f. Also notice that this code renders the images in the order of 1,2,3,4. However, when you run the code, it is not drawn like that—it draws seemingly random, much like in Figure 2.5.
Figure 2.5. Rendering multiple sprites with no control
However, if you change the call to Begin with the following, it draws the images with the first image on the bottom and the last image on top, much like you see in Figure 2.6.
spriteBatch.Begin(SpriteSortMode.FrontToBack, null);
Figure 2.6. Rendering multiple sprites with layer control

This is because this overload of the Begin call includes the first parameter of type SpriteSortMode, which controls how multiple sprites sort within this batch before drawn on the screen. The options for this enumeration include FrontToBack as seen here, which renders images with the highest layer depth “on top” and the lowest layer depth “on bottom.” The image with the 4 on it is rendered on top because it has the highest layer depth. If you instead switched this to BackToFront, the order reverses itself, and the lowest layer depth is “on top,” and in this case, the image with the 1 is rendered on the top.
Another option for sorting is the default sorting option Texture. This causes the Draw calls to sort by the texture. In the previous example code, all of the Draw calls use the same texture, so there is no special sorting. This is the default because drawing a few images, switching textures, drawing a few more images, switching back to the original texture, and drawing a few more images can hinder performance.
Other options for the sorting mode include Deferred. Each image sorts in the order it is used in the Draw calls. This means that all Draw calls should be “batched up” to make as few actual rendering calls to the hardware as possible. This is because an actual rendering call on the hardware can be expensive, and it is better to make fewer rendering calls that render lots of data instead of a large amount of render calls that render small amounts of data. All options in the sorting mode except for one also infers the behavior of Deferred.
The last sort mode is the one that doesn’t follow the Deferred behavior and is called Immediate. This tells the sprite batch to make a call to the rendering hardware for every call to Draw you make.
The other parameter to Begin shown previously and that is currently null is the BlendState you want to use for this sprite batch. Although we discuss the blend state (and the other states) in later chapters, now is a good time to understand the basics of blending. As the name implies, blending controls how multiple images are combined. The default value (what is used if you pass in null) is BlendState.AlphaBlend. The alpha values control the transparency of objects drawn, so this blending state tells the sprite batch that for every pixel it draws, it should render the top-most pixel if the pixels are opaque (have no alpha value), or it should blend the top most pixel with the pixels “underneath” it.
In your content project, add another existing item, AlphaSprite.png. This item is a png (much like you did when you picked the animated sprite), because this file format can include alpha data. Instead of using the same texture object you’ve been using, though, add a new texture variable to your class so you can see how things blend together:
Texture2D alphaTexture;
Of course, you need to load this texture, so add that to the LoadContent method:
alphaTexture = Content.Load<Texture2D>("AlphaSprite");
Then replace the Draw method with the following:
This renders the full four-picture sprite you used previously along with a little character in the middle of it (see Figure 2.7).
Figure 2.7. Rendering multiple sprites with alpha blending

Now change the blend state from alpha blending to BlendState.Opaque, which doesn’t attempt to blend the two images. Because of the Deferred sort mode, it renders them in the order they appear, so it renders the character last. Notice that you can’t see anything other than the character, and the portions that used to be transparent are now black. Change it again to BlendState.Additive and notice a weird combination of the two images that look too “bright.” This is caused by “adding” the colors together.
There are other parameters to other overloads of the Begin method, including the depth stencil state, sampler states, rasterizer state, which effect is used, and a matrix for transformations. Each of these is discussed in Chapter 7.
Rendering Text
Another important reason to use the sprite batch is to render text to the screen. Notice a DrawString method on the sprite batch object, which is the method you use to draw the text. Before you get there, you need to do a few extra steps.
First, add a new item to your content project by right-clicking the project and selecting Add->New Item. In the dialog box, select the option to add a Sprite Font, name it Game, and click the Add button. Visual Studio opens this file, which is simply a standard XML file.
The first node of note is the FontName node, which (as expected) is the name of the font. The default here is Kootenay although we personally like Comic Sans MS. Select a font (browse through your fonts folder), and type the font name in the node. The next node is Size, which is how large you want the font to be. The default here is 14, but you can choose any size you’d like. The size roughly matches what you see if you change the font size in a text editor such as notepad. The sample with the downloadable examples is a size of 48.
Next is Spacing, which enables you to control how the letters are laid out when they draw. The default value is zero, so no extra spacing is placed between characters as they draw, but changing the value adds extra space (in pixels) between characters. It’s even possible to use a negative number to remove space between characters. Hand in hand with spacing, the next node is called UseKerning and controls whether kerning is used when rendering the text. Kerning changes how the spacing between characters is laid out. Rather than a fixed amount of space between each character, the amount of space depends on the character that comes before and the character that comes after. The default is true because in most cases it just looks better that way.
Next is the Style node, which enables you to choose what the style of the font. The default is Regular, but you can also choose Bold, Italic, or if you are adventurous, choose Bold, Italic. Note that these styles are case sensitive.
The last set of nodes controls which characters you expect to draw. The default includes all English characters (ASCII codes 32 through 126). To draw characters beyond this range, you can update the values here.
Now it’s time to get some text on the screen. First, add a new variable to the class to hold the font data:
SpriteFont font;
Then, load the new font in your LoadContent method:
font = Content.Load<SpriteFont>("Game");
Finally, replace your Draw method with the following to see how easy it is to add text rendering to your games:

Everything except the DrawString should be quite familiar by now. There are a number of DrawString overloads, many of which mirror ones you saw earlier for rendering images rather than text. The DrawString methods do not take a Texture2D, but instead take a SpriteFont to get the font data. They also include an extra parameter that is either a string or a StringBuilder that is the text you want to render. They do not, however, include a destination rectangle or a source rectangle (because these do not make sense when rendering text). All other parameters to Draw exist in the overloads of DrawString, however, so you can freely scale, rotate, color, and layer your text rendering.
The sprite font object has a few methods and properties that are somewhat interesting. For example, what if you wanted to draw a second line of text just below the line you’ve already drawn? How would you know where to begin? Add the following lines of codes to your Draw method directly below the DrawString call:
Vector2 stringSize = font.MeasureString("XNA Game Studio 4.0");
spriteBatch.DrawString(font, "rocks!", new Vector2(0,stringSize.Y), Color.White);
Here, you use the MeasureString method on the sprite font object, which calculates the size (in pixels) that the rendered string takes up. You can then use that size to start the next line of text rendered down by an appropriate number of pixels. Running the application now shows you two lines of text as in Figure 2.8.
Figure 2.8. Text rendering

Summary
In this chapter, you learned the basics of simply showing an image onscreen along with rendering animated characters, rotating images, blending between multiple images, and drawing text on the screen.
Before moving on to more rendering techniques, you should get a basic understanding of what the rest of the projects you created are doing and the basic game loop.