
2. Introduction to SharePoint Development
WITH THE INTRODUCTION OF SHAREPOINT 2010 and Visual Studio 2010, SharePoint development is easier than ever. This chapter introduces the concepts you need to get started with SharePoint development and leads you through creating your first SharePoint web part in Visual Studio. It is intended to help new SharePoint developers be successful with this book, rather than as a comprehensive guide to SharePoint development.
This chapter shows you
• How content is organized in SharePoint and how SharePoint combines web server files with content and customizations stored in SharePoint content databases
• How to build and deploy SharePoint web parts, both as “Visual” Web Parts which are based on an ASP.NET User Control, and code-based web parts based on ASP.NET Web Part objects
• How to create SharePoint lists and libraries in Visual Studio for use in your project
• How to access lists and libraries using the SharePoint API and LINQ to SharePoint
• How to intercept changes to lists and libraries using event receivers
• How to package your projects with SharePoint Solutions and Features
The first thing to remember is that SharePoint is an ASP.NET application. The web parts you see on the page are ASP.NET web parts, and they are part of an .aspx page just like any other ASP.NET application. The biggest difference is that whereas an ASP.NET site stores its pages in the web server file system, SharePoint stores pages in content databases.
Understanding SharePoint Content
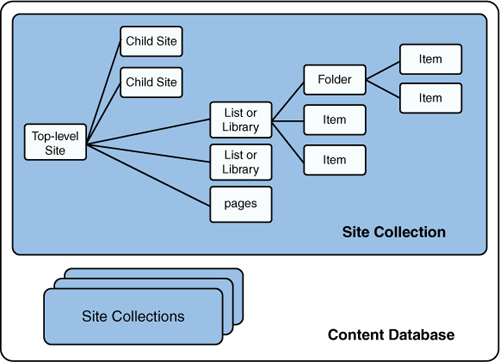
Figure 2.1 shows a SharePoint content database. One or more site collections are inside, each with a top-level site and possibly a hierarchy of child sites, grandchild sites, and so on. As the name suggests, a site collection is a collection of SharePoint sites that are stored and managed together. Each site contains lists and libraries which hold all sorts of information. SharePoint announcements, blog entries, contacts, and tasks are all stored as lists. A threaded discussion is a list of postings, and a calendar is a list of events. Libraries are lists that include a binary file integrated with each item, so for example there are document libraries, picture libraries, and media asset libraries. The web pages you see are stored as content too, either in a Pages or SitePages library or as free-floating .aspx files, depending on the features enabled in your site.
Figure 2.1. SharePoint content
Placing all the content in databases makes it easier to manage and update and to share the content among a group of web servers. SharePoint supports flexible “farms” of servers working together, and traffic is often load balanced across multiple web servers.
There’s a problem, however, with simply storing all the pages and files in every SharePoint site within a content database: Much of the content in each site is redundant, such as the pages used for site administration, to display and manipulate lists, and so on. Storing all this duplicate data for every site would be wasteful and would make it hard to update the pages globally. On the other hand, if a single set of pages were shared by all sites, it would be hard to customize them for any individual site.
SharePoint manages to balance both of these, sharing central copies of page and file templates among many sites unless they are customized using SharePoint Designer 2010, a free SharePoint editing tool. You might hear this sharing called ghosting, a term that dates back to earlier versions of SharePoint. A physical file was “ghosted” into the site URL space until it was “unghosted” (or “customized”). This haunting terminology was deemed confusing to end-users, so now we say that a file is uncustomized until it is customized; you can decide which is clearer!
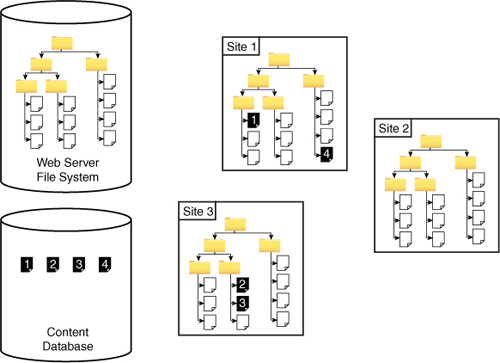
Figure 2.2 shows page and file templates stored on the file system of each web server. SharePoint ghosts them into an apparent file structure accessible by a URL within each site. For example, given two newly created sites from the same site definition, http://server1/sites/site1/default.aspx is the same file as http://server1/sites/site2/default.aspx.
Figure 2.2. SharePoint customization
When users edit SharePoint pages in the web browser, they don’t really edit the pages but only the content in the pages’ web part zones, wiki fields, or other page fields. This avoids having to edit the original pages all together but doesn’t allow changing their structure or editing their HTML.
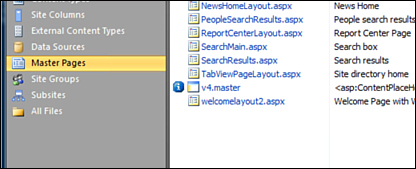
To do that, SharePoint Designer 2010 is needed. In this case, the file is customized, and the changed copy is saved in the site collection’s content database. The customized pages are shown as numbered pages in Figure 2.2. You can tell if a page has been customized in SharePoint Designer by the blue i icon that appears next to customized files as shown in Figure 2.3 and the Customization Status shown on the file information summary. If you want to revert to the initial file contents, simply right-click and select Reset to Site Definition to uncustomize the file. A site definition is a set of files that is used to create new sites; this is where the original page templates are stored. Uncustomizing a file removes the customizations and allows the original template to show through.
Figure 2.3. A customized file in SharePoint Designer 2010
By overlaying customized files from the content database over the baseline files on the web servers, SharePoint achieves the best of both worlds: It’s possible to customize pages as needed without repeatedly storing the boilerplate files that are used most of the time.
Tip
The best way to inspect the content in SharePoint is to use SharePoint Designer 2010, which is a free download available from http://bit.ly/SPSL_SPDesigner64. Use the file menu to open a SharePoint site. You will see more content if you choose the top-level site at the root of a SharePoint site collection, considering these sites store shared content that is used by all the sites in the collection, such as the Master Page Gallery.
SharePoint Designer presents you with a site summary page showing the name and location of the site, site permissions, and a list of child or subsites (if any). To the left of this, you can see a Navigation panel with shortcuts to the content most frequently edited with SharePoint designer. Click the All Files shortcut at the bottom of the list to see all the content in the site, with shared content from the file system seamlessly overlaid with content from the content database. Many of the files are set to use SharePoint’s versioning system, with checkouts turned on and sometimes approvals as well.
This is the same content that your code sees when it runs in SharePoint and uses the SharePoint API. SharePoint Designer only works at the content layer; it never changes the file system.
A SharePoint developer needs to be aware of these two layers: the files installed on each web server and database contents that overlay them. In many cases, a given change can be made on either layer, with different consequences.
For example, suppose a developer wants to create a new master page to brand SharePoint’s look and feel. Master pages in SharePoint are just like they are in other ASP.NET applications: they provide a common outer HTML structure used to brand a site, and they include elements that are common to all web pages. Master pages are stored in the Master Page Gallery, which is a document library in every SharePoint top-level site.
If the developer creates the master page in SharePoint Designer or uploads it into the Master Page Gallery using a web browser, it is created directly in the content database and is only visible to the site collection where it was created. If another site collection wants to use the master page, it needs to be copied into place, and two independent copies will be stored in the content database.
On the other hand, the master page could be created in Visual Studio 2010 as part of a SharePoint web solution package (.wsp file). Web solution packages are the vehicle for deploying customizations to SharePoint, and they correspond one-to-one with Visual Studio solutions. If the master page is in a farm-level web solution package, it can be installed on each web server’s file system so all site collections share the same copy of the master page. Those copies can all be changed by updating the solution package—except in sites where someone used SharePoint designer to customize the master page (and thus saved a one-off copy in the content database).
Similarly, web page content is layered in SharePoint. Special pages, such as web part pages, wiki pages, and page layouts used in web publishing, are files ending in .aspx in SharePoint’s content system. Whether ghosted from the file system or retrieved from a SharePoint content database, they are passed to ASP.NET for rendering.
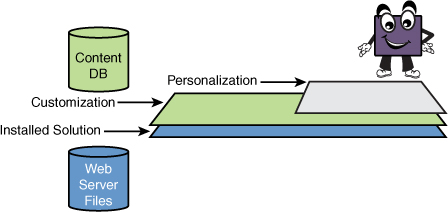
These pages contain special ASP.NET controls that emit dynamic content on the page, such as the placement of web parts, text, and other elements that are edited in the web browser. The web part settings can be personalized by each user; for example, if it’s enabled in a web part zone, users can rearrange and reconfigure web parts to personalize their view of a SharePoint site. Thus, when you look at a typical SharePoint page, you’re actually seeing the web page (including its master page), overlaid with web parts and other content residing in the content database. Although the web part code might be installed on each web server, the web part placement and metadata are treated as content. The user sees a seamless blend of web pages and controls that are installed on the web server, overlaid with controls placed on the page as content, possibly with customizations, as shown in Figure 2.4.
Figure 2.4. Customization and personalization in SharePoint
For more detail on SharePoint customization see http://bit.ly/SPSL_SPCustomization.
Building a Web Part
A good first project for SharePoint development is to build a web part. Begin by setting up your development environment as described in Chapter 1, “Getting Started with SharePoint and Silverlight.” Log in to your development machine as a server and SharePoint administrator and then open a web browser and visit the test SharePoint site you created at the end of the SharePoint installation. Then open Visual Studio 2010 and be sure to give it administrative privileges by right-clicking the icon and selecting Run as Administrator.
You might want to download the finished solution from http://code.msdn.com/SPSL/. If you’re starting from scratch, click New Project ... in the Visual Studio 2010 start screen, and the New Project dialog box presents itself as in Figure 2.5. On the left, under Installed Templates click the SharePoint project template.
Figure 2.5. Visual Studio 2010 New Project dialog box
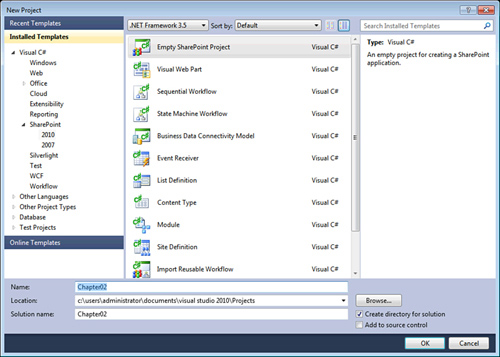
SharePoint 2010 uses .NET Framework 3.5, so be sure that’s the version that’s selected. For this project, start with an Empty SharePoint Project and enter a project name before pressing the OK button.
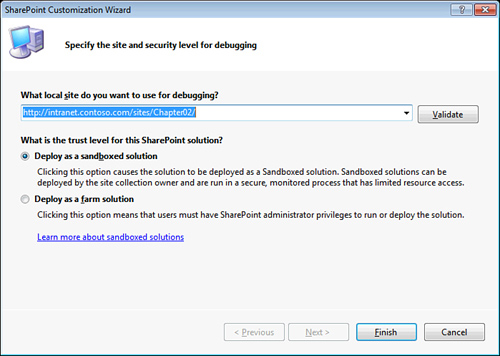
The next dialog box, shown in Figure 2.6, asks for the site you wish to use for debugging; enter your test site URL. It also asks you if you want a sandboxed or farm solution. This web part is a sandboxed solution, which means the entire solution is to be installed into the content database, and in many situations it can be installed by a business user. Because they’re so easy to deploy and don’t require the approval of a high-level administrator, sandboxed solutions run with limited trust. They can only use a subset of the SharePoint API within the site collection where they are installed, and they can’t call out over the network or gain access to the servers where they run.
Figure 2.6. SharePoint Customization Wizard
Farm solutions, on the other hand, require the full trust of the SharePoint farm administrator because they can place files on the web server file systems and can install .dlls into the web application’s bin directory or the global assembly cache.
Sandboxed solutions are the recommended choice when it’s possible to work within their limitations. They can be deployed by a larger audience, and developers will appreciate that the debugger starts much faster after each build of your project, given Visual Studio only has to restart the sandboxed solution service rather than the whole web application as in a farm solution. After ensuring the Deploy as a Sandboxed Solution radio button is selected, click Finish to close the wizard.
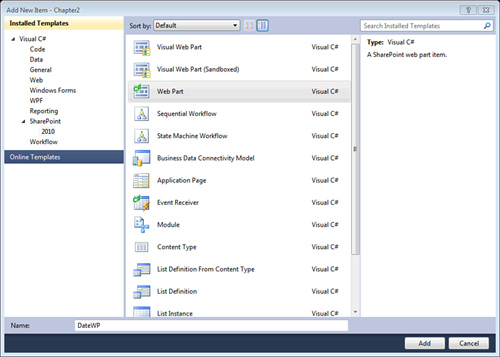
With the project selected in Solution Explorer on the right, use the Project menu to Add New Item. For this first project, select a Web Part option; this is the traditional web part, which is entirely implemented in code, rather than an .ascx file with ASP.NET markup.
Tip
Use Visual Web Parts when you want a design surface for laying out ASP.NET controls. Use the standard Web Part when you want to control rendering in your code.
Both techniques are used in this book; because Silverlight is doing most of the rendering, the Visual Web Part is most useful when you want to edit the Silverlight object tag or other markup or Javascript on the page.
You might also notice two kinds of Visual Web Parts: Visual Web Part and Visual Web Part (Sandboxed). Standard Visual Web Parts won’t work in sandboxed solutions, but the Sandboxed ones will. They were added after SharePoint 2010 was released and are part of the Visual Studio 2010 SharePoint Power Tools, which can be downloaded at http://bit.ly/SPSL_PowerTools.
A standard Web Part gives developers complete control over the rendering of the web part and is used often in this book to embed the Silverlight object tag and also pass information to Silverlight. Select the standard Web Part item and give the web part the name DateWP, as shown in Figure 2.7.
Figure 2.7. Add New Item Web Part
Visual Studio presents you with a web part class containing a single method, CreateChildControls(). Like all web controls, a web part is basically a .NET object that spits out HTML; because it’s a web part, it also knows how to be edited and can be placed on the page using a web browser. To display the current date in the web part, add to CreateChildControls() as shown in Listing 2.1.
Listing 2.1. CreateChildControls()
private Label messageLabel;
protected override void CreateChildControls()
{
Label messageLabel = new Label();
messageLabel.Text = DateTime.Now.ToLongDateString();
messageLabel.Style.Add("Font-Weight", "Bold");
messageLabel.Style.Add("Font-Size", "18pt");
this.Controls.Add(messageLabel);
}
This code creates a new web control, a Label that simply renders whatever text you place in its Text property. After setting the text property to the current date, it adds a couple of CSS styles to the label and adds it to the web part’s Controls collection, making the Label a child of the WebPart. The web part automatically renders all the child controls in order, and the date is displayed.
To build and deploy your solution, select Deploy Solution under the Build menu. Visual Studio packages up the solution and deploys it to your debugging web site. If you prefer to simply start the debugger by pressing F5, Visual Studio also attaches the debugger and launches a web browser to the debugging site URL.
Tip
To run a sandboxed solution, the sandboxed code service must be running on the SharePoint server. To check this, start SharePoint Central Administration in the start menu of your SharePoint server. Click the Application Management heading and then under Service Applications, click Manage services on server. Ensure the Microsoft SharePoint Foundation Sandboxed Code Service is started in order to run a sandboxed solution.
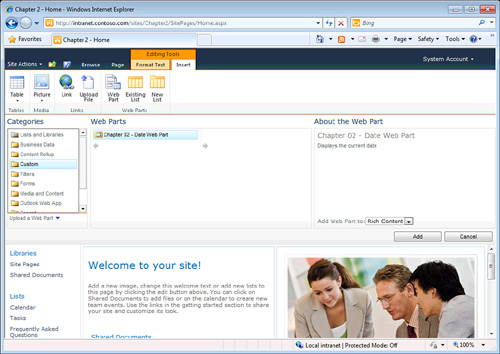
Within the web browser, place your new web part on the page to test the new web part. Begin by clicking the Page tab and then the Edit button on the Ribbon. This should switch the page into edit mode, enabling two additional editing tabs. Click the spot where you wish to add the new web part and then go to the Insert tab and click Web Part. Below the Ribbon, the web part insertion tool appears; click the Custom category and select DemoWP, which is your web part, as shown in Figure 2.8. Finally, click Add to place the web part on the page. If it looks OK, return to the Page tab and click Save to close the page editor.
Figure 2.8. Inserting a Web Part
The web part should display today’s date in large, bold letters.
Using this simple technique, it’s possible to render most anything with a web part. ASP.net provides a wide range of controls to choose from, but like the Label in this example, they are created and set up in procedural code instead of in a declarative .aspx or .ascx file. This makes the web part a composite control, which means that rather than generating its own HTML, it creates a composite of child controls to do the HTML generation.
You can make the web part more flexible by adding some properties that users can set. The easiest way to do this is to create some public properties in your web part and decorate them with attributes to let SharePoint know that it should save the properties and allow the user to edit them. For example, add the code in Listing 2.2 to your DateWP class.
Listing 2.2. Adding Editable Properties to a Web Part
public enum color { Black, Red, Blue, Green, Gold };
private color _messageColor = color.Black;
[Personalizable(PersonalizationScope.Shared),
WebBrowsable(true),
WebDisplayName("Date Color"),
System.ComponentModel.Category("Configuration")]
public color MessageColor
{
get { return _messageColor; }
set { _messageColor = value; }
}
private int _messageSize = 18;
[Personalizable(PersonalizationScope.Shared),
WebBrowsable(true),
WebDisplayName("Font Size"),
System.ComponentModel.Category("Configuration")]
public int MessageSize
{
get { return _messageSize; }
set { _messageSize = value; }
}
private bool _messageIsBold = true;
[Personalizable(PersonalizationScope.Shared),
WebBrowsable(true),
WebDisplayName("Bold"),
System.ComponentModel.Category("Configuration")]
public bool MessageIsBold
{
get { return _messageIsBold; }
set { _messageIsBold = value; }
}
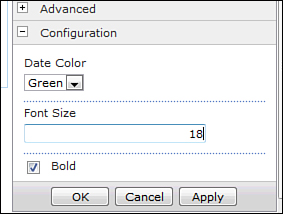
If the property is a string or integer, SharePoint displays a text box; if it’s a bool, SharePoint shows a checkbox, and for an enum, SharePoint shows a drop-down list of options. Now when editing the web part, the user sees a Configuration section as shown in Figure 2.9.
The values can then be used to change the web part rendering and logic, as shown in Listing 2.3.
Listing 2.3. Updating CreateChildControls() to Use Custom Properties
private Label messageLabel;
protected override void CreateChildControls()
{
messageLabel = new Label();
messageLabel.Text = DateTime.Now.ToLongDateString();
messageLabel.Style.Add("Color", MessageColor.ToString());
if (MessageIsBold) messageLabel.Style.Add("Font-Weight", "Bold");
messageLabel.Style.Add("Font-Size", MessageSize.ToString() + "pt");
this.Controls.Add(messageLabel);
}
To test these changes, re-deploy and edit the web part. On the right under Configuration, you should see the options as shown in Figure 2.9. If you apply the changes, you see your selected color, font size, and weight in your web part display.
This approach works well for simple property settings. In some cases, however, you might want to put your own custom controls in the editing panel instead of one that SharePoint generates for you. For example, you might want to populate a drop-down list with options that are determined at runtime or even include a Silverlight user interface to capture more complex data sets. Chapter 7, “Accessing SharePoint Using the HTML Bridge,” shows how to do this.
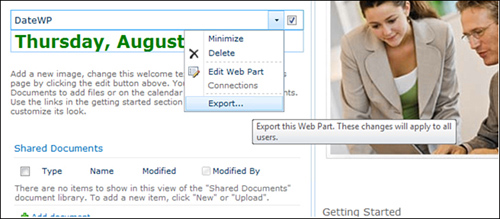
Notice that there are a number of other web part settings available. For example, if you want to suppress the title above the web part, under Appearance change the Chrome Type to None and click OK. Now the title only appears when you are editing the page. It’s useful to know how to set these built-in properties in your web part as well as custom ones. The easiest way to do this is to export your web part and view its web part template file, which ends in a .webpart file name extension. A web part template file is an XML configuration file that describes the web part to SharePoint, along with all its settings.
To export your modified web part, the first step is to edit it again, and under the Advanced category change the Export Mode to Export All Data and press Apply. This allows you to go the web part’s drop-down menu (to the right of its title as seen in Figure 2.10) and select Export.
Figure 2.10. Exporting a web part
Save the web part template to your desktop and open it in Notepad or another text editor. Here you can see the web part properties such as the one that hid the title earlier, the ChromeType property in Listing 2.4.
There is also a web part template file in your Visual Studio 2010 project, under the DateWP folder, and it’s called DateWP.webpart. Paste the property element from the exported web part into the one in Visual Studio. You also can add your custom properties and clean up the out-of-the-box properties to reflect what’s shown in Listing 2.4.
Listing 2.4. Properties in the Web Part Template File
<properties>
<property name="Title" type="string">Date Web Part</property>
<property name="Description"
type="string">Displays the current date</property>
<property name="ChromeType" type="chrometype">None</property>
<property name="ExportMode" type="exportmode">All</property>
<property name="MessageColor"
type="Chapter2.DateWP.DateWP.color">Blue</property>
<property name="MessageSize" type="int">48</property>
</properties>
Deploy the solution in Visual Studio and then return to the web browser. Delete the web part and place a new one on the page. If you changed the web part title, the new title now appears on the list of custom web parts, and the new web part is preloaded with the default settings you have specified in the .webpart file.
Lists and Libraries
One way to view SharePoint is as a colossal list manager. SharePoint uses lists to store many kinds of data, including obvious things like contacts and tasks and less obvious things like calendars (a list of events) and threaded discussions (a list of postings). A list is similar to a database table: it has columns with specific data types and rows containing data items. Business users with site administrator permission can add and remove columns to capture whatever data they wish, and SharePoint displays these columns in forms and views. Views are similar to database views and can expose specific columns, sort orders, and groupings to end users.
A library in SharePoint is simply a list with an integrated binary component, such as a document or image, in each row. In libraries the binary component is a file corresponding to the library type, such as a document, web page, image, or multimedia file.
Figure 2.11 shows a diagram of content types and lists in SharePoint. A content type defines the schema for a list or library and is primarily made up of a set of site columns, which are also called fields in the SharePoint API. Each field has a type and can be from any of the myriad field types that ship with SharePoint. In Chapter 15, “Creating a Silverlight Field Control,” you learn how to create your own field type that uses Silverlight to edit and display its content, but that’s for another day.
Figure 2.11. Content types and lists in SharePoint
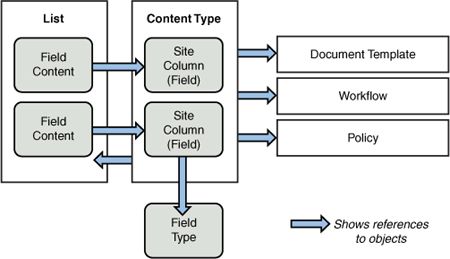
In addition to referencing a field type, each site column stores information about the field such as its default value, options for choice fields, and validation settings.
Content types store a set of site columns and can also include a document template such as an Office document template or InfoPath form template. In addition, they can reference SharePoint workflows and policies that are related to the content type. So for example, a Press Release content type can include its own standard Microsoft Word template, an approval workflow, and a disposition policy for how long to retain each Press Release.
Content types also support inheritance. For example, a Press Release could inherit from a Public Document content type, which inherits from the out-of-the-box Document content type. Site columns can be added, and other settings can be overridden at each level.
Content types can be scoped at the site collection, site, or list level. Content types at the site collection level are stored in the top-level site; you can see them by going to Site Administration for the top-level site and clicking the Site Content Types link. From there, they can propagate down into child sites, grandchild sites, and so on—and also into lists. This defines the storage and user interface for the list.
All lists have list content types; however, they might not be visible in the user interface. A list that appears to not have a content type actually has a hidden list content type that is presented in the SharePoint User Interface as the list’s own columns and settings. List content types usually reference out-of-the-box content types from the site and can be customized to change the columns and other settings within a particular list.
Lists and libraries begin their lives as list definitions; this is a set of XML files that describes the list, the list content type, and other details. You can include list definitions in your solution by creating them in Visual Studio and packaging them in your web solution package. In general, to ensure that your code knows what data to expect in a list, you should either use the out-of-the-box list definitions or create your own and include them with your solution.
A list definition describes the columns and other list settings and can be used to create list instances where users can store and work with data. When an end user creates a list or library, she selects a list definition that might have been included with SharePoint by a solution package that is installed or by a list template that another user saved as a starting point for making new lists. In each case, a list instance is created, and the user can then begin entering data or uploading documents. Again, your visual studio solution can include list instances to provide a location to store content.
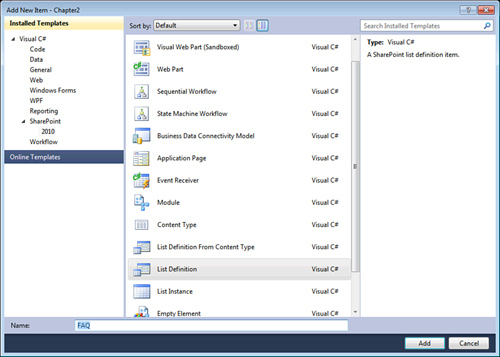
The next programming example is a web part that displays Frequently Asked Questions (FAQs) and allows users to submit new questions. The FAQs are kept in a SharePoint list. If end-users were expected to create the FAQ list manually, the solution would be fragile because a mistakenly named column would break the code. To avoid this, the first step is to create the FAQ list definition and instance in Visual Studio and to package the list along with the code that uses it.
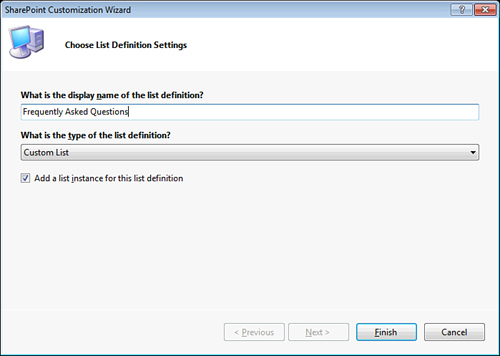
To do this, right-click the project in Visual Studio and select Add and then New Item.... In the Add New Item dialog box, select List Definition and name the list definition FAQ, as shown in Figure 2.12.
Figure 2.12. Adding a list definition
The SharePoint Customization Wizard then runs and captures the display name of the new list definition as well as the type of list to start with; in this case select Custom List and be sure to check the checkbox next to Add a List Instance for This List Definition, as shown in Figure 2.13.
Figure 2.13. Choosing list definition settings
Visual Studio creates a new folder in your project called FAQ, which is populated with some XML files to declare the list definition and instance. The next step is to add the columns and other settings for the FAQ list. The schema for the list definition is in a file called Schema.xml. First, you need to add new fields to the list, so add to the <Fields> XML element as shown in Listing 2.5 to the Schema.xml file.
Listing 2.5. FAQ List Definition
<Fields>
<Field ID="{129883A2-82F4-4B32-86D2-8541DE9715CD}"
Name="Answer"
DisplayName="Answer"
StaticName="Answer"
Type="Note"
RichText="TRUE"
RichTextMode="FullHtml"
IsolateStyles="TRUE"
NumLines="15"
Sortable="FALSE"
/>
<Field ID="{86057F1F-D120-4BB1-8055-2E75025733FC}"
Name="WebPage"
DisplayName="Related Web Page"
StaticName="WebPage"
Type="URL"
/>
<Field ID="{3f6c8ca4-d576-45d1-8fe8-452a2d37ef80}"
Name="Answered"
DisplayName="Answered"
StaticName="Answered"
Type="Boolean"
EnforceUniqueValues="FALSE"
Indexed="FALSE"
ColName="bit1"
RowOrdinal="0">
<Default>0</Default>
</Field>
<Field ID="{E94EDB6D-EE39-4C4E-9F9F-6D8DE1882C8C}"
Name="Comments"
DisplayName="Comments"
StaticName="Comments"
Type="Note"
RichText="TRUE"
Sortable="FALSE"
/>
</Fields>
The field ID columns need to be unique GUIDs (globally unique IDs), which you can generate by selecting Create GUID under the Tools menu in Visual Studio. The FAQ list uses the built-in Title field for the question; the Title field is inherited from the Custom List definition that was specified as the base for this list. To this, the solution adds a rich-text column for the answer, a hyperlink to a related web page, a Boolean to indicate if the question has been answered, and a comments field. Many other types of fields are possible and are documented in the SharePoint Software Developer’s Kit List Schema reference at http://bit.ly/SPSL_ListSchemaRef.
Next, you can add these new fields to the list Content Type. Content types can be defined at a site or site collection level, where they can be used by multiple lists. In this case, you just want to add the new fields to the single content type for an FAQ list, so you just need to add some FieldRef elements to the list content type in Schema.xml, as shown in Listing 2.6. The remainder of the content type remains unchanged from the initial Schema.xml.
<ContentType ID="0x01" Name="Item"
Group="List Content Types"
Description="Create a new list item."
FeatureId="{695b6570-a48b-4a8e-8ea5-26ea7fc1d162}">
<FieldRefs>
<FieldRef ID="{c042a256-787d-4a6f-8a8a-cf6ab767f12d}"
Name="ContentType" />
<FieldRef ID="{fa564e0f-0c70-4ab9-b863-0177e6ddd247}"
Name="Title" Required="TRUE" />
<FieldRef ID="{129883A2-82F4-4B32-86D2-8541DE9715CD}"
Name="Answer" ShowInNewForm="TRUE" ShowInEditForm="TRUE"
ShowInDisplayForm="TRUE" />
<FieldRef ID="{86057F1F-D120-4BB1-8055-2E75025733FC}"
Name="WebPage" ShowInNewForm="TRUE" ShowInEditForm="TRUE"
ShowInDisplayForm="TRUE" />
<FieldRef ID="{3f6c8ca4-d576-45d1-8fe8-452a2d37ef80}"
Name="Answered" ShowInNewForm="TRUE" ShowInEditForm="TRUE"
ShowInDisplayForm="TRUE" />
<FieldRef ID="{E94EDB6D-EE39-4C4E-9F9F-6D8DE1882C8C}"
Name="Comments" ShowInNewForm="TRUE" ShowInEditForm="TRUE"
ShowInDisplayForm="TRUE" />
</FieldRefs>
...
Notice that in addition to adding our new fields, we also tell SharePoint to show these fields in the forms it automatically generates to create, modify, and view list items.
Finally, add the new fields to the default view for the list, so they show up when a user displays the whole list. To do this, add more FieldRef elements, this time to ViewFields at the bottom of Schema.xml for the default view, as shown in Listing 2.7.
Listing 2.7. Defining a View for the FAQ List
<ViewFields>
<FieldRef Name="LinkTitleNoMenu"></FieldRef>
<FieldRef Name="Answered"></FieldRef>
<FieldRef Name="Answer"></FieldRef>
<FieldRef Name="WebPage"></FieldRef>
<FieldRef Name="Comments"></FieldRef>
</ViewFields>
When the Schema.xml file is complete, expand the FAQListInstance item and edit the Elements.xml file inside (not the Elements.xml file under FAQList). Ensure the list title is Frequently Asked Questions. If you want the list to be displayed on the Quick Launch (left navigation) bar, add an attribute to the ListInstance for OnQuickLaunch="True", as shown in Listing 2.8.
Listing 2.8. Elements.xml under FAQListInstance
<?xml version="1.0" encoding="utf-8"?>
<Elements xmlns="http://schemas.microsoft.com/sharepoint/">
<ListInstance Title="Frequently Asked Questions"
OnQuickLaunch="TRUE"
TemplateType="10000"
Url="Lists/FAQ"
Description="Frequently asked questions and answers">
</ListInstance>
</Elements>
Having made all these changes, deploy the solution. The site should now create both a definition for an FAQ and an instance of the list called Frequently Asked Questions. This is a fully functioning list, and SharePoint creates the views, editing forms, and even a built-in web part to display it. Like all SharePoint lists, it can support versioning, approval, workflow, item-level security, folders, RSS feeds, and more. Some of these capabilities aren’t enabled by default; you could turn them on by visiting the List Settings screen for your list instance or by changing the code in your Visual Studio project.
For more details about lists and content types, see http://bit.ly/SPSL_ListDataModel.
The second time you successfully deploy your solution, you can expect a Deployment Conflict notice from Visual Studio as shown in the following figure. This conflict occurs because the list instance you are deploying already exists. If you click Resolve Automatically, Visual Studio deletes the list instance in SharePoint and creates a new one; this makes sense if you’ve changed the list schema, but it removes any test data you have placed in the list. Therefore, if you haven’t changed the list definition, you might want to click Cancel to allow the list to remain unchanged in SharePoint.
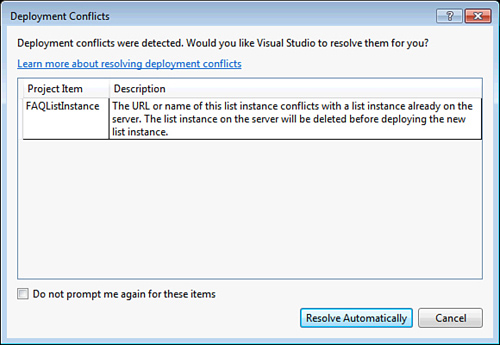
To eliminate the prompt, select the list instance (in this case FAQInstance) in Visual Studio and edit the Deployment Conflict property. Selecting Automatic replaces the list instance every time the solution is deployed; selecting None leaves the list in place; and Prompt brings up the dialog box to allow you to choose each time.
Accessing Lists and Libraries with the SharePoint Server API
SharePoint provides server- and client-side APIs; this chapter introduces the server-side object model. Chapter 8, “Accessing SharePoint Data with the Client Object Model,” explains how to access SharePoint’s client API from Silverlight.
On the server, the SharePoint API for manipulating lists and libraries, as well as the sites that contain them, is in the Microsoft.SharePoint namespace. Going back to Figure 2.1, recall that sites are grouped into site collections with a single top-level site and a hierarchy of subsites; lists and libraries reside within these sites. The SharePoint API includes object classes to represent each of these as shown in Table 2.1.
Table 2.1. SharePoint Object Classes

For historical reasons, the object for a site collection is called an SPSite, and the object for a site is an SPWeb. This is somewhat confusing and leads to ambiguity when referring to a “site.” This book calls an SPSite a “site collection” and an SPWeb a “site” to be consistent with common usage. Recall that a site collection is a hierarchy of sites containing a top-level site, which might or might not have descendent sites. The site collection and its top-level site are represented by two different objects in the SharePoint API: SPSite is the site collection, and its top-level site is the SPWeb object at the root of the site collection, accessed using the RootWeb property of the SPSite object.
The next step is to create an FAQ web part to display the answered frequently asked questions and to allow users to add new questions. This time it will be a Visual Web Part, which is based on an ASP.NET user control. Out of the box, a Visual Web Part can’t run in a sandboxed solution, but this limitation is removed by the Visual Studio 2010 SharePoint Power Tools, which can be downloaded from http://bit.ly/SPSL_PowerTools. Later you learn how to build the same FAQ web part using a traditional web part with no .ascx file.
Some of the key objects in the SharePoint API are disposable, which means that they consume resources outside of the .NET object system and must be formally disposed of using the IDisposable interface. If these objects were just left for the .NET garbage collector, only the .NET resources would be released, and a memory leak would result from the abandoned external resources. The most notable of these disposable objects are SPSite and SPWeb, both of which are used frequently, as well as the DataContext object used in LINQ to SharePoint. To correctly dispose of these objects, use either the Dispose() method or the C# using statement. The following example shows both methods:
using (SPSite mySiteCollection = new SPSite("http://myserver/"))
{
SPWeb myWeb = null;
try
{
myWeb = mySiteCollection.RootWeb;
// Do something with the SPWeb ...
}
finally
{
// Now formally dispose of the SPWeb object
if (myWeb != null) myWeb.Dispose();
}
} // Closing the using statement will dispose of the SPSite object
Notice that the try/finally block is needed to ensure the SPWeb object doesn’t leak if an exception is thrown. The using statement takes care of this for you automatically and streamlines the code.
To add to the fun, there’s another rule about disposing of SPSite and SPWeb objects: if you got the objects from the SharePoint context object, they shouldn’t be disposed of after all! The SharePoint context keeps a couple of these objects around, and if you dispose of them the API will begin to behave unpredictably. For example, here the SPSite object does not need to be disposed of because it came from SPContext.Current, but the SPWeb object is a copy obtained from SPSite.RootWeb and therefore must be disposed of.
SPSite mySiteCollection = SPContext.Current.Site;
using (SPWeb myWeb = mySiteCollection.RootWeb)
{
// Do something with the SPWeb
}
SharePoint Dispose Check is a great tool that will check your code for these problems. It includes a Visual Studio 2010 add-in that automatically checks every project after it is built. SharePoint Dispose Check is available on MSDN code gallery at http://code.msdn.microsoft.com/SPDisposeCheck.
Begin by adding a new SharePoint 2010 item to your Visual Studio project and select Visual Web Part (Sandboxed), giving the web part a name such as FaqVisualWP. Visual studio creates an .ascx file for your web part, which can be edited using the Visual Studio design surface or in text. Below the pregenerated directives in the .ascx file, add the user control markup shown in Listing 2.9.
Listing 2.9. Markup in a Visual Web Part
<asp:DataList ID="FaqDataList" runat="server">
<HeaderTemplate>
<ul>
</HeaderTemplate>
<FooterTemplate>
</ul>
</FooterTemplate>
<ItemTemplate>
<li>
<asp:HyperLink ID="HyperLink1" runat="server"
NavigateUrl='<%# DisplayUrl( DataBinder.Eval(Container.DataItem,
"ID")) %>'
Text='<%# DataBinder.Eval(Container.DataItem, "Title") %>'>
</asp:HyperLink>
</li>
</ItemTemplate>
</asp:DataList>
<br />Ask a question: <br />
<asp:TextBox ID="QuestionTextBox" Width="320px"
runat="server"></asp:TextBox>
<asp:Button ID="QuestionButton" runat="server" Text="Ask"
OnClick="QuestionButton_Click" />
<asp:Label ID="MessageLabel" runat="server" Text="" />
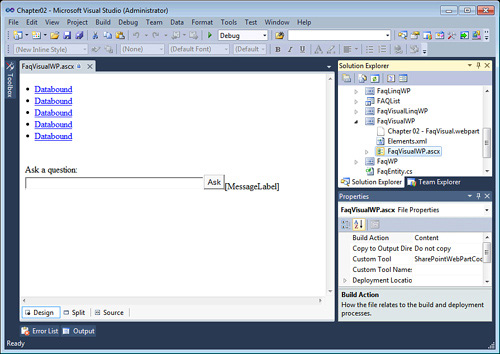
The design view of the web part is shown in Figure 2.14. A DataList was used instead of a BulletedList to allow more flexibility; in this case the flexibility is needed because there’s no way to directly bind the list item’s URL, given that the SPListItem object doesn’t have a useful URL property to bind to. Instead, the URL is built from the item’s unique ID by a function called DisplayURL, which you see later in this chapter in Listing 2.10. The DataList is also more flexible in that the rendering can be changed using ASP.NET Templates for the header, footer, item, and so on.
Figure 2.14. Visual Web Part design surface
Next, add some code behind the web part to retrieve the list of FAQs and bind them to FaqDataList. It’s best to do the binding late in the page rendering cycle in case the list has changed in response to some user input elsewhere on the page; therefore a good place to retrieve the SharePoint data and connect it to the data list is during the PreRender stage. This is accomplished by overriding the OnPreRender event in the FaqVisualWP.ascx.cs file, as shown in Listing 2.10.
Listing 2.10. Querying and Binding List Data
private string listFormUrl;
protected override void OnPreRender(EventArgs e)
{
base.OnPreRender(e);
try
{
SPWeb myWeb = SPContext.Current.Web;
SPList faqList = myWeb.Lists["Frequently Asked Questions"];
this.listFormUrl = myWeb.Url + "/" +
faqList.Forms[0].Url + "?ID=";
SPQuery q = new SPQuery();
q.Query = "<Where><Eq><FieldRef Name='Answered' />" +
"<Value Type='Bool'>True</Value></Eq></Where>" +
"<OrderBy><FieldRef Ascending="TRUE" " +
"Name="Title" /></OrderBy>";
SPListItemCollection answeredQuestions =
faqList.GetItems(q);
this.FaqDataList.DataSource = answeredQuestions;
this.FaqDataList.DataBind();
}
catch (Exception ex)
{
this.Controls.Clear();
this.Controls.Add(new LiteralControl(ex.Message));
}
}
The work is done in a Try/Catch block in case SharePoint throws an exception; in that case, the code throws away all the child controls that were generated from the .ascx code and adds a new one to show the error message. In a production application, it would be bad form to show the error message directly to an end-user because it might contain sensitive information; instead you would want to log the error and display a generic message, but for debugging purposes this is fine.
When in the Try block, the code begins by obtaining an SPWeb object for the current site in the statement:
SPWeb myWeb = SPContext.Current.Web;
SPContext represents a SharePoint context such as which site collection and site are currently in use; the SPContext.Current static method always returns the current SharePoint context, which is the SharePoint site where the web part is running. The using statement ensures that the SPWeb object will be properly disposed of.
At this point you can store away a piece of information you will need later, which is the URL to display the FAQ list item when a user clicks. SharePoint maintains a number of forms for displaying and editing list items, so there is no one obvious URL, and the SPListItem’s URL property is of little help. The statement
this.listFormUrl = myWeb.Url + "/" +
faqList.Forms[0].Url +
"?ID=";
saves the URL of the default form (the display form) for the list. This is used during data binding; as you can see in Listing 2.9, the binding to the HyperLink object’s NavigationUrl property calls a function called DisplayUrl(), shown in Listing 2.11. DisplayUrl concatenates the list form URL with the item’s unique ID, which is passed as an argument in the data binding expression.
Listing 2.11. DisplayUrl() Function
public string DisplayUrl(object id)
{
return this.listFormUrl + id.ToString();
}
Note that the code uses Hyperlink objects rather than link buttons because there is no way to redirect after a post-back in a sandboxed solution. This makes sense if you think about it: You’re running in the sandbox, so you can’t touch the HTTP context.
Next, you want to select just the FAQ items that have been answered. Getting to the FAQ list instance is simple:
SPList faqList = myWeb.Lists["Frequently Asked Questions"];
At this point, you could just enumerate faqList.Items and only display the FAQ items that have been answered, but this is inefficient because you might have to loop through a lot of unanswered items. Instead, the code builds a query to retrieve only the answered questions and to retrieve them in alphabetical order. This query does not use the SharePoint search engine, which provides full-text search across many lists and sites; think of it more like a database query against the SharePoint list. The query is written in SharePoint’s internal language called CAML, which stands for Collaboration Application Markup Language; this is the same language that was used in the list definition. In this case, a query is created in CAML, as shown in Listing 2.12. This query is already in the code, which you might have noticed in Listing 2.10.
Listing 2.12. CAML Query for Answered FAQ Items
<Where>
<Eq>
<FieldRef Name='Answered' />
<Value Type='Bool'>True</Value>
</Eq>
</Where>
<OrderBy>
<FieldRef Ascending="True" Name="Title" />
</OrderBy>
As you can see, CAML uses an XML element hierarchy to structure the query; although this is easily parsed by computers, it can seem cumbersome to humans. The query is placed in an SPQuery object, which can then be used to get the desired list items, already sorted and ready for binding to the DataList.
If you want to give the web part a try, add a stubbed-out event handler to the code-behind for the QuestionButton_Click event so the project will compile:
void QuestionButton_Click(object sender, EventArgs e)
{
}
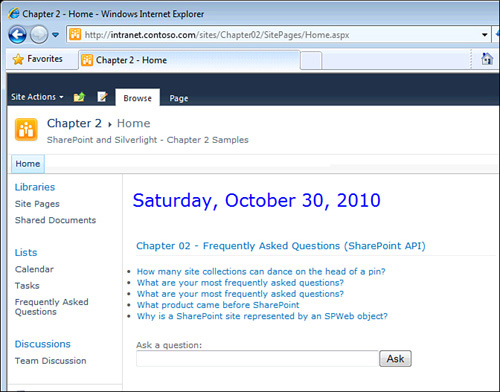
Given some answered questions in the FAQ list, which can easily be created within the SharePoint user interface, the resulting web part displays them as shown in Figure 2.15. Be sure to edit the items and check the Answered column so they match the CAML query and are shown in the web part display.
Updating List Data with the SharePoint API
Next up is to add the ability for a user to enter a new FAQ question into the list. To do this, a text box for the user to type in and a button to post the question in the .ascx file are already included, so all that remains is to create the code to update the list, as shown in Listing 2.13.
Listing 2.13. QuestionButton Click Event Handler
void QuestionButton_Click(object sender, EventArgs e)
{
try
{
SPWeb myWeb = SPContext.Current.Web;
SPList faqList = myWeb.Lists["Frequently Asked Questions"];
SPListItem li = faqList.AddItem();
li["Title"] = this.QuestionTextBox.Text;
li.Update();
this.QuestionTextBox.Text = "";
this.MessageLabel.Text = "<br />Thank you for submitting a " +
"new question.";
}
catch (Exception ex)
{
// TODO: In production, log the error and show a generic message
this.MessageLabel.Text = "Error saving your question: " +
ex.Message;
}
}
Notice that the new list item is obtained from the SPList object’s AddItem() method and is then filled in with its property values. A call to the list item’s Update() method persists the changes to SharePoint. In general the SharePoint API expects an Update() method to be called when updating data, allowing you to make several changes to an object before persisting it.
LINQ to SharePoint
You might notice that the SharePoint API is not strongly typed with respect to SharePoint data, and runtime errors can occur if a list name, field name, or CAML query doesn’t match the underlying SharePoint content. To address this, as well as to remove the need to write queries in the arcane CAML syntax, SharePoint 2010 introduces support for LINQ to SharePoint. LINQ stands for Language Integrated Query and allows your code to include strongly typed data references and queries that interact with SharePoint data.
The problem of loose typing is not entirely solved by LINQ; rather it is moved from the human developer to a tool. For LINQ to SharePoint, this tool is called SPMetal.exe, and it is installed along with all editions of SharePoint. The developer captures a snapshot of site content using SPMetal, which generates strongly-typed wrapper classes for the lists in the site. This code is then imported into Visual Studio where it can be accessed by your code.
Presumably SPMetal is less error-prone than a human programmer, and any errors are more likely to be caught by Visual Studio as the developer is typing rather than at runtime. It’s still the developer’s responsibility to ensure that the lists and libraries the code is accessing are identical in structure to the ones passed to SPMetal during development. In this case, because the code and list structure are defined within the same solution, SPMetal can be safely run on the developer’s test SharePoint site with confidence that an identical list will be there in production.
SPMetal can be found in the SharePoint Root, which is where most of the SharePoint files are installed. Its default location is C:Program FilesMicrosoft SharedWeb Server Extensions14; SPMETAL is in the bin directory within. Enter spmetal /? for help; an example command might be
spmetal /web:http://myserver /code:"C:SomePathFaqEntity.cs"
Use SPMetal to generate an entity file for your development site where the FAQ list instance is installed and import it into your Visual Studio project. The code allows you to query and update the FAQ list using LINQ to SharePoint.
Tip
Take care when choosing which user account to use when running the SPMetal utility, as it only generates code for objects that a user has permission to see.
A second web part called FaqVisualLINQWP is included in the code download to show the same web part using LINQ to SharePoint instead of the SharePoint API. The two web parts are very similar, except of course in how the SharePoint data is accessed. As you can see in Listing 2.14, the OnPreRender method now uses LINQ instead of a CAML query to show the answered questions, sorted by title.
Listing 2.14. LINQ Code for FAQL Web Part
protected override void OnPreRender(EventArgs e)
{
base.OnPreRender(e);
try
{
using (FaqEntityDataContext dc =
new FaqEntityDataContext(SPContext.Current.Web.Url))
{
EntityList<FrequentlyAskedQuestionsItem> faqs =
dc.GetList<FrequentlyAskedQuestionsItem>
("Frequently Asked Questions");
if (faqs.Any<FrequentlyAskedQuestionsItem>())
{
var faqEnumerable = from item in faqs
where (item.Answered == true)
orderby item.Title
select item;
this.FaqDataList.DataSource = faqEnumerable;
this.FaqDataList.DataBind();
}
}
}
catch (Exception ex)
{
this.Controls.Clear();
this.Controls.Add(new LiteralControl(ex.Message));
}
}
The FaqEntityDataContext class was generated by SPMetal and is derived from the LINQ to SharePoint DataContext class. This class is used whenever SharePoint data is queried or updated using LINQ to SharePoint. Because DataContext is IDisposable, a using statement is included to ensure there is no memory leak. The query itself is now easier to read and is validated by the compiler.
One difference between the LINQ and SharePoint API code is that where the SPQuery returned its results in an SPListItemCollection, LINQ returns them in a generic collection—specifically an IEnumerable <FrequentlyAskedQuestionsItem> where the FrequentlyAskedQuestions Item is defined in the code generated by SPMetal. FrequentlyAskedQuestionsItem is strongly typed, so the code can access its properties with compile-time checking to make certain they’re used correctly.
New questions can also be added to the list using LINQ to SharePoint, as shown in Listing 2.15. Notice that the DataContext can manage changes to the site data and updates them when its SubmitChanges() method is invoked.
Listing 2.15. Updating the List with LINQ
void QuestionButton_Click(object sender, EventArgs e)
{
try
{
using (FaqEntityDataContext dc = new
FaqEntityDataContext(SPContext.Current.Web.Url))
{
EntityList<FrequentlyAskedQuestionsItem> faqList =
dc.GetList<FrequentlyAskedQuestionsItem>
("Frequently Asked Questions");
FrequentlyAskedQuestionsItem i =
new FrequentlyAskedQuestionsItem()
{
Title=this.QuestionTextBox.Text
};
faqList.InsertOnSubmit(i);
dc.SubmitChanges();
}
this.QuestionTextBox.Text = "";
this.MessageLabel.Text = "<br />Thank you for the question.";
}
catch (Exception ex)
{
// TODO: In production, log the error and show a generic message
this.MessageLabel.Text = "Error saving your question: " +
ex.Message;
}
}
Web Parts as Composite Controls
As a SharePoint developer, you don’t want to be confined to developing Visual Web Parts. Sometimes it’s easier to write web parts in procedural code, especially if the goal is to simply place a Silverlight object tag on the page and pass in some data. The reusability of a simple WebControl allows the Silverlight tag rendering and application details to be encapsulated into separate classes. Many of the other kinds of SharePoint customizations, such as editor parts and field controls, are only possible as composite controls. This section shows you how to build the same web parts as composite controls so you can take advantage of these scenarios later in the book.
A composite control is an ASP.NET control that, rather than spitting out its own HTML, renders its contents by creating and manipulating a set of child controls. The child controls are created in code by overriding the CreateChildControls() method instead of declaring the controls in an .ascx file as in the Visual Web Part. Listing 2.16 shows the code to create the exact same controls declared in the previous example’s .ascx file.
Listing 2.16. The Web Part as a Composite Control
// Fields to hold child controls
private DataList FaqDataList = new DataList();
private TextBox QuestionTextBox = new TextBox();
private Label MessageLabel = new Label();
protected override void CreateChildControls()
{
try
{
// Add the data list that will display the FAQ
this.FaqDataList.HeaderTemplate = new FaqWP_HeaderTemplate();
this.FaqDataList.ItemTemplate = new FaqWP_ItemTemplate();
this.FaqDataList.FooterTemplate = new FaqWP_FooterTemplate();
this.Controls.Add(this.FaqDataList);
// Add a literal instructing the user to ask a question
this.Controls.Add
(new LiteralControl("<br />Ask a question:<br />"));
// Add a text box to capture a new question
this.QuestionTextBox.Width = Unit.Pixel(320);
this.Controls.Add(this.QuestionTextBox);
// Add a button for the user to click to enter a new question
Button QuestionButton = new Button();
QuestionButton.Text = "Ask";
QuestionButton.Click += new EventHandler(QuestionButton_Click);
this.Controls.Add(QuestionButton);
// Add a label to display a message to the user
this.Controls.Add(this.MessageLabel);
}
catch (Exception ex)
{
this.Controls.Clear();
this.Controls.Add(new LiteralControl("Error: " + ex.Message));
}
}
As you can see, some of the controls are saved as private fields so other code in the web part such as the OnPreRender override and the button click event handler can find them. All the controls are created and configured in CreateChildControls() just as they were in the .ascx file, and each control is added to the web part’s Controls collection. The click event handler on the QuestionButton is connected in code, as are the DataList templates.
The DataList templates need to be objects that implement the ITemplate interface, so you need to add a class for each template to replace the template code in the .ascx file. The code is shown in Listing 2.17. ITemplate requires a single method, InstantiateIn(), which adds the template’s child controls into a container during data binding much as in CreateChildControls().
Listing 2.17. Code for Data Binding Templates
public class FaqWP_HeaderTemplate : ITemplate
{
public void InstantiateIn(Control container)
{
container.Controls.Add(new LiteralControl("<ul>"));
}
}
public class FaqWP_ItemTemplate : ITemplate
{
public void InstantiateIn(Control container)
{
container.Controls.Add(new LiteralControl("<li>"));
HyperLink h = new HyperLink();
h.DataBinding += new EventHandler(h_DataBinding);
container.Controls.Add(h);
container.Controls.Add(new LiteralControl("</li>"));
}
void h_DataBinding(object sender, EventArgs e)
{
HyperLink h = (HyperLink)sender;
DataListItem container = (DataListItem)h.NamingContainer;
SPListItem li = (SPListItem)container.DataItem;
h.Text = li.Title;
h.NavigateUrl = li.Web.Url + "/" +
li.ParentList.Forms[0].Url +
"?ID=" + li.ID;
}
}
public class FaqWP_FooterTemplate : ITemplate
{
public void InstantiateIn(Control container)
{
container.Controls.Add(new LiteralControl("</ul>"));
}
}
The code approach removed the need to save the display form URL for use in data binding; instead the h_DataBinding event handler is able to fill in the properties of the bound control directly. The LINQ to SharePoint version varies slightly because the data binding is with a FrequentlyAskedQuestionsItem instead of a SPListItem; in this case the display form is hard-coded to simplify the code, as shown in Listing 2.18.
Listing 2.18. LINQ Version of Data Binding Code
void h_DataBinding(object sender, EventArgs e)
{
HyperLink h = (HyperLink)sender;
DataListItem container = (DataListItem)h.NamingContainer;
FrequentlyAskedQuestionsItem li =
(FrequentlyAskedQuestionsItem)container.DataItem;
h.Text = li.Title;
h.NavigateUrl = li.Path + "/DispForm.aspx?ID=" + li.Id;
}
Event Receivers
Another arrow in the SharePoint developer’s quiver is the event receiver. Event receivers are components that execute code on the server in response to various events in SharePoint, such as a list item being created or a feature being activated. SharePoint 2010 provides an extensive list of events, as shown in Table 2.2.
Table 2.2. SharePoint Foundation Site and List Events
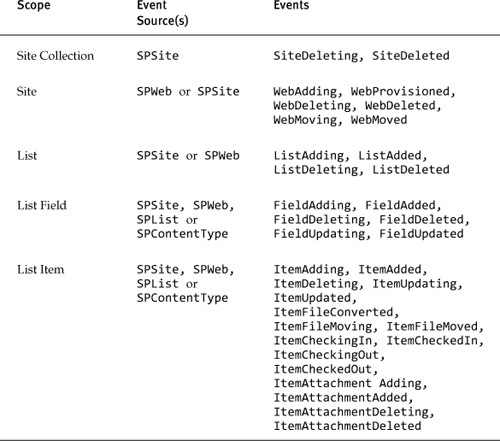
For example, if a new list is added to a SharePoint site, the ListAdding and ListAdded events run. The events with names ending in ing are “before” events that run synchronously, before the actual event takes place. In this case, your code could cancel the operation if, for example, it contained business logic that determined the item should not be added. The events with names ending in ed are “after” events that run asynchronously, after the event has completed. This is useful for auditing or other activities that run after the action takes place.
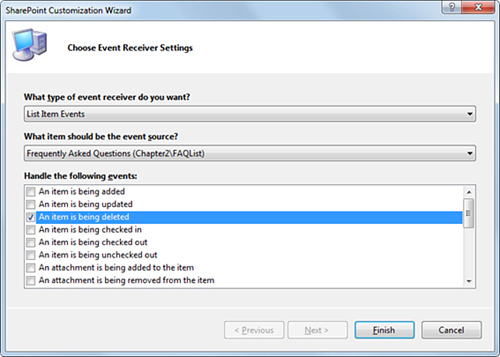
To extend on the previous examples, let’s add an event receiver to enforce a business rule that stipulates that no FAQ question should be deleted until it has been answered. To do this, hook the ItemDeleting event and check to be sure the question has been answered; if not, the deletion is aborted, and an error is reported back to the user.
To begin, add a new item to your project in Visual Studio. This time select the SharePoint 2010 Event Receiver item. As shown in Figure 2.16, the SharePoint Customization Wizard prompts you for the type of event receiver to create, the event source, and the events to be handled. You want a List Item event receiver, and for the source you want to select the Frequently Asked Questions list that is created in your own Visual Studio project. You only need to handle the situation of an item being deleted and need the synchronous version to abort it if necessary; therefore you should select An Item Is Being Deleted for the event.
Figure 2.16. Adding an event receiver
At this point, Visual Studio creates your event receiver along with its class file and an Elements.xml file to declare the event receiver. The class file is set up with an override of the ItemDeleting() method, so add the event logic as shown in Listing 2.19.
Listing 2.19. ItemDeleting Event Receiver
public override void ItemDeleting(SPItemEventProperties properties)
{
base.ItemDeleting(properties);
bool isAnswered = Boolean.Parse
(properties.ListItem["Answered"].ToString());
if (!isAnswered)
{
properties.ErrorMessage =
"You cannot delete an unanswered question.";
properties.Cancel = true;
}
}
Solutions and Features
When creating this simple web part, you have created a SharePoint solution. It’s not only a solution in Visual Studio, it’s also a SharePoint Solution, which is an installable package stored in a single file with the extension .wsp. The letters “wsp” stand for Web Solution Package; just to add to the confusion about sites and webs, they are installed at the SharePoint farm or site collection levels.
A .wsp file is simply a cabinet file; you can rename one to end in .cab and open it up if you want to look inside. A .wsp file must contain a root file called manifest.xml, which tells SharePoint how to install the package. The .wsp also includes all the files that need to be installed including executable .dlls, supporting files such as images and style sheets, and a variety of .xml files that tell SharePoint how to stitch your content into the content system. SharePoint administrators generally expect to install .wsp files rather than run scripts or proprietary setup programs when adding new extensions to their SharePoint installations. This has the advantage of providing a single point of control and knowing that SharePoint takes care of provisioning the package as needed to new SharePoint servers as they are added to the farm.
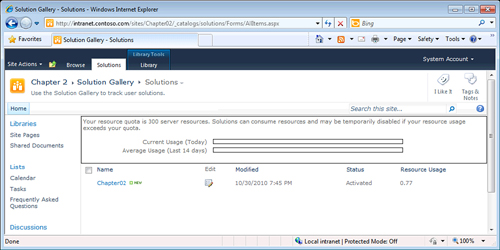
To view the solution in the web browser, open the Site Actions menu and select Site Settings. Sandboxed solutions are managed at the site collection level, so if you are in a child site, click Go to Top Level Site Settings under Site Collection Administration. Here you see a number of options under the Galleries heading. The .webpart file you just edited is in the Web Part Gallery, and the solution is in the Solution Gallery. Click into the Solution Gallery and you see your solution, along with resource usage statistics, as shown in Figure 2.17.
Figure 2.17. Site Collection Solution Gallery
The Solution Gallery is a SharePoint library containing .wsp files. The Solutions tab allows sandboxed solutions to be uploaded and managed. If this was a farm solution instead of a sandboxed one, it would be managed in Central Administration. To see this, open Central Administration and click System Settings; then under Farm Management, click Manage Farm Solutions.
Within a solution there are features that administrators can selectively enable to make functionality “light up” in SharePoint. Features can be scoped at the farm, web application, site collection, or site level, giving administrators at all these levels the ability to enable or disable functionality. In addition to web parts, features can contain SharePoint content types, list definitions, list instances, application pages, Ribbon items, and more.
The solution created so far in this chapter has two features. One contains all the web parts and is scoped at the site collection (SPSite) level. This is because all web parts depend on the Web Part Gallery to hold their .webpart files, and the Web Part Gallery is always shared by all sites in a site collection. The other feature is scoped at the site (SPWeb) level and contains the FAQ list definition along with its list instance and the event handler.
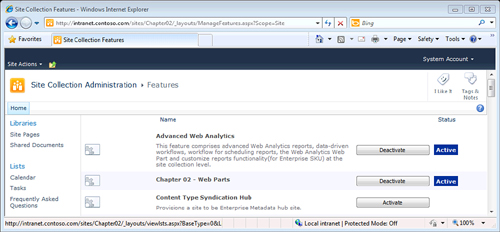
To view the web part feature, open Site Settings, and under Site Collection Administration, click Site Collection Features. To view the site scoped feature, click Site Features in the settings of your debug site. In the code download, the feature is called “Chapter 02 - Web Parts,” as in the Figure 2.18; in your project it might be different. You can change the name in the Feature Designer, which is explained later in this section.
Figure 2.18. Site collection features
Each Visual Studio 2010 solution is always one SharePoint solution that produces a single .wsp file. Within that solution, Visual Studio can associate SharePoint Items with one or more SharePoint features. Each of the things you created in Visual Studio—the web parts, the list and the event handler—appears in Visual Studio as a SharePoint Item or SPI. SPIs act like folders with special icons to indicate their types, properties to configure them, and the source code and declarative XML inside the folder.
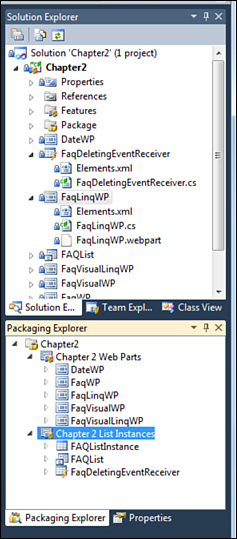
The Visual Studio Solution Explorer shows the Visual Studio hierarchy: a solution containing one or more projects with SharePoint Items inside at least one of the projects. To view the SharePoint hierarchy, you need to look at the Packaging Explorer instead. To enable this in Visual Studio 2010, open the View menu, and under Other Windows, click Packaging Explorer. Now you can see the SharePoint solution with its two features and the SharePoint items within each feature. Figure 2.19 shows both displays as they appear for the sample project developed in this chapter.
Figure 2.19. Solution Explorer and Packaging Explorer
Tip
SharePoint users and administrators refer to SharePoint “sites” and “site collections,” as in this book. The SharePoint APIs, however, use different and sometimes confusing terminology. In the API, a SharePoint site is called a “Web,” so a site is embodied in an SPWeb object, and a SharePoint site collection is called a “Site” and represented by an SPSite object. The resulting ambiguity in the word “site” can cause confusion.
This is seen in the Feature Designer in Visual Studio as well. From the Packaging Explorer, right-click on a feature and select View in Designer. The Feature Designer allows you to manage the feature, including setting its scope. The choices are Farm, Site (meaning site collection), Web (meaning a site), and WebApplication.
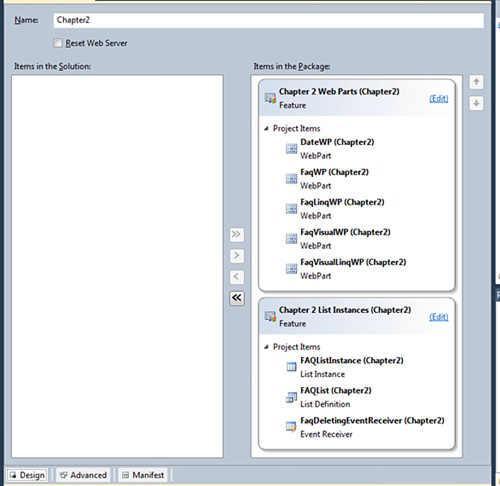
To see more detail, right-click the solution (top node) in the Packaging Explorer and select View Designer. The Solution Designer opens, as shown in Figure 2.20. Here you can move Visual Studio project items in and out of the .wsp package; by clicking the Advanced tab at the bottom of the designer, you can also add additional .dll files that you need to deploy. The Manifest tab shows the solution’s Manifest.xml file, which is at the core of the solution. Notice that the manifest refers to your compiled .dll file and also includes a SafeControl setting that is placed in the ASP.NET web.config file to mark your assembly as safe to run. If you ever need to edit solution and feature files manually, always do so in the Visual Studio 2010 packaging designer so it can correctly merge your changes with the XML generated by Visual Studio.
Figure 2.20. The SharePoint Solution Designer
If you developed your solution in the “top-level” site, your list definition and instance might be in the same site collection feature as the web part. This causes your solution to break if it’s used in a child site because the FAQ list appears in the top-level site! It’s a good practice to test your solutions in top-level and child sites, as this sort of mistake is easy to make.
To correct it, on the Visual Studio View menu, select Other Windows and then Packaging Explorer. The top item in the Packaging Explorer is the SharePoint solution, and the feature(s) are immediately below this. Right-click the solution name and select Add Feature. Give your feature a name and ensure its scope is set to Web. Then in the panel on the lower left, select the FAQ list definition, list, and deleting event handlers and click the >> button to move them to your new feature.
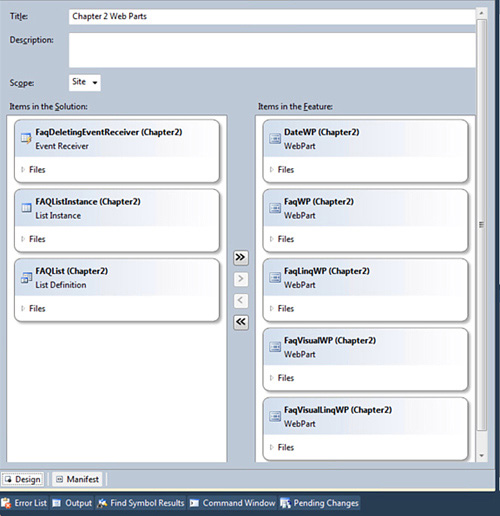
Click the Edit link on either feature to open the Feature Designer. Figure 2.21 shows the Feature Designer for the web part feature; as you can see, the scope is set to Site, and all the web part SPIs are included in the feature. Using the Feature Designer, you can easily consolidate or rearrange features as desired to allow administrators to turn your functionality on and off.
Feature Receivers
Another kind of event receiver you may find helpful is a feature receiver, which runs your code when a SharePoint feature is activated, deactivated, installed, or updated (with the same ing variations available as well). This allows you to do any kind of setup or cleanup that can’t be handled in the declarative feature.xml and other files associated with your project.
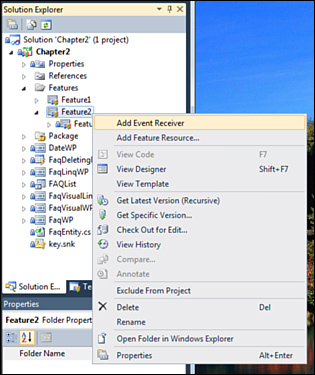
To show this, add a simple feature receiver to the FAQ solution to add an initial question to the list when it is provisioned. To create the feature receiver, go to Solution Explorer in Visual Studio, and under the Features folder, find the web level feature that contains the FAQ list instance (probably Feature2 if you did the project in the same order as the chapter). Right-click the feature and click Add Event Receiver as shown in Figure 2.22. Visual Studio creates a class derived from SPFeatureReceiver, which you can edit to add your event code.
Figure 2.22. Adding a feature receiver
In this case, we want to hook the FeatureActivated event, so uncomment the method in the class file and add code to create an initial FAQ entry, as shown in Listing 2.20.
Listing 2.20. FeatureActivated Event Receiver
public override void FeatureActivated
(SPFeatureReceiverProperties properties)
{
using (SPWeb web = properties.Feature.Parent as SPWeb)
{
if (web != null)
{
SPList faqList = web.Lists["Frequently Asked Questions"];
SPListItem li = faqList.AddItem();
li["Title"] = "What are your most frequent questions?";
li["Answer"] = "Use this list to capture and answer them!";
li["Answered"] = true;
li.Update();
}
}
}
Now, whenever your feature is activated, the initial FAQ question is added; this is done by default every time you deploy your solution in Visual Studio, so you can end up with quite a lot of them if you continue working on the project and have disabled deployment conflicts on the FAQ List Instance.
Summary
You now are equipped with a baseline of SharePoint development knowledge to tackle the rest of this book. You have been exposed to the core concepts needed to build lists to hold content, event receivers to extend list behavior, and solutions and features to package your work. Although web parts are rendered in Silverlight after this chapter, they are still based on the SharePoint web part or Visual Web Part project items introduced here. Becoming adept at composite control development helps as well, especially when tackling more advanced projects such as field controls and connected web parts.