
15. Creating a Silverlight Field Control
SHAREPOINT PROVIDES quite a number of field types for use throughout the product to define the data representation in every column of every list in SharePoint. These begin with the basics, such as text, numbers, and dates and get more advanced, including field types for rich, multiline text, as well as person, choice, and lookup fields. If you want to see the fields available on a SharePoint site, go to Site Settings and, under Galleries, view the Site Columns Gallery; all of these fields are based on out-of-the-box field types.
In this chapter, you learn to add your own field types in SharePoint. Each field knows how to store its data in SharePoint’s content system and how to render itself for viewing or editing. Naturally, this viewing and editing will use Silverlight. Figure 15.1 shows the finished field being edited in a SharePoint publishing site. The field remembers all the map settings and respects them when the page is viewed.
Figure 15.1. A Map field control on a SharePoint publishing page

The programming example in this chapter adds a location field type, which uses Bing Maps to display and edit the location. When installed, any list in SharePoint can be geo-coded and mapped by simply adding a location column. In addition, you learn to add a site column using the new field type and to add that column to a page layout for use in SharePoint publishing sites. This allows for web pages in which the map is edited as a field on the page, rather than as a web part. Along the way, you learn a bit about SharePoint’s web publishing system.
You can notice some parallels between this chapter and Chapter 7, “Accessing SharePoint Using the HTML Bridge,” because both use the HTML Bridge to communicate between SharePoint and Silverlight in a hidden input field. In this case, the location information is serialized and placed in the field as a simple string, which can be readily accessed by Silverlight as well as the page logic. In this case, using the HTML Bridge is important since you really want to post back the location along with the other fields on the page or dialog box, where they are saved or abandoned depending on whether the user presses the Save button or does some other post-back on the page. Directly saving the data via the Client Object Model would save the data prematurely and ignore the user’s wishes to back out the change if she presses the Cancel button.
It might be easier to follow this chapter if you download the code sample and follow along in a working project. The code sample includes a SharePoint project called Chapter15.sln and a pair of Silverlight applications, MapViewSL and MapEditSL, for viewing and editing the maps. In the SharePoint project, a module called ClientBin uses project output references to deploy the two .xap files.
To make the project work, you need to download and install the Bing Maps Silverlight Control and to obtain a Bing Maps application ID. For information on downloading the control, see http://bit.ly/SPSL_BingMapsSLControl; to obtain an application ID, see http://bit.ly/SPSL_BingMapsAppId. In addition, be aware that because the solution includes SharePoint publishing page layout, it requires SharePoint Server 2010 Standard or Enterprise Edition (not SharePoint Foundation 2010); however, if you pare back the solution, the field type itself can be used in SharePoint Foundation 2010 to geo-code general list and library content.
Defining the Bing Maps Field Type
Although the SharePoint user interface can be used to create new fields, or site columns as they’re called in the UI, creating a new field type is a developer task. This requires a SharePoint farm solution, given the field needs to be defined in an XML file that lives on the file system of every SharePoint server, and this is forbidden in a sandboxed solution. At a minimum, this includes a new field class, derived from one of the built-in SharePoint field types and an XML file that declares the field in SharePoint.
There is no Visual Studio project template or item for a field type; if you were starting from scratch, you’d need to create it yourself. The approach is to begin with an empty SharePoint project, create a class file, and derive it from one of the out-of-the-box field types. In this case, the field in MapField.Field.cs is derived from SPFieldText, which is already defined in SharePoint as a text field. The new class stores its content in a SharePoint text field, and you serialize the location information into that text field using the DataContractJsonSerializer, just as in Chapter 7. This makes it easy to store and pass around simple strings, and it can be used both on the SharePoint server and in Silverlight.
Listing 15.1 shows the code for the new field type, which is included in the code download under the MapLocationFieldType folder in a file called MapField.Field.cs.
Listing 15.1. SharePoint Field Type Class
public class MapFieldControlField : SPFieldText
{
public MapFieldControlField(SPFieldCollection fields,
string fieldName) : base(fields, fieldName)
{
}
public MapFieldControlField(SPFieldCollection fields,
string typeName, string displayName)
: base(fields, typeName, displayName)
{
}
public override BaseFieldControl FieldRenderingControl
{
// Override the control for rendering this SPField
[SharePointPermission(SecurityAction.LinkDemand,
ObjectModel = true)]
get
{
BaseFieldControl fieldControl = new MapFieldControl();
fieldControl.FieldName = this.InternalName;
return fieldControl;
}
}
}
There’s not much here, really; the only thing the derived class does is to override the SPTextField’s FieldRenderingControl property, which tells SharePoint which web control to use when rendering the field. That’s where all the magic happens to turn a text field into a location field.
When the solution is deployed, SharePoint installs this class on every server in the SharePoint farm. The next step is to add an .xml file that will tell SharePoint about the new field type and refer it to the MapFieldControlField class. To do this, add a SharePoint mapped folder to your project and navigate to TEMPLATEXML as the folder to map to. Anything placed in this folder in your Visual Studio project is deployed to the TEMPLATEXML folder on every SharePoint server, under the SharePoint root in the file system.
To tell SharePoint about our field, the .xml file must be named following the pattern fldtypes*.xml; in the code download, the file is called fldtypes_MapFieldControl.xml. SharePoint reads this file to learn about the new field type and class. The declaration for the Bing Maps field type is shown in Listing 15.2.
Listing 15.2. XML Declaration of a Field Type
<?xml version="1.0" encoding="utf-8"?>
<FieldTypes>
<FieldType>
<Field Name="TypeName">MapViewField</Field>
<Field Name="TypeDisplayName">Map View</Field>
<Field Name="TypeShortDescription">Bing Maps location</Field>
<Field Name="ParentType">Text</Field>
<Field Name="UserCreatable">TRUE</Field>
<Field Name="FieldTypeClass">Chapter17.MapFieldControlField, $SharePoint.Project.AssemblyFullName$</Field>
</FieldType>
</FieldTypes>
The contents of this file are pretty self-explanatory. The new field type is given internal and display names as well as a description and reference to the parent field type. The Field attribute named FieldTypeClass contains the class and full assembly name, which Visual Studio conveniently fills in for you in place of the $SharePoint.Project.AssemblyFullName$ token.
The solution won’t compile yet, of course, because we haven’t created the MapFieldControl class that we used in the FieldType. This is covered in the next section.
Building a Silverlight Field Control
A SharePoint Field Control is similar to a conventional web part or web control, except that it has more than one mode, so it can present a different user interface depending on whether it’s in Display, Edit, New, or Invalid mode. This allows one control to present the field in display, edit, and new dialog boxes and pages throughout SharePoint.
A field control must be derived from SharePoint’s BaseFieldControl class and must implement a Value property that allows access to the field’s value. Listing 15.3 shows the somewhat elaborate Value property implementation for the field control. Notice that the property is aware of the control’s mode, and when it’s in an Edit mode, stores the value directly as a web control (MapSelectControl) to get or set the value directly from Silverlight in a hidden input control. It also reads and updates SharePoint’s stored version of the field value, which is stored in the base.ItemFieldValue property.
Listing 15.3. Field Control Value Property
// We always have a MapSelectControl in the wings to hold the
// current selection
private MapSelectControl mapEditControl = new MapSelectControl();
public override object Value
{
get
{
if (ControlMode == SPControlMode.New ||
ControlMode == SPControlMode.Edit)
{
// If we are editing a new or existing item,
// then the control's value is in the editing
// control
if (mapEditControl != null &&
mapEditControl.SerializedMapLocation != null)
{
return mapEditControl.SerializedMapLocation;
}
else
{
return String.Empty;
}
}
else
{
// If we are viewing the item, then the control's
// value is the field value from SharePoint
if (base.ItemFieldValue != null)
{
return base.ItemFieldValue;
}
else
{
return String.Empty;
}
}
}
set
{
// Set the value in SharePoint and in the map editing control
base.ItemFieldValue = value;
if (value != null)
{
mapEditControl.SerializedMapLocation = value.ToString();
}
else
{
mapEditControl.SerializedMapLocation = String.Empty;
}
}
}
Field controls are still ASP.NET controls and still have a CreateChildControls() method you can use to create child controls that render the user interface. Listing 15.4 shows CreateChildControls() for the location field control.
Listing 15.4. CreateChildControls()
private bool errorSet = false;
private string errorMessage = "";
protected override void CreateChildControls()
{
base.CreateChildControls();
try
{
if (this.ControlMode == SPControlMode.Display)
{
CreateDisplayModeChildControls();
}
else
{
CreateEditModeChildControls();
}
}
catch (Exception ex)
{
errorSet = true;
errorMessage = ex.Message;
}
}
As you can see, it’s not doing much yet; it simply calls other methods depending on the display mode and sets up a bit of exception handling.
Listing 15.5 shows the display mode controls creation and an override of the display mode render method. Notice that now you’re dealing with another kind of display mode: the design mode. Design mode is derived from the great-grandparent of all controls, the Control object, and is a boolean that tells you if the control is on a design surface (such as SharePoint Designer) or not. If it is, you won’t try to render the Silverlight control but will stick to a simple gray box. This shows up when you add the field to a page layout in SharePoint Designer.
Also notice that you’re passing all the information needed to render a map down to Silverlight. You dig into how the location is stored in the next section; for now, just notice that you’re passing some of the location properties via InitParams to Silverlight. You’re also passing in an application ID; that’s required by Bing Maps to ensure you’ve got a valid Bing Maps account. The application ID is stored in the top-level site’s property bag; this is covered later in the chapter as well.
Listing 15.5. Display Mode Rendering
private SilverlightPlugin sl;
private void CreateDisplayModeChildControls()
{
string applicationId = "";
SPWeb web = SPContext.Current.Site.RootWeb;
if (web.Properties.ContainsKey(Constants.ApplicationIdPropertyKey))
{
applicationId =
web.Properties[Constants.ApplicationIdPropertyKey].ToString();
}
if (!this.DesignMode)
{
BingMapsLocation location;
if (Value.ToString() != "")
{
// There is a location - reconstitute it
location = BingMapsLocation.Load(Value.ToString());
}
else
{
// There never was a location - make an empty one
location = new BingMapsLocation();
}
if (location.IsValid)
{
// Set up the Silverlight control, passing
// the field value as the video URL to play
sl = new SilverlightPlugin();
sl.Source = SPContext.Current.Site.Url +
"/ClientBin/MapViewSL.xap";
sl.InitParameters = "latitude=" +
location.Latitude.ToString() +
",longitude=" + location.Longitude.ToString() +
",zoomlevel=" + location.ZoomLevel.ToString() +
",mode=" + location.Mode.ToString().ToLower() +
",applicationid=" + applicationId;
this.Controls.Add(sl);
}
else
{
errorSet = true;
errorMessage = "No valid location to map - please set ";
}
}
}
// Render the Silverlight control in a <div> so it will
// be the right dimensions on the page (Note SharePoint does this
// automatically for web parts ...)
protected override void RenderFieldForDisplay
(System.Web.UI.HtmlTextWriter output)
{
output.Write("<div style="height:" +
Height.ToString() + "px;width:" +
Width.ToString() +
"px;color:white;background-color:CornflowerBlue;"+
"text-align:center;">");
if (this.DesignMode)
{
// Very simple rendering in SharePoint Designer
output.Write("<b>*** MAP HERE ***</b>");
}
else if (this.ControlMode == SPControlMode.Display)
{
// OK we're in display mode, render the child controls
// with exception handling
if (!errorSet && sl != null)
{
try
{
sl.RenderControl(output);
}
catch (Exception ex)
{
output.Write("Error rendering map field: " +
ex.Message);
}
}
else
{
output.Write("Error displaying map: " + errorMessage);
}
}
output.Write("</div>");
}
A later section explains how the map actually gets displayed in Silverlight. This section focuses on the field control for now and examines the server-side Edit mode rendering. For modularity, the Edit mode is handled by a second web control, MapSelectControl. The field control always creates one of these as a handy place to store the field’s value and is capable of editing the field. Listing 15.6 shows the Edit mode rendering.
Listing 15.6. Edit Mode Rendering
// We always have a MapSelectControl in the wings to hold the
// current selection
private MapSelectControl mapEditControl = new MapSelectControl();
// Create child controls for edit mode
private void CreateEditModeChildControls()
{
if (this.ControlMode != SPControlMode.Display)
{
// Handle the possibility that someone registered a Bing Map
// Location selector in an (ASCX) template file
MapSelectControl mapSelectorInTemplate =
this.TemplateContainer.FindControl(this.TemplateName)
as MapSelectControl;
if (mapSelectorInTemplate == null)
{
// No Bing Map Location selector was found in the control
// template ASCX files.
// Add the default selector.
this.Controls.Add(this.mapEditControl);
}
else
{
// Swap in the Bing Map Location selector from the control
// template ASCX file
mapSelectorInTemplate.SerializedMapLocation =
this.mapEditControl.SerializedMapLocation;
this.mapEditControl = mapSelectorInTemplate;
}
}
}
There is some logic here for rendering a template file; this is an ASP.NET user control that can be used to override a field’s editing experience. The code supports such a file, but it’s easier to use a real server control, so that’s what you create by default. You could probably omit this logic and simply add the editing control, but this is the best practice because it allows adding a template file later.
Listing 15.7 shows the MapSelectControl class. It places the MapEditSL Silverlight application on the page and will pass in two InitParams: the application ID and the client ID of a hidden input control that contains the serialized location. This allows the Silverlight application to place a new location in the field for posting back to the server.
Listing 15.7. MapSelectControl Class Handles Field Input
public class MapSelectControl : WebControl
{
// Fields to hold child controls
private Label messageLabel;
private HiddenField locationHiddenField;
private SilverlightPlugin silverlightPlugin;
// Fields for exception handling
private bool errorSet = false;
private string errorMessage = "";
public string SerializedMapLocation
{
get
{
EnsureChildControls();
return this.locationHiddenField.Value;
}
set
{
EnsureChildControls();
this.locationHiddenField.Value = value;
}
}
protected override void OnInit(EventArgs e)
{
base.OnInit(e);
// This ensures that the child control receives its postback.
EnsureChildControls();
}
protected override void CreateChildControls()
{
base.CreateChildControls();
messageLabel = new Label();
this.Controls.Add(messageLabel);
locationHiddenField = new HiddenField();
this.Controls.Add(locationHiddenField);
}
protected override void OnPreRender(EventArgs e)
{
base.OnPreRender(e);
try
{
string applicationId = "";
SPWeb web = SPContext.Current.Site.RootWeb;
if (web.Properties.ContainsKey
(Constants.ApplicationIdPropertyKey))
{
applicationId =
web.Properties[Constants.ApplicationIdPropertyKey].ToString();
}
silverlightPlugin = new SilverlightPlugin();
silverlightPlugin.Source = SPContext.Current.Site.Url +
"/ClientBin/MapEditSL.xap";
silverlightPlugin.InitParameters = "locationControlId=" +
this.locationHiddenField.ClientID +
",applicationId=" + applicationId;
this.Controls.Add(silverlightPlugin);
}
catch (Exception ex)
{
messageLabel.Text = "Error launching location editor: " +
ex.Message;
locationHiddenField.Visible = true;
}
}
protected override void Render(HtmlTextWriter writer)
{
if (!errorSet)
{
writer.Write("<div style="width:400px; height:300px;">");
base.Render(writer);
writer.Write("</div>");
}
else
{
writer.Write(errorMessage);
}
}
}
Notice the calls to EnsureChildControls(); this is called to ensure that CreateChildControls() has been run and that the child controls are created and ready to go. When the SerializedMapLocation property is changed, the change is immediately written to the underlying hidden input control. To allow this, you need to call EnsureChildControls() from the property getter and setter so the hidden input control will always be there.
Over the next three sections, you complete the field control by filling in your own serializable class for holding a location, the strategy for storing the Bing Maps application ID, and the Silverlight applications to display and edit maps.
Serializing a Bing Maps Location
The SPTextField stores text, but this solution needs to store a location and not just any location, but a location for use with Bing Maps, which includes settings for the map viewer such as the zoom level and whether to show street or aerial maps. To easily do this, and do it in a way in which Silverlight as well as SharePoint can get at the data, you can use the DataContractJsonSerializer just as you did in Chapter 7. Please refer to that chapter for the details; this section focuses on the location data itself.
Listing 15.8 shows a portion of the BingMapsLocation class, omitting the Load() and Serialize() methods, which are the same as they were in Chapter 7.
Listing 15.8. BingMapsLocation Class
[DataContract]
public class BingMapsLocation
{
[DataMember]
public double Latitude { get; set; }
[DataMember]
public double Longitude { get; set; }
[DataMember]
public double Altitude { get; set; }
[DataMember]
public double ZoomLevel { get; set; }
[DataMember]
public MapMode Mode { get; set; }
[DataMember]
public string ErrorMessage { get; set; }
[DataMember]
public string StreetAddress { get; set; }
[DataMember]
public DateTime GeoCodeTime { get; set; }
[DataMember]
public bool IsValid { get; set; }
public enum MapMode { Road, Aerial }
public BingMapsLocation()
{
this.Latitude = 0.0;
this.Longitude = 0.0;
this.Altitude = 0.0;
this.ZoomLevel = 10.0;
this.Mode = MapMode.Road;
this.ErrorMessage = "Location not set";
this.StreetAddress = "";
this.IsValid = false;
}
The properties begin with the obvious latitude and longitude, as well as altitude, though that’s not currently used. Bing Maps allows zoom levels from 1 (the widest view) to 21 by default (this can vary based on location and is the most zoomed-in view). The object stores the zoom level and map mode, which can be set to show a road map or aerial view.
To allow more efficient geo-coding, you also store the most recently geo-coded address, the time, and any error that might have been returned when geo-coding. This allows the code to check to see if the same street address was already geo-coded, to avoid doing it again unnecessarily.
All the geo-coding is done on the Silverlight side, though it could be done on the server if that were needed for some reason. This is covered in the section Displaying and Editing Maps in Silverlight, next.
The other methods of the BingMapsLocation class allow a location to be transformed into a string using the Serialize() method and a string to be transformed into a location object using the Load() method. This is the same technique described in Chapter 7. Listing 15.9 shows how the Serialize() and Load() methods are used.
Listing 15.9. Using the Serialize() and Load() Methods
BingMapsLocation location = BingMapsLocation.Load(locationString);
// do something to the location
locationString = location.Serialze();
Getting Started with Bing Maps
Bing Maps provides a Silverlight control and SDK for rendering and interacting with maps and a set of web services for interacting with the Bing Maps service. For information and download instructions, see http://bit.ly/SPSL_BingMapsSLControl. You need to install the Silverlight control on your development machine and add references to Microsoft.Maps.MapControl.dll and Microsoft.Maps.MapControl.Common.
To use the Bing Maps control and web services, you need an application ID. This can easily be obtained at http://bit.ly/SPSL_BingMapsAppId, and in most cases there is no charge. (See terms of use for details.)
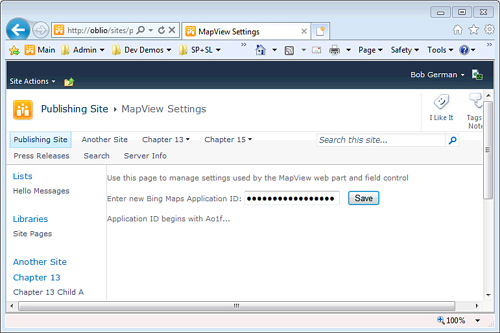
This application ID is needed in your Silverlight applications to access the Bing Maps service. It’s simple enough to pass it from SharePoint to Silverlight via using InitParams, but the question is where to store it in SharePoint. A Bing Maps web part might store the application ID in a web part setting, but this doesn’t help the field control, which might be used in any number of pages or list items and should only need to be set once. The solution is to store it in a SharePoint property bag and allow the user to set the property in Site Settings. Every SharePoint web and site contains a property bag that can store name-value pairs; the sample stores the application ID in the property bag of the top-level site of the site collection where it is installed.
If you install the sample code for this chapter, you should see a new link under Site Collection Administration, under Site Settings for the top-level site of your site collection. The link is called Chapter 15—MapView Settings and leads to the page shown in Figure 15.2.
Figure 15.2. Setting the Application ID
This is a SharePoint layouts page, as indicated by the fact that the URL contains the _layouts folder following the site URL. To add this to Visual Studio, right-click the SharePoint project and click Add; then on the fly-out menu, click SharePoint Layouts Mapped Folder. Visual Studio creates a folder in your project that is mapped to SharePoint’s TEMPLATELAYOUTS folder under the SharePoint root, so anything you place in the Visual Studio folder is deployed to TEMPLATELAYOUTS and is accessible under any SharePoint site’s _layouts folder. In this case, there is an ordinary folder called Chapter15—MapView within the Layouts folder to isolate our new page and avoid naming conflicts. Within that folder, right-click to add a new item and select a SharePoint 2010 Application Page. This puts an ordinary .aspx page in your project, which you can use however you wish.
The page in this case is called MapSettings.aspx, and contains a few simple ASP.NET controls to capture the application ID. The full page contains a number of directives and content placeholders so it will work within SharePoint’s master page system; these are created by Visual Studio for you, so all you need to do is fill in the “Main” placeholder as shown in Listing 15.10.
Listing 15.10. MapSettings.aspx Page to Save Application ID
<asp:Content ID="Main" ContentPlaceHolderID="PlaceHolderMain"
runat="server">
<br />
Use this page to manage settings used by the MapView web part and
field control<br />
<br />
Enter new Bing Maps Application ID:
<asp:TextBox ID="ApplicationIdTextBox" Text="" runat="server"
TextMode="Password" />
<asp:Button ID="SaveButton" runat="server" Text="Save"
OnClick="SaveButton_Click" /><br />
<br />
<asp:Label ID="MessageLabel" runat="server" Text=""
EnableViewState="false" />
</asp:Content>
Listing 15.11 shows the code-behind. It retrieves the application ID to show part of it to the user and updates the application ID if the user saves a new one.
Listing 15.11. Saving the Application ID in the Web Property Bag
public partial class MapSettings : LayoutsPageBase
{
protected void Page_Load(object sender, EventArgs e)
{
EnsureChildControls();
if (!IsPostBack)
{
SPWeb web = SPContext.Current.Site.RootWeb;
if (web.Properties.ContainsKey
(Constants.ApplicationIdPropertyKey))
{
string applicationId =
web.Properties[Constants.ApplicationIdPropertyKey].ToString();
ApplicationIdTextBox.Text = applicationId;
}
else
{
MessageLabel.Text = "No application ID is defined.";
}
}
}
protected void SaveButton_Click(object sender, EventArgs e)
{
SPContext.Current.Site.RootWeb.Properties
[Constants.ApplicationIdPropertyKey] =
ApplicationIdTextBox.Text;
SPContext.Current.Site.RootWeb.Properties.Update();
}
protected override void OnPreRender(EventArgs e)
{
base.OnPreRender(e);
if (ApplicationIdTextBox.Text.Length > 5)
{
MessageLabel.Text = "Application ID begins with " +
ApplicationIdTextBox.Text.Substring(0, 5) + "...";
}
else
{
MessageLabel.Text = "No application ID is defined.";
}
}
}
This allows the field control, or any of the server code, to easily retrieve the application ID from the site collection property bag.
Although this is enough to get the page working, you still need to add it to the Site Collection Administration page. This can be done by adding a custom action to an Elements.xml file in the project; in this case you add it to the Elements.xml file already under the ClientBin folder in the project, which is being used to deploy the .xap files. Listing 15.12 shows the complete Elements.xml file. As you can see, the <CustomAction> tag adds the action to site settings; any page can be linked to from settings (or other menus in SharePoint) using this tag.
Listing 15.12. Adding the Site Settings Page to Elements.xml
<?xml version="1.0" encoding="utf-8"?>
<Elements xmlns="http://schemas.microsoft.com/sharepoint/">
<Module Name="ClientBin">
<File Path="ClientBinMapViewSL.xap" Url="ClientBin/MapViewSL.xap" />
<File Path="ClientBinMapEditSL.xap" Url="ClientBin/MapEditSL.xap" />
</Module>
<CustomAction Id="MapView.SettingsAction"
GroupId="SiteCollectionAdmin"
Location="Microsoft.SharePoint.SiteSettings"
Sequence="1000"
Title="Chapter 17 - MapView Settings">
<UrlAction Url="_layouts/Chapter17-MapView/MapSettings.aspx"/>
</CustomAction>
</Elements>
Displaying and Editing Maps in Silverlight
The MapViewSL Silverlight application is responsible for displaying a mapped location, and it’s really pretty simple. First, in the Application_Startup() method under App.xaml.cs, you extract the InitParams containing all the information needed to render the map and pass them to the MainPage via its constructor. This is shown in Listing 15.13.
Listing 15.13. Application_Startup for the MapViewSL Application
private void Application_Startup(object sender, StartupEventArgs e)
{
double latitude = 0.0;
double longitude = 0.0;
double zoomLevel = 1.0;
string mode = "aerial";
string applicationId = "";
if (e.InitParams.ContainsKey("latitude") &&
e.InitParams.ContainsKey("longitude") &&
e.InitParams.ContainsKey("zoomlevel") &&
e.InitParams.ContainsKey("mode") &&
e.InitParams.ContainsKey("applicationid"))
{
Double.TryParse(e.InitParams["latitude"].ToString(),
out latitude);
Double.TryParse(e.InitParams["longitude"].ToString(),
out longitude);
Double.TryParse(e.InitParams["zoomlevel"].ToString(),
out zoomLevel);
mode = e.InitParams["mode"].ToLower();
applicationId = e.InitParams["applicationid"];
}
this.RootVisual = new MainPage(latitude, longitude, zoomLevel,
mode, applicationId);
}
The MainPage XAML is exceedingly simple, containing just the Bing Maps control as shown in Listing 15.14.
Listing 15.14. Main Page XAML for MapViewSL Application
<Grid x:Name="LayoutRoot" Background="White">
<m:Map x:Name="myMapControl" />
</Grid>
The code behind isn’t much more complex than that. The Bing Maps control makes it really easy, as shown in Listing 15.15.
Listing 15.15. Main Page Code for MapViewSL Application
public MainPage(double latitude, double longitude,
double zoomLevel, string mode, string applicationId)
{
InitializeComponent();
myMapControl.CredentialsProvider =
new ApplicationIdCredentialsProvider(applicationId);
if (mode == "aerial")
{
myMapControl.Mode = new AerialMode(true);
}
else
{
myMapControl.Mode = new RoadMode();
}
myMapControl.SetView(new Location(latitude, longitude), zoomLevel);
Pushpin p = new Pushpin();
p.Location = new Location(latitude, longitude);
myMapControl.Children.Add(p);
}
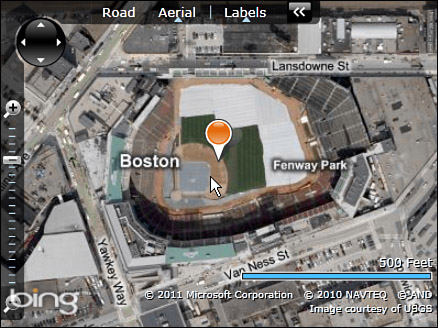
When rendered, the map display looks like the image in Figure 15.3, shown here with an aerial view of Boston’s historic Fenway Park. As you can see, the map is centered on the chosen location, which is also marked with a pushpin.
Figure 15.3. MapViewSL display
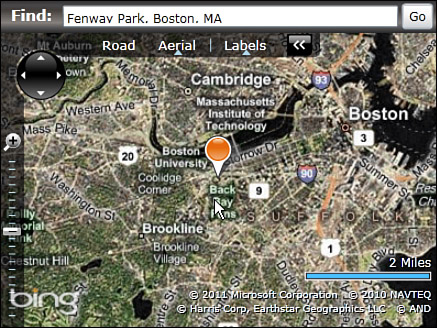
The MapEditorSL application is more interesting. Figure 15.4 shows the user interface. A text box and button have been added to allow geo-coding, and the map can also be moved using the mouse and zoom control to refine the location.
Figure 15.4. Geocoding with the MapEditSL application
The Application_Startup method is simpler in this case, in that it passes in the application ID (of course) and the client ID of a hidden input field containing the serialized location. This allows you to push a new location into the hidden field so it is posted back to the host along with the rest of the New or Edit form.
Listing 15.16 shows the MapEditSL Main Page XAML. Notice that in addition to adding a text box and button for geo-coding, the map control now has event handlers for MouseClick and ViewChangeOnFrame. These fire when the user clicks the mouse or changes the view frame, such as zooming or changing from road to aerial view. Note that clicking the view frame centers the view and the pushpin on the location clicked.
<Grid x:Name="LayoutRoot" Background="White">
<Grid.RowDefinitions>
<RowDefinition Height="30"/>
<RowDefinition/>
</Grid.RowDefinitions>
<Grid>
<Grid.Background>
<LinearGradientBrush EndPoint="0.5,1" StartPoint="0.5,0">
<GradientStop Color="#D80C0B0B" Offset="0"/>
<GradientStop Color="#D8000000" Offset="1"/>
<GradientStop Color="#D8726666" Offset="0.689"/>
<GradientStop Color="#FF453C3C" Offset="0.307"/>
<GradientStop Color="#D82B2626" Offset="0.164"/>
</LinearGradientBrush>
</Grid.Background>
<Grid.ColumnDefinitions>
<ColumnDefinition Width="0.132*"/>
<ColumnDefinition Width="0.781*"/>
<ColumnDefinition Width="0.087*"/>
</Grid.ColumnDefinitions>
<TextBlock d:LayoutOverrides="Height" Text="Find:" Margin="10,5,0,0"
FontSize="13.333" FontWeight="Bold" Foreground="White" />
<TextBox x:Name="StreetAddressTextBox" Margin="5,5,0,5"
d:LayoutOverrides="Height" Grid.Column="1" />
<Button Content="Go" Click="Button_Click" d:LayoutOverrides="Height"
Grid.Column="2" Margin="3" />
</Grid>
<m:Map x:Name="myMapControl" MouseClick="myMapControl_MouseClick"
ViewChangeOnFrame="myMapControl_ViewChangeOnFrame" Margin="0"
Grid.Row="1" />
</Grid>
Listing 15.17 shows the MainPage constructor. It uses the same technique shown in Chapter 10 to read the location from the hidden input field using the HTML Bridge. If the field contains a valid location, it’s loaded into a new BingMapsLocation object; if not, you make a new BingMapsLocation object (which points to a location with latitude and longitude of zero). Then the location is mapped using much the same code you saw in the MapViewSL application.
Listing 15.17. MainPage Constructor for MapEditSL Application
string locationControlId;
BingMapsLocation location;
string applicationId;
Pushpin currentLocationPushpin = new Pushpin();
public MainPage(string locationControlId, string applicationId)
{
InitializeComponent();
// Save away the location control and Bing Maps application ID
this.locationControlId = locationControlId;
this.applicationId = applicationId;
// Get credentials provider for this app ID
myMapControl.CredentialsProvider =
new ApplicationIdCredentialsProvider(this.applicationId);
// Get the location from the location control
HtmlDocument doc = HtmlPage.Document;
HtmlElement hiddenField = doc.GetElementById(locationControlId);
if (hiddenField.GetAttribute("value") == null)
{
// If no location is provided, make a new one
this.location = new BingMapsLocation();
}
else
{
// If we have a location, load it as a BingMapsLocation object
string locationString =
hiddenField.GetAttribute("value").ToString();
this.location = BingMapsLocation.Load(locationString);
StreetAddressTextBox.Text = this.location.StreetAddress;
// Point map to the location, and set the mode (road vs. aerial)
myMapControl.SetView(new Location(this.location.Latitude,
this.location.Longitude), this.location.ZoomLevel);
if (this.location.Mode == BingMapsLocation.MapMode.Road)
{
myMapControl.Mode = new RoadMode();
}
else
{
myMapControl.Mode = new AerialMode(true);
}
}
// Now set a pushpin on the location
currentLocationPushpin.Location =
new Location(this.location.Latitude, this.location.Longitude);
myMapControl.Children.Add(currentLocationPushpin);
}
Things start to get interesting in the event handlers. The MouseClick event fires when the user clicks on the map. It centers the map and pushpin on the point where he clicked. Listing 15.18 shows the code. Note that the Location object class is part of the Bing Maps SDK, but this.location refers to your own BingMapsLocation field.
Listing 15.18. MouseClick Event Handler
private void myMapControl_MouseClick(object sender, MapMouseEventArgs e)
{
// User clicked on the map, center on the clicked location
Location l = myMapControl.ViewportPointToLocation(e.ViewportPoint);
myMapControl.SetView(l, this.location.ZoomLevel);
currentLocationPushpin.Location = l;
StreetAddressTextBox.Text = "";
// Now remember the location and update the location control so it
// will get posted back
this.location.StreetAddress = "";
this.location.Latitude = l.Latitude;
this.location.Longitude = l.Longitude;
this.location.Altitude = l.Altitude;
this.location.IsValid = true;
UpdateLocationField();
}
private void UpdateLocationField()
{
// Now push back to the host!
string locationString = this.location.Serialize();
HtmlDocument doc = HtmlPage.Document;
HtmlElement hiddenField = doc.GetElementById(locationControlId);
hiddenField.SetAttribute("value", locationString);
}
The UpdateLocationField() method is used to update the hidden field when the user makes other changes. For example, Listing 15.19 shows the ViewChangedOnFrame event handler, which saves changes to the display mode and zoom level.
Listing 15.19. ViewChangedOnFrame Event Handler
private void myMapControl_ViewChangeOnFrame
(object sender, MapEventArgs e)
{
// User changed mode or zoom level, so save it in the location and
// update the location control so it will get posted back
this.location.ZoomLevel = myMapControl.ZoomLevel;
if (myMapControl.Mode is AerialMode)
{
this.location.Mode = BingMapsLocation.MapMode.Aerial;
}
else
{
this.location.Mode = BingMapsLocation.MapMode.Road;
}
UpdateLocationField();
}
When the user clicks the button, the address in the text box is geo-coded. This is shown in Listing 15.20. For development purposes, you need to add a reference to the staging environment in Bing Maps at http://staging.dev.virtualearth.net/webservices/v1/metadata/geocodeservice/geocodeservice.wsdl. Call the service GeoCodeService.
Notice that the code checks to see if the street address in the BingMapsLocation is the same as the one being geo-coded so it can skip the web services call if it’s the same location again. The geo-code service allows setting of a confidence filter; this code is optimistic and uses a low-confidence filter, which is likely to return results more often, even if they’re not as sure to be accurate.
Listing 15.20. Geo-Coding with Bing Maps
private void Button_Click(object sender, RoutedEventArgs e)
{
// User clicked the button, so geocode the address they typed
GeoCode(this.StreetAddressTextBox.Text, applicationId);
}
// Return true if a new location will be loaded
private bool GeoCode(string streetAddress, string applicationId)
{
if (streetAddress == this.location.StreetAddress)
{
// Location did not change
return false;
}
// OK we're going to try to look up the address
// No matter what we'll want to indicate to our caller that the
// location has changed. Mark the location as not valid until we
// get a new geocode
bool locationWillChange = true;
this.location.StreetAddress = streetAddress;
this.location.IsValid = false;
try
{
BasicHttpBinding binding = new BasicHttpBinding();
EndpointAddress endpoint = new EndpointAddress
("http://dev.virtualearth.net/webservices/v1/GeocodeService/GeocodeService.svc");
GeocodeService.GeocodeRequest request =
new GeocodeService.GeocodeRequest();
request.Query = location.StreetAddress;
request.Options = new GeocodeService.GeocodeOptions();
request.Options.Filters =
new ObservableCollection<GeocodeService.FilterBase>();
GeocodeService.ConfidenceFilter filter =
new GeocodeService.ConfidenceFilter();
filter.MinimumConfidence = GeocodeService.Confidence.Low;
request.Options.Filters.Add(filter);
request.Credentials =
new Microsoft.Maps.MapControl.Credentials();
request.Credentials.ApplicationId = applicationId;
GeocodeService.GeocodeServiceClient client =
new GeocodeService.GeocodeServiceClient(binding, endpoint);
client.GeocodeCompleted += new
EventHandler<GeocodeService.GeocodeCompletedEventArgs>
(client_GeocodeCompleted);
client.GeocodeAsync(request);
}
catch (Exception ex)
{
this.location.ErrorMessage = ex.Message;
this.location.IsValid = false;
};
return (locationWillChange);
}
void client_GeocodeCompleted(object sender,
GeocodeService.GeocodeCompletedEventArgs e)
{
if (e.Result.ResponseSummary.StatusCode ==
GeocodeService.ResponseStatusCode.Success)
{
if (e.Result.Results.Count > 0)
{
GeocodeService.GeocodeResult result = e.Result.Results[0];
this.location.Latitude = result.Locations[0].Latitude;
this.location.Longitude = result.Locations[0].Longitude;
this.location.Altitude = result.Locations[0].Altitude;
this.location.ErrorMessage = "";
this.location.GeoCodeTime = DateTime.Now;
this.location.IsValid = true;
myMapControl.SetView(
new Location(this.location.Latitude,
this.location.Longitude), 10);
currentLocationPushpin.Location =
new Location(this.location.Latitude,
this.location.Longitude);
UpdateLocationField();
}
else
{
this.location.ErrorMessage = "Address not found";
this.location.IsValid = false;
}
}
else
{
this.location.ErrorMessage = e.Error.Message;
this.location.IsValid = false;
}
}
You might be pleased to find that the geo-coding feature is very flexible and can find landmarks as well as street addresses. Try looking for “Statue of Liberty,” “Pyramids at Giza,” or “Hollywood Sign.”
Using the Location Field
If you stopped at this point, you should be able to deploy the solution as it is and add one or more Bing Maps Location fields to any list in SharePoint. For example, Figure 15.5 shows how to add a location to a contacts list, allowing you to show a map for each contact in the list.
Figure 15.5. Adding a location field to a contacts list
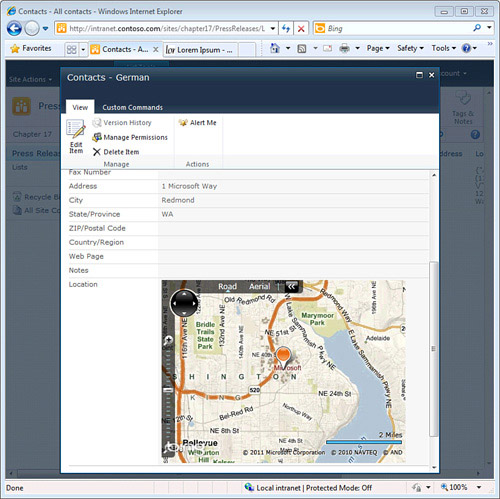
The user can find addresses and landmarks, fine-tune the location by clicking, and adjust the view by zooming and selecting road or aerial rendering. If he clicks Save, then the map is saved right in the contact list item. Figure 15.7 shows a view of the map in a contact. Note that the map has no relation to the Address and City fields in the contact, but to the map location selected when the contact is edited.
Once the new Location column is added, we can simply edit any contact in the list to edit its map view and location, as shown in Figure 15.6.
Figure 15.6. Editing a location field in a SharePoint contacts list
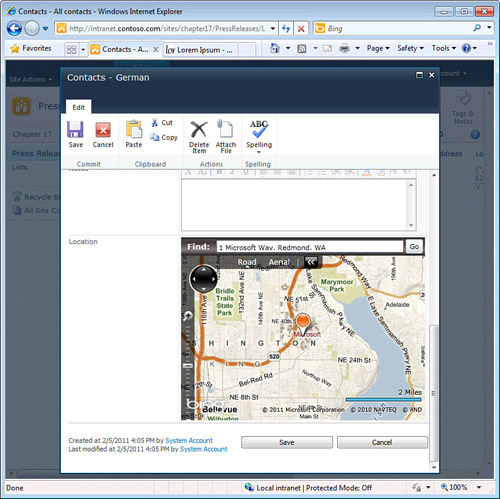
Figure 15.7. Viewing the location of a contact
This is pretty cool on its own because now you can geo-code anything in SharePoint by simply adding a Bing Maps Location field to a list or library. To take it to the next step, you connect it with SharePoint’s web publishing system to allow maps to be first-class fields on pages, with a full editing workflow, page versioning and approval and all the other Web Content Management features in SharePoint.
Field Controls and Publishing Sites
When publishing a web site, different people have different responsibilities that extend to each web page. For example, a marketing specialist chooses the site branding and works with graphic artists and web developers to implement the brand and basic page structure. An information architect can determine the navigation structure and the fields that appear on different page layouts. And authors and editors can directly edit page content and manage media files and other site content.
SharePoint Server 2010 solves these problems by adding publishing sites to the more basic sites provided in SharePoint Foundation. To make use of them, it’s best to create a site collection with the “Publishing Portal” template. This sets up your site collection to host pages in /Pages libraries, with editable fields and page navigation.
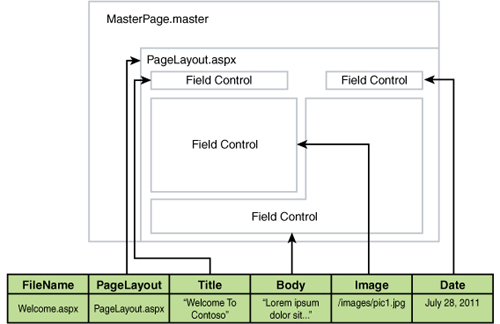
Figure 15.8 shows the rendering of a page in a SharePoint publishing site. The master page provides the basic page structure and branding, and the page layout places field controls on the page. This provides a consistent structure for, say, a news article or a catalog listing. Each field control renders and edits a field in the Pages library. For example, the Title field in the Pages Library is rendered by a text field control. This allows the Pages library to manage page content with all the features of any SharePoint library: versioning, approval, workflow, and so on.
Figure 15.8. Rendering a SharePoint publishing page
When someone requests a publishing page, such as http://myserver/Pages/Article123.aspx, SharePoint reads the Pages library and obtains its page layout, which is a special field indicating the .aspx page that renders the page. This is a real .aspx page in SharePoint’s content system, in the Master Page Gallery. SharePoint renders the page layout using the currently selected master page. The field controls then show each field, including, soon, your map field. This is shown in more detail in Figure 15.9.
Figure 15.9. Content flow in a SharePoint publishing page
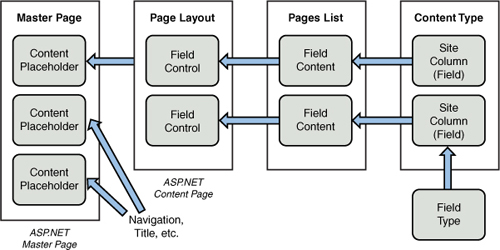
Looking at Figure 15.9, begin in the lower right corner, with your field type. The field type can be used to instantiate one or more site columns. Site columns are called fields in the SharePoint object model. Content types, oddly named consistently between the programming and user interfaces, organize the site columns into reusable sets. A Pages list supports the Page content type and can hold any other content types derived from Page. In this case the derived content type includes a location site column.
To render the new page content type, you need to associate one or more page layouts with it. The page layout contains the actual field controls to render and edit content, and it binds the field controls to the page’s underlying fields. The page layout itself shows through a Content Placeholder in the master page, generally the largest one on the page. Other Content Placeholders might display the title, navigation, and other page features that are part of SharePoint or the branding treatment.
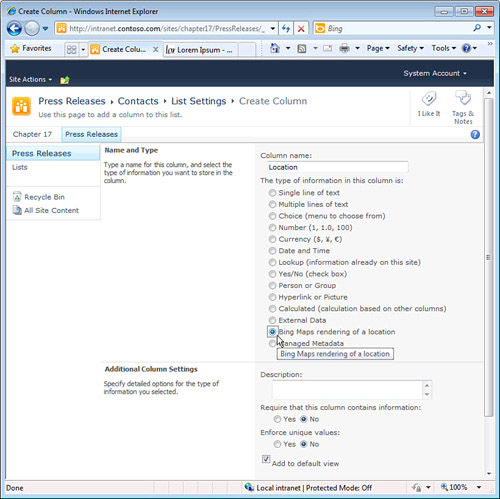
Defining a Bing Maps Column and Content Type
Columns (or fields) can exist at multiple levels in SharePoint. A column can be added to a list, or a site column can be defined. To view site columns, go to Site Settings and select Site Columns under the Galleries heading. If a site column is defined in the top-level site of a site collection, it can be used in lists and libraries throughout the site collection.
Site columns allow SharePoint to match a column across lists or content types—for example, a shoe size and a temperature might both be numbers in SharePoint, but when they’re called “shoe size” or “temperature” they are created as columns either in the list or as a site column.
In similar fashion, content types can exist in lists, or in the Site Content Types Gallery at the site or site collection level. Content types define, well, types of content, such as tasks, contacts, documents, or pages. Each content type contains a set of site columns and can inherit from other content types; for example an Article Page (a web page intended for a news article) is derived from the Page content type.
Tip
Content types are normally limited to a single site collection, but they can be distributed to many site collections using the Content Type Hub in the SharePoint Managed Metadata Service. For more information, see http://bit.ly/SPSL_CTHub.
In this section, you learn how to create a site column for the location field type and an Article Page with Layout content type that’s derived from Article Page.
An easy way to create the site column would be to go to the Site Columns Gallery and create the column directly. If your field type is defined and working, that will get you going. However, it’s not packaged, and the site column needs to be manually created, which throws a wrench into the ability to test and deploy the solution. The same is true for the content type.
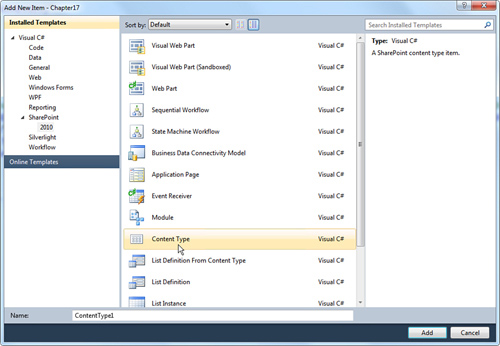
To create the site column and content type in Visual Studio and include them in your solution, begin by right-clicking the SharePoint project and adding a new item; select Content Type under the SharePoint 2010 templates as shown in Figure 15.10.
Figure 15.10. Creating a content type in Visual Studio
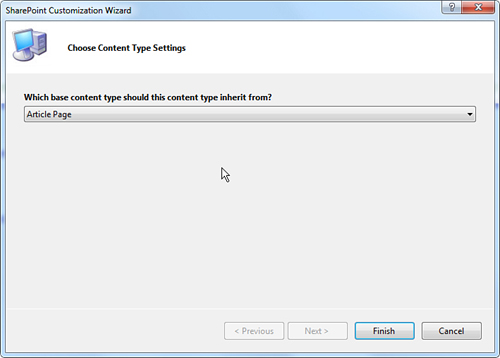
You now have an opportunity to choose the Parent content type, as shown in Figure 15.11.
Figure 15.11. Choosing the Parent content type
You are rewarded with an elements.xml file containing a new content type with the trickiest part, the long compound ID, all figured out for you. Content type IDs are concatenations of GUIDs, with each derived content type adding its GUID to the end. Just ensure that the Parent content type is available wherever you deploy the solution.
It is necessary to manually edit the XML to declare the site column and a reference to it in the content type. Listing 15.21 shows the complete Elements.xml file, which is included in the solution download in the Chapter15 project under MapLocationField.
Listing 15.21. Declaring a Site Column and Content Type
<?xml version="1.0" encoding="utf-8"?>
<Elements xmlns="http://schemas.microsoft.com/sharepoint/">
<Field ID="{12595A28-9364-465E-AB07-2A2B6BAD91E9}"
Name="MapLocation"
DisplayName="Map Location"
Type="MapViewField"
Required="FALSE"
Group="Custom Columns"
/>
<!-- Parent ContentType: Article Page (0x010100...) -->
<ContentType ID="0x010100..."
Name="Article Page with Map"
Group="Page Layout Content Types"
Description="Chapter 17 - Article content type with map"
Inherits="TRUE"
Version="0">
<FieldRefs>
<FieldRef DisplayName="Map Location"
Name="MapLocation"
ID="{12595A28-9364-465E-AB07-2A2B6BAD91E9}" />
</FieldRefs>
</ContentType>
</Elements>
You need to generate a new GUID for your field ID and reference the same GUID in the field reference in the content type. This is easily done in Visual Studio by selecting Create GUID on the Tools menu and pasting the GUID into your XML file.
The full schema reference for Elements.xml is available at http://bit.ly/SPSL_ElementsSchema.
Defining a Page Layout
The easiest way by far to create a page layout in SharePoint is to use SharePoint designer. The Article Page with Map page layout that’s included in the code download was made by editing the ArticleRight.aspx page layout that’s included with SharePoint.
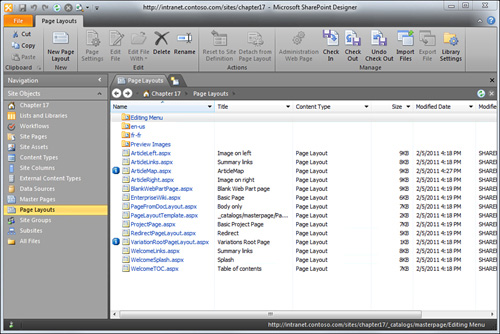
To do this yourself, begin by downloading and installing SharePoint Designer from http://bit.ly/SPSL_DownloadSPD2010. Start SharePoint Designer and open your development site; then click the Page Layouts link on the left. You see all the page layouts in the site, as shown in Figure 15.12. Right-click the page layout you wish to copy and copy it, paste it, and rename it to your liking.
Figure 15.12. Opening a Page Layout in SharePoint Designer
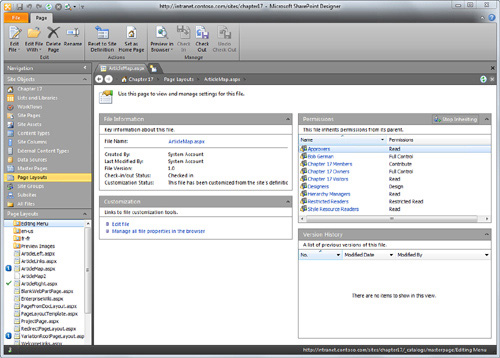
Now click your new page layout to open its Settings page, as shown in Figure 15.13.
Figure 15.13. The Page Layouts Settings page in SharePoint Designer
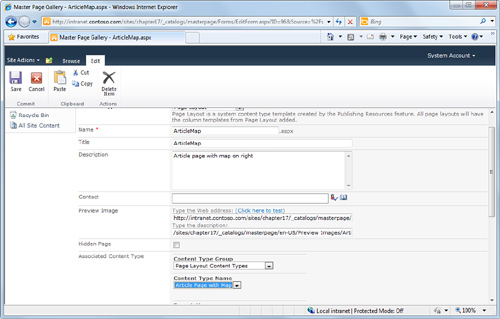
On the settings page, under Customization, click Manage All File Properties in the Browser, and the browser opens, allowing you to view the properties of the page layout in its gallery. Click Edit Item and change the Associated Content Type to your new content type, as shown in Figure 15.14.
Figure 15.14. Changing the Associated Content Type of a Page Layout
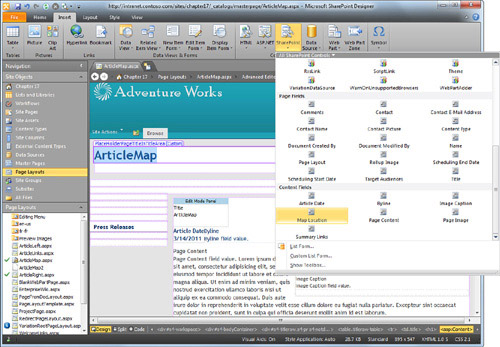
Save your changes and close the web browser, returning to SharePoint Designer. Now click Edit File to edit the page layout’s markup, and add the map field control. You might be prompted to edit in Advanced Mode; go ahead and do this.
When the page is open, you can choose to edit it in Design or Code mode, or a split view. When you’re ready to place your new field on the page layout, click the Insert tab and open the SharePoint drop-down on the Ribbon. It might take a while for all the choices to populate; when they do, scroll down, and at the bottom you can see all the available fields on the page based on the associated content type, as shown in Figure 15.15. Select the Map Location field and drag it onto the page.
Figure 15.15. Adding a field to a Page Layout in SharePoint Designer
At this point, you could check in and approve your page layout, but only on your development web site. Indeed, it’s a good idea to test the page layout and adjust the details while it’s in SharePoint Designer. However, to package the page layout for deployment along with the new field control, you need to bring it into our Visual Studio project.
This is a simple matter of copy and paste. In SharePoint Designer, click the Code tab to display all the markup for the page layout. Select all of it and copy it to the clipboard.
Next, return to Visual Studio and create a new module called MasterPage. Even though SharePoint Designer gives the illusion of a separate library for page layouts, they live in the Master Page Gallery along with the master pages. Inside the module, create a new item and add a Code File item with the filename of your page layout, in this case, ArticleMap.aspx. Simply paste the markup into this file.
Even though Visual Studio created an Elements.xml file for you, you need to add some properties to correctly mark the file as a page layout and to mark its associated content type. Listing 15.22 shows the Elements.xml file.
Listing 15.22. Elements.xml for a Page Layout
<?xml version="1.0" encoding="utf-8"?>
<Elements xmlns="http://schemas.microsoft.com/sharepoint/">
<Module Name="MasterPage" Url="_catalogs/masterPage">
<File Path="MasterPageArticleMap.aspx" Url="ArticleMap.aspx"
Type="GhostableInLibrary">
<Property Name="Title" Value="ArticleMap"/>
<Property Name="MasterPageDescription" Value="Article page with map on
right"/>
<Property Name="ContentType"
Value ="$Resources:cmscore,contenttype_pagelayout_name;"/>
<Property Name="PublishingAssociatedContentType" Value=";#Article Page
with
Map;#0x010100C568DB52D9D0A14D9B2FDCC96666E9F2007948130EC3DB064584E219954237AF39
00242457EFB8B24247815D688C526CD44D0052bc7cfd01064eb996b3225d0963bf69;#" />
<Property Name="PublishingPreviewImage"
Value="~SiteCollection/_catalogs/masterpage/$Resources:core,Culture;/Preview
Images/ArticleLeft.png,
~SiteCollection/_catalogs/masterpage/$Resources:core,Culture;/Preview
Images/ArticleLeft.png"/>
</File>
</Module>
</Elements>
Notice that the file is marked as GhostableInLibrary; this indicates that it is an item in a SharePoint library that can be further edited and versioned, which is exactly the case for the Master Page Gallery. In addition, a ContentType property is provided for the page layout itself; for this you can use a $Resources token, which Visual Studio converts into the content type for a page layout. The associated content type in the PublishingAssociated ContentType property must be specified in full; this contains the long compound GUID from the content type’s Elements.xml file. You can also optionally provide a preview image to display to users when they are selecting a page layout.
Using the Location Field in a Publishing Site
At this point the solution contains everything that’s needed to publish web pages including maps. The field type knows how to represent a map location as a data type in SharePoint, and the field control knows how to render and edit the maps using Silverlight. An instance of the field and a content type are provided for use in page authoring, as is a page layout to hold it all. You can now begin to create web pages with map fields.
To do this, go to your publishing site and, on the Site Actions menu, select New Page. Give the page a name and click Create. You get the default page layout; to change it, click the Page tab, open the Page Layout drop-down, and select your new page layout as shown in Figure 15.16.
Figure 15.16. Using the New Page Layout

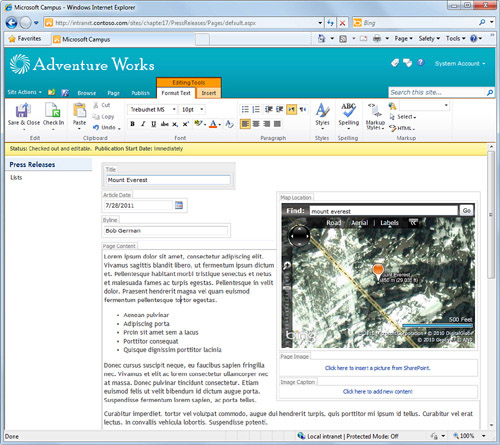
The editing experience is much as it was when the field was in a contacts list, except now it’s on a publishing page surrounded with other fields and is part of a rich web site editing experience, as shown in Figure 15.17. The map will be approved and versioned along with all the other fields on the page, providing a consistent editing and publishing experience.
Figure 15.17. Editing the Page with Map
Summary
This chapter demonstrates a number of key concepts that allow you to make powerful changes in SharePoint. It shows you how to add new kinds of data, to display them in any list, and then how to integrate them into the SharePoint web publishing system. The map could as easily be a stock ticker, a molecule, or a musical chord. With the ability to create new field types, you can add almost anything to SharePoint’s content system.