
13. Creating Silverlight Navigation
SHAREPOINT 2010 INCLUDES A BUILT-IN NAVIGATION SYSTEM that greatly simplifies managing SharePoint site collections and sites. In this chapter you learn how SharePoint navigation works, how to change the links rendered by navigation, and most importantly, how to use Silverlight to render the navigation for end users.
Out-of-the-Box Navigation
First of all, it’s important to note that although SharePoint generates navigation dynamically based on sites, lists, and pages, it always does this within a single site collection. Navigation outside of a site collection must be configured manually by adding links to the navigation structure or by building a custom site map provider, as explained in the next section.
There are many kinds of sites available in SharePoint, and they often handle navigation in unique ways. The commonly used site definition is a “Team Site” that is designed for general collaboration; it is provided in all the SharePoint products including SharePoint Foundation 2010. This chapter refers to team site as a general category of site that includes the supplied Team Site as well as other sites derived from the same site definition. Examples of this are a blank site or a user’s personal My Site.
In contrast to team sites, there are specialized publishing sites based on the Publishing Portal site definition provided in SharePoint Server 2010 (standard or enterprise edition). Publishing sites are intended for web publishing and include a number of extra features for managing, approving, and summarizing web content in a publishing scenario. Where a team site is intended for many-to-many collaboration, a publishing site is optimized for few-to-many web publishing.
The distinction between team and publishing sites is important in this chapter because they each handle navigation slightly differently.
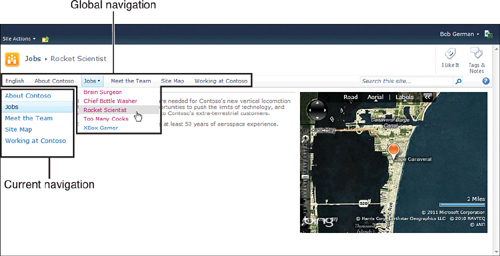
Figure 13.1 shows standard Team Site navigation. Notice that navigation is shown in two areas of the page. Global navigation is shown at the top of the page, and by default it shows the current site and its children. It might inherit global navigation from its parent, so it shows a higher-level site and its children. For example, if a child site inherits its parent’s global navigation, it shows the parent site and its peers, thus providing general navigation among this group of sites.
Figure 13.1. Navigation in a SharePoint 2010 Team Site
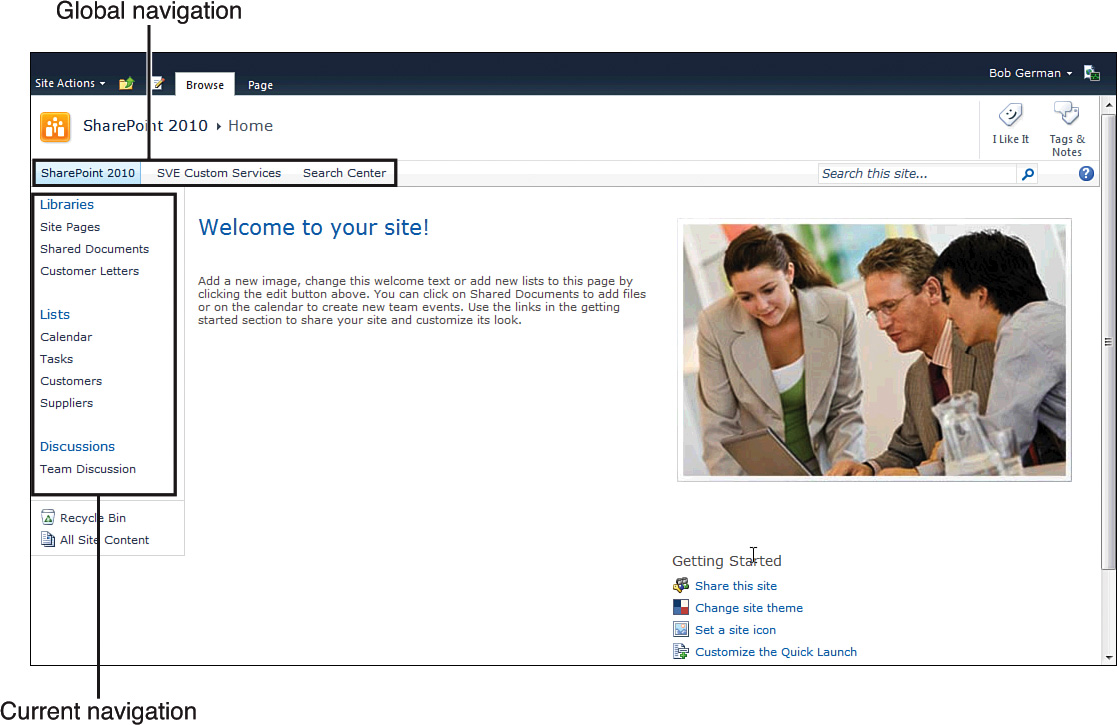
In the case of a team site, current navigation shows the lists and libraries in the site. This is also called the Quick Launch bar, and each list or library can be shown or hidden in current navigation by changing the Display This List on the Quick Launch option in list settings under the Title, Description, and Icon link.
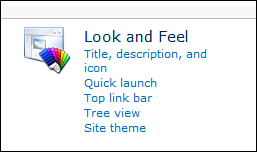
Team Site settings include a section to control Look and Feel, as shown in Figure 13.2. Three of the settings control navigation.
Figure 13.2. Team Site Look and Feel settings
The Top Link Bar link leads to an administrative screen to manage the navigation bar at the top of every SharePoint page, as shown in Figure 13.3.
Figure 13.3. Top navigation settings in a SharePoint Team Site
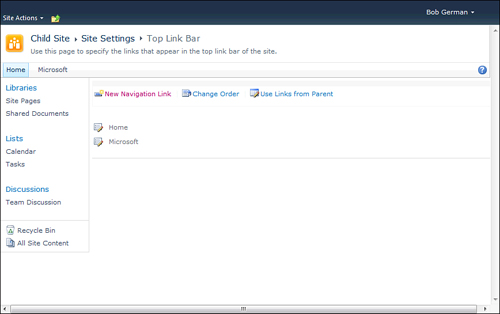
SharePoint automatically generates top navigation links for Home (the current site, or its answer if Use Links from Parent is enabled) and its child sites. Administrators can add, edit, and rearrange the links and delete them as well under the edit icon to the left of each link on the navigation settings.
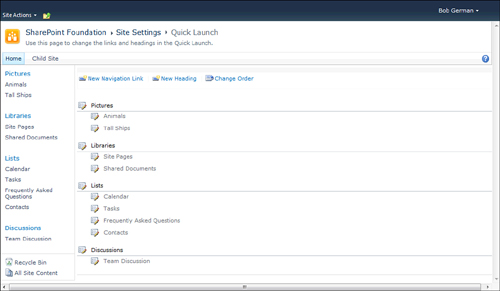
Quick Launch navigation, normally shown on the left side, shows the lists and libraries in the current site. There is no option to inherit links from a parent site; this restriction is removed with publishing sites. The lists and libraries are presented with headings such as Libraries, Lists, and Discussions, and these headings can be edited along with the links using the Quick Launch settings as shown in Figure 13.4.
Figure 13.4. Quick Launch settings in a SharePoint Team Site
The Quick Launch bar can be replaced with a Tree View showing the lists and libraries of the current site using the Tree View settings page. Without programming, the Team Site is only capable of automatically generating navigation for one site and its children (in the top navigation) and the current site’s lists and libraries (in Quick Launch or the Tree View).
Publishing sites are considerably more flexible. In a publishing site, both the top and side navigation are hierarchical, with the potential to show multiple site levels. Figure 13.5 shows a publishing site with its navigation. The “top” navigation in publishing sites is called global navigation. In this case, global navigation shows the parent site called English and its immediate children, based on the current site inheriting its global navigation from its parent. Pages and child sites within each of these sites appear in a drop-down menu. On the side of the site, we see current navigation, which shows the children of the parent, again because inheritance is enabled.
Figure 13.5. Navigation in a SharePoint 2010 publishing site
There are fewer Look and Feel options in publishing sites, as seen in Figure 13.6; however visiting the Navigation page, shown in Figure 13.7, reveals a much more extensive group of settings for both global and current navigation.
Figure 13.6. Team Site Look and Feel settings
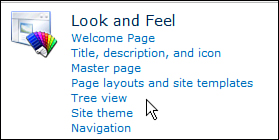
Figure 13.7. Navigation settings in a SharePoint publishing site
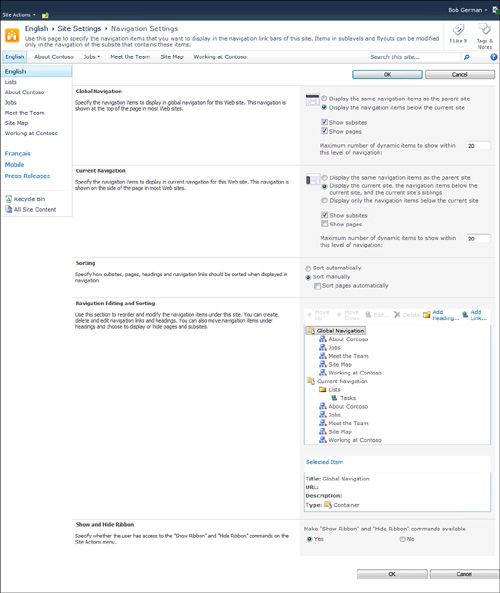
Notice that global and current navigation can be controlled independently, and each can be set to inherit navigation items from the parent site. Each can also be set to show child sites, publishing pages, or both, and if they are selected, then child sites and pages are automatically added to the navigation hierarchy.
Both global and current navigation can be edited using a browser-based editor. The editor allows hiding the automatically created child site and publishing page links and also allows the manual creation of new links.
The more advanced navigation in a publishing site makes it much easier to organize information in a potentially large collection of sites.
Site Map Providers
Whatever you do, don’t go building a new navigation system based on the SharePoint API. It might seem tempting to remove the out-of-the-box navigation controls from your master page and replace them with web controls that build a navigation structure using SharePoint API calls. It turns out that SharePoint’s built-in navigation is orders of magnitude faster than the server APIs. It’s worth paying attention to that overhead given that navigation is rendered multiple times on every SharePoint page for navigation controls including bread crumbs. The overhead from the client APIs would be even higher because they use the server APIs under the covers and also have to marshal requests over the network.
At this point you might think, “I’ll outsmart him, I’ll just cache the navigation structure and more than compensate for the performance difference!” This might be OK, as long as you take SharePoint’s built-in security trimming system into account. Security trimming means that when any navigation is rendered in SharePoint, users can only see things they have permission to access. Thus, the navigation complies with SharePoint’s built-in security system, and users don’t discover things they shouldn’t. Because the SharePoint APIs also respect security trimming, custom navigation controls based on the APIs would be security trimmed, but the cache would need to have a copy of the site hierarchy for each user to account for their potentially unique security access.
The beauty of SharePoint’s navigation system is it caches the navigation structure and enough access control information to dynamically security trim the navigation hierarchy each user sees. End users expect this to work. There are many ways to gain (or deny) access to an item in SharePoint, so it’s best to let SharePoint implement this for consistent access control.
SharePoint didn’t invent its own navigation system from scratch; instead it built on the system already in ASP.NET, which defines a provider model for navigation. In this model, site map providers provide a hierarchy of site map nodes that represent some navigation structure. Data source objects consume the site map, and navigation controls bind to them and render the user interface.
This provider model allows navigation controls and site map providers to be interchanged for greater flexibility and code reuse. In the next section you learn how to create your own site map provider that can be consumed by SharePoint’s out-of-the-box navigation system.
SharePoint provides a site map provider class called PortalSiteMapProvider for publishing sites; team sites are similar, except that they offer an SPContentMapProvider instead. Both inherit from ASP.NET’s System.Web.SiteMapProvider class, and both provide a hierarchy of SiteMapNode objects that represent a site’s navigation. Figure 13.8 shows the site map providers used in a SharePoint publishing site.
Figure 13.8. Site map provider hierarchy in publishing site

Site map providers can be stacked on top of one another, with one site map provider consuming the hierarchy from another and providing an altered site map to its consumers. SharePoint publishing sites do just this, as shown in Figure 13.8.
The PortalSiteMapProvider provides the site hierarchy as it currently exists, with security trimming applied. CombinedNavSiteMapProvider objects consume this hierarchy and alter it to create the Global and Current site maps and to account for editing performed in the site settings. Data source objects on the master page consume the CombinedNavSiteMapProviders and are bound to the navigation controls we see in the SharePoint user interface.
SharePoint’s built-in navigation controls, by the way, are very flexible and can be greatly customized by setting properties and using cascading style sheets.
Building a Site Map Provider
The navigation editor in Site Settings is nice, but it’s no way to manage navigation across a large site collection. If you want to control SharePoint’s navigation structure, the trick is to write your own site map provider that consumes one of the site map providers that ships with SharePoint, and then alter the structure before handing it on. Some potential uses include
• Adding or hiding links to aid navigation or enforce policy
• Stitching together multiple sites or site collections
• Adding links for business entities obtained from a database
Just remember to consider securely caching any external data you want to add.
Tip
The sample code for this chapter is for a publishing site. To use it, you need SharePoint Server 2010, Standard or Enterprise edition. Be sure you create your test site using the Publishing Portal template. SharePoint Foundation 2010 does not support publishing sites.
Writing a site map provider is as easy as inheriting from one, such as PortalSiteMapProvider, and overriding its GetChildNodes method. Listing 13.1 shows a simple site map provider that adds a new heading called Sample and links to the Microsoft Technology Center and SharePoint web sites.
Listing 13.1. Custom Navigation Provider
public class NavigationProvider : PortalSiteMapProvider
{
public override SiteMapNodeCollection
GetChildNodes(System.Web.SiteMapNode node)
{
if (node is PortalSiteMapNode &&
(node == this.RootNode || node.Title == "English"))
{
PortalSiteMapNode portalNode = node as PortalSiteMapNode;
SiteMapNodeCollection nodeCollection =
base.GetChildNodes(portalNode);
PortalSiteMapNode childNode = new
PortalSiteMapNode(portalNode.WebNode,
"Sample", NodeTypes.Heading,
"http://www.microsoft.com/", "Sample",
"Sample Links for You");
nodeCollection.Add(childNode);
childNode.ChildNodes = new SiteMapNodeCollection();
PortalSiteMapNode grandchildNode = new
PortalSiteMapNode(portalNode.WebNode,
"MTC", NodeTypes.AuthoredLink,
"http://www.microsoft.com/MTC/", "MTC",
"Microsoft Technology Centers");
childNode.ChildNodes.Add(grandchildNode);
grandchildNode = new
PortalSiteMapNode(portalNode.WebNode,
"SharePoint", NodeTypes.AuthoredLink,
"http://www.microsoft.com/sharepoint/", "SharePoint",
"SharePoint Product Site");
childNode.ChildNodes.Add(grandchildNode);
return nodeCollection;
}
else
{
return base.GetChildNodes(node);
}
}
After the site map provider is written, the next challenge is to deploy it. This calls for a Farm solution. The code itself is installed as a .dll in the bin directory of each web application or in the global assembly cache. But SharePoint won’t see the new site map provider without a change to ASP.NET’s dreaded web.config file, where all site map providers are configured. Specifically, a line needs to be added to the <providers> element under the <siteMap> element:
<add name="SampleNavProvider" description="Sample provider"
type="Chapter13.NavigationProvider, Chapter13, Version=1.0.0.0,
Culture=neutral, PublicKeyToken=d238a824d583ebab"
NavigationType="Global" EncodeOutput="true" />
Fortunately, SharePoint provides a way to consistently manage web.config across all its web servers. The trick is to define a feature receiver that adds the entry to web.config when the feature is activated and removes it upon deactivation. SharePoint provides the SPWebConfigModification class for this purpose.
The sample code is written as a Farm solution with a farm-level feature for the navigation provider. This means it updates all web applications in the farm; if you want to affect only one web application, a web application feature would make more sense. The farm feature includes a receiver to manage web.config, as shown in Listing 13.2.
Listing 13.2. Feature Receiver to Update web.config
public class Navigation_ProviderEventReceiver : SPFeatureReceiver
{
// When the feature is activated, add the entry into web.config
public override void FeatureActivated
(SPFeatureReceiverProperties properties)
{
SPWebConfigModification modification =
new SPWebConfigModification();
modification.Path = "configuration/system.web/siteMap/providers";
modification.Name = "add[@name='SampleNavProvider']";
modification.Sequence = 0;
modification.Owner = "SampleNavProvider";
modification.Type =
SPWebConfigModification.SPWebConfigModificationType.EnsureChildNode;
modification.Value = "<add name="SampleNavProvider"
description="Sample navigation provider adds heading with links" type="" +
typeof(NavigationProvider).AssemblyQualifiedName +
"" NavigationType="Global" EncodeOutput="true" />";
SPWebService contentService = SPWebService.ContentService;
contentService.WebConfigModifications.Add(modification);
contentService.Update();
contentService.ApplyWebConfigModifications();
}
public override void FeatureDeactivating
(SPFeatureReceiverProperties properties)
{
SPWebConfigModification configModFound = null;
SPWebService contentService = SPWebService.ContentService;
Collection<SPWebConfigModification> modsCollection =
contentService.WebConfigModifications;
// Find the most recent modification of a specified owner
int modsCount1 = modsCollection.Count;
for (int i = modsCount1 - 1; i > -1; i--)
{
if (modsCollection[i].Owner == "SampleNavProvider")
{
configModFound = modsCollection[i];
}
}
// Remove it and save the change to the configuration database
modsCollection.Remove(configModFound);
contentService.Update();
contentService.ApplyWebConfigModifications();
}
}
In the FeatureActivated method, a new SPWebConfigModification is created, and its path property is set to the path where the modification is to be performed. The name property specifies the XML element to be added (“add”) and an attribute (“name”) and its value. The Owner property is set to a unique value that is needed to remove the modification at a later point. Finally, the type property is set to the full type name of the new site map provider. Notice that this can be done using .NET reflection to avoid having to deal with the long assembly name string.
When the SPWebConfigModification object is filled in, it is added to the WebConfigModifications collection in SharePoint’s content service. The content service is updated to register the change in SharePoint’s content database, and the modifications are applied to actually edit web.config on each web server.
To reverse the action in the FeatureDeactivating method, go back to SharePoint’s content service and obtain the WebConfigModifications collection. Then loop through the collection and look for the modification with the same Owner property used when the modification was registered and remove it.
At this point, the new navigation can be rendered by SharePoint’s out-of-the-box navigation controls, as shown in Figure 13.9. To make this work, you need to modify the master page to reference SampleNavProvider instead of GlobalNavSiteMapProvider and/or CurrentNavigation. Listing 13.3 shows a snippet of the out-of-the-box “v4.master” master page with global navigation switched to use SampleNavProvider. The <SharePoint:AspMenu> element is SharePoint’s navigation control, and the <PublishingNavigation:PortalSiteMapDataSource> element is the data source object that connects to the SampleNavProvider site map provider.
Figure 13.9. The sample navigation provider has added links to global navigation.

Listing 13.3. Referencing the Site Map Provider in a SharePoint Master Page
<SharePoint:AspMenu
ID="TopNavigationMenuV4"
Runat="server"
EnableViewState="false"
DataSourceID="topSiteMap1"
AccessKey="<%$Resources:wss,navigation_accesskey%>"
UseSimpleRendering="true"
UseSeparateCss="false"
Orientation="Horizontal"
StaticDisplayLevels="2"
MaximumDynamicDisplayLevels="3"
SkipLinkText=""
CssClass="s4-tn"/>
<PublishingNavigation:PortalSiteMapDataSource
ID="topsitemap1"
Runat="server"
SiteMapProvider="SampleNavProvider"
EnableViewState="false"
EnableInheritance="true"
StartFromCurrentNode="false"
ShowStartingNode="true"
TreatStartingNodeAsCurrent="true"/>
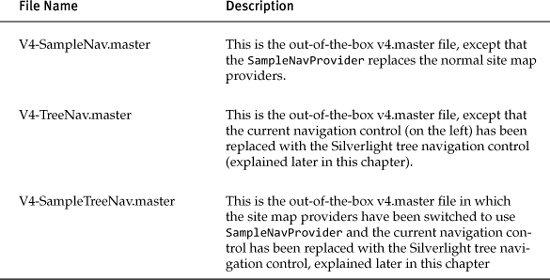
This change can be made using SharePoint Designer, or updated master pages can be deployed along with the solution. The code sample includes three master pages in a module called MasterPage, as shown in Table 13.1. To see the SampleNavProvider in action, simply go to Site Settings and under Look and Feel, click Master Page and select the v4-SampleNav.master page.
Table 13.1. Master Pages Included in the Navigation Code Sample
Building a Navigation Web Part
To work on a navigation control, begin by building something more familiar: a simple web part. This will be a Navigation Web Part that shows the site hierarchy viewed through any of the available site map providers. This web part is useful in its own right as a site map display, and also allows you to easily view any site map provider by simply editing the web part.
Figure 13.10 shows the Navigation Web Part. It uses an out-of-the-box Silverlight tree control to show the site hierarchy. The tree automatically expands to show the current site or page and highlights the current location.
Figure 13.10. Navigation Web Part

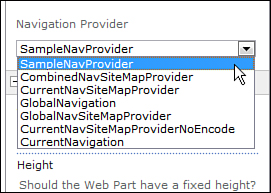
Figure 13.11 shows the Navigation Web Part’s editing experience. A custom editor part allows the user to select the site map provider to display from a list of available providers.
Figure 13.11. Editing the Navigation Web Part
Take a moment to examine the editing experience itself. The web part is in a single class called NavigationWP.cs, which includes a property to hold the site map provider name and declares an editor part to edit this property. This is shown in Listing 13.4.
Listing 13.4. Setting up the Editor Part for the Site Map Web Part
// Property to hold navigation provider name
[Personalizable(PersonalizationScope.Shared)]
[WebBrowsable(false)]
public string NavProvider { get; set; }
// Set up custom Editor Part
public override EditorPartCollection CreateEditorParts()
{
ArrayList editorPartArray = new ArrayList();
NavigationEP editorPart = new NavigationEP();
editorPart.ID = this.ID + "_editorPart";
editorPartArray.Add(editorPart);
return new EditorPartCollection(editorPartArray);
}
Notice that the property’s WebBrowsable attribute is set to false, so SharePoint won’t create a text box to edit this string. Instead, the override of CreateEditorParts() is used to instantiate a custom editor part called NavigationEP, and pass it back as part of an EditorPartCollection.
The editor part itself is a simple composite control that uses an ASP.NET DropDownList to display the available site map providers. This list is initialized in CreateChildControls() as shown in Listing 13.5. The list of available providers is readily available from the System.Web.SiteMap class by way of a static property called Providers.
Listing 13.5. Populating the Editor Part with a List of Site Map Providers
DropDownList navProviderDropDownList = new DropDownList();
protected override void CreateChildControls()
{
base.CreateChildControls();
this.Controls.Add(new LiteralControl("<p>Navigation Provider</p>"));
if (navProviderDropDownList.Items.Count == 0)
{
foreach (SiteMapProvider p in SiteMap.Providers)
{
if (p is PortalSiteMapProvider)
{
navProviderDropDownList.Items.Add
(new ListItem (p.Name));
}
}
}
this.Controls.Add(navProviderDropDownList);
this.Controls.Add(new LiteralControl("<br /><br />"));
}
The editor part also includes the standard overrides SyncChanges() and ApplyChanges() update the editor part controls with the current property value and update the property value from the editor part controls during editing. These are shown in Listing 13.6.
Listing 13.6. SyncChanges() and ApplyChanges() in the Editor Part
// SyncChanges - Override to update the EditorPart controls
// with the latest web part properties
public override void SyncChanges()
{
this.EnsureChildControls();
if (this.WebPartToEdit is NavigationWP)
{
NavigationWP webPart = this.WebPartToEdit as NavigationWP;
navProviderDropDownList.Text = webPart.NavProvider;
}
}
// ApplyChanges - Override to update the web part with the
// latest EditorPart control values
public override bool ApplyChanges()
{
if (this.WebPartToEdit is NavigationWP)
{
NavigationWP webPart = this.WebPartToEdit as NavigationWP;
webPart.NavProvider = navProviderDropDownList.Text;
}
return true;
}
The web part itself passes the entire site map to Silverlight for rendering. In this way, the Silverlight application can be programmed to show as much of the navigation hierarchy as desired, interacting with the user as she explores the options, without any need to go back to the SharePoint server for more information. The site map is passed using the same serialization technique explained in Chapter 10, “Accessing SharePoint with Web Services.”
The solution contains a class in NavigationNode.cs that is used to serialize a simplified version of the site map to Silverlight. This class is included in both the SharePoint and Silverlight projects.
A NavigationNode object can be a single node or the parent of a whole hierarchy. The node contains string properties for Title and Url, plus boolean properties IsExpanded (to tell Silverlight to expand the node on rendering) and IsCurrent (to tell Silverlight to highlight the node as the current one). It also includes a property called Children of type List<NavigationNode>; this allows the node to be part of a hierarchy. An entire hierarchy of NavigationNode objects can be serialized and deserialized using the Serialize() and Load() methods, exactly the same as in Chapter 10.
In addition, the NavigationNode class includes a method called GetNavigationNode(), which fills in the node from a site map provider, and GetNavigationNodeCollection(), which fills in a collection of child nodes. These are recursive methods that fill in the entire hierarchy with a single call to GetNavigationNode(). Listing 13.7 shows the NavigationNode class, including these methods, and its serializable properties. It uses a base class, SerializableObject, to fill in the Serialize() and Load() methods.
Listing 13.7. NavigationNode Class Used to Pass Navigation Information to Silverlight
[DataContract]
public class NavigationNode : Utility.SerializableObject<NavigationNode>
{
[DataMember]
public string Title { get; set; }
[DataMember]
public string Url { get; set; }
[DataMember]
public bool IsExpanded { get; set; }
[DataMember]
public bool IsCurrent { get; set; }
[DataMember]
public List<NavigationNode> Children { get; set; }
public static NavigationNode GetNavigationNode
(SiteMapProvider provider, SiteMapNode node)
{
NavigationNode result = new NavigationNode();
bool expandThis = false;
result.Title = node.Title;
result.Url = node.Url;
result.Children = GetNavigationNodeCollection(provider,
node.ChildNodes, out expandThis);
result.IsCurrent = (node == provider.CurrentNode);
result.IsExpanded = expandThis || (node == provider.CurrentNode);
return result;
}
private static List<NavigationNode>
GetNavigationNodeCollection(SiteMapProvider provider,
SiteMapNodeCollection nodeCollection, out bool expandParent)
{
bool expandThis = false;
List<NavigationNode> result =
(from SiteMapNode childNode in nodeCollection
select new NavigationNode()
{
Title = childNode.Title,
Url = childNode.Url,
Children = GetNavigationNodeCollection(provider,
childNode.ChildNodes, out expandThis),
IsCurrent = (childNode == provider.CurrentNode),
IsExpanded = expandThis ||
(childNode == provider.CurrentNode)
}).ToList();
expandParent = (from NavigationNode n in result
where n.IsExpanded
select true).Any<bool>();
return result;
}
}
An initial call to GetNavigationNode() passes in a SiteMapProvider and its root SiteMapNode:
NavigationNode navRoot = NavigationNode.GetNavigationNode
(siteMapProvider, siteMapProvider.RootNode);
This fills in a new NavigationNode object with the information from the root node and calls GetNavigationNodeCollection() to fill in the children. GetNavigationNodeCollection() uses a LINQ query to build a list of children and calls itself recursively to fill in any grandchildren and other descendants.
The web part itself creates a hidden field to hold the serialized NavigationNode tree and a Silverlight plugin control to render the Silverlight application that displays it. This is performed in CreateChildControls, as shown in Listing 13.8. Then the OnPreRender() method is overridden to actually populate the hidden field with the NavigationNode tree. This is because during web part editing, the user’s new selected site map provider won’t be available until after ViewState processing, and by the time OnPreRender() runs, it will definitely be there.
Listing 13.8. Navigation Web Part
private HtmlInputHidden navInfoField;
private SilverlightPlugin silverlightPlugin;
protected override void CreateChildControls()
{
base.CreateChildControls();
navInfoField = new HtmlInputHidden();
this.Controls.Add(navInfoField);
silverlightPlugin = new SilverlightPlugin();
string siteCollectionUrl = SPContext.Current.Site.Url;
silverlightPlugin.Source = ((siteCollectionUrl == "/") ? "" :
siteCollectionUrl) +
"/ClientBin/NavigationSL.xap";
this.Controls.Add(silverlightPlugin);
}
protected override void OnPreRender(EventArgs e)
{
base.OnPreRender(e);
try
{
SiteMapProvider siteMapProvider =
(SiteMapProvider)SiteMap.Providers[this.NavProvider];
// Set up hidden field with serialized navigation tree
NavigationNode navRoot =
NavigationNode.GetNavigationNode(siteMapProvider,
siteMapProvider.RootNode);
navInfoField.Value = navRoot.Serialize();
// Set up Silverlight object
silverlightPlugin.InitParameters = "NavInfoFieldId=" +
navInfoField.ClientID;
}
catch (Exception ex)
{
this.Controls.Clear();
this.Controls.Add(new LiteralControl
(HttpUtility.HtmlEncode(ex.Message)));
}
}
The code for this chapter includes a Silverlight application called NavigationSL that knows how to consume the NavigationNode hierarchy and bind it to a Silverlight TreeView control. For the purposes of this book, the TreeView control has the advantage that it’s included for free with Silverlight and is capable of hierarchical data binding. You can choose a fancier rendering, but the approach is the same.
As before, the work begins with the Application_Startup event in the Silverlight App.xaml.cs file, shown in Listing 13.9. The event handler looks for the hidden form field’s client ID in InitParams, and if it finds it, it uses the HTML Bridge to read the field’s content and load it into a Navigation Node hierarchy.
Listing 13.9. Silverlight Application Startup Event Handler
private void Application_Startup(object sender, StartupEventArgs e)
{
if (e.InitParams.ContainsKey("NavInfoFieldId"))
{
HtmlDocument doc = HtmlPage.Document;
HtmlElement element =
doc.GetElementById(e.InitParams["NavInfoFieldId"]);
if (element != null && element.GetAttribute("value") != null)
{
string jsonString = element.GetAttribute("value").ToString();
if (jsonString != "")
{
Chapter13.NavigationNode navRoot =
Chapter13.NavigationNode.Load(jsonString);
UIElement p = new MainPage(navRoot);
this.RootVisual = p;
}
}
}
}
The application startup event passes the NavigationNode tree to the MainPage class in its constructor, which is shown in Listing 13.10. The TreeView control expects to be bound to a hierarchical collection (that is, a collection of hierarchies, rather than a single tree root). To accommodate this, the root NavigationNode is placed in a new List<NavigationNode> as its sole member, which is then bound to the TreeView control.
Listing 13.10. The MainPage Constructor Binds the Navigation Hierarchy to a TreeView Control
public MainPage(Chapter13.NavigationNode navRoot)
{
InitializeComponent();
this.navRoot = navRoot;
// The TreeView expects to be bound to a collection, so make the root
// be a collection of one
List<Chapter13.NavigationNode> l = new
List<Chapter13.NavigationNode>();
l.Add(navRoot);
// Bind the hierarchy
navigationTreeView.ItemsSource = l;
// Expand the tree to show the current page
Dispatcher.BeginInvoke(() =>
{
ExpandTree(navigationTreeView);
});
}
The tricky part of this is getting the tree to expand to show the current page. This is done using the IsExpanded and IsCurrent properties of each NavigationNode. Unfortunately, the TreeView doesn’t have bindings to support the expanded state of a node, so this needs to be done in code. Further, this code can’t be run in the MainPage constructor because the data binding runs in the background; the TreeView can’t be expanded in the MainPage constructor because its nodes aren’t filled in yet. This is easily fixed by using Dispatcher.BeginInvoke() to expand the tree after the background processing is complete.
The ExpandTree() code is shown in Listing 13.11. There are two signatures for this method; the first begins at the top of the TreeView and expands its root node. From there, the second method is used to recursively expand nodes as specified in the NavigationNode properties.
Listing 13.11. Code to Expand the TreeView to Show the Current Page
private void ExpandTree(TreeView tv)
{
TreeViewItem tvi =
navigationTreeView.ItemContainerGenerator.ContainerFromIndex(0)
as TreeViewItem;
if (tvi != null)
{
ExpandTree(navRoot, tvi);
}
}
private void ExpandTree(Chapter13.NavigationNode node, TreeViewItem tvi)
{
// Attach the correct style based on whether this is the current node
if (node.IsCurrent)
{
tvi.Style = (Style)this.Resources["CurrentTreeViewItem"];
}
else
{
tvi.Style = (Style)this.Resources["NotCurrentTreeViewItem"];
}
// If the node should be expanded but the TreeViewItem isn't, then
// expand it and dispatch another call to process the children
if (node.IsExpanded && !tvi.IsExpanded)
{
tvi.IsExpanded = true;
tvi.Dispatcher.BeginInvoke(() => { ExpandTree(node, tvi); });
}
else
{
// OK, this node is all set. Process any children next.
foreach (object o in tvi.Items)
{
Chapter13.NavigationNode childNode =
o as Chapter13.NavigationNode;
TreeViewItem childTvi =
tvi.ItemContainerGenerator.ContainerFromItem(childNode)
as TreeViewItem;
if (childTvi != null)
{
ExpandTree(childNode, childTvi);
}
}
}
}
Silverlight styles are used to highlight the current node. Then a check is made to see if the node needs to be expanded; if so, another call to ExpandTree must be dispatched. As you might suspect, the TreeView is creating its child controls only as its branches are expanded, so you need to keep using the Dispatcher to allow the background processing to happen. When a TreeViewItem is finally expanded, the foreach loop at the bottom of the method loops through its children to expand them as needed.
The only remaining task is to make the TreeView respond to a user clicking its nodes and then navigating the web browser to the corresponding page. This is done by hooking the SelectedItemChanged event on the TreeView. The event handler is quite simple, as shown in Listing 13.12.
Listing 13.12. SelectedItemChanged Event Handler
private void navigationTreeView_SelectedItemChanged
(object sender, RoutedPropertyChangedEventArgs<object> e)
{
if (e.NewValue is Chapter13.NavigationNode)
{
Chapter13.NavigationNode selectedNode =
e.NewValue as Chapter13.NavigationNode;
System.Windows.Browser.HtmlPage.Window.Navigate(
new Uri(selectedNode.Url, UriKind.RelativeOrAbsolute));
}
}
The HTML Bridge makes it easy to navigate to the user’s destination, and the Site Map Web Part is complete.
Building a Navigation Control
There isn’t a huge difference between the Navigation Web Part and a navigation control. Both are ASP.NET composite controls, so the code is nearly identical. The code download for this chapter includes a navigation control called NavigationAspMenu.cs. Instead of being derived from an ASP.NET web part, it’s derived from System.Web.UI.WebControls.Menu, the same class that SharePoint’s out-of-the-box global and current navigation controls are derived from. Other than that, the only difference is that we need to go to the data source to obtain the site map provider, as shown in Listing 13.13.
Listing 13.13. Navigation Control Reads from the Data Source Object
protected override void OnPreRender(EventArgs e)
{
try
{
SiteMapDataSource dataSource =
this.GetDataSource() as SiteMapDataSource;
if (dataSource != null)
{
SiteMapProvider siteMapProvider = dataSource.Provider;
// From here on, the method is the same as in the
// Navigation web part
// . . .
}
}
}
Rendering a Navigation Control on a SharePoint Master Page
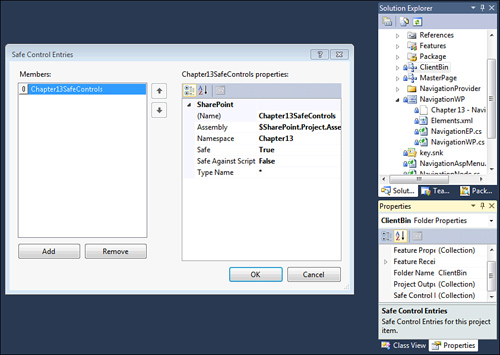
At this point, you’re almost ready to use the navigation control; however, if you put it on a SharePoint page now, you would get the dreaded error telling you that the control is not marked as safe. To do this, you need to add a safe control entry to web.config. Because safe controls come up all the time, this is much easier than adding the site map provider earlier in this chapter; rather than manually manipulating web.config, you can simply add an entry to the Safe Controls Entries in one of the SharePoint items in Visual Studio 2010. In the code sample, it’s in the ClientBin module. In the SharePoint project, click the ClientBin module and open its properties view. Scroll down to the Safe Control Entries collection and click the ellipsis (...). This displays the Safe Control Entries dialog box. In this case, there’s a defined safe control entry for the entire namespace, as shown in Figure 13.12.
Figure 13.12. Adding a safe controls entry to allow the navigation control to run
Finally, you can change the master page to use the new navigation control. This is provided in two of the master pages that are included in the code download: v4-TreeNav.master replaces the context navigation with the new navigation tree, and v4-SampleTreeNav.master makes the same replacement and also switches from the standard CurrentNavigation site map provider to the sample site map provider from earlier in this chapter. Listing 13.14 shows the relevant lines in v4-SampleTreeNav.master.
Listing 13.14. Referencing the New Navigation Control and Site Map Provider in a Master Page
<Chapter13:NavigationAspMenu
ID="Chapter13NavigationMenu"
Runat="server"
EnableViewState="false"
DataSourceID="topSiteMap2"
AccessKey="<%$Resources:wss,navigation_accesskey%>"
UseSimpleRendering="true"
UseSeparateCss="false"
Orientation="Horizontal"
StaticDisplayLevels="2"
MaximumDynamicDisplayLevels="3"
SkipLinkText=""
Height="600"
Width="153"
CssClass="s4-tn"/>
<!-- Data Source for Nav Control -->
<PublishingNavigation:PortalSiteMapDataSource
ID="topsitemap2"
Runat="server"
SiteMapProvider="SampleNavProvider"
EnableViewState="false"
EnableInheritance="true"
StartFromCurrentNode="false"
ShowStartingNode="true"
TreatStartingNodeAsCurrent="true"/>
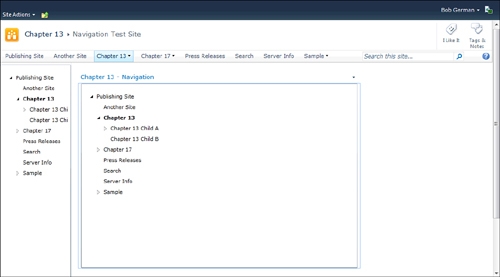
The result, as shown in Figure 13.13, is the same navigation tree rendered as the side navigation in a SharePoint page.
Figure 13.13. The navigation control and Navigation Web Part in use
Summary
In this chapter, you have seen how the out-of-the-box navigation works and how you can augment it with your own site map provider. You know better than to try and craft a new navigation system due to the complexities of SharePoint security trimming and the need for low overhead given that navigation is rendered in multiple places on every SharePoint page. And you learned to make a new navigation control using Silverlight, which can provide a richer experience for the end user.
It should also be clear by now that by working with the ASP.NET navigation system, you can mix and match your Silverlight navigation with SharePoint’s out-of-the-box navigation and any third-party ASP.NET navigation controls you might choose to add to your toolkit. Overall, SharePoint and ASP.NET provide a highly flexible and extensible platform to build your own site navigation experience.