
3. Introduction to Silverlight Development
MICROSOFT SILVERLIGHT APPLICATIONS are flexible and have many forms and can have different appearances. Often it’s video or a dynamic user experience that drives interest in web sites and gives developers good reason to construct these applications. These applications are frequently called rich Internet applications (RIA).
Although rich Internet applications often take over the entire user interface, including navigation and all layout elements, in SharePoint users generally expect to use SharePoint as a basis for the user interface. This allows users to compose their own web user interfaces using web parts, page layouts, and navigation settings and to reuse the many assets included in SharePoint. Therefore, Silverlight solutions in SharePoint are generally small islands of RIA residing on a SharePoint page in a web part or elsewhere in the SharePoint user interface. This is the approach taken in this book.
In the sections that follow, you learn how to create your own Silverlight applications and test them in a local web site in Visual Studio 2010. First, however, you learn how to put a Silverlight application on a web page.
Placing Silverlight on a Web Page
Placing a Silverlight application on a web page begins by creating a Silverlight application package in a file ending with the .xap extension, which is commonly pronounced “zap.” A .xap file is really a Zip archive, and if you rename one to end with a .zip filename extension, you can open it and look inside. This can be helpful in learning Silverlight, as well as to understand what’s taking up space in an overly large .xap file. Web browsers download .xap files from web sites just like any other file, and they are cached just like other web files. The .xap file can be deployed to a web site just like any other.
Tip
Typically, other than external data, everything a Silverlight application needs to run is contained within its .xap file. However, this isn’t necessary: The application can load additional code and resources (also in .xap files) after it has started running. This can reduce startup time and also allow the browser to cache libraries that are used by multiple solutions.
Dynamic .xap loading is covered in Chapter 8, “Accessing SharePoint Data with the Client Object Model,” where you learn to load the SharePoint client object model dynamically after your application has started up.
After the .xap file has been created and placed on a web site for download, the next step is to place the Silverlight browser plug-in on a web page and pass it the location of the .xap file to be rendered. An HTML <object> tag, as shown in Listing 3.1, is used to instruct the browser to display Silverlight.
Listing 3.1. Placing Silverlight on an HTML Page
<div id="silverlightControlHost">
<object data="data:application/x-silverlight-2,"
type="application/x-silverlight-2" width="100%" height="100%">
<param name="source" value="ClientBin/Chapter03.xap"/>
<param name="onError" value="onSilverlightError" />
<param name="background" value="white" />
<param name="minRuntimeVersion" value="4.0.50826.0" />
<param name="autoUpgrade" value="true" />
<a
href="http://go.microsoft.com/fwlink/?LinkID=149156&v=4.0.50826.0"
style="text-decoration:none">
<img
src="http://go.microsoft.com/fwlink/?LinkId=161376" alt="Get Microsoft
Silverlight" style="border-style:none"/>
</a>
</object><iframe id="_sl_historyFrame"
style="visibility:hidden;height:0px;width:0px;border:0px"></iframe></div>
This example is taken from the code download for this chapter, in the file Chapter03TestPage.aspx. When you create a new Silverlight project, Visual Studio 2010 offers to create a test web project, and this is from the test web page from the test project. The .xap file itself is placed in the Silverlight project’s bin directory and is copied to the ClientBin directory in the test project to make it accessible on the test web site.
It’s a best practice to use the test page that ships with Silverlight as a basis for placing Silverlight on a web page, given there are many nuances in the HTML that can affect rendering in specific browsers. It’s safe to change the Silverlight parameters (the <param> elements), the <object> tag’s height and width attributes, and the <div> attributes, but the rest of the markup should be copied exactly to ensure your solution works properly in all web browsers. For example, the hidden <iframe> tag ensures that navigation works in Safari.
Notice the <a> tag and the image within it; this is what is rendered when Silverlight is not installed. This default content shows an image, asking the user to download Silverlight and links to the download page. If you want to override this logic, you can replace this with some other HTML. For example, rather than asking the user to download Silverlight, you could provide a simple HTML rendering of your solution.
You can pass parameters into Silverlight using <param> elements in the <object> tag. Table 3.1 explains the most commonly used parameters, including the ones shown in Listing 3.1.
Table 3.1. Common Silverlight Parameters
Building a Simple Silverlight Application with Visual Studio 2010
From a developer’s point of view, Silverlight is a subset of Microsoft’s Windows Presentation Foundation (WPF); indeed Silverlight began its life as “WPFe,” which is an acronym for “WPF Everywhere.” The idea was to build a simpler subset of WPF that would run in web browsers across platforms with the ambitious goal of eventually running everywhere. There are many advantages in this strategy, including significant reuse of code, tools (such as Visual Studio and Expression Blend), and developer expertise.
Like WPF, a Silverlight application contains a combination of procedural code and a user interface markup in a language called XAML. XAML stands for Extensible Application Markup Language and is an XML syntax for defining a WPF or Silverlight user interface. This approach is similar to HTML on a web page and has the advantage of providing a clean break between user interface and procedural code. XAML is considerably richer than HTML, however, and is also designed to allow very exact control over rendering.
Like many other application development environments, Silverlight has “controls” ranging from buttons to data grids, which are arranged on a design surface to create a user interface. Visual Studio 2010 provides a control toolbox and designer for adding drag-n-drop controls, as well as a properties grid to change them. The underlying code page describes the controls as XAML.
XAML defines controls using XML tags. Each control is a .NET object, and XAML is actually a way to serialize these objects using XML.
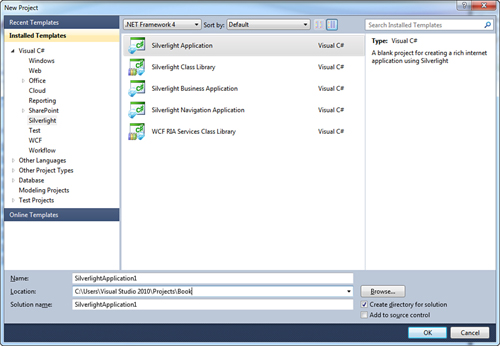
To begin building a simple application, open Visual Studio 2010 and select New Project; you are presented with the New Project dialog box as shown in Figure 3.1. Choose the Silverlight template and update the project name to Chapter03. Select Silverlight Application and click OK to create the project.
Figure 3.1. Creating a new Silverlight project
The projects in this book use the Silverlight Application project template, which creates a simple, single-page Silverlight application. A Silverlight Class Library might be useful as well if you want to break your application up into multiple .xap files that can be downloaded at runtime. The Silverlight Navigation Application and Silverlight Business Application templates add navigation and login code within the Silverlight application; when SharePoint is involved, it generally handles these functions. WCF RIA Services Class Libraries are briefly discussed later in this chapter but are not otherwise used in this book.
When the application type has been selected, you are prompted to choose the Silverlight version you want to target and asked if you want to Host the Silverlight application in a new web site. If you check this option, Silverlight generates a test web site to host your application during development. For this example, select Silverlight 4 or 5 and go ahead and let Visual Studio create the test web site.
After creating the Silverlight project, you are presented with a blank design surface. This starting XAML looks like the markup in Listing 3.2.
Listing 3.2. The XAML Markup for a New Silverlight Project
<UserControl x:Class="Chapter3.MainPage"
xmlns="http://schemas.microsoft.com/winfx/2006/xaml/presentation"
xmlns:x="http://schemas.microsoft.com/winfx/2006/xaml"
xmlns:d="http://schemas.microsoft.com/expression/blend/2008"
xmlns:mc="http://schemas.openxmlformats.org/markup-compatibility/2006"
mc:Ignorable="d"
d:DesignHeight="300" d:DesignWidth="400">
<Grid x:Name="LayoutRoot" Background="White">
</Grid>
</UserControl>
At the root of the XAML is a UserControl, which is the base class for the main page, as implemented in MainPage.xaml and MainPage.xaml.cs. User controls in Silverlight are similar to user controls in ASP.NET in that they host a number of other controls that define all or part of your application’s user interface. The UserControl also contains the namespaces for other controls that are used on the page.
The user control contains one child element, which is a Grid control. A grid can have one or more children, including child grids that can create their own children. The grid control is one of a handful of “layout controls” that arrange other controls on its surface; in the case of a grid, its children are arranged in rows and columns.
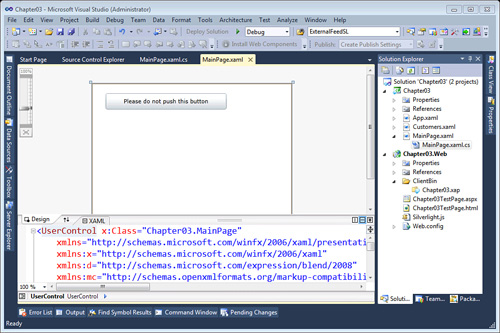
To begin building the user interface, ensure the toolbox is visible by selecting Toolbox on the View menu. Then drag a Button control onto the design surface from the toolbox. When placed on the surface, the controls are added to the XAML for you. Single click the button and drag the square on its right to the right so the button is larger. In the XAML, set the button’s content to Please Do Not Push This Button. Your UI should now be similar to what’s shown in Figure 3.2.
Figure 3.2. A button added to a new Silverlight application
Listing 3.3 shows the generated XAML for the application. When you dropped the button control on the design surface, Visual Studio captured the exact location in the Margin attribute of each element, so your values will probably be different depending on where you dropped it.
Listing 3.3. The TextBox and Button in XAML
<UserControl x:Class="Chapter03.MainPage"
xmlns="http://schemas.microsoft.com/winfx/2006/xaml/presentation"
xmlns:x="http://schemas.microsoft.com/winfx/2006/xaml"
xmlns:d="http://schemas.microsoft.com/expression/blend/2008"
xmlns:mc="http://schemas.openxmlformats.org/markup-compatibility/2006"
mc:Ignorable="d"
d:DesignHeight="300" d:DesignWidth="400">
<Grid x:Name="LayoutRoot" Background="White">
<Button Name="button1" Click="button1_Click" Margin="5"
Content="Please do not push this button" Height="32" />
</Grid>
</UserControl>
Adding a click event handler to the button is as simple as double-clicking on the button in the Visual Studio design surface to generate the method stub. Listing 3.4 shows an example that changes the text on the button control.
Listing 3.4. The Button Click Event Handler
private void button1_Click(object sender, RoutedEventArgs e)
{
button1.Content = "Please do not push this button again!";
}
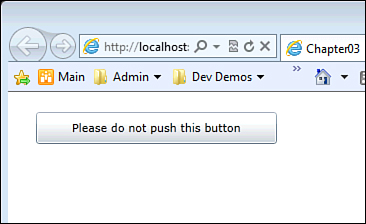
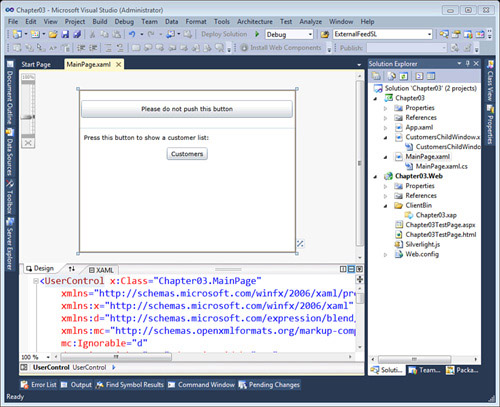
Add the line of code assigning new text to button1.Content and press the F5 key to run the application. Visual Studio builds the Silverlight project, deploys its .xap file to the test project, and then starts the test project to display the Silverlight application in Internet Explorer. Click the button, and the text box displays the message as defined in the event handler. Figure 3.3 shows the application running in the test web site.
Figure 3.3. Running the application
Tip
Expression Blend provides a richer design experience for Silverlight and WPF than Visual Studio and is the tool of choice for Silverlight UI designers. You might want to switch to Expression Blend for complex UI manipulation such as managing layout controls, setting up navigations, and using styles.
Fortunately, Visual Studio 2010 plays nicely with Expression Blend 3.0 or greater. If you’ve installed Expression Blend on your development machine, simply right-click any .xaml file and select Open in Expression Blend. Blend opens and allows you to edit the file, even if it’s also open in Visual Studio. Blend also respects source control, and if a file was open in Visual Studio when you close Blend, Visual Studio offers to reload the new version of the file.
Chapter 6, “Expression Blend, Data Binding, and Sample Data,” provides details on using Expression Blend and its prototyping tool, SketchFlow, in conjunction with SharePoint 2010.
Toolbox and Layout Controls
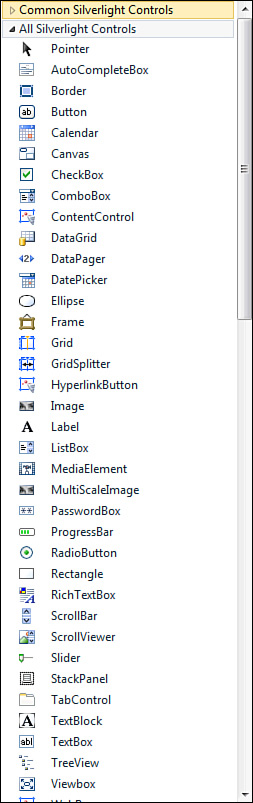
To familiarize yourself with the full suite of controls, open up the toolbox again and take a look at its contents, as shown in Figure 3.4. Scroll down to look over the whole list.
Figure 3.4. The Silverlight toolbox in Visual Studio 2010
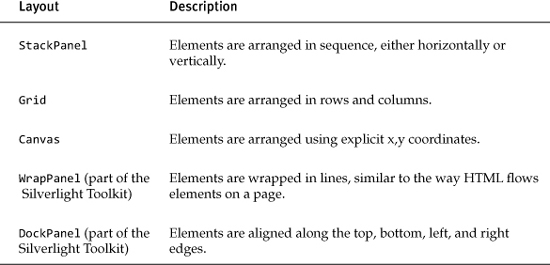
Some of these controls render content such as text and images, but many of them are responsible for managing and arranging other controls on the display. Table 3.2 shows the basic types of controls with examples.
Table 3.2. Types of Silverlight Controls

This allows for a lot of flexibility: For example, because a Button can contain another element, it could include an image to make an image button. To take it a step further, the button could contain a Grid layout control, which could contain an Image and a TextBlock to provide a button with an image and text arranged in a grid. By limiting the content controls to a single child, developers are forced to use layout controls such as a Grid throughout the user interface to arrange multiple child controls. This is a good thing as it ensures consistency in how controls are arranged whether they’re in the top-level user control or in a tiny button deep within.
The Layout controls are important because they are used to lay out other controls in the user interface. The earlier example didn’t really make use of the Grid control; it only contained one row and cell, and its children were laid out based on their Margin attributes. The Grid control is designed to present its child elements in rows and columns. Table 3.3 shows the layout controls and their general use.
Table 3.3. Silverlight Layout Controls
Listing 3.5 shows an updated user interface button from the earlier example arranged using layout controls. The grid now has two rows, and the second row contains a StackPanel with two child objects, a TextBlock and another Button. The two grid rows are defined in the Grid.RowDefinitions element; the top one has a fixed height of 70 pixels, and the bottom one is given the default height of “auto,” meaning it takes up as much room as is available.
Listing 3.5. Using Layout Controls in XAML
<UserControl x:Class="Chapter03.MainPage"
xmlns="http://schemas.microsoft.com/winfx/2006/xaml/presentation"
xmlns:x="http://schemas.microsoft.com/winfx/2006/xaml"
xmlns:d="http://schemas.microsoft.com/expression/blend/2008"
xmlns:mc="http://schemas.openxmlformats.org/markup-compatibility/2006"
mc:Ignorable="d"
d:DesignHeight="300" d:DesignWidth="400">
<Grid x:Name="LayoutRoot" Background="White">
<Grid.RowDefinitions>
<RowDefinition Height="70" />
<RowDefinition Height="*" />
</Grid.RowDefinitions>
<Button Name="button1" Click="button1_Click" Margin="5"
Content="Please do not push this button" Height="32"
Grid.Row="0" />
<StackPanel Grid.Row="1" Height="230" HorizontalAlignment="Left"
Name="stackPanel1" VerticalAlignment="Top" Width="400">
<TextBlock Name="textBlock1" Margin="10"
Text="Press this button to show a customer list:" />
<Button Content="Customers" Name="button2"
Height="23" Width="75" />
</StackPanel>
</Grid>
</UserControl>
When you’re working with layout controls, you’re likely to run into attached properties, which bear a little explanation. The first <Button> and the <StackPanel> in Listing 3.4 include an attached property, Grid.Row, to specify the grid row that will hold the stack panel. The Grid.Row attribute is attached to the grid control, and tells it which row to place the StackPanel in. Although this new concept might seem a bit confusing at first, it is a lot easier to work with than the row and column counting endemic in HTML tables, and it allows you to specify the position of each child control directly in the child rather than in the parent.
The new user interface should resemble the design shown in Figure 3.5. You can either enter the XAML from Listing 3.4 or drag the controls in from the toolbox and configure them in the designer in Visual Studio 2010.
Figure 3.5. The updated Silverlight application in Visual Studio 2010
Later in this chapter you implement a show customers feature to display customer information when the second button is pressed. For now the application should run, but the Customers button won’t do anything.
Setting Control Properties
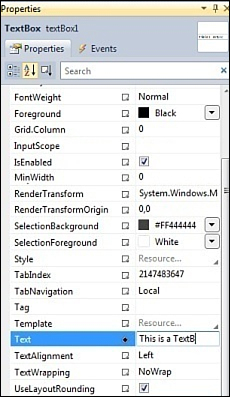
Control properties specify the appearance and content of controls and can be set in the Properties window, in XAML or in code. For example, to display text in a text box, simply set the control’s Text property. This can easily be done in code, but you can also do it at design time. Figure 3.6 shows how to change the text in a text box using the property grid in Visual Studio. Another option would be to edit the XAML directly and include a Text property in the <TextBox> element. By using Visual Studio’s property grid, however, you have the advantage that Visual Studio helps you select a valid property setting, in many cases providing pick lists and other facilities for selecting a value.
Figure 3.6. Property grid for a text box control
Creating and Showing Child Windows
A UserControl element is at the root of the simple example just shown; the user control is displayed as the Silverlight application’s user interface. User controls always have a single child control, which is a layout control named LayoutRoot by convention. An application could easily have more than one user control to offer different displays. In this case the MainPage user control is displayed by code in the Application_Startup event handler in App.Xaml.cs.
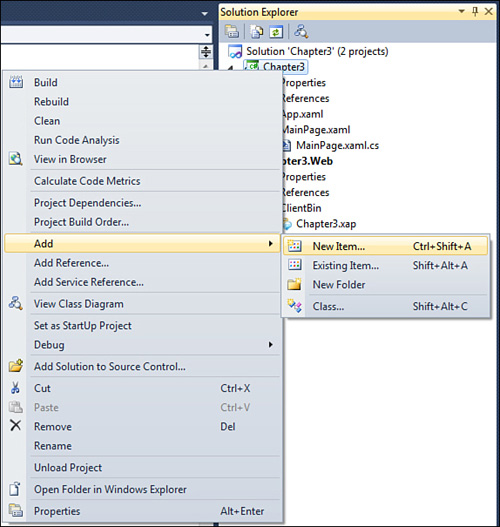
Sometimes, however, you might want to display a pop-up or child window, and this is easily accomplished as well. A child window is similar to a user control except that it pops up over the rest of the user interface like a dialog box. To begin, right-click your Silverlight project and select Add New Item, as shown in Figure 3.7.
Figure 3.7. Adding a child window to the Silverlight project
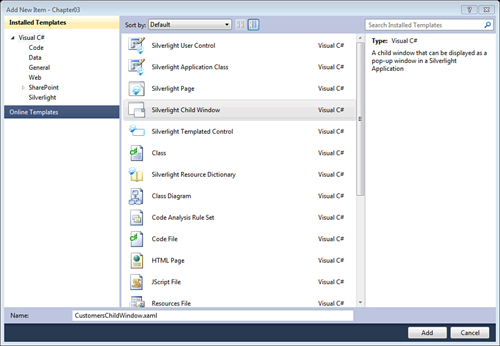
Add a new Silverlight Child Window and name the window CustomersChildWindow.xaml, as shown in Figure 3.8. Click OK to create the child window.
Figure 3.8. Adding a child window to the Silverlight project
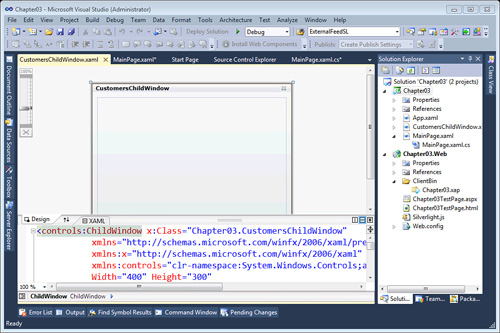
When created, the child window has button controls ready to use, as shown in Figure 3.9.
Figure 3.9. A new child window
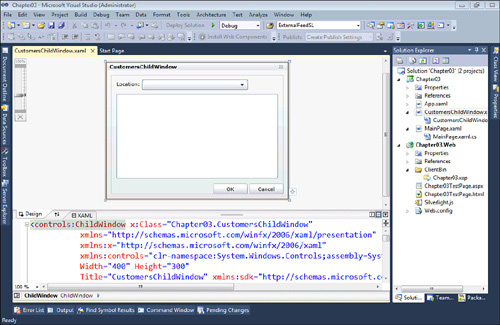
Add combo box and data grid controls to the CustomersChildWindow.xaml designer by dragging them from the toolbox onto the design surface. Then resize them to fit, as shown in Figure 3.10.
Figure 3.10. Updated child window
Return to the MainPage.xaml file and double-click the Customers button to add an event handler that will show the child control. The event handler code is shown in Listing 3.6.
Listing 3.6. Method to Show the Child Window
private void button2_Click(object sender, RoutedEventArgs e)
{
CustomersChildWindow childWindow = new CustomersChildWindow();
childWindow.Title = "Customers";
childWindow.Show();
}
Run the project and test the buttons. This is a good time to try out more of the controls to familiarize yourself with the palette of controls you use throughout this book.
Advanced Features of .NET in Silverlight
Silverlight does not support the entire .NET framework, but only a subset. Experienced .NET developers might be distressed to see some of their old friends have been omitted from Silverlight. For example, the ArrayList is nowhere to be found, XmlDocument has been banished, and the familiar ADO.NET is gone as well. Fortunately, all of these have been replaced by new and improved alternatives, and this section provides an overview of them.
Generic Collections
Generics in .NET have been around since .NET 2.0; if you haven’t started using them, now is the time to start. Generic classes act on types that aren’t specified until the classes are used, when the type is specified in angle brackets. This allows classes that are general in nature and still act in a strongly-typed way on objects whose types aren’t known until later.
Generic collections are generic classes that manage various kinds of collections on any type specified. Compare this to a construct such as an ArrayList, which operates on .NET Object types which then need to be cast to their specific type at runtime. Generic collections provide a type-safe way to separate the collection logic from the items in the collection. Generic collections come from the System.Collections.Generic namespace. For example, consider the Customer class shown in Listing 3.7.
public class Customer {
public string Name { get; set; }
public string Address { get; set; }
}
Given this example, a list of customers would be coded as List<Customer>, and an enumerable collection of customers as IEnumerable<Customer>.
Automatic Properties
Listing 3.7 shows two automatic properties. These are properties that simply get and set an automatically generated field within the class. Automatic properties allow short-hand property declarations, and the compiler emits getters and setters behind the scenes.
Anonymous Methods
An anonymous method is code that is declared inline without naming an actual method. Generally this is useful when the method is used only once as a call-back or event handler. The method’s code is defined inline, as shown in Listing 3.8. In this example, the delegate keyword is used to define the inline code to handle an event. To use a full event receiver, which is passed a reference to the sender object and event arguments, the code can
be extended as shown in Listing 3.9.
Listing 3.8. An Anonymous Method
button2.Click += delegate {
textBox1.Text = "We can make this the Cancel button.";
};
Listing 3.9. An Anonymous Event Handler
button1.Click += new RoutedEventHandler(
delegate(Object s, RoutedEventArgs e)
{
textBox1.Text = "Hello, world";
});
A shorthand for the delegate keyword is called a lambda expression and is shown in Listing 3.10. The => symbol is used instead of the delegate keyword, and the argument types are inferred, in this case from the definition of RoutedEventHandler.
Listing 3.10. Using a Lambda Expression to Define an Anonymous Function
button1.Click += new RoutedEventHandler((s, e) =>
{
textBox1.Text = "Hello, world";
});
Although placing short anonymous methods inline can improve readability, especially when handling asynchronous network calls, overuse of anonymous methods leads to code complexity and more difficult troubleshooting. The effect is especially visible when single-stepping in the debugger, where the anonymous function is run when the event fires rather than inline with the rest of the code. In general, if you have more than a few lines of code in an event handler or call-back function, you should spell out the function separately.
Tip
Silverlight and WPF have a single User Interface thread. It’s only possible to update the UI from that specific thread. If the thread is busy, the UI becomes unresponsive. That’s why network calls in Silverlight are asynchronous—so the UI thread won’t be tied up while waiting for a response from the network.
When an event handler fires, if it’s not a UI event such as a button click, you might not be running on the UI thread, and therefore you can’t touch the UI directly. This is generally the case when a network request completes.
Silverlight provides a Dispatcher for this purpose; it’s like a message loop that runs on the UI thread. All you need to do is put your code in a function and pass a delegate to the Dispatcher.BeginInvoke()method. Anonymous functions can make this seem much easier, as in
private void SomeEventHandler object sender, EventArgs e)
{
Dispatcher.BeginInvoke(() =>
{
MessageBox.Show("The event fired!");
});
}
Anonymous Types
Listing 3.11 shows two variable declarations. In the first, the variable’s type is clearly spelled out, and in the second the variable uses an anonymous type. The C# var keyword declares that the type of an object is anonymous and should be inferred from the expression to the right of the assignment statement. This allows developers to use variables without declaring their types.
List<Customer> list1 = new List<Customer>();
var list2 = new List<Customer>();
The var keyword in C# should not be confused with the one in JavaScript in which the type is evaluated at runtime; this is handled in C# by the dynamic type. Instead, the data type of a var is inferred at compile time, and normal type checking occurs when it’s used. Just as an anonymous person is a real person whose name is unknown, an anonymous type is a real type, and the compiler knows its name even if you don’t.
Examining the code in Listing 3.11, both list1 and list2 are of the type List<Customer>. The benefit of this is easier to see in the example in Listing 3.12.
Listing 3.12. An Anonymous Type with LINQ Query
var query = from c in Customers
where c.Name == "Matt"
select new { Name = c.Name };
This code contains a Language Integrated Query (LINQ) that queries a collection called Customers for customers with the name “Matt” and generates a collection of anonymous objects that contain a single Name property. There are two anonymous types here: The first one is selected for each customer named “Matt,” and the second is a collection of the first. In this situation there is no way to explicitly define the type, and the var keyword saves the day.
Language Integrated Query (LINQ)
Whole books have been written on .NET’s new Language Integrated Query (LINQ) capability and this section only scratches the surface. LINQ allows strongly-typed queries directly in code, and can query .NET objects, XML structures, SharePoint content, or any other data source that has a LINQ provider.
LINQ to XML provides a rich alternative to XmlDocument, and is capable of building as well as querying XML structures in memory. In general the code is more readable than XmlDocument code.
It’s time to go back to the coding example to demonstrate some typical uses of LINQ queries in Silverlight. The code provides the customer display in the child window created earlier in this chapter.
To begin with, you need some customers to display. For the sake of demonstration the customers are hard coded as simple .NET objects. Declare the customer class as shown in Listing 3.13, either in its own class file or in the CustomersChildWindow.xaml.cs file (outside of the CustomersChildWindow partial class, of course).
public class Customer
{
public string Name { get; set; }
public string Location { get; set; }
}
Next, inside the CustomerChildWindow partial class, declare and initialize a customer list as shown in Listing 3.14.
Listing 3.14. Initializing the Customer List
List<Customer> xx = new List<Customer>();
// Fortunately the customer list is short and never changes.
List<Customer> customers = new List<Customer>
{
new Customer { Name = "Paul", Location = "Washington" },
new Customer { Name = "Matt", Location = "Arkansas" },
new Customer { Name = "Bob", Location = "Massachusetts" },
new Customer { Name = "Andrew", Location = "Florida" },
new Customer { Name = "Ed", Location = "Virginia" },
new Customer { Name = "Matt", Location = "Massachusetts" },
new Customer { Name = "Scott", Location = "Massachusetts" },
new Customer { Name = "Ted", Location = "Florida" }
};
Next, add code to the CustomersChildWindow constructor to initialize the combo box with a list of locations. The code is shown in Listing 3.15, and it uses a LINQ query to create a collection of strings to bind to the combo box.
Listing 3.15. CustomersChildWindow Constructor
public CustomersChildWindow()
{
InitializeComponent();
// Set the combo box to show the locations in ascending
// order with no duplicates
var locations = from c in this.customers
orderby c.Location
select c.Location;
comboBox1.ItemsSource = locations.Distinct();
}
The LINQ code is querying a collection of .NET objects; this is possible as long as the collection implements the IEnumerable<> or IQueryable<> interface. In the case of IEnumerable<>, the interface only provides the ability to enumerate the collection, and LINQ must grovel through the whole thing in order to execute the query. IQueryable<> extends IEnumerable<> to provide an interface that can evaluate and run LINQ queries itself and is implemented by query providers such as LINQ to SQL or LINQ to XML.
Reading the query expression from the beginning,
from c in this.customers
specifies that the query is over the customers list and that the symbol c is used to represent customer items in the query. The next line,
orderby c.location
sorts the query results in order by the customer location field. Finally,
select c.location;
tells the compiler what you want the query to produce. In this case, the customer’s location is a string, so the query produces an IEnumerable<string>. If the statement were changed to
select c;
then it would produce an IEnumerable<Customer>, given that c on its own represents a Customer object from the list. If it were
select new { Who = c.Name, Where = "at " + c.Location };
then the query would return an IEnumerable of some anonymous type with two string properties called Who and Where, and the word at would be inserted in front of each location. As you can see, this is very flexible!
Following the query, the combo box is bound to the collection of locations in the statement:
comboBox1.ItemsSource = locations.Distinct();
If the locations collection had been assigned directly to the combo box’s ItemsSource property, it would work, but there would be duplicates on the list because some locations are present in more than one customer. The Distinct() method eliminates the duplicates and is called a method-based query. For more details, see http://bit.ly/SPSL_LinqIntro.
The final step to complete the sample application is to show the customers in the data grid when a location is chosen in the combo box. To do this, return to the CustomerChildWindow.xaml file and double-click the combo box to add an event handler for its SelectionChanged event. Fill in the event handler as shown in Listing 3.16.
Listing 3.16. Combo Box SelectionChanged Event Handler
private void comboBox1_SelectionChanged(object sender,
SelectionChangedEventArgs e)
{
// A new location was selected; show the customers in that location
var cust = from c in this.customers
where c.Location == comboBox1.SelectedValue.ToString()
orderby c.Name
select c;
dataGrid1.ItemsSource = cust;
}
This time the LINQ query includes a where clause, which is a simple comparison in C#. Because the SelectedValue combo box property is an Object, it needs to be converted to a string before it can be compared to the c.Location property.
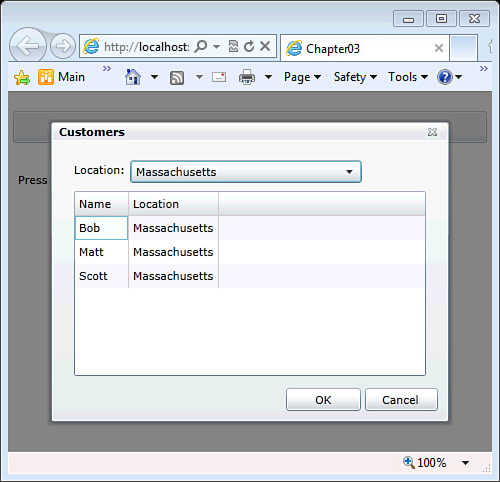
At this point the sample application should work. When the Customers button on the main page is pressed, the child window should launch as shown in Figure 3.11. Selecting a location in the combo box should display the customers from that location.
Figure 3.11. Customers child window
Networking and Web Services in Silverlight
Silverlight doesn’t have a way to directly call a database like SQL Server or Oracle, but it does have strong support networking and web services so you can access services that provide data. For example, a common pattern is to develop a web service to access a database using ADO.NET Entity Framework and then to consume the web service in Silverlight.
This section summarizes the options for network access in Silverlight.
Networking Options in Silverlight
Silverlight provides a number of ways to access networked resources and web services. This section lists the major options.
WebClient Class
Silverlight provides a WebClient class for accessing HTTP resources. It can be used to request a simple page or newsfeed or to build custom web service proxies.
Web Services
Calling web services could be a complex affair, but Visual Studio makes it easy by generating a local proxy class to do all the nitty-gritty work. Your code can simply call the proxy service locally, and it takes care of all the networking details. WCF supports a number of protocols such as HTTP and TCP/IP and data formats such as Atom, SOAP, and XML.
Chapter 10, “Accessing SharePoint with Web Services,” shows you how to create WCF services in SharePoint and consume them in Silverlight.
WCF Data Services
WCF Data Services is a framework for working with data using the Open Data Protocol (OData). Like WCF web services, WCF Data Services handles all the serialization and networking for you.
OData is a REST style protocol for accessing tables of data, including full Create, Read, Update, and Delete operations. There are a number of products, including Microsoft SharePoint 2010, Microsoft SQL Server Reporting Services, and IBM Websphere, that provide OData interfaces. In addition, public services such as eBay and Netflix provide OData feeds.
Chapter 9, “Accessing SharePoint Data with WCF Data Services,” shows how to access Silverlight data using SharePoint 2010’s OData feed.
WCF RIA Services
WCF rich Internet application (RIA) services is a tool for developing n-tier enterprise solutions. WCF RIA Services builds matching client- and server-side projects, and Visual Studio automates, keeping the data model in sync across both projects. This is a wonderful thing, but because it requires .NET 4.0, and SharePoint uses .NET 3.5, it’s not particularly useful in SharePoint solutions unless the server component can be hosted on a separate ASP.NET 4.0 web server.
Sockets and Multicast
If all else fails you can access the network directly by using the System.Net.Sockets namespace. With direct access to TCP and UDP and advanced features such as full-duplex and multicast operation, this is the right choice if you want to build your own streaming media client or any time you need complete control over the networking stack.
Asynchronous Response Handling
In Silverlight, all network calls are asynchronous. That means that when you call a web service or request something on the network, the next line of code that runs will not contain the result from the server! A successful return only means that the local networking stack successfully made a request; the response (if any) from the server is returned using a call-back function or event. This leads to having lots of event handlers and delegates in your code and explains why anonymous functions are so popular among Silverlight developers.
For example, Listing 3.17 shows some code from Chapter 10 to read an ATOM feed. As you can see, there is a method to request the feed and an event handler to handle the response. When the response is received, it’s loaded into a SyndicationFeed object and transformed into a collection of objects that are bound to the user interface.
Listing 3.17. Code to Read an RSS or ATOM Feed in Silverlight
// RequestActivityFeed - Kick off the request for an activity (ATOM) feed
private void RequestActivityFeed(string userName)
{
// Transform the person's my site URL into an activity feed URL
string feedUrl = this.userUrl.Substring(0,
this.userUrl.IndexOf("Person.aspx")) +
"_layouts/activityfeed.aspx?consolidated=false&publisher=" +
System.Windows.Browser.HttpUtility.UrlEncode(userName);
// Request the feed
WebClient wc = new WebClient();
wc.OpenReadCompleted +=
new OpenReadCompletedEventHandler(RequestActivityFeedCompleted);
wc.OpenReadAsync(new Uri(feedUrl));
}
// Handle the activity feed when it comes back
void RequestActivityFeedCompleted(object sender,
OpenReadCompletedEventArgs e)
{
// Transform the result stream into a SyndicationFeed for easy
// ATOM parsing
XmlReader feedReader = XmlReader.Create(e.Result);
SyndicationFeed feed = SyndicationFeed.Load(feedReader);
// Project a collection of ActivityItems for binding to the View
this.Activities = from item in feed.Items
select new ActivityItem
{
Title = item.Title.Text,
Description = FixHtml (item.Summary.Text),
PubDate = item.PublishDate.LocalDateTime
};
}
In some cases, anonymous functions can make the code easier to read. Listing 3.18 shows an example from Chapter 9 of reading an OData source. In this case, the request is made when the code calls BeginExecute(), but instead of passing in a separate delegate, the function is specified inline. In this case, it’s a call to Dispatcher.BeginInvoke()to move processing over to the Silverlight UI thread. The dispatcher calls yet another anonymous function to actually handle the completion and bind the data to the UI.
Listing 3.18. Handling Asynchronous Completion with Anonymous Functions
// Create a query of all contacts, sorted by name
DataServiceQuery<SharePointContent.ContactsItem> q =
(DataServiceQuery<SharePointContent.ContactsItem>)
(
from contact in dataContext.Contacts
orderby contact.FullName
select contact
);
// Execute the query asynchronously, and when it completes,
q.BeginExecute((IAsyncResult result) =>
{
// Schedule some work on the UI thread, and when we get there,
// bind the feed data to the data grid
Dispatcher.BeginInvoke(() =>
{
// Get result as IEnumerable
q = result.AsyncState as
DataServiceQuery<SharePointContent.ContactsItem>;
IEnumerable<SharePointContent.ContactsItem> items =
q.EndExecute(result);
// Place result in an observable collection and bind to the grid
dataServiceCollection = new
DataServiceCollection<SharePointContent.ContactsItem>(items);
listDataGrid.ItemsSource = dataServiceCollection;
needsRefresh = false;
});
}, q);
Introducing Silverlight 5
Silverlight 5 was in Beta testing while this book was being written. Although most of the programming examples work with Silverlight 4 or 5, some chapters include special sections to show how you can take the solutions a step further with new Silverlight 5 features as detailed in Table 3.4.
Table 3.4. Silverlight 5 Examples in This Book
Silverlight 5 includes a number of additional features which, although not specifically applicable to SharePoint development, can be useful in any Silverlight application. These include
• Improved Media Support, including GPU acceleration of H.264 decoding and TrickPlay to play video at different speeds and to support fast forward and rewind
• Text improvements to allow text to flow across columns and linked text containers and to improve text rendering
• Data binding and MVVM enhancements such as the ones shown in Chapters 9 and 10, plus Markup Extensions, which allow you to write your own code to parse properties and event handlers in XAML, and Ancestor RelativeSource to allow a DataTemplate to bind to a property on the control that contains it
• Extended “Trusted Appliction” model to allow full desktop access if a Silverlight application is trusted
• Many other performance and graphics improvements
Summary
Silverlight is powerful and a lot of fun to work with. As you go through this book, you’ll learn more, yet that’s still only the beginning. There are many aspects of Silverlight such as media streaming and animation that don’t especially relate to SharePoint and therefore aren’t in this book, but all of them are useful in your projects wherever you choose to host Silverlight.