
7. Accessing SharePoint Using the HTML Bridge
SILVERLIGHT IS DESIGNED to be hosted on web pages, and it’s no surprise that developers would want a way for their Silverlight applications to interact with the pages that host them. This is provided by the HTML Bridge, which connects a Silverlight application with the browser’s HTML Document Object Model and Javascript. This chapter shows you how to optimize your solutions by passing information on the web page and accessing it via the HTML Bridge instead of making extra requests to the server. It also shows you how to call SharePoint’s Javascript and JQuery from your Silverlight applications.
Passing Data to Silverlight with the HTML Bridge
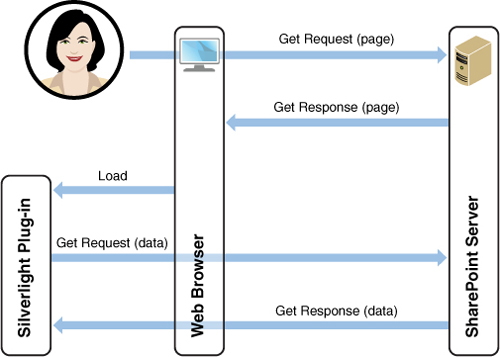
Figure 7.1 shows a typical Silverlight application interacting on the network. It begins when a user clicks on a web page and the browser issues an HTTP Get request. On a good day, the server (in this case SharePoint) responds with a Get response containing some HTML to be rendered. What the diagram doesn’t show is that the web browser will likely issue a flurry of additional Get requests for any number of images, style sheets, Javascript files, and other objects referenced in the HTML, unless they are already in the browser’s cache. In this case, let’s assume one of these objects is a Silverlight application (.xap) file, referenced in an <object> tag.
Figure 7.1. Typical Network Interaction in a Silverlight application
The browser loads the Silverlight application, and as soon as it starts running, it realizes that it needs some data to display. To get the data, it makes some sort of network request using the Client Object Model, RESTful services, or some other protocol and waits for a response. Assuming the needed data was already on the server when the web page was requested and we already knew what we’d need, this round trip is “wasted” because rather than passing a reference to the data on the web page, we could have just sent the data itself. It’s not terrible, but it does add load to the web server and slows down the client experience. There is a better way!
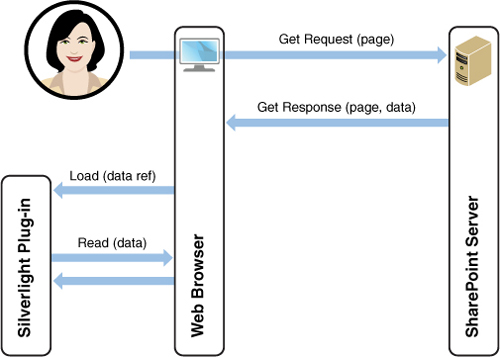
This chapter proposes an alternative, depicted in Figure 7.2. The data needed by Silverlight is embedded in the web page, so the Silverlight application doesn’t need to make another round trip to the server. This can noticeably speed up the user interface, especially when a page is loading and the browser is requesting a lot of other resources, and it certainly reduces load on the server. It’s easy to pass data to your Silverlight application in a hidden field or even in the InitParams property of the Silverlight object tag.
Figure 7.2. Piggybacking data on the SharePoint page
This technique isn’t only useful for optimizing network traffic; there are situations where you really need to pass data on the web page because users expect the data to be processed when the page is posted back. An example of this is in the editor part later in this chapter. An editor part is a control that runs in the web part editing panel to allow users to configure some aspect of the web part. When editing a web part, users expect all their changes to be saved or cancelled when they press the OK, Apply, or Cancel buttons in the SharePoint UI. If a Silverlight application located in the web part editing panel were to use the client object model or a web service to update the settings as the user selects them, it would be too soon. Instead, the Silverlight application pushes its data into a hidden field on the page that is handled along with all the other fields during postback processing so all of the changes are saved or cancelled together.
Passing Data on the Web Page
Early on in this book, you learned a simple way to pass data to Silverlight using the InitParams parameter in the Silverlight <object> tag. This is indeed on the web page, and is a good start, but InitParams is really intended for passing a few values needed for application startup, specified as name/value pairs and accessed as a Dictionary object. For example, if InitParams is specified as
<param name="initparams" value="message=hello,urgency=normal" />
the application will be passed a Dictionary object containing two keys (“message” and “urgency”) and their values (“hello” and “normal”). This can be accessed in the Application_Startup event as shown in Listing 7.1, which passes the information to the Silverlight user control in its (modified) constructor.
Listing 7.1. Accessing InitParams from the Silverlight Application_Startup Method
private void Application_Startup(object sender, StartupEventArgs e)
{
if (e.InitParams.ContainsKey("message") &&
e.InitParams.ContainsKey("urgency"))
{
string message = e.InitParams["message"];
string urgency = e.InitParms["urgency"];
this.RootVisual = new MainPage(message, urgency);
}
}
Although some developers have reported success passing large amounts of serialized data in InitParams, it’s generally easier and more flexible to pass it in a hidden field on the page. Visible fields can also be used, and sometimes using a TextBox can be helpful during debugging.
Access to the field from Silverlight is provided by the Silverlight HTML Bridge. The Silverlight HTML Bridge provides dynamic access to the hosting web page, as well as access to and from Javascript functions and objects. You can easily retrieve and change any content on the web page using this technology.
Silverlight maintains a security setting called enableHtmlAccess, which controls whether a web page wants its HTML and Javascript to be available to Silverlight. This security setting could block Silverlight’s ability to access data in a page field, as shown in this chapter.
By default, enableHtmlAccess is true when the web page and Silverlight applications both come from the same DNS domain and otherwise is set to false. For example, if you host your .xap file on http://server.abc.com and your web page on http://www.xyz.com, by default Silverlight won’t be able to access the page.
To manually enable access, include the enablehtmlaccess property in the Silverlight object tag, as follows:
<param name="enablehtmlaccess" value="bool"/>
Set “bool” to true or false to enable or disable access. There are similar issues when calling web services across DNS domains in Silverlight; this is covered in Chapter 11, “Accessing External Data.”
To start, consider a simple example. (The solution is called Chapter07a.sln in the downloadable code.) If you want to create a similar project yourself, begin with a SharePoint sandboxed solution and add a simple web part. Then add a Silverlight application project, but don’t bother to allow it to create a test application.
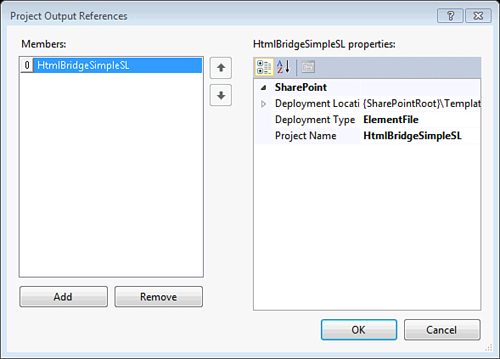
In the SharePoint project, add a new Module item and call it ClientBin. Delete the Sample.txt file that comes with the module. Click the module and view its properties and then open up the Project Output References collection. Add a new Project Output Reference by clicking the Add button. Set the Deployment Type to ElementFile and for Project Name, select the Silverlight project. Figure 7.3 shows the Project Output Reference dialog box. This tells SharePoint to deploy the Silverlight project’s .xap file to the /ClientBin directory when the SharePoint solution is deployed.
Figure 7.3. Setting a Project Output Reference to deploy the Silverlight .xap file
In the web part, a hidden HTML field is created along with the Silverlight plug-in in CreateChildControls(); this is shown in Listing 7.2. The code uses the same custom Silverlight plug-in control that was introduced in Chapter 5, “Web Part Development”; your best bet is to copy it from the code download.
Listing 7.2. Passing Data to Silverlight in a Hidden Field
protected override void CreateChildControls()
{
HiddenField hidden = new HiddenField();
hidden.Value = "Hello, world.";
this.Controls.Add(hidden);
SilverlightPlugin silverlight = new SilverlightPlugin();
SPSite currentSite = SPContext.Current.Site;
silverlight.Source =
((currentSite.ServerRelativeUrl == "/") ? "/" :
currentSite.ServerRelativeUrl + "/") +
"ClientBin/Chapter10SimpleSL.xap";
silverlight.InitParameters = "controlId=" + hidden.ClientID;
this.Controls.Add(silverlight);
}
The code passes a message, “Hello, world,” in a hidden field and passes the client ID of the hidden field to Silverlight in the initparams property.
Tip
The URL manipulation for the Silverlight source file in Listing 7.2 is to ensure the solution works in a site collection at the root of a web application (such as http://myserver/) or under a managed path (such as http://myserver/sites/something/). Unfortunately the SharePoint Server API returns / for the former case, but only /sites/something (with no trailing /) in the latter, so the code needs to add the extra / when building the .xap file’s URL.
To thoroughly test your solutions, ensure they work properly in the root of a web application and under a managed path. For each of these, test the web part in the top-level site and in a child site.
Doing a “view source” in a web browser displaying the web part shows the hidden field (the control IDs are shortened for readability):
<input type="hidden" name="ctl00$m$g..." id=" ctl00$m$g..."
value="Hello, world." />
The HTML source also shows that the hidden field’s control ID is passed in initparams:
<object data="data:application/x-silverlight-2,"
type="application/x-silverlight-2" width="100%" height="100%">
<param name="source"
value="/sites/book/ClientBin/Chapter10SimpleSL.xap"/>
...
<param name="initparams" value="controlId= ctl00$m$g..." />
...
</object>
The next step is when the Silverlight application starts up and fires its Application_Startup event in App.xaml.cs. The code retrieves the control ID and passes it to the user control, as shown in Listing 7.3.
Listing 7.3. Passing the Hidden Field’s Control ID into the Silverlight Application
private void Application_Startup(object sender, StartupEventArgs e)
{
if (e.InitParams.ContainsKey("controlId"))
{
string controlId = e.InitParams["controlId"];
this.RootVisual = new MainPage(controlId);
}
}
Finally, the message is passed to the main page in its constructor, which displays the message in a text box. Change the MainPage constructor in MainPage.xaml.cs as shown in Listing 7.4.
Listing 7.4. Displaying Data from the Hidden Field
public MainPage(string controlId)
{
InitializeComponent();
HtmlDocument doc = HtmlPage.Document;
HtmlElement hiddenField = doc.GetElementById(controlId);
string message = hiddenField.GetAttribute("value").ToString();
MessageTextBlock.Text =
"The message from the server is: " + message;
}
The HtmlPage, HtmlDocument, and HtmlElement classes are part of the HTML Bridge and are in the System.Windows.Browser namespace. The HtmlDocument object corresponds to the web browser’s Document object, and as in Javascript there is a function to get an element by ID. When the hidden field element is in hand, its value attribute can be accessed (or even updated) just as in Javascript.
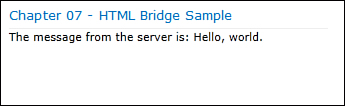
When the project is deployed and the web part placed on a SharePoint page, the simple message is shown in the Silverlight application, as seen in Figure 7.4.
Figure 7.4. Simple demonstration of the HTML Bridge
Passing SharePoint Library Content to Silverlight
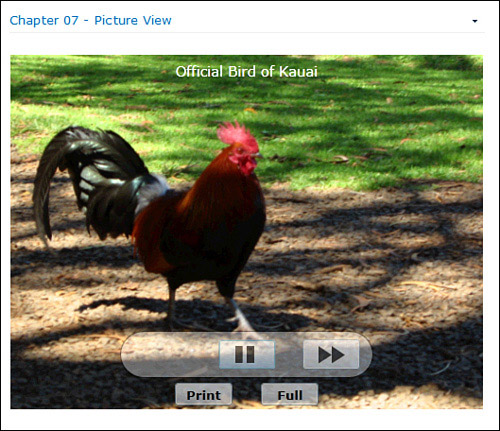
Passing “Hello world” from server to client isn’t all that exciting, and indeed such a message could be passed in InitParams rather than using a hidden field. To demonstrate a more interesting example, consider the PictureView Web Part included as the Chapter07b.sln solution in the code download. As shown in Figure 7.5, this web part displays images from a picture library as a slide show.
Figure 7.5. The PictureView Web Part
This is the kind of web part that might find its way onto the home page of a web site, rotating the pictures of the day. If traffic is high, avoiding the extra round-trip is especially appealing. The web part reads the picture library and passes Silverlight the data needed to render pictures in a hidden field.
There’s too much code in this solution to include all of it in the chapter listings, so it’s best to start right off with the Chapter07b.sln solution from the code download. The chapter, however, endeavors to explain all the concepts required to follow the code. For those who don’t want to build the sample, you still learn how to use the HTML Bridge to shuttle data structures between SharePoint and Silverlight.
Open the sample solution in Visual Studio 2010 and deploy it to a test SharePoint site where you have a Picture Library that contains some pictures. Place the PictureView Web Part on the page and edit it. In the editing panel, select the picture library you wish to display, and you should be presented with a slide show of the images in the web part.
Tip
Another advantage of retrieving SharePoint data on the server is the possibility of caching. This solution could be made even more scalable by caching the list of pictures on the server. This is easily done using the ASP.NET Cache object.
Just remember that SharePoint implements security trimming on both the server and client APIs; if a user doesn’t have permission to read an item, it is hidden from the API. This is a cool feature that comes with no additional code; end users just see what they’re supposed to without any developer work. However, caching one user’s content and showing it to another could be a problem. If security is a concern, be sure to take this into account before designing server-side caching into your solution.
This project begins much as the previous one. It starts with a SharePoint sandboxed solution called Chapter07b, which contains a standard web part. The solution also contains two Silverlight applications. The PictureViewSL project displays the pictures, and PictureViewEditorPartSL is used when editing the web part. In the SharePoint project, a module called ClientBin contains output references to the Silverlight application projects. To complete the setup, the SilverlightPlugin class seen in Chapter 5 is back to place the Silverlight application on the page.
Listing 7.5 shows the web part’s CreateChildControls() method, which places the hidden field and Silverlight objects on the page. Notice that both of the child controls are in fields so they can be accessed later on during web part processing.
Listing 7.5. CreateChildControls() Creates a Hidden Field and Silverlight Plugin Control
HtmlInputHidden inputControl;
SilverlightPlugin silverlightControl;
protected override void CreateChildControls()
{
inputControl = new HtmlInputHidden();
this.Controls.Add(inputControl);
silverlightControl = new SilverlightPlugin();
this.Controls.Add(silverlightControl);
}
You might wonder why CreateChildControls() doesn’t pass any data to Silverlight as it did in the previous example. The reason is that the picture data won’t necessarily be available during CreateChildControls() because that comes too early in the page rendering cycle. If a user edits the web part and changes its properties, to select a new picture library for example, the changes won’t show up until the postback occurs during page rendering. This is long after CreateChildControls() has run. To make the changes show up immediately when the web part is edited, the code to read the picture data is in OnPreRender(), which always runs after postback processing. This is shown in Listing 7.6.
The code checks to be sure the user has selected a picture library, and if so it passes the picture information to Silverlight in a collection of PictureList objects. The next section describes the PictureList class and explains the mysteries of its Serialize method, which turns the whole list into an HTML-safe string. For now just observe the use of the SharePoint server API to get the picture data and put it in the hidden field. The hidden field’s client-side ID is passed to the Silverlight applications in InitParams, just like in the last example.
Listing 7.6. Sending Picture Data to Silverlight
protected override void OnPreRender(EventArgs e)
{
base.OnPreRender(e);
try
{
// Ensure there is a picture library selected
if (this.PictureLibraryName == null ||
this.PictureLibraryName == "")
{
throw new Exception("Please select a picture library ");
}
// Build the server URL (to be pre-pended to image URL's to
// make them absolute)
Uri serverUri = new Uri(this.WebUrl);
string serverUrl = serverUri.Scheme + "://" +
serverUri.DnsSafeHost;
if (serverUri.Port != 80)
{
serverUrl += ":" + serverUri.Port.ToString();
}
// Build the picture list
PictureList pictureList = new PictureList();
pictureList.ServerUrl = serverUrl;
pictureList.WebUrl = this.WebUrl;
pictureList.PictureLibName = this.PictureLibraryName;
using (SPSite site = new SPSite(this.WebUrl))
{
using (SPWeb web = site.OpenWeb())
{
SPList picList = web.Lists[this.PictureLibraryName];
foreach (SPListItem li in picList.Items)
{
pictureList.List.Add(new Picture(li.Title,
serverUrl + li.File.ServerRelativeUrl));
}
}
}
inputControl.Value = pictureList.Serialize();
// Set up Silverlight plug-in
SPSite currentSite = SPContext.Current.Site;
silverlightControl.Source =
((currentSite.ServerRelativeUrl == "/") ?
"/" : currentSite.ServerRelativeUrl + "/") +
"ClientBin/PictureViewSL.xap";
silverlightControl.InitParameters = "InputControlID=" +
inputControl.ClientID;
base.CreateChildControls();
}
catch (Exception ex)
{
this.errorSet = true;
this.errorMessage = ex.Message;
}
}
As you can see, the code loops through the picture library and adds a Picture object to the PictureList for each item it finds. During the process it changes each picture’s URL from relative to an absolute by adding the http://servername portion in front. The Silverlight Bitmap object that eventually reads the images expects an absolute URL. When the PictureList completes, it is serialized and stuffed into a hidden input control.
You might notice the exception handling sets a flag called errorSet and saves away the error message in a field called errorMessage. In case an exception is thrown, the overridden Render() method displays the error message instead of the child controls as shown in Listing 7.7.
Listing 7.7. Exception Handling in the Web Part Render() Method
// Exception handling fields
private bool errorSet = false;
private string errorMessage = "";
// Render exception if any, otherwise let the base class render the
// Controls collection
protected override void Render(HtmlTextWriter writer)
{
if (!this.errorSet)
{
base.Render(writer);
}
else
{
writer.Write("Error: " +
HttpContext.Current.Server.HtmlEncode(this.errorMessage));
}
}
Serializing Using the Data Contract JSON Serializer
To see how the picture data is serialized, take a look at Listing 7.8. This code defines the PictureList and Picture classes and can be found in PictureList.cs in both the SharePoint and PictureViewSL projects in the code download. To make it serializable, the classes are decorated with a DataContract attribute, and each serializable property is marked as a DataMember.
Listing 7.8. Picture and PictureList Classes
using System.IO;
using System.Runtime.Serialization;
using System.Runtime.Serialization.Json;
[DataContract]
public class Picture
{
public Picture(string title, string url)
{
this.Title = title;
this.Url = url;
}
public Picture()
{
}
[DataMember]
public string Title { get; set; }
[DataMember]
public string Url { get; set; }
}
[DataContract]
public class PictureList
{
[DataMember]
public string ServerUrl { get; set; }
[DataMember]
public string WebUrl { get; set; }
[DataMember]
public string PictureLibName { get; set; }
[DataMember]
public List<Picture> List { get; set; }
public PictureList()
{
this.List = new List<Picture>();
}
}
The code defines a Picture class to hold the information about each picture and a PictureList class, which as the name implies is a list of pictures. Some other random information needed by the Silverlight application is also included in the PictureList class; an advantage of this technique is that it’s extremely easy to change the data payload by simply editing DataMember properties.
This is a good start, but there is still no code to serialize the data so it can be placed in a hidden field on the server side and reconstituted from the field in Silverlight. .NET provides serializers for XML and JSON, the JavaScript Object Notation; of these the latter is more compact and has the advantage that it can be evaluated by Javascript. To use the JSON serializer, you must add references to System.Runtime.Serialization and System.ServiceModel.Web; these are available both on the server and in Silverlight.
Actually serializing and deserializing the PictureList is only a few lines of code, as shown in Listing 7.9. Deserializing is provided in a static Load() method to make it easy for callers to obtain a PictureList already loaded from some serialized data. Both methods are part of the PictureList class.
Listing 7.9. Serializing and Deserializing the Picture List
public string Serialize()
{
DataContractJsonSerializer js =
new DataContractJsonSerializer(this.GetType());
string result = "";
using (MemoryStream ms = new MemoryStream())
{
js.WriteObject(ms, this);
result = Encoding.UTF8.GetString(ms.ToArray(), 0,
Convert.ToInt32(ms.Length));
}
return result;
}
public static PictureList Load(string serializedObject)
{
DataContractJsonSerializer js =
new DataContractJsonSerializer(typeof(PictureList));
PictureList result = null;
using (MemoryStream ms = new
MemoryStream(Encoding.UTF8.GetBytes(serializedObject)))
{
Object o = js.ReadObject(ms);
if (o is PictureList)
{
result = o as PictureList;
}
ms.Close();
}
return (result);
}
Notice that the serialized JSON is in UTF8 format; this encoding is specified in the JSON specification.
It’s not too hard, by the way, to put the Serialize() and Load() methods in a reusable class, so any derived class you might cook up can easily be serialized; this is the SerializableObject class found in Chapters 10, 13, and 15. To make this work, the Load() method needs to use a generic to allow it to return the derived type at runtime. This is shown in Listing 7.10.
Listing 7.10. SerializableObject Base Class
// Serializable Object - Base class to allow quick serialization and
// deserialization of derived classes. To use, pass the derived
// class as T.
[DataContract]
public class SerializableObject <T> where T : SerializableObject<T>
{
// Serialize the object and return it as a string
public string Serialize()
{
DataContractJsonSerializer js =
new DataContractJsonSerializer(this.GetType());
string result = "";
using (MemoryStream ms = new MemoryStream())
{
js.WriteObject(ms, this);
result = Encoding.UTF8.GetString(ms.ToArray(), 0,
Convert.ToInt32(ms.Length));
}
return result;
}
// Deserialize the object from the provided string
public static T Load(string serializedObject)
{
DataContractJsonSerializer js =
new DataContractJsonSerializer(typeof(T));
T result = null;
using (MemoryStream ms = new
MemoryStream(Encoding.UTF8.GetBytes(serializedObject)))
{
Object o = js.ReadObject(ms);
if (o is T)
{
result = o as T;
}
ms.Close();
}
return (result);
}
}
Retrieving the Data in Silverlight
On the Silverlight side, the process of getting the PictureList begins in the Application_Startup event handler in App.xaml.cs, which, as before, passes the control ID of the hidden field that contains the data. This is shown in Listing 7.11.
Listing 7.11. Retrieving the Hidden Field ID in the Application_Startup Event
private void Application_Startup(object sender, StartupEventArgs e)
{
MainPage p = new MainPage();
this.RootVisual = p;
if (e.InitParams.ContainsKey("InputControlID"))
{
p.ReadPictureDataFromPage(e.InitParams["InputControlID"]);
}
}
The event handler calls a method called ReadPictureDataFromPage() in the MainPage class. Reading the data is just a question of accessing the hidden field and calling the Load() method, as shown in Listing 7.12.
Listing 7.12. Reading the Picture Data from the Hidden Field
// Private fields for picture data and selection
private IEnumerable<Picture> currentPictures;
private int currentPictureIndex = 0;
internal void ReadPictureDataFromPage(string inputControlID)
{
// Use the browser DOM to find the element and parse it
HtmlDocument doc = HtmlPage.Document;
HtmlDocument doc = HtmlPage.Document;
HtmlElement hidden = doc.GetElementById(controlId);
string jsonString = hidden.GetAttribute("value").ToString();
// Get picture data from json
PictureList p = PictureList.Load(jsonString);
currentPictures = p.List;
// Display the first image and start the timer to show them all
DisplayImage(0);
timer.Start();
VisualStateManager.GoToState(this, "Playing", true);
}
Introducing the Visual State Manager
At the end of Listing 7.12 there are a few lines of code to display the first image, start the timer, and to go to a state in the Visual State Manager (VSM), which is the topic of this section.
DisplayImage(0);
timer.Start();
VisualStateManager.GoToState(this, "Playing", true);
The first image is displayed using the DisplayImage() method, and the timer is started to begin showing the pictures as a slide show. Then the VSM is called to set the application’s play/pause controls to the Playing state. DisplayImage() uses the VSM to show the fade transition between images, so it makes sense to understand it before digging into DisplayImage() itself.
The VSM is a powerful part of Silverlight and Windows Presentation Foundation that greatly simplifies managing the user interface states for an application. VSM manages states, such as whether the slide show is playing or paused. These are grouped into state groups, which are sets of states that govern independent aspects of the user interface. PictureView has a number of state groups that control its presentation:
• PlayStates (Paused, Playing)—These states control whether the application is playing a slide show or is paused.
• CurrentItemStates (FirstItem, MiddleItem, LastItem)—These states control the disabling of the Previous and Next buttons for the first and last items in the list, so you can’t advance beyond the last image or before the first.
• MouseStates (MouseOver, MouseOut)—These states control the fading in of controls when the mouse hovers over the application.
• DisplayImageStates (MainImageShowing, AltImageShowing)—These states are used to smoothly fade between images.
The XAML code defines a set of animations or storyboards to be played when each state is entered. The storyboards change control properties over a period of time. For example, entering the MouseOver state gradually changes the opacity of the player controls to 100%, and entering the MouseOut state fades it to 0%.
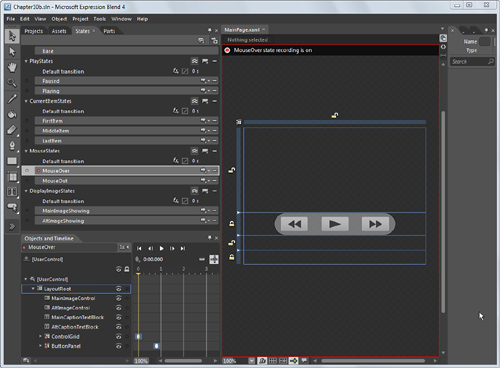
Figure 7.6 shows these state groups being edited in Expression Blend. In the figure, the MouseOver state is selected; this brings the MouseOver timeline into the Objects and Timeline panel. A timeline is used to define the Silverlight animation, and the points on the timeline relate to property settings to be attained when that point in time is reached. Expression Blend makes it easy to create and edit these timelines by “recording” the property settings when an object and point in time are selected. For a video walk-through of how to configure Visual State Manager states in Expression Blend, see http://bit.ly/SPSL_BlendVSM.
Figure 7.6. Working with the Visual State Manager in Expression Blend
When they’ve been set up in XAML, it’s easy to switch between visual states in code, as in this example:
private void LayoutRoot_MouseEnter(object sender, MouseEventArgs e)
{
VisualStateManager.GoToState(this, "MouseOver", true);
}
Displaying and Caching Images
Loading the pictures smoothly is the intent of the DisplayImageStates state group. Silverlight displays images using its Image control, and PictureView has not one but two of them. The MainImageControl is shown when the DisplayImageStates group is in MainImageShowing state, and the AltImageControl is shown in AltImageShowing state.
DisplayBitmap()is called when an image is to be shown; it loads a bitmap into whichever image control isn’t showing, and the VSM plays an animation that fades out the old image while fading in the new one. This is shown in Listing 7.13.
Listing 7.13. Fading Between Bitmaps with the Visual State Manager
// Alternate between main and alt image controls, beginning with main
private enum ImageControlStates { MainImageShowing, AltImageShowing }
private ImageControlStates currentImageControlState =
ImageControlStates.MainImageShowing;
// Display a bitmap on whichever image control isn't being used, then
// change visual and local states
private void DisplayBitmap(BitmapImage bitmap, string caption)
{
switch (this.currentImageControlState)
{
case ImageControlStates.MainImageShowing:
{
AltImageControl.Source = bitmap;
AltCaptionTextBlock.Text = caption;
VisualStateManager.GoToState(this, "AltImageShowing",
true);
this.currentImageControlState =
ImageControlStates.AltImageShowing;
break;
}
case ImageControlStates.AltImageShowing:
{
MainImageControl.Source = bitmap;
MainCaptionTextBlock.Text = caption;
VisualStateManager.GoToState(this, "MainImageShowing",
true);
this.currentImageControlState =
ImageControlStates.MainImageShowing;
break;
}
}
}
You might have noticed that back in Listing 7.12 there was a call to DisplayImage(0). DisplayImage() calls DisplayBitmap() and also adds bitmap caching.
Silverlight does not cache downloaded images, nor does the browser’s cache help with this. DisplayImage() caches the images in a dictionary object. Though this doesn’t persist after the user leaves the web page, it works for as long as the slide show is left cycling. This is shown in Listing 7.14.
Listing 7.14. Code to Display Images from SharePoint
// Bitmaps are cached in this Dictionary
private Dictionary<int, BitmapImage> imageCache =
new Dictionary<int, BitmapImage>();
// DisplayImage - Displays an image by its index
private void DisplayImage(int pictureIndex)
{
// Get the selected picture information
Picture picture = currentPictures.ElementAt<Picture>(pictureIndex);
// Try to get the bitmap from cache, or load it up
BitmapImage bitmap;
if (imageCache.ContainsKey(pictureIndex))
{
bitmap = imageCache[pictureIndex];
}
else
{
bitmap = new BitmapImage(new Uri(picture.Url));
imageCache[pictureIndex] = bitmap;
}
// Display the bitmap and remember the current picture index
DisplayBitmap(bitmap, picture.Title);
currentPictureIndex = pictureIndex;
// Cache the next image if necessary
if (currentPictureIndex < (currentPictures.Count<Picture>() - 1) &&
!imageCache.ContainsKey(pictureIndex+1))
{
Picture nextPicture =
currentPictures.ElementAt<Picture>(pictureIndex + 1);
imageCache[pictureIndex+1] =
new BitmapImage(new Uri(nextPicture.Url));
}
// Set visual state depending on what item we are now showing
if (currentPictureIndex <= 0)
{
VisualStateManager.GoToState(this, "FirstItem", true);
}
else if (currentPictureIndex <
(currentPictures.Count<Picture>() - 1))
{
VisualStateManager.GoToState(this, "MiddleItem", true);
}
else
{
VisualStateManager.GoToState(this, "LastItem", true);
}
}
DisplayImage() is passed an index for the picture to be displayed, and it starts by looking in the imageCache dictionary for a bitmap with that index. If it’s not found, the bitmap is loaded from SharePoint and added to the cache:
bitmap = new BitmapImage(new Uri(picture.Url));
imageCache[pictureIndex] = bitmap;
Then the bitmap is displayed by calling DisplayBitmap(). Display Image() also attempts to cache the next image in advance so it can be displayed quickly when the time comes.
DisplayImage() also manages the CurrentItemStates group, which governs the display of the control buttons. When the first image is displayed, the Previous button must be hidden, just as the Next button is concealed when the last image is shown. The code simply switches to the appropriate visual state to show and hide the buttons as needed.
Much of the rest of the MainPage code is spent in button event handlers and the timer, all of which end up calling DisplayImage(). However, there are a couple more nuggets to explore next, namely the code behind the Full Screen and Print buttons.
Full Screen and Printing in Silverlight
If you press the Full Screen button on the web part, the application runs in full screen. The code only needs to flip the IsFullScreen flag, as shown in Listing 7.15.
Listing 7.15. Running Silverlight Full Screen
private void FullScreenButton_Click(object sender, RoutedEventArgs e)
{
App.Current.Host.Content.IsFullScreen =
!App.Current.Host.Content.IsFullScreen;
}
Be aware, however, that there are some security limitations when running in full screen. This is to prevent an application from simulating another user interface, such as a login screen or web browser, to illicitly obtain information from a user. To that end, it’s not possible to start an application in full screen mode; it can only be changed in an event handler that follows some user action. In addition, the user is prompted for consent, and keyboard use is limited while in full screen mode.
If you press the Print button on the web part, you are presented with the operating system’s Print dialog box and given an opportunity to print the currently displayed picture. Again the code is pretty simple, as shown in Listing 7.16. InitializePrinting() is called from the MainPage constructor, so printing is always ready when a user clicks the button.
Listing 7.16. Printing in Silverlight
private PrintDocument pDoc = new PrintDocument();
private void InitializePrinting()
{
pDoc.PrintPage +=
new EventHandler<PrintPageEventArgs>(pDoc_PrintPage);
}
void pDoc_PrintPage(object sender, PrintPageEventArgs e)
{
if (this.currentImageControlState ==
ImageControlStates.AltImageShowing)
{
e.PageVisual = this.AltImageControl;
}
else
{
e.PageVisual = this.MainImageControl;
}
}
private void PrintButton_Click(object sender, RoutedEventArgs e)
{
pDoc.Print("Silverlight Photo");
}
Web Part Editing and Posting Back with the Web Page
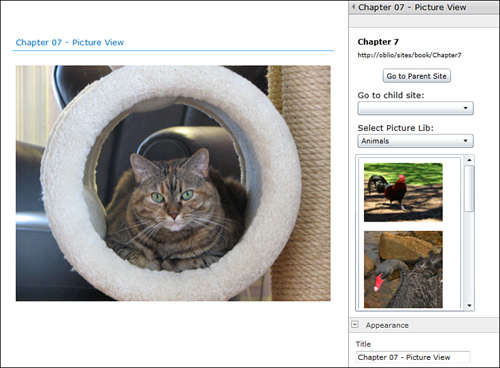
The PictureView Web Part could employ a simple text field to contain the URL of the picture library to be displayed, but that’s a pain for users who would have to type the long URL exactly or paste it in from the browser’s address bar. To simplify matters, PictureView includes an Editor Part to provide a custom, Silverlight-based editing experience. As shown in Figure 7.7, the editor part allows the user to select a picture library in the current or a different site and to preview the first few pictures before completing the selection.
Figure 7.7. PictureView Editor Part
This also provides another key example of HTML Bridge use. The editor part runs in the panel that swings out from the right when a user edits a web part. There are many fields on the panel, and the users rightfully expect that all or none of them will be saved when they click OK or Cancel. The same thing happens in a dialog box, on an administrative form, or during web page editing: Updating is an all-or-nothing affair across multiple web form fields. The Silverlight application uses a hidden field to post back the data along with the other fields on the page.
Under the covers, this editor part operates on two strings: the site URL and picture library name. They are exposed as public properties in the PictureView Web Part, as shown in Listing 7.17.
Listing 7.17. Editable Properties of the PictureView Web Part
[Personalizable(PersonalizationScope.Shared),
WebBrowsable(false),
WebDescription("URL of Web Site"),
WebDisplayName("Web URL"),
System.ComponentModel.Category("Configuration")]
public string WebUrl { get; set; }
[Personalizable(PersonalizationScope.Shared),
WebBrowsable(false),
WebDescription("Name of Picture Library"),
WebDisplayName("Picture Library"),
System.ComponentModel.Category("Configuration")]
public string PictureLibraryName { get; set; }
If the WebBrowsable attribute were set to true, SharePoint would generate a pair of text boxes for these properties, but because our Silverlight editor part renders the information, it is set to false. Next you must tell the web part about the editor part so it will be displayed when the web part is edited; this is accomplished by overriding the CreateEditorParts() method as shown in Listing 7.18.
Listing 7.18. CreateEditorParts() Method
public override EditorPartCollection CreateEditorParts()
{
ArrayList editorPartArray = new ArrayList();
PictureViewEP editorPart = new PictureViewEP();
editorPart.Height = Unit.Pixel(450);
editorPart.ID = this.ID + "_editorPart";
editorPartArray.Add(editorPart);
// If no site is already selected, use this site
if (string.IsNullOrEmpty(WebUrl))
{
Uri pageUrl = HttpContext.Current.Request.Url;
string webUrl = SPContext.Current.Web.ServerRelativeUrl;
if (pageUrl.IsDefaultPort)
{
WebUrl = pageUrl.Scheme + "://" + pageUrl.Host + webUrl;
}
else
{
WebUrl = pageUrl.Scheme + "://" + pageUrl.Host + ":" +
pageUrl.Port + webUrl;
}
}
return new EditorPartCollection(editorPartArray);
}
The Editor Part itself is a composite control called PictureViewEP, which is derived from the EditorPart class. Listing 7.19 shows the editor part’s CreateChildControls() method; as you can see it uses two hidden fields, which just happens to correspond with the two web part properties from Listing 7.17. As before, the hidden field IDs are passed to the Silverlight application using InitParams.
Listing 7.19. CreateChildControls() in the Editor Part
private HiddenField webUrlField = new HiddenField();
private HiddenField pictureLibraryField = new HiddenField();
protected override void CreateChildControls()
{
base.CreateChildControls();
// Add hidden fields to store the web address and picture library
this.Controls.Add(webUrlField);
this.Controls.Add(pictureLibraryField);
// Add the Silverlight application which will edit these values
SilverlightPlugin sl = new SilverlightPlugin();
SPSite site = SPContext.Current.Site;
sl.Source = ((site.ServerRelativeUrl == "/") ? "/" :
site.ServerRelativeUrl + "/") +
"ClientBin/PictureViewEditorPartSL.xap";
sl.InitParameters =
"webUrlClientID=" + this.webUrlField.ClientID +
",pictureLibraryClientID=" + this.pictureLibraryField.ClientID;
sl.Width = this.Width;
sl.Height = this.Height;
this.Controls.Add(sl);
}
All editor parts must implement a pair of methods, ApplyChanges() and SyncChanges(), to keep the editor part in sync with the web part being edited. SyncChanges() is called to tell the editor part to load the values from the web part prior to editing, and ApplyChanges() tells the editor part to save the updated values back to the web part.
Listing 7.20 shows the PictureView editor part’s implementation of these methods. All they really need to do is copy the web part properties into the hidden fields (in SyncChanges()) and back again (in ApplyChanges()). Notice that both methods call EnsureChildControls(); this method calls CreateChildControls() if it hasn’t already run and ensures that the hidden fields have been created before attempting to move data in and out of them.
Listing 7.20. SyncChanges() and ApplyChanges() in the Editor Part
// SyncChanges - Override to update the EditorPart controls
// with the latest web part properties
public override void SyncChanges()
{
this.EnsureChildControls();
if (this.WebPartToEdit is PictureView)
{
PictureView webPart = this.WebPartToEdit as PictureView;
webUrlField.Value = webPart.WebUrl;
pictureLibraryField.Value = webPart.PictureLibraryName;
}
}
// ApplyChanges - Override to update the web part with the
// latest EditorPart control values
public override bool ApplyChanges()
{
if (this.WebPartToEdit is PictureView)
{
PictureView webPart = this.WebPartToEdit as PictureView;
webPart.WebUrl = webUrlField.Value;
webPart.PictureLibraryName = pictureLibraryField.Value;
}
return true;
}
The Silverlight application can now read and write its settings to the hidden fields, and the editor part take cares of updating the web part settings in its ApplyChanges() method. When the Silverlight application starts up, it saves away both fields and initializes the user interface based on their initial values. Listing 7.21 shows the PictureViewEditorPartSL application’s MainPage constructor. Just as in the earlier examples in this chapter, the Application_Startup() event handler takes the IDs of the two hidden fields from InitParams and passes them in.
Listing 7.21. Silverlight Editor Part MainPage Constructor
// Fields on the hosting web page, used to pass data between
// server and client
private HtmlElement webUrlField;
private HtmlElement pictureLibraryField;
private string originalPictureLibraryName;
public MainPage(string webUrlClientID, string pictureLibraryClientID)
{
InitializeComponent();
// Get the fields on the hosting page
HtmlDocument doc = HtmlPage.Document;
webUrlField = doc.GetElementById(webUrlClientID);
pictureLibraryField = doc.GetElementById(pictureLibraryClientID);
// If we have a picture library name, remember it
if (pictureLibraryField != null &&
pictureLibraryField.GetAttribute("value") != null)
{
this.originalPictureLibraryName =
pictureLibraryField.GetAttribute("value").ToString();
}
// If we have a web URL, then start the UI
if (webUrlField != null &&
webUrlField.GetAttribute("value") != null)
{
LoadSiteData(webUrlField.GetAttribute("value").ToString());
}
}
LoadSiteData() uses the Client Object Model to populate the child site and picture library combo boxes and to show the picture library preview. The Client Object Model is covered in detail in Chapter 8, “Accessing SharePoint Data with the Client Object Model.”
As the user browses within the editor part to various sites and picture libraries, the Silverlight application continually saves the selected site and picture library in the hidden fields. For example, when the user selects a picture library, the combo box’s event handler stuffs the library name into the hidden field and shows a preview of the images in the library. This is shown in Listing 7.22.
Listing 7.22. Updating the Picture Library Field
// Library_SelectionChanged - When the user selects a picture library,
// save it to the web page for post-back
private void Library_SelectionChanged(object sender,
SelectionChangedEventArgs e)
{
if (this.LibraryComboBox.SelectedValue != null)
{
pictureLibraryField.SetAttribute("value",
this.LibraryComboBox.SelectedValue.ToString());
ShowPreview(this.SiteUrlTextBlock.Text,
this.LibraryComboBox.SelectedValue.ToString());
}
}
Using this technique, a Silverlight application can be the user interface for nearly any ASP.NET control; in this case it was an editor part, but it could just as easily be a field control (like the one in Chapter 15) or a control on a web form. Silverlight stuffs updated data into the hidden field(s) just as a user would type into a textbox or click a radio button, so the user gets a richer experience without disrupting the page postback logic.
Calling SharePoint Javascript and JQuery from Silverlight
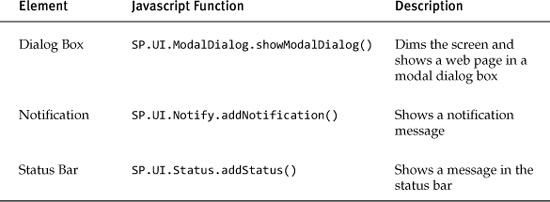
SharePoint’s user interface includes a number of user interface elements like status bars and dialog boxes that developers can use in their solutions. Simple Javascript APIs are provided; using them can save you work and also help your solution fit visually into SharePoint. Table 7.1 shows some of the most useful of these functions.
Table 7.1. Commonly Used SharePoint UI Functions
The sample solution Chapter07c.sln shows a simple Silverlight Web Part that shows a JQuery progress bar in the SharePoint status bar. JQuery is a popular Javascript library that includes client-side widgets such as this progress bar.
When the button is pushed, the Silverlight application simulates a long-running process and advances the progress bar over a period of about 10 seconds. When the progress bar reaches 100%, the status bar is hidden. Figure 7.8 shows two of these web parts, each with its own progress bar.
Figure 7.8. JQuery progress bars in the SharePoint Status Bar
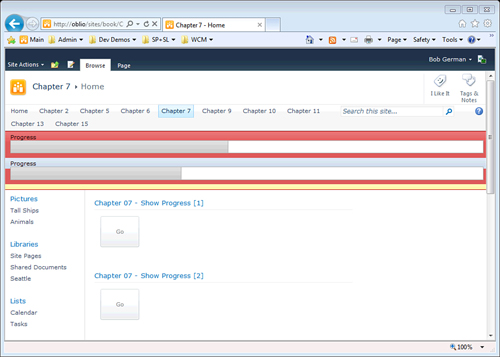
Tip
There are two web parts and progress bars in Figure 7.8 because it was tricky to get two of them to work together on the page. This will be evident in the code.
When testing your solutions, decide if you want to support multiple instances on a page and if so, test it. It’s easy to hard-code an object ID or to add some Javascript, and it might work fine until a second instance is added to the page.
This solution begins with a Custom Silverlight Web Part from the Silverlight SharePoint Web Parts extension described in Chapter 5. This automatically creates a sandboxed Visual Web Part to host the Silverlight application and deploys the Silverlight .xap file to the Master Page Gallery in SharePoint.
From this starting point, the first challenge is to deploy JQuery and its progress bar widget to SharePoint so we can use it in the solution. They come as a set of scripts (.js files), style sheets (.css files) and images (.png) files, which are used to render the progress bar. This is an easy one: Simply add a module to your SharePoint project called jQuery and add all the files. Visual Studio packages them up and deploys them to a folder called jQuery in SharePoint. Because the module is part of a site collection feature, the jQuery folder shows up in the top-level site of the site collection. For documentation on the JQuery and the progress bar, see http://bit.ly/SPSL_JQueryProgressBar.
With the files deployed, the next step is to place the <script> and <link> elements on the page to bring in the Javascript files and style sheets. The tricky part is that if there is more than one instance of the web part on the page, you only want one set of <script> and <link> elements. In a SharePoint farm solution this could be handled by using the ClientScriptManager.RegisterClientScriptBlock() method on the server side, but alas this isn’t accessible in a sandboxed solution. Instead this is handled with client script added to the ShowProgressWP.ascx file, shown in Listing 7.23.
Listing 7.23. Javascript to include JQuery Library Only Once on a Page
<script type="text/javascript">
// Ensure jQuery and extensions are loaded
if (window.ch7jquery == undefined)
{
ch7jquery = new Object();
ch7jquery.load = function (url)
{
var head= document.getElementsByTagName('head')[0];
var element;
if (url.indexOf('.js') > 0)
{
element= document.createElement('script'),
element.type= 'text/javascript';
element.src= url;
}
else
{
element = document.createElement('link'),
element.type = 'text/css';
element.rel = 'stylesheet';
element.href = url;
}
head.appendChild(element);
}
ch7jquery.load ('<%=SPContext.Current.Site.Url%>/jQuery/jquery-1.4.4.min.js'),
ch7jquery.load ('<%=SPContext.Current.Site.Url%>/jQuery/jquery-ui-1.8.11.custom.min.js'),
ch7jquery.load ('<%=SPContext.Current.Site.Url%>/jQuery/jquery-ui-1.8.11.custom.css'),
}
</script>
The other change to the .ascx file is to pass the client control ID to the Silverlight application in InitParams so it can be used to uniquely name its scroll bar. This is easily added to the InitParams parameter:
<param name="initParams" value="MS.SP.url=<%=
Microsoft.SharePoint.Utilities.SPHttpUtility.HtmlEncode(Microsoft.SharePoint.SP
Context.Current.Web.Url) %>,clientID=<%= this.ClientID %>" />
Being able to edit the .ascx file to add script and change the object tag is a big convenience of the Custom Silverlight Web Part.
On the Silverlight side, the Application_Startup event handler passes the client control ID to the MainPage constructor, which saves it away to use in uniquely naming the HTML objects it creates when someone pushes the button. It also starts a DispatcherTimer, which ticks at regular intervals to update the progress bar. By now you’re probably used to seeing Dispatcher.BeginInvoke() used to queue up work for the UI thread; the DispatcherTimer takes care of this for you. (If it’s not familiar, see the Tip on this topic in Chapter 3, “Introduction to Silverlight Development.”) The constructor code is shown in Listing 7.24.
Listing 7.24. MainPage Constructor for JQuery Sample
DispatcherTimer timer = new DispatcherTimer();
private int progressValue = 0;
private string clientID;
public MainPage(string clientID)
{
InitializeComponent();
timer.Tick += new EventHandler(timer_Tick);
timer.Interval = TimeSpan.FromMilliseconds(100);
this.clientID = clientID;
}
When the button is clicked, its event handler cooks up a script block, embedding the unique client control ID in the script to make the status bar ID and progress bar ID unique across multiple instances of the web part. Running Javascript is as easy as calling the HtmlPage.Window.Eval() method. This and the rest of the MainPage code are in Listing 7.25.
Listing 7.25. Code to Animate a JQuery Progress Bar in a SharePoint Status Bar
private void GoButton_Click(object sender, RoutedEventArgs e)
{
string scriptBlock =
"var statusId_" + clientID + "=SP.UI.Status.addStatus" +
" ('','Progress <div id="progressbar_" + clientID +
""></div>')," +
"SP.UI.Status.setStatusPriColor(statusId_" + clientID +
", 'red')," +
"$("#progressbar_" + clientID + "").progressbar({value: 0, height:
10});";
ShowProgress(this.progressValue = 0);
HtmlPage.Window.Eval(scriptBlock);
timer.Start();
GoButton.IsEnabled = false;
}
private void ShowProgress(int i)
{
HtmlPage.Window.Eval("$("#progressbar_" + clientID +
"").progressbar("option", "value", " + i.ToString() + ");");
}
void timer_Tick(object sender, EventArgs e)
{
if (this.progressValue < 100)
{
this.progressValue += 1;
ShowProgress(this.progressValue);
}
else
{
timer.Stop();
HtmlPage.Window.Eval("SP.UI.Status.removeStatus(statusId_"+
clientID + ");");
GoButton.IsEnabled = true;
}
}
Summary
The HTML Bridge is an elegant and efficient way to optimize network utilization and provide expected postback behavior in Silverlight. It also can be used to access Javascript and JQuery elements on the page to provide seamless integration between Silverlight and the rest of the SharePoint UI.
In the next few chapters you explore several other ways for Silverlight to interact with SharePoint: through the Client Object Model, RESTful services, and traditional web services. Powerful as these tools are, it’s worth remembering that the HTML Bridge is available, too, and if you were just delivering or posting back a whole page anyway, it might be your best choice!