
9. Accessing SharePoint Data with WCF Data Services
IN THE LAST CHAPTER you learned about SharePoint’s Client Object Model. This chapter introduces another option for accessing SharePoint list data in Silverlight. WCF Data Services, also known as ADO.NET Data Services, provides easy access to SharePoint list data using REST and the Open Data Protocol.
A major advantage of using WCF Data Services rather than the Client Object Model or Web Services interfaces to SharePoint is that Visual Studio can generate client-side proxy classes that provide strongly-typed access to list data. This can reduce coding errors and makes list fields available in Visual Studio IntelliSense. For example, where in the Client Object Model you might retrieve an IEnumerable<ListItem>, in WCF Data Services you can retrieve an IEnumerable<Task> and be able to reference the task columns as properties of the Task object.
Another advantage is that WCF Data Services uses a standard, the Open Data Protocol (OData), to access SharePoint. This can give you the flexibility to use the same code to access other OData services as well as SharePoint.
REST and the Open Data Protocol
REST and RESTful interfaces have become increasingly popular over the last several years. REST means Representational State Transfer and is actually an architectural pattern rather than a specific technology. For example, although nearly all RESTful interfaces are based on the HTTP protocol, a carrier-pigeon–based system could implement REST as long as it had a uniform way to address resources, used stateless servers, and conformed to a handful of other design principles.
The World Wide Web works on the same design principles, but REST is more general and allows for any kind of data and client states, instead of being limited to page rendering in a web browser. Because the Web itself follows REST, conventional web servers, gateways, proxies, and firewalls are already designed to handle RESTful traffic.
When a RESTful web service is implemented using the HTTP protocol, the resource being acted upon is specified in the URI, the MIME type specifies the data format, and the HTTP verb (GET, PUT, POST or DELETE) specifies the action to be taken. Depending on whether the URI specifies a collection (that is, ends with a /) or a specific entity, the verbs might have different meanings; for example a GET of a collection typically lists the collection, whereas a GET of a specific entity is expected to return the entity’s associated data.
Beyond this, there is no single REST protocol, just as there is no single type of blue jeans: It’s an easily recognized style but not an exact standard. Although many of the advantages of REST can be realized by just following the pattern, interoperability requires standards. That’s where OData comes in.
OData is a protocol that allows for database-style Create, Read, Update and Delete (CRUD) operations over the Web. OData is an abbreviation for Open Data Protocol; for details see http://www.odata.org. OData access is mostly RESTful and is based on HTTP and familiar technologies such as the Atom Publishing Protocol and JavaScript Object Notation (JSON).
OData’s mission is to bridge silos of data and to promote an ecosystem of compatible data consumers and providers. A single client, such as Excel 2010, can access any number of OData services without any programming, and an OData service such as the eBay catalog can be accessed by a wide variety of client applications.
Since its introduction in November 2009, quite a number of OData implementations have become available. At this writing, client libraries were available for Javascript, PHP, Java, iPhone, Silverlight and .NET, as well as being built into client applications such as Excel 2010.
On the server side, Microsoft SQL Server 2008 R2 exposes its reporting services data as OData, as does Microsoft Dynamics CRM 2011, the cloud-based SQL Azure and, of course, SharePoint Server 2010. IBM Websphere also supports the standard, and SAP has announced that its products will as well. In addition, eBay and Netflix have published their catalogs as OData; Windows Live provides OData access to photos, contacts and status messages; and many smaller web sites allow their content to be queried using the standard.
Getting Started with WCF Data Services
WCF Data Services provides both a client library and data services framework to make it easy to consume and produce OData interfaces in .NET and Silverlight. This technology was originally called ADO.NET Data Services, and the name change doesn’t seem to have fully taken effect because the terms are used interchangeably on the Microsoft web site. At this writing, the download is still for “ADO.NET Data Services Update,” even though much of the documentation is labeled “WCF Data Services.”
The good news is that SharePoint 2010 supports OData through this same services framework; the bad news is that the framework code is not installed as a prerequisite, so before using OData, it’s important to ensure that WCF Data Services has been installed on the SharePoint servers to be accessed. Download http://bit.ly/SPSL_DataServicesUpdate and make it a part of your standard SharePoint installation. Ensure that this is installed on your development machine before attempting any of the OData examples in this chapter.
The examples in this chapter make use of a Contacts list in SharePoint. If your test site doesn’t already contain a Contacts list, create one by selecting More Options on the Site Actions menu in SharePoint. Because WCF Data Services is strongly typed, your list name is important because that will be the class name used in your solution; the sample in this chapter uses a contact list called, simply, Contacts.
For the paging and caching examples later in this chapter, it will be helpful to have quite a few contacts in there, so if you have some in Microsoft Outlook you might want to move them into your SharePoint list as test data. To do this, navigate into the list from the computer where you run Outlook; you might need to log in using basic authentication prompts if this machine isn’t in your SharePoint development domain. Click the List tab and then the Connect to Outlook button. (Of course this assumes you have Microsoft Outlook 2007 or 2010 installed.) You are presented with a security prompt; if you allow the connection, Outlook connects to the contacts list in SharePoint. From here you can drag any contacts you have in Outlook into the SharePoint list. On the Send/Receive tab in Outlook, press Send/Receive All Folders to sync your changes into SharePoint. Now you should be able to see your contacts in the SharePoint list.
When WCF Data Services is installed and working on the SharePoint farm, you can use any web browser to query data directly from SharePoint. For example, if your site is at http://intranet.contoso.com/sites/Chapter09/, browse to http://intranet.contoso.com/sites/Chapter09/_vti_bin/listdata.svc. The service responds by enumerating the lists on the site, as shown in Figure 9.1.
Figure 9.1. Enumerating a site’s list with OData
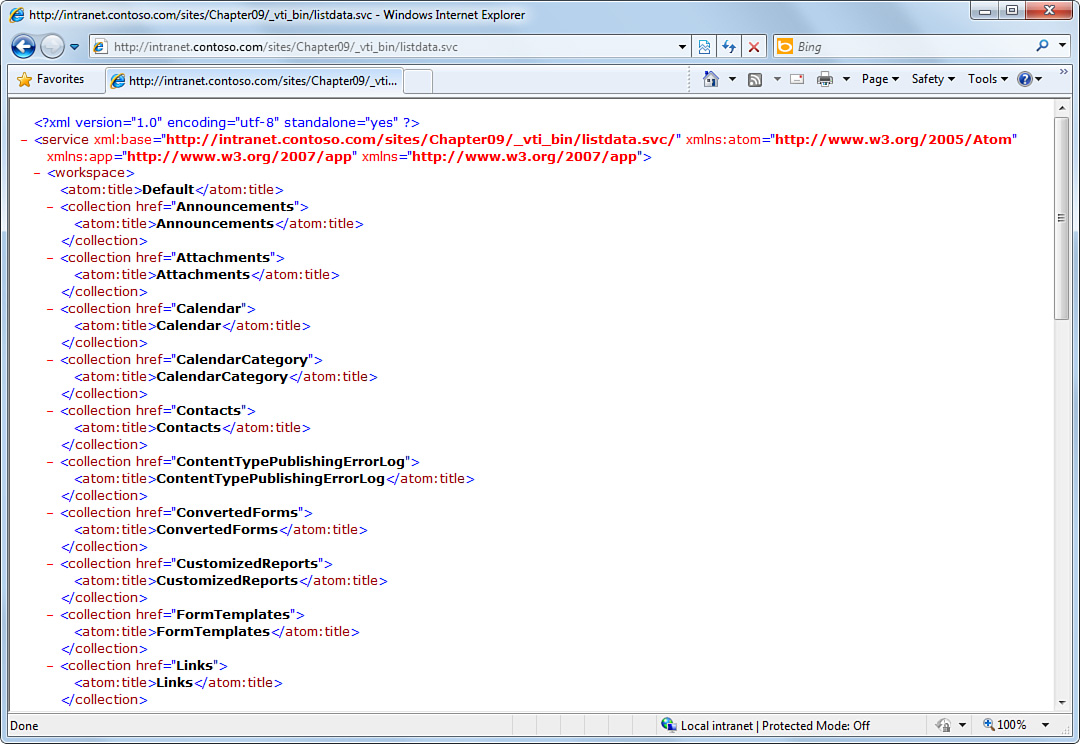
The URI can be extended to query specific list data; for example, appending /Contacts to the URL enumerates the items in the Contacts list as an ATOM feed. If you’re using Internet Explorer, it recognizes the Atom Pub format and offers to subscribe to it as a feed. If you wish to see the XML directly, you can turn this off. On the Tools menu, select Internet Options; then on the Content Tab click the Settings button for Feeds and Web Sites. If you uncheck the Turn on Feed Reading View checkbox, the browser displays simple XML thereafter.
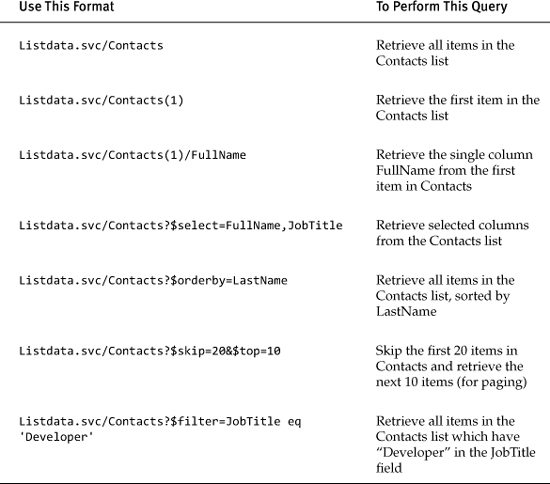
Many other sorts of queries are possible, as shown in Table 9.1.
Binding to a SharePoint List Using WCF Data Services
WCF Data Services generates object wrappers for the OData service, allowing you to code to a strongly typed object model in your Silverlight application. To do this in your own Silverlight project, right-click Service References in Solution Explorer and enter the URL for the site that contains your contacts list, ensuring you append the service address /_vti_bin/listdata.svc after the site URL. Give the service a namespace such as SharePointContent. The Add Service Reference dialog box is shown in Figure 9.2; note that under Services: you need to double-click the data context if you want to see the lists expanded as in the screen shot.
Figure 9.2. Adding a service reference to ListData.svc
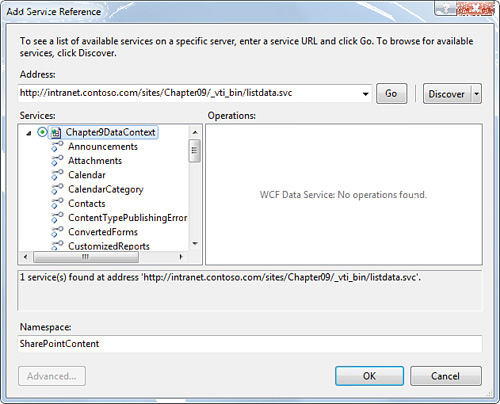
This queries the web service description and generates an entity data model to allow you to access the service. Note that in the code download this step has already been done for you. The namespace and object class of the entity data model are determined when the service reference is added; in Figure 9.2 the class is SharePointContent.Chapter9DataContext.
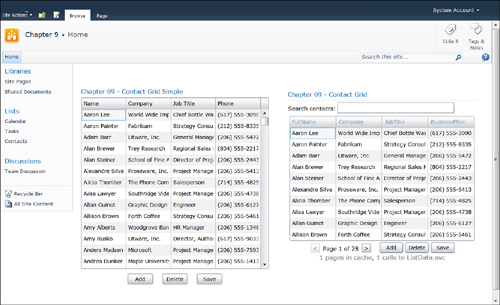
Three web parts with accompanying Silverlight applications are provided to accompany this chapter: Contact Grid Simple, Contact Grid, and Contact Grid (Silverlight 5). The first two of these are shown in Figure 9.3. The simple version is a minimal implementation to bind the contacts list to a Silverlight DataGrid and perform full Create, Read, Update, and Delete (CRUD) operations on it, and the full version adds sorting, filtering, paging, and caching to the solution to show how to manage large data sets.
Figure 9.3. Simple and full contact grid web parts
There is a Silverlight project for each of the web parts, and a SharePoint project is set up to deploy them along with simple web parts to place them on the page. To set this up from scratch, you begin with an empty SharePoint project and add the Silverlight applications to the same solution. A module called ClientBin is added to deploy the .xap files, as described in Chapter 7; see Figure 7.3 for a screen shot.
The web parts are quite simple and use the SilverlightPlugin object to place the Silverlight application on the page and pass in the site URL; SilverlightPlugin was introduced in Chapter 5, “Web Part Development”; see Listing 5.2 for details. Listing 9.11 shows the ContactGridSimpleWP Web Part in its entirety except for the using statements and class declaration.
Listing 9.1. ContactGridSimpleWP Web Part
protected override void CreateChildControls()
{
SilverlightPlugin sl = new SilverlightPlugin();
sl.Source = SPContext.Current.Site.RootWeb.Url.ToString() +
"/ClientBin/ContactsGridSimpleSL.xap";
sl.InitParameters = "siteUrl=" +
SPContext.Current.Web.Url.ToString();
this.Controls.Add(sl);
}
As you can see, not much work is done in the server side of the web part; it simply passes the site URL. Next, let’s look at the simplified web part’s Silverlight application in detail. It uses the standard DataGrid control with three buttons below it, laid out using a StackPanel. The XAML for this is shown in Listing 9.2.
Listing 9.2. XAML for Simple Contact Grid Web Part
<Grid x:Name="LayoutRoot" Background="White">
<Grid.RowDefinitions>
<RowDefinition Height="*" />
<RowDefinition Height="25" />
</Grid.RowDefinitions>
<Grid.ColumnDefinitions>
<ColumnDefinition Width="*" />
</Grid.ColumnDefinitions>
<sdk:DataGrid x:Name="listDataGrid" Grid.Row="0"
Margin="0,0,0,10" AutoGenerateColumns="False"
CanUserSortColumns="False">
<sdk:DataGrid.Columns>
<sdk:DataGridTextColumn Binding="{Binding FullName}"
Header="Name" Width="*" />
<sdk:DataGridTextColumn Binding="{Binding Company}"
Header="Company" Width="*" />
<sdk:DataGridTextColumn Binding="{Binding JobTitle}"
Header="Job Title" Width="*" />
<sdk:DataGridTextColumn Binding="{Binding Path=BusinessPhone}"
Header="Phone" Width="*" />
</sdk:DataGrid.Columns>
</sdk:DataGrid>
<StackPanel Grid.Row="1" Orientation="Horizontal"
HorizontalAlignment="Center">
<Button Content="Add" Height="23" Margin="10,0,10,0"
Name="AddButton" VerticalAlignment="Top"
Width="54" Click="AddButton_Click"
Grid.RowSpan="2" />
<Button Content="Delete" Height="23" Margin="10,0,10,0"
Name="DeleteButton" VerticalAlignment="Top"
Width="54" Click="DeleteButton_Click"
Grid.RowSpan="2" />
<Button Content="Save" Height="23" Margin="10,0,10,0"
Name="SaveButton" VerticalAlignment="Top"
Width="54" Click="SaveButton_Click"
Grid.RowSpan="2" />
</StackPanel>
</Grid>
As you can see, the DataGrid contains binding expressions relating the field names from the SharePoint list to the data columns in the grid. Later on, the code creates a two-way data binding to this grid.
The Silverlight coding begins in App.xaml.cs, where the Application_Startup method is modified to take the site URL out of InitParams and pass it into the main page, whose constructor has been modified to accept the site URL as an argument. This is shown in Listing 9.3.
Listing 9.3. Application_Startup Event Handler
private void Application_Startup(object sender, StartupEventArgs e)
{
string siteUrl;
if (e.InitParams.TryGetValue("siteUrl", out siteUrl))
{
MainPage p = new MainPage(siteUrl);
this.RootVisual = p;
}
}
Things get more interesting in the MainPage’s constructor, which begins the process of connecting the DataGrid to the SharePoint Contacts list as shown in Listing 9.4. First, the code creates a new instance of SharePointContent.Chapter09DataContext; this object represents the runtime context of the WCF Data Services connection. This class was generated by Visual Studio when the service reference was made to ListData.svc. If you refer back to Figure 9.2, you can see the namespace and context name were chosen at that point. SharePointContent.Chapter09DataContext provides Entity Framework Object Services, which allow strongly-typed queries, inserts, updates, and deletes of the SharePoint Contacts list.
Listing 9.4. MainPage Creates DataContext
SharePointContent.Chapter9DataContext dataContext;
public MainPage(string siteUrl)
{
InitializeComponent();
// Set up the data context and display the data
dataContext = new SharePointContent.Chapter9DataContext(
new Uri(siteUrl + "/_vti_bin/listdata.svc", UriKind.Absolute));
RefreshData();
}
Chapter9DataContext is derived from the DataServiceContext class in the System.Data.Services.Client namespace provided by WCF Data Services. The DataServiceContext constructor takes a Uri as an argument; this allows the code to act on the site where the web part is installed rather than the one used when adding the service reference. Note that in order for this to work, the Contacts list in the target site must be identical to the one in the site where the service reference was made!
The final data binding, shown in Listing 9.5, is done in a separate method called RefreshData(), which is called from the MainPage constructor as well as later on when rows are added or deleted in the DataGrid.
Listing 9.5. Binding the DataGrid to the SharePoint Contacts List
bool needsRefresh = false;
// Retrieve and display data
private void RefreshData()
{
DataServiceQuery<SharePointContent.ContactsItem> q =
(DataServiceQuery<SharePointContent.ContactsItem>)
(
from contact in dataContext.Contacts
orderby contact.FullName
select contact
);
q.BeginExecute((IAsyncResult result) =>
{
Dispatcher.BeginInvoke(() =>
{
q = result.AsyncState as
DataServiceQuery<SharePointContent.ContactsItem>;
IEnumerable<SharePointContent.ContactsItem> items =
q.EndExecute(result);
dataServiceCollection = new
DataServiceCollection<SharePointContent.ContactsItem>
(items);
listDataGrid.ItemsSource = dataServiceCollection;
needsRefresh = false;
});
}, q);
}
RefreshData() begins with a LINQ query against the Entity Framework objects that selects the entire list, sorted by FullName. The query is strongly typed, and IntelliSense makes coding quick and less error-prone than with the traditional SharePoint Object Model.
The LINQ code constructs the query but doesn’t actually issue it to SharePoint; to do that you need to call the BeginExecute() method. BeginExecute() expects to be passed a delegate, which it calls when a response has been received, in typical Silverlight asynchronous style. In this case, the delegate is defined as an anonymous function, taking a single IAsyncResult as its argument.
When this callback function is invoked, another anonymous function is used to switch over to the Silverlight UI thread using Dispatcher.BeginInvoke(). When this second anonymous function runs, it has the results in hand and is on the UI thread so it can bind the results to the DataGrid.
The IAsyncResult passed in contains a Result property, which contains the now-populated Object Services representation of the Contacts list. Invoking the EndExecute method returns an IEnumerable collection of results, which in this case are ContactsItem objects generated to represent items in the SharePoint Contacts list.
Debugging Data Binding with Silverlight 5
Even though this is a Silverlight 4 project, if you have loaded Silverlight 5 (or the Silverlight 5 Beta), you can debug your data binding by simply setting a breakpoint in your XAML. This is shown in Figure 9.4.
Figure 9.4. Data binding debugging with Silverlight 5
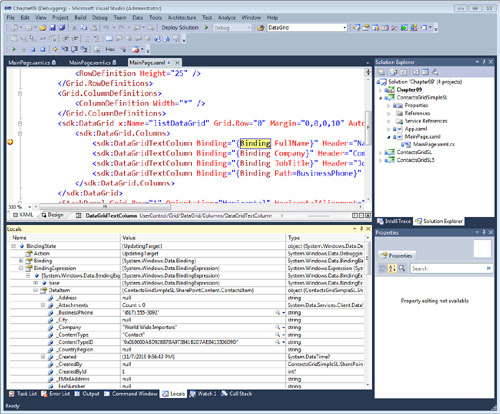
When you run your project in the debugger, the breakpoint is hit as the data binding expression is about to be evaluated. In the Locals debugger pane you see a BindingState object that contains all the details about the data binding. If you need to inspect the data item, it’s right inside the BindingExpression within the BindingState object. This can save a lot of time when troubleshooting data binding expressions.
Updating SharePoint Data
At this point you could simply bind the IEnumerable collection to the DataGrid and be done with it; indeed it would faithfully render the contact list. However, that would only give you a one-way binding, and two-way binding is necessary if you want to update the data back in SharePoint. To do this you need to enlist another class in the System.Data.Services.Client namespace: the DataServiceCollection class. Its constructor can be passed an IEnumerable collection, so it’s easy enough to pass in the contacts list. Recall these lines from Listing 9.5:
IEnumerable<SharePointContent.ContactsItem> items =
q.EndExecute(result);
dataServiceCollection = new
DataServiceCollection<SharePointContent.ContactsItem>(items);
DataServiceCollection is an ObservableCollection, which as the name implies, is a collection that can be observed. In this case, the observer is WCF Data Services, which is notified of any adds, changes, or deletes in the collection. DataServiceCollection can then update the data source with these changes on demand. When the DataServiceCollection is bound to the DataGrid, the binding is two-way, and changes in the grid can be written back to SharePoint.
This write-back is not implicit; indeed if every change to the object collection were immediately written back, it would result in a very chatty user interface. In this case, the user needs to press the “Save” button to write the data back to SharePoint. Listing 9.6 shows the Save button’s click event handler, which saves any changes back to SharePoint.
Listing 9.6. Save Button Saves Changes to SharePoint
private void SaveButton_Click(object sender, RoutedEventArgs e)
{
dataContext.BeginSaveChanges(SaveChangesOptions.Batch,
delegate(IAsyncResult asyncResult)
{
Dispatcher.BeginInvoke(() =>
{
try
{
dataContext.EndSaveChanges(asyncResult);
MessageBox.Show("Changes saved");
if (needsRefresh) RefreshData();
}
catch (Exception ex)
{
MessageBox.Show("Error: " + ex.InnerException.Message);
}
});
}, dataContext);
}
Saving data is done in the same asynchronous pattern as querying data and begins with invoking the data context’s BeginSaveChanges() method. Again, an anonymous delegate is used, along with a call to Dispatcher.BeginInvoke() to ensure that a second anonymous function runs in the Silverlight UI thread. If EndSaveChanges() is successful, it reports the results back to the user; if not it shows an error message.
You might notice a Boolean field needsRefresh was declared just before the RefreshData() method and was set to false in RefreshData(). This flag is used when rows are added to the grid to refresh and re-sort the data. If the flag is set, RefreshData() is called.
At this point, users can click the DataGrid and update the cells, and the changes are written back to SharePoint when they click Save. The only thing that remains is to implement the Add and Delete button click events so users can add and delete rows in the DataGrid.
Clicking the Add button creates a new ContactsItem object and adds it to the DataServiceCollection. The new item will be at the end of the collection and therefore appears at the bottom of the DataGrid, so the last row is selected and scrolled into view to make it visible to the user. The Delete button is even simpler: It simply deletes the selected row. The add and delete code is shown in Listing 9.7.
Listing 9.7. Adding a Contact to the Collection
// Add a new item to the grid and position there
private void AddButton_Click(object sender, RoutedEventArgs e)
{
SharePointContent.ContactsItem c =
new SharePointContent.ContactsItem();
dataServiceCollection.Add(c);
listDataGrid.SelectedIndex = dataServiceCollection.Count - 1;
listDataGrid.ScrollIntoView(listDataGrid.SelectedItem,
listDataGrid.Columns[0]);
needsRefresh = true;
}
// Delete an item from the grid
private void DeleteButton_Click(object sender, RoutedEventArgs e)
{
int i = listDataGrid.SelectedIndex;
dataServiceCollection.RemoveAt(i);
}
The DataGrid now implements all of the “CRUD” (Create, Read, Update and Delete) operations on a SharePoint list, and all the heavy lifting is done by WCF Data Services.
Paging through Large Data Sets
This example is fine as long as you don’t mind downloading the entire SharePoint list every time you want to display the data. And that’s okay if the list is short, but if the list becomes too large it would waste a lot of time and bandwidth retrieving rows of data the user might never choose to view. The solution is to provide a way to page through the data and to find contacts through a user query function. These features are included in the full ContactsGridWP Web Part.
As a first step to implement paging, additional controls are added below the DataGrid to page through the data. The out-of-the-box paging control would allow paging through objects in memory, but this solution implements its own so it can fetch the pages from SharePoint as they’re needed. The extra controls are shown in Listing 9.8.
Listing 9.8. Paging Controls for the Contacts Grid
<StackPanel x:Name="PagingControlsStackPanel" Orientation="Horizontal"
HorizontalAlignment="Center">
<Button x:Name="PreviousPageButton" Click="PreviousPageButton_Click"
Width="20" Content="<" Height="20" Margin="3,0"/>
<TextBlock x:Name="PageNumberTextBlock" Text="Page 1 of x"
TextWrapping="Wrap" Margin="3,0" FontSize="12"
Padding="0,5,0,0"/>
<Button x:Name="NextPageButton" Click="NextPageButton_Click" Width="20"
Content=">" Height="20" Margin="3,0"/>
<Button x:Name="AddButton" Width="50" Content="Add" Margin="15,0,0,0"
Click="AddButton_Click" />
<Button x:Name="DeleteButton" Width="50" Content="Delete"
Margin="5,0,0,0" Click="DeleteButton_Click" />
<Button x:Name="SaveButton" Width="50" Content="Save" Margin="5,0,0,0"
Click="SaveButton_Click" />
</StackPanel>
Instead of retrieving all the rows of the Contacts list, the code retrieves the rows in “pages” of pageSize rows and stores each “page” in its own DataServiceCollection object in a local cache. The UI state is maintained in a set of local fields shown in Listing 9.9. At any given time, the currentPage field contains the page number being displayed.
Listing 9.9. Fields to Maintain State of Contact Grid
// Current page number
private int currentPage = 0;
// Page size and Row Count
private const int pageSize = 10; // # of rows to display in grid
private long totalRowCount = 0; // total rows in result set
private long totalPageCount
{
get { return ((totalRowCount - 1) / pageSize) + 1; }
}
To display the number of pages and avoid allowing the user to page past the end of the data, the code needs to know how many rows are on the server. This can be retrieved along with each page of data and is stored in totalRowCount so the totalPageCount property will be accurate and can be displayed in the paging user interface.
Listing 9.10 shows the code to retrieve and display a page of data. Note that the code samples that can be downloaded with this book also include caching, filtering, and sorting logic, which are discussed later in this chapter; therefore this Listing is simpler than the download.
Listing 9.10. Code to Retrive a Page of Data
private void DisplayPage(int pageNum)
{
// Remember new state
currentPage = pageNum;
DataServiceQuery<SharePointContent.ContactsItem> q =
(DataServiceQuery<SharePointContent.ContactsItem>)
(from contact in dataContext.Contacts.IncludeTotalCount()
select contact).Skip<SharePointContent.ContactsItem>
(pageNum * pageSize).Take<SharePointContent.ContactsItem>
(pageSize);
try
{
// Kick off the query as an asynchronous request
q.BeginExecute((IAsyncResult result) =>
{
// Ensure we're running on the UI thread
Dispatcher.BeginInvoke(() =>
{
// Process the result
q = result.AsyncState as
DataServiceQuery<SharePointContent.ContactsItem>;
QueryOperationResponse<SharePointContent.ContactsItem>
queryResponse = q.EndExecute(result) as
QueryOperationResponse<SharePointContent.ContactsItem>;
if (queryResponse != null)
{
this.totalRowCount = queryResponse.TotalCount;
this.dataServiceCollection = new
DataServiceCollection<SharePointContent.ContactsItem>
(queryResponse);
// Bind to the DataGrid and save away in cache
listDataGrid.ItemsSource = this.dataServiceCollection;
// Update the other controls on the page
UpdatePageControls(1);
}
});
}, q);
}
catch (Exception ex)
{
// If here, something bad happened, so tell the user
Dispatcher.BeginInvoke(() =>
{
MessageBox.Show("Error retrieving data: " + ex.Message);
});
}
}
Notice that the LINQ query is more elaborate than in the previous example. First, the .Skip<T>() and .Take<T>() methods have been added to the query to fetch just the page we want. One more piece of information is needed, however, and that’s the total number of rows matching the query so we know how many pages there are. Fortunately, OData and WCF Data Services can accommodate that without requiring an extra round-trip to the server. To request the total row count, the method IncludeTotalCount() is called while referencing the Contacts object.
Following the LINQ query, the code is pretty similar to the simplified Contacts grid example from earlier in this chapter. The result is passed into an anonymous delegate function, and the Dispatcher is used to ensure you’re on the UI thread.
The result processing is a bit different, however, because it needs to extract the total count from the result set. The EndExecute() method returns an IEnumerable<ContactsItem> suitable for data binding or access via a DataServiceCollection, but if you count the items in the collection, you’ll only get the count for one page of data. To get at the total row count, you need to cast the IEnumerable interface to its underlying object, which is a QueryOperationResponse<ContactsItem>; this is the object that allows access to the total row count.
After binding the DataServiceCollection to the DataGrid control, the code calls a private method called UpdatePageControls(). As shown in Listing 9.11, it simply displays the page number and disables the Previous or Next button when the user is at the first or last page, respectively. It also maintains some simple statistics for demonstration purposes.
Listing 9.11. Updating Controls after a Paging Operation
// Update paging buttons and status messages
private void UpdatePageControls(int callsToService)
{
// Enable and disable paging buttons to prevent moving back
// from the first page or forward from the last
this.PreviousPageButton.IsEnabled = (currentPage > 0);
this.NextPageButton.IsEnabled = (currentPage < totalPageCount - 1);
this.PageNumberTextBlock.Text = "Page " + (currentPage + 1) +
" of " + totalPageCount.ToString();
// Show a sneak peek at the cache for demonstration purposes
this.callsToListDataSvc += callsToService;
this.StatusTextBlock.Text = this.cache.Keys.Count() +
" pages in cache, " +
this.callsToListDataSvc +
" calls to ListData.svc";
}
Allowing the user to page through the data is simple: When the Previous and Next buttons are clicked, the new page is displayed using the DisplayPage() method as shown in Listing 9.12.
Listing 9.12. Paging Button Click Event Handlers
// Handle paging buttons
void PreviousPageButton_Click(object sender, RoutedEventArgs e)
{
DisplayPage(--currentPage);
}
void NextPageButton_Click(object sender, RoutedEventArgs e)
{
DisplayPage(++currentPage);
}
Caching Paged Data
An easy way to cache pages of data is to keep the DataServiceCollection objects as they are retrieved, and to reuse them as the user pages back and forth. The cache is just a generic Dictionary collection with the page number as its key and a DataServiceCollection as its value. Adding a page to cache is simple; AddToCache() is called after retrieving a new page in DisplayPage(). This is shown in Listing 9.13.
Listing 9.13. Caching Code in Contacts Grid Web Part
// Here is the cache:
private Dictionary<int, DataServiceCollection
<SharePointContent.ContactsItem>> cache = new Dictionary
<int, DataServiceCollection<SharePointContent.ContactsItem>>();
// Add a page of data to the cache
private void AddToCache(int pageNumber,
DataServiceCollection<SharePointContent.ContactsItem> page)
{
cache[pageNumber] = page;
}
// Attempt to display a cached page of data, or return false if it
// isn't available
private bool DisplayFromCache(int pageNumber)
{
if (cache.ContainsKey(pageNumber))
{
// If here, we found the cached page; go ahead and display it
DataServiceCollection<SharePointContent.ContactsItem>
bindingCollection = cache[pageNumber];
listDataGrid.ItemsSource = bindingCollection;
UpdatePageControls(0);
return true;
}
else
{
// If here, no luck; tell caller to get the page from SharePoint
return false;
}
}
private void ClearCache()
{
cache.Clear();
}
The strategy is to try to display a page from cache before requesting it from SharePoint. This function returns true if it’s able to display the page from cache or false to indicate that we need to use WCF Data Services to get the data. In addition, a simple method is provided to clear the cache.
A minor update to the DisplayPage() method checks the cache before requesting data, and if a new page is retrieved, adds it to the cache. This is shown in Listing 9.14.
Listing 9.14. DisplayPage() Tries to Use Cache Before Retrieving a Page
private void DisplayPage(int pageNum)
{
// Remember new state
currentPage = pageNum;
// Try to display from cache if available
if (!DisplayFromCache(pageNum))
{
// Retrieve and display from SharePoint as before
// (code is not repeated from the earlier listing...)
// After binding the page to the DataGrid,
// add this line to save it in cache:
AddToCache(pageNum, this.dataServiceCollection);
}
}
Filtering and Sorting the Data
The whole idea of paging is to handle large data sets, yet if there were thousands of contacts in the Contacts list, users would quickly tire of paging through hundreds of grids full of data. A filtering feature allows the user to type a few characters of the contact’s information to quickly narrow down the list of choices. In addition, users often like to click the grid headings to sort the data to their liking. Both of these features have been included in the full ContactsGrid Silverlight application.
An AutoCompleteBox from the Silverlight Toolkit (http://silverlight.codeplex.com/) has been added above the DataGrid so users can type a filter string to narrow down the data set. The Populated event fires if the user pauses more than 250 milliseconds while typing, as specified in the MinimumPopulateDelay property. When this happens, the code updates the grid with a new filter for a very interactive user experience. The added controls are shown in Listing 9.15.
Listing 9.15. AutoCompleteBox for Filtering the Results Set
<StackPanel Orientation="Horizontal">
<TextBlock Text="Search contacts:" FontSize="12" Padding="0,8,0,0" />
<sdk:AutoCompleteBox HorizontalAlignment="Left"
x:Name="filterAutoCompleteBox"
Margin="3" VerticalAlignment="Top" Text=""
Height="23" Width="249"
MinimumPopulateDelay="250"
MinimumPrefixLength="0"
Populated="filterAutoCompleteBox_Populated"/>
</StackPanel>
An AutoCompleteBox is similar to a TextBox and is intended to offer possible completions for what the user is typing, similar to the search suggestions SharePoint shows. In this case there won’t be any suggestions, but the AutoCompleteBox’s Populate event is useful for refreshing the data when the user pauses in typing rather than triggering a new query for each keystroke.
When the AutoCompleteBox fires its Populate event, the event handler sets the filter field to whatever the user has typed, clears the cache, and displays the first page of data as shown in Listing 9.16.
Listing 9.16. AutoCompleteBox Event Handler to Filter Results
// Field to hold current filter string
private string filter = "";
// Handle filtering
private void filterAutoCompleteBox_Populated(object sender,
PopulatedEventArgs e)
{
this.filter = this.filterAutoCompleteBox.Text;
this.ClearCache();
this.DisplayPage(0);
}
Another difference between this and the simplified contacts grid is that this one implements sorting. The DataGrid control would gladly handle this by simply setting its CanUserSortColumns property to true, but this would just sort the data that was in the grid. To sort the whole data set, the sorting needs to happen on the server so the code needs to flush the cache and do a new query with the required sort order.
The user initiates a sort by clicking a column heading. If the data was already sorted in ascending order by the column the user has clicked, then it is sorted in descending order instead. Listing 9.17 shows the column heading Click event handler.
Listing 9.17. Column Heading Click Event Handler
// Field to hold current sort order
private string orderby = "FullName asc";
private void SortHeading_Click(object sender, RoutedEventArgs e)
{
HyperlinkButton btn = sender as HyperlinkButton;
if (btn != null)
{
if (this.orderby == btn.Content.ToString() + " asc")
{
this.orderby = btn.Content.ToString() + " desc";
}
else
{
this.orderby = btn.Content.ToString() + " asc";
}
this.ClearCache();
this.DisplayPage(0);
}
}
The only thing left to do to enhance the DisplayPage() method to include the filter and orderby terms in the LINQ query. Listing 9.18 shows the whole query, including what was shown in the earlier listing of DisplayPage() with the addition of dynamic query terms for sorting and filtering.
Listing 9.18. LINQ Query with Sorting, Filtering, and Paging
// Begin with the basic list query...
DataServiceQuery<SharePointContent.ContactsItem> q =
(DataServiceQuery<SharePointContent.ContactsItem>)
(from contact in dataContext.Contacts.IncludeTotalCount()
select contact).Skip<SharePointContent.ContactsItem>
(pageNum * pageSize).Take<SharePointContent.ContactsItem>
(pageSize);
// ... then add the dynamic query terms
q = q.AddQueryOption("$orderby", orderby);
if (filter != "")
{
q = q.AddQueryOption("$filter", "substringof('" +
this.filter + "', FullName) or substringof('" +
this.filter + "', Company) or substringof('" +
this.filter + "', JobTitle) or substringof('" +
this.filter + "', BusinessPhone)");
}
The AddQueryOption() method allows any query string option to be added to the query. This allows the $orderby and $filter query string parameters to be added at runtime rather than baking them into a LINQ query that is evaluated at compile time. The filter term is applied to all four of the displayed data fields by specifying a logical “or” of four substring expressions. Consult the OData standard for details on how to construct query options on your own.
Using Silverlight 5 to Bind Style Setters
Silverlight 5 introduces the ability to bind data to style setters, a feature that was already available in Windows Presentation Foundation. Style setters are XAML elements that declare visual styles to be displayed by setting specific properties. For example, a bold style might use a style setter that sets the Bold property to true. In this next example, you learn how to bind style setters in the Contacts Grid to highlight rows based on the data.
After using the Contacts Grid Web Part, users reported they would like the grid to highlight managers and directors so they can be identified at a glance. This information is already in each contact’s JobTitle field; the key is to convert it to a form that is useful for data binding and then bind it to a style that sets the grid cells’ background.
A grid cell’s background property is set to a Silverlight Brush object, so a value converter is needed to convert the JobTitle string into a Brush for data binding. The binding expression references the value converter, and the class’s Convert() method is called during data binding. The value converter is shown in Listing 9.19.
Listing 9.19. Data Binding Value Converter from Contact to Brush
public class JobTitleToBrushConverter : IValueConverter
{
public object Convert(object value, Type targetType,
object parameter, System.Globalization.CultureInfo culture)
{
Color resultColor = Colors.Transparent;
if (value is string)
{
string jobTitle = value as string;
if (jobTitle.IndexOf("Director") >= 0)
{
// Pale green background
resultColor = Color.FromArgb(225, 144, 227, 100);
}
else if (jobTitle.IndexOf("Manager") >= 0)
{
// Pale yellow background
resultColor = Color.FromArgb(255, 255, 255, 165);
}
}
Brush result = new SolidColorBrush(resultColor);
return result;
}
public object ConvertBack(object value, Type targetType,
object parameter, System.Globalization.CultureInfo culture)
{
// Should never be called in this application
throw new NotImplementedException();
}
}
The style is declared immediately after opening the UserControl tag in MainPage.xaml, as shown in Listing 9.20. The style affects all DataGridCell elements; these are the cells in the DataGrid.
Listing 9.20. Style to Change Cell Background Based on Job Title
<UserControl.Resources>
<local:JobTitleToBrushConverter x:Key="JobTitleToBrushConverter" />
<Style TargetType="sdk:DataGridCell">
<Setter Property="Background" Value="{Binding JobTitle,
Converter={StaticResource JobTitleToBrushConverter}}" />
</Style>
</UserControl.Resources>
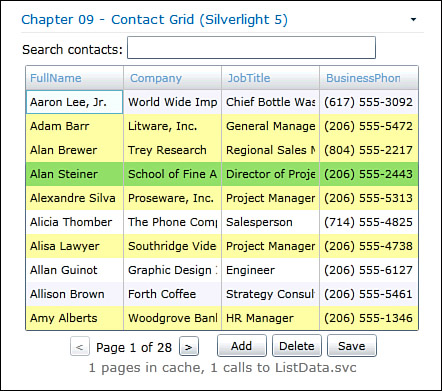
Figure 9.5 shows the finished project; any contact with Manager or Director in the JobTitle field is highlighted. Notice you can edit the job title of one of the contacts and the style changes immediately based on the data binding.
Figure 9.5. Finished Contact Grid with data-bound style setters
Summary
OData and WCF Data Services are extremely useful for accessing SharePoint list data and other data sources from Silverlight. Two-way data binding makes it easy to display and update SharePoint data from any Silverlight control that supports it. Large data sets can be accessed efficiently by using the paging features of WCF Data Services. The type-safe approach can be a blessing or a curse, depending on the application; the Client Object Model might be a better choice if your solution needs the flexibility to access lists and fields that are determined at runtime.