
12. Windows Phone 7 SharePoint Applications
DEVELOPING WINDOWS PHONE 7 APPLICATIONS for SharePoint is another area where you can leverage your existing SharePoint skills. The mobile application space is a white hot and wide open area for developers. You can also have the opportunity to sell your apps in the marketplace and make some money. When you combine the enormous install base of SharePoint and the number of mobile devices either in the market or coming in the next year, the numbers are staggering. But building phone applications that target SharePoint has a number of challenges. Some of the issues have been worked out, and Microsoft is still working to improve the experience in other areas. This chapter is not intended to be an all-inclusive guide for developing Windows Phone applications, but instead you learn how to get started and see techniques to get around some of the most common issues.
Office Hub
Windows Phone includes a mobile version of Office. This is commonly referred to as the Office hub. Office on the phone includes Word, Excel, PowerPoint, and OneNote. Although the mobile versions are not as fully featured as the full desktop version, you are still able to edit any documents, and those documents are fully compatible with the desktop version. It is not likely you will want to do a lot of writing on the phone due to its form factor, but it is great to do some reading, commenting, and light editing.
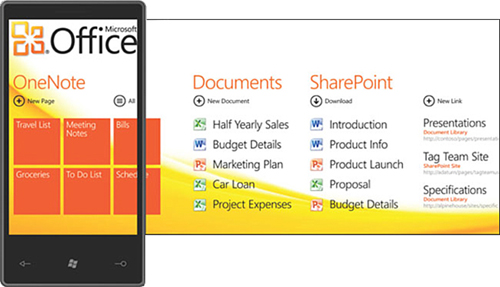
The Office hub includes the SharePoint Workspace Mobile application, shown in Figure 12.1. The SharePoint Workspace syncs your SharePoint Libraries with the phone. When the libraries are synced, you can read or edit the documents using the mobile versions of the Office applications. Any changes you make are efficiently synced back to the SharePoint Server.
SharePoint Workspace Mobile can connect to the SharePoint 2010 site and Online SharePoint 2010 in Office 365, on premise. To connect to an on-premise SharePoint site behind your firewall, you need to use a virtual private network (VPN). The only VPN supported is the Microsoft Forefront Unified Access Gateway (UAG). Microsoft has published a detailed whitepaper for configuring and setting up UAG to connect to your SharePoint sites. The whitepaper is titled, “Building Windows Phone 7 Applications with SharePoint 2010 and Unified Access Gateway” and is located at http://bit.ly/SPSL_UAG.
With all of that said about the Office hub, you should explore and use it to collaborate on your SharePoint documents, but this chapter is about building your own SharePoint applications that can leverage SharePoint data and services. You learn how to build Silverlight phone applications that can read and write SharePoint list data and call other SharePoint services. Let’s start by looking at Windows Phone 7 application development framework.
Development Framework
Developing applications for the phone can be done using either Silverlight or XNA, which is targeted at game developers building 3D applications. In this chapter you use Silverlight to develop business applications for the phone that leverage the SharePoint platform. The phone contains a version of Silverlight 3 with a few additions specific to the phone platform. You use Visual Studio and Expression Blend to develop the applications. Silverlight is not supported in the browser on the phone, so you can only use it to build native Silverlight applications. For example, there are APIs to access multitouch, the accelerometer, the camera and microphone, location awareness, and notifications. You can only deploy and install your application from the Windows Phone Marketplace. The marketplace is also how you make money from selling your applications.
Getting Started
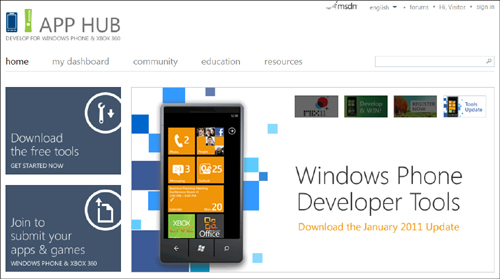
The place to start developing Windows Phone applications is App Hub, located at http://create.msdn.com. The App Hub, shown in Figure 12.2, has everything you need to develop phone applications. There are links to download the latest tools and SDK. You can find learning resources such as documentation, hands-on labs, and other quick start samples. There is a rich community forum site for asking questions from others in the community. But the one thing that is missing is information about how to build Windows Phone applications for SharePoint. This is where this chapter comes in to fill the gap in community knowledge around building SharePoint solutions on the phone.
Figure 12.2. Developers App Hub site
The App Hub contains a wealth of knowledge. Look around the site, and then come back to the chapter to look at the tools used to build phone applications and begin learning how to configure your development machine.
Development Tools
Developing Windows Phone applications begins like most other Microsoft applications, in Visual Studio or Expression Blend. Building phone applications doesn’t actually require a physical phone device; the Visual Studio tools include a Windows Phone Emulator. There are a number of caveats you need to consider when building your developer machine, which you explore later in this chapter.
Visual Studio
Visual Studio 2010 Phone 7 tools contain a number of project templates in both C# and VB, as shown in Figure 12.3. You can find detailed information about all of the project templates on MSDN at http://msdn.microsoft.com/en-us/library/ff402571. For your SharePoint projects you use the first template, Windows Phone Application. This is a simple template containing a single page.
Figure 12.3. Visual Studio project templates

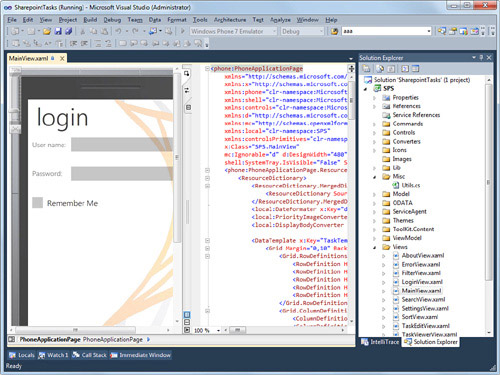
The Windows Phone tools in Visual Studio contain a rich XAML editor and a graphical designer. Unlike developing regular Silverlight applications, Visual Studio by default displays the designer and the code side-by-side, as shown in Figure 12.4. This is better optimized for wide-screen monitors and phone developers, as the phone applications tend to be vertically aligned.
Figure 12.4. Windows Phone Designer in Visual Studio
The development model for the phone is identical to regular Silverlight applications. When you have written the code, you can set breakpoints and press F5 to build, deploy, and debug the Windows Phone application. The main difference is that you can choose where to deploy your solution. By default the solution deploys using the Windows Phone emulator as the deployment target, as shown in Figure 12.5. This makes it easy to get started even if you don’t actually have a real Windows Phone device. If you do have a device, then select Windows Phone 7 Device as the deployment target. Deploying directly to the device requires that you have the Zune software running on an unlocked device.
Figure 12.5. Deploying to the Windows Phone 7 emulator
Although Visual Studio is your main tool for building applications, Expression Blend is a close second. Blend enables your designers to create rich experiences that would be difficult using Visual Studio alone. You get a look at Expression Blend in the next section.
Expression Blend
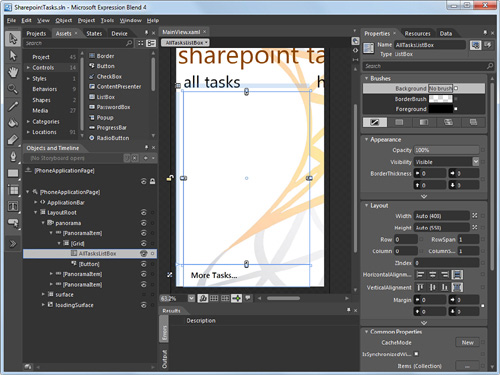
Designers who are familiar with using Expression Blend for WPF and Silverlight applications will find designing phone applications to be similar if not exactly the same. All of the same features that designers love are there; animations, layout, styles, and more. Many times when you are building complex screens, Blend is better able to display them than the Visual Studio designer, as shown in Figure 12.6. Normally you use them together, switching back and forth as you go from design to code to debugging. Blend and Visual Studio make this a seamless process.
Figure 12.6. Expression Blend Windows Phone designer
Although both Blend and Visual Studio are great tools for building Windows Phone applications, Blend, as expected, has more of a focus on the design of your application. Blend helps you make your phone application look like a Windows phone application by setting the default styles that match the Windows Phone style guide. You can read the complete Windows Phone style guide on MSDN at http://msdn.microsoft.com/enus/library/aa511258.aspx.
Windows Phone Emulator
Developing applications for the Windows Phone has a low barrier to entry with the help of a full Windows Phone 7 emulator included with the tools, as shown in Figure 12.7. This enables you to build, debug, and test your applications without a physical device. Ultimately you need to deploy to a real phone device and test your application, but the emulator puts that off until you are ready.
Figure 12.7. Windows Phone 7 emulator
The emulator supports networking, storage, keyboard, debugging, and touch. Keyboard support is helpful when you are developing applications, making it easy to enter text information. To enable the keyboard, press the Pause key. You can even tab by quickly pressing the Tab key twice. Keep in mind, though, as you’re designing and testing your applications that phone users might not have a keyboard, and requiring them to type long or complex strings can be a problem on a physical device. Also, the emulator supports touch. If you are developing on a laptop or monitor that supports touch, you will be able to interact with the emulator using touch, which more closely simulates how your users will use the application.
Tip
The Windows Phone emulator uses the same underlying hypervisor technology that Hyper-V uses, so they collide if running on the same machine. If you start the emulator on the host machine running Hyper-V, your machine will crash. You see later in the chapter how you can run the emulator in a Windows 7 VHD running in Hyper-V to work around this issue.
Connecting to SharePoint
The most difficult part of building a Windows Phone 7 application against SharePoint is how to authenticate. Authentication with SharePoint from the phone can be difficult because Silverlight on the Windows phone does not support Windows Authentication (NTLM). This means that your SharePoint site must support Forms Based Authentication (FBA) or a proxy technology such as the ForeFront Unified Access Gateway (UAG).
Forms Based Authentication
FBA enables users to log in to a SharePoint site using a simple user name and password. The credential store used by FBA can be anywhere; typically this is SQL Server or Active Directory. You can find more information on how to configure FBA on your SharePoint site from MSDN at http://msdn.microsoft.com/en-us/library/bb975136.aspx.
The login process for FBA requires that you as a developer pass the user name and password to SharePoint authentication.asmx web service. The authentication service returns a secure cookie back that contains the SAML token. This is called the FedAuth cookie and is passed to every subsequent call to SharePoint. In essence the FedAuth cookie becomes the user’s credentials. The problem is that the FedAuth cookie is a protected cookie, which means that you as a developer cannot see this cookie. So how do you use a cookie you cannot see? The way you are able to use this protected cookie is through the System.Net.CookieContainer class built into the .NET Framework. This provides the programmatic equivalent of the cookie cache in your browser.
Authenticate to SharePoint using the code shown in Listing 12.1 in the MainPage class. The first thing is to create an event handler to handle an event when the authentication process is complete. Next create a Cookie Container to store the authentication tokens. In this simple example the user name and password are hardcoded, but you would create an actual login screen for the user to enter the credentials. Finally, create a method to handle the OnAuthenticated event and call the Authentication() method.
Listing 12.1. Authenticating with SharePoint from Windows Phone 7
public partial class MainPage : PhoneApplicationPage
{
public event EventHandler OnAuthenticated;
CookieContainer cookieJar = new CookieContainer();
//Hard coded for Demo
private string userName = "danj";
private string userPassword = "pass@word1";
// Constructor
public MainPage()
{
InitializeComponent();
this.OnAuthenticated += MainPage_OnAuthenticated;
Authenticate();
}
}
You can start the authentication process by calling the authentication.asmx web service. In the example in Listing 12.2, the SharePoint server is called Phone.Contoso.com. You must craft the SOAP web service call by hand using the HttpWebRequest class. Add the following code to your MainPage class:
Listing 12.2. Calling the Authentication.asmx Service
private void Authenticate()
{
System.Uri authServiceUri = new
Uri("http://phone.contoso.com/_vti_bin/authentication.asmx");
HttpWebRequest spAuthReq = HttpWebRequest.Create(authServiceUri) as
HttpWebRequest;
spAuthReq.CookieContainer = cookieJar;
spAuthReq.Headers["SOAPAction"] =
"http://schemas.microsoft.com/sharepoint/soap/Login";
spAuthReq.ContentType = "text/xml; charset=utf-8";
spAuthReq.Method = "POST";
//add the soap message to the request
spAuthReq.BeginGetRequestStream(new AsyncCallback(spAuthReqCallBack),
spAuthReq);
}
The last line in Listing 12.2 calls the BeginGetRequestStream() method to start the service call. This calls the following code to build the body of the message being posted to the authentication.asmx service. The first thing is to create the SOAP envelope. The envelope defines the method called, the Login() method, and the parameters being passed, the username and password. Add the code from Listing 12.3 to your MainPage class.
Listing 12.3. Handling the Authentication Request Callback
private void spAuthReqCallBack(IAsyncResult asyncResult)
{
string envelope =
@"<?xml version=""1.0"" encoding=""utf-8""?>
<soap:Envelope xmlns:xsi=""http://www.w3.org/2001/XMLSchema-instance""
xmlns:xsd=""http://www.w3.org/2001/XMLSchema"" xmlns:soap=""http://schemas.xml-soap.org/soap/envelope/"">
<soap:Body>
<Login xmlns=""http://schemas.microsoft.com/sharepoint/soap/"">
<username>{0}</username>
<password>{1}</password>
</Login>
</soap:Body>
</soap:Envelope>";
UTF8Encoding encoding = new UTF8Encoding();
HttpWebRequest request = (HttpWebRequest)asyncResult.AsyncState;
Stream _body = request.EndGetRequestStream(asyncResult);
envelope = string.Format(envelope, userName, userPassword);
byte[] formBytes = encoding.GetBytes(envelope);
_body.Write(formBytes, 0, formBytes.Length);
_body.Close();
request.BeginGetResponse(new AsyncCallback(ResponseCallback),
request);
}
The last line of the previous code posts the SOAP message to the web service and defines a method to callback when the method is completed, the ResponseCallback() method. The ResponseCallBack() method just verifies that the authentication completed successfully and fires the OnAuthenticated event. Add the code from Listing 12.4 to your MainPage class.
Listing 12.4. Handling the Authentication Response Callback
private void ResponseCallback(IAsyncResult asyncResult)
{
HttpWebRequest request =
(HttpWebRequest)asyncResult.AsyncState;
HttpWebResponse response =
(HttpWebResponse)request.EndGetResponse(asyncResult);
Stream content = response.GetResponseStream();
if (request != null && response != null)
{
if (response.StatusCode == HttpStatusCode.OK)
{
using (StreamReader reader = new StreamReader(content))
{
//Put debugging code here
string _responseString = reader.ReadToEnd();
reader.Close();
}
}
}
//authentication complete
OnAuthenticated(null, null);
}
You can also examine the response from the authentication method to verify everything is good. The ErrorCode will be NoError if there was a successful login and PasswordNotMatch if the username or password were incorrect. Listing 12.5 shows an example of a good response message in the _responseString variable from the code in Listing 12.4.
Listing 12.5. Successful Authentication Response Message
<?xml version="1.0" encoding="utf-8"?>
<soap:Envelope
xmlns:soap="http://schemas.xmlsoap.org/soap/envelope/"
xmlns:xsi="http://www.w3.org/2001/XMLSchema-instance"
xmlns:xsd="http://www.w3.org/2001/XMLSchema">
<soap:Body>
<LoginResponse
xmlns="http://schemas.microsoft.com/sharepoint/soap/">
<LoginResult>
<CookieName>FedAuth</CookieName>
<ErrorCode>NoError</ErrorCode>
<TimeoutSeconds>1800</TimeoutSeconds>
</LoginResult>
</LoginResponse>
</soap:Body>
</soap:Envelope>
When the user is authenticated, you can get the tasks from SharePoint. At this point the CookieContainer contains the FedAuth SAML token, and as long as you still have a reference to this object, you can pass it to every service call without authenticating again. Add the code from Listing 12.6 to your MainPage class:
Listing 12.6. OnAuthenticated Event Handler
void MainPage_OnAuthenticated(object sender, EventArgs e)
{
GetTasks();
}
There is one last thing you need to change to support using the CookieContainer. You must add the enableHttpCookieContainer attribute in the binding node of the clientconfig file and set it to a value of true. Listing 12.7 shows an example of where you add the enableHttpCookieContainer attribute for the ListsSoap binding node.
Listing 12.7. Clientconfig Change to Support CookieContainer
<configuration>
<system.serviceModel>
<bindings>
<basicHttpBinding>
<binding name="ListsSoap"
enableHttpCookieContainer="true"
maxBufferSize="2147483647"
maxReceivedMessageSize="2147483647">
<security mode="None" />
</binding>
</basicHttpBinding>
</bindings>
<client>
<endpoint address="http://Phone.contoso.com/_vti_bin/lists.asmx"
binding="basicHttpBinding"
bindingConfiguration="ListsSoap"
contract="ListsService.ListsSoap"
name="ListsSoap" />
</client>
</system.serviceModel>
</configuration>
You are ready to call the list web service to retrieve the List items. You already have the CookieContainer with the FedAuth security token from the authentication process; just attach the instance to the CookieContainer property of the ListsSoapClient object. Then the rest of the code in Listing 12.8 is just a set of standard web service calls to SharePoint.
Listing 12.8. Retrieving Data with SharePoint Web Services
private void GetTasksFBA()
{
ListsService.ListsSoapClient lists =
new ListsService.ListsSoapClient();
// Attach the cookies to the call
lists.CookieContainer = cookieJar;
//Callback when call returns from SharePoint
lists.GetListItemsCompleted +=
new EventHandler<ListsService.GetListItemsCompletedEventArgs>
(lists_GetListItemsCompleted);
lists.GetListItemsAsync(
"Tasks", // listName
String.Empty, // viewName
null, // query
null, // viewFields
null, // rowLimit
null, // queryOptions
null); // webID
}
Before you see how to handle the Task list return, the next section looks at an example of how to authenticate using the Unified Access Gateway (UAG) as an alternative to forms-based authentication.
ForeFront Unified Access Gateway
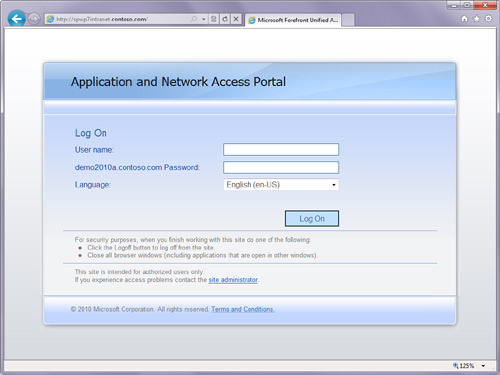
UAG is a Microsoft server product that enables you to access SharePoint from the Internet across the firewall. It also can act as the login form to log in to a SharePoint site that might or might not be secured using FBA. You can learn how to set up and configure UAG for SharePoint from a Microsoft whitepaper titled “Building Windows Phone 7 applications with SharePoint 2010 Products and Unified Access Gateway (UAG)” located at http://bit.ly/SPSL_UAG. The UAG whitepaper walks you through step-by-step on how to get UAG up and running. Figure 12.8 shows an example of the UAG configuration screen.
Figure 12.8. UAG configuration for SharePoint

When you have UAG configured and running, you can test it using Internet Explorer to browse to the address that you created, which maps to your internal SharePoint site. UAG presents you with a forms-based login screen, as shown in Figure 12.9. On this form, enter the same credentials you would use to log in to the SharePoint site itself.
Using UAG to authenticate against a SharePoint server is a little more straightforward than using FBA. This is not well documented anywhere, but in order to authenticate to UAG from the phone, you need to pass a couple of header parameters for each call. Consider the code in Listing 12.9, which uses UAG to pull List items from the Task list in SharePoint. This starts off the same as a normal SOAP call to SharePoint using the client proxy generated by the Visual Studio Add Reference command. The key is creating an OperationContextScope from the InnerChannel property of the ListSoapClient object. After you have established the OperationContextScope you can create two headers for the Authorization and UserAgent properties.
Listing 12.9. Reading List Data Through a Unified Access Gateway
private void GetTasksUAG()
{
ListsService.ListsSoapClient lists =
new ListsService.ListsSoapClient();
// TODO:Ask the user for these
string userName = "Danj";
string userPassword = "pass@word1";
//Callback when call returns from SharePoint
lists.GetListItemsCompleted +=
new EventHandler<ListsService.GetListItemsCompletedEventArgs>
(lists_GetListItemsCompleted);
//Add the credentials to the message header
using (OperationContextScope OCScope =
new OperationContextScope(lists.InnerChannel))
{
//Create the Request Message Property
HttpRequestMessageProperty msgProperty =
new HttpRequestMessageProperty();
//Add Authorization Property
msgProperty.Headers
[System.Net.HttpRequestHeader.Authorization] =
"Basic " + Convert.ToBase64String(
Encoding.UTF8.GetBytes(
userName + ":" + userPassword)) +
System.Environment.NewLine;
//Add UserAgent Property
msgProperty.Headers
[System.Net.HttpRequestHeader.UserAgent] =
"Microsoft Office Mobile";
//Add the headers to the message
OperationContext.Current.OutgoingMessageProperties.Add(
HttpRequestMessageProperty.Name, msgProperty);
lists.GetListItemsAsync(
"Tasks", // listName
String.Empty, // viewName
null, // query
null, // viewFields
null, // rowLimit
null, // queryOptions
null); // webID
}
}
In the previous code, the Authorization property is a Base64 encoded colon delimited username and password preceded with the type, which is Basic. For example Danj:pass@word1 becomes Basic RGFuajpwYXNzQHdvcmQx. The UserAgent is Microsoft Office Mobile. This is important as it tells UAG how to handle the incoming request. If, for example, you didn’t set this, UAG would assume you are calling from a browser and would try to send you additional information such as an ActiveX control, which your app can’t handle.
You can learn more about UAG from the Microsoft UAG site at http://www.microsoft.com/forefront/unified-access-gateway/en/us/default.aspx.
Databinding to the Task List
You have seen how to authenticate against SharePoint using FBA and via UAG. When you have authenticated and called the Task list, handing the results is the same for both FBA and UAG. In this example, you use Silverlight data binding to bind the List items to the List box.
First you need to create a List box to bind the items to, as shown in Listing 12.10. Open the MainPage.xaml file and add the following code. This adds a ListBox control named listBox1. It also defines an item template called ItemTemplate.
Listing 12.10. ListBox to Display Tasks
<Grid x:Name="ContentPanel" Grid.Row="1" Margin="12,0,12,0">
<ListBox ItemTemplate="{StaticResource ItemTemplate}"
Name="listBox1" />
</Grid>
The item template defines what the List items will look like in the list. Add the code from Listing 12.11 to define an item template with three text blocks. The first text block has a font size of 32 and is bold. The text for all three is mapped to the field names in the collection of List items that you bind to the ListBox.
Listing 12.11. ItemTemplate for Task Items
<phone:PhoneApplicationPage.Resources>
<DataTemplate x:Key="ItemTemplate">
<StackPanel>
<TextBlock Text="{Binding Title}" FontSize="32"
FontWeight="Bold"/>
<TextBlock Text="{Binding Priority}"/>
<TextBlock Text="{Binding Status}"/>
</StackPanel>
</DataTemplate>
</phone:PhoneApplicationPage.Resources>
Next you handle the return call from the GetListItemsAsync() method that you called with either FBA or UAG. The first thing to do is to get the results into an XElement object within which you access the data rows. When you have the collections of data rows, you can use LINQ to convert them to a new collection of Task objects. Set the new collection of Task objects as the ItemsSource of the ListBox. This creates the List items to bind to the ListBox. Listing 12.12 shows how to handle the callback.
Listing 12.12. Binding SharePoint Data to a ListBox on Windows Phone 7
void lists_GetListItemsCompleted(object sender,
ListsService.GetListItemsCompletedEventArgs e)
{
XElement listItems = e.Result;
IEnumerable<XElement> rows = e.Result.Descendants(XName.Get("row",
"#RowsetSchema"));
// Create a new collection of Task objects.
IEnumerable<Task> tasks = from element in rows
select new Task
{
Title =
(string)element.Attribute("ows_LinkTitle"),
Status =
(string)element.Attribute("ows_Status"),
Priority =
(string)element.Attribute("ows_Priority")
};
// Data Bind the list items
listBox1.ItemsSource = tasks;
}
// Task data structure
public class Task
{
public string Title { get; set; }
public string Status { get; set; }
public string Priority { get; set; }
}
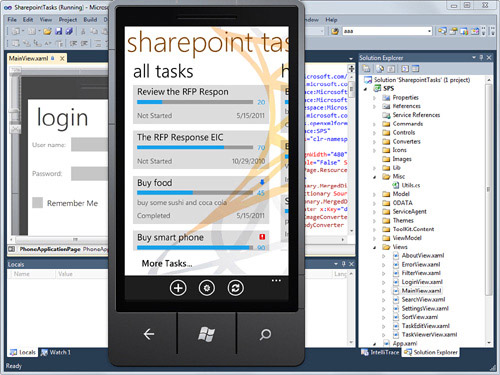
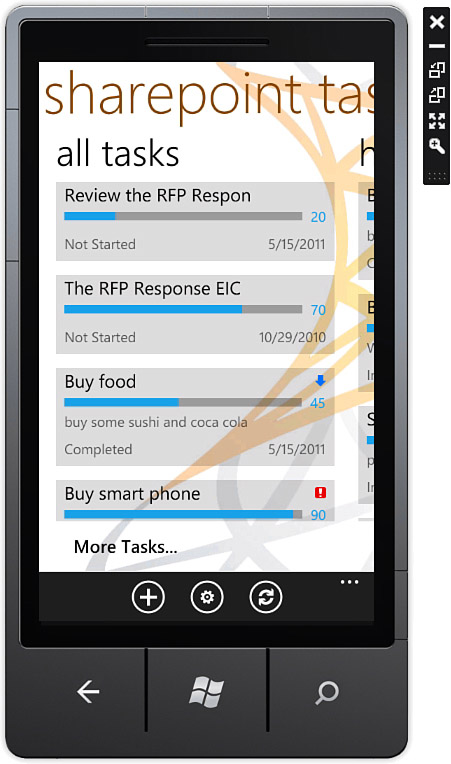
Press F5 to run the application. With everything set up correctly, you see the List items from the task list on your phone emulator, as shown in Figure 12.10.
Figure 12.10. SharePoint task list on the phone

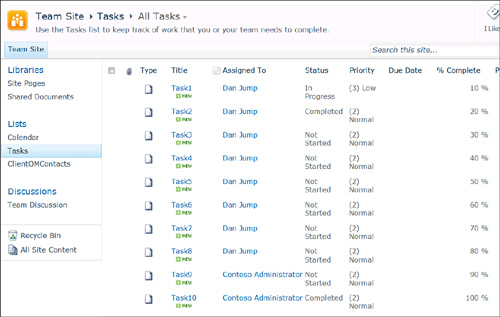
You can see in Figure 12.11 what the task list looks like in SharePoint. For this example you have only used three fields from the list; Title, Priority, and Status. But you can easily expand this sample to use any of the fields from the list.
Figure 12.11. SharePoint task list in the browser
You have seen how to code the phone application, but what does it take to get a development environment up and running? In the next section, you see various patterns for setting up your developer machines.
Development Environment
One of the most difficult tasks in developing SharePoint applications is setting up your developer machines. When you add the phone environment and UAG into the mix, things can get complicated quickly. What you learn in this section is about some of the options when configuring your development environment.
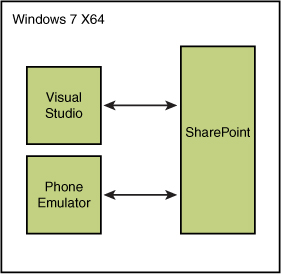
Single Machine
This setup shown in Figure 12.12 uses a single machine with 64-bit Windows 7 installed. You then install SharePoint, Visual Studio, and the Windows Phone tools onto the machine. Everything is running natively and gives you the best performance. This is good if you have a limited amount of memory; 8GB or less. This also works well if you are not able to run a server operating system or Hyper-V. The best way to set up this environment is to use the SharePoint Easy Setup Script, located on MSDN at http://bit.ly/SPSL_EasySetup. The Easy Setup Script is a PowerShell script that automates the entire process of downloading and setup of everything you need to start building SharePoint solutions.
Figure 12.12. SharePoint task list in the browser
Multi-Machine
Using multiple machines is another common setup. This enables you to split the SharePoint image from the Visual Studio Phone tools. In this setup you can install SharePoint on a VHD or natively. You can also download the SharePoint Information Worker VHD from MSDN from http://bit.ly/SPSL_SharePoint2010VHD. The networking setup is shown in Figure 12.13. The SharePoint VHD is configured with two virtual switches, both on 192.168.150.xx. The first virtual switch is created as an internal-only switch with a static IP of 192.168.150.10. The network card on the SharePoint VHD that is connected to this switch is 192.168.150.1. It is a good practice to always set up your SharePoint VHD using this pattern even if you are not doing phone development. This provides a static endpoint for you to use the Remote Desktop Connection to access the VHD. The Remote Desktop Connection enables full screen, cut and paste between host and VHD, and drive access to host drives. Next, you connect your external Windows 7 development machine using the static IPs shown in Figure 12.13.
Figure 12.13. SharePoint task list in the browser
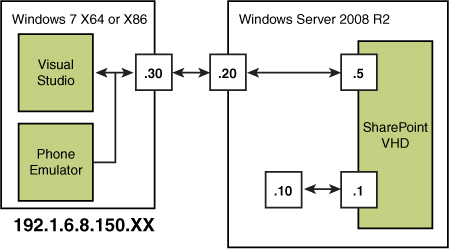
Tip
The easiest way to connect your two developer machines together is to use a normal network cable and plug them directly into each other. Most modern network cards have the ability to automatically switch to support a crossover without a special crossover cable. If this does not work, you can always fall back to using a switch between the two machines.
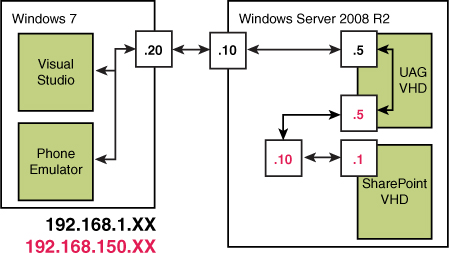
Multi-Machine with UAG
This setup is the same as the previous setup except that you have added UAG to the server machine. This also requires splitting the network into two subnets, 192.168.1.xx and 192.168.150.xx. UAG does the mapping between these two subnets. Follow the diagram in Figure 12.14 below to set up the networking. This setup works well for testing building applications that need to use UAG, but you don’t have enough resources to run everything on a single machine.
Figure 12.14. Multi-machine setup using UAG
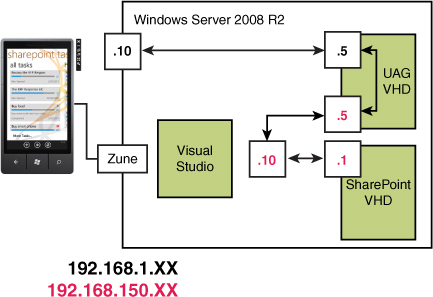
Single Machine with UAG
The setup shown in Figure 12.15 is similar to the previous setup except that you are not using a second machine to run Visual Studio and the phone tools. In this scenario you install Visual Studio directly on the host machine. The key to making this setup work is that you need a physical phone device. You cannot use the emulator on the same machine running Hyper-V because this causes the machine to instantly crash. To get around this, set Visual Studio to deploy to the phone device attached to the machine through the Zune software installed on the host.
Figure 12.15. Single machine setup using UAG
Single Machine with Hyper-V
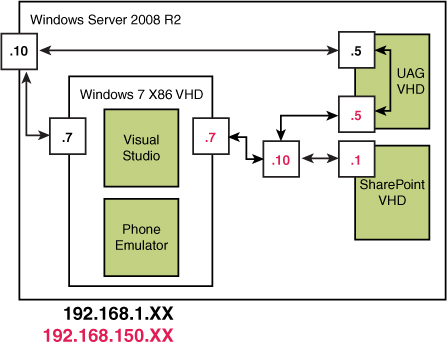
This setup is the preferred setup if you have enough resources to run three VHDs. This puts everything on a single machine, greatly simplifying the portability of the environment, and is a combination of a couple of the previous patterns. The key to this setup is that the Visual Studio phone tools and emulator must be installed on a Windows 7 32-bit VHD. In spite of what the SDK may say, at the time of this writing any other operating system including 64-bit Windows 7 will not work and causes the VHD or the host machine to crash. In the configuration shown in Figure 12.16, you have a Windows 7 client machine connected to both the UAG network and directly to the SharePoint network. This enables you to build and test applications that can use FBA or UAG without reconfiguring your machine.
Figure 12.16. Single machine setup with Hyper-V
There are a number of different ways to configure your developer machines. The one you choose depends on the hardware you have available and the goal of your development. Other factors such as the ability to snapshot, install, rollback, and share instances all need to be considered when building your perfect setup.
Publishing an Application
After you have built your SharePoint phone application, you then need to deploy it to the marketplace. Visit the phone marketplace at http://create.msdn.com. The phone marketplace does not allow you to publish private applications. This means that any application you create will be visible to everyone on the marketplace. This is a challenge for business applications because many contain private information for a company. You need to consider this when designing your applications. There are many techniques to handle this situation such as obfuscation and activation keys. Although this is an advanced topic and beyond the scope of this book, you should be aware of the issue and think about the approach that best fits your company’s policies and concerns.
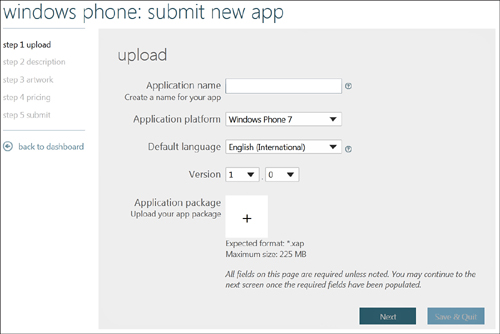
When you are ready to publish the application you should follow the steps in the help page titled “App Hub Application Submission Walkthrough” located at http://go.microsoft.com/fwlink/?LinkId=216139. There are five basic steps—upload, description, artwork, pricing, and submit. Figure 12.17 shows an example of the app submission page on App Hub.
Figure 12.17. Submit your phone application
The Microsoft App Hub is a great resource for Windows Phone developers. On the site you can find many articles and whitepapers on building and publishing phone applications.
Summary
In this chapter you learned how to build phone applications that can leverage the SharePoint platform for data and services. Building phone applications using Silverlight against SharePoint is the next growth wave for SharePoint developers. As more companies move to SharePoint and as everyone depends on mobile applications for most business processes, phone developers who understand SharePoint will be in high demand. You also saw how you can leverage UAG to not only provide access across the firewall, but you can use UAG to provide authentication without changing your SharePoint site.
Building a great development environment for building SharePoint and Windows Phone applications can be a challenge. Although there is not one answer for everyone, you saw a number of ways that you could build out an environment that works for you and your company. You saw that you could build a setup that includes everyone on the client or everything on the server or a mix of the two environments.
The last consideration when building a phone application is how to deploy it to the marketplace for your users to install on their phones. There are unique considerations for a SharePoint application because the phone marketplace doesn’t support private application submissions. But with a little planning, you can create an application that can only be accessed and used by authorized users.