
14. SharePoint and Silverlight in the Cloud
SO FAR IN THIS BOOK, you’ve worked through many Silverlight solutions for SharePoint, and getting to this point is an achievement. This chapter builds on what you’ve learned and shows you how to integrate Silverlight into SharePoint Online as a service within Office 365.
The Microsoft Office365 product offering consists of three relatively distinct parts:
1. Communications—Instant Messaging, Voice and Video calls, and web conferencing
2. Email with Outlook 2010 and Outlook Web Access
3. Collaboration with SharePoint Online
A great way to think of SharePoint Online is the same as SharePoint 2010—a web portal through which individuals can store and exchange documents, as well as other information such as Tasks and Calendars—but in this case “it’s in the cloud.” (To be clear what the cloud is in this case, it’s a public multi-tenant Software as a Service infrastructure located in Microsoft datacenters.) SharePoint Online (SPO) delivers most of the same site collection level developer features as in the on-premise Microsoft SharePoint 2010 product line.
Why then is there a special chapter on SPO? Although SPO offers developers the ability to upload custom applications, there are caveats in how to accomplish this task. To know why this important, you need only to understand that SPO is a multitenant environment. This means customers “share” resources like CPU and RAM—but do not share their data. This fact must be kept in mind when building applications. As discussed throughout this book, SharePoint Sandboxed Solutions is the feature that allows developers to run custom code in multitenant environments without administrators worrying about the stability of servers running SharePoint Online. Most importantly, when SPO is combined with Sandboxed Solutions to host Silverlight applications, developers can create custom Visual Studio 2010 solutions that can be immediately uploaded to SharePoint Online.
In fact, there are many types of customizations to SPO. In this chapter you focus on Silverlight external data connectivity to SharePoint Online; building custom web parts in Visual Studio 2010; and adding a Ribbon group, buttons, and building several Silverlight applications to connect to SharePoint data sources. The purpose is to show how to mesh Silverlight into the SharePoint Online to enable rich solutions that can connect to sources beyond the reach of the Sandbox in accordance with good practical use for the SharePoint Client Object Model. After reading this chapter, you’ll have a good idea how to apply the knowledge from other parts of this book to SharePoint Online as well.
Let’s take a look at a custom project for SharePoint Online to get a better idea of these concepts. Figure 14.1 shows a Silverlight application embedded into a SharePoint Sandboxed Web Part and deployed with a Ribbon customization to Office365 SharePoint Online. You’ve used these models before in this book, but the implementation and deployment differs enough for us to spend time exploring in SharePoint Online. Additionally, the goal of many cloud applications is data integration—what better way than to build a project in Office365 accessing data from Azure, Microsoft’s cloud-based application environment.
Figure 14.1. Office365 SharePoint Online Silverlight Web Part connected to Azure
SharePoint Online Sandboxed Solutions, Development Environment, and Deployment
As mentioned previously, custom development packages with SharePoint Online will be SharePoint 2010 Sandboxed Solutions and Silverlight Solutions in Visual Studio 2010. With SPO, our development environment is a local instance of SharePoint 2010 Foundation or Enterprise Server and is the same development environment as suggested in this book. Although not necessary, testing should occur on local servers before publishing to SPO.
The Visual Studio solution types have been covered in previous chapters, but let’s go over them briefly. In this chapter, three types of projects are mixed together to create integrated solutions:
• Visual Studio Silverlight Solutions
• Visual Studio SharePoint Sandboxed Solutions
• Visual Studio SharePoint Ribbon Solutions (declarative SharePoint Ribbon markup for customization)
Sometimes when working with more complex SharePoint projects, dependent artifacts, such as lists, images, or content types, might not be represented in our production SPO site. Perhaps the data required is absent or external service references are not available. For these reasons when planning for SPO with Sandbox Solutions, also plan to incorporate other artifacts, like images, into the Visual Studio SharePoint deployment packages; it’s recommended to deploy them to the Site Assets library. This way, the main code and all related pieces can be published and tested as a single unit. The strategy is especially useful when deploying to remote and external platforms. Alternatively, images can be included in the Silverlight .xap file for deployment. In most cases, inclusion in the .xap file makes its size larger, and downloading and executing the application takes more time. If the images are deployed to the Site Assets library in Sandbox Solutions, the .xap size stays smaller, and the images can be changed without your needing to recompile the .xap file.
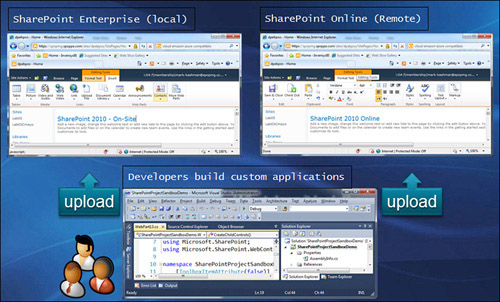
In general, the deployment model features local and remote environments for testing and production (SharePoint Online). The deployment packages are deployable to all environments. Figure 14.2 shows an example of local test and remote production environments.
Figure 14.2. Example: Local test and remote production environments
Deployment packages can contain a couple of web parts or modules. With a basic Silverlight application for SharePoint, there is only one file—the Silverlight .xap application file and, commonly, the .xap file is uploaded manually to the Site Assets list in SharePoint Online. When uploaded, take the URL reference to the file in the Site Assets list (as shown in Figure 14.3) and reference when adding an out-of-the-box Silverlight Web Part to a SharePoint page.
Figure 14.3. Copying a shortcut to a Silverlight .xap file

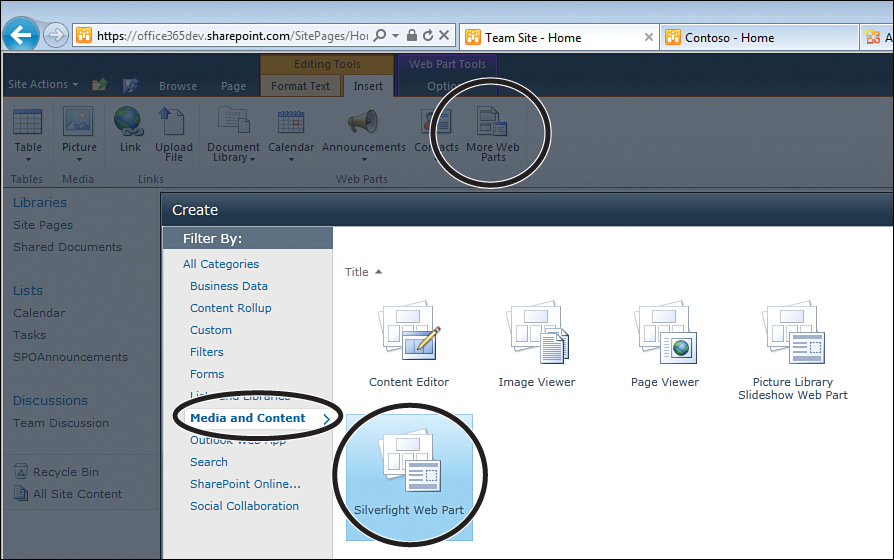
In Figure 14.4, adding a new out-of-the-box Silverlight Web Part in SharePoint Online is slightly different than SharePoint Foundation.
• The More Web Parts button contains the Silverlight Web Part.
• The parts are in the Media and Content category.
• Select the Silverlight Web Part and click Add.
• You are prompted, “No Silverlight Application (.xap) is specified [...]”
• Open the Tool Pane and configure.
• Use the .xap URL from the Site Assets list.
Figure 14.4. Adding the Silverlight Web Part

A developer can upload the .xap file into most lists. The “Site Assets” list provides a common place to hold these files, as well as images or .css files.
The following list contains the basic steps in the process of creating, deploying, and activating a sandboxed solution in SharePoint Online:
1. Develop and test the solution. Create a solution on a local computer where SharePoint Foundation 2010 is installed.
• Develop a Silverlight Application and deploy to the SharePoint Silverlight Web Part.
• Develop a sandboxed solution and embed the Silverlight Application.
2. Deploy and activate the solution. After you create and debug your solution on the local computer, upload the solution package (.wsp) file to the Solution Gallery for activation.
3. Assign resources for the site collection’s sandboxed solutions. Ensure sandboxed solutions resources have been allocated to the site collection (see Figure 14.5).
Figure 14.5. Setting a resource quota in SharePoint Online
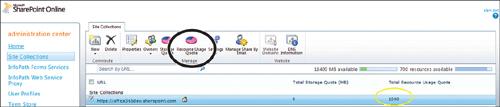
To explain the Resource Usage Quota a little more, in the Office365 Dashboard for SharePoint, ensure site collections using sandboxed web parts have a Resource Allocation value (also referred to as resource points). With a value of zero, sandboxed solutions do not activate. In the example shown in Figure 14.5, 1000 resource points are allocated. However, 300 points is a good value to begin with because each Office365 account has overall point apportionment (a small Office365 account point allotment is 6000), and you distribute points to each site as needed. Later, if an Administrator judges more points are needed, she can update the value in the Administrator dashboard, and alerts can be sent to the site collection Administrator based on a percentage of resource allocation usage. The dashboard is located off the SharePoint Online Administrator Center under Manage SharePoint Online.
Note
Each customer can get to his SharePoint Online Administration Center by typing https://YourDomain-admin.sharepoint.com where you replace Your-Domain with the company name you signed up with for Office365.
Web Services in SharePoint Online
Web services are interesting in SPO...and sandboxed solutions do not allow external connections. However, Silverlight can access SharePoint data via Client Side Object Model and external data services directly.
Deciding which data access method to use is a design choice based on authentication, ease of access, or other criteria. Microsoft has committed to supporting direct access to external data via web services. SharePoint Online plans to support those core components of Business Connectivity Services (BCS) for direct access to external data via web services. For example, if the Administrator connects SPO to an external service and grants access to users, then Silverlight clients can easily integrate the SharePoint (external list) data with the Client API and do not need to carry service references or authenticate remotely—this is a strong point because SPO can centrally manage security and service references. In a different scenario, the application could be independent of SharePoint Online to manage its service connections and authentication. There are benefits to either solution, but it’s good to point out the choices.
SharePoint Online Client Object Models
SPO uses the same Client APIs available in SharePoint on-premise and mentioned previously in this book. This book sticks with the Silverlight SharePoint Client API to retrieve data in its examples, but it is important to note SPO has the same access to the SharePoint List REST interface, as well as the Excel Services REST interface. The Excel API lets developers open workbooks through a URL and display or update data.
WCF and ASP.NET Web Services
Although SharePoint web services and other external data connections are not available for use in sandboxed solutions, you can access them through Silverlight applications. These types of data sources are external sources like Azure or On-Premise WCF solutions. For details on connecting to external data sources, see Chapter 11, “Accessing External Data,” which explains how to wire up Silverlight to display the data of your choosing.
SharePoint Online Debugging
Debugging sandboxed solutions in SharePoint Online can be very challenging. In SPO, developers have no access to server resources or counters, cannot log errors to a file, and can’t attach a debugger to SharePoint Online IIS process or sandboxed solution process. Additionally, even if a SharePoint correlation error is shown to the user, the developer can’t research logs to find the cause.
However, in a much more positive light, Silverlight allows you to attach to the browser process running the SharePoint Online site to directly debug and hit breakpoints in the Silverlight code. The interesting conundrum comes with the question of how you might log information or errors with the SPO restrictions. Also, how might you debug the mix of Silverlight and SharePoint Online to receive useful information as the application runs? In simple applications, where the code might just be Silverlight, the issue is easier, of course. However, many applications will also be running a full set of sandboxed code coupled with a Silverlight client; in those situations, retrieving debug data at all levels is helpful. Here are some helpful hints:
• Use the Developer Dashboard to see if the issue is in your web part. This is the icon enabled on the far upper right corner of the browser.
• Pull the suspected web part back to your local environment and commence debugging and testing with Visual Studio 2010. Use the local debugger to set breakpoints and evaluate values and errors.
• Look for missing artifacts on the SharePoint Online site, such as Lists or Images.
• Put your code in try-catch-blocks in the catch statement.
• Use a Textbox to output error messages.
• Use a SPList to log error messages. Be sure to also create a function to remove entries in the list. If the list grows too large, site performance may be degraded.
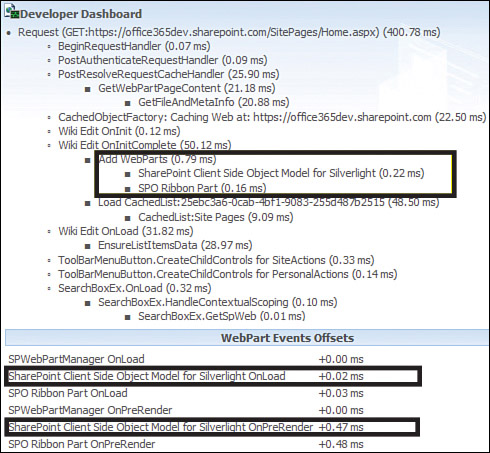
In Figure 14.6, the Developer Dashboard is enabled by clicking the icon in the upper left corner. Importantly, when enabled, the dashboard has sections describing the load times for the sandboxed web part to inform the developer how the parts are loading. For example, if a developer puts code in the sandbox solution server side OnLoad() or OnPrerender() methods, the load time could be very slow, perhaps indicating the issue is not within the Silverlight client but within the sandboxed code accompanying it. Figure 14.6 shows an example of the web part initialization, load, and render times.
Figure 14.6. Developer Dashboard
Customization of the Developer Dashboard with the SharePoint SPMonitoredScope class is not supported in sandboxed solutions. Fortunately, the default output of dashboard is helpful to gain insight on coding issues.
SharePoint Online API “Additional” Restrictions for Sandboxed Solutions
SharePoint Online has additional restrictions in the Microsoft.SharePoint namespace in addition to the default set of restrictions for standard SharePoint sandboxed solutions. (Full details can be found on MSDN at http://bit.ly/SPSL_SandboxedAPI.) The best strategy is installing Visual Studio Service Pack 1 that contains compiler instructions to throw an error if restricted types are used when the SharePoint sandboxed solution project attribute is true and the project is compiled. However, additionally blocked items for SPO will not be covered in VS2010 SP1, so they are listed here. If you accidentally try to use one, the sandboxed solution throws a runtime error stating that there has been a security exception, which assists in uncovering the root of the problem.
The additionally blocked namespaces for SharePoint Online are
• microsoft.sqlserver
• microsoft.win32
• system.array.createinstance
• system.data.sql
• system.data.sqlclient
• system.data.sqltypes
• system.delegates
• system.io.pipes
• system.io.ports
• system.reflection
• system.runtime.interopservices
• system.runtime.remoting
• system.threading
• system.type.gettype
• system.type.invokemember
There are a few targeted exceptions to this block, however. The following types and members from the previous list of blocked namespaces can be used in a sandbox solution in SPO:
• system.runtime.interopservices.layoutkind
• system.reflection.fieldinfo.getvalue
• system.reflection.memberinfo.get_name
• system.reflection.memberinfo.getcustomattributes
• system.reflection.propertyinfo.get_propertytype
• system.reflection.propertyinfo.getvalue
• system.reflection.propertyinfo.setvalue
• system.threading.monitor.enter
• system.threading.monitor.exit
• system.threading.thread.get_managedthreadid
• system.threading.thread.get_currentthread
SharePoint Online Silverlight “Client Side Object Model” Data Project
Now that you’ve reviewed most of the information for SharePoint Online developers, let’s build a common project using the SharePoint Client Side Object Model for Silverlight and publish to SPO. If you’ve read Chapter 8, you should be familiar with the SharePoint Client Side Object Model for Silverlight (CSOM).
Let’s step through a project, and although you’ve done this before, the publishing aspect at the end is different. In brief, you create a Silverlight application in Visual Studio 2010, then add code to the default Page.xaml.cs file. Next, you build and upload the project’s application package (.xap) file to a document library. Then insert a Silverlight Web Part into a web parts page and point the URL source of the web part to the .xap file’s path location in a document library.
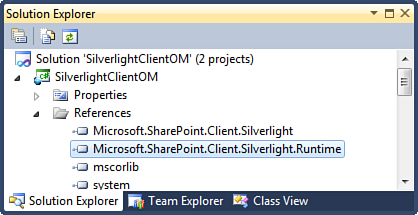
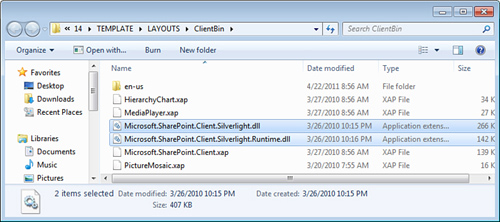
You need to add a reference to the Microsoft.SharePoint.Client.Silverlight and Runtime DLLs to use the SharePoint Client Object Model (CSOM). Use the DLLs found on the local SharePoint machine in the .. 14TEMPLATELAYOUTSClientBin directory. In Figure 14.7, the project deploys the files with the Silverlight .xap file.
Figure 14.7. Client Object Model assemblies for Silverlight
There are a number of ways to accomplish the task of publishing a Silverlight application to SharePoint. In fact, several of them are covered in this book. However, for this sample, you want to use a simple way to build and manually publish to understand the publishing process.
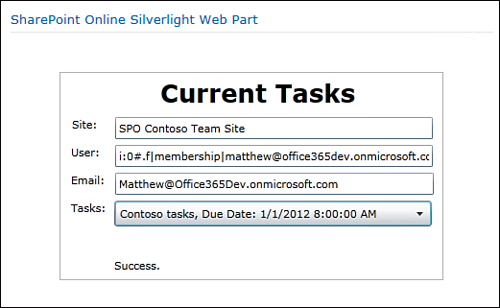
Let’s build the project shown in Figure 14.8.
Figure 14.8. Client Object Model example in SharePoint Online
Create a new Silverlight Application and name it SilverlightClientOM, as shown in Figure 14.9.
Figure 14.9. Creating the Silverlight project for the client OM example
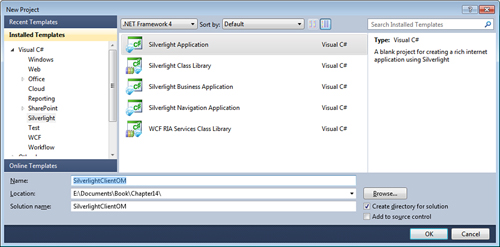
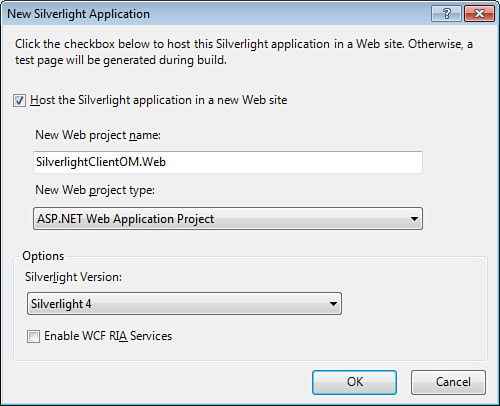
Accept the default Silverlight Application type and click OK, and you are presented with the dialog box shown in Figure 14.10.
Figure 14.10. Selecting the Silverlight project type
Navigate to SharePoint ..14TEMPLATELAYOUTSClientBin and copy Microsoft.SharePoint.Client.Silverlight.dll and Microsoft.SharePoint.Client.Runtime.dll to your local Visual Studio project folder, as shown in Figure 14.11.
Figure 14.11. Copying the Client Object Model .dll files from the ClientBin directory
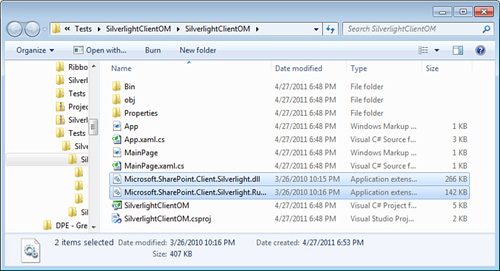
After pasting, the Visual Studio Project folder now contains the assemblies, as shown in Figure 14.12.
Figure 14.12. Copying the Client Object Model .dll files to the local project directory
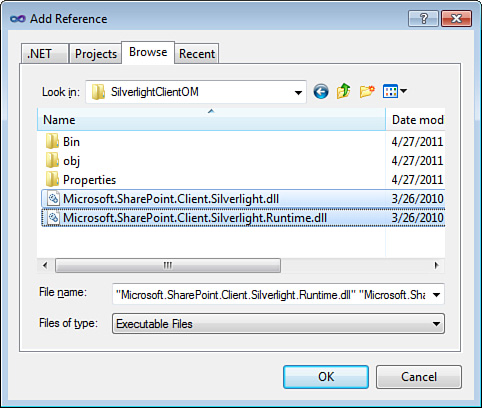
In Visual Studio Silverlight project, right-click the project and select Add Reference; then add the two assemblies copied into your SilverlightClientOM project folder as shown in Figure 14.13.
Figure 14.13. Adding references to the Client Object Model
Next add a reference to the Silverlight SDK Client Libraries. On the .NET tab in Add Reference locate and select the System.Windows.Controls.Data. Input assembly to add it to the project.
Open the MainPage.xaml.cs file and add a using statement:
using Microsoft.SharePoint.Client;
At this point, you have the necessary references to construct and deploy a Silverlight CSOM project. Next add code to build a custom UI with Silverlight.
Open the MainPage.xaml file and replace the UserControl XAML with the XAML shown in Listing 14.1. Note the reference to xmlns:sdk allowing the use of the sdk labels in the project.
Listing 14.1. XAML for Client OM Example
<UserControl x:Class="SilverlightClientOM.MainPage"
xmlns="http://schemas.microsoft.com/winfx/2006/xaml/presentation"
xmlns:x="http://schemas.microsoft.com/winfx/2006/xaml"
xmlns:d="http://schemas.microsoft.com/expression/blend/2008"
xmlns:mc="http://schemas.openxmlformats.org/markup-compatibility/2006"
mc:Ignorable="d"
d:DesignHeight="294" d:DesignWidth="434"
xmlns:sdk="http://schemas.microsoft.com/winfx/2006/xaml/presentation/sdk">
<Grid x:Name="LayoutRoot" Background="White" Height="218" Width="401">
<Border BorderBrush="Silver" BorderThickness="1" Height="217"
HorizontalAlignment="Left" Name="border1"
VerticalAlignment="Top" Width="400" />
<TextBox Height="23" HorizontalAlignment="Left"
Margin="58,76,0,0" Name="UserText" VerticalAlignment="Top"
Width="331" />
<sdk:Label Height="23" HorizontalAlignment="Left"
Margin="12,76,0,0" Name="label2" VerticalAlignment="Top"
Width="39" Content="User:" />
<sdk:Label Height="22" HorizontalAlignment="Left"
Margin="12,105,0,0" Name="label1" VerticalAlignment="Top"
Width="39" Content="Email:" />
<TextBox Height="23" Margin="58,105,11,0" Name="EmailText"
VerticalAlignment="Top" />
<ComboBox Height="27" HorizontalAlignment="Left"
Margin="57,134,0,0" Name="TaskComboBox" VerticalAlignment="Top"
Width="331" />
<sdk:Label Height="27" HorizontalAlignment="Left"
Margin="12,134,0,0" Name="label3" VerticalAlignment="Top"
Width="36" Content="Tasks:" />
<sdk:Label Height="35" HorizontalAlignment="Center"
Margin="18,6,6,0" Name="label4" VerticalAlignment="Top"
Width="378" Content="Current Tasks" FontSize="26"
FontFamily="Verdana" FontStretch="Expanded" FontWeight="Bold" />
<TextBlock Height="23" HorizontalAlignment="Left"
Margin="57,194,0,0" Name="ErrorMessage" Text="TextBlock"
VerticalAlignment="Top" Width="333" />
<sdk:Label Height="28" HorizontalAlignment="Left"
Margin="13,47,0,0" Name="label5" VerticalAlignment="Top"
Width="36" Content="Site:" />
<TextBox Height="23" HorizontalAlignment="Left"
Margin="58,47,0,0" Name="UserSite" VerticalAlignment="Top"
Width="331" />
</Grid>
</UserControl>
Return to the MainPage.xaml.cs file and add FilterTasksByUser() method and call it in the MainPage constructor as shown in Listing 14.2.
Listing 14.2. Button Click Event Handler for Client OM Example
public partial class MainPage : UserControl {
private Site site;
private Web web;
private User user;
private List list;
private ListItemCollection listItems;
private ClientContext SPContext;
public MainPage() {
InitializeComponent();
FilterTasksByUser();
}
private void FilterTasksByUser() {
ErrorMessage.Text = string.Empty;
try {
//SPContext = new
ClientContext("https://MySPOSite.sharepoint.com");
SPContext = new ClientContext("http://contoso");
site = SPContext.Site;
web = site.RootWeb;
user = web.CurrentUser;
list = web.Lists.GetByTitle("Tasks");
SPContext.Load(site);
SPContext.Load(web);
SPContext.Load(list);
SPContext.Load(user);
SPContext.ExecuteQueryAsync(Succeeded, Failed);
} catch (Exception x) {
ErrorMessage.Text = x.Message;
}
}
Add the methods shown in Listing 14.3 to capture the asynchronous response.
Listing 14.3. Client Object Model Response Handlers
private void Succeeded(object sender, ClientRequestSucceededEventArgs args) {
this.Dispatcher.BeginInvoke(delegate()
{
ComboBoxItem CItem;
UserText.Text = user.LoginName.ToString();
EmailText.Text = user.Email.ToString();
UserSite.Text = web.Title.ToString();
if (listItems == null) {
CamlQuery camlQuery = new CamlQuery();
string query =
(@"<View><Query><Where>
<Eq>
<FieldRef Name='AssignedTo'/>
<Value Type='User'>{0}</Value>
</Eq>
</Where></Query>
<RowLimit>100</RowLimit>
</View>");
camlQuery.ViewXml = string.Format(query, UserText.Text);
listItems = list.GetItems(camlQuery);
SPContext.Load(listItems);
SPContext.ExecuteQueryAsync(Succeeded, Failed);
} else {
foreach (var item in listItems) {
CItem = new ComboBoxItem();
CItem.Content = Convert.ToString(item["Title"]) + ",
Due Date: " + Convert.ToString(item["DueDate"]); //avoid null exceptions in
return values.
TaskComboBox.Items.Add(CItem);
}
}
ErrorMessage.Text = "Success.";
}
);
}
public void Failed(object sender, ClientRequestFailedEventArgs args) {
this.Dispatcher.BeginInvoke(delegate()
{
ErrorMessage.Text += "Call Failed.";
}
);
}
Modify the URL string parameter to reference the SPO site collection URL; likely it’s HTTPS protocol. (The purpose of hardcoding the value of the URL in this example is to explicitly demonstrate how the value is used. The value can be parameterized later to dynamically select the correct URL string.)
Right-click the solution and build the application. To deploy to SharePoint Online:
1. Log in to SharePoint Online as Administrator.
2. Navigate to the Site Assets Library.
3. Click Add Item and choose the location of your current Silverlight project.
4. Locate the SilverlightClientOM.xap file located in the BINDebug folder.
5. Upload the file to SharePoint Online.
6. After uploading, right-click the item link and copy shortcut. (Keep it handy!)
Add a Silverlight Web Part as shown in Figure 14.14:
1. Go to the SharePoint page where you want to web part to be loaded.
2. Click the Page tab and then the Edit button.
3. Click the More Web Parts button to view available web parts.
4. Select the Media and Content category.
5. Select the Silverlight Web Part and click Add.
6. When prompted,
a. “No Silverlight Application (.xap) is specified [...] open the Tool Pane and Configure.”
b. Open the tool pane and use the .xap Shortcut URL from the Site Assets list item.
7. Click OK, and the Silverlight application loads.
a. Optionally, manage the Height, Width, and other properties in Web Part Properties page. If so, select Apply and watch for formatting errors to fix.
8. Click the Save and Close button in the SharePoint Ribbon.
Figure 14.14. Adding a Silverlight Web Part
At this point, the project is complete. You can test the project by adding tasks assigned to you. Review the values in the Silverlight Combo Box against the assigned tasks. Try changing the URL value in code and deploy to your local instance of SharePoint. What differences are there?
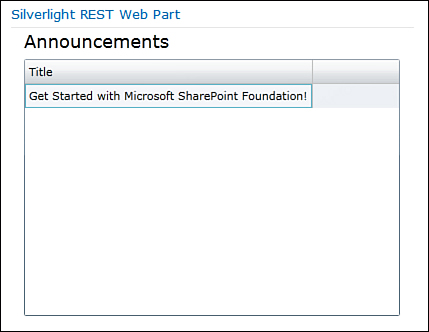
SharePoint Online Silverlight REST Data Project
In this project, shown in Figure 14.15, you connect to SharePoint Online List REST service to extract data and demonstrate using the REST protocol in SPO.
Figure 14.15. REST data protocol example
Create a new Silverlight Application, and name it SilverlightREST, as shown in Figure 14.16.
Figure 14.16. Adding the SilverlightREST project
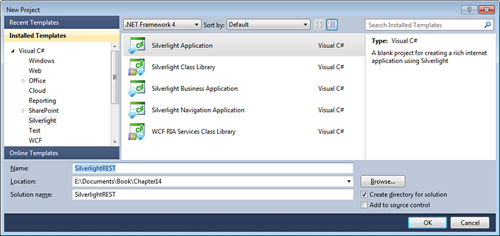
Accept the default Silverlight Application type, as shown in Figure 14.17.
Figure 14.17. Selecting the Silverlight project type

Generate a web service proxy to the local SharePoint REST service (local is the installation of SharePoint running on your local machine). This is shown in Figure 14.18.
1. Add a reference to the /_vti_bin/listdata.svc.
2. Update the Namespace to ListSvc.
3. Click OK.
Figure 14.18. Adding a service reference to the local REST service
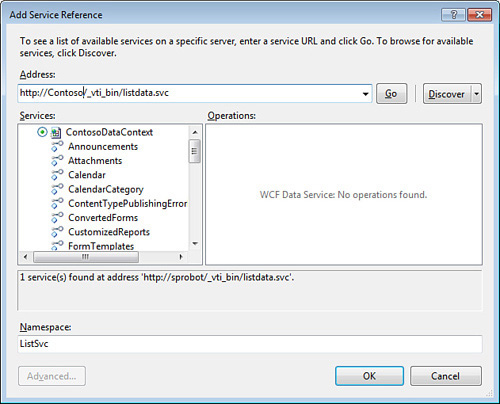
It’s important to understand that you use the local reference to the listdata.svc service to generate the service proxy; then hardcode the local URI into the service instance to test locally. Finally, when you’re ready to publish to SharePoint Online, you modify the URI to your SharePoint Online site collection URI + /_vti_bin/listdata.svc.
Using the hardcoded values is only a strategy to step through the process of understanding the REST service reference. After completing the project, use the Silverlight Context object to dynamically reference the URI (for example: SPContext.Current.Site.Url).
Here, you want to add a DataGrid and bind one column to demonstrate pulling that data and presenting in the UI. To accomplish this quickly, open the MainPage.xaml file and replace the Grid control with the XAML shown in Listing 14.4:
Listing 14.4. XAML for REST Example
<Grid x:Name="LayoutRoot" Background="White">
<sdk:DataGrid AutoGenerateColumns="False" Height="257"
HorizontalAlignment="Left" Margin="12,31,0,0" Name="dataGrid1"
VerticalAlignment="Top" Width="376">
<sdk:DataGrid.Columns>
<sdk:DataGridTextColumn x:Name="Title"
Binding="{Binding Path=Title}" Header="Title"
CanUserReorder="True" CanUserResize="True"
CanUserSort="True" Width="Auto" />
</sdk:DataGrid.Columns>
</sdk:DataGrid>
<sdk:Label Height="28" HorizontalAlignment="Left" Margin="12,0,0,0"
Name="label1" VerticalAlignment="Top" Width="181"
Content="Announcements" FontSize="18" />
</Grid>
Next add a reference to the Silverlight SDK Client Libraries. On the .NET tab in Add Reference, locate and select the System.Windows.Controls.Data.Input assembly to add it to the project. You know the reference is needed if the sdk:DataGrid does not compile.
Return to the MainPage.xaml.cs file and replace the MainPage() constructor method with the method shown in Listing 14.5. Note that, as mentioned, you need to change the URI when publishing to SharePoint Online.
The REST service reference uses the ListSvc namespace. If a different value was used, locate the data context by referring to the site Name + DataContext. In the example here, Contoso site name plus DataContext equals ListSvc.ContosoDataContext as the proper reference.
Listing 14.5. Methods to Retrieve Data from ListData.svc
public MainPage()
{
InitializeComponent();
//ListSvc.ContosoDataContext ctx = new ListSvc.ContosoDataContext(new
Uri("https://MySharePointOnlineSite.sharepoint.com/_vti_bin/listdata.svc"));
ListSvc.ContosoDataContext ctx = new ListSvc.ContosoDataContext(new
Uri("http://contoso/_vti_bin/listdata.svc"));
// Instantiate the collection
System.Data.Services.Client.DataServiceCollection
<ListSvc.AnnouncementsItem> AnnouncementsCollection =
new DataServiceCollection<ListSvc.AnnouncementsItem>();
// Register a event handler
AnnouncementsCollection.LoadCompleted +=
new EventHandler<LoadCompletedEventArgs>
(AnnouncementsCollection_LoadCompleted);
//Query that returns all announcements
DataServiceQuery<ListSvc.AnnouncementsItem> query =
ctx.Announcements;
// Execute the query.
AnnouncementsCollection.LoadAsync(query);
}
Add the method in Listing 14.6 to capture the asynchronous response.
Listing 14.6. Method to Handle REST Response
private void AnnouncementsCollection_LoadCompleted
(object sender, LoadCompletedEventArgs e)
{
// Get the collection that executed the query.
var binding = (DataServiceCollection<ListSvc.AnnouncementsItem>)
sender;
dataGrid1.ItemsSource = binding;
}
Right-click the solution and build the application. When it’s working locally, it’s time to deploy to SharePoint Online:
1. Log in to SharePoint Online as Administrator.
2. Navigate to the Site Assets list.
3. Click Add Item and choose the location of your current Silverlight project.
4. Locate the SilverlightREST.xap file located in the BINDebug folder.
5. Upload the file to SharePoint Online.
6. After uploading, right-click the item link and copy shortcut.
Add a SharePoint Silverlight Web Part to host the Silverlight Application:
1. Open the Web Part Tools Pane and add the reference URL to the .xap file.
2. Click OK, and the Silverlight application loads. Optionally, manage the Height, Width, and other properties in the web part’s Properties page.
3. Click the Save and Close button on the SharePoint Ribbon.
4. The project is complete.
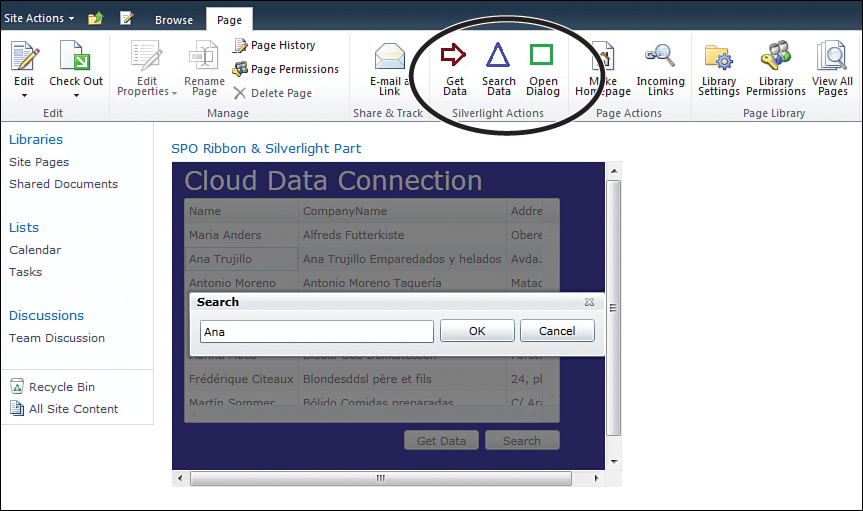
SharePoint Online Azure Project
In this project you use SQL Azure to access a public OData data source. The data source has anonymous access so you can easily build and test a solution for use in SharePoint Online. You also integrate the application into the SharePoint Ribbon to enhance the UI application cohesiveness between Silverlight and SharePoint Online.
The ability to access resources regardless of the application topology is an important aspect of data availability. Combined with Office365, companies will have ways to provide custom data applications directly into SharePoint Online. In this type of scenario, the Information Worker using Office365 could simply have access to multiple external resources in one location. Examples could be a simple weather service or useful line of business applications such as Shipping and Tracking, Supply Chain Management, Sales Contacts, or Video Training. Developers can combine cloud and on-premise data to create integrated solutions providing access to business functions.
SharePoint Online, SQL Azure, and Silverlight
In this project, you create a sandboxed solution, add a web part embedding the Silverlight Object, and then add an XML element to define Ribbon buttons. The Silverlight Application contains a web service OData reference to SQL Azure, a Silverlight Grid to display data and a Search interface. The JavaScript on the Ribbon uses the HTML Bridge to call Silverlight methods.
A note about security, as in this example, you specifically use an anonymous connection to SQL Azure to demonstrate data access. In reality, authenticated connections are almost always used. SQL Azure can be opened in conjunction with Azure Web Services and Azure ACS (Access Control Services) or directly with a Live ID session or Secret Key issued by SQL Azure. A review of the security methods for Silverlight access is beyond the scope of this chapter; however, “Security for Windows Azure” guidance can be found at http://msdn.microsoft.com/en-us/library/ff934690.aspx.
To get started, you add a couple of Visual Studio projects to the solution:
1. Create a new Empty SharePoint Project solution named Ribbon Prototype.
2. Accept Sandboxed Solution project type.
3. In RibbonPrototype project, add an assembly reference to System.ServiceModel.dll.
4. Add a web part (do not add a Visual Web Part) called RibbonPart.
5. Add an Empty Element part named GroupRibbonElement.
6. Add a Module named stylelibrary.
7. Add a new Visual Studio Silverlight Project to the RibbonPrototype Solution and name the project SPOSilverlight.
8. Add a Silverlight child window called Activity to the SPOSilverlight project.
9. Add a service reference to the SPOSilverlight project and call the namespace NorthwindCatalog. Add a reference to https://odata.sqlazurelabs.com/OData.svc/v0.1/hqd7p8y6cy/Northwind/ and click OK.
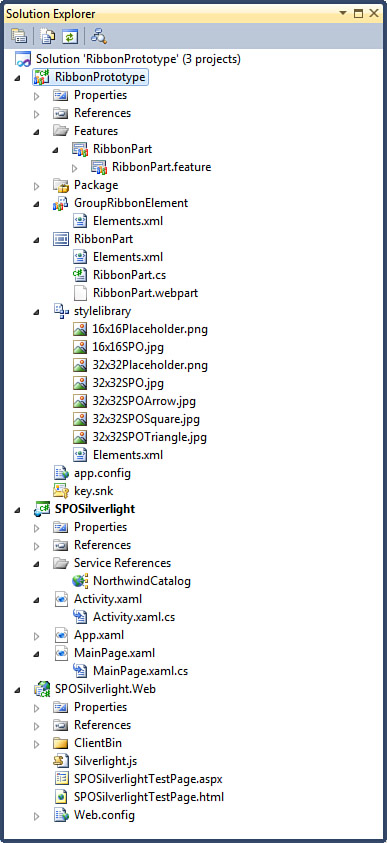
All the components are in place to add code, and the VS Explorer resembles what you see in Figure 14.19:
Figure 14.19. Solution Explorer for the Azure project
In the SharePoint RibbonPrototype Project
While you are adding the declarative SharePoint Ribbon markup to the project, take a minute to examine the structure of the Ribbon component being added. Note specifically the Location value—it tells SharePoint where the buttons will be visible. Also review the CommandUIHandler for SelectExecuteCommand; it is the call to the HTML Bridge for JavaScript to call into the Silverlight application methods executing code.
Open the Features folder and right-click on the RibbonPart.Feature to view it in the Feature Designer. Update the Title to “SharePoint Online Ribbon Prototype.” Then open GroupRibbonElementElements.xml and add the XML shown in Listing 14.7. This code tells SharePoint to display three new buttons in the Ribbon and defines a Javascript command for each of them.
Listing 14.7. Elements.xml for the GroupRibbonElement Module
<?xml version="1.0" encoding="utf-8"?>
<Elements xmlns="http://schemas.microsoft.com/sharepoint/">
<CustomAction
Id="Ribbon.WikiPageTab.CustomGroup"
Location="CommandUI.Ribbon">
<CommandUIExtension>
<CommandUIDefinitions>
<CommandUIDefinition
Location="Ribbon.WikiPageTab.Groups._children">
<Group
Id="Ribbon.WikiPageTab.CustomGroup"
Sequence="55"
Description="Silverlight Actions"
Title="Silverlight Actions"
Command="EnableCustomGroup"
Template="Ribbon.Templates.Flexible2">
<Controls Id="Ribbon.WikiPageTab.CustomGroup.Controls">
<Button
Id="Ribbon.WikiPageTab.CustomGroup.CustomGroupExecute"
Command="SelectExecuteCommand"
Image16by16="/Style Library/stylelibrary/16x16Placeholder.png"
Image32by32="/Style Library/stylelibrary/32x32SPOArrow.jpg"
LabelText="Get Data"
TemplateAlias="o2"
Sequence="15" />
<Button
Id="Ribbon.WikiPageTab.CustomGroup.CustomGroupWindow"
Command="SelectCommandOpenChildWindow"
Image16by16="/Style Library/stylelibrary/16x16Placeholder.png"
Image32by32="/Style Library/stylelibrary/32x32SPOTriangle.jpg"
LabelText="Search Data"
TemplateAlias="o2"
Sequence="18" />
<Button
Id="Ribbon.WikiPageTab.CustomGroup.CustomGroupOther"
Command="OpenDialogCommand"
Image16by16="/Style Library/stylelibrary/16x16Placeholder.png"
Image32by32="/Style Library/stylelibrary/32x32SPOSquare.jpg"
LabelText="Open Dialog"
TemplateAlias="o2"
Sequence="19" />
</Controls>
</Group>
</CommandUIDefinition>
<CommandUIDefinition
Location="Ribbon.WikiPageTab.Scaling._children">
<MaxSize
Id="Ribbon.WikiPageTab.Scaling.CustomGroup.MaxSize"
Sequence="15"
GroupId="Ribbon.WikiPageTab.CustomGroup"
Size="LargeLarge" />
</CommandUIDefinition>
</CommandUIDefinitions>
<CommandUIHandlers>
<CommandUIHandler
Command="EnableCustomGroup"
CommandAction="javascript:return true;" />
<CommandUIHandler Command="SelectExecuteCommand"
CommandAction="javascript:
function cmdExecuteCommand()
{
var mySilverlightObject = document.getElement-
ById('sponline'),
if (mySilverlightObject != null)
mySilverlightObject.Content.SPOSilverlight.ExecuteCommand();
}
cmdExecuteCommand();
"/>
<CommandUIHandler Command="SelectCommandOpenChildWindow"
CommandAction="javascript:
function cmdOpenChildWindow()
{
var mySilverlightObject = document.getElement-
ById('sponline'),
if (mySilverlightObject != null)
mySilverlightObject.Content.SPOSilverlight.ActivateChildWindow();
}
cmdOpenChildWindow();
"/>
<CommandUIHandler Command="OpenDialogCommand"
CommandAction="javascript:
var dialogOptions = {
url: 'http://www.microsoft.com/en-
us/office365/online-software.aspx',
title: 'Office365',
allowMaximize: false,
showClose: true,
width:700,
height:600
};
SP.UI.ModalDialog.showModalDialog(dialogOptions);
" />
<CommandUIHandler Command="SelectCommandServerPostback"
CommandAction="javascript: alert('My Postback'),
__doPostBack('RibbonizedWebPartPostback','My Postback')," />
<CommandUIHandler Command="MakeAlert"
CommandAction="javascript: alert('Hello World')," />
</CommandUIHandlers>
</CommandUIExtension>
</CustomAction>
</Elements>
Now open the RibbonPartElements.xml file and modify the Group property value to SharePoint Online Ribbon Silverlight Web Part. Then open the RibbonPartRibbonPart.webpart file and change its Title property to SPO Ribbon Part. Finally, open RibbonPartRibbonPart.cs and replace all the code and using statements with the code in Listing 14.8.
Note that the code writes out the Silverlight control in a literal control. There are other ways to do this in SharePoint, but this is an example where you can also change the .xap file reference in code.
It’s important to explicitly label the embedded object ID sponline. The out-of-the-box SharePoint Web Part gives the Silverlight application a random ID, and you can’t hook the HTML Bridge Javascript calls. This is a key component to wiring up the SharePoint Javascript to Silverlight.
Listing 14.8. Web Part Code in RibbonPart.cs
using System;
using System.ComponentModel;
using System.Web;
using System.Web.UI;
using System.Web.UI.WebControls;
using System.Web.UI.WebControls.WebParts;
using Microsoft.SharePoint;
using Microsoft.SharePoint.WebControls;
using System.Collections.Generic;
using System.Linq;
using System.Web.UI.HtmlControls;
using System.Xml.Linq;
using System.ServiceModel;
namespace RibbonPrototype.RibbonPart {
[ToolboxItemAttribute(false)]
public class RibbonPart : WebPart {
// Constants
private string POSTBACK_EVENT = "RibbonizedWebPartPostback";
protected override void CreateChildControls() {
// Handle postback from ribbon or dialogs.
HandleRibbonPostback();
//Add Controls
Literal ctrl = new Literal();
string outString =
"<div id="MySilverlightControlHost" >" + "
" +
"<object id="sponline" data="data:application/x-silverlight-
2," type="application/x-silverlight-2" width="100%" height="100%">" +
"
" +
"<param name="source" value="" + SPContext.Current.Site.Url + "/SiteAssets/SPOSilverlight.xap"/>" + "
" +
"<param name="onError" value="onSilverlightError" />" +
"
" +
"<param name="background" value="white" />" + "
" +
"<param name="minRuntimeVersion" value="4.0.50826.0" />" +
"
" +
"<param name="autoUpgrade" value="true" />" + "
" +
"<a
href="http://go.microsoft.com/fwlink/?LinkID=149156&v=4.0.50826.0"
style="text-decoration:none">" + "
" +
"<img src="http://go.microsoft.com/fwlink/?LinkId=161376"
alt="Get Microsoft Silverlight" style="border-style:none"/></a>" + "
" +
"</object></div>";
ctrl.Text = outString;
this.Controls.Add(ctrl);
}
private void HandleRibbonPostback() {
if (this.Page.Request["__EVENTTARGET"] == POSTBACK_EVENT) {
string passedArgument =
this.Page.Request.Params.Get("__EVENTARGUMENT");
//Each Ribbon event can be parsed and executed.
if (passedArgument == "value") {
// do something interesting
}
}
}
protected override void OnPreRender(EventArgs e) {
LoadAndActivateRibbonContextualTab();
base.OnPreRender(e);
}
private void LoadAndActivateRibbonContextualTab() {
}
}
}
Now open the StyleLibraryElements.xml and add the XML in Listing 14.9. This is how you get the project images packaged for use in SharePoint Online. It is good to review the declarative markup and then after package deployment find them using a web browser to confirm the URL and location. The project functions without button images, but you can copy or create new images as needed. Learning the URL paths and XML properties for the StyleLibrary is important; however, images might also be copied into the Visual Studio project, and the XML updates as needed.
Listing 14.9. Code to Deploy Images to SharePoint Online
<?xml version="1.0" encoding="utf-8"?>
<Elements xmlns="http://schemas.microsoft.com/sharepoint/">
<Module Name="stylelibrary" Url="Style Library" xmlns="http://schemas.microsoft.com/sharepoint/">
<File Path="stylelibrary32x32SPOSquare.jpg" Url="stylelibrary/32x32SPOSquare.jpg" Type="GhostableInLibrary" />
<File Path="stylelibrary32x32SPOArrow.jpg" Url="stylelibrary/32x32SPOArrow.jpg" Type="GhostableInLibrary" />
<File Path="stylelibrary32x32SPO.jpg" Url="stylelibrary/32x32SPO.jpg" Type="GhostableInLibrary" />
<File Path="stylelibrary32x32Placeholder.png" Url="stylelibrary/32x32Placeholder.png" Type="GhostableInLibrary" />
<File Path="stylelibrary16x16SPO.jpg" Url="stylelibrary/16x16SPO.jpg" Type="GhostableInLibrary" />
<File Path="stylelibrary32x32SPOTriangle.jpg" Url="stylelibrary/32x32SPOTriangle.jpg" Type="GhostableInLibrary" />
<File Path="stylelibrary16x16Placeholder.png" Url="stylelibrary/16x16Placeholder.png" Type="GhostableInLibrary" />
</Module>
</Elements>
Open the SPOSilverlight Silverlight Project.
Add references to the Silverlight WCF RIA Service SDK and Silverlight Client SDK. You might notice if you’re pasting the code into a new project that not all the references resolve because the SDKs are not added. Managing the SDK references can be complex, so be sure to compare the completed Visual Studio project RibbonPrototype to match the references.
Create the search window as a Silverlight child window named Activity.xaml. Open the SPOSilverlightActivity.xaml file and replace the XAML with the markup shown in Listing 14.10.
Listing 14.10. XAML Markup for Search ChildWindow
<controls:ChildWindow x:Class="SPOSilverlight.Activity"
xmlns="http://schemas.microsoft.com/winfx/2006/xaml/presentation"
xmlns:x="http://schemas.microsoft.com/winfx/2006/xaml"
xmlns:controls="clr-namespace:System.Windows.Controls;
assembly=System.Windows.Controls"
Width="417" Height="65"
Title="Activity">
<Grid x:Name="LayoutRoot" Margin="2">
<Grid.RowDefinitions>
<RowDefinition />
<RowDefinition Height="Auto" />
</Grid.RowDefinitions>
<Button x:Name="CancelButton" Content="Cancel"
Click="CancelButton_Click" Width="75" Height="23"
HorizontalAlignment="Right" Margin="0,-1,0,4" />
<Button x:Name="OKButton" Content="OK" Click="OKButton_Click"
Width="75" Height="23" HorizontalAlignment="Right"
Margin="0,-1,80,4" />
<TextBox Height="23" HorizontalAlignment="Left" Name="textBox1"
VerticalAlignment="Top" Width="234" Grid.RowSpan="2" />
</Grid>
</controls:ChildWindow>
Open SPOSilverlightActivity.xaml.cs file and make sure the functions shown in Listing 14.11 are present:
Listing 14.11. Button Click Events for Child Window
private void OKButton_Click(object sender, RoutedEventArgs e)
{
this.DialogResult = true;
}
private void CancelButton_Click(object sender, RoutedEventArgs e)
{
this.DialogResult = false;
}
Open the MainPage.xaml file and replace the all the XAML with the markup shown in Listing 14.12.
Listing 14.12. XAML Markup for MainPage User Control
<UserControl x:Class="SPOSilverlight.MainPage"
xmlns="http://schemas.microsoft.com/winfx/2006/xaml/presentation"
xmlns:x="http://schemas.microsoft.com/winfx/2006/xaml"
xmlns:d="http://schemas.microsoft.com/expression/blend/2008"
xmlns:mc="http://schemas.openxmlformats.org/markup-compatibility/2006"
mc:Ignorable="d"
d:DesignHeight="300" d:DesignWidth="400"
xmlns:sdk="http://schemas.microsoft.com/winfx/2006/xaml/presentation/sdk">
<Grid x:Name="LayoutRoot" Background="#FF2A34B7">
<sdk:DataGrid AutoGenerateColumns="False" Height="225"
HorizontalAlignment="Left" Margin="12,36,0,0" Name="dataGrid1"
VerticalAlignment="Top" Width="376">
<sdk:DataGrid.Columns>
<sdk:DataGridTextColumn x:Name="ContactName"
Binding="{Binding Path=ContactName}" Header="Name"
CanUserReorder="True" CanUserResize="True"
CanUserSort="True" Width="Auto" />
<sdk:DataGridTextColumn x:Name="CompanyName"
Binding="{Binding Path=CompanyName}" Header="CompanyName"
CanUserResize="True" CanUserSort="True" Width="Auto" />
<sdk:DataGridTextColumn x:Name="Address"
Binding="{Binding Path=Address}" Header="Address"
CanUserReorder="True" CanUserResize="True"
CanUserSort="True" Width="Auto" />
</sdk:DataGrid.Columns>
</sdk:DataGrid>
<Button Content="Search" Height="20" HorizontalAlignment="Left"
Margin="313,268,0,0" Name="button1" VerticalAlignment="Top"
Width="75" Click="button1_Click" />
<sdk:Label Height="28" HorizontalAlignment="Left"
Margin="12,0,0,0" Name="label1" VerticalAlignment="Top"
Width="314" Foreground="White" FontSize="26"
Content="Cloud Data Connection" />
<Button Content="Get Data" Height="20" HorizontalAlignment="Left"
Margin="232,268,0,0" Name="button2" VerticalAlignment="Top"
Width="75" Click="button2_Click" />
</Grid>
</UserControl>
In the code that follows, a generic query statement from the Customers Context is used to demonstrate accessing the customer collection. It is important to know the customerBindingCollection.LoadAsync(query) method takes a DataServiceQuery type. Here is how the example queries the data:
DataServiceQuery<NorthwindCatalog.Customer> query = ctx.Customers;
To upgrade the query to use LINQ in future projects, explicitly cast the LINQ query as DataServiceQuery. This is shown in Listing 14.13.
Listing 14.13. Casting the LINQ Query to DataServiceQuery
System.Data.Services.Client.DataServiceQuery
<NorthwindCatalog.Customer> query;
query = (DataServiceQuery<NorthwindCatalog.Customer>)
from customers in ctx.Customers
where customers.ContactName.Contains("value")
select customers;
In this code, you also add the Search method to highlight the found item. The implementation accesses the DataGrid item collection as shown in Listing 14.14.
Listing 14.14. Retrieving the Customer Collection
//Cast the Collection so we can enumerate it
DataServiceCollection<NorthwindCatalog.Customer> Customers =
(DataServiceCollection<NorthwindCatalog.Customer>)dataGrid1.ItemsSource;
Build the select statement to query the Customers collection to return items meeting the search criteria. Then the item is simply added to the SelectedItems collection to highlight, as shown in Listing 14.15.
Listing 14.15. Code to Highlight the Customers the User Searched For
//Query the Collection
var query = from c in Customers
where c.ContactName.Contains(sw.textBox1.Text)
select c;
//Add Selected Items
foreach (var item in query)
{
dataGrid1.SelectedItems.Add(item);
}
Return to the MainPage.xaml.cs file and replace all the code with the code in Listing 14.16. Note the use of the [ScriptableType] attribute to mark the MainPage class as visible to Javascript, and the [ScriptableMemberAttribute] to allow the methods to be seen in script. The call RegisterScriptableObject completes the process, making the Silverlight class accessible from Javascript.
Listing 14.16. MainPage to Display Data from SQL Azure
using System;
using System.Collections.Generic;
using System.Linq;
using System.Net;
using System.Windows;
using System.Windows.Controls;
using System.Windows.Documents;
using System.Windows.Input;
using System.Windows.Media;
using System.Windows.Media.Animation;
using System.Windows.Shapes;
using System.Data.Services.Client;
using System.ComponentModel;
namespace SPOSilverlight
{
[System.Windows.Browser.ScriptableType()]
public partial class MainPage : UserControl
{
private NorthwindCatalog.Northwind ctx;
public MainPage()
{
InitializeComponent();
System.Windows.Browser.HtmlPage.RegisterScriptableObject
("SPOSilverlight", this);
button1.IsEnabled = false;
}
[System.Windows.Browser.ScriptableMember()]
public void ExecuteCommand()
{
// Instantiate the context based on the data service URI.
ctx = new NorthwindCatalog.Northwind(new
Uri(https://odata.sqlazurelabs.com/OData.svc/v0.1/hqd7p8y6cy/Northwind/
));
// Instantiate the binding collection.
System.Data.Services.Client.DataServiceCollection
<NorthwindCatalog.Customer>
customerBindingCollection = new
DataServiceCollection<NorthwindCatalog.Customer>();
// Register a handler for the LoadCompleted event.
customerBindingCollection.LoadCompleted += new
EventHandler<LoadCompletedEventArgs>
(customerBindingCollection_LoadCompleted);
// Define a query that returns all customers.
DataServiceQuery<NorthwindCatalog.Customer> query =
ctx.Customers;
// Execute the query.
customerBindingCollection.LoadAsync(query);
}
[System.Windows.Browser.ScriptableMember()]
public void ActivateChildWindow()
{
Activity myWindow = new Activity();
myWindow.Title = "Search";
myWindow.Closed += new EventHandler(myWindow_Closed);
myWindow.Show();
}
void myWindow_Closed(object sender, EventArgs e)
{
Activity sw = (Activity)sender;
if (sw.DialogResult == true &&
sw.textBox1.Text != string.Empty)
{
dataGrid1.SelectedItems.Clear();
//Cast the Collection so we can enumerate it
DataServiceCollection<NorthwindCatalog.Customer>
Customers =
(DataServiceCollection<NorthwindCatalog.Customer>)
dataGrid1.ItemsSource;
//Query the Collection
var query = from c in Customers
where c.ContactName.Contains(sw.textBox1.Text)
select c;
//Add Selected Items
foreach (var item in query)
{
dataGrid1.SelectedItems.Add(item);
}
}
else if (sw.DialogResult == false)
{
//MessageBox.Show("Cancelled");
}
}
private void customerBindingCollection_LoadCompleted
(object sender, LoadCompletedEventArgs e)
{
// Get the binding collection that executed the query.
var binding =
(DataServiceCollection<NorthwindCatalog.Customer>) sender;
if (e.Error == null)
{
// Consume a data feed that contains paged results.
if (binding.Continuation != null)
{
// If there is a continuation token,
// load the next page of results.
binding.LoadNextPartialSetAsync();
}
else
{
// Since there are no remaining results pages,
// bind the collection to the view source.
// in propeties bind to ElementName, DataContext
dataGrid1.ItemsSource = binding;
button1.IsEnabled = true;
}
}
else
{
// Display the error returned by the data service.
MessageBox.Show(string.Format
("An error has occured: {0}", e.Error.Message));
}
}
private void button1_Click(object sender, RoutedEventArgs e)
{
ActivateChildWindow();
}
private void button2_Click(object sender, RoutedEventArgs e)
{
ExecuteCommand();
}
}
}
Right-click the solution and Build All and then right-click the SharePoint project and select Package. Deploy the solution to SharePoint Online as follows:
1. Log in to SharePoint Online as Administrator.
2. Navigate to the Site Assets list. This location is referenced in the SharePoint Web Part file. If uploading to another list, modify the source location in the Silverlight embedded object.
3. Click Add Item and choose the location of your current Silverlight project.
4. Locate the SPOSilverlight.xap file located in the BINDebug folder.
5. Upload the file to SharePoint Online
6. After uploading, right-click the item link and copy shortcut.
Add a sandboxed web part to SharePoint Online:
1. Go to Site Actions Menu and click Site Settings.
2. Click the Solutions Link under Galleries.
3. Click Solutions Tab.
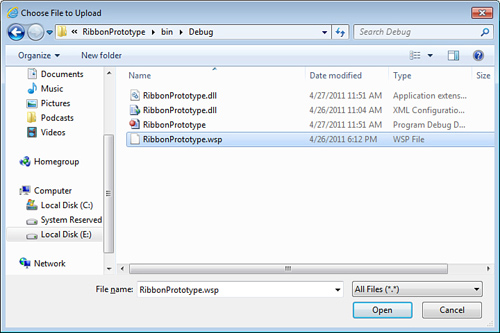
4. Click Update Solution.
5. Locate the RibbonPrototype.wsp file and upload, as shown in Figure 14.20.
Figure 14.20. Uploading the .wsp file to the SPO Solutions Gallery
6. Activate the solution (click the Activate button).
7. Return to the SharePoint page where you want to add the web part.
8. Click the Page tab and then the Edit button.
9. Click the Insert tab.
10. Click the More Web Parts button to view available web parts.
11. Select the SharePoint Online Ribbon Silverlight Web Part category.
12. Add the SPO Ribbon Part.
13. Save and close the SharePoint page.
14. The Silverlight application loads. Optionally, manage the Height, Width, and other properties in the Web Part Properties page. After completing the project, the scrollbars might be modified with the Silverlight embedded object properties in code.
15. Test the Ribbon button to call the Silverlight methods
Note
The Ribbon functions are deployed to the root site collection, and the SPO Ribbon Part, which contains the Silverlight Application, should be placed on the SharePoint page where the Ribbon functionality is present.
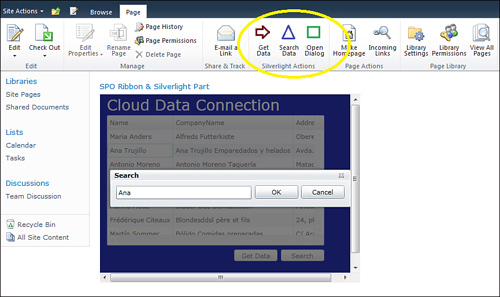
16. The project is complete and should appear as shown in Figure 14.21.
Figure 14.21. Completed Azure project
Authentication in Managed Client Object Models
For most SharePoint Online Silverlight projects, the application runs in the context of the current user, and by default the Silverlight Client Object Models authenticate users by using their SharePoint Online credentials.
Related Authentication Topics
A topic of interest would be how to authenticate and get data from SharePoint Online (SPO) in a client application, perhaps a Silverlight Out-of-Browser or Windows application. With an Interactive User solution, developers might pop up a browser in a dialog window where the user could enter their Office365 credentials, and the developer attaches the authentication cookies Office365 issued to the SharePoint Client Side Object Model to query your SPO site. Microsoft has published a whitepaper on how to accomplish this task (http://msdn.microsoft.com/en-us/library/hh147177.aspx) and provided sample code (http://code.msdn.microsoft.com/Remote-Authentication-in-b7b6f43c).
This solution works well, but it’s not a good solution if your client code is a service or another application where a user isn’t present. To deal with this scenario the code needs to effectively log in on the user’s behalf. To do this the developer queries the Office365 Secure Token Service (STS) directly using Windows Identity Foundation (WIF) and a user’s credentials. WIF helps with managing the security tokens and requests to the STS.
Tip
To do this you need to have the WIF runtime installed and, in brief, you need to:
• Use WIF to log in with the Office365 STS
• Extract the Authentication Cookies from the response
• Construct a CookieContainer with those cookies
• Attach the CookieContainer to the Client Object Model web request
• Call the SPO site and return information from the site
External Authentication
Accessing remote resources in Azure or On-Premise via a web service might also require authentication, and using the context of the current user does not work. Authentication can be accomplished with an Office365 Federated User in SharePoint Online. However, in many cases, Office365 Federation is unavailable to many users, and there are a couple of alternate solutions. For example, within the Silverlight application, a dialog can be presented asking for user credentials for remote service access on application initialization. This solution might not be as seamless as sometimes expected from applications, but it does promote a direct request for credentials that the user must enter to gain access. Another solution, returning to the first example in this chapter, might involve accessing the user login name paired with email address as well as evaluating the HTTP Header Referrer values, then sending the values to the web service for evaluation before granting access. In a variation of these two solutions, the customer might also be given a secret key—often a GUID—and asked to put the key in a known SPO list location after securely logging into the site. The Silverlight application could then present the key to a remote service during the service call to gain access. Many customers opt for granting access based on other requirements—for example, ease of access (a weather service may provide anonymous access to data). In all scenarios, if the data requires a highly secure environment, then perhaps sharing it via public web service, regardless of authentication, is not a viable solution for the specific implementation. Whichever solution is ultimately selected, Office365 Federation is often selected as default authentication, but there are options and choices that depend on the authentication requirements.
Summary
Cloud computing is becoming increasingly popular as customers seek to lower the cost and effort of deploying complex software solutions on premises. SharePoint Online, a part of the Microsoft Office365 suite, is such a solution and provides a good amount of SharePoint capabilities in the cloud. Silverlight is a natural way to add custom web parts and other extensions to SharePoint Online because it runs in the client, outside of the restricted cloud environment.