
8. Accessing SharePoint Data with the Client Object Model
THE SHAREPOINT CLIENT OBJECT MODEL (CLIENT OM) for Silverlight offers a new client API for accessing SharePoint data. SharePoint actually has three separate Client Object Models—JavaScript, .NET CLR, and Silverlight. In this book we only cover the Silverlight Client OM, but when you learn one, the others are easy because they are similar. The Client OM will be very familiar to SharePoint developers who have used the server API. This makes learning to program SharePoint with Silverlight as easy as creating a traditional SharePoint application that runs on the server.
Client Object Model Goals
In the past, developers had limited options to access SharePoint data from client applications. If your application were not on the server, you really only had .asmx Web Services as a programming option. Although this is still a viable and powerful option for many SharePoint solutions, the Client OM makes developing core SharePoint scenarios much easier. As more developers looked to expand the way they communicated with SharePoint and the types of devices and languages increased, it was clear that a new API was needed.
To handle all of the requests, the SharePoint team designed the Client OM as a proxy on the Server API. A proxy is generated for each platform and language that the SharePoint team wants to support. For SharePoint 2010 they shipped with support for the .NET Common Language Runtime, JavaScript, and Silverlight.
Understanding that the Client OM is just a wrapper on the server API also helps you understand how to use and learn programming on the client. Many times if you know the method or object name on the server, you can find the same method or object on the client. The only real exception to this is that some classes that are prefixed with SP on the server have dropped the prefix on the client. For example SPWeb on the server is just Web on the client. Generating the client API as a proxy to the server solves the first goal of being consistent. It is important that there should be a common or very similar way to program on the client no matter which client platform you are targeting.
Another goal of the Client OM is to be efficient. The Client OM is going to be calling across the network or the Internet to send and retrieve data. It is very important to have an efficient calling pattern that minimizes the number of calls to the server and reduces the number of roundtrips and the amount of data sent back and forth for each call.
The Client OM is efficient in two ways. The first is that you explicitly call the server—no behind-the-scenes calls are made. Developers decide when to call the server based on their needs. The second way is that developers need to be explicit about the amount of data that is returned. By default the Client OM does not return all properties or all fields in a list. Being explicit about the data returned reduces the amount of data across the wire and increases the perceived responsiveness of the Silverlight applications.
Hello World
The best way to understand the Client OM is starting with a simple example. This code snippet updates the title property of the SharePoint web site. You learn all of the details on how this snippet works throughout the chapter, but this should give you a sense of the coding style and pattern of the Client OM. The code has been stripped down to just the items that relate to the Client Object Model. The full sample is included with the source for the chapter.
All of the Client Object Model classes are contained in two assemblies that are located in the layoutsclientbin folder in C:Program FilesCommon FilesMicrosoft SharedWeb Server Extensions14TEMPLATELAYOUTSClientBin. Add a reference to these two files, Microsoft.SharePoint.Client.Silverlight.dll and Microsoft.SharePoint. Client.Silverlight.Runtime.dll. Add the using statement.
using Microsoft.SharePoint.Client;
Define two class variables for the ClientContext and the Web objects. This makes it easy to use these objects across the asynchronous callbacks.
ClientContext clientContext;
Web site;
This sample uses the Silverlight navigation pages, as shown in Listing 8.1. When the user navigates to this page, he needs to call SharePoint to get the site title. Set a reference to ClientContext using the static property called Current. Set a reference to the Web property of the clientContext and then add this to the query stack by calling the Load() method.
At this point, everything has happened on the client. Call the ExecuteQueryAsync() method to send the query to SharePoint. The query is sent to SharePoint asynchronously, and the results are returned to the succeededCallback() or the failedCallback() methods, depending on success or failure.
Listing 8.1. Hello World ClientOM Sample
// Executes when the user navigates to this page.
protected override void OnNavigatedTo(
NavigationEventArgs e)
{
// Get the client context for the site
clientContext = ClientContext.Current;
// Get the Web Site Title
site = clientContext.Web;
// Add the site to the query
clientContext.Load(site);
// Call the SharePoint Server with the query
clientContext.ExecuteQueryAsync(
succeededCallback, failedCallback);
}
The succeededCallback() method is called when the query was successfully executed on the SharePoint server. The method is called on a background thread, which is different from the UI thread. To communicate with the UI thread, you need to call the BeginInvoke() method of the Dispatcher object, as shown in Listing 8.2.
Listing 8.2. Handling a Successful Callback from the Client OM
private void succeededCallback(
object sender, ClientRequestSucceededEventArgs args)
{
// Update the UI with the site's title
this.Dispatcher.BeginInvoke(() =>
{
siteTitle.Text = site.Title;
});
}
Failed results are returned to the failedCallback() method. The args parameter contains information about the exception. In Listing 8.3, the ValidationSummary control is used to display exception information to the user.
Listing 8.3. Handling a Failed Callback from the Client OM
private void failedCallback(
object sender, ClientRequestFailedEventArgs args)
{
// Display the error message in the UI
this.Dispatcher.BeginInvoke(() =>
{
ValidationSummaryItem error =
new ValidationSummaryItem(
"Request failed. " + args.Message);
validationSummary.Errors.Add(error);
});
}
The successful path shown in Listing 8.2 shows how the Client OM can read SharePoint content when it returns the site object and the title property. Updating data using the Client OM is straightforward as well. To update the title property, set the new value of the property and call Update(). The Update() method flags the object to be updated on the query. There is no need to call Load() in this case.
Just like when reading data from the server, no calls to the server occur until the ExecuteQueryAsync() method is called. Consider the code in Listing 8.4, which updates the title of the site and turns the border of the text box green if it is successfully set.
Listing 8.4. Setting SharePoint Content with the Client OM
private void UpdateButton_Click(
object sender, RoutedEventArgs e)
{
// Set the new site title
site.Title = siteTitle.Text;
// flag the site to be updated
site.Update();
// Call the SharePoint Server with the query
clientContext.ExecuteQueryAsync(
updateSucceededCallback, updateFailedCallback);
}
private void updateSucceededCallback(
object sender, ClientRequestSucceededEventArgs args)
{
// Set the border green
this.Dispatcher.BeginInvoke(() =>
{
siteTitle.BorderBrush =
new SolidColorBrush(Colors.Green);
});
}
private void updateFailedCallback(
object sender, ClientRequestFailedEventArgs args)
{
// Display the error message in the UI
this.Dispatcher.BeginInvoke(() =>
{
ValidationSummaryItem error =
new ValidationSummaryItem(
"Request failed. " + args.Message);
validationSummary.Errors.Add(error);
});
}
This is one of the simplest examples you see with the Silverlight Client Object Model, but it is a good way to learn the pattern used by all Client OM calls. The first step is to get a reference to the ClientContext. In the next section you learn about the various ways to do this. The second step is to build the query by referencing objects and setting them on the Load() and LoadQuery() methods. After you have loaded all of the queries on the ClientContext, you send and execute them on the server using the ExecuteQueryAsync() method. The last step is to handle the succeeded or failed results. All programming using the Client OM follows this pattern.
Now that you have a basic understanding of how to program with the Client OM, you get to learn a few of the details around how it works and then finish the chapter with some coding examples of common tasks you will perform.
Client Context
The ClientContext is the central object used to program the Client Object Model. This should be a familiar concept if you have programmed using the Context object of the SharePoint server API. ClientContext maintains the object identities for objects returned using the Load() method. ClientContext makes calls to the server and parses the results back into objects on the client.
One of the first programming tasks is to set the context for ClientContext; that is the site that the context refers to. The most basic way to set the ClientContext is to hard code the URL.
ClientContext clientContext =
new ClientContext("http://intranet.contoso.com");
Generally this is not the best approach. Because the Silverlight application is deployed to multiple sites, you need to pass the parameter in as an initParam. One scenario where this might be used is if you are targeting a site other than the one that the application is deployed to. A better approach is to use the static property of the ClientContext class called Current to return an instance of the ClientContext object.
ClientContext clientContext = ClientContext.Current;
The Current property is available when using the Silverlight Web Part. If you are creating your own Web Part or using the Object tag directly on the page, you might encounter the error “Unhandled Error in Silverlight Application Object reference not set to an instance of an object.” This error occurs because the Current property returns a null value. Behind the scenes the Client Object Model looks for an initParam called MS.SP.url. The Silverlight Web Part automatically sets the MS.SP.url parameter to the URL of the current site. If you are not using the Silverlight Web Part, you need to set this property yourself. For example, if you are using a Visual Web Part, then you could set it in the following way:
<param
name="initParams"
value="MS.SP.url=<%=
Microsoft.SharePoint.Utilities.SPHttpUtility.HtmlEncode(
Microsoft.SharePoint.SPContext.Current.Web.Url) %>" />
There are scenarios in which the Silverlight application is not running in the context of a web part but is in fact running in the Out of Browser host. The Out of Browser feature allows the Silverlight application to run in a special mode on the desktop outside of any web browser host. This gives the Silverlight application additional features such as access to the file system and COM automation. One of the limitations of the Out of Browser mode is that there are no initParams. The technique to work around this limitation is to cache the parameters in isolated storage when the application is opened in the browser. This works because generally the application opens when in the browser, even if for only a moment before it is installed in Out of Browser mode.
Load and LoadQuery
You might have noticed that the Client Object Model has two load methods, Load() and LoadQuery(). The Load() method does an in-place loading of the data returned from the server. All of the data returned from the server is stored and tracked inside of the ClientContext object. The ClientContext tracks the object IDs of the items and properties returned from the server. For example if you call the server for the web object but do not return the title on the first call, you could subsequently call the server again for the title. The Title property is now filled in and ready to be used. This convenience does come with some trade-offs. For example, because the objects returned from the server are stored in the ClientContext object, it means that all of the data will only be garbage collected in the Silverlight application when the ClientContext object is cleaned out.
The LoadQuery() method returns the results as new objects. These objects are not part of the ClientContext and a result can be easily managed and discarded when not needed any more. Another difference between Load() and LoadQuery() is the type of queries you can write. The Client OM supports two types of queries: LINQ query syntax and method syntax. LINQ query syntax is a more natural declarative query language. This format is one that you are probably more familiar with and what people think of when they write LINQ queries. Listing 8.5 shows an example of a LINQ query to return visible Lists.
Listing 8.5. Using LINQ Query Syntax with the Client OM
private void loadQueryButton_Click(object sender, RoutedEventArgs e)
{
ClientContext clientContext = ClientContext.Current;
ListCollection lists = clientContext.Web.Lists;
var query = from list
in lists
where list.Hidden != false
select list;
IEnumerable<List> listsCollection = clientContext.LoadQuery(query);
clientContext.ExecuteQueryAsync(
// Succeeded Callback
(ss, se) =>
{
// Execute on the UI thread
Deployment.Current.Dispatcher.BeginInvoke(() =>
{
//Databind the List of Lists to the listbox
listBox1.ItemsSource = listsCollection;
listBox1.DisplayMemberPath = "Title";
});
},
// Failed Callback
(fs, fe) =>
{
// Not Implemented
});
}
Listing 8.6 is the equivalent code that uses the method syntax query and the Load() method. The results are exactly the same as the LoadQuery() example just described. Both examples return a list of List objects that are not hidden and bind them to the list box control.
Listing 8.6. Using Method Syntax with the Client OM
private void loadButton_Click(object sender, RoutedEventArgs e)
{
ClientContext clientContext = ClientContext.Current;
ListCollection lists = clientContext.Web.Lists;
clientContext.Load(lists,
lc => lc.Where(
list => list.Hidden != false)
.Include(
list => list.Title));
clientContext.ExecuteQueryAsync(
// Succeeded Callback
(ss, se) =>
{
// Execute on the UI thread
Deployment.Current.Dispatcher.BeginInvoke(() =>
{
//Data bind the List of Lists to the listbox
listBox1.ItemsSource = lists;
listBox1.DisplayMemberPath = "Title";
});
},
// Failed Callback
(fs, fe) =>
{
// Not Implemented
});
}
Object Model
The Silverlight Client OM supports a wide range of programming tasks against the server. Most of the examples you commonly see are against lists, list items, and document libraries. Although these are the cornerstone of the types of applications you write with the Client OM, there are many other interesting areas supported. For example you can work with site collections and sites. You can program against files and folders within a document library. You can create content types, pages, and web parts. You can work with users’ roles and security. Unlike working with OData services (as explained in Chapter 9), the Client OM allows you to program against more features of a SharePoint site other than list and library data.
In this chapter you see how to do many of these tasks, but you won’t see examples of everything you can do with the Client OM. You can visit the Microsoft SharePoint Client Object Model Resource Center at http://bit.ly/SPSL_ClientOMResourceCenter for links to more examples and documentation.
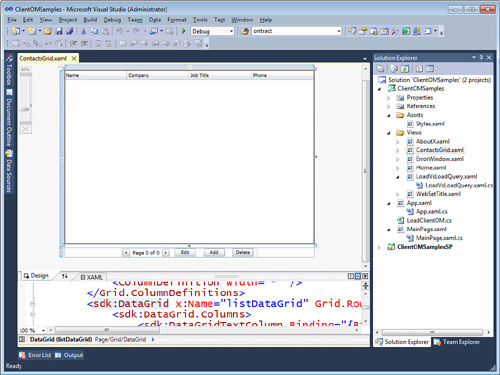
Let’s start with a basic look at some of the ways to interact with list data. In the sample project included with this chapter you find a data grid that uses data binding to display the list data from SharePoint, as shown in Figure 8.1.
Figure 8.1. Data grid for data binding
Retrieving List Data
Retrieving list data from SharePoint is the most common use of the Client OM. The first thing you need to do is to call the GetByTitle() method of the list collection to return the specific list. Remember at this point you haven’t called the server yet. You are just building up the query that will be sent to the server.
You must pass a CAML query to the GetItems method. You might remember CAML queries and the Collaboration Application Markup Language from Chapter 2, “Introduction to SharePoint Development.” In this case you want to return all of the items so you can use the static method CreateAllItemsQuery() on the CamlQuery class to create a query that returns all of the items. In a real-world scenario you would pass a more complex query to filter and sort the items returned to reduce the network traffic. You see how to do paging later in this chapter without writing any CAML queries. Next you call the Load() method of the ClientContext object to add the query to the call back to the server. Finally, to actually execute the call on the server, call the ExecuteQueryAsync() method as shown in Listing 8.7.
Listing 8.7. Reading a SharePoint List with the Client OM
//Get Contacts from SharePoint
ListCollection lists = clientContext.Web.Lists;
contactsList =
lists.GetByTitle("ClientOMContacts");
contactsListItems =
contactsList.GetItems(
CamlQuery.CreateAllItemsQuery());
//load the list so we can get the item count for paging
clientContext.Load(contactsListItems);
clientContext.ExecuteQueryAsync(
// Succeeded Callback
(ss, se) =>
{
// Execute on the UI thread
Deployment.Current.Dispatcher.BeginInvoke(() =>
{
// Databind the List Items Collection to the Datagrid
listDataGrid.ItemsSource = contactsListItems;
});
},
// Failed Callback
(fs, fe) =>
{
// Not Implemented
});
The ExecuteQueryAsync() method is an asynchronous call to the server with two callbacks for succeeded and failed. As in this example, one way to handle the callbacks is to use an anonymous delegate to handle them inline; this was explained in Chapter 3, “Introduction to Silverlight Development.” In this case there are two parameters, Sender and ClientRequestSucceededEventArgs. When the results return from the server, you need to display them in the data grid. Data binding is the easiest way to do this. Set the ItemsSource property of the datagrid to the list collection.
Next you use a special data binding syntax for each field in the XAML of the data grid. This is required because the Client OM returns a loosely typed collection of items in a dictionary object. This means you need to bind to the items using an indexer reference as opposed to directly to the object. The indexer binding syntax is the name of the field in the dictionary, in this case FieldValues, then the fieldname in square brackets, as shown in Listing 8.8.
Listing 8.8. Data Binding to a List Item Collection
<sdk:DataGrid x:Name="listDataGrid"
Grid.Row="0" Margin="0,0,0,10"
AutoGenerateColumns="False"
CanUserSortColumns="False">
<sdk:DataGrid.Columns>
<sdk:DataGridTextColumn
Binding="{Binding Path=FieldValues[FullName]}"
Header="Name" Width="*" />
<sdk:DataGridTextColumn
Binding="{Binding Path=FieldValues[Company]}"
Header="Company" Width="*" />
<sdk:DataGridTextColumn
Binding="{Binding Path=FieldValues[JobTitle]}"
Header="Job Title" Width="*" />
<sdk:DataGridTextColumn
Binding="{Binding Path=FieldValues[WorkPhone]}"
Header="Phone" Width="*" />
</sdk:DataGrid.Columns>
</sdk:DataGrid>
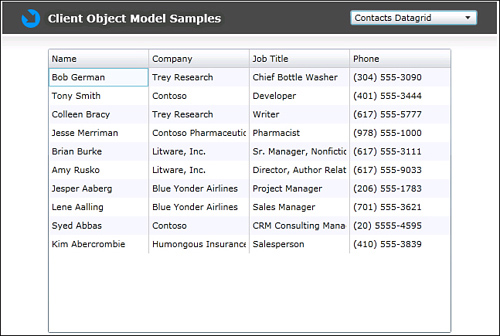
When you run the application, you see the Contacts list data displayed in the data grid, as shown in Figure 8.2.
Figure 8.2. SharePoint Contact List
Updating List Data
Updating an item using the Client OM, as shown in Listing 8.9, is as simple as setting the new values for an item. The work comes from getting a reference to the item you want to update. In this example, with the data grid you already have a reference to the item. Cast the SelectedItem of the data grid to a ListItem object. Set the values of the properties you want to change. In this case you only need to call the Update() method of the item. Calling the Update() method is enough to flag that record for update when you call the ExecuteQueryAsync() call.
Listing 8.9. Updating List Data with the Client OM
ListItem item = (ListItem)listDataGrid.SelectedItem;
// prepend the value with an X as a test
item["Title"] = "X " + item["Title"];
item["FullName"] = "X " + item["FullName"];
item["Company"] = "X " + item["Company"];
item["JobTitle"] = "X " + item["JobTitle"];
item.Update();
clientContext.ExecuteQueryAsync(
// Succeeded Callback
(ss, se) =>
{
// Execute on the UI thread
Deployment.Current.Dispatcher.BeginInvoke(() =>
{
// Remember the selected index before refresh
int index = listDataGrid.SelectedIndex == 0
? 1 : listDataGrid.SelectedIndex - 1;
// refresh the databinding to the List Items Collection
listDataGrid.ItemsSource = null;
listDataGrid.ItemsSource = contactsListItems;
// Set the selected item and show it
listDataGrid.SelectedIndex = index;
listDataGrid.UpdateLayout();
listDataGrid.ScrollIntoView(
listDataGrid.SelectedItem,
listDataGrid.Columns[0]);
});
},
// Failed Callback
(fs, fe) =>
{
// Not Implemented
});
When the record is updated on the server, you need to do a little work on the data grid to refresh the bindings and scroll back to the record that was updated. This is not strictly required but provides a good user experience.
Deleting List Data
One of the easiest operations to do with the Client OM is to delete a List item. When you have a reference to the item you want to delete, call the DeleteObject() method of the ListItem, using the code from Listing 8.10.
Listing 8.10. Deleting List Data with the Client OM
ListItem item = (ListItem)listDataGrid.SelectedItem;
item.DeleteObject();
clientContext.ExecuteQueryAsync(
// Succeeded Callback
(ss, se) =>
{
// Execute on the UI thread
Deployment.Current.Dispatcher.BeginInvoke(() =>
{
// Remember the selected index before refresh
int index = listDataGrid.SelectedIndex == 0
? 1 : listDataGrid.SelectedIndex - 1;
// refresh the databinding to the List Items Collection
listDataGrid.ItemsSource = null;
listDataGrid.ItemsSource = contactsListItems;
// Set the selected item and show it
listDataGrid.SelectedIndex = index;
listDataGrid.UpdateLayout();
listDataGrid.ScrollIntoView(
listDataGrid.SelectedItem,
listDataGrid.Columns[0]);
});
},
// Failed Callback
(fs, fe) =>
{
// Not Implemented
});
Just as you did with the Update()method, you can do a little work to refresh the data grid view. Again this is a just a function of the data grid and not part of the Client OM.
Creating List Data
Creating a new List item is almost the same as updating a List item. The only difference is you create a new record using the ListItemCreationInformation() object in the AddItem() method of the List. When you have a reference to the new instance of a List item, you can set the field values just as you did when you updated a record. Call the Update() method of the new item after you have set all of the field values. Finally, calling ExecuteQueryAsync()creates the new List item on the server. Use the code in Listing 8.11 to create a new List item.
Listing 8.11. Creating List Data with the Client OM
ListItem newItem =
contactsList.AddItem(
new ListItemCreationInformation());
newItem["Title"] = "TestName";
newItem["FullName"] = "TestName";
newItem["Company"] = "TestCompany";
newItem["JobTitle"] = "TestJob";
newItem["WorkPhone"] = "555-123-1234";
newItem.Update();
clientContext.Load(newItem);
clientContext.ExecuteQueryAsync(
// Succeeded Callback
(ss, se) =>
{
// Not Implemented
},
// Failed Callback
(fs, fe) =>
{
// Not Implemented
});
Paging
One of the best ways to handle large lists of data is to use paging. Paging returns items in small increments. For example if you set the page size to ten, then only ten items will be returned at a time. This allows the user to flip through all of the data if needed without overwhelming the server or the network connection.
Let’s take a look at the data grid example you saw earlier and see what it takes to add paging support. In this case you want to be able to page forward and backward through the List items, know what page you are on, and know how many total pages of data there are. First add a couple of buttons to handle the navigation forward and backward through the List items. Then add some text to indicate what page you are on. These controls are shown in Listing 8.12.
Listing 8.12. Adding Paging Buttons and Text
<Button x:Name="PreviousPageButton"
Click="PreviousPageButton_Click"
Content="<"
Width="20"
Height="20"
Margin="3,0"/>
<TextBlock x:Name="PageNumberTextBlock"
Text="Page 0 of 0"
TextWrapping="Wrap"
Margin="3,0"
FontSize="12"
Padding="0,5,0,0"/>
<Button x:Name="NextPageButton"
Click="NextPageButton_Click"
Content=">"
Width="20"
Height="20"
Margin="3,0"/>
Next you need a few class level variables to hold information about the page size, the current page, and the Client OM page query object called ListItemCollectionPosition(). In this case the page size is set to ten, as shown in Listing 8.13.
Listing 8.13. Variables to Hold Paging Information
// Hold paging info
ListItemCollectionPosition itemPosition = null;
// Start with 10 so you can see paging in action
int pageSize = 10;
int currentPage = 1;
Next when you get the data from the server, you pass the paging information as well. Start by resetting the navigation buttons to disabled. This is because you do not want the user to navigate until you have retrieved the list data from the server. Otherwise the user could click the button faster than you can retrieve the data, causing multiple calls to the server at the same time.
The next change is to pass the page size to the CreateAllItemsQuery() method, as shown in Listing 8.14. This still creates a CAML query that returns all items, but now it only returns the number of items specified in the page size. You also initialize the ListItemCollectionPosition property by passing in the next data page to use. In the first run when you are on the first page, this is null.
Listing 8.14. Retrieving Paged Data with the Client OM
// Disable paging buttons until the data returns
PreviousPageButton.IsEnabled = false;
NextPageButton.IsEnabled = false;
//Get Contacts from SharePoint
ListCollection lists = clientContext.Web.Lists;
contactsList =
lists.GetByTitle("ClientOMContacts");
// Get items with paging support
CamlQuery query =
CamlQuery.CreateAllItemsQuery(pageSize);
query.ListItemCollectionPosition = itemPosition;
contactsListItems =
contactsList.GetItems(query);
//load the list so we can get the item count for paging
clientContext.Load(contactsList);
clientContext.Load(contactsListItems);
clientContext.ExecuteQueryAsync(
// Succeeded Callback
(ss, se) =>
{
UpdatePaging();
// Execute on the UI thread
Deployment.Current.Dispatcher.BeginInvoke(() =>
{
// Databind the List Items Collection to the Datagrid
listDataGrid.ItemsSource = contactsListItems;
});
},
// Failed Callback
(fs, fe) =>
{
// Not Implemented
});
After the call returns from the server, you need to call the UpdatePaging() method, which is discussed next. Finally data bind the list collection to the data grid. The only difference here is that there are only a few items being bound to the data grid. The way you data bind doesn’t change because you are paging.
The UpdatePaging() method is a helper method you can create to encapsulate all of the paging functionality in one place. The first thing to do is calculate the text for the current page. You can return the total list size from the ItemCount property of the list. Next save a reference to the ListItemCollectionPosition object. The ListItemCollectionPosition object is the key to paging; in particular, the PageInfo property contains the paging query string used to determine which data page to return. Finally, enable the correct navigation buttons based on what page you are on. The UpdatePaging() method is shown in Listing 8.15.
Listing 8.15. Updating Paging Controls
private void UpdatePaging()
{
// Calculate the data pages
int pageCount = (int)Math.Ceiling(
(double)contactsList.ItemCount /
(double)pageSize);
string pageText = string.Format("Page {0} of {1}",
currentPage,
pageCount);
// Get the current data page query
itemPosition =
contactsListItems.ListItemCollectionPosition;
// Execute on the UI thread
Deployment.Current.Dispatcher.BeginInvoke(() =>
{
PageNumberTextBlock.Text = pageText;
// Enable paging buttons
PreviousPageButton.IsEnabled = (currentPage > 1);
NextPageButton.IsEnabled = (currentPage < pageCount);
});
}
Let’s first look at the Forward navigation button event handler. This is the easiest one to understand because there is really nothing to do. When you call for a ListCollection that uses paging, SharePoint sets the ListItemCollectionPosition object to the next data page. Each time you call the server, you automatically get the next page of data. This might be useful if want to return all of the data from the server at once, one page at a time. Listing 8.16 shows the click event handler of the Forward button; you only need to increment the page count and refresh the data. The next data page query is already set.
Listing 8.16. Next Page Button Click Event Handler
private void NextPageButton_Click(object sender, RoutedEventArgs e)
{
currentPage++;
RefreshData();
}
Navigating backward is a little more difficult because you need to build the ListItemCollectionPosition object yourself. All you really need to do is set the PagingInfo property to the correct data page, as shown in Listing 8.17. The format of the PagingInfo property is a string of key and value pairs separated by an ampersand.
The first parameter is the Paged=TRUE, which tells the server you are paging. The next parameter is the PagedPrev=TRUE. If this property is true, it tells the server that you are paging backward. If this property is false or omitted, then you are paging forward. The last parameter is p_ID. This is the SharePoint record ID for a record in the data page. If you are paging forward, this is the record ID of the last record. If you are paging backward, this is the record ID of the first record of the current data page. In this case you can retrieve the first record ID from the list collection as record zero.
Listing 8.17. Previous Page Button Click Event Handler
private void PreviousPageButton_Click(
object sender, RoutedEventArgs e)
{
currentPage--;
// Build the paging query string
string pageInfo =
String.Format(
"Paged=TRUE&PagedPrev=TRUE&p_ID={0}",
contactsListItems[0].Id);
itemPosition = new ListItemCollectionPosition();
itemPosition.PagingInfo = pageInfo;
RefreshData();
}
Paging in SharePoint is a little obscure and not well documented. Walking through the sample included with this chapter can help you gain a better understanding of how it works.
Document Upload
The Client OM supports uploading documents to a document library. The sample code included in this chapter demonstrates how to capture an image from a webcam and upload the image file to a SharePoint document library.
Silverlight doesn’t have any built in way to convert a raw image from the webcam into an image file such as a .png or .jpg. For this you need to leverage some other code. The code used in the sample code can be found on codeplex at http://imagetools.codeplex.com/. This code adds an extension to the System.Windows.Media.Imaging.WriteableBitmap class to convert the webcam image to a .png, by default. The conversion is also pluggable so that you can add additional file converters.
The first part of the code in Listing 8.18 converts the WriteableBitmap object into a MemoryStream that contains the .png image from the webcam. You need to obtain a reference to the Library that you will copy the file to. From the List object, create a new file definition using the FileCreationInformation class. Set the Contents property of the file definition to Byte array from the MemoryStream representation of the .png file. The Url property is the name the image file will be in SharePoint. With the FileCreationInformation object populated with the details of the file, you just add it to the Files collection of the Library object.
Listing 8.18. Converting a WriteableBitmap to a PNG Stream and Uploading to SharePoint
ImageTools.Image image = (ImageTools.Image)bitmap.ToImage();
PngEncoder encoder = new PngEncoder();
MemoryStream PNGstream = new MemoryStream();
encoder.Encode(image, PNGstream);
clientContext = ClientContext.Current;
// Get the Library
List library =
clientContext.Web.Lists.GetByTitle("Shared Documents");
// Prepare the File to Upload
FileCreationInformation fileCreationInformation =
new FileCreationInformation();
fileCreationInformation.Content = PNGstream.ToArray();
fileCreationInformation.Overwrite = true;
fileCreationInformation.Url = "TestWebCamImage.png";
library.RootFolder.Files.Add(fileCreationInformation);
clientContext.ExecuteQueryAsync(succeededCallback, failedCallback);
Creating Ribbon Custom Actions
The Client OM also supports creating Ribbon Custom Action Commands. In this example you create a custom action on the Site Actions menu, as shown in Listing 8.19. The first thing to do is to set a couple of variables to hold the collection of custom actions and the ClientContext. You can return a collection of the custom actions from the Web object using the UserCustomActions property. Then call the server to fill the collection with the custom actions.
Listing 8.19. Adding a Ribbon Custom Action with the Client OM, Part 1
UserCustomActionCollection userCustomActions;
ClientContext clientContext;
// Add Ribbon Custom Action
private void AddRibbonCustomAction()
{
clientContext = ClientContext.Current;
userCustomActions = clientContext.Web.UserCustomActions;
clientContext.Load(userCustomActions);
clientContext.ExecuteQueryAsync(succeededCallback, failedCallback);
}
When the collection of custom actions is returned from the server, you can add a new custom action to the collection. Before you add a new custom action, you should be sure that the action doesn’t already exist. In this example in Listing 8.20, you can iterate through all of the custom actions deleting any that already exist. To add a new custom action, call the Add() method of the UserCustomActions collection. When you have a new custom action, you can set all of the required properties such as the location for the item. In this case Microsoft.SharePoint.StandardMenu refers to the Site Actions menu. You must also set the Url to navigate to when the custom action menu item is clicked. You should also set the Title, Description, and ImageUrl. Just like when adding a new List item, you call the Update() method of the userCustomAction object.
Listing 8.20. Adding a Ribbon Custom Action with the Client OM, Part 2
private void succeededCallback
(object sender, ClientRequestSucceededEventArgs e)
{
// Loop backward through the collection to clean out old actions
for (int x = userCustomActions.Count - 1; x >= 0; x--)
{
if (userCustomActions[x].Url.Contains("Smile"))
{
userCustomActions[x].DeleteObject();
}
}
// Add the Custom Action
UserCustomAction userCustomAction = userCustomActions.Add();
userCustomAction.Location = "Microsoft.SharePoint.StandardMenu";
userCustomAction.Group = "SiteActions";
userCustomAction.Sequence = 101;
userCustomAction.Title = "This is my Custom Action";
userCustomAction.Description = "My Custom Action.";
userCustomAction.Url = @"~site/SitePages/default.aspx";
userCustomAction.ImageUrl = "_layouts/1033/images/RTEIMG.GIF";
userCustomAction.Update();
clientContext.ExecuteQueryAsync(succeededCallback2, failedCallback);
}
private void succeededCallback2
(object sender, ClientRequestSucceededEventArgs e)
{
// Not Implemented
}
private void failedCallback
(object sender, ClientRequestFailedEventArgs e)
{
// Not Implemented
}
Server Side Exception Handling
In regular programming you can wrap your code in a try/catch block to handle exceptions. This allows you to execute an alternate code path if an exception occurs. For example, you might use the code shown in Listing 8.21.
Listing 8.21. Typical Exception Handling Code
public void RunCode()
{
try
{
MessageBox.Show("Executing try block");
throw new NullReferenceException();
}
catch
{
MessageBox.Show("Caught the exception");
}
finally
{
MessageBox.Show("Running the finally block.");
}
}
The Client Object Model has a similar concept that allows you to create server-side try/catch blocks. This is important in that there are many times where you expect an exception to occur. The server-side exception handling allows you to handle the exception and run an alternate code path without returning to the client.
The Client Object Model contains a class called ExceptionHandlingScope. The ExceptionHandlingScope class provides a wrapper for the try/catch and finally statements. The exception handling pattern is the same as you do on the client.
Begin by creating an instance of the ExceptionHandlingScope class. In the following example, which is part of the webcam sample project, you need to delete a wiki page from the Site Pages list. This page might or might not exist. If it doesn’t exist then the code throws an exception, but in this case it doesn’t matter, and you want the code to continue executing without returning to the client. Listing 8.22 shows how to use this.
Listing 8.22. Server Side Exception Handling with the Client OM
ExceptionHandlingScope ex =
new ExceptionHandlingScope(clientContext);
using (ex.StartScope())
{
using (ex.StartTry())
{
// Delete the existing Wiki Page if it exists
SP.File existingPage =
clientContext.Web.GetFileByServerRelativeUrl(
"/SitePages/Smile.aspx");
existingPage.DeleteObject();
clientContext.Load(existingPage);
}
// Do this if there is an exception on the server
using (ex.StartCatch())
{
// Do nothing
}
// Always do this
using (ex.StartFinally())
{
// Do nothing
}
}
Server-side exception handling is a good way to optimize your code to reduce the number of calls to the server. There are also a number of properties of the ExceptionHandlingScope class that tell you information about the server side exceptions. These are ErrorMessage, HasException, ServerErrorCode, ServerErrorValue, and ServerStackTrace. When the call returns from the server, you can query these properties to see if there was an exception handled on the server and find more details about what that exception was.
Deployment and Redistribution
The last thing that you need to think about with the Client Object Model is how to redistribute the Client OM assemblies. Microsoft does ship a redistributable package of the Client OM assemblies for Silverlight and the .NET CLR. You can download the package at http://on-msn.com/SPSL_ClientOMRedist. This package also allows you to develop SharePoint solutions without the need to install SharePoint Foundation.
Redistributing the two Client OM assemblies in your Silverlight .xap package is not a best practice. A better approach is to dynamically load the assemblies at runtime. This allows you to avoid the issues of servicing the assemblies. For example, what do you do if Microsoft updates them in a future Service Pack? If you embed them in every Silverlight Web Part you create, then you would need to recompile and redeploy each one of these web parts. Including the assemblies inside of your .xap file also increases the size by 407KB. That is not a huge amount, but over a large deployment it adds up. Another benefit of loading the Client OM at runtime is that the assemblies are cached by the browser. This caching benefits the user because for every Silverlight application that uses the Client OM, the assemblies are only downloaded once and are pulled from the browser cache. The caching benefits the server by reducing the load of downloading the assemblies for every user for every Silverlight Web Part. The code to download the Silverlight Client OM at runtime is very generic, and you can write it once and it can be reused again in every application.
Dynamically loading the Client OM has two basic steps. The first step is to download the Client OM assemblies, which are packaged as a Silverlight .xap package file located in /_layouts/clientbin/Microsoft.SharePoint.Client.xap file. You can also pass an Action delegate so you can tell your application that you have finished downloading and loading the Client OM assemblies. Download the .xap package using the WebClient class. Even though your code downloads the .xap file every time the app runs, it is not a problem because Internet Explorer actually returns the .xap from the browser cache. Listing 8.23 shows how to load the assemblies at runtime.
Listing 8.23. Dynamically Loading the Client OM, Part 1
private Action action;
public LoadClientOM(Action action)
{
this.action = action;
WebClient client = new WebClient();
client.OpenReadCompleted += ReadCompleted;
client.OpenReadAsync
(new Uri("/_layouts/clientbin/Microsoft.SharePoint.Client.xap",
UriKind.Relative));
}
The second step is to extract the Client OM assemblies from the Microsoft.SharePoint.Client.xap package you downloaded and load the assemblies. Loading the assemblies makes them available to the rest of your application. For each assembly you want to load from the downloaded .xap package, you extract the assembly as a stream using the GetResourceStream method. When you have the stream, you can pass the stream to the Load() method of an AssemblyPart class. And then finally you can callback on the Action delegate to tell the calling application that the assemblies have been loaded and are ready to be used. This is shown in Listing 8.24.
Listing 8.24. Dynamically Loading the Client OM, Part 2
void ReadCompleted(object sender, OpenReadCompletedEventArgs e)
{
Stream assemblyStream;
AssemblyPart assemblyPart;
// Load Client Runtime
assemblyStream = Application.GetResourceStream(
new StreamResourceInfo(e.Result, "application/binary"),
new Uri("Microsoft.SharePoint.Client.Silverlight.Runtime.dll",
UriKind.Relative)).Stream;
assemblyPart = new AssemblyPart();
assemblyPart.Load(assemblyStream);
// Load Client OM
assemblyStream = Application.GetResourceStream(
new StreamResourceInfo(e.Result, "application/binary"),
new Uri("Microsoft.SharePoint.Client.Silverlight.dll",
UriKind.Relative)).Stream;
assemblyPart = new AssemblyPart();
assemblyPart.Load(assemblyStream);
// Callback on the passed Delegate
if (action != null) action();
}
Summary
The Client Object Model is the key to building SharePoint solutions using Silverlight. Although some of the data functionality is covered by the WCF Data Services, you have seen that the Client OM covers much more of the functionality of SharePoint. This enables you to not only consume data from SharePoint, but to create fully functional client-side applications that can do much of what you can do on the server. The power of the Client OM not only comes from how much you can do against SharePoint but in how easy it is to create those applications. The Client OM makes client-side asynchronous programming easy to do across a number of clients such as Silverlight and JavaScript. The Client OM also makes it easy for you to create very efficient applications that are fast across the network and reduce the load on the server.