
11. Accessing External Data
THERE ARE SOME CHALLENGES inherent in accessing external data from a SharePoint web part or other user interface extension. SharePoint’s Business Connectivity Services (BCS) addresses these challenges, so it should be no surprise that this chapter includes a section on how to set up BCS and use it from Silverlight. However you also learn how to access external data from Silverlight without BCS so you can directly access web services, newsfeeds, and other network resources in your solutions.
One challenge is that for security reasons, sandboxed solution code isn’t allowed to make network calls. For example, if you wanted to write an RSS reader that runs in a sandboxed solution, it wouldn’t be possible to read the RSS feed in the server code.
Another challenge is the dreaded “multi-hop” authentication problem. The issue here is that even if you can authenticate to a web server (SharePoint in this case), that doesn’t mean that SharePoint can authenticate on your behalf to a third tier such as a remote web service or database server. It’s possible to do this using SAML claims or Kerberos authentication, but developers rarely have the ability to influence how authentication is set up; those decisions are typically made by the SharePoint deployment team or IT security specialists.
A natural solution to both of these challenges is to access the network from Silverlight on the client. A Silverlight application that is deployed in a sandboxed solution isn’t subject to the sandbox limitations; it runs in the Silverlight sandbox on the client, which has no such restriction on network access. Moreover, the multi-hop scenario is avoided because the client computer authenticates directly to the external server in a single hop.
Alas, no solution is perfect, and this one is no exception. A new challenge is introduced by this approach, the challenge of cross-domain access.
Silverlight (as well as other browser plug-ins and all major web browsers) has restrictions on making network calls across DNS domains. Consider, for example, the scenario shown in Figure 11.1. A user browses to a page on a SharePoint server hosted in the intranet.com DNS domain. The page contains a Silverlight application, which attempts to access another domain, external.com, over the network. By default, Silverlight prohibits this as a cross-domain access. If you’re wondering why this is so, consider what might happen if external.com were your bank’s web site. If you were already logged into the bank web site, or if the login were automatic (as it would be for many servers within an enterprise), the application would have unfettered access to act on your behalf and could empty your bank account or do other malice.
Figure 11.1. Cross-domain access from Silverlight
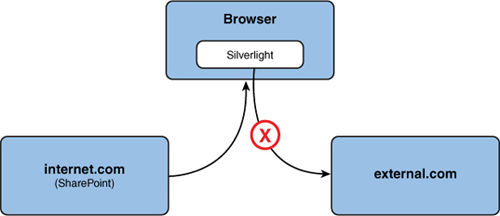
There are a couple ways to address this issue. One is to provide a policy file on the external.com server that explicitly allows access from an external domain. Silverlight looks for a file called clientaccesspolicy.xml, and if it doesn’t find it, it looks for the Adobe Flash equivalent of this file, crossdomain.xml. If either of these files is present and includes a policy that allows access, Silverlight permits the access.
Tip
Silverlight looks for the clientaccesspolicy.xml and crossdomain.xml files under the root of the target web server. For example, when attempting to access http://server.external.com/child/grandchild/myservice.svc, Silverlight tries to read http://server.external.com/clientaccesspolicy.xml, ignoring the child and grandchild directories and reading directly under the root of the web server.
Here are some other points to keep in mind:
• Silverlight considers all network access from an “out of browser” application to be cross-domain because the .xap file is installed on the client computer.
• The SharePoint Client Object Model is not subject to cross-domain policy, but access to SharePoint using OData or web services is.
• Even with REST and web services access, none of this is an issue when the Silverlight application tries to access data on the same SharePoint server that served up the .xap file because that’s not “cross-domain” access.
Listing 11.1 shows a sample clientaccesspolicy.xml file. In this example, it’s set to allow any domain to access any path within the server. It’s possible to be quite specific as to what domains can access what resources on the server using this file. For example, by setting the grant-to element it is possible to limit access to a specific SharePoint site or even an individual .xap file.
Listing 11.1. Clientaccesspolicy.xml
<?xml version="1.0" encoding="utf-8"?>
<access-policy>
<cross-domain-access>
<policy>
<allow-from http-request-headers="SOAPAction">
<domain uri="*"/>
</allow-from>
<grant-to>
<resource path="/" include-subpaths="true"/>
</grant-to>
</policy>
</cross-domain-access>
</access-policy>
Listing 11.2 shows the Adobe Flash policy file, called crossdomain.xml. Although it doesn’t allow the server to specify what resource paths are allowed, it still controls the domains that can have access. The advantage of supporting the Flash version of the file is that it’s already present on many web servers on the Internet; generally Silverlight developers use the clientaccesspolicy.xml file.
<?xml version="1.0"?>
<!DOCTYPE cross-domain-policy SYSTEM
"http://www.macromedia.com/xml/dtds/cross-domain-policy.dtd">
<cross-domain-policy>
<allow-http-request-headers-from domain="*"
headers="SOAPAction,Content-Type"/>
</cross-domain-policy>
Consider a Silverlight newsfeed reader, which is explained in the next section. If the web part is set to read news headlines from CNN, it works perfectly because CNN provides a policy file that allows any domain to access its services. Other news services, such as BBC and MSNBC, provide policy files that only allow a list of their own domains to have access, so the web part can’t access those feeds as long as it’s not hosted on one of those domains. Figure 11.2 shows a browser tracing program, Nikhil’s Web Development Helper, as the web part attempts to display a feed from a test web site that has no policy file. You can see that it attempts to read both the Silverlight and Flash versions of the file and, when it gets 404 “not found” errors, the access fails.
Figure 11.2. Attempting to read the cross-domain policy files

In the sections that follow, you learn how to build a newsfeed reader in Silverlight that works subject to cross-domain policy. Then you learn how to avoid the cross-domain issue by setting up a newsfeed proxy on SharePoint (as a Farm solution, so it can retrieve the newsfeed). After that, you learn how to add a cross-domain policy to SharePoint in case you want to allow incoming requests from other domains. Finally, the chapter concludes with a BCS solution that shows how to access a SQL Server database from a Silverlight web part using a SharePoint external list and the Client Object Model.
Building a Feed Reader Web Part
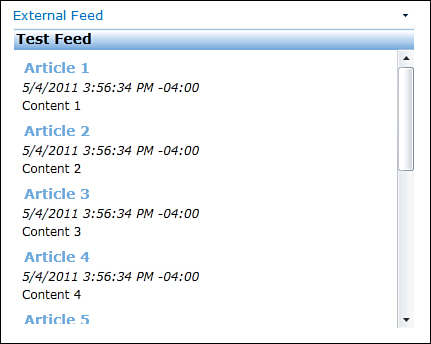
The External Feed Web Part is provided in the code download in a solution called Chapter11a.sln. The Visual Studio solution includes four projects: the SharePoint web solution package, Silverlight 4 and 5 applications, and a test web project that generates an RSS feed. Figure 11.3 shows the External Feed web part pointing to the test web project, which is running at http://localhost:1589/feed.aspx (the port is selected randomly on your workstation).
Figure 11.3. External Feed Web Part
Tip
Visual Studio 2010 allows you to set more than one “startup project” that runs when you start the debugger. This can be useful for this example to start both the SharePoint project and the test web site that hosts the RSS feed. To do this, right-click the solution at the top of the Solution Explorer tree and select Set Startup Projects. This brings up a dialog box that allows you to choose a single startup project or to select more than one.
When the web part accesses the feed on the test web site, it’s considered a cross-domain access. The web project includes cross-domain policy files, so the web part works fine. This is an ideal environment for testing the policy files. Try removing them entirely or using only the Adobe Flash version of the file.
The web part includes two editable properties, FeedType and Location. FeedType is an enumeration of Direct, Proxy, and ExtList. This same web part is used for all the examples in this chapter, and the FeedType property tells the web part if it should access a newsfeed directly, via a SharePoint proxy, or if it should access data via a BCS external list. This section focuses on the first of these choices, direct access.
Listing 11.3 shows the web part server code. There’s not much to it: it simply places the Silverlight object tag on the page and passes it the feed type, location, and the current site’s URL.
Listing 11.3. ExternalFeed Web Part
public class ExternalFeed : WebPart
{
public enum FeedOptions {Direct, Proxy, ExtList}
[WebBrowsable(true)]
[Personalizable(PersonalizationScope.Shared)]
public FeedOptions FeedType { get; set; }
[WebBrowsable(true)]
[Personalizable(PersonalizationScope.Shared)]
[Description("URL of feed or external list be displayed")]
public string Location { get; set; }
// Silverlight plug-in control
private SilverlightPlugin sl = new SilverlightPlugin();
protected override void CreateChildControls()
{
// Set up Silverlight plug-in
SPSite site = SPContext.Current.Site;
sl.Source = ((site.ServerRelativeUrl == "/")
? "/" : site.ServerRelativeUrl + "/") +
"ClientBin/ExternalFeedSL.xap";
sl.InitParameters = "FeedType=" + this.FeedType.ToString() +
",Location=" + this.Location +
",SiteUrl=" + site.Url;
this.Controls.Add(sl);
}
}
The Silverlight application follows the MVVM design pattern, as explained in Chapter 10, “Accessing SharePoint with Web Services.” Two ViewModels are provided, one for the two newsfeed scenarios (direct and proxy), and one for the BCS external list example. Listing 11.4 shows the Silverlight Application_Startup event handler, which creates the Model and connects the appropriate ViewModel.
Listing 11.4. Silverlight Application_Startup Event Handler
private void Application_Startup(object sender, StartupEventArgs e)
{
// We expect feed type, location and site URL
// Any less and we display an error
if (e.InitParams.ContainsKey("FeedType") &&
e.InitParams.ContainsKey("Location") &&
e.InitParams.ContainsKey("SiteUrl"))
{
if (e.InitParams["Location"] != "")
{
// If we have a valid location, create the view
// and bind the correct ViewModel
MainPage page = new MainPage();
switch (e.InitParams["FeedType"].ToLower())
{
case "direct":
{
page.LayoutRoot.DataContext =
new SimpleFeedVM(e.InitParams["Location"],
"direct",
e.InitParams["SiteUrl"]);
break;
}
case "proxy":
{
page.LayoutRoot.DataContext =
new SimpleFeedVM(e.InitParams["Location"],
"proxy",
e.InitParams["SiteUrl"]);
break;
}
case "extlist":
{
page.LayoutRoot.DataContext =
new ExternalListVM(page,
e.InitParams["Location"]);
break;
}
}
this.RootVisual = page;
}
else
{
this.RootVisual = new ErrorPage();
}
}
}
In the case of “direct” access, the code creates a ViewModel called SimpleFeedVM and binds it to the view using its layout root’s DataContext property. Both the SimpleFeedVM and ExternalListVM ViewModels are based on a common base class called BaseVM. The views are bound to the base class (and yes, there are two views: MainPage.xaml to display a list of items and EditDetailChildWindow.xaml, which is used in the BCS example).
As in the MVVM example in Chapter 10, the ViewModels implement the INotifyPropertyChanged interface to allow two-way data binding to its properties. The BaseVM class implements the required PropertyChanged event handler, and its properties raise this event when they are set to tell any bound controls to update themselves. The BaseVM properties are
• string FeedName: The name of the feed or list to be displayed
• string FeedUrl: The URL of a user-clickable link to the information source
• IEnumerable<FeedItem> Items: A collection of FeedItem objects
• FeedItem SelectedFeedItem: The currently selected FeedItem
Keep in mind that these properties are different from what we passed from the server to Silverlight; they’re binding points for the Silverlight view and its controls. For example, the FeedUrl need not be the location of the information feed—it’s a user-clickable link that will be displayed in the Silverlight UI.
The BaseVM.cs file includes a second class, FeedItem, which also implements INotifyPropertyChanged. The Items and SelectedFeedItem properties of the BaseVM refer to this class, which represents an individual item in a newsfeed or external list. Again, the code is similar to the example in the last chapter, with each property firing the PropertyChanged event when it is set. The FeedItem properties are
• int ContactID: A unique numeric identifier for the feed item
• string Title: The title or full name of the item
• string TitleUrl: A hyperlink to the item
• string SubText1: Descriptive text about the item
• string SubText2: Descriptive text about the item
• string Summary: Descriptive text about the item
Notice that the properties are all pretty generic, which is an indication that the view will be general in nature so it can display different kinds of information such as a newsfeed item and a contact in an external list.
The FeedItem class also implements a CopyTo() method, which allows the code to make a copy of a FeedItem. This is used in the BCS example when editing the details of an item.
Things start to get more interesting in the SimpleFeedVM class, which inherits its properties from BaseVM and populates them with a newsfeed. Listing 11.5 shows the constructor, which kicks off the process of requesting the newsfeed, and its completion handler, which uses LINQ to project the results into an IEnumerable<FeedItem> for binding to the user interface.
Listing 11.5. SimpleFeedVM Code to Retrieve a Newsfeed
public SimpleFeedVM(string url, string feedType, string siteUrl)
{
// Read the specified feed using the WebClient
WebClient wc = new WebClient();
string feedUrl = url;
if (feedType == "proxy")
{
feedUrl = siteUrl +
"/_layouts/FeedProxy/GetFeed.aspx?url=" + url;
}
wc.DownloadStringCompleted +=
new DownloadStringCompletedEventHandler
(wc_DownloadStringCompleted);
wc.DownloadStringAsync(new Uri(feedUrl));
}
// Completion handler
void wc_DownloadStringCompleted(object sender,
DownloadStringCompletedEventArgs e)
{
if (e.Error == null)
{
// If here, we successfully got the newsfeed.
// Run the result through the StringReader to iron out encoding
// issues from the source feed
StringReader reader = new StringReader(e.Result);
// Now read into a SyndicationFeed
XmlReader feedReader = XmlReader.Create(reader);
SyndicationFeed feed = SyndicationFeed.Load(feedReader);
// Copy scalar values from the SyndicationFeed to our
// bindable properties
this.FeedName = feed.Title.Text;
this.FeedUrl = feed.Links.Count > 0 ?
feed.Links[0].Uri.AbsoluteUri : "";
// Project the SyndicationFeedItems into a collection of our
// own FeedItems for binding to the View
var i = from item in feed.Items
select new FeedItem
{
Title = item.Title.Text.Trim(),
TitleUrl = item.Links.Count>0
? item.Links[0].Uri.ToString() : "",
SubText1 = item.PublishDate.ToString(),
SubText2 = item.Authors.Count>0
? item.Authors[0].Name : "",
Summary = FixHtml(item.Summary.Text)
};
this.Items = i;
}
else
{
// If there was a problem, show the error
this.Items = null;
System.Windows.MessageBox.Show(e.Error.InnerException.Message);
}
}
Notice that Silverlight conveniently provides a SyndicationFeed object to parse the newsfeed, regardless if it’s in RSS or ATOM format. The LINQ query enumerates the feed and because newsfeeds can have multiple authors and links, flattens these by selecting the first of each for binding to the user interface.
The only missing piece in Listing 11.5 is a utility method called StripHtml, which removes extraneous HTML tags from the newsfeed content. Unfortunately, displaying HTML is a bit of a challenge. Silverlight 4 introduced a WebBrowser control, but this is only available for use in out-of-browser applications. Silverlight 5 allows this in trusted browser applications, and this is shown later in this chapter, but still the WebBrowser control is too heavy-weight to use in every item in a feed. Therefore the solution just strips out the HTML. Listing 11.6 shows the StripHtml method; it’s not perfect but removes most of the tags found in RSS feed entries.
Listing 11.6. StripHtml Strips Out HTML Tags
private string StripHtml(string html)
{
const string BR_REGEX = "<[Bb][Rr].*?>";
const string HTML_REGEX = "<.*?>";
string stripped = HttpUtility.HtmlDecode(html);
// Make all <br /> tags into newlines
stripped = Regex.Replace(stripped, BR_REGEX, "
");
// Now strip away all other tags
stripped = Regex.Replace(stripped, HTML_REGEX, string.Empty).Trim();
return stripped;
}
To test the web part, add it to a page and point it at the feed.aspx test feed. To do this, expand the TestWeb project, right-click feed.aspx, and click View in Browser. You should see a test feed with ten numbered articles. Copy the URL and paste it into the web part’s location property, and because the cross-domain policy is set up, you should see the display just shown in Figure 11.3.
Building a Custom Feed Reader Proxy
Cross-domain policies sometimes get in the way, so it’s good to have a few more tricks up your sleeve. The cross-domain policy file is only checked if you’re accessing data across domains, so why not employ the SharePoint server as an intermediary? This is shown in Figure 11.4 and is a helpful work-around when a cross-domain policy is not available.
Figure 11.4. Using SharePoint to proxy requests
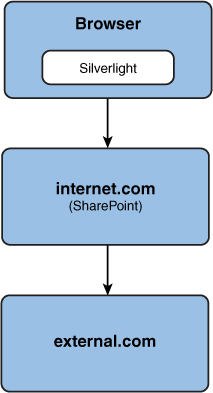
This can have the added advantage that you can cache content in SharePoint, improving performance and reducing thread use on the SharePoint server. However, be sure to respect security; caching can be tricky if different users have different access rights to the cached content.
You can also run afoul of the multihop authentication issue, so the proxy approach is more straightforward when the external site is accessed anonymously or under a single account. BCS handles complex security settings more easily and is preferable for a number of other reasons, but that’s a discussion for later in the chapter.
This section examines a proxy solution for newsfeeds. The BCS entity model doesn’t map too well to a newsfeed, and many great newsfeeds work with no authentication, so it makes sense to build a feed proxy.
The Chapter11c.sln solution included with the code download contains a Farm solution that adds a newsfeed proxy to SharePoint. The proxy is implemented as a layouts page, which means that it can be accessed under the _layouts directory in any SharePoint site. A custom web service, like the one explained at the end of Chapter 10, could have worked as well. This example using a page shows a simpler alternative and shows how to develop layouts pages in general. It’s also accessible from other feed readers because it relays the feed in its original format.
The Visual Studio project consists of a single mapped folder, which is a project folder that is mapped to a physical folder in the SharePoint root directory. In this case, that folder is the Layouts directory that underlies the _layouts folder in SharePoint URLs. Mapped folders are not controlled using the Features infrastructure, so there is no Feature in the project; when the Farm solution is deployed, the proxy page is available in the _layouts directory in every site on the farm.
Within the Layouts folder the solution deploys a folder called FeedProxy, and within that a single web page, GetFeed.aspx, which does all the work. Listing 11.7 shows the feed proxy as implemented in the code behind this page. It accepts a newsfeed URL as a query string parameter, and responds with the contents of that newsfeed just as if it came from the source.
Listing 11.7. Feed Proxy Implemented in GetFeed.aspx.cs
protected void Page_Load(object sender, EventArgs e)
{
string feedString = "";
Cache currentCache = HttpContext.Current.Cache;
try
{
// Ensure we have a URL
string feedUrl = Request.QueryString["url"];
if (string.IsNullOrEmpty(feedUrl))
{
throw new Exception("You must specify a URL for the feed");
}
// Try to get the feed from cache
if (currentCache["Feed" + feedUrl] != null)
{
feedString = currentCache["Feed" + feedUrl].ToString();
}
else
{
// If here, the feed was not in cache, fetch it
WebClient wc = new WebClient();
feedString = wc.DownloadString(feedUrl);
currentCache["Feed" + feedUrl] = feedString;
}
}
catch (Exception ex)
{
// Report the exception as an RSS feed
Response.Clear();
ReportError(ex);
}
// We have the feed, return it with the correct MIME type
Response.Write(feedString);
Response.ContentType = "text/xml";
}
The code uses the ASP.NET cache to save the feed, so it need not be retrieved each time it is displayed. The cache key contains the feed URL to make it unique. If the feed isn’t found in cache, the WebClient object is used to retrieve the feed. This is the same WebClient object used in the last section in Silverlight code, except here it’s called synchronously in the style of ASP.NET. The response is sent to the cache and written to the client using a Response.Write statement. All that’s left to do is flip the MIME type to “text/xml”, and the feed has been sent to our client just as we received it.
You might have noticed in the last section, in Listing 11.5, there is a check for a feed proxy. The snippet of code is repeated in Listing 11.8.
Listing 11.8. The Silverlight Client Adds the Feed Proxy to a Newsfeed URL
if (feedType == "proxy")
{
feedUrl = siteUrl +
"/_layouts/FeedProxy/GetFeed.aspx?url=" + url;
}
As you can see, the proxy feed type simply puts the feed proxy URL in front of the newsfeed URL. Try it out by editing the External Feed web part and selecting the Proxy connection type. Of course you’ll need to ensure that your web server can make outgoing Internet calls; if it can, you should see the feed in Silverlight.
Adding Cross-Domain Policy to SharePoint
What if the tables are turned and you want to allow external users into your SharePoint site? What if you want to use the feed reader to access a cross-domain SharePoint server within your enterprise? Then you need to deploy a cross-domain file on SharePoint.
The simple and most popular approach is to simply copy the policy file in the virtual directory for your web application. This directory is found inside of c:inetpubwssVirtualDirectories on a SharePoint Server; there is a subdirectory for each SharePoint web application.
If you want to control the policy as a SharePoint package, so it is reliably deployed on all web servers in the farm or want to add some logic in defining its contents, this is certainly possible. Such a package is included as the Chapter11b.sln solution in the code download. The solution deploys an HTTP handler, which serves up the policy file anonymously, as shown in Listing 11.9. It is called PolicyHandler in the code download.
Technically, adding any HTTP handler to SharePoint is “unsupported,” but this is a nondestructive change that could be removed if you ever had to troubleshoot a problem with Microsoft support.
Listing 11.9. HttpHandler to Provide the Cross-Domain Access Policy File
class ClientAccessPolicyHttpHandler : IHttpHandler
{
public bool IsReusable
{
get { return true; }
}
private const string POLICY_XML =
@"<?xml version='1.0' encoding='utf-8' ?>
<access-policy>
<cross-domain-access>
<policy>
<allow-from http-request-headers='*'>
<domain uri='*' />
</allow-from>
<grant-to>
<resource path='/' include-subpaths='true' />
</grant-to> </policy>
</cross-domain-access>
</access-policy>";
public void ProcessRequest(HttpContext context)
{
if (context.Request.Path.ToLowerInvariant() ==
"/clientaccesspolicy.xml")
{
context.Response.ContentType = "text/xml";
context.Response.Write(POLICY_XML);
}
}
}
The HTTP handler needs to be declared in web.config. Listing 11.10 shows how to add the HTTP handler to web.config automatically in the feature receiver. The key is to use SharePoint’s SPWebConfigModification object. This is explained in more detail in Chapter 13, “Creating Silverlight Navigation.”
Listing 11.10. Adding the HTTP Handler to web.config
public override void
FeatureActivated(SPFeatureReceiverProperties properties)
{
SPWebConfigModification modification = new SPWebConfigModification();
modification.Path = "configuration/system.webServer/handlers";
modification.Name = "add[@name='ClientAccessPolicy']";
modification.Sequence = 0;
modification.Owner = "ClientAccessPolicy";
modification.Type =
SPWebConfigModification.SPWebConfigModificationType.EnsureChildNode;
modification.Value =
"<add name="ClientAccessPolicy" path="clientaccesspolicy.xml""+
" verb="*" type="" +
typeof(ClientAccessPolicyHttpHandler).AssemblyQualifiedName +
"" />";
SPWebService contentService = SPWebService.ContentService;
contentService.WebConfigModifications.Add(modification);
contentService.Update();
contentService.ApplyWebConfigModifications();
}
public override void
FeatureDeactivating(SPFeatureReceiverProperties properties)
{
SPWebConfigModification configModFound = null;
SPWebService contentService = SPWebService.ContentService;
Collection<SPWebConfigModification> modsCollection =
contentService.WebConfigModifications;
// Find the most recent modification of a specified owner
int modsCount1 = modsCollection.Count;
for (int i = modsCount1 - 1; i > -1; i-)
{
if (modsCollection[i].Owner == "ClientAccessPolicy")
{
configModFound = modsCollection[i];
}
}
// Remove it and save the change to the configuration database
modsCollection.Remove(configModFound);
contentService.Update();
contentService.ApplyWebConfigModifications();
}
Using Business Connectivity Services from Silverlight
Business Connectivity Services (BCS) in SharePoint 2010 has evolved from SharePoint 2007’s Business Data Catalog (BDC). Microsoft loves to keep us all guessing with new acronyms, so why not a new one for the line-of-business access component in SharePoint?
BCS allows access to
• Databases, including Microsoft SQL Server and other databases compatible with the ODBC standard
• Web and WCF services
• Microsoft .NET Framework assemblies
• Custom data sources
Simple connections to databases and web services can be set up using SharePoint Designer 2010; .NET and custom data sources require Visual Studio 2010. The entity model is defined in an XML file that, in the case of .NET and custom data sources, is backed by code. The model defines entities, such as customers, products and orders, their properties, and relationships among them. Methods can be implemented on entities to allow them to be read, created, updated, and deleted.
When the entity model is complete, there are a number of ways SharePoint and Microsoft Office can consume the data. This is part of the power of BCS: one entity model satisfies a number of use cases, all within the familiar SharePoint user interface. Table 11.1 shows the use cases and the editions of SharePoint that support them.
Table 11.1. BCS Features and SharePoint Editions
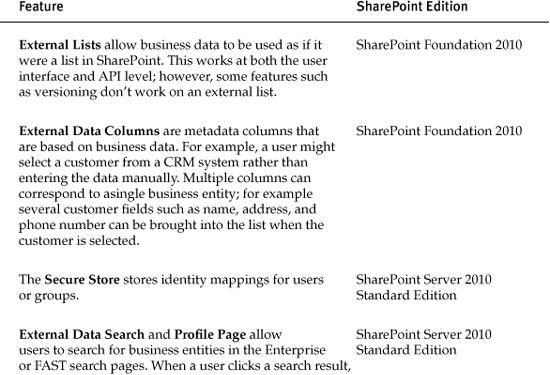
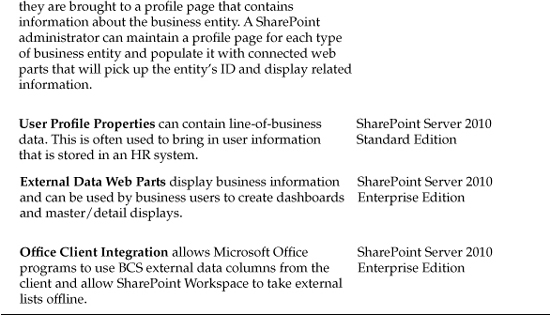
BCS provides flexible authentication options that are configured as part of its entity model. There are three authentication modes available:
• Pass Through—The end user’s identity is used to access the data source; this requires the ability to do double-hop authentication using technology such as Kerberos or claims.
• Secure Store Service—The end user’s identity is mapped to an identity stored in the secure store, which is used to access the data source. For example, all users in the Accounting group in Active Directory might connect to a web service using a generic AccountingUser identity. This eliminates the multi-hop authentication issue and also allows for more effective connection pooling, which is of limited value when individual users connect to a data source.
• Revert to Self—The SharePoint service account’s identity is used to access the data source. This is the simplest option and works well when all SharePoint users have the same permissions when viewing the line-of-business system.
Whole books and tons of other documentation are available on BCS, so this section won’t attempt to cover it completely. Instead, you learn to create a simple BCS entity using SharePoint Designer 2010 and to access the data in Silverlight.
The example uses the AdventureWorksLT sample database, which is available at http://bit.ly/SPSL_AdventureWorksLT. Begin by downloading and installing the database according to the accompanying instructions.
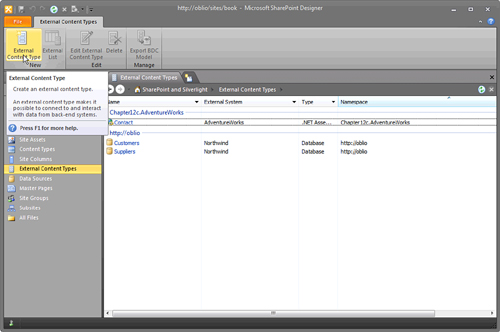
When the database is ready, the first step is to open your development web site in SharePoint Designer 2010. Under Site Objects in the left navigation, select External Content Types. The content types display appears, as shown in Figure 11.5, and lists any content types you’ve previously created.
Figure 11.5. Creating an External Content Type in SharePoint Designer 2010
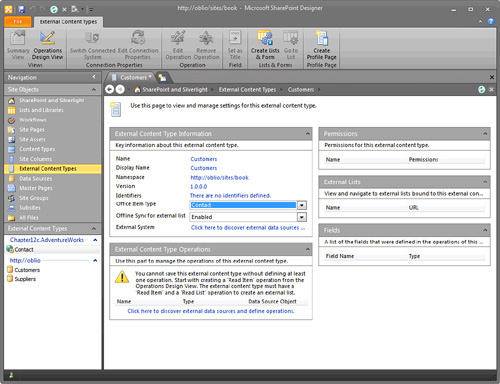
Click the new External Content Type button in the Ribbon bar. This opens the new External Content Type form shown in Figure 11.6. Click the New External Content Type link next to the Name: field and set the name to Customers. Also set the Office Item Type to Contact; this allows Microsoft Outlook 2010 and Microsoft SharePoint Workspace 2010 to render the data in a Contact form. This isn’t really necessary for the Silverlight exercise but is interesting to try as another way to use the data.
Figure 11.6. Filling in the New External Content Type form
Next, click the link under External Content Type Operations to discover external data sources and define operations. This opens the Data Source Explorer, as shown in Figure 11.7.
Figure 11.7. Data Source Explorer
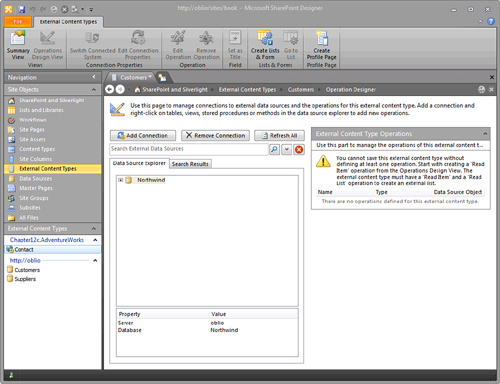
A data source for the Northwind database was previously registered in the screen shot, but there is no connection to the AdventureWorksLT database. To add one, click the Add Connection button, which prompts you to select a data source type. Select SQL Server, and the SQL Connection dialog box opens up as shown in Figure 11.8.
Figure 11.8. Create SQL database connection
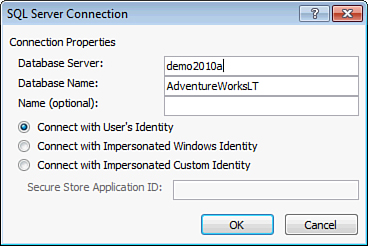
Notice that there are three connection options that correspond to the three authentication types allowed in BCS. For now, select Connect with User’s Identity, which accesses the AdventureWorksLT database with the SharePoint user’s identity. If you installed the database on your SharePoint server, multihop authentication won’t be an issue because it’s literally cross-server hops that are at issue, not connections within a server.
If you’d prefer to connect as the SharePoint service account, then select Connect with Impersonated Windows Identity. If you’d like to try using the Secure Store, select the third option and enter the Secure Store Application ID to select the identity mapping to use.
Clicking OK closes the dialog box and returns you to the Data Source Explorer, except that now the AdventureWorksLT is available as a data source. Open it up and right-click the Customer table as shown in Figure 11.9. Select Create All Operations from the pop-up menu, and SharePoint Designer faithfully generates all the necessary operations for you. Shouldn’t all programming be that easy?
Figure 11.9. Create all operations
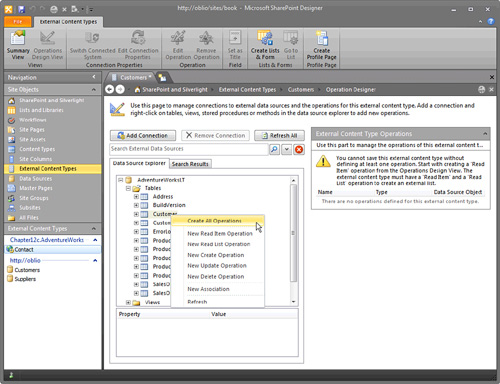
You might notice that it’s also possible to create the operations one at a time. There are five possible operations; Create, Read Item, Update and Delete are easily recognizable as the classic CRUD operations. The Read List operation is used to enumerate the entities. It’s easy to create a read-only External Content Type by simply omitting the Create, Update, and Delete operations.
If you were to develop an External Content Type in Visual Studio 2010, you would code these operations yourself and could do whatever you wished in your .NET code to access the data.
Because the External Content Type is mapped to one of the Office content types, to create the operations it’s necessary to map fields from the data source to Office fields. For example, this allows Outlook to display the FirstName field correctly. This parameter configuration is shown in Figure 11.10. Notice there are a number of errors and warnings at the bottom of the screen, which go away as you map the fields. One by one, select data source fields and set the Office Property drop-down to select the matching Office field.
Figure 11.10. Mapping fields to Office properties
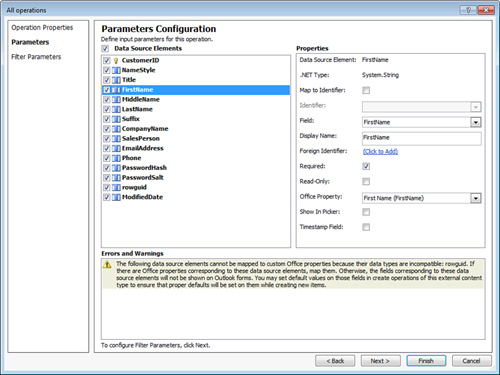
Because Office doesn’t understand globally unique identifiers (GUIDs), there’s no way to map the rowguid field, and a warning about that remains at the end of this process.
Next, you can add filter parameters as shown in Figure 11.11.
Figure 11.11. Adding a filter parameter
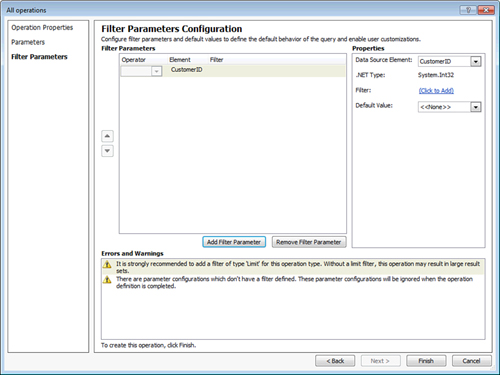
Filter parameters can be used to speed up querying the data source and in some instances to show filter options in the SharePoint user interface. At the very least, a Limit filter should be defined to tell SharePoint not to retrieve more than a certain number of rows at one time when reading the list. To do this, click the Add Filter Parameter button to launch the Filter Configuration dialog box as shown in Figure 11.12.
Figure 11.12. Configuring a limit filter
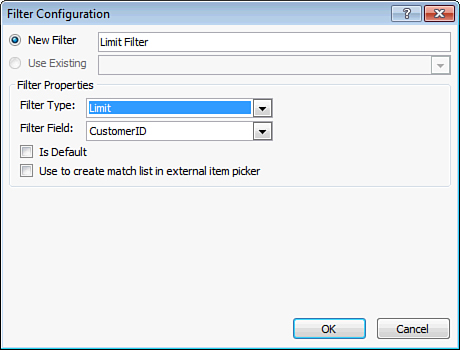
Change the filter type to Limit, leave the Filter field set to CustomerID, and click OK. Back in the Filter Paramaters Configuration screen, set the Default Value (under Properties on the right) to 1000. At this point you can click Finish in the Filter Parameters Configuration screen to complete the new External Content Type.
Before using the new External Content Type, however, you need to give users permission to use it. In this case permission must be granted in two places: in BCS and in the underlying SQL Server database.
To set the BCS permissions, go to Central Administration and under Application Management, click the Manage Service Applications link. Click the Business Data Connectivity Service link, and you see a list of all the BCS services you have created. Select the check box next to the New External Content Type you just created and then click Set Object Permissions in the ribbon bar. You are then presented with the Set Object Permissions dialog box as shown in Figure 11.13.
Figure 11.13. Setting BCS permissions
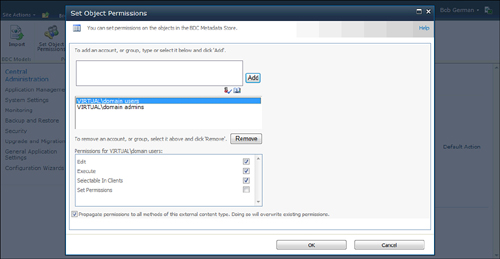
Use the dialog box to grant users permission to use the External Content Type. In the screen shot, all domain users are given Edit, Execute, and Selectable in Clients permission, which gives them read/write access to the External Content Type. Note that at least one user or group must have Set Permissions rights.
Because the data is in SQL Server, permissions need to be set there as well. To do this, open up SQL Server Management Studio and connect to your database server. Expand the tree on the left and open up the Security folder. Right-click the Logins folder and select New Login from the pop-up menu. You are presented with the dialog box shown in Figure 11.14.
Figure 11.14. Adding SQL server permissions

In the screen shot, all Domain Users are given db_datareader and db_datawriter permissions; this is important because the External Content Type was set to Connect with User’s Identity as shown back in Figure 11.8. If you chose to Connect with Windows Impersonated Identity, then grant permissions to the SharePoint service account instead.
Finally it’s time to create a new external list to display the External Content Type. Go back to your browser and open up your development SharePoint site. On the Site Actions menu, select More Options... to create a SharePoint list from many options. Select External List from the Silverlight dialog box that appears; this brings you to the screen shown in Figure 11.15.
Figure 11.15. Adding a new external list
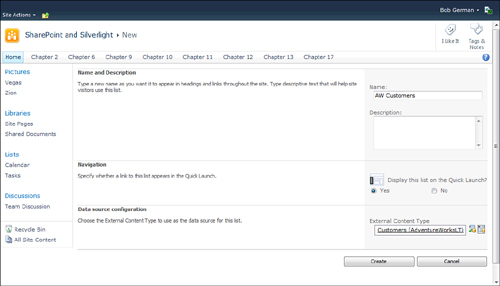
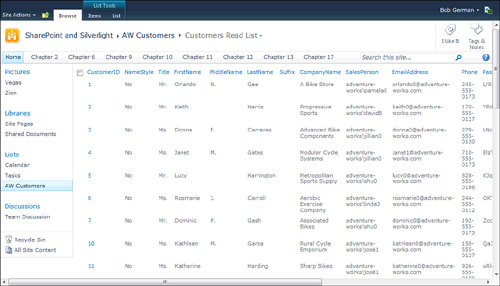
Give the external list a name and select your new External Content Type as the data source. When you click Create, at last your work is rewarded by what should be a working external list of AdventureWorks customers. This is shown in Figure 11.16.
Figure 11.16. Viewing the external list
SharePoint’s Client Object Model makes it easy to access the external list from Silverlight. (Unfortunately, OData is not supported with external lists.) The External Feed Web Part that showed newsfeeds earlier in the chapter also contains logic to display and edit the AdventureWorks contact list. To do this, edit the web part and select the Ext List feed type. Paste the list URL into the Location property; the web part is smart enough to trim off the web page that displays the list so you can paste in a URL such as http://intranet.contoso.com/Lists/AW%20Customers/Read%20List.aspx. Figure 11.17 shows the web part display.
Figure 11.17. Viewing external data in Silverlight
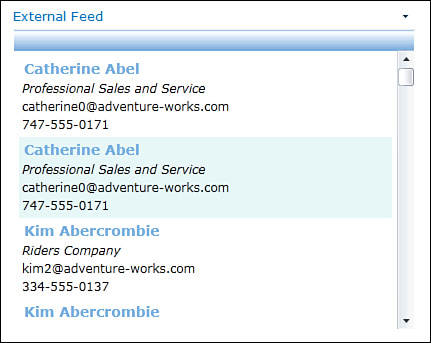
You’ll immediately notice that the AdventureWorksLT database has duplicate customer names in it. This isn’t a problem with the web part and becomes obvious only when you sort the names.
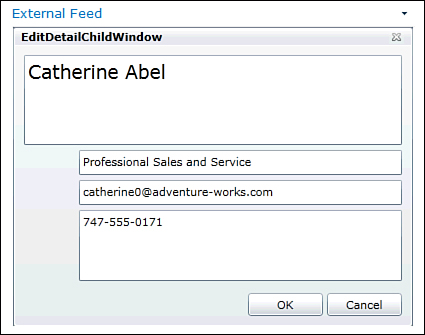
If you click a name, the web part launches your email program to send them mail given that the names are mailto: hyperlinks. If you click elsewhere on one of the entries, an editing form opens up, as shown in Figure 11.18. This form allows the user to edit the customer record, which is written all the way back to the database if the user clicks OK.
Figure 11.18. Editing an external list item
The main Silverlight View shown in Figure 11.17 is the same one that rendered newsfeeds in an earlier example, but now it has a new ViewModel that provides the external list data to the View.
The ViewModel class begins with a CAML query that will sort the customers. The Client Object Model is less forgiving about queries involving external lists, so to make this work it’s necessary to use a CAML query that explicitly references the fields in use. The query is shown in Listing 11.11.
Listing 11.11. CAML Query to Access the External List
private const string camlQuery =
@"<View>
<Query>
<OrderBy>
<FieldRef Name=""LastName""/>
<FieldRef Name=""FirstName""/>
</OrderBy>
</Query>
<ViewFields>
<FieldRef Name=""Title""/>
<FieldRef Name=""FirstName""/>
<FieldRef Name=""LastName""/>
<FieldRef Name=""CompanyName""/>
<FieldRef Name=""EmailAddress""/>
<FieldRef Name=""Phone""/>
</ViewFields>
</View>";
The ViewModel, ExternalListVM.cs initiates the query in its constructor. The code to do this is shown in Listing 11.12. Notice that again the fields are explicitly requested in the LoadQuery() method call; this is always a good idea, but in the case of an external list, it’s not optional. Any mismatch between the CAML query and LoadQuery() methods are rewarded with a failure message saying that “The given key was not present in the dictionary.”
Listing 11.12. Querying the External List
public ExternalListVM(UserControl view, string listUrl)
{
this.view = view;
string webUrl;
string listName;
ParseUrl(listUrl, out webUrl, out listName);
// Now use the Client OM to retrieve the external list
ctx = new ClientContext(webUrl);
Web web = ctx.Web;
List list = web.Lists.GetByTitle(listName);
// Set up a CAML query and issue it against the list
CamlQuery cq = new CamlQuery();
cq.ViewXml = camlQuery;
var listItemQuery = list.GetItems(cq);
// Load the query, explicitly including the needed fields
listItems = ctx.LoadQuery<ListItem>
(listItemQuery.Include(
l => l["Title"],
l => l["FirstName"],
l => l["LastName"],
l => l["CompanyName"],
l => l["EmailAddress"],
l => l["Phone"]));
ctx.ExecuteQueryAsync(RequestSucceeded, RequestFailed);
}
If the request succeeds, the resulting list items are projected onto FeedItem objects in the ViewModel’s Items collection, which is bound to the ListBox in the View. This and the failure processing are shown in Listing 11.13.
Listing 11.13. Handling Query Completion
private void RequestSucceeded
(Object sender, ClientRequestSucceededEventArgs e)
{
// If here, the query completed successfully
view.Dispatcher.BeginInvoke(() =>
{
// Project the results into FeedItems that are bound
// to the Silverlight view
int i = 0;
this.Items = from li in listItems
select new FeedItem
{
ContactID = i++,
Title = li["FirstName"] + " " +
li["LastName"],
TitleUrl = "mailto:" + li["EmailAddress"],
SubText1 = li["CompanyName"].ToString(),
SubText2 = li["EmailAddress"].ToString(),
Summary = li["Phone"].ToString()
};
});
}
private void RequestFailed(Object sender, ClientRequestFailedEventArgs e)
{
// If here, the query failed. For the demo, just report the error
view.Dispatcher.BeginInvoke(() =>
{
MessageBox.Show(e.Message);
});
}
The ShowDetail() method is bound to the MouseLeftButtonUp event in the MainPage View, and when it’s pressed, it launches a child window for editing the clicked item. As shown in Listing 11.14, ShowDetail() copies the selected item and binds it to the child window rather than binding directly to the selected item itself. This is to avoid changing the item prematurely in case the user cancels out of the child window.
Listing 11.14. Method to Display the Detail ChildWindow
public override void ShowDetail()
{
if (this.SelectedItem != null)
{
// First, make a copy of the selected item for editing
detailItem = new FeedItem();
this.SelectedItem.CopyTo(detailItem);
// Create a child window and bind it to the copy
EditDetailChildWindow child = new EditDetailChildWindow();
child.Show();
child.DataContext = detailItem;
// When the child window closes, if the user wants to save the
// data then do so
child.Closed += new EventHandler(UpdateContact);
}
}
Notice that the last thing this code does is to wire up an event handler on the child window, which updates the external list item, but only if the user clicked OK to close the child window. The code for this is shown in Listing 11.15.
Listing 11.15. Updating the External List item
private void UpdateContact(Object sender, EventArgs e)
{
ChildWindow child = sender as ChildWindow;
if (child.DialogResult == true)
{
// The user clicked "OK" so save their changes.
// First, copy the values to the corresponding SharePoint
// list item
ListItem li =
this.listItems.ElementAt<ListItem>(detailItem.ContactID);
li["FirstName"] =
detailItem.Title.Substring(
0, detailItem.Title.IndexOf(" ")).Trim();
li["LastName"] =
detailItem.Title.Substring(
detailItem.Title.IndexOf(" ")).Trim();
li["CompanyName"] = detailItem.SubText1;
li["EmailAddress"] = detailItem.SubText2;
li["Phone"] = detailItem.Summary;
li.Update();
// Execute the list update and display an error if any
ctx.ExecuteQueryAsync(((s0, e0) =>
{
// The update succeeded, so show the change
// in the main view
view.Dispatcher.BeginInvoke(() =>
{
detailItem.CopyTo(this.SelectedItem);
});
}),
((s1, e1) =>
{
// The update failed, so show a message
view.Dispatcher.BeginInvoke(() =>
{
MessageBox.Show(e1.Message);
});
}));
}
}
If the Child Window returns a true result, the user clicked OK, and the code saves the changes. The code goes back to the ListItem objects that were returned by the Client Object Model and updates the one the user changed. If the query succeeds, the edited item is copied back to the item displayed in the main view, so the user can see the change. If the query fails, a message is shown instead of copying back the item, and the user can see the item was not changed.
Adding a Web Browser Preview with Silverlight 5
Silverlight 4 added a <WebBrowser> element that displays a full web browser within a Silverlight application, but it was only available within trusted out-of-browser applications. In Silverlight 5 <WebBrowser> works even in browser-hosted applications, although they still need to be trusted.
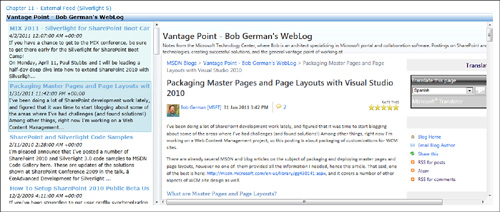
In this section, you learn how to add the web browser control to the Feed Reader Web Part to display a feed preview, as shown in Figure 11.19. This is part of the Chapter11a solution, in a separate web part with a separate Silverlight application called ExternalFeedSL5.
Figure 11.19. FeedReader Web Part with Preview Panel
Unfortunately, binding to the Source property is not supported by the WebBrowser control, and such a binding is needed to allow the control to bind with the ExternalFeedVM ViewModel. Fortunately, you can add your own control binding class. Listing 11.16 shows the code to do this, found in the solution in WebBrowserControlBindings.cs.
Listing 11.16. Adding Control Bindings to the WebBrowser Control
public class BindableProperties
{
public static readonly DependencyProperty SourceProperty =
DependencyProperty.RegisterAttached(
"Source",
typeof(string),
typeof(System.Windows.Controls.WebBrowser),
new PropertyMetadata(null, SourcePropertyChanged));
public static string GetSource(DependencyObject sourceProperty)
{
return (string)sourceProperty.GetValue(SourceProperty);
}
public static void SetSource(DependencyObject sourceProperty,
string value)
{
sourceProperty.SetValue(SourceProperty, value);
}
public static void SourcePropertyChanged
(DependencyObject sourceProperty,
DependencyPropertyChangedEventArgs e)
{
if (sourceProperty is WebBrowser && e.NewValue != null)
{
WebBrowser browser = sourceProperty as WebBrowser;
browser.Source = new Uri(e.NewValue.ToString());
}
}
}
This makes it easy to add the WebBrowser control to MainPage.xaml and to bind it to the PreviewUrl property, which has been added to in the ViewModel.
<WebBrowser Grid.Row="1" Grid.Column="1"
local:BindableProperties.Source="{Binding PreviewUrl}" />
The MainPage.xaml view was already set up with a behavior to show details when a user clicks on a feed item; this was used in the ExternalListVM in the Silverlight 4 version. When a user clicks a feed item, the behavior calls ShowDetail(), which only needs to set the PreviewUrl property to display the corresponding web page. This is shown in Listing 11.17.
Listing 11.17. Showing a Preview Web Page
// ShowDetail: Display a preview
public override void ShowDetail()
{
if (this.SelectedItem != null)
{
this.PreviewUrl = this.SelectedItem.TitleUrl;
}
}
At this point the solution would work, except for one thing: The Silverlight application is not trusted, so it only shows an error message. A detailed MSDN article at http://bit.ly/SPSL_TrustedApps explains the process; it is summarized here for your reference. This all happens on the client computer, which runs the Silverlight application.
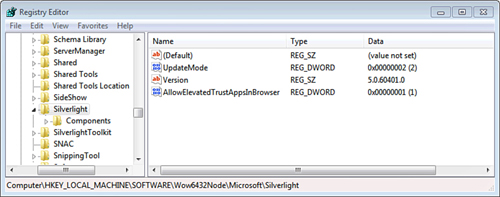
First, you need to enable in-browser trusted applications by adding a key to the registry. On a 64-bit client, the key goes in HKEY_LOCAL_MACHINESoftwareWow6432NodeMicrosoftSilverlight; for 32-bit clients, the location is HKEY_LOCAL_MACHINESoftwareMicrosoft Silverlight. Use regedit.exe to add a DWORD value called AllowElevated TrustAppsInBrowser with a value of 1, as shown in Figure 11.20.
Figure 11.20. Setting the Client Registry to Allow Elevated Trust Applications in Browser
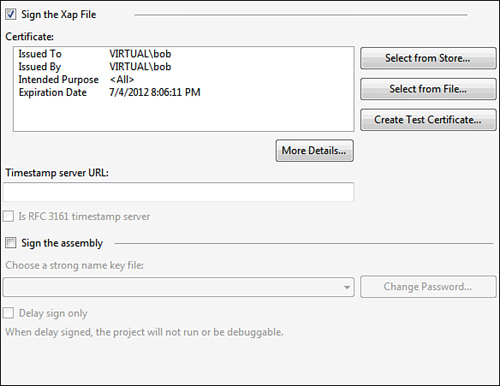
Next, you need to sign the .xap file; this option is available in the Signing tab of the Silverlight project properties in Visual Studio 2010 as shown in Figure 11.21. The easiest approach is to simply click Create Test Certificate; however, you might want to use a particular certificate that your clients already trust.
Figure 11.21. Signing the .xap file
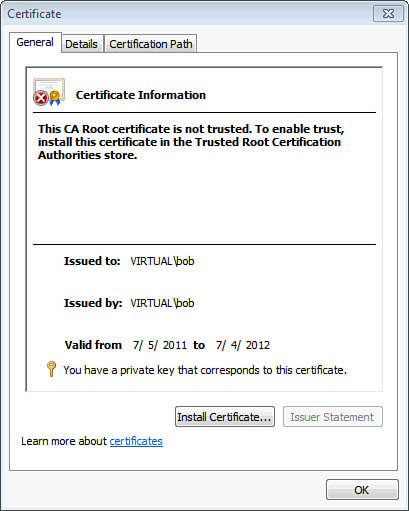
To install the test certificate on your development machine, simply click the More Details button to view the certificate. This is shown in Figure 11.22. Click Install Certificate and follow the wizard to complete the installation.
Figure 11.22. Installing the Test Certificate
Now your solution should work, and you can preview any feed item easily within the web part.
Summary
There are many ways to access external data from Silverlight; the important thing is to think about security before determining the right approach. BCS is the most flexible and provides for a lot of other use cases, so if your data lends itself to the BCS metadata model, that’s probably the best way to go. Otherwise, you now have the tools to navigate around multi-hop and cross-domain issues that come up when you go after external data yourself.
One of the key strengths of SharePoint is its ability to blend structured and unstructured information. This chapter should give you the tools to start bringing more structured information from more varied sources into your solutions.