Hour 2. Trying Out File | New | Project
What You’ll Learn This Hour:
• What makes up a Windows Store Blank App
• How to use the Fixed Layout App
• How the Navigation App template works
• How page navigation works in Windows Store apps
• How the Split App project template functions
• How the Grid App project template works
• How to navigate to content outside the app
When learning a new technology, going to File | New | Project can be beneficial, to see what the options are. Sometimes we have many options; other times, we have only one. After selecting a project, it is fun to start digging in and seeing what kind of havoc can be wrought.
When we run Visual Studio 2012 and select File | New | Project, we can see the Windows Store option under the JavaScript section of the templates. From here, we have five different project templates to choose from (see Figure 2.1). In this hour, we dive into all these templates. We also discuss page navigation in Windows Store apps and discuss how to load content from outside an app. We look at the different security context our apps run in. Finally, we examine how to pass data back and forth to the different contexts.

Figure 2.1. Visual Studio offers five JavaScript Windows Store app project template choices.
To run the examples in the book, you need to have installed Microsoft Visual Studio Express 2012, along with the Blend for Visual Studio 2012 component. Any higher-end SKU of Visual Studio (such as Professional and Ultimate) also works, but this book uses the free version of Visual Studio 2012, the Express SKU.
Creating a Blank App Project
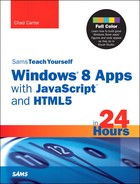
The first project template we create is the Blank App. In creating this app, we can see that it isn’t really blank. Figure 2.2 shows the Solution Explorer immediately after creating the project.
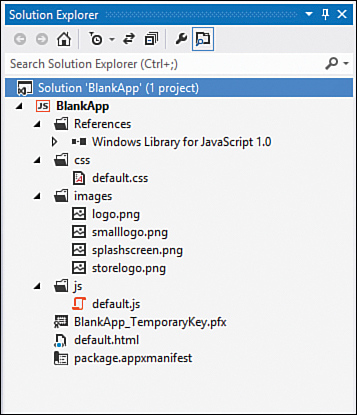
Figure 2.2. The Blank App project isn’t so blank after all.
Let’s take a moment to look at these files and explain what each one does. To begin, we open default.html. As expected, this is the main page that will run. The start page is determined from package.appxmanifest. We discuss this file shortly in the section on app manifest.
All the examples from Hour 1, “Getting a Refresher on JavaScript, HTML5, and CSS3,” were created from the Blank App project. Most real projects should start from the Grid or Split App projects because the majority of the design work is already done for us. Hour 5, “Understanding Microsoft Design Style Principles,” discusses the Microsoft design style language.
Examining the Blank App HTML File
Inside the default.html file is the following markup:
<!DOCTYPE html>
<html>
<head>
<meta charset="utf-8" />
<title>BlankApp</title>
<!-- WinJS references -->
<link href="//Microsoft.WinJS.1.0/css/ui-dark.css" rel="stylesheet" />
<script src="//Microsoft.WinJS.1.0/js/base.js"></script>
<script src="//Microsoft.WinJS.1.0/js/ui.js"></script>
<!-- BlankApp references -->
<link href="/css/default.css" rel="stylesheet" />
<script src="/js/default.js"></script>
</head>
<body>
<p>Content goes here</p>
</body>
</html>
The project was named BlankApp, so Visual Studio used that as the page title. Everything else is the same whenever a new Blank App project is created. Everything is as expected: The HTML5 doctype is followed by the html and head and body elements. Inside the head element are references to some CSS files and JavaScript files. Under the comment <!-- WinJS references --> is the ui-dark.css reference.
Windows Store apps have two default styles: light and dark. The templates default to dark, to conserve battery power. Fewer resources are needed to render a dark screen than a bright screen.
Referencing the Windows Library for JavaScript
Following the CSS reference are two scripts, base.js and ui.js. The CSS file and the JavaScript files are all part of the Windows Library for JavaScript (WinJS). These files are read-only and should not be modified. The base.js file must be loaded before the ui.js file. If any code is relying on WinJS, both of those files must be loaded before the app’s JavaScript files are. We talk about WinJS in detail during Hour 3, “Exploring the Windows Runtime (WinRT) and Windows Library for JavaScript (WinJS).”
Examining the Blank App CSS File
After referencing the WinJS files, default.html references to the app’s own CSS and JavaScript files. The contents of the Blank App’s default.css is as follows:
body {
}
@media screen and (-ms-view-state: fullscreen-landscape) {
}
@media screen and (-ms-view-state: filled) {
}
@media screen and (-ms-view-state: snapped) {
}
@media screen and (-ms-view-state: fullscreen-portrait) {
}
Some styles have been stubbed out, but nothing is actually styled. The CSS3 Media Queries (@media) are discussed in detail during Hour 13, “Working with Fullscreen, Filled, Snapped, and Portrait Views.” For now, it is important to know that we can override styles in those sections, to have the app lay out content differently based on portrait view or snapped view.
Examining the Blank App JavaScript File
Listing 2.1 shows the default.js code included in the app. Note that the code is wrapped in a self-executing anonymous function. If the concept of a self-executing anonymous function is unfamiliar, read Hour 1 now. (“GO TO →” Hour 1, Getting a Refresher on JavaScript, HTML5, and CSS3; Self-Executing Anonymous Functions”)
Listing 2.1. default.js from the Blank App
(function () {
"use strict";
WinJS.Binding.optimizeBindingReferences = true;
var app = WinJS.Application;
var activation = Windows.ApplicationModel.Activation;
app.onactivated = function (args) {
if (args.detail.kind === activation.ActivationKind.launch) {
if (args.detail.previousExecutionState !==
activation.ApplicationExecutionState.terminated) {
// TODO: This application has been newly launched. Initialize
// your application here.
} else {
// TODO: This application has been reactivated from suspension.
// Restore application state here.
}
args.setPromise(WinJS.UI.processAll());
}
};
app.oncheckpoint = function (args) {
// TODO: This application is about to be suspended. Save any state
// that needs to persist across suspensions here. You might use the
// WinJS.Application.sessionState object, which is automatically
// saved and restored across suspension. If you need to complete an
// asynchronous operation before your application is suspended, call
// args.setPromise().
};
app.start();
})();
We dig into this JavaScript in detail during Hour 3. For now, we can see the places in code we can tie into when the app is starting up. We will discuss the application life cycle during Hour 15, “Handling Our App Life Cycle Events”. So far, we have looked at the HTML, the CSS, and the JavaScript. Before we go any further, let’s take a look at the app manifest file.
Examining the Blank App Manifest File
When we open the app manifest file (package.appxmanifest), Visual Studio has a tabbed form where we can enter information. This can be seen in Figure 2.3. Again, we see that the start page is set to default.html. If we wanted the start page to be something different, we would change that setting here. We discuss this XML file in detail during Hour 9, “Working with Location and Hardware Sensors.” For now, let’s look at the different fields available for setting images. On the Application UI tab, a logo file, a small logo file, and a splash screen image file can all be set. These were all provided under the /images folder. In addition, the store logo can also be set under the Packaging tab. We discuss this tab during Hour 23, “Getting Through Certification.”
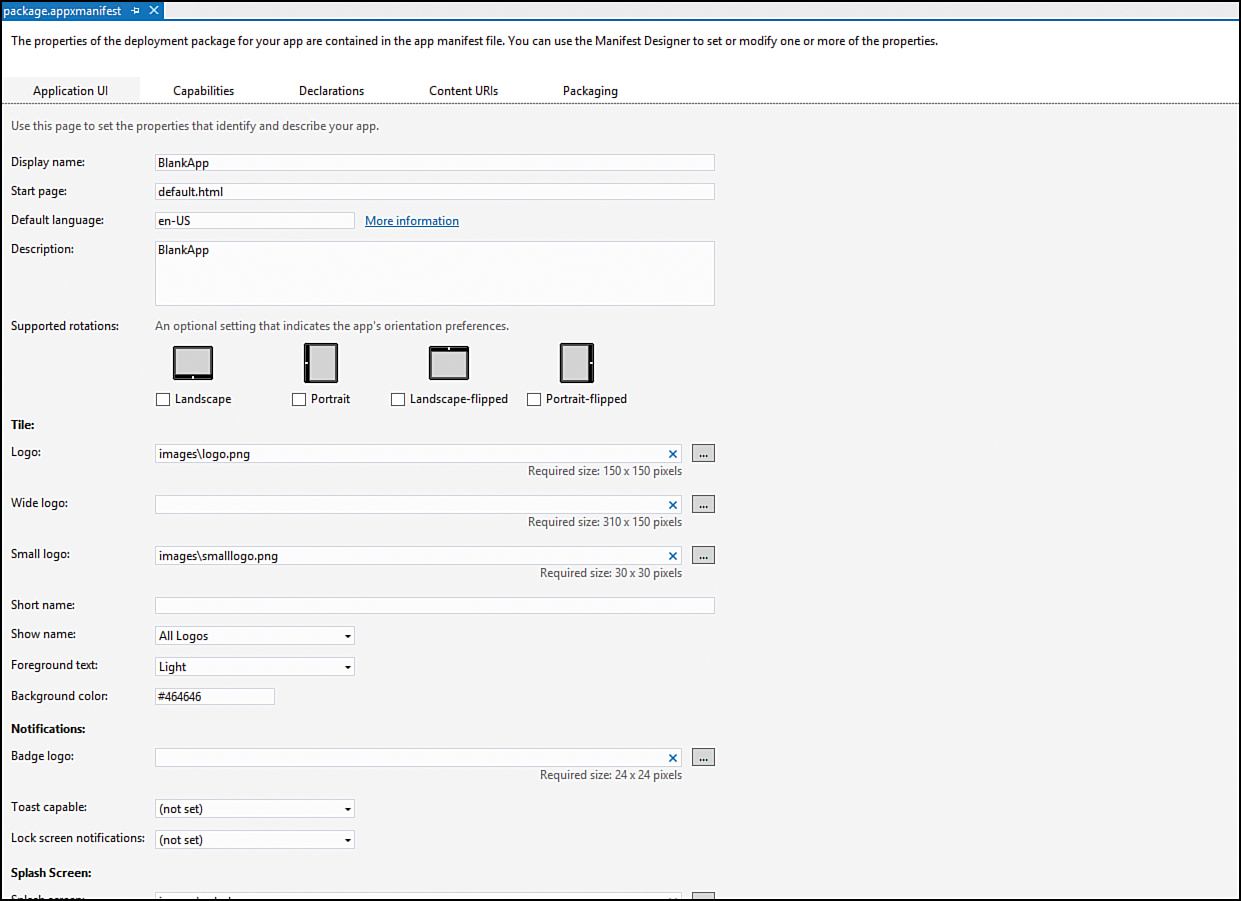
Figure 2.3. The Application UI tab in the app manifest enables us to set the logos and splash screen images.
Certificates and Keys
The only file left to discuss is the BlankApp_TemporaryKey.pfx file. Windows Store apps must have their manifests digitally signed by a certificate to run. This TemporaryKey file is a Personal Information Exchange file that allows for release signing. The certificate is used for development purposes. If the file gets deleted or another issue arises, the certificate can be generated again by selecting Choose Certificate and then, in the Configure Certificate drop-down, selecting Create Test Certificate (see Figure 2.4).
Figure 2.4. The Packaging tab in the app manifest enables us to generate a new test certificate.
Finally, as in Figure 2.5, enter a password and confirmation to generate a new test certificate.
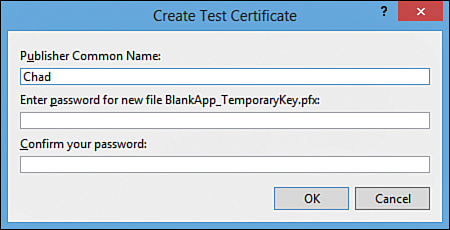
Figure 2.5. A password is needed to finish creating the test certificate.
When actually submitting an app to the Windows Store, a real certificate is provided for the app. The test certificate is needed only during the development process.
Figure 2.6 shows the result of running the app.
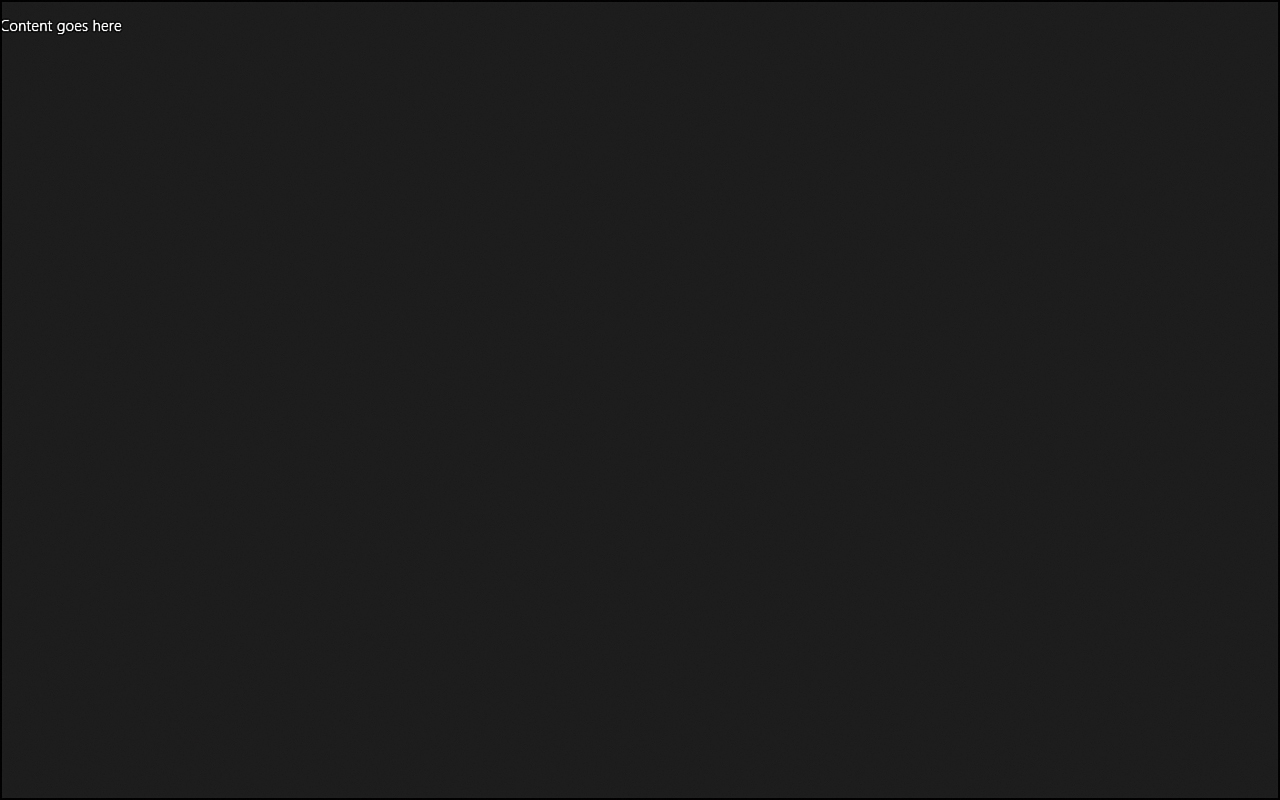
Figure 2.6. The Blank App produces these exciting results.
Creating a Fixed Layout App Project
Next up is the Fixed Layout App. The suggested use for this template is when we want to create a game. This app enables us to explicitly write to our code with specific widths and heights in mind. Then Windows scales the app up or down, as needed, based on the device it is on. This is especially beneficial when writing games that use the HTML5 canvas element.
We can generate this project the same way we did the Blank App project, except that we need to select the Fixed Layout App, of course. We can call the project FixedLayoutApp. The number of files and their locations are identical; the only difference is the actual content of the default.html and default.css files. The default.js file is the same as it was in the Blank App.
Note that the templates discussed this hour are just that, templates. They were added to Visual Studio to help developers get up and running quickly. These templates are not part of the Windows Runtime (WinRT) or the Windows Library for JavaScript (WinJS), although some templates use parts of both.
Besides simply referencing the Windows Library for JavaScript (WinJS), as the Blank App project template did, this template actually utilizes the library. We discuss the Windows Runtime (WinRT) and WinJS in detail during Hour 3. For now, we just touch on the pieces we need to see how these project templates function.
Inside the default.html file, we see the following content inside the body element:
<div data-win-control="WinJS.UI.ViewBox">
<div class="fixedlayout">
<p>Content goes here</p>
</div>
</div>
In the first line, the Windows Store JavaScript apps reference WinRT components by accessing them through WinJS. Windows Store apps all run on WinRT components. Microsoft provides some of these components, but as developers, we can create our own Windows Runtime components. Because we are using JavaScript, we rely on the JavaScript projection of the Windows Runtime that Microsoft provides. Through this projection, we are able to access the large number of WinRT APIs. In addition, we have access to the Windows Library for JavaScript (WinJS). WinJS adds features and controls beyond what the WinRT APIs offer.
To access the Windows Runtime APIs, we will use the Windows namespace (not to be confused with window in the Browser DOM objects). To access the Windows Library for JavaScript, we use the WinJS namespace.
The template utilizes the HTML5 custom data attribute (data-) to assign custom data to the div element. Microsoft has a few custom data attributes, each beginning with win-. In this case, the code is loading up a ViewBox control built in to WinJS. Inside the ViewBox control is a div element with the fixedlayout class. We discuss the ViewBox control during Hour 13.
The code in the cssdefault.css file of the Fixed Layout App is as follows:
html, body {
height: 100%;
margin: 0;
padding: 0;
}
body {
-ms-flex-align: center;
-ms-flex-direction: column;
-ms-flex-pack: center;
display: -ms-flexbox;
}
.fixedlayout {
-ms-grid-columns: 1fr;
-ms-grid-rows: 1fr;
display: -ms-grid;
height: 768px;
width: 1024px;
}
The html and body tags are styles that make the content fill the entire screen. Next inside the body CSS rule, we see that display has been set to -ms-flexbox. This rule centers the entire body. The actual fixedlayout class is to be displayed as an -ms-grid element with a single column and a single row. The 1fr simply means 1 fractional unit. In this case, the grid will have one column and one row that fill the entire width and height declared (1,024 × 768). We discuss grids in more detail during Hour 10, “Binding Data to Our Apps.”
The Microsoft vendor prefix -ms- is used when a CSS property is not part of the official CSS specification. Other vendors have their own prefixes, such as -webkit- and -moz-. For Windows Store app development, we can use only standard properties or Microsoft-specific properties because Windows Store apps, written in JavaScript and HTML, need to work with the IE 10 rendering engine.
To better understand how the styles are working together, let’s add the following CSS property anywhere inside the fixedlayout rule:
background-color: gray;
This styles our fixedlayout grid to gray, with the main app styled to the dark gray from the WinJS ui-dark.css style sheet. Now when we run the FixedLayout App with the one modification, we see the result in Figure 2.7.

Figure 2.7. The FixedLayout App always scales the gray div, regardless of the screen resolution.
Creating a Navigation App Project
We can create a new project using the Navigation App project template called NavigationApp. Now we can see a number of new files created. The first new file is the navigator.js file under the /js folder. There is also a new pages folder with a home subfolder. Inside the home subfolder are three more files: home.css, home.html, and home.js (see Figure 2.8).
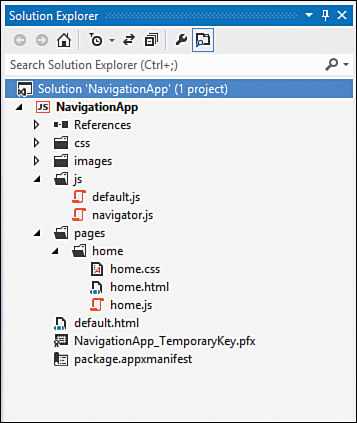
Figure 2.8. The Navigation App project adds new files.
When using the web, we can easily add anchor tags and do a redirect to an entirely different page. However, when we simply redirect, we lose all our state. For apps, this can be bad. WinJS provides navigation functionality that helps maintain application state when moving among multiple pages inside an app.
Creating Single-Page Applications
Websites typically use either multipage navigation or single-page navigation. Websites that use single-page navigation are typically called Single Page Apps (SPAs). Multipage navigation is typical of most websites, with each hyperlink causing the entire page to be unloaded and a new page loaded. Because this is HTML, navigating to a new page with a top-level navigation causes a blank screen to appear. All state is lost unless explicitly saved with client- or server-side code. Figure 2.9 shows the multipage navigation model.

Figure 2.9. Multipage navigation unloads the existing page and loads the new page.
Single-page navigation, on the other hand, still allows for the app to be split into multiple physical page files, but when the user clicks a hyperlink, the new page content is loaded inside the main page. This way, the main page maintains all state and the new content is simply treated as dynamic data. Because the page is never unloaded, the scripts remain intact. This makes managing state easier and enables us to transition the new content with animations. For these reasons, single-page navigation is the recommended navigation model for Windows Store apps using JavaScript. See Figure 2.10.
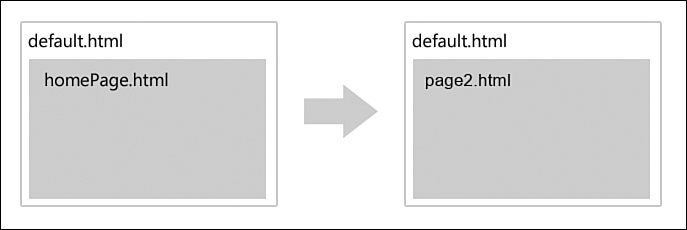
Figure 2.10. Single-page navigation keeps the main page loaded and replaces some content with content from another page.
Understanding the WinJS Navigation Objects
Most apps need a consistent way of navigating to multiple pages and keeping track of where they are in the process. WinJS provides the Navigation object for this common need. This object exposes functions such as navigate, back, and forward. It also exposes the onbeforenavigate, onnavigating, and onnavigated events. In addition, the object exposes the following properties: canGoForward, canGoBack, history, location, and state. The WinJS.Navigation object simply maintains a stack of the URLs that the app has navigated to.
The next piece of the puzzle that WinJS provides is the pages themselves. The WinJS.UI.Pages.PageControl object enables us to define a modular unit of JavaScript, HTML, and CSS. We can navigate to this unit or use it as a custom WinJS control. We saw the built-in WinJS ViewBox control being used earlier. The NavigationApp project gives an example of this modular unit. In the /pages folder is a /home subfolder that contains the .html, .css, and .js files that make up the home PageControl. We cover how this PageControl is defined in the code shortly. We also look at WinJS built-in controls in detail during Hour3.
Another piece of navigation functionality that WinJS exposes is fragments. WinJS.UI.Fragments is useful for when we need to load HTML fragments into the main page. This is done via the render and renderCopy functions. This book doesn’t discuss using this object because we use the Navigator.js code from the project templates.
Find more information on these fragments at http://msdn.microsoft.com/en-us/library/windows/apps/br229781.
Even though WinJS provides these objects, we would need to write a lot of code to have our single-page apps navigate correctly. Fortunately, the Navigation App project template solves this problem with the navigator.js file. The navigator.js code uses the WinJS.Navigation object and the WinJS.UI.Pages object to accomplish the common needs of single-page applications.
Working with the PageControlNavigator
The navigator.js exposes a PageControlNavigator namespace. PageControlNavigator is not part of WinJS; it is boilerplate code that the Visual Studio project template adds to the project. We can thus customize it as needed. In this book, we use it as is because it meets our needs nicely.
The navigator.js code creates a WinJS control called PageControlNavigator. Again, this control is not part of WinJS, but our app code (albeit, boilerplate code) is creating this new control on-the-fly and making it a part of the WinJS namespace. This is the power of a dynamic language such as JavaScript. This means that any of our app codes can create a WinJS control. We cover how to create our own control during Hour 4, “Creating WinJS Namespaces, Classes, and Custom Controls.”
To see how the PageControlNavigator control is used, we can look at the default.html file:
<div id="contenthost" data-win-control="Application.PageControlNavigator"
data-win-options="{home: '/pages/home/home.html'}"></div>
This div has an id of contenthost. The actual id value is not important and can be anything. By using the data-win-control, we instantiate the Application.PageControlNavigator control. With the data-win-options attribute (another custom data attribute that Microsoft provides), we can pass parameters to the control’s constructor. It takes a JavaScript Object Literal.
For the PageControlNavigator, we need to set the home property to the actual URL of the page we want to load inside default.html. If the control took more than one parameter, we would separate them with a comma just as in any JavaScript Object Literal.
Simply setting a value in data-win-control doesn’t actually instantiate the object. During Hour 3, we discuss exactly how this text in markup gets instantiated when the app is activated. For now, think of it as happening by simply setting the value in markup.
Examining the Home Page Control
Listing 2.1 contains the markup of /pages/home/home.html. This page control is loaded into the default.html because we passed this page to the home parameter of the Application.PageControlNavigator constructor.
Listing 2.1. The Markup Portion of the Home Page Control
<!DOCTYPE html>
<html>
<head>
<meta charset="utf-8" />
<title>homePage</title>
<!-- WinJS references -->
<link href="//Microsoft.WinJS.1.0/css/ui-dark.css" rel="stylesheet" />
<script src="//Microsoft.WinJS.1.0/js/base.js"></script>
<script src="//Microsoft.WinJS.1.0/js/ui.js"></script>
<link href="/css/default.css" rel="stylesheet" />
<link href="/pages/home/home.css" rel="stylesheet" />
<script src="/pages/home/home.js"></script>
</head>
<body>
<!-- The content that will be loaded and displayed. -->
<div class="fragment homepage">
<header aria-label="Header content" role="banner">
<button class="win-backbutton" aria-label="Back" disabled
type="button"></button>
<h1 class="titlearea win-type-ellipsis">
<span class="pagetitle">Welcome to NavigationApp!</span>
</h1>
</header>
<section aria-label="Main content" role="main">
<p>Content goes here.</p>
</section>
</div>
</body>
</html>
The code in Listing 2.1 is more than just a fragment of markup—it is an entire page! However, this is not a problem. Any scripts that our fragments want to load that are already loaded are ignored. This means that the WinJS script files (base.js and ui.js) and the default.js are loaded when the default.html page loads. Because default brings in content from the home.html file, home.js is also loaded. Both base.js and ui.js are ignored because they were already loaded by default.html. Having all the scripts and styles in the page controls is beneficial because it enables us to load the page control in Blend for Visual Studio and see exactly what it will look like. We talk about Blend for Visual Studio during Hour 5.
The JavaScript portion of the home page control is a self-executing anonymous function that registers itself with WinJS as a page control. This is done through the WinJS.UI.Pages.define function:
(function () {
"use strict";
WinJS.UI.Pages.define("/pages/home/home.html", {
// This function is called whenever a user navigates to this page. It
// populates the page elements with the app's data.
ready: function (element, options) {
// TODO: Initialize the page here.
}
});
})();
The define function takes in the id of the page control (the URL) as the first parameter and takes an object literal as the second parameter. The object literal contains the page control’s functions. Take a minute and let this code sink in. We are telling WinJS that we want to define a page control. We give it an id (the relative URL of the markup) and then tell it to create some functions on-the-fly that we want it to add to the page control. Dynamic languages aren’t half bad! (Remind me I said that when we get to the debugging portion of the book in Hour 7, “Debugging, Securing, and Measuring Our Apps’ Performance.”)
If WinJS.UI.Pages.define is called multiple times with the same URL, the members are added to the existing members. If a member already exists, the last one defined replaces the one already present.
The last part of the page control is the style sheet. The contents of home.css are as follows:
.homepage section[role=main] {
margin-left: 120px;
}
@media screen and (-ms-view-state: snapped) {
.homepage section[role=main] {
margin-left: 20px;
}
}
@media screen and (-ms-view-state: portrait) {
.homepage section[role=main] {
margin-left: 100px;
}
}
This is standard CSS using the attribute selector to style the section content of the homepage class. The content is simply being spaced 120 pixels from the left. This is the correct positioning for Microsoft design style content. We discuss this more during Hour 5. The last two CSS rules are inside media queries (@media), which we discuss during Hour 13.
We can run the application and see a single page where the content was loaded from the home page. Figure 2.11 shows the result (after changing the style of default.html and home.html to use ui-light.css instead of ui-dark.css).

Figure 2.11. The NavigationApp with the ui-light style sheet applied.
Try It Yourself: Adding a New Page Control to the NavigationApp
1. Add a new folder under pages called newpage, as in Figure 2.12.
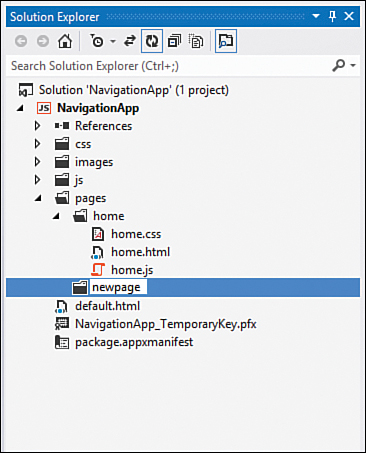
Figure 2.12. Adding a new folder called newpage to hold the new page control.
2. Right-click the newpage folder and select Add | New Item.
3. Inside the Add New Item dialog box, select Page Control and name it newpage.html, as in Figure 2.13.
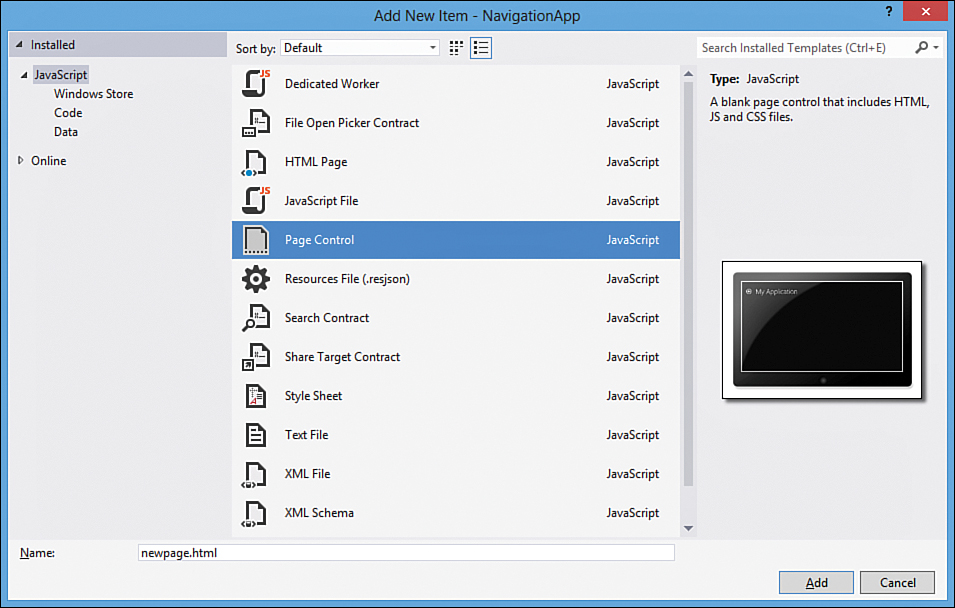
Figure 2.13. Select Page Control and name it newpage.html.
4. Notice that three files were added to the newpage folder: newpage.css, newpage.html, and newpage.js.
5. Open /pages/home/home.html and, inside the section element, add the following a element:
<a id="link" href="#">Go to New Page</a>
6. Open /pages/home/home.js and, inside the ready function, add the following JavaScript:
document.getElementById("link").onclick = function (event) {
WinJS.Navigation.navigate("/pages/newpage/newpage.html");
};
7. We are handling the onclick event and navigating to newpage.html through the WinJS Navigation object instead of just doing a normal redirect. Doing navigation this way enables us to maintain state.
8. Let’s also change the style to ui-light.css on the pages/newpage/newpage.html page.
9. Run the app and see the final result in Figure 2.14.
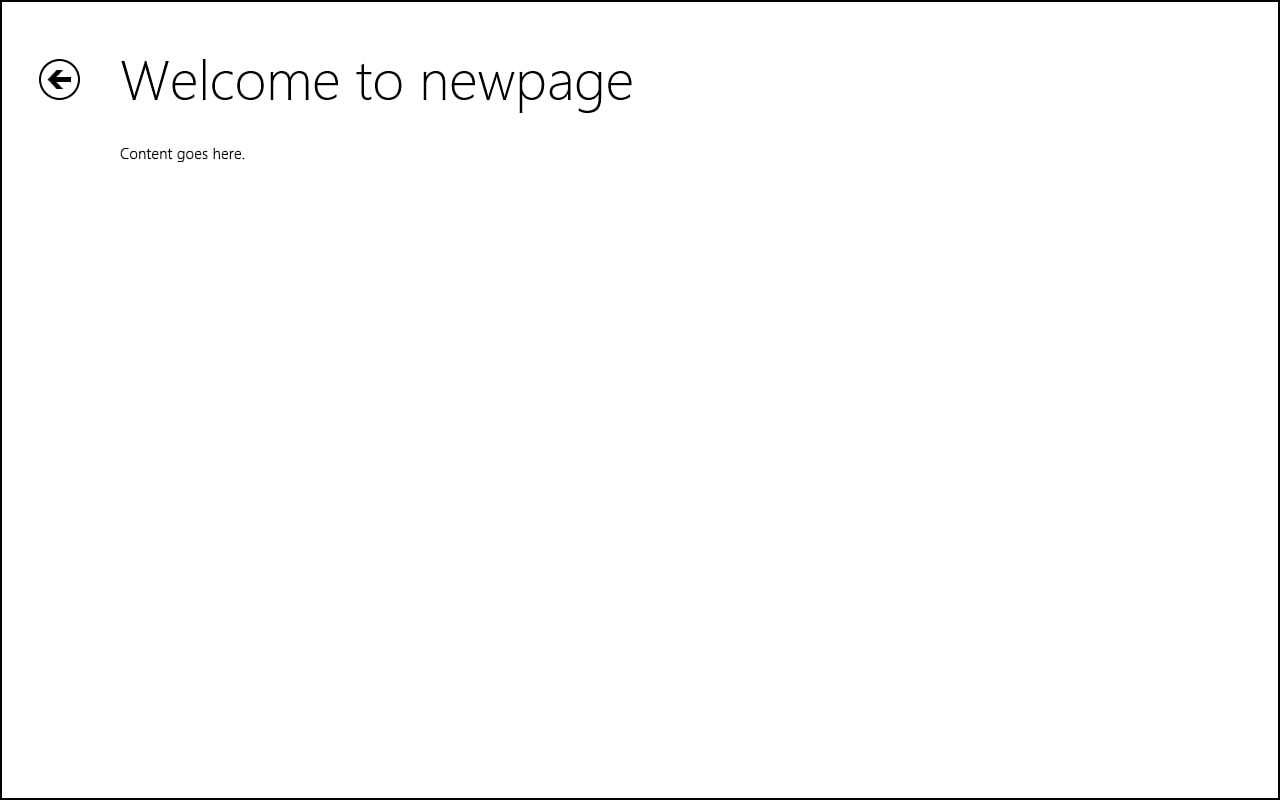
Figure 2.14. Navigated to the newly added page control and properly seeing the Back button.
Creating a Split App Project
The next app project template is the Split App project template. When we create this new Windows Store JavaScript project, called SplitApp, we see a few more files created than we have seen so far. This template provides some great boilerplate code for us to get up and running with a good-looking app pretty quickly.
When we open the default.html file, the first page control loaded is /pages/items/items.html.
When we open items.html, we have some new HTML markup to look at. At the bottom of the file is the same section element that we saw in the Navigation App project template. Instead of having only a static paragraph element, this code has a WinJS ListView control. This is set with the data-win-control attribute. The code also sets selectionMode to 'none' in the data-win-options property. We discuss the ListView control in detail during Hour 10.
The next piece to examine is inside the items.js file. Under the _itemInvoked function, we see where it navigates to the /pages/split/split.html file. In the ready function, the _itemInvoked function is hooked up to ListView’s oniteminvoked event. This event is kicked off when an item is tapped in ListView.
Let’s open the split.html file. Inside the splitpage fragment div, right after the header element, are two div elements. Inside the first div is another WinJS ListView control. The second div contains an article with associated content.
Running the SplitApp project brings up the items.html page. Tapping on an item handles the iteminvoked event. This causes the page to navigate to the split.html page. On the split.html page is a group of items on the left side of the split, along with the selected article content on the right of the split.
The code obtains the data from the /js/data.js file. We postpone talking about the ListView control in detail and exploring how the data.js data is actually bound to it until Hour 10. Figure 2.15 shows the details of the SplitApp app.
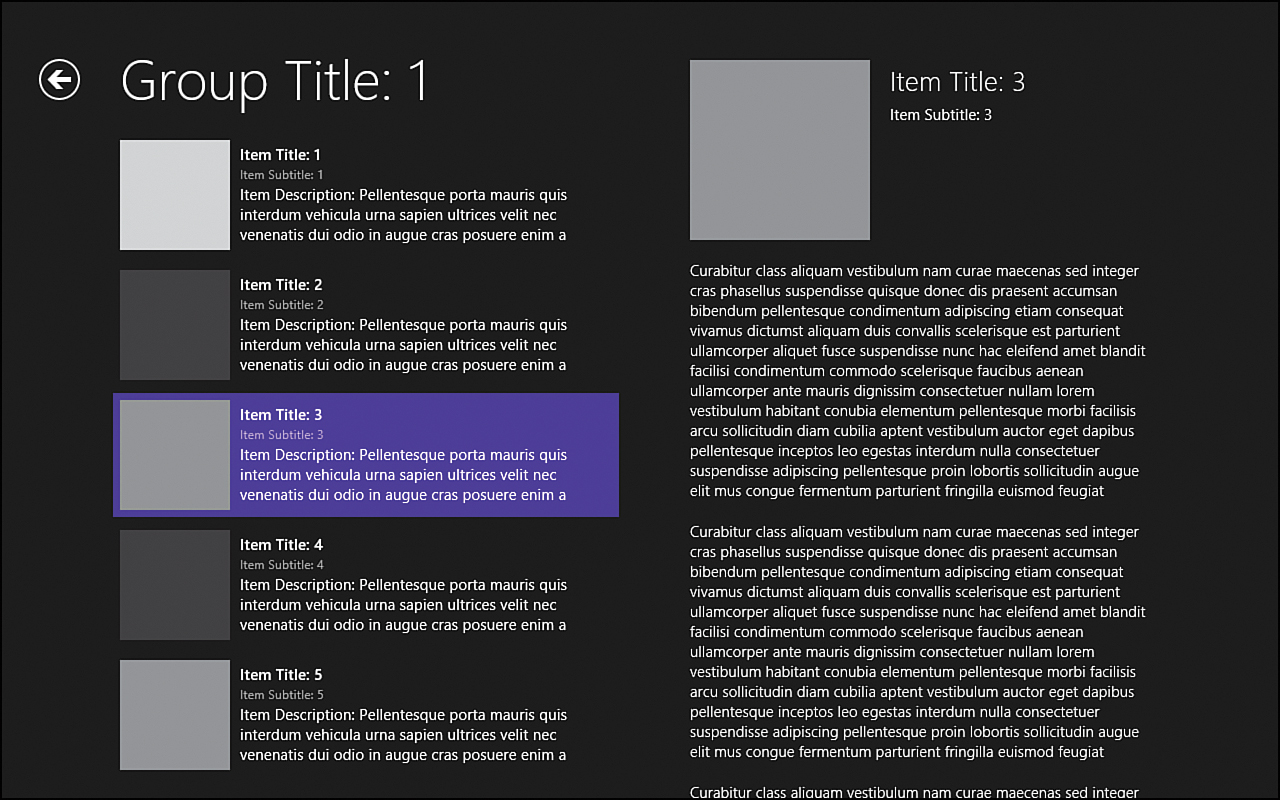
Figure 2.15. The SplitApp app enables us to select an item on the left and see the details on the right.
Creating a Grid App Project
The final app project template is the Grid App project template. This template also utilizes the navigator.js with the PageControlNavigator. When we create a Grid App project, called GridApp, we see three page controls created for us, instead of the two in the SplitApp project. Inside the default.html file, the first page control loaded is /pages/groupedItems/groupedItems.html. At the bottom of the groupedItems.html page, we can see that it also uses the WinJS ListView control.
After running the project, the ListView displays as a grid. The ListView control is flexible and has a grid layout mode in addition to a list layout mode. The group titles also can be tapped to take us to a group detail page. Selecting an item from the main hub page or the group detail page takes us to the item detail page, which lists the content of the item.
This project template has a lot to it. The majority involves binding data to the ListView. We dig into this project in great detail during Hour 10. For now, we can look at the navigation code.
When we open the /pages/groupedItems/groupedItems.html file, we can see that a button in the headertemplate div has the following onclick event handler:
"Application.navigator.pageControl.navigateToGroup(event.srcElement.groupKey)"
This handles clicking on the group name on the groupedItems (hub) page. We can open the /pages/groupedItems/groupedItems.js file and see the following navigateToGroup function:
navigateToGroup: function (key) {
nav.navigate("/pages/groupDetail/groupDetail.html", { groupKey: key });
},
As expected, clicking the group name navigates to the groupDetail page. The nav variable is just an alias to the WinJS.Navigation class, to save on typing. Let’s also look at the _itemInvoked function. It has some conditional logic and either navigates to the groupDetail page control (by calling the navigateToGroup function) or the itemDetail page control. The condition checks to see if the app is in a snapped view state. We discuss the different view states during Hour 13.
Navigating to Content in Any Location
During the “Creating a Navigation App Project” section of this hour, we talked about the navigation model used in the last three project templates (Navigation, Split, and Grid). There we covered loading content (page controls) within our application. But sometimes we need to load content from the web.
Understanding the App Host
Before we dig deeper into loading content, we need to understand how the App Host works. The App Host does what the name implies: It hosts apps written in JavaScript, HTML, and CSS. When developing an app using these technologies, we need the app to run in a container. Languages such as C++, C#, and Visual Basic each compile into an executable that the operating system can call directly. For our apps, we have only text files. In the web world, the web browser processes these files to display content to the user. In much the same way, the App Host process (wwahost.exe) hosts and executes JavaScript Windows Store apps. The App Host provides security contexts that the code can run in. Page controls that we create and reside in the app run in local context; resources outside the app run in what is called the web context.
Context is an important concept in Windows Store apps written in JavaScript. If we are bringing dynamic content into our app from the web, we need to make sure that the content isn’t allowed to inject JavaScript and start taking over our process. We talk about some ways to keep apps secure during Hour 7. For now, it is important to know that we need to take precautions when loading dynamic remote data. Of course, sometimes we want to call a remote page that we are in control of. For example, we might want our app to access a web service that we created in the cloud, to obtain data.
Running in Local Context
When our app is running in local context, we have access to the entire Windows Runtime and Windows Library for JavaScript. Apps run in local context when pages are loaded from within the app package. This means apps have access to the machine and hardware sensors, such as the GPS and web camera.
To access the hardware, even in local context, we still need to tell the system that we want to use these devices. We discuss this during Hour 9.
However, when we run JavaScript in the local context, the actual .js file must exist locally. We cannot use remote source references inside the local context. The following is not allowed in the local context:
<script src="http://www.somesite.com/somescript.js"></script>
The protocol when using local context resources is ms-appx://. To access a local resource in our app, we would use ms-appx://ourpackage/someresource. We can use a shortcut by using three forward slashes and just set it to ms-appx:///someresouce. Using this protocol, we load content packaged in our app into the local context. This code has access to the Windows Runtime and all of the device’s hardware capabilities.
Inside the local context, any HTML that is injected into an app needs to be filtered by the window.toStaticHTML method, for security reasons. The local context allows the application to talk with the operating system and run with more privileges than a typical web browsing session. Because injecting HTML is a security risk, Windows runs any calls to innerHTML (and related operations) through a filtering process invoked by toStaticHTML. toStaticHTML simply walks through the data it is passed and strips out anything that resembles a script, while keeping the static HTML tags (like <b>) intact. If toStaticHTML is not called and script is present, an exception is thrown.
For more information and to see the list of related operations of innerHTML that are run through the filtering process, see the following article from Microsoft: http://msdn.microsoft.com/en-us/library/windows/apps/hh465388.
In some scenarios, injecting HTML and JavaScript into the DOM is valuable. It isn’t allowed by default, but we can override that if we need to by calling MSApp.execUnsafeLocalFunction. Do this with great caution, however, and never use it on content that isn’t validated. We talk more about this function in Hour 7.
Running in Web Context
If we load content from the web, those pages are run in the web context. If we just link to content on the web, Windows opens the web browser and our app goes to the background. We cannot have a top-level navigation to web content. If we want to actually display the web content inside the app, we use an iframe. This way, the web resource that is loaded will function just it does in the browser. But it doesn’t have access to the user’s data, device hardware, or any of the Windows Runtime.
If we are trying to display unknown content, loading the iframe with the sandbox attribute set is best. By default, the iframe lets all scripts and form elements run and also gets information about the origin that could lead to accessing data such as cookie information. If we are loading our own resource on our web server or a well-known resource and we need the script or the form data to be processed as normal, we just pull it in with an iframe. However, if we are bringing up content that we don’t know about—perhaps something the user has been able to browse to—we want to make sure we put the iframe in sandbox mode. We have the option to tell it to execute scripts but not forms, or vice versa. We can let it access the origin information (which allows sharing local storage such as cookies) or keep it from doing so.
Using Third-Party Libraries
If we needed to include a third-party library, we could bring the entire JavaScript file down locally so that it is included in our app package. We could then look at the code and make sure it isn’t doing anything malicious. If it is local, we can use it normally as long as the library isn’t trying to update the DOM. Remember, the local context filters any calls to innerHTML, outerHTML, pasteHTML, document.write, and functions like them. So if a third-party library will be injecting HTML and script into the DOM, it will not work even if the library is included with the app. We can get a third-party library that modifies the DOM to work in Windows Store apps in two ways. One way is to load the content in an iframe via the ms-appx-web:// protocol and load the script remotely. This lets it run in the web context, which means it can manipulate the DOM all it wants. However, it will not be able to use the Windows Runtime and other features that are available to only the local context. The second way we can get the third-party library that manipulates the DOM to work correctly is to modify the script and wrap the function(s) that manipulate the DOM in the MSApp.execUnsafeLocalFunction. Again, that call should be used only on scripts that are absolutely trusted and sanitized.
We don’t discuss any third-party libraries in this book because we don’t even enough pages to cover all the built-in functionality Microsoft provide, much less those provided by third-party libraries. However, Windows Store apps can definitely use third-party libraries.
Communicating Between Local Context and Web Context
Local context and web context can talk to each other by passing data through the postMessage function. This is a standards function that allows each iframe to share data at will. To use this function, we need to add an event listener for the window (not document) message event. Inside the event handler, we get the data being communicated in the event.data property (where event is the parameter of the event handler). For example:
window.addEventListener("message", function (evt) {
var msg = evt.data;
}
The code to kick off that event looks similar to the following:
window.parent.window.postMessage(data, target);
The idea is that this code is in an iframe and it is trying to send a message to the main default.html where it is hosted. It finds its parent window.parent and then calls its parent’s window.postMessage function. We cover this scenario in detail when we discuss how to work with passing messages between iframe elements securely during Hour 7.
Further Exploration
More information on the sandbox property of the iframe element is available at http://msdn.microsoft.com/en-us/library/windows/apps/hh441129.aspx.
Excellent resources to help with Windows Store app development are the Windows SDK samples at the following location: http://code.msdn.microsoft.com/windowsapps/Windows-8-Modern-Style-App-Samples.
When browsing the samples online, keep in mind they can be filtered by language and subject. It is also possible to search for keywords. Clicking the See All link to the left of the description provide the following link, where we can filter the samples: http://code.msdn.microsoft.com/windowsapps/site/search?f%5B0%5D.Type=User&f%5B0%5D.Value=Official%20Windows%20SDK%20Sample.
Taking some time and working through the samples is worthwhile. Unfortunately, they aren’t sorted in any particular order after they’re downloaded. As we move through the book, the folder names of the examples that are relevant to the topics of that hour are called out in the “Further Exploration” sections. The samples of interest for this hour are
• Navigation and navigation history sample
• HTML page controls sample
• Integrating content and controls from web services sample
• JavaScript iframe sandbox attribute sample
Summary
Out of the box, Visual Studio templates provide a lot of functionality that enables us to create great-looking sites. We looked at three of the five templates in detail and talked about the last two. We were able to see how the navigation works in these templates, how the security context works for our apps, how that can affect navigation, and how we load content locally and from the web. Finally, we saw how it is possible to pass data to and glean data from the different contexts within our app.
Q&A
Q. For a typical app, should I start with the Blank App project template or another?
A. Rarely does it make sense to start with the Blank App project template. Instead, either the Split App or the Grid App is a better choice, depending on your needs. If there is no need for data to be loaded, the Navigation App is a good choice.
Q. Can I load content from the web directly into my app?
A. Yes! web content can be added using iframe elements. Information can be passed to and from the iframe using the window.postMessage function.
Q. When running in local context, can I reference scripts on the web?
A. No. For scripts to be loaded in the local context, they must be packaged with the app. If a remote script must be referenced, the page that needs that script must reside in an iframe.
Workshop
Quiz
1. The PageControlNavigation is part of Windows Library for JavaScript (WinJS). True or false?
2. When making a game using a canvas, the best app project template to start with is the Fixed Layout App project template. True or false?
3. When page controls are loaded, the WinJS library is duplicated if it is referenced in the main default.html and the page control .html pages. True or false?
4. Which is the preferred navigation model, multipage navigation or single-page navigation?
Answers
1. False. PageControlNavigation is generated from boilerplate code when the applications are generated. In code, we access it just as if it were a WinJS control, but it isn’t part of the base.js or ui.js files that make up WinJS.
2. True. The primary purpose of the Fixed Layout App project template is to give game developers an easy way to use code that depends on a certain resolution.
3. False. The WinJS script files are not loaded multiple times when using page controls.
4. Single-page navigation is the preferred navigation model for Windows Store apps written with JavaScript.
Activities
1. Create a new Navigation App and create three page controls. Allow the user to switch among all three page controls in the single-page app.
2. Create a new Blank App and add multiple iframe elements. Create two page controls, and load those page controls into two iframe elements. The third iframe should reference content on the web. As you navigate in the web content iframe, notice the JavaScript console window in Visual Studio. Most likely, exceptions are logged where certain content can’t be loaded, such as with ActiveX controls or Flash plug-ins.