Hour 19. Making the RSS Aggregator App
What You’ll Learn This Hour:
• Renaming a Visual Studio solution, project, and folders
• Creating an RSS aggregation app to load desired feeds
• Showing a progress screen while data is dynamically loaded
• Keeping track of the scroll position of the ListView control
• Launching a web browser programmatically
We created the RSSReader app during Hour 12, “Using Remote Data.” We then updated the RSSReader during Hour 16, “Using Contracts and Extensions,” by enabling it to use search. Here we turn the simple app into an aggregator that enables the user to enter as many RSS feeds as desired.
The only new piece of functionality that we will look at during this hour is how to launch a web browser using the Windows.System.Launcher.launchUriAsync function. We want the content to look great in our app, but sometimes the user will want to go to the actual site to see the particular content. This can be especially true with sites that provide only a short paragraph with a link to read more.
Upgrading the RSSReader to the RSS Aggregator
We start the RSS Aggregator app by copying the latest RSSReader from Hour 16. We will copy and rename it to RSSAggregator. After renaming it, we will modify it so it can use more than a single feed.
After confirming that everything works, let’s copy the groupedItems and itemDetail folders using Windows Explorer from Hour 2GridAppGridApppages and paste them in our pages folder through the Solutions Explorer inside Visual Studio. Let’s open each .html file and change the WinJS CSS to use ui-light instead of ui-dark.
Now, instead of opening the split page, we want to open the groupedItems page just like the Grid project template does. We can open default.html and change the home text from
{home: '/pages/split/split.html'}
to
{home: '/pages/groupedItems/groupedItems.html'}
Now we can run the app and see that the RSS feed is being populated (although it needs some styling help). If we click any of the posts, it will crash: The groupedItems page wants to use a function that we removed from the Split template when we created the RSSReader during Hour 12.
We need to add the following two functions (from the default Grid template project) to the RSS Aggregator’s data.js after defining the namespace:
function getItemReference(item) {
return [item.group.key, item.title];
}
function resolveItemReference(reference) {
for (var i = 0; i < groupedItems.length; i++) {
var item = groupedItems.getAt(i);
if (item.group.key === reference[0] && item.title === reference[1]) {
return item;
}
}
}
The functions are built in to the Split and Grid project templates and help the pages find an item using different information. Now we need to add the two functions to the namespace so that the pages can actually see them:
WinJS.Namespace.define("Data", {
items: groupedItems,
groups: groupedItems.groups,
getItemsFromGroup: getItemsFromGroup,
getItemReference: getItemReference,
resolveItemReference: resolveItemReference,
refreshFeeds: refreshFeeds
});
In groupedItems.js, we can change the navigateToGroup function from
navigateToGroup: function (key) {
nav.navigate("/pages/groupDetail/groupDetail.html", { groupKey: key });
},
to
navigateToGroup: function (key) {
nav.navigate("/pages/split/split.html", { groupKey: key });
},
So now if we click on the group title, it goes to the split screen we set up originally in the RSSReader project. We need to make the groupedItems.html page use the ui-light.css WinJS style sheet to match the rest of the app. We need to make the same change to the itemDetail.html page as well.
To make sure our grid functionality in our RSS Aggregator works with more than a single feed, as with the RSSReader, let’s change the feeds initialization to include another blog. We can change the feeds initialization in the data.js file:
var feeds = [
{
key: "http://blogs.msdn.com/b/b8/atom.aspx",
title: "Building Windows 8"
},
{
key: "http://blogs.msdn.com/b/windowsappdev/rss.aspx",
title: "Windows 8 app dev"
}
];
This additional blog tests the aggregator with more than one feed, plus it uses Atom instead of RSS to make sure the logic added in the past works as expected. If we run it, we will not see any difference because we assumed in the RSSReader code that we would have only a single feed. Let’s modify the refreshFeeds function.
We need to change the following line
return getFeed(feeds[0].key)
to this:
var promises = [];
feeds.forEach(function (feed) {
var promise = getFeed(feed.key)
We can close out the forEach that we added by adding the following code right before we close the function:
promises.push(promise);
});
return WinJS.Promise.join(promises);
Still inside the refreshFeeds function, let’s change the call to getItemsFromXml to pass in feed instead of feeds[0].
When we created the RSSReader app, we modified Split.js to assume a single group. We need to revert the code to the way the template had it. In the ready function of split.js, we need to change the initialization of the _group variable:
this._group = (options && options.groupKey) ?
Data.resolveGroupReference(options.groupKey) : Data.groups.getAt(0);
We need to also add the function back into our Data.js file after the namespace definition:
function resolveGroupReference(key) {
for (var i = 0; i < groupedItems.groups.length; i++) {
if (groupedItems.groups.getAt(i).key === key) {
return groupedItems.groups.getAt(i);
}
}
}
Finally, we need to expose the function through the namespace:
WinJS.Namespace.define("Data", {
items: groupedItems,
groups: groupedItems.groups,
getItemsFromGroup: getItemsFromGroup,
getItemReference: getItemReference,
resolveItemReference: resolveItemReference,
resolveGroupReference: resolveGroupReference,
refreshFeeds: refreshFeeds
});
Now when we run it, we can see that the Building Windows 8 blog is also displayed along with the original Windows 8 app dev. We can tap on either of the headers to go to the correct group in the split view page.
Cleaning Up the UI
Now that we have the data being pulled for multiple feeds and displaying in the app, let’s clean up the actual UI to make it more appealing. To begin, let’s open groupedItems.html and change the pagetitle from GridApp to RSS Aggregator.
In the itemtemplate, we can change subtitle to postDate, which comes from the getItemsFromXml function in data.js.
When we created the RSSReader, we removed the image from the Split App template, but let’s populate an image if one is present in the post. In data.js, let’s add the following call inside getItemsFromXml after we initialize the staticContent variable:
var staticContent = toStaticHTML(content.textContent);
var imageData = getImage(staticContent);
We must be sure to include the imageData in the object we are pushing into the feedPosts array:
feedPosts.push({
group: feed,
key: feed.key,
link: postLink,
title: postTitle,
author: postAuthor,
postDate: postDate,
content: staticContent,
shortContent: toStaticHTML(content.textContent.substring(0, 400)),
backgroundImage: imageData.image
});
Now we add the actual getImage function after getItemsFromXml:
function getImage(content) {
var image = "";
var imgStart = content.indexOf("<img");
if (imgStart >= 0) {
imgStart += 5;
var imgEnd = content.indexOf(">", imgStart);
var srcStart = content.indexOf("src=", imgStart) + 5;
var srcEnd = content.indexOf('"', srcStart);
image = content.substring(srcStart, srcEnd);
}
return {
image: image
};
}
The getImage function is simply taking in the content of the post and parsing it to find the first img tag. When it finds the tag, it sets the value to everything between quotation marks in the src attribute.
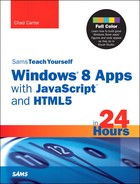
Now when we run it, we see images. Some of the posts don’t have images because the post has no img tag. This is why we set the image to an empty string. We can see that the images that are present are skewed; they fill up the entire space regardless of their original size and aspect ratio. See Figure 19.1.
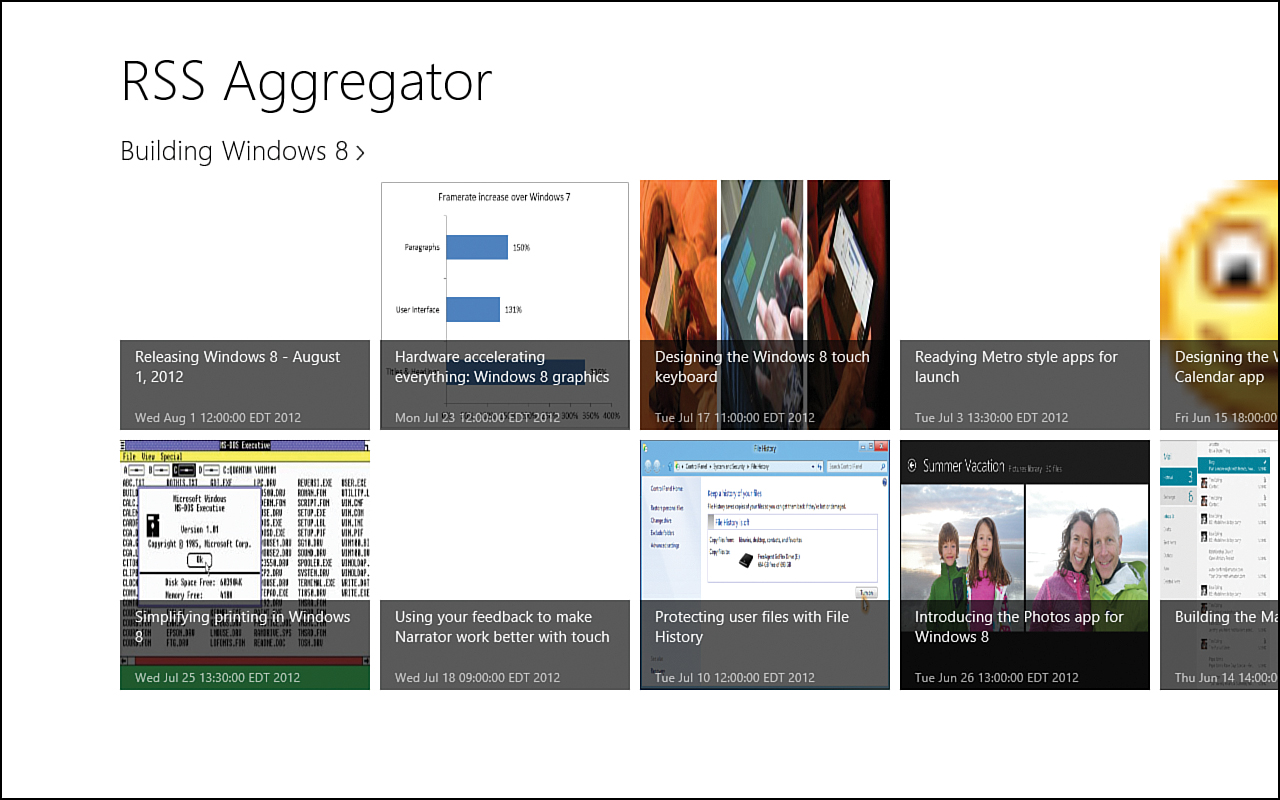
Figure 19.1. The RSS Aggregator is now allowing multiple feeds and displaying available images for each post. However, the images are skewed and do not look right.
Let’s modify the getImage function to set the sizing information for the images. We can also set a background color for the items that don’t have an image or that are using a transparent 1×1-pixel image for tracking purposes.
We can add the following variables inside the getImage function after the image declaration and initialization:
var color = "orange";
var templateWidth = 250;
var templateHeight = 250;
var width = templateWidth;
var height = templateHeight;
var imageWidth;
var imageHeight;
var left = 0;
var top = 0;
Next, we can resize code right after we declare and initialize the srcEnd variable:
var wStart = content.indexOf("width=", imgStart) + 6;
var wEnd = content.indexOf(" ", wStart);
imageWidth = parseInt(content.substring(wStart, wEnd));
var hStart = content.indexOf("height=", imgStart) + 7;
var hEnd = content.indexOf(" ", hStart);
imageHeight = parseInt(content.substring(hStart, hEnd));
width = imageWidth;
height = imageHeight;
//determine if we need to resize according to width or height
var w = imageWidth / templateWidth;
var h = imageHeight / templateHeight;
if (w >= h) {
width = templateWidth;
var ratio = width / imageWidth;
height *= ratio;
//vertically center the image
top = Math.abs(templateHeight - height) / 2 | 0;
}
else {
height = templateHeight;
var ratio = height / imageHeight;
width *= ratio;
//horizontally center the image
left = Math.abs(templateWidth - width) / 2 | 0;
}
We are using the same logic we used for the FingerPainting app when we allowed the user to pick a file and set the background image of the canvas. Similarly to how we extracted the value of the src attribute of the img element, we are grabbing the width and height if it is associated to the image element. It has been modified slightly to use 250 for the width and height because that is what the template is using.
Outside the condition, right before the return, we need to add "px" to the variables and return them to the calling function:
width = width + "px";
height = height + "px";
left = left + "px";
top = top + "px";
return {
image: image,
width: width,
height: height,
color: color,
left: left,
top: top
};
Next, we need to add the image data we return from this function to the object being passed to the feedPosts in the getItemsFromXml function:
// Store the post info we care about in the array
feedPosts.push({
group: feed,
key: feed.key,
link: postLink,
title: postTitle,
author: postAuthor,
postDate: postDate,
content: staticContent,
shortContent: toStaticHTML(content.textContent.substring(0, 400)),
backgroundImage: imageData.image,
width: imageData.width,
height: imageData.height,
color: imageData.color,
left: imageData.left,
top: imageData.top
});
Finally, we need to actually apply the styles to the template. Let’s replace the current img element inside the itemtemplate in the groupedItems.html page to be the following:
<img class="item-image" src="#" data-win-bind="src: backgroundImage;
alt: title; style.width: width; style.height: height;
style.marginTop: top; style.marginLeft: left;
style.backgroundColor: color;" />
If we wanted the images to always be at the top and not centered vertically, we could remove the style.marginTop: top; from the binding. We can run it and see a much better-looking hub page (see Figure 19.2).
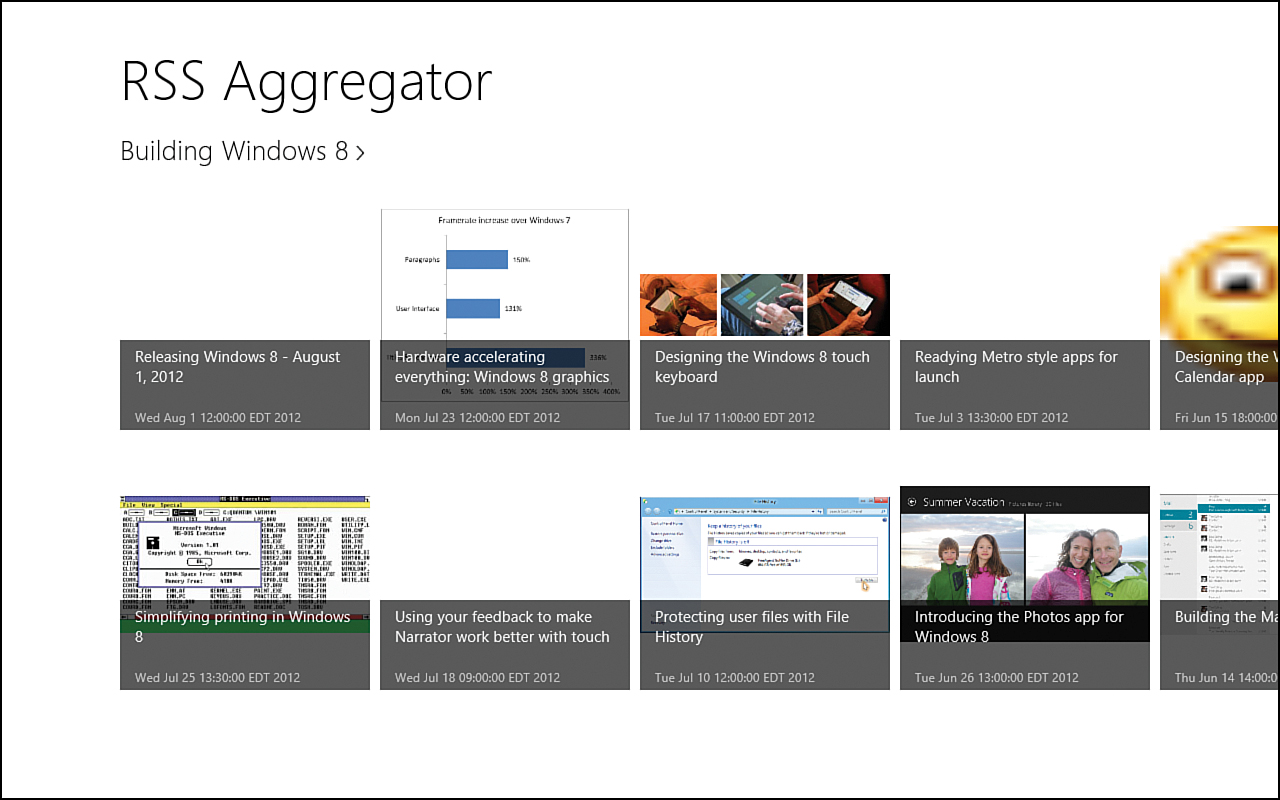
Figure 19.2. With a little bit of data binding and styling, the images are being displayed as expected.
If we drill down into a post, we can see that the itemDetail page is trying to show an image at the beginning of the article. Although we could also bind the image to this slot, it might not make sense because the image will be displayed within the content, possibly at the beginning of the post. Because of this, we simply remove the img element from the itemDetail.html page:
<img class="item-image" src="#" />
We also need to remove the following two lines from itemDetail.js:
element.querySelector("article .item-image").src = item.backgroundImage;
element.querySelector("article .item-image").alt = item.subtitle;
We can set the subtitle to the following information:
element.querySelector("article .item-subtitle").textContent =
"by " + item.author + " on " + item.postDate;
Now when we drill down into an item, the image is gone and the author and date are displayed instead of undefined, where it was trying to find a nonexistent subtitle. If we click on the actual group from the groupedItems (hub) page, we are taken to the split page created in the original RSSReader project. To have a little more consistency, let’s modify the split.html to also show “by author on date” and also switch around the class so that the name and date pop a little more than they did before:
<h6 class="item-subtitle">by </h6>
<h6 class="win-type-ellipsis"
data-win-bind="textContent: author"></h6>
<h6 class="item-subtitle"> on </h6>
<h6 class="win-type-ellipsis"
data-win-bind="textContent: postDate"></h6>
Now we can see the name and date displayed while the extra text fades into the background. While we are working on the style, we can add in a 2,560×1,440 background image called rss-feed-large.png and place it in the images folder. (The image can be found in the Hour19 folder.) Then inside groupedItems.css, we can add the following CSS rule:
.groupeditemspage .win-listview {
background-image: url('/images/rss-feed-large.png');
background-repeat: no-repeat;
}
Let’s change the color of the pagetitle across all pages to orange by adding the following property to the appropriate CSS rule in the default.css file:
.fragment header[role=banner] .titlearea .pagetitle {
width: calc(100% - 20px);
color: orange;
}
Now let’s make the group title on the hub page a shade of blue by changing the following rule in the groupedItems.css file:
.groupeditemspage .groupeditemslist .group-header .group-title {
display: inline-block;
color: #013CA5;
}
.groupeditemspage .groupeditemslist .group-header .group-chevron {
-ms-grid-column: 3;
display: inline-block;
color: #013CA5;
}
Besides making the title blue, we are making the arrow/chevron blue as well. Similarly, we can add the same shade of blue to the post title in the itemDetail.css file:
.itemdetailpage .content article header .item-title {
margin-bottom: 19px;
color: #013CA5;
}
Instead of just using the color of orange when no image is present, let’s loop through a predetermined list of colors. We can implement this through a data binding converter function. Let’s add a new JavaScript file to the js folder called utility.js. We can add the following code to the newly created utility.js file:
"use strict";
(function () {
WinJS.Namespace.define("STYWin.Utility", {
getNextColor: WinJS.Binding.converter(getNextColor)
});
var colorCount = 0;
var colors = ["#FFBD87", "#FFE5CE", "linen", "#FFEBE8", "#FFE2B2"];
function getNextColor() {
colorCount++;
return colors[(colorCount - 1) % colors.length];
}
})();
We can reference the JavaScript file immediately following the reference to /js/data.js in default.html:
<script src="/js/utility.js"></script>
Then to actually use the converter function, let’s make the following changes to groupedItems.html:
<div class="itemtemplate" data-win-control="WinJS.Binding.Template">
<div class="item" data-win-bind="style.backgroundColor:
color STYWin.Utility.getNextColor">
<img class="item-image" src="#" data-win-bind="src: backgroundImage;
alt: title; style.width: width; style.height: height;
style.marginTop: top; style.marginLeft: left;
style.backgroundColor: color;" />
We added the background color to the parent item div and are now using the getNextColor converter function. The color property is being ignored, even though it is being set by data.js. We removed the background color from the img element, along with the top margin value. We removed the top margin that so it will always be at the top of the div instead of centered, as it was before. This looks nicer than having it centered vertically because the bottom of the div contains the title of the post. If we run the app with the latest style changes, we see a result similar to Figure 19.3.
Figure 19.3. The RSS Aggregator now has a background image for the hub page, and different-colored backgrounds are being displayed.
Loading the Feeds Dynamically
We don’t want to block the UI while we load feeds. Although we showed how to block the UI in the simple RSSReader app, it is a bad practice; if it goes over 5 seconds, the app will fail certification. A better approach is to show a progress control while we are loading the data. To get started, let’s remove the call to refreshFeeds inside the default.js:
args.setPromise(WinJS.UI.processAll().then(function () {
return Data.refreshFeeds();
})
.then(function () {
Now we can call refreshFeeds in the groupedItems ready function. We can add this to the end of the ready function in groupedItems.js:
if (!Data.groups) {
var self = this;
Data.refreshFeeds().then(function () {
self._initializeLayout(listView, appView.value);
});
}
We refresh the feeds only if we don’t already have data. This causes the page to come up (instead of the splash screen staying up), but depending on how many feeds we will have and how long it takes to pull the data, the user could be staring at a blank screen thinking that the app is hung. Let’s add a progress bar to show the user that we are fetching data to show. We can add the following markup to groupedItems.html as the very first element inside the Main content section:
<div class="fetchingresults">
<label class="win-type-xx-large">
<progress class="win-ring win-large"></progress>
Fetching ...
</label>
</div>
We can add the following corresponding rules for the progress control in the groupedItems.css:
.groupeditemspage section[role=main] .fetchingresults {
position: absolute;
top: 300px;
left: 120px;
color: #013CA5;
}
progress.win-large {
color: orange;
background-color: transparent;
height: 10px;
}
Back inside the groupedItems.js file let’s, replace the _initializeLayout function with the following code:
// This function updates the ListView with new layouts
_initializeLayout: function (listView, viewState) {
/// <param name="listView" value="WinJS.UI.ListView.prototype" />
document.querySelector(".fetchingresults").style.display = "block";
if (Data.groups) {
if (viewState === appViewState.snapped) {
listView.itemDataSource = Data.groups.dataSource;
listView.groupDataSource = null;
listView.layout = new ui.ListLayout();
} else {
listView.itemDataSource = Data.items.dataSource;
listView.groupDataSource = Data.groups.dataSource;
listView.layout = new ui.GridLayout({ groupHeaderPosition: "top" });
}
document.querySelector(".fetchingresults").style.display = "none";
}
},
We want to make sure that we try to populate the list view only if we actually have data in our groups. Before checking to see if we have data, we make sure the progress bar is visible. Likewise, we added the line to hide the progress bar by setting the display to none if we actually have posts to display.
So when the layout gets set up (the site loads, switches between monitors, snaps, unsnaps, and so on), the _initializeLayout function is called. Inside the function, we always display the progress control. If we have data and are ready to show it onscreen, as soon as the listView has the data we hide the progress control because it is inside the condition. However, if there is no data yet, the progress bar continues to display until this function is called again when data is present.
We can run the app and see the progress bar indicating that the feeds are being fetched. See Figure 19.4.

Figure 19.4. The progress ring with the text Fetching lets the user know that is coming soon.
Making Search Work with Multiple Feeds
Because we are using more than one feed, we need to fix our search code. When this app was just a single RSS reader, it sent users to the split page, but now we want the users to go to the itemDetail page after they tap on a search result. To do this, we need to open the pagessearchsearchResults.js file and modify _itemInvoked, as follows:
_itemInvoked: function (args) {
args.detail.itemPromise.done(function itemInvoked(item) {
nav.navigate("/pages/itemDetail/itemDetail.html", {
item: Data.getItemReference(item.data)
});
});
},
The itemDetail page expects an array with the first value being the key and second item being the title. It calls Data.getItemReference, so we are calling the exact same function. The item value passed in when the item is invoked contains all the information about the item in the data property. We can pass that in and get back the array that itemDetail needs to load the post.
Styling Snap View
If we look at the snapped view for the itemDetail or split, we see results as we would expect. However, if we snap the app while on the groupedItems (hub) page, we see that the styling is way off. Fortunately, a little CSS can clear this up.
Inside the groupedItems.css file, we can make modifications inside the snapped media query:
@media screen and (-ms-view-state: snapped) {
We are going to remove the image from snapped view and remove the subtitle. We also are going to make sure the data spans both columns (main column and left column, where the image was). To begin, let’s modify the following rule to hide the image:
.groupeditemspage .groupeditemslist .item {
-ms-grid-columns: 0px 1fr;
-ms-grid-rows: 1fr;
display: -ms-grid;
height: 60px;
width: 272px;
}
We simply changed 60px to 0px because we don’t really want the first column to have any width. Now we can hide the image by adding the following CSS rule to the bottom of the media query:
.item-image {
display: none;
}
Next, we can hide the subtitle because we don’t have any information on the feed itself. To do this, we replace the contents of the following rule to not display anything:
.groupeditemspage .groupeditemslist .item .item-overlay .item-subtitle {
display: none;
}
Finally, we need the data to span both columns; currently, it is bunched up where the image was. We can add the following CSS rule to the end of the snapped media query:
.item-info {
-ms-grid-column-span: 2;
}
Now when we run our app, the snapped view is styled nicely. Figure 9.5 shows the before-and-after of the snapped view of the hub page.
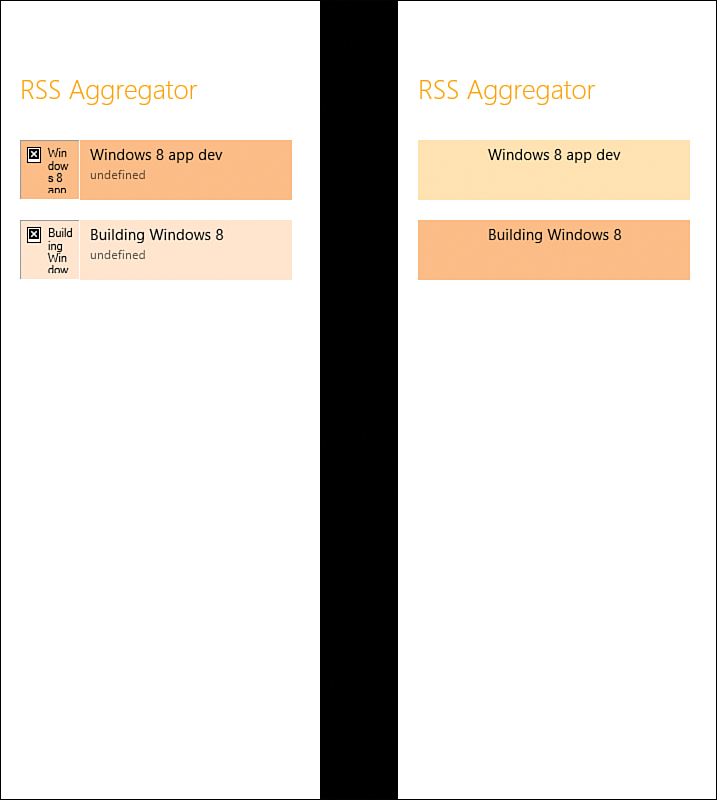
Figure 19.5. The snapped view of the RSS Aggregator app before and after modifying the item templates and applying CSS rules.
While we are making changes to the styles, let’s open the in split.css and style the selection element for this page. Instead of using the default purple, let’s make it orange to go with the rest of our site:
.splitpage .win-selectionstylefilled.win-listview
.win-selected .win-selectionbackground {
background-color: #E69500;
}
Using the DOM Explorer makes it easy to determine which rules we need to override. By selecting an element, it showed the previous rule without the .splitpage on the front of the rule. By simply adding the .splitpage, we are isolating our change to our page. If we want the style across all the pages, we can place it in default.css and remove the .splitpage part of the rule.
Allowing the User to Enter Feed URLs
Our app is functioning the way we want so far, and we are able to display more than one feed. But currently, the feeds are hardcoded in the data.js file. This isn’t desired. We want a general-purpose RSS aggregator that enables users to add as many of their favorite feeds as they want.
To enable this functionality, let’s add an app bar to the app. We can add the following markup to the default.html page:
<div id="addFeedFlyout" data-win-control="WinJS.UI.Flyout"
aria-label="{Add RSS Feed Flyout}" >
<div><input id="rssFeedUrl" type="url" placeholder="RSS Feed URL"
required="required" /></div>
<div><button id="addRSSFeed">Add RSS Feed</button></div>
</div>
<div id="appbar" data-win-control="WinJS.UI.AppBar">
<button data-win-control="WinJS.UI.AppBarCommand"
data-win-options="{id:'cmdAdd',label:'Add',icon:'add',section:'global',
tooltip:'Add Feed', type:'flyout', flyout: 'addFeedFlyout'}"></button>
<button data-win-control="WinJS.UI.AppBarCommand"
data-win-options="{id:'cmdView', label:'View', section:'selection',
icon:'view', extraClass:'postSelect',
tooltip:'View Post in Browser'}"></button>
<button data-win-control="WinJS.UI.AppBarCommand"
data-win-options="{id:'cmdSort',label:'Sort',icon:'sort',
section:'selection',extraClass:'feedSort',
tooltip:'Sort Feeds'}"></button>
<button data-win-control="WinJS.UI.AppBarCommand"
data-win-options="{id:'cmdDelete',label:'Delete',icon:'delete',
section:'selection',extraClass:'feedSelect',
tooltip:'Delete Feed'}"></button>
</div>
Updating the App Bar
The app bar will have an Add button and a Sort button in the global section (on the right side). It will also have a View in Browser button and a Delete button. The Add button will cause a flyout to open where the user can enter the URL address. Let’s create a new appbar.js file under the /js folder. The following code can go inside the newly created appbar.js file:
"use strict";
(function () {
WinJS.Utilities.ready(function () {
//hook up handler for add rss feed button in flyout
document.getElementById("addRSSFeed")
.addEventListener('click', addRSSFeed, false);
});
})();
We have hooked up an event handler for the Add button in the flyout. We can now create the addRSSFeed event handler and add it after the ready function in appbar.js:
function addRSSFeed(e) {
var rssFeedUrl = document.getElementById('rssFeedUrl');
if (rssFeedUrl.value.length > 0) {
//hide flyout on successful data entry and clicking button
document.getElementById("addFeedFlyout").winControl.hide();
Data.addRSSFeed(rssFeedUrl.value)
.then(function () {
var page = WinJS.UI.Pages
.get("/pages/groupedItems/groupedItems.html");
var listView = document
.querySelector(".groupeditemslist").winControl;
page.prototype._initializeLayout(listView,
Windows.UI.ViewManagement.ApplicationView.value);
rssFeedUrl.value = '';
document.getElementById("appbar").winControl.hide();
})
.done(null, function (err) {
STYWin.Utility.showNonCriticalError(err.toString());
});
}
}
If a URL is entered, we hide the flyout and then call a new function in the Data namespace called addRSSFeed, passing in the URL. Inside the promise, we add a reference to the groupedItems page and call the _initializeLayout function to have it refresh the page. The key is that it sets the itemDataSource and groupDataSource on the listView control. We could have done that and called listView.forceLayout() to get it to update. However, initializeLayout also takes into consideration whether we are in a snapped view state. The _ in _initializeLayout means it is meant to be a private function. However, we still have access to it through the prototype. But if we want to be correct (and have time and space), we should either rename the function without the underscore prefix or expose that private function with a new public function.
After updating the list view, we hide the app bar and display any error. We add that function inside the utility.js file:
function showNonCriticalError(message) {
var nonCriticalError = document.getElementById("nonCriticalError").winControl;
document.getElementById("errormessage").innerHTML =
"<b>An Error Occurred: " + message + "</b>";
nonCriticalError.show(document.querySelector("header"));
}
We also need to expose the showNonCriticalError function in the STYWin.Utility namespace. We need to add the flyout to the default.html file:
<div id="nonCriticalError" data-win-control="WinJS.UI.Flyout"
aria-label="{Non-Critical Error}" >
<div id="errormessage"></div>
</div>
We can style the error message by adding the following CSS rule at the top of the default.css file:
#errormessage {
color: red;
}
We need to reference the appbar.js file at the end of the reference list in the default.html file:
<script src="/js/appbar.js"></script>
Let’s add the addRSSFeed function to the data.js file:
function addRSSFeed(url) {
var feed = {
key: url,
title: 'tbd'
};
return processFeed(feed);
}
We expose the addRSSFeed function through the Data namespace by adding the following to the end of the namespace definition:
, addRSSFeed: addRSSFeed
Refactoring the Code
Now we refactor some code. We strip out part of refreshFeeds and place it into the processFeed function. The processFeed function is called from refreshFeeds and from the addRSSFeed we just added. Let’s replace the existing refreshFeeds function with the following two functions:
function refreshFeeds() {
var promises = [];
feeds.forEach(function (feed) {
var promise = processFeed(feed);
promises.push(promise);
});
return WinJS.Promise.join(promises);
};
function processFeed(feed) {
var xml;
return getFeed(feed.key)
.then(function (request) {
xml = request.responseXML;
return getItemsFromXml(xml, feed);
}).then(function (numberOfPosts) {
// Now feedPosts is fully populated ...
list = new WinJS.Binding.List(feedPosts);
groupedItems = list.createGrouped(
function groupKeySelector(item) { return item.group.key; },
function groupDataSelector(item) { return item.group; }
);
Data.items = groupedItems;
Data.groups = groupedItems.groups;
});
}
The code logic didn’t change; we just refactored a little. Because we will be adding RSS feeds from the user, we want to pull the name of the feed from the feed itself. The user will only enter the URL; we need to find and apply the name of the feed to our list. Let’s add the following code to the newly created processFeed function right before we bind the feedPosts to the list variable:
//Let's set the feed name
var title = xml.querySelector("feed > title") ||
xml.querySelector("title");
if (title) {
feed.title = title.textContent;
}
Sorting the Feeds
When we run the app, we can now add RSS feeds to our app. However, the screen just refreshes and we are at the beginning of our list instead of seeing the feed that was just added. Let’s modify the feed group data we are storing to also store a sort value. We can replace the initialization of feeds in data.js to the following:
var feeds = [
{
key: "http://blogs.msdn.com/b/b8/atom.aspx",
title: "Building Windows 8",
sort: 1
},
{
key: "http://blogs.msdn.com/b/windowsappdev/rss.aspx",
title: "Windows 8 app dev",
sort: 2
}
];
Let’s replace the addRSSFeed function in data.js with the following, which uses the sort value and also adds the feed to the list of feeds so that we can accurately set the following sort order:
function addRSSFeed(url) {
var feed = {
key: url,
title: 'tbd',
sort: feeds.length + 1
};
return processFeed(feed).then(function () {
feeds.push(feed);
});
}
We are simply setting the sort value of the feed to the order each one is added by setting it to the length of the feeds array. We also make sure we add this feed to the feeds array so that our sort will be valid next time.
To make sure the feeds are sorted on the screen correctly, we need to implement the group sorter. In the last promise of the processFeed function, let’s replace the initialization of groupedItems with the following code:
groupedItems = list.createGrouped(
function groupKeySelector(item) { return item.group.sort; },
function groupDataSelector(item) { return item.group; },
function compareForSort(item1, item2) { return item1 - item2; }
);
For the groupKeySelector, we changed it from keying off the item.group.key (the URL) to keying off the sort. Because we are always incrementing the sort number, this should work for now. We will run into problems if we try to implement a delete functionality, but we can either reset all the sorts when we perform a delete or have a more robust sort-setting algorithm than just checking the length of the feeds we have. We will cross that bridge when we get there.
Updating the Scroll Position
For now, we need to scroll the position to the feed that was just added. Because we know that it will be added to the end of the list, we can check the number of total posts we have before we add the new feed. Then we can determine how many we have after the feed is added. We will try to add seven posts past the last post that was present if the new feed has at least seven posts. Otherwise, we will just add however many new posts there are. The code for this is in the addRSSFeed in appbar.js. Right before we call the Data.addRSSFeed function, we can add this line of code:
var currentNumberOfPosts = Data.items.length;
Right before we clear the rssFeedUrl textbox, after we call _initializeLayout, let’s add the following code:
var nav = WinJS.Navigation;
var newPostCount = Data.items.length - currentNumberOfPosts;
var ensureVisiblePostIndex = currentNumberOfPosts +
(newPostCount < 7 ? newPostCount : 7);
nav.navigate("/pages/groupedItems/groupedItems.html", {
ensureVisiblePostIndex: ensureVisiblePostIndex
});
We are determining where we need to scroll the user to when a new feed is added. We then store this value and navigate to the main home page. We are simply grabbing the current number of items and then counting the total items after adding the new feed. If the number of posts is less than 7, we use that number; otherwise, we use 7. We are then redirecting to the groupedItems page and passing in the value.
Let’s add a condition inside the groupedItems page to handle this value. We can add the following code in the ready function of the groupedItems page right before we call this._initializeLayout:
if (options && options.ensureVisiblePostIndex) {
msSetImmediate(function () {
listView.ensureVisible(options.ensureVisiblePostIndex);
});
}
We are using the same msSetImmediate and ensureVisible calls that we did when we created the original RSSReader app, to make sure that the post index being passed in is visible onscreen. We can run the app and see when we add a new RSS feed that the app scrolls to the left to where the new feed is visible.
Keeping Track of the Scroll Position
When users drill into an item, we want to make sure that when they click Back, they return to the same location as before they left. Always starting at the beginning of the ListView control is not acceptable. This seems like a good fit for session state, so let’s create a new JavaScript file called sessionstate.js in the js folder, with the following contents:
"use strict";
(function () {
var SessionState = {};
SessionState.scrollPosition = 0;
WinJS.Namespace.define("STYWin.SessionState", SessionState);
})();
We can reference the session state JavaScript file in default.html after we reference /js/data.js.
<script src="/js/sessionstate.js"></script>
Next, we want to track when someone invokes an item and goes to the itemDetail page or the split page where we will store his scroll position in session state. Let’s add the following code to the beginning of navigateToGroup in the groupedItems.js file:
var listView = document.querySelector(".groupeditemslist").winControl;
STYWin.SessionState.scrollPosition = listView.scrollPosition;
We need to add the previous code to the very beginning of the _itemInvoked function as well.
Then we need to read that saved value back in and update our list view when we come back to the page. Inside the _initializeLayout function, we can add the following code right before we set the fetchingresults display to none:
msSetImmediate(function () {
if (STYWin.SessionState.scrollPosition > 0)
listView.scrollPosition = STYWin.SessionState.scrollPosition;
});
We also need to set the scroll position to 0 when a new RSS feed is added. Inside addRSSFeed in appbar.js, we add the following statement:
var ensureVisiblePostIndex = currentNumberOfPosts +
(newPostCount < 7 ? newPostCount : 7);
STYWin.SessionState.scrollPosition = 0;
nav.navigate("/pages/groupedItems/groupedItems.html", {
ensureVisiblePostIndex: ensureVisiblePostIndex
});
Now if we run the app, scroll to a place in the list, invoke either a group or an item, and then go back to the list, the scroll position will be the same.
Adding the View in Browser Capability
Let’s hook up the View in Browser app bar button. This button should be present only on the itemDetail page. At least, that is all we will be implementing. It could actually be used on the split page as well, but we won’t add that in these pages. The idea is that, once users drill down into a particular post, they may want to see it formatted as it was originally intended on the website. So they should be able to click the View in Browser button and have the web browser launch and take them where they want to be.
Inside default.js in the WinJS.UI.processAll promise, right before the nav.location condition, let’s add the following code:
var appbar = document.getElementById("appbar").winControl;
appbar.showOnlyCommands(["cmdAdd"]);
When the app bar is loaded, we ensure that only the cmdAdd button is being shown. Now in the itemDetails page, we can add the following code at the end of the ready function:
STYWin.SessionState.postLink = item.link;
var appbar = document.getElementById("appbar").winControl;
appbar.showCommands(["cmdView"]);
document.getElementById("cmdView")
.addEventListener('click', STYWin.Utility.viewInBrowser, false);
Next, we can add the following unload function after the ready function in the itemDetails page:
,unload: function () {
var appbar = document.getElementById("appbar").winControl;
appbar.hideCommands(["cmdView"]);
document.getElementById("cmdView")
.removeEventListener('click', STYWin.Utility.viewInBrowser, false);
}
When we load the page, we are showing the cmdView button and hooking into the event to call a function that will actually do the work of launching the web page. We are also storing the link of the post in session state. When we leave the page, we are hiding the button and removing the event handler.
We can add the viewInBrowser function to the utility.js file:
function viewInBrowser(evt) {
var uriToLaunch = STYWin.SessionState.postLink;
var uri = new Windows.Foundation.Uri(uriToLaunch);
var launcherOptions = new Windows.System.LauncherOptions();
launcherOptions.treatAsUntrusted = true;
Windows.System.Launcher.launchUriAsync(uri).then(
function (success) {
if (success) {
//good
} else {
//bad
}
});
}
As usual, we also need to expose the function in our namespace:
WinJS.Namespace.define("STYWin.Utility", {
getNextColor: WinJS.Binding.converter(getNextColor),
showNonCriticalError: showNonCriticalError,
viewInBrowser: viewInBrowser
});
The code uses WinRT to launch the web browser. We are telling the launcher to treat the content as untrusted. The URL we are using is from the link of the post we stored in session state. We have stubbed out conditions for success or failure, but we don’t write any code for this in this book. When launching something as untrusted, the user is greeted with the warning in Figure 19.6.
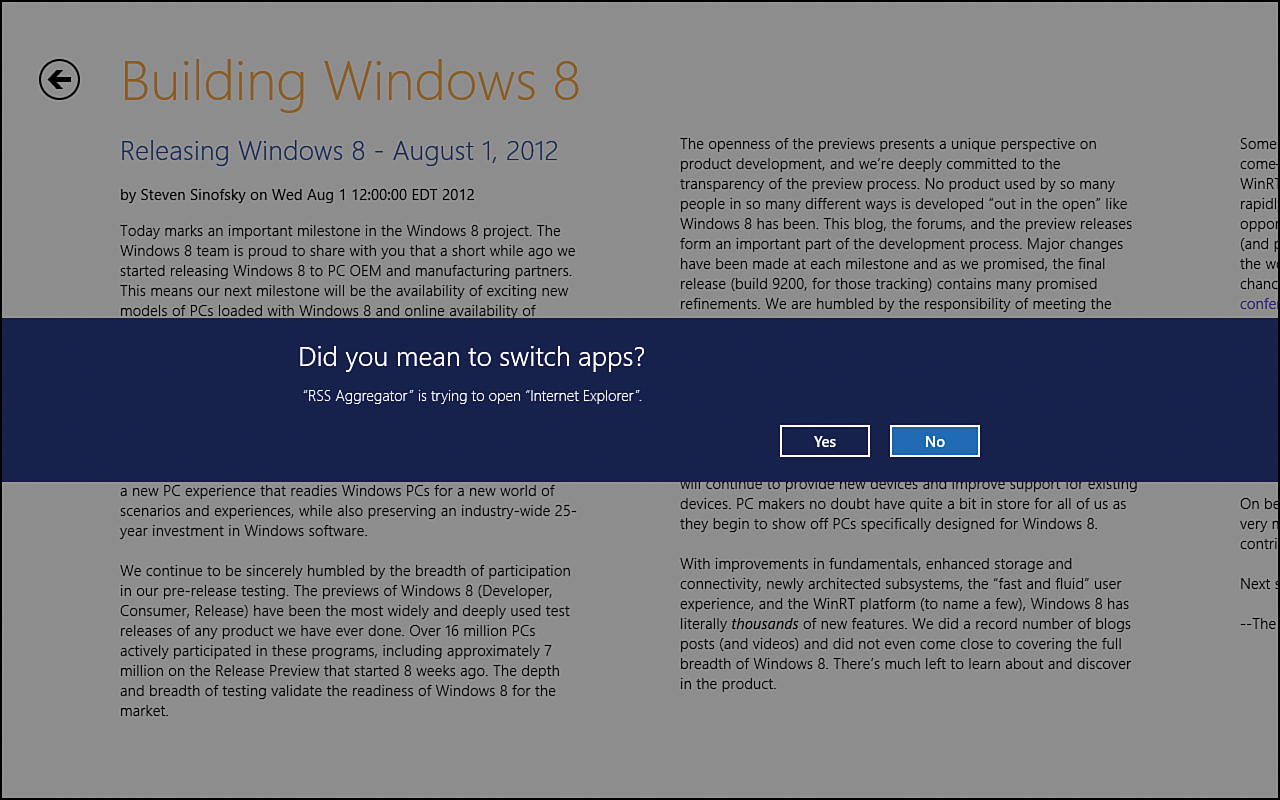
Figure 19.6. The user is presented a warning if an app tries to launch an item marked as untrusted.
Allowing the User to Remove Feeds
We have allowed users to add feeds; now we need to enable them to remove them as well. Let’s add the following flyout to the default.html page to handle the delete command on the app bar:
<div id="deleteFeedFlyout" data-win-control="WinJS.UI.Flyout"
aria-label="{Delete RSS Feed Flyout}" >
<div>Remove the feed from your list.</div>
<div><button id="deleteRSSFeed">Delete Feed</button></div>
</div>
We can also modify the app bar button to use the flyout by adding the following to the data-win-options of the cmdDelete button:
type:'flyout', flyout: 'deleteFeedFlyout'
At the end of the ready function of the split.js file, let’s add the following code to make the Delete button visible on the app bar and start listening for a click event:
var appbar = document.getElementById("appbar").winControl;
appbar.showCommands(["cmdDelete"]);
document.getElementById("deleteRSSFeed").onclick = function () {
WinJS.Promise.as(Data.deleteRSSFeed(options.groupKey))
.then(function () {
if (nav.canGoBack) {
//go back
nav.back();
} else {
nav.navigate("/pages/groupedItems/groupedItems.html");
}
});
};
Likewise, we can the following code that does the opposite in the unload function:
var appbar = document.getElementById("appbar").winControl;
appbar.hideCommands(["cmdDelete"]);
document.getElementById("deleteRSSFeed").onclick = null;
If the Confirm Delete button is pressed, we call the deleteRSSFeed function, which we create shortly. We wrap that in a promise, and when the function completes, we navigate to the home page. If there are any pages in history, we just go back one page; otherwise, we navigate to the home page directly.
Let’s open data.js and add the function that will do the actual feed manipulation and bind our data again:
function deleteRSSFeed(url) {
for(var i=0; i < feeds.length; i++) {
if (feeds[i].key === url) {
feeds.splice(i, 1);
break;
}
}
for (var p = 0; p < feedPosts.length; undefined) {
if (feedPosts[p].key === url) {
feedPosts.splice(p, 1);
} else {
p++;
}
}
bindList();
}
We are looping through the feeds to find the one to delete. Then we loop through all the posts to delete them. We then need to bind the list again so that it refreshes. We already have this code at the bottom of the processFeed function. Let’s refactor the code from the bottom of the processFeed function to create the following:
function bindList() {
list = new WinJS.Binding.List(feedPosts);
groupedItems = list.createGrouped(
function groupKeySelector(item) { return item.group.sort; },
function groupDataSelector(item) { return item.group; },
function compareForSort(item1, item2) { return item1 - item2; }
);
Data.items = groupedItems;
Data.groups = groupedItems.groups;
}
We also need to expose deleteRSSFeed in our Data namespace.
At this point, the user can tap the Delete command from the app bar and confirm that he or she wants to delete the feed. The app loops through the feeds and the feed posts to find each item in the group and remove them all. The app then sends the user back to the main hub page to see the feeds that are still there.
Saving the Feeds
As the user adds and removes feeds, the user expects the app to persist this information so that the app is showing the desired information. Here we save only the feed locations and obtain the individual posts every time. An enhancement is to actually save the posts as well.
Inside data.js, let’s add the following function:
function saveFeeds() {
var appData = Windows.Storage.ApplicationData.current;
var roamingSettings = appData.roamingSettings;
roamingSettings.values["feeds"] = JSON.stringify(feeds);
}
We can also replace the feeds variable with the following code:
var feeds = loadFeeds();
function loadFeeds() {
var appData = Windows.Storage.ApplicationData.current;
var roamingSettings = appData.roamingSettings;
if (!roamingSettings.values["feeds"]) {
return [{
key: "http://blogs.msdn.com/b/b8/atom.aspx",
title: "Building Windows 8",
sort: 1
},
{
key: "http://blogs.msdn.com/b/windowsappdev/rss.aspx",
title: "Windows 8 app dev",
sort: 2
}];
} else {
return JSON.parse(roamingSettings.values["feeds"]);
}
}
We check the roaming settings and if nothing is present, then the feeds are initialized with what we had previously. However, if something is present, those feeds are used instead. We need to expose the saveFeeds function through the Data namespace as well. The entire definition now looks like this:
WinJS.Namespace.define("Data", {
items: groupedItems,
groups: groupedItems.groups,
getItemsFromGroup: getItemsFromGroup,
getItemReference: getItemReference,
resolveItemReference: resolveItemReference,
resolveGroupReference: resolveGroupReference,
refreshFeeds: refreshFeeds,
addRSSFeed: addRSSFeed,
deleteRSSFeed: deleteRSSFeed,
saveFeeds: saveFeeds
});
We want to call saveFeeds from default.js. We handle the save during the checkpoint event:
app.sessionState.history = nav.history;
Data.saveFeeds();
We can also save the feeds when a feed is removed or added.
Now we can run the app and see that feeds are successfully being added to our roaming data, and we can read from it when we launch. Roaming data allows only 10K, so if we go over that amount, the data won’t actually roam. We can check the size of the JSON string and notify the user that the list won’t roam due to the number of feeds. If we had our own cloud service, we could store the additional ones there.
Further Exploration
We introduced the Launcher class, which enables us to launch a web browser. It also allows us to launch files, assuming that our app is in the foreground. For example, we could launch Word or Excel by launching a .docx or .xlsx file (assuming that the user has Office installed). It does not allow launching any files that execute code, such as .msi, .exe, and .js files. More information on this class can be found in the MSDN documentation at: http://msdn.microsoft.com/en-us/library/windows/apps/windows.system.launcher.aspx.
In addition to the documentation, Microsoft has the “Association launching” Windows SDK sample, which shows not only how to launch a file, but also how to associate a file to our app. This is beneficial if we have our own file format or want to give the user the option of using our app to handle a common file format.
Summary
We have created a functioning RSS Aggregator app that enables users to enter the feeds they want and remove feeds. The app saves the list of feeds so that they are always available to the user. When the user drills down into the actual content, we store the scroll position of the ListView control so that it takes them back to the correct place. When a new feed is added, we automatically add it to the end of the list of feeds and scroll the view so that the user can see it.
We enable users to view the feeds horizontally by clicking the post directly. We also enable them to view the post by scrolling vertically, by clicking the feed name and taking them to our original split view. The user can also select View in Browser from the app bar to launch the web browser and view the post in its original format. We have also saved the feeds so that the user doesn’t need to enter them each time.
Q&A
Q. How can we force the ListView control to scroll to a particular item?
A. The listView.ensureVisible function can be used to scroll the ListView to a particular item. The function takes an index of the data in the listView.
Q. How can we force the ListView control to scroll to a particular position?
A. listView.scrollPosition can be used to get the current position of the ListView control or set it.
Q. How can we programmatically launch a web browser for the user?
A. Windows.System.Launcher.launchUriAsync enables us to launch the user’s browser to a specific URL.
Workshop
Quiz
1. What media query would we use if we were styling elements that were in snapped view?
2. What WinJS function wraps the XmlHTTPRequest function, and what does it return?
3. What is the maximum amount of data we can store in roaming settings?
4. What property can we use on the ListView to keep track of the position the user is located?
Answers
1. We can style our elements to appear a certain way in snapped view by placing the CSS rules in the following media query:
@media screen and (-ms-view-state: snapped) {
2. WinJS has the xhr function, which wraps the XmlHTTPRequest and returns a promise.
3. 10KB is the maximum amount of data we can store in roaming settings.
4. scrollPosition is the property on the ListView control that we can use to keep track of the user’s position.
Activities
1. Style the search page so that it looks nice.
2. Add a way for the user to sort the feeds.
3. Implement semantic zoom so that the users can easily get to the feeds they want.
4. Create a live tile by updating the tile with the five newest posts from across the feeds. Choose a template based on whether the post has an image.
5. Store not just the feeds, but also the actual posts, using IndexedDB. Load from the cache first so that the user sees data immediately. Then bring in the updated data. Allow users to remove posts from their storage or have a setting that automatically removes it after they mark it as read.